Configure Triage 2.0
Overview
Triage 2.0 is a dramatic improvement from its predecessor as its architecture is completely different. Now, Triage classifies tickets by building an org-field specific index and using semantic search to classify tickets. You can read more about how Triage works here: https://help.moveworks.com/docs/triage-2-pt-0-technology-overview.
If you are upgrading from 1.0, you should be aware of the differences:
- Triage 2.0 leverages existing configs such as Ticket Filters, Field Configs, Heuristic Settings, & Metadata Cache Setup
- All models must upgrade to Triage 2.0 for a given ticket type e.g.
incident- You cannot mix models, e.g. have assignment group on 2.0 but category+subcategory on 1.0 as that won’t function.
- Triage 2.0 leverages the EXI tables when pulling tickets to build an index
- You may need to use Ticket Backpolling feature with Moveworks Setup to fill the EXI tables.
- If the training data requires manually editing, reach out to Moveworks Support.
- Triage 2.0 has AutoML as well which continuously indexes the data
- By default, this happens once every month at 1st of every month.
Step 1: Prepare for Triage 2.0
Before training the model, there are several important steps:
-
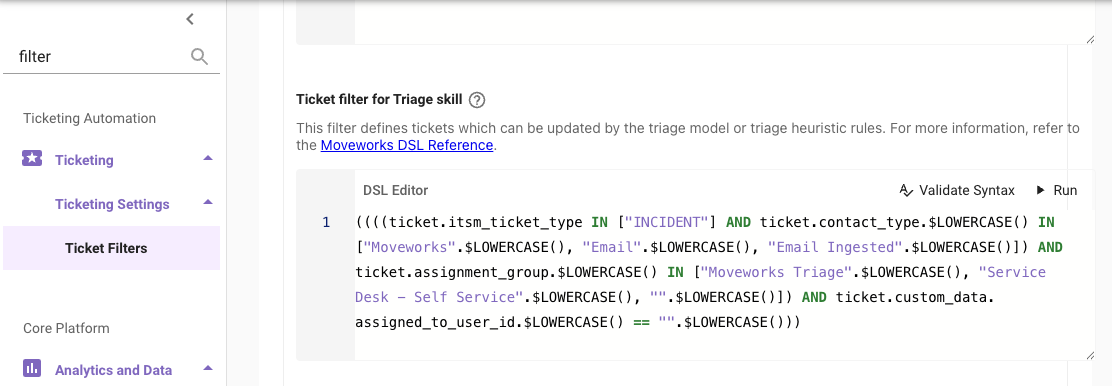
Configure the Triage Ticket Filter
-
Navigate to
Ticketing -> Ticketing Settings -> Ticket Filters -> Skill-specific ticket filters -> Ticket filter for Triage skill -
For guidance on how to set ticket filters, including for Triage, read https://help.moveworks.com/docs/ticket-filters#/
Ensure to validate syntax by testing tickets that are in-scope of Triage
-
-
Configure the custom_data mapper in the ticket proto
-
Navigate to
Ticket Mapping (Select ITSM) -> Configure TICKET TYPE -
Go through each TICKET TYPE’S ATTRIBUTE MAPPING and confirm the fields to be triaged are under the
custom_data. Most likely, they already exist due to default settings.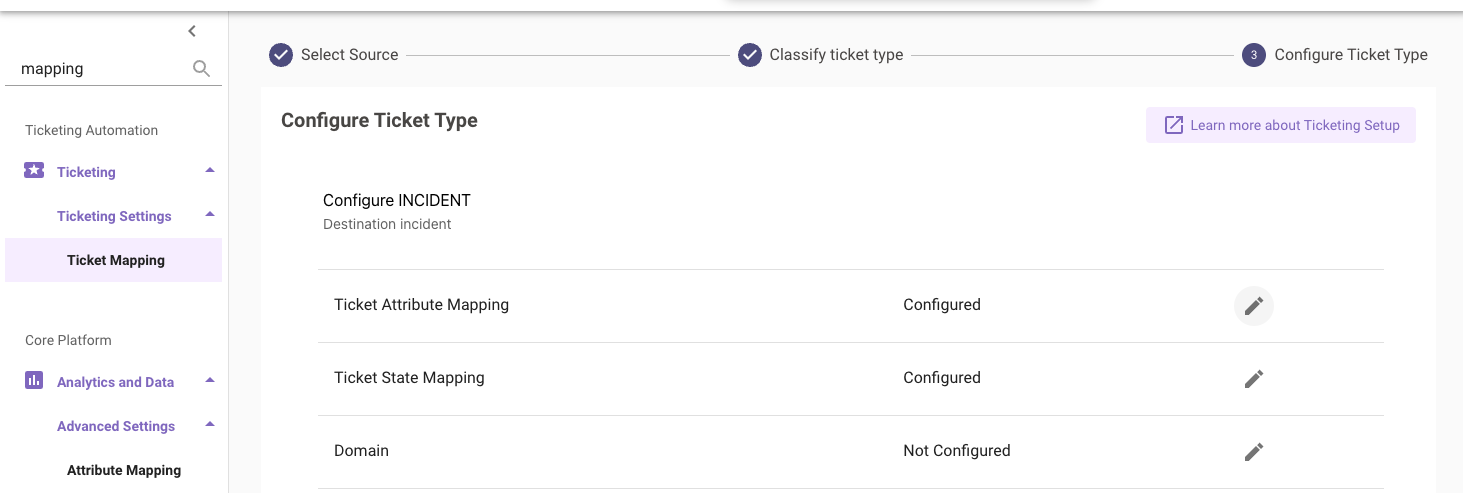
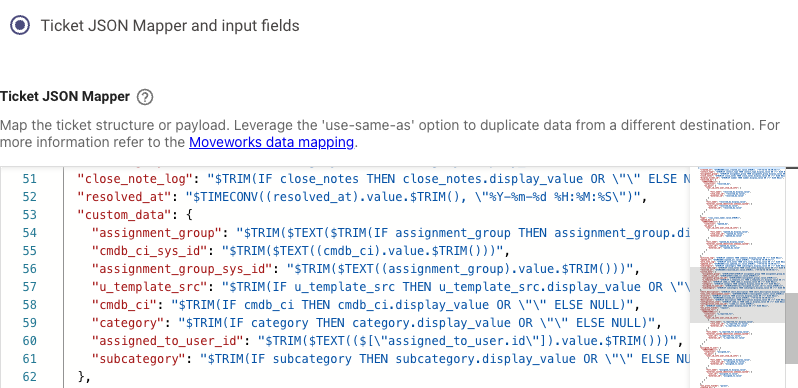
c. Go through each ticket type’s
UPDATE TICKET PAYLOADand confirm the fields to be triaged are mapped as well. Most likely, they already exist due to default settings. If triage is enabled BEFORE ticket creation, make sureCREATE TICKET PAYLOADis configured and mapped as well.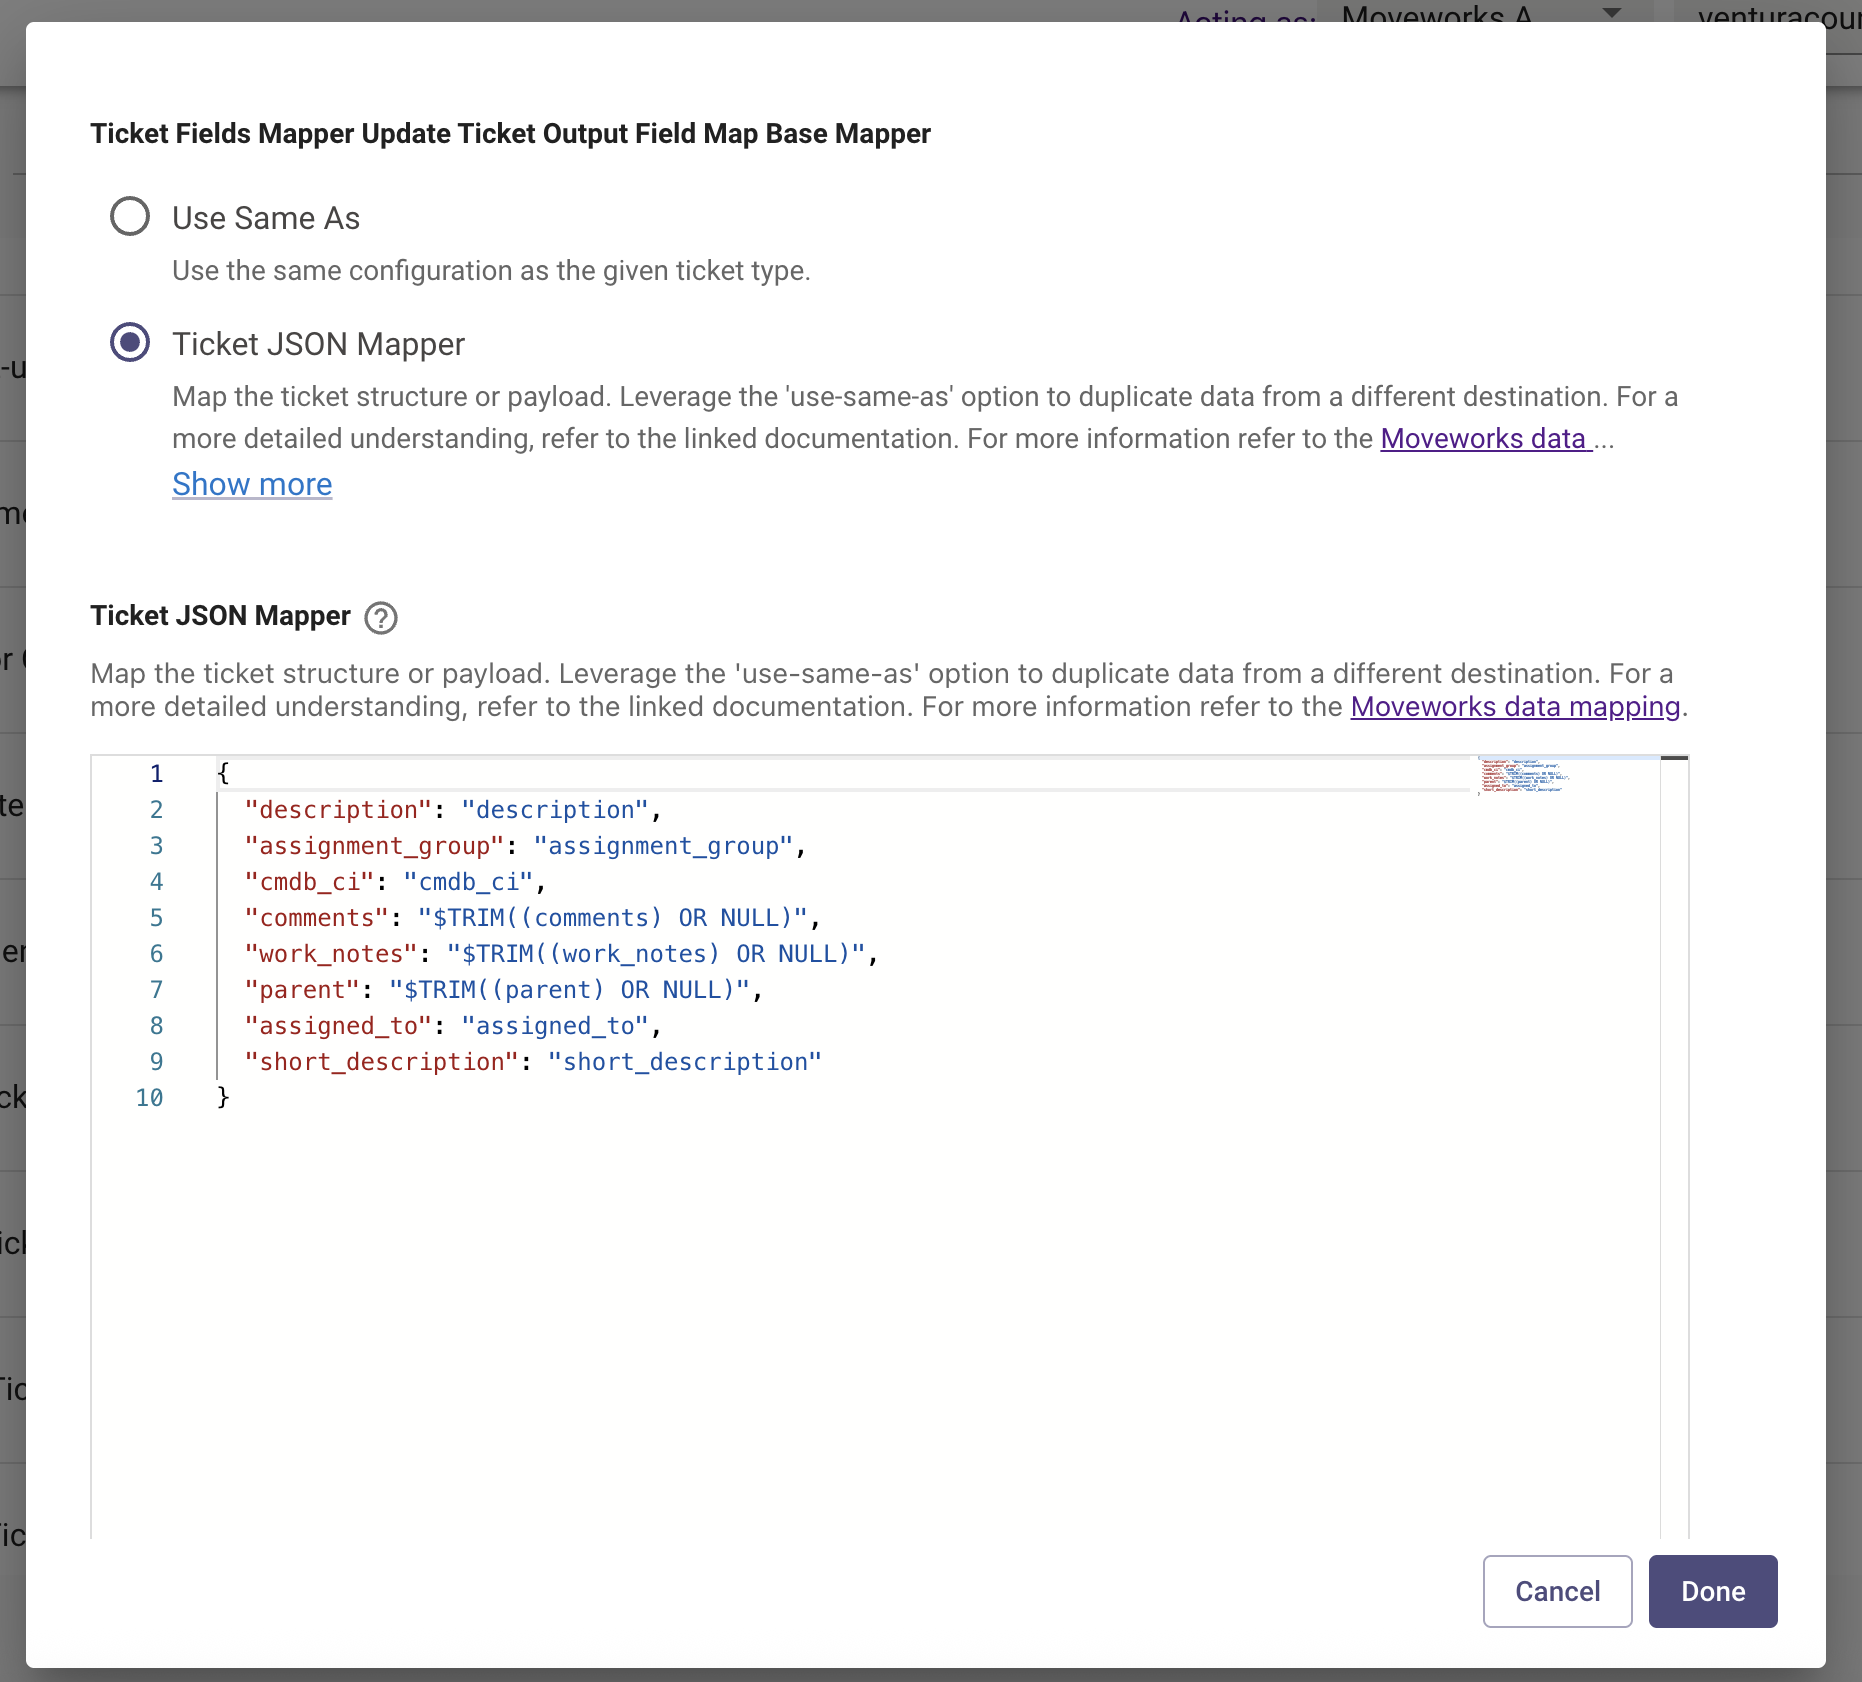
-
-
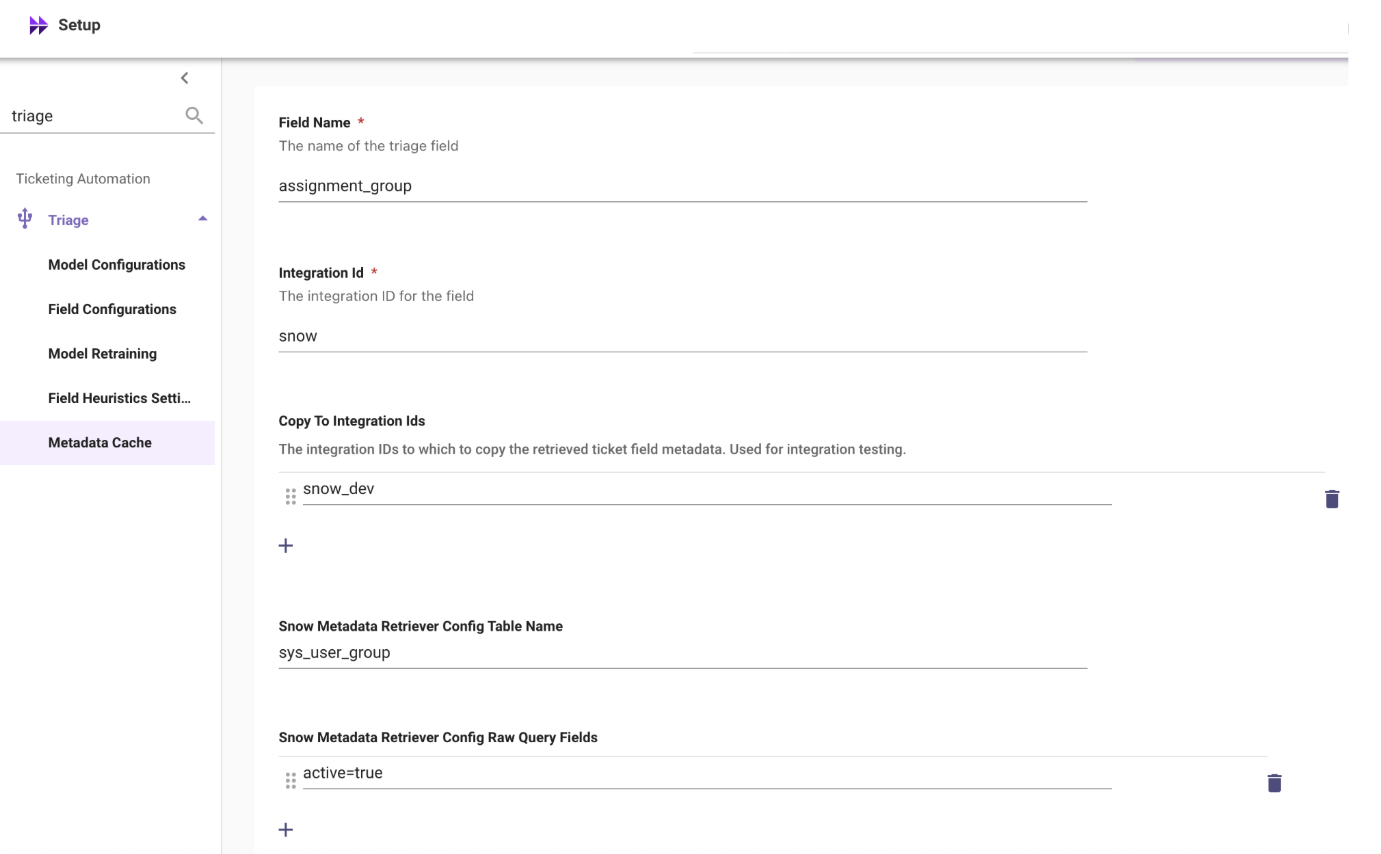
Configure the Metadata cache filters (Note: Metadata cache is only supported for ServiceNow.)
-
Navigate to
Triage > Metadata Cache -
Click “Create” or “Edit” Display Name (ticket fields)
-
Field Name: The name of the triage field we’re predicting
-
Integration ID: only
snowcan be accepted -
Copy To Integration IDs: The integration IDs to which to copy the retrieved ticket field metadata. Used for integration testing.
- snow_dev
-
Snow Metadata Retriever Config Table Name: the backend ServiceNow table name of the
sys_idwe are predicting i.e:sys_user_grouporcmdb_ci -
Snow Metadata Retriever Config Raw Query Fields: URL used to filter and retrieve status of labels
Example queries
operational_status=1^sys_class_nameINcmdb_ci,cmdb_ci_service_discoveredoperational_status=1 -
Snow Metadata Retriever Config Id Key Path: Optional field used to specify an alternative value to use as the ID in the TicketFieldMetadata proto. Should be the dot-delimited path to the value in the payload returned by the REST API call for the ticket field metadata.
-
Snow Metadata Retriever Config Name Key Path: Optional field used to specify an alternative value to use as the name in the TicketFieldMetadata proto. Should be the dot-delimited path to the value in the payload returned by the REST API call for the ticket field metadata.
-
Snow Metadata Retriever Config Max Record Count: Optional field used to specify the maximum number of ticket field metadata records to pull from the REST API. If unspecified, a default value defined in SnowMetadataRetriever will be used instead.
-
Snow Metadata Retriever Config Page Size: The page size to use for paginating calls to the REST API. If unspecified, a default value defined in SnowMetadataRetriever will be used instead. Example Configuration:
-
-
Enable the following 3 flows in
Setup Internal -> Ingestion > Scheduled Flows:
Flows To Run Metadata Cache Loader Flow- An update-only job that maps the configured tables’sys_idstodisplay_namesFlows To Run Metadata Cache Loader Full Flow- A “snapshot” version of the theCache Load Flowabove. Existing values will be removed and freshly imported on each run.Flows To Run Metadata Cache Sync Flow- Syncs the production environment metadata cache into the preprod environment. This is similar to how Form Flow and KB Flow are not usually run in preprod directly.
-
-
Back poll tickets into the Moveworks Ticket Table via Moveworks Setup is mandatory. Follow this guide: https://help.moveworks.com/docs/ticket-back-polling-for-exi for how to set this up.
-
⚠️ Note on Backpolling
If you have already configured backpolling for another Moveworks module like EXI or Knowledge Studio, then you do not need to re-run the Ticket Backpolling job. If you have triage 1.0 enabled, you will still need to configure backpolling as Triage 1.0 does not leverage the Ticket Tables.
- Once backpolling is complete, you will need wait 24 hrs for Moveworks to finish backend pre-processing required before proceeding to Step 2 where the index can be built.
-
Step 2: Create / Update the Triage Field Configurations
If you are upgrading from 1.0 to 2.0, these should already be already set. If not, following these steps,
- Navigate to
Triage > Field Configurations - Click “Create” or “Edit” Display Name (ticket fields)
-
Field Name: The name of the triage field, e.g.
assignment_group,cmdb_ci,category, subcategory. NOTE: Even concatenated fields should be configured separately. -
Ticket Type: Ticket type to be triaged. Ex :
incident, orhr_case -
Routes
TICKET= This is used for triage by polling existing tickets. These tickets can be created through any source (in or out of the bot). The “risk” is that polling ITSM systems is expected to fail on occasion and some tickets are forced to fail sooner than othersBOT= This is used for triage before ticket creation. The predicted value is determined before the initial create_ticket payload is submitted. This means that it is only applicable to tickets that are created through the bot and no other source.-
Ensure that the triage field is mapped in “Create Ticket Payload” if
BOToption is added in. -
This field interacts directly with
Triage During Ticket CreationconfigWhen
Triage During Ticket Creationis on ✅TICKET- only non-bot created tickets from polling ⚠TICKET,BOT- non-bot created tickets from polling + bot-created ticketsBOT- only bot created tickets are triaged ⚠
When
Triage During Ticket Creationis off. ❌TICKET- all tickets are triage from pollingTICKET,BOT- all tickets are triage from pollingBOT- No action ❌
-
-
Select Connector: Select the connector, which should already have been configured as part of the configuration of the AI Assistant.
-
Two configurations to setup Enable Triage & Send As Update
- For Dry-Run Mode: Enable Triage =
false& Send As Update =true- For sandbox orgs, turn ON Analytics and set the org status to LIVE in order to see dry run analytics.
- For Live Mode: Enable Triage =
true& Send As Update =true- Send As Recommendation: Sends work note with its prediction. Will only work if Enabled Triage =
True. Either this orSend As Updatemust be checked for triage to trigger on a ticket
- Send As Recommendation: Sends work note with its prediction. Will only work if Enabled Triage =
- For Dry-Run Mode: Enable Triage =
-
Required Field (for dependent model): If checked, this model must get a prediction or else Triage will early exit without submitting updates for any other models / fields. This is typically only used for dependent models, ie. if you must triage
categoryin order to also triagesubcategory. -
Start Date: At times, Triage can run in dry-run mode, which would pollute the downstream data analytics. Apply a start date (YYYY-MM-DD) to clear old data. If unspecified, then analytics dashboard will not show any results for Triage.
-
Mapped Field: This field is used to classify the route within data analytics. There are 3 values that can be set and it is NOT tied to the name of field that is being triaged. Think of it as a description of the purpose of triaging the field.
- The 3 options are:
call_type- Determine which type of ticket should created. In most cases, this should not be configured and is used for the default, built-in model which determines whether a user’s utterance should create a request vs. an incident.assignment_group- The purpose of this model is to route the ticket to the right party. For example, abusiness_servicemodel could be of this type because there could be a ServiceNow rule that ties assignment to thebusiness_service.category- The purpose of this model is to categorize and label tickets appropriately. For example, adding a specificlabelto a ticket will not change who the ticket is assigned to.
- The 3 options are:
-
Predicted Value Filter: Apply a blocklist or allowlist which will be acted upon the output of the Triage 2.0 prediction.
See example for usage of the blocklist

-
Values To Overwrite: Typically, these values are the groups that the L1 Service team manually analyzes tickets to triage or any default values for other field types, e.g. category, subcategory
- If
Empty= Triage will predict only on incoming empty values for the predicted field - Set as
*to overwrite any field that passes the threshold
See example for usage of the values to overwrite
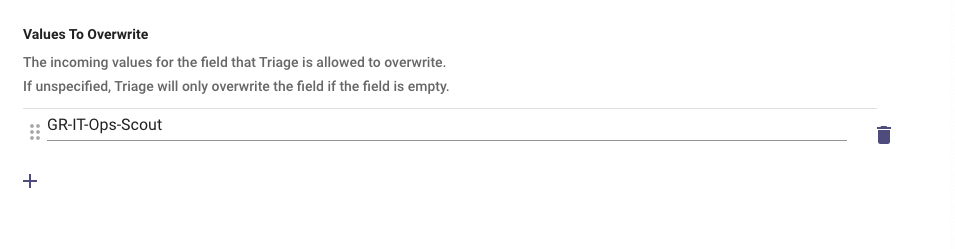
- If
-
Default Value: If no value passes the confidence threshold, this value will be predicted instead.
- Use sys_id default value for sys_id models
-
- Click “Submit” with the title in the format of ⇒ triage.[predicted_field].[ticket_type].['Route']
- e.g:
triage.subcategory.INCIDENT.['TICKET']
- e.g:
Step 3: Create / Update the Triage Field Heuristics Rule Settings
If you are upgrading from 1.0 to 2.0, these should be already set. If not, following these steps,
- Navigate to
Triage > Field Heuristics Settings - Click “Create” or “Edit” Display Name (ticket fields)
- Field Settings: Enter “field name” , “ticket type”, “Routes”, “Select Connector” as done in prior steps.
- Heuristic Rules:
-
You MUST create a configuration for heuristic rules even if you don’t have a rule to add. Without the configuration file, TriageService Logs may just return a
{}response - The heuristic rules need to be defined separately even for the dependant fields.
-
- Additional Controls: For
Dilbert Model Type, copy the model type name fromdilbert_service.proto. This is only required for existing 1.0 models- Format:
TRIAGE_{org}_{field}e.g:TRIAGE_PARAMOUNT_CMDB_CI_SYS_ID
- Format:
- Click “Submit” with the title in the format of ⇒ triage.[predicted_field].[ticket_type].['Route']
- e.g:
triage.subcategory.INCIDENT.['TICKET']
- e.g:
Step 4: Configure Triage 2.0
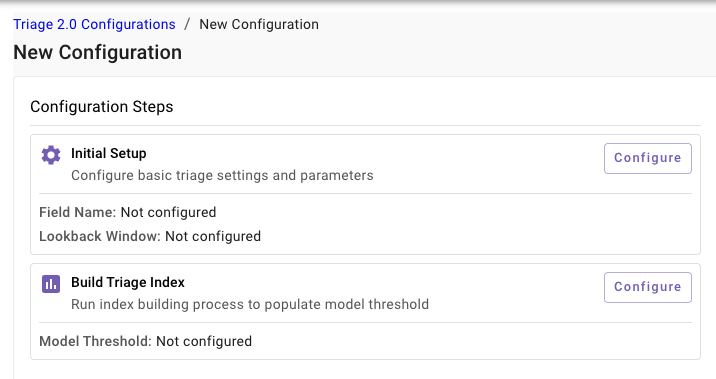
-
Configure the Initial Setup
-
Navigate to
Triage > Triage 2.0 Configurations -
Fill out the relevant information
- Field Name, e.g.
assignment_group,cmdb_ci,category, etc - Select Additional Features, e.g.
requested_for.location, etc. These additional fields are used to inject signal to the ranking of results - Set SQL parameters is typically established by setting at least two important parameters:
- ticket type - typically these are unstructured tickets
- e.g.
itsm_ticket_type = 'INCIDENT'
- e.g.
- contact type - filter tickets from digital routes and avoid those from walk-ups, phone automated alerts, etc
- e.g.
contact_type IN ('Assistant', 'Portal', ‘Email’)
- e.g.
- if additional fields are needed, they need to be extracted using a DSL rule
- e.g.
json_extract_scalar(ticket_custom_data, '$.u_domain') in ('d4743d251b709010519711331d4bcb9d')
- e.g.
- ticket type - typically these are unstructured tickets
- Set Lookback Window (Days), e.g. 180 days
- Field Name, e.g.
-
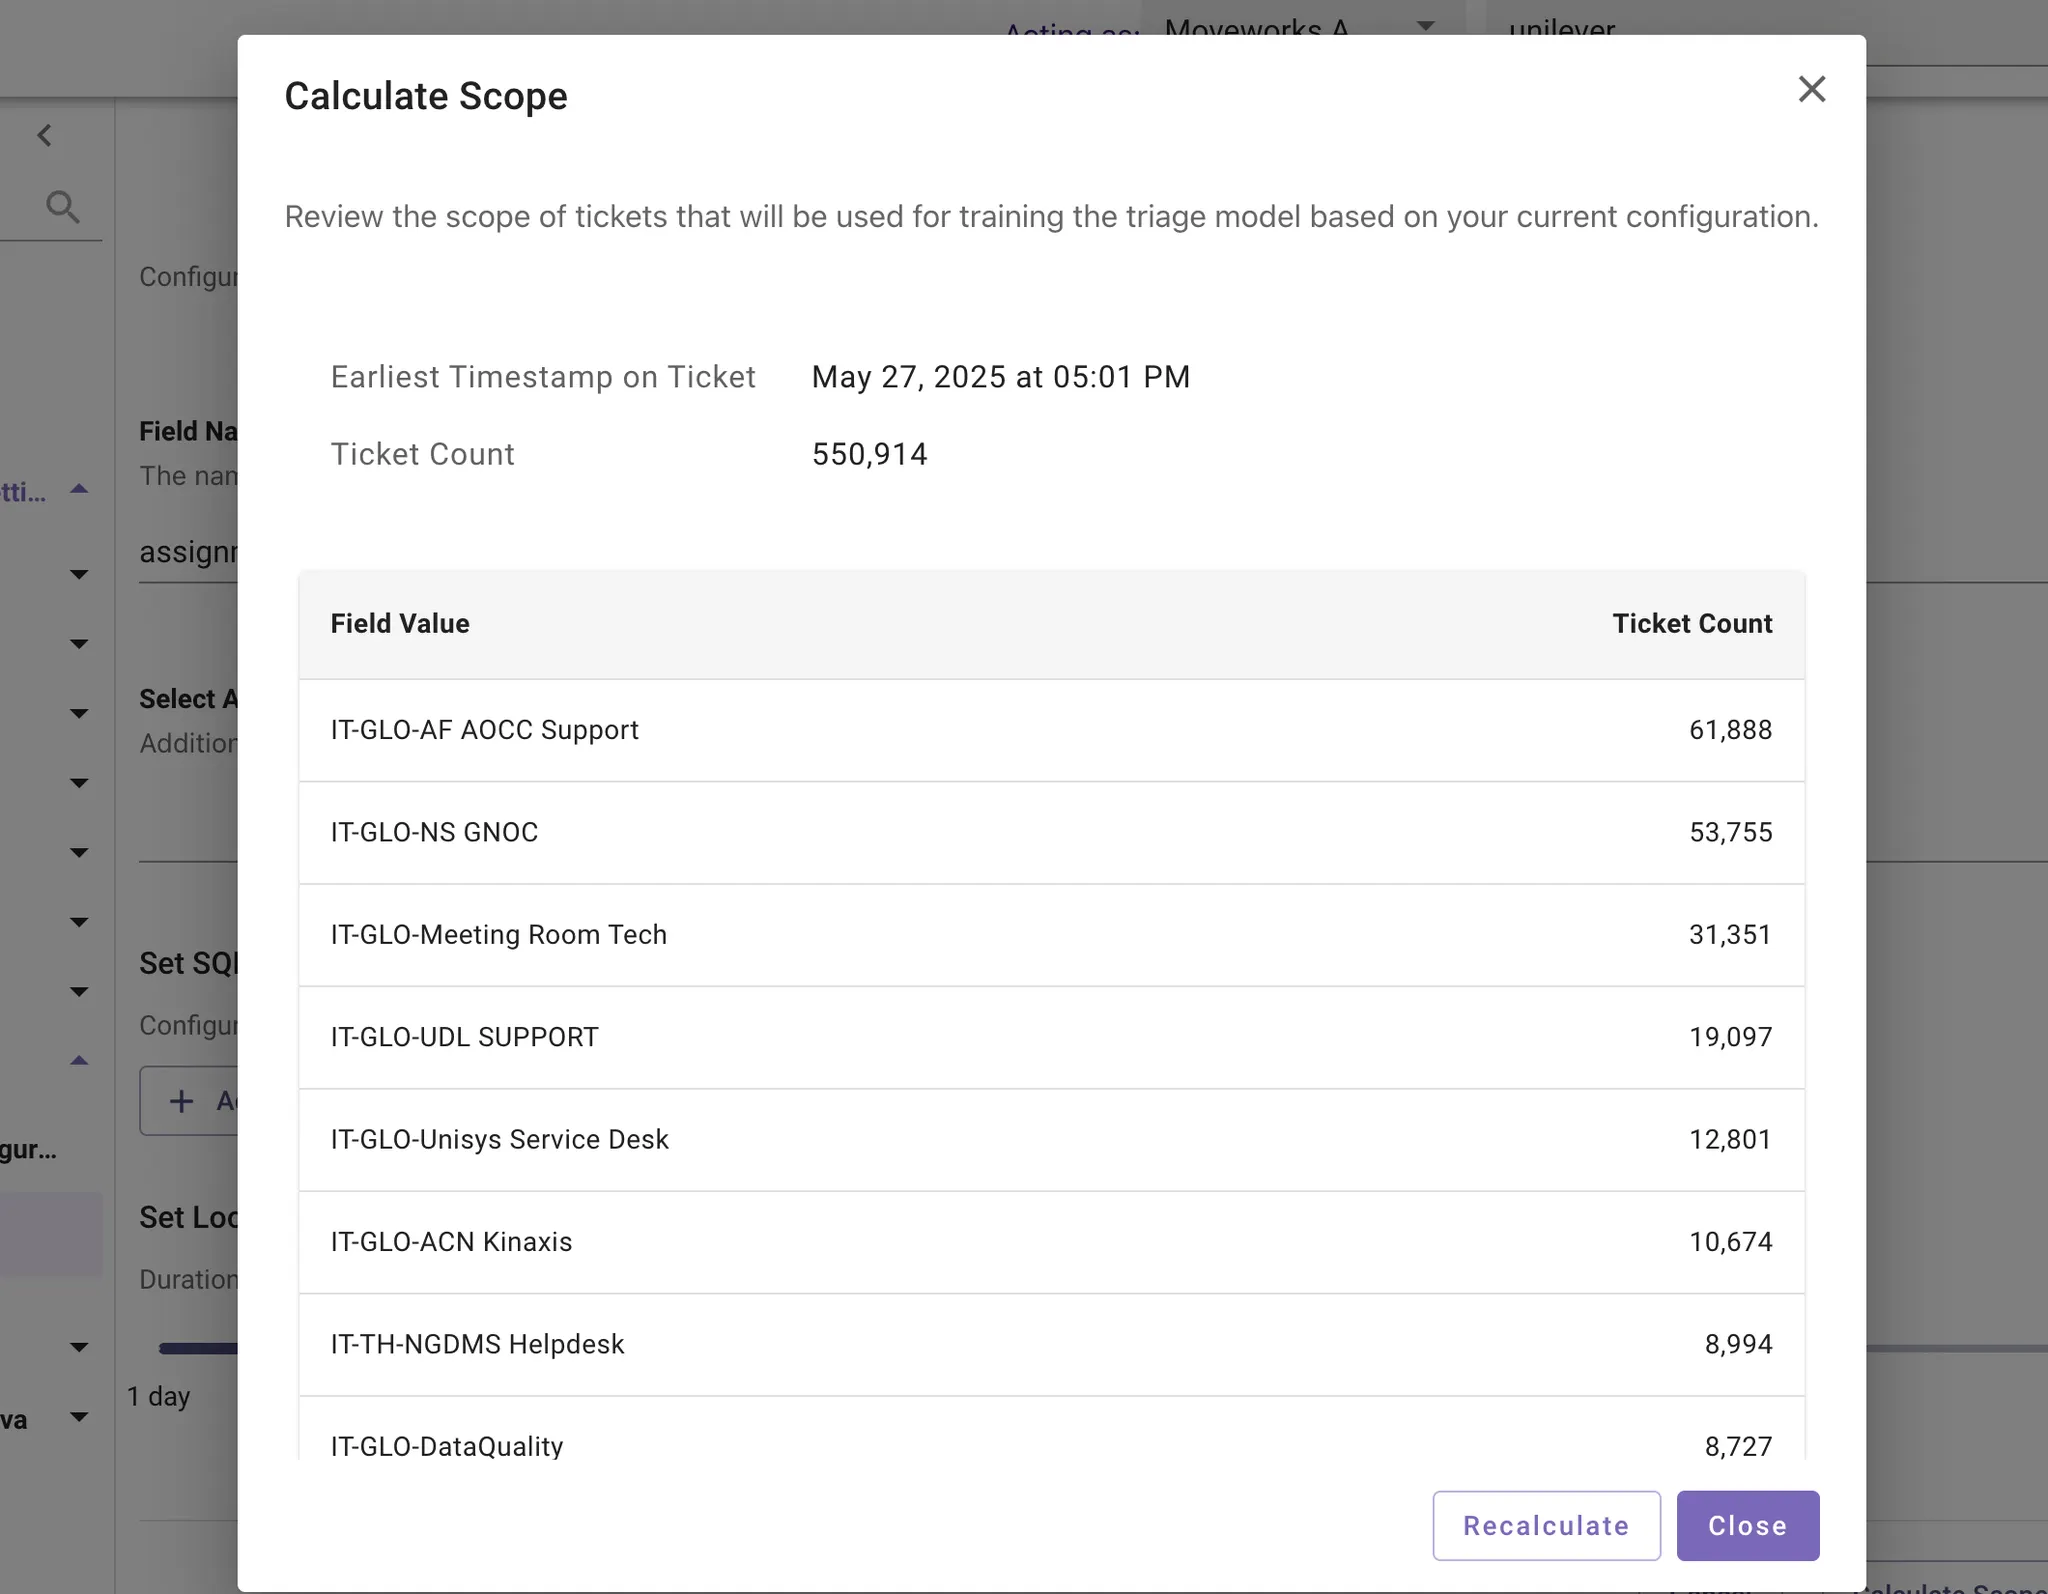
Click “Calculate Scope” to generate estimated size of training set
- This step runs a SQL query against the stored tickets from the backpolling step.
- Once the report is created, run sanity checks on the data
- Does the earliest timestamp at 180 days prior, for example?
- Is the ticket count above 100,000? If so, then it’s recommended to reduce scope
- Is the ticket count at 0? If so, then check if backpolling was ran or was finished over 24 hrs prior
-
Click “Save Configuration” and proceed to the next step.
-
-
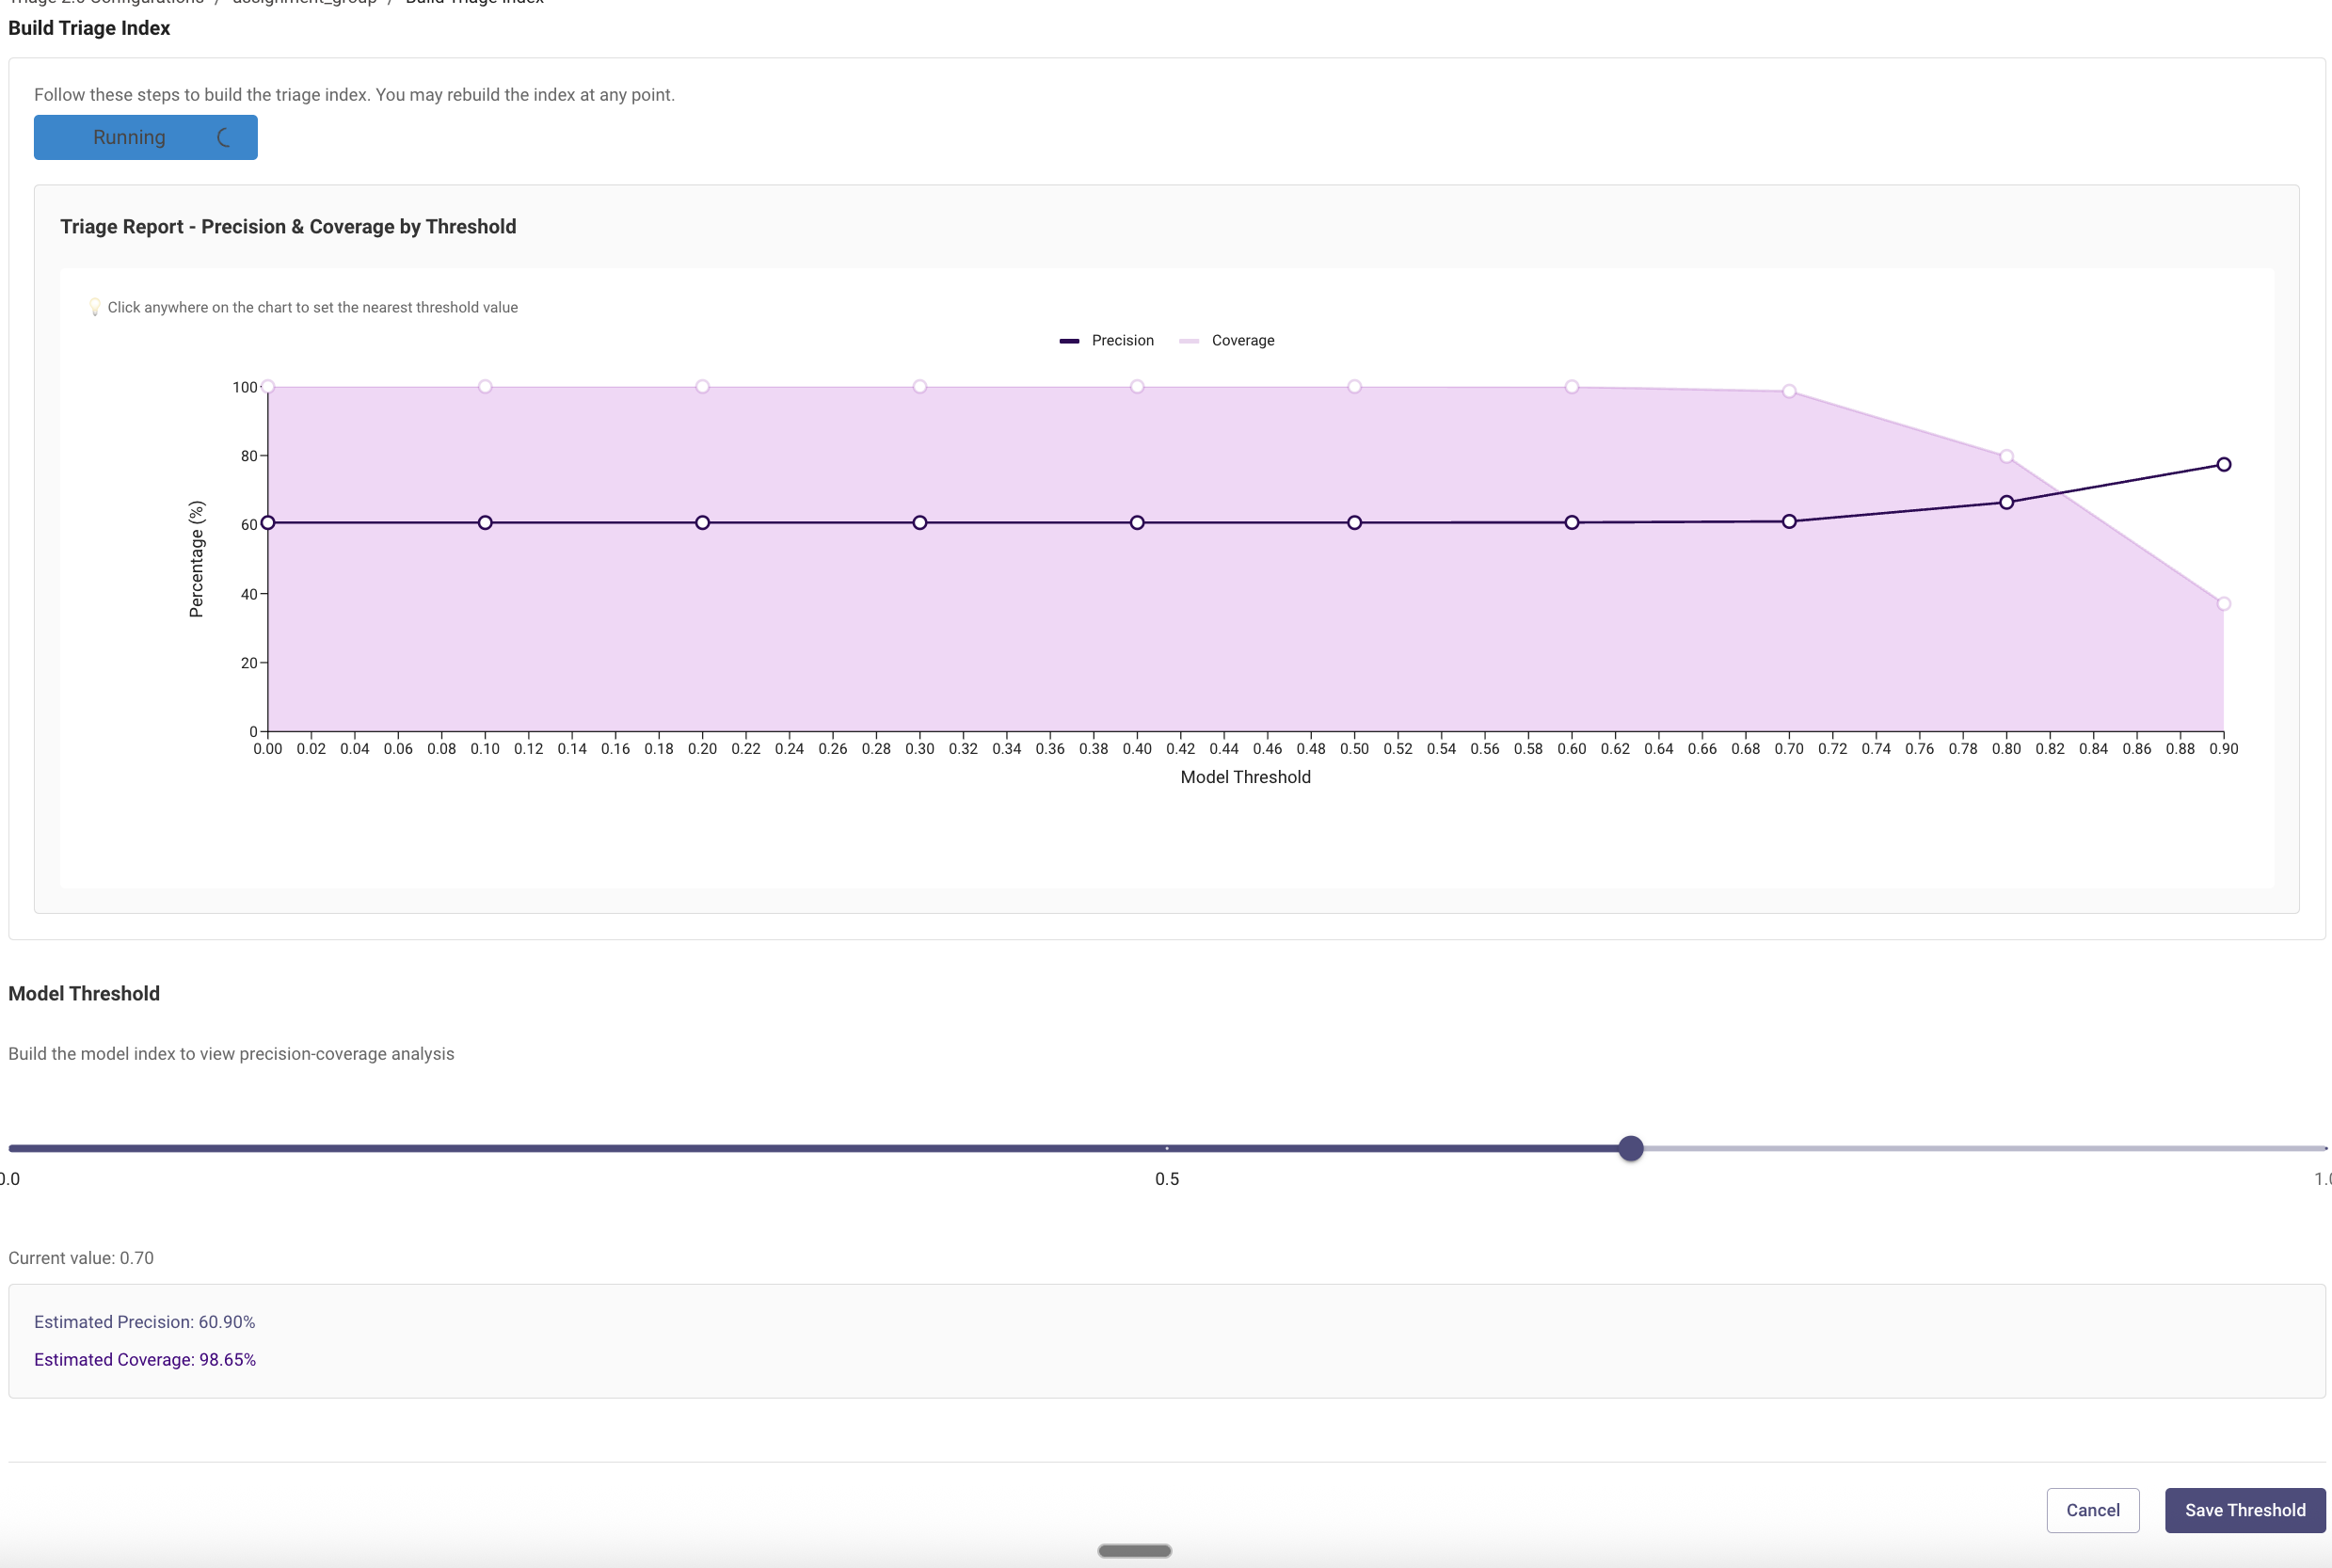
Build Triage Index
- Click “Not Started” to proceed with Build Index
- Once this step is complete click “Fetch Report” to generate the Precision & Coverage graphic
- Select the right model threshold according to your preference
- If you want to take a conservative approach, set the threshold for a high precision (> 90%)
- Otherwise, set the threshold for a high coverage for maximum impact of Triage
- Click “Save Threshold” to save the config.
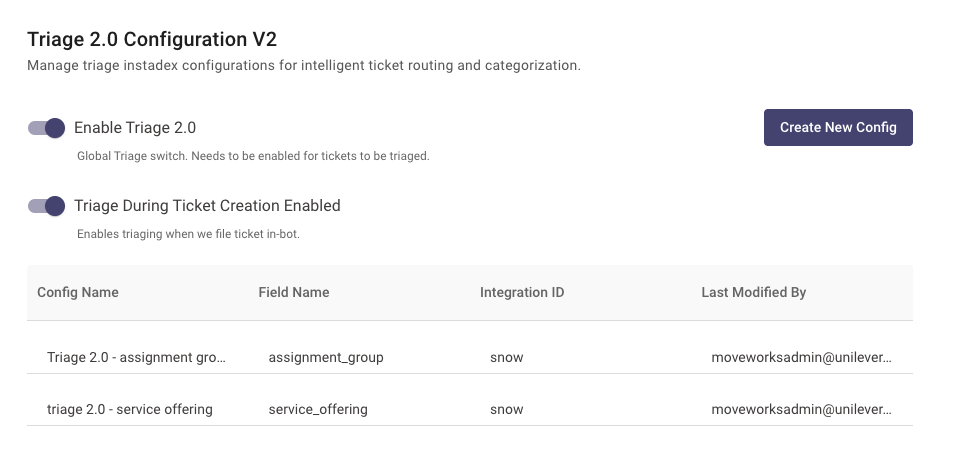
Step 5: Enable Triage 2.0
To enable the model, you will need to turn on two settings:
-
Triage Behavior Controls (model-specific) - Enable Triage ✅
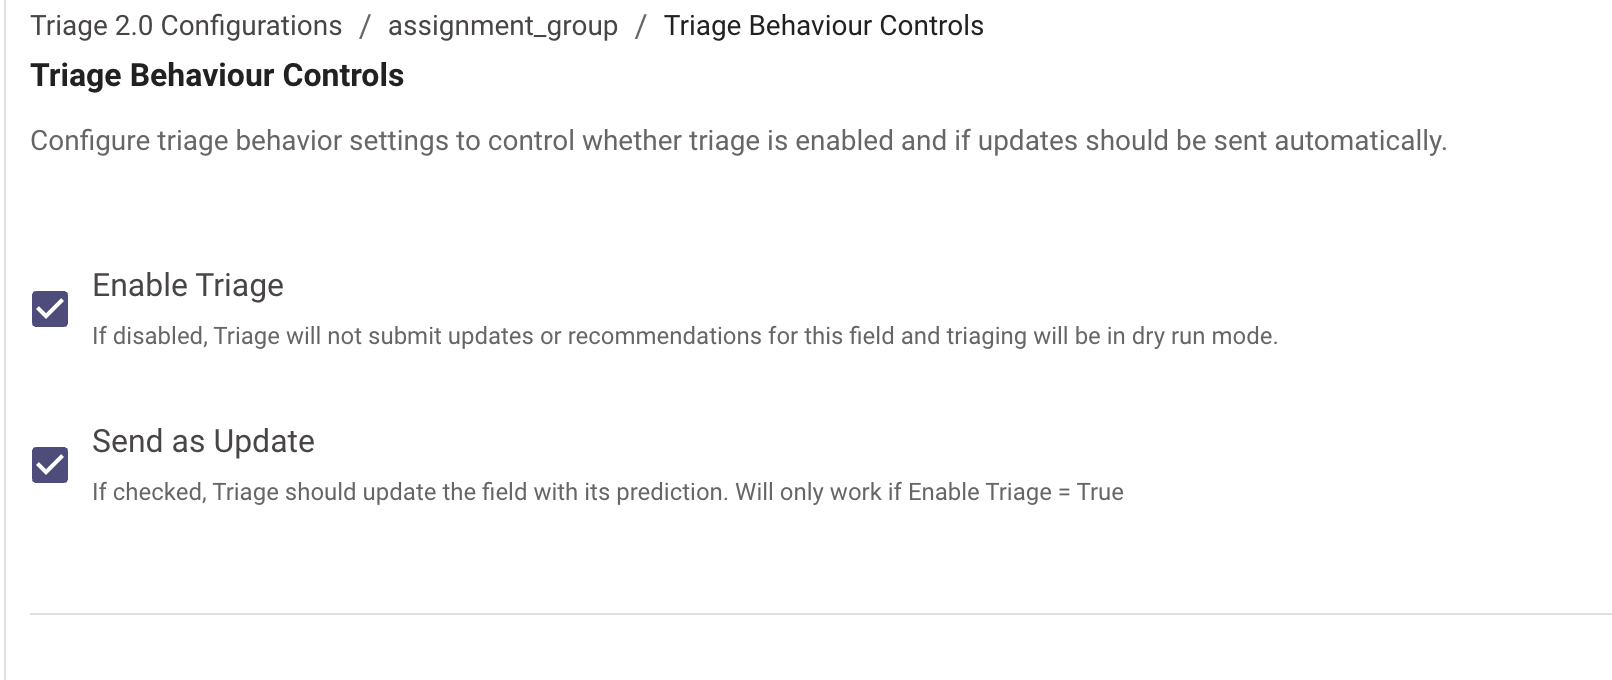
-
Triage 2.0 Configurable (product-level switch) ✅
Congrats, you have successfully launched Moveworks Triage ✅
Updated about 2 months ago