Confluence (Cloud) Setup for Enterprise Search
This page is for the Confluence (Next Gen) connector for Confluence Cloud and it can only be configured within the new enterprise search configuration experience explained below.
Currently, the new experience is only available for Confluence Cloud. For Confluence Data Center (Confluence On-Prem), please reach out to your customer success manager.
Please visit this documentation to learn more about Next Gen and Classic connectors.
System Overview
Confluence Cloud is Atlassian’s collaborative workspace that enables teams to create, organise, and share knowledge at scale. From an enterprise search perspective, it serves as a central knowledge repository, where content is structured in spaces and pages, making it a key source of organisational knowledge to index and surface in Moveworks’ enterprise search.
Authentication
- For Confluence Cloud, Moveworks requires a dedicated Service Account. API access is done via basic auth and requires a username and token, which needs to be generated by logging in as the Service Account user.
- The Service Account must have read access to the necessary Confluence spaces where end-user knowledge articles reside.
Permissions Enforcement
- Moveworks honours all user access controls, ensuring that individuals only see search results for content they are permitted to view.
API Usage
- Moveworks uses Atlassian’s standard REST API for Confluence to ingest all data
Content Types
The Confluence connector for Moveworks supports the following content types:
- Pages: All Confluence pages within accessible spaces.
- Blog Posts: All Blog posts within accessible spaces.
- Attachments: All Files attached to pages and blog posts.
- Supported file formats: doc • docx • pdf • ppt • txt • html
- Macros: Moveworks support a wide range of Macros (static and dynamic) present within Pages and Blogs.
- Restricted Pages: Available if the restricted content records are shared with the service account.
Moveworks delivers comprehensive data coverage—including metadata, identity data, permissions data, and activity data—and keeps content in sync in real time, ensuring that updates and permission changes are immediately reflected in search results.
Access Requirements
Moveworks requires a Service Account to connect with your Confluence instance. First, you’ll need to create a Service Account by going to the admin portal of your Atlassian instance. Moveworks uses Basic Authentication to authorize with the API and requires the Username (email address of your Service Account) and Password (API token generated for your Service Account). Make sure the Service Account has read access to all spaces you want to ingest into Moveworks and has access to all users and relevant permissions.
Pre-requisites
Before you get started, make sure you have everything you need:
-
Admin permissions
- Org/Site admin access in Atlassian Admin so you can create or invite a user and assign a Confluence license.
- Space admin access (or help from the space owners) to give the service account view permissions across the spaces you want to index.
-
Environment details
- The base URL of your Confluence instance—for example:
https://<your-site>.atlassian.net/wikiif you’re using the standard Confluence Cloud setup.
- The base URL of your Confluence instance—for example:
-
List of spaces to ingest
- Put together a list of all the Confluence spaces you want Moveworks to index, including any with page restrictions. This makes it easier to give the service account “View” access to all of them in one go.
Setup Service Account in Confluence
You’ll need to create a new Service Account within your domain and ensure you have access to its email inbox. This inbox will be used later to onboard the Service Account to your Confluence instance.
Once the initial setup for the Service Account is complete, let’s proceed with the onboarding to Confluence.
-
Visit the
https://admin.atlassian.compage and ensure the correct organisation is selected.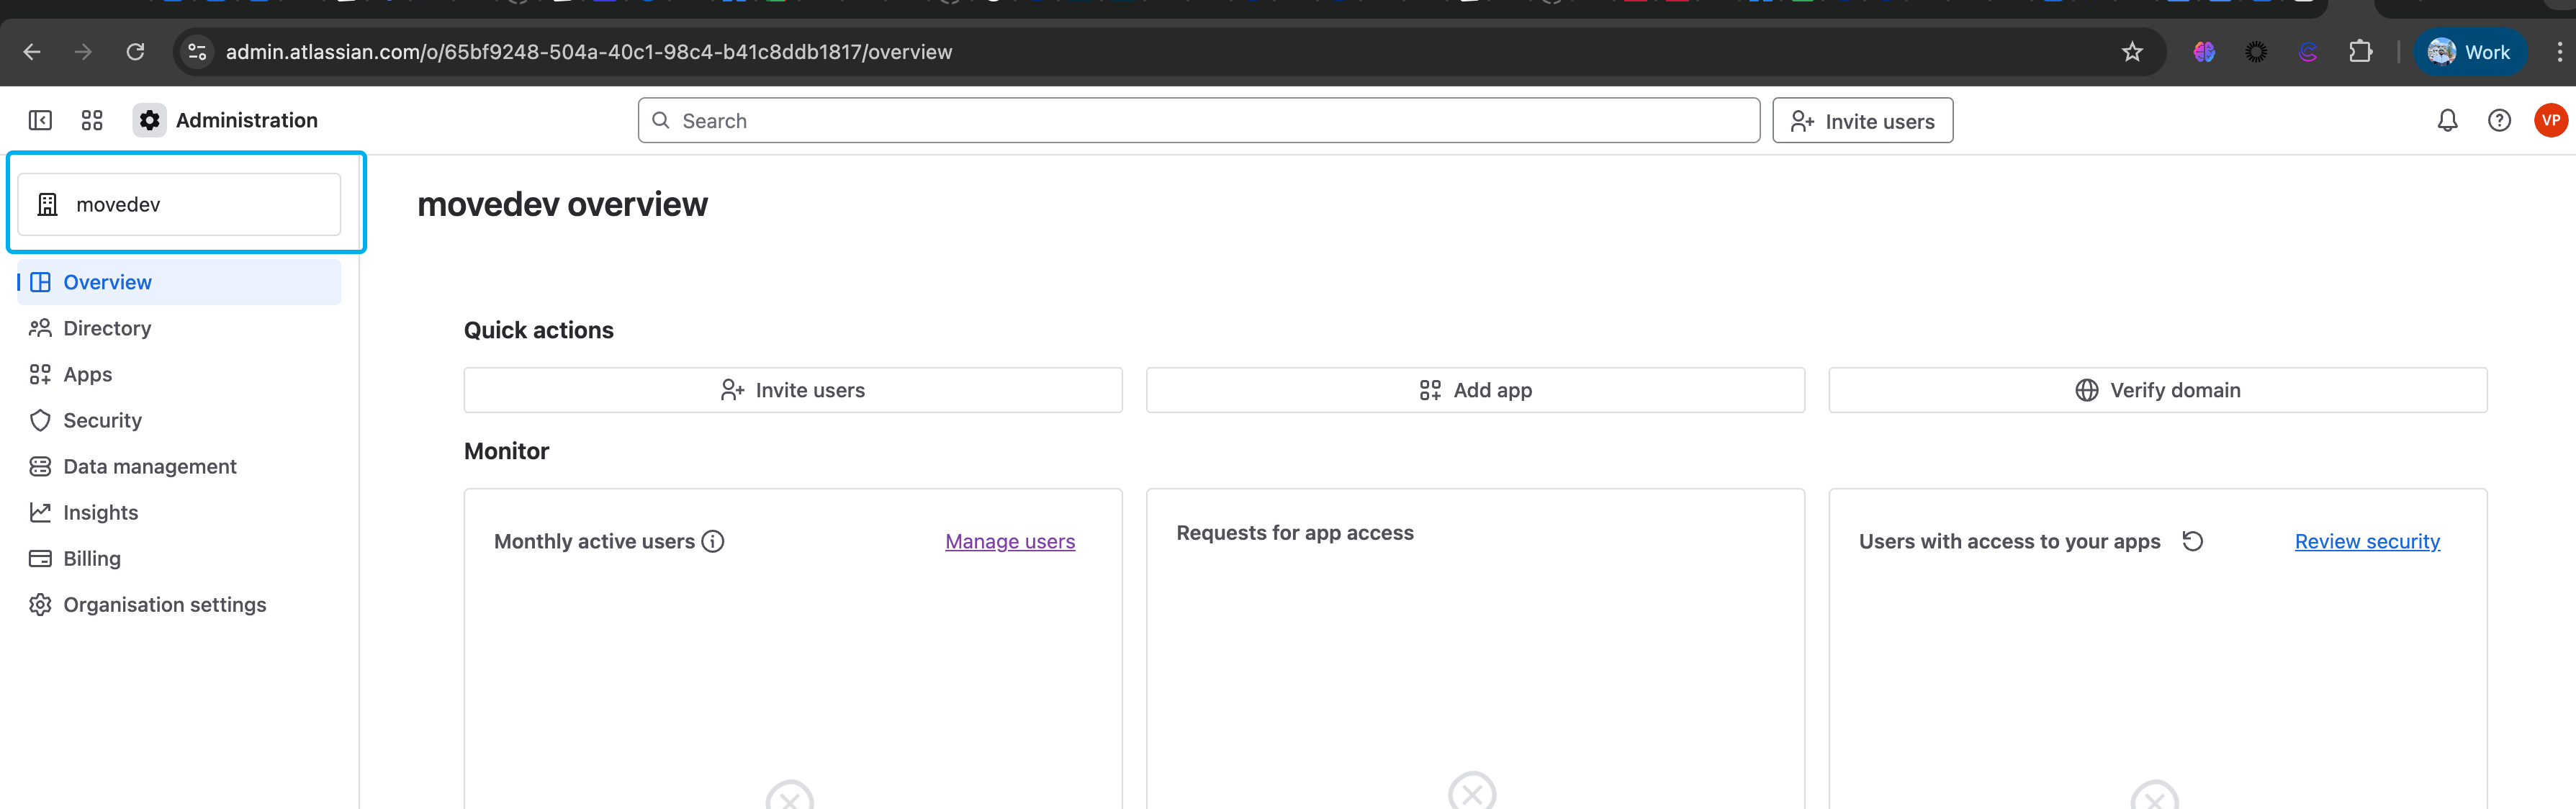
-
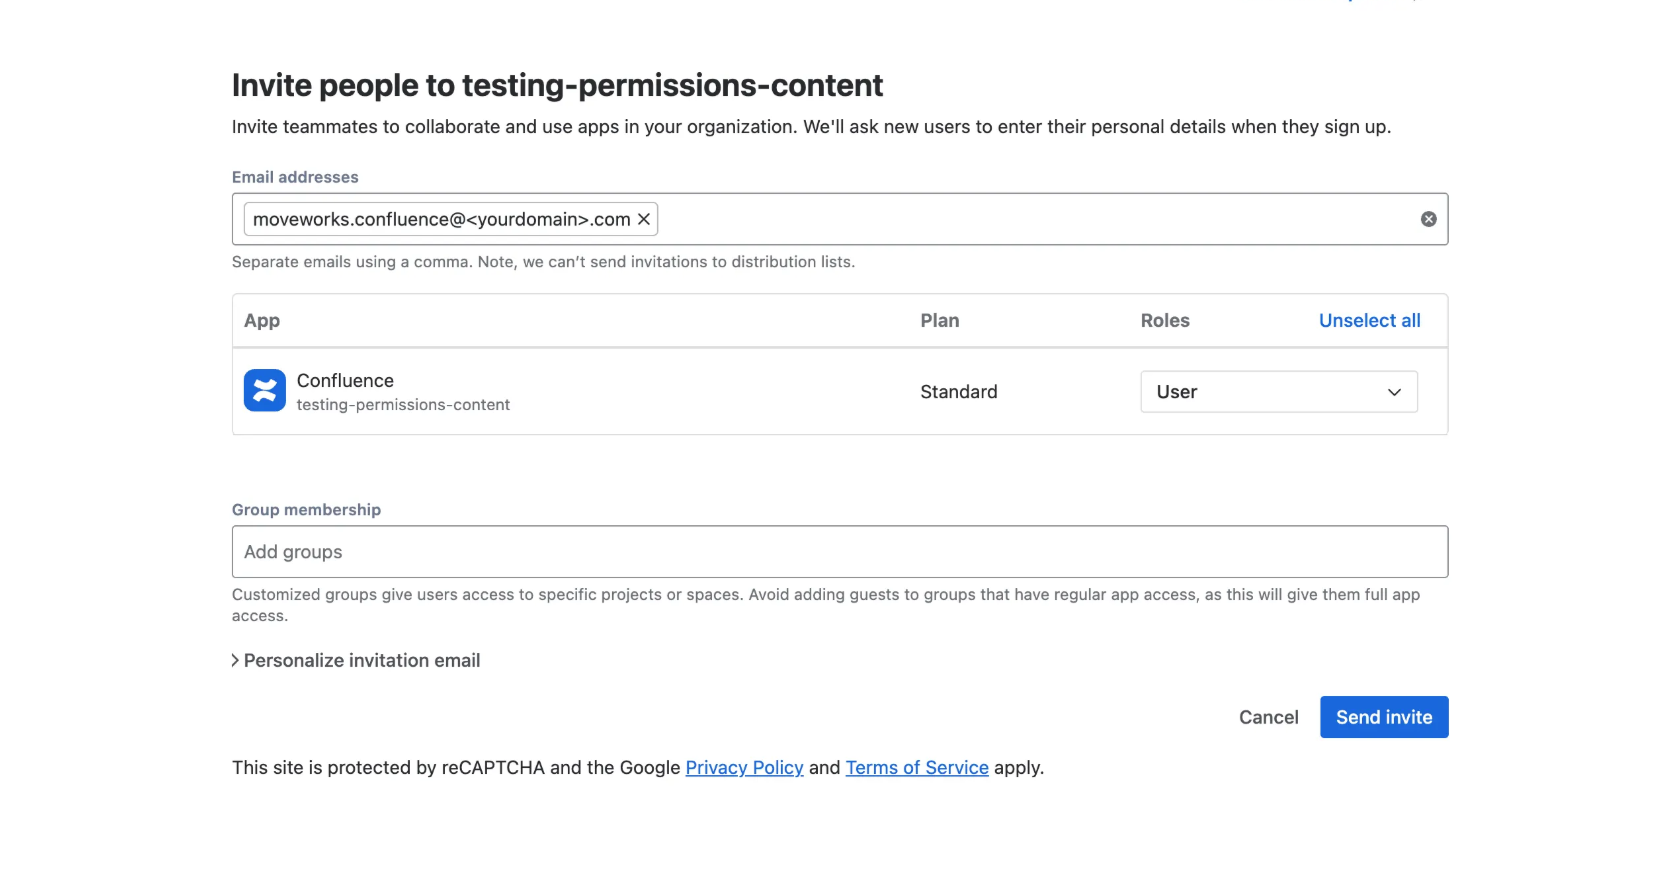
Navigate to Directory → Users and click on the “Invite users” button. Enter the email address of the Service Account and assign the Confluence application to it. By default, the user will be added to the standard users group in your Confluence instance. If your instance uses a specific group with access to certain spaces, make sure the Service Account is added to that group as well. Click on the “Send invite” button once done.
-
Go the Service Account email inbox and accept the invite. This will ask the user to setup the Full name and Password - Complete all the necessary steps. Once done you can now visit this URL :
https://id.atlassian.com/manage/api-tokensas Service Account and generate the API key (Refer to the below section for detailed steps)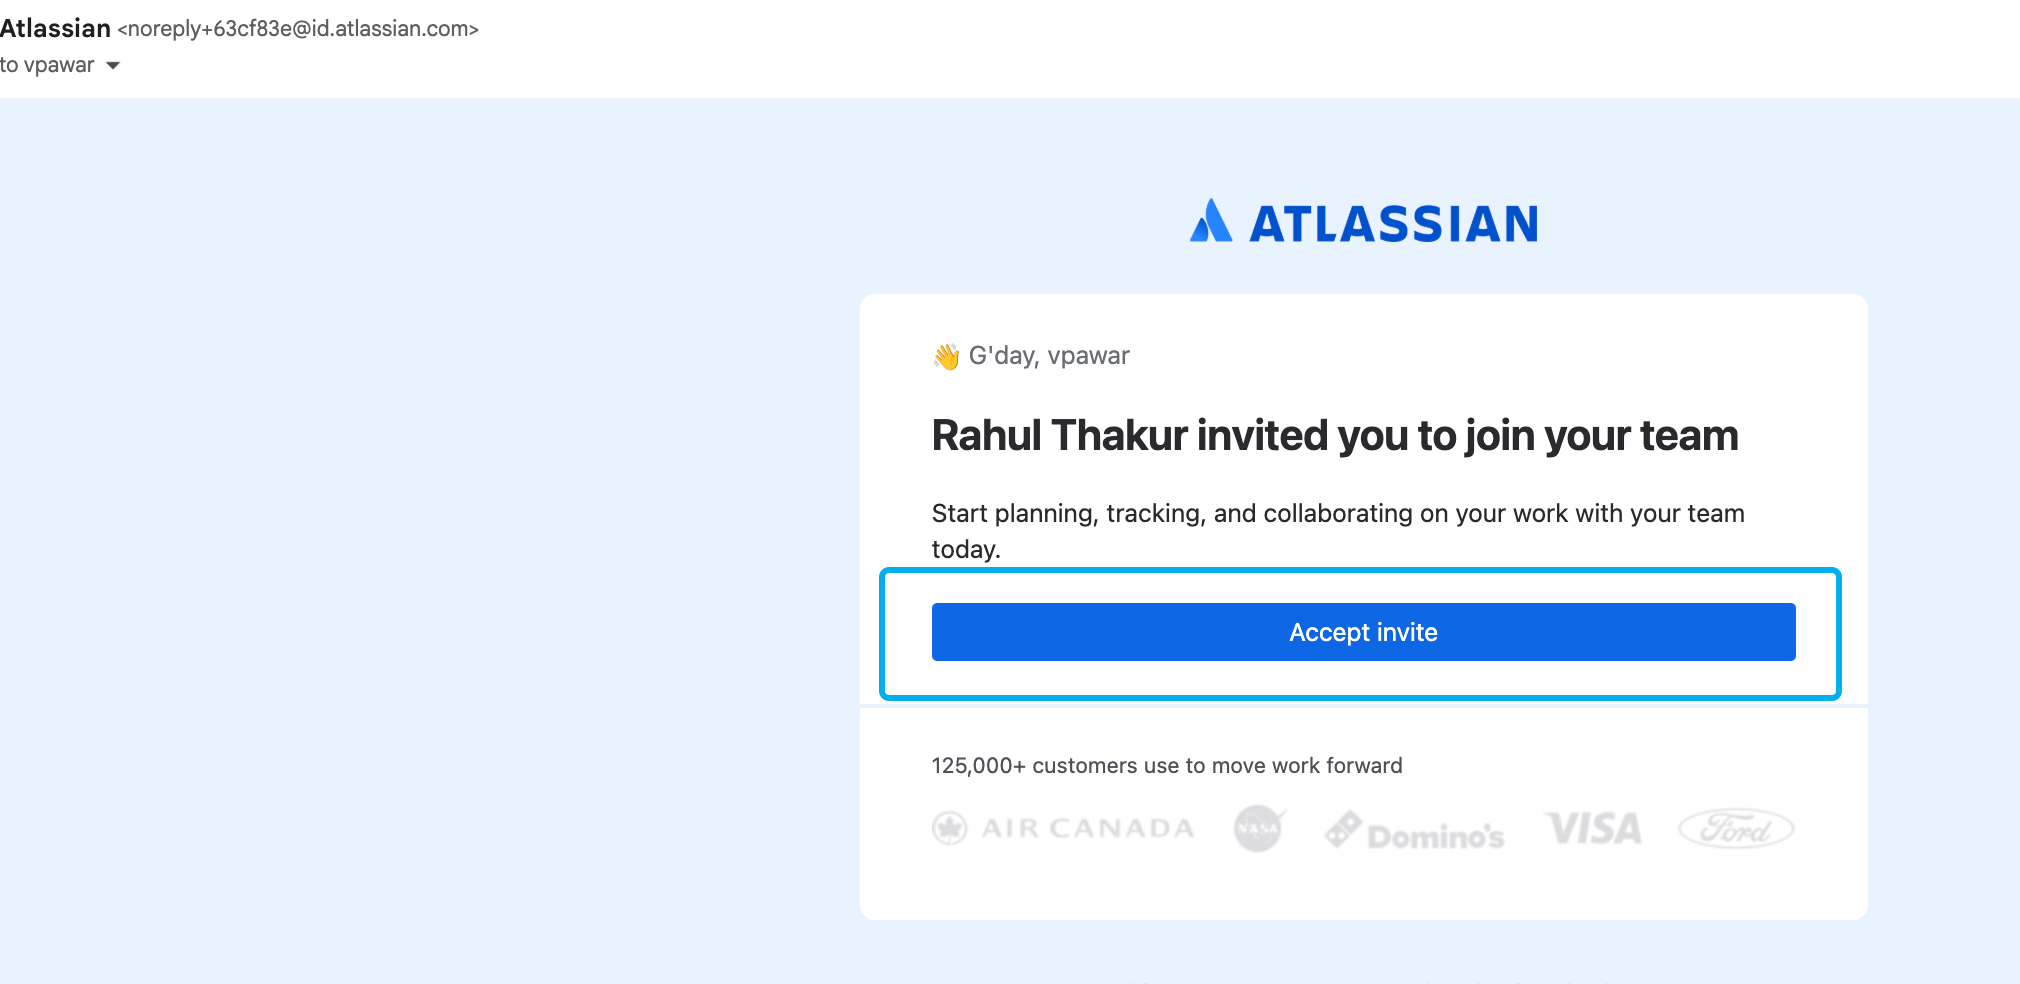
Generating API token
-
Log in to https://id.atlassian.com/manage/api-tokens using the Service Account, and click on “Create API token.” This token will be associated with the Service Account in your Confluence instance.
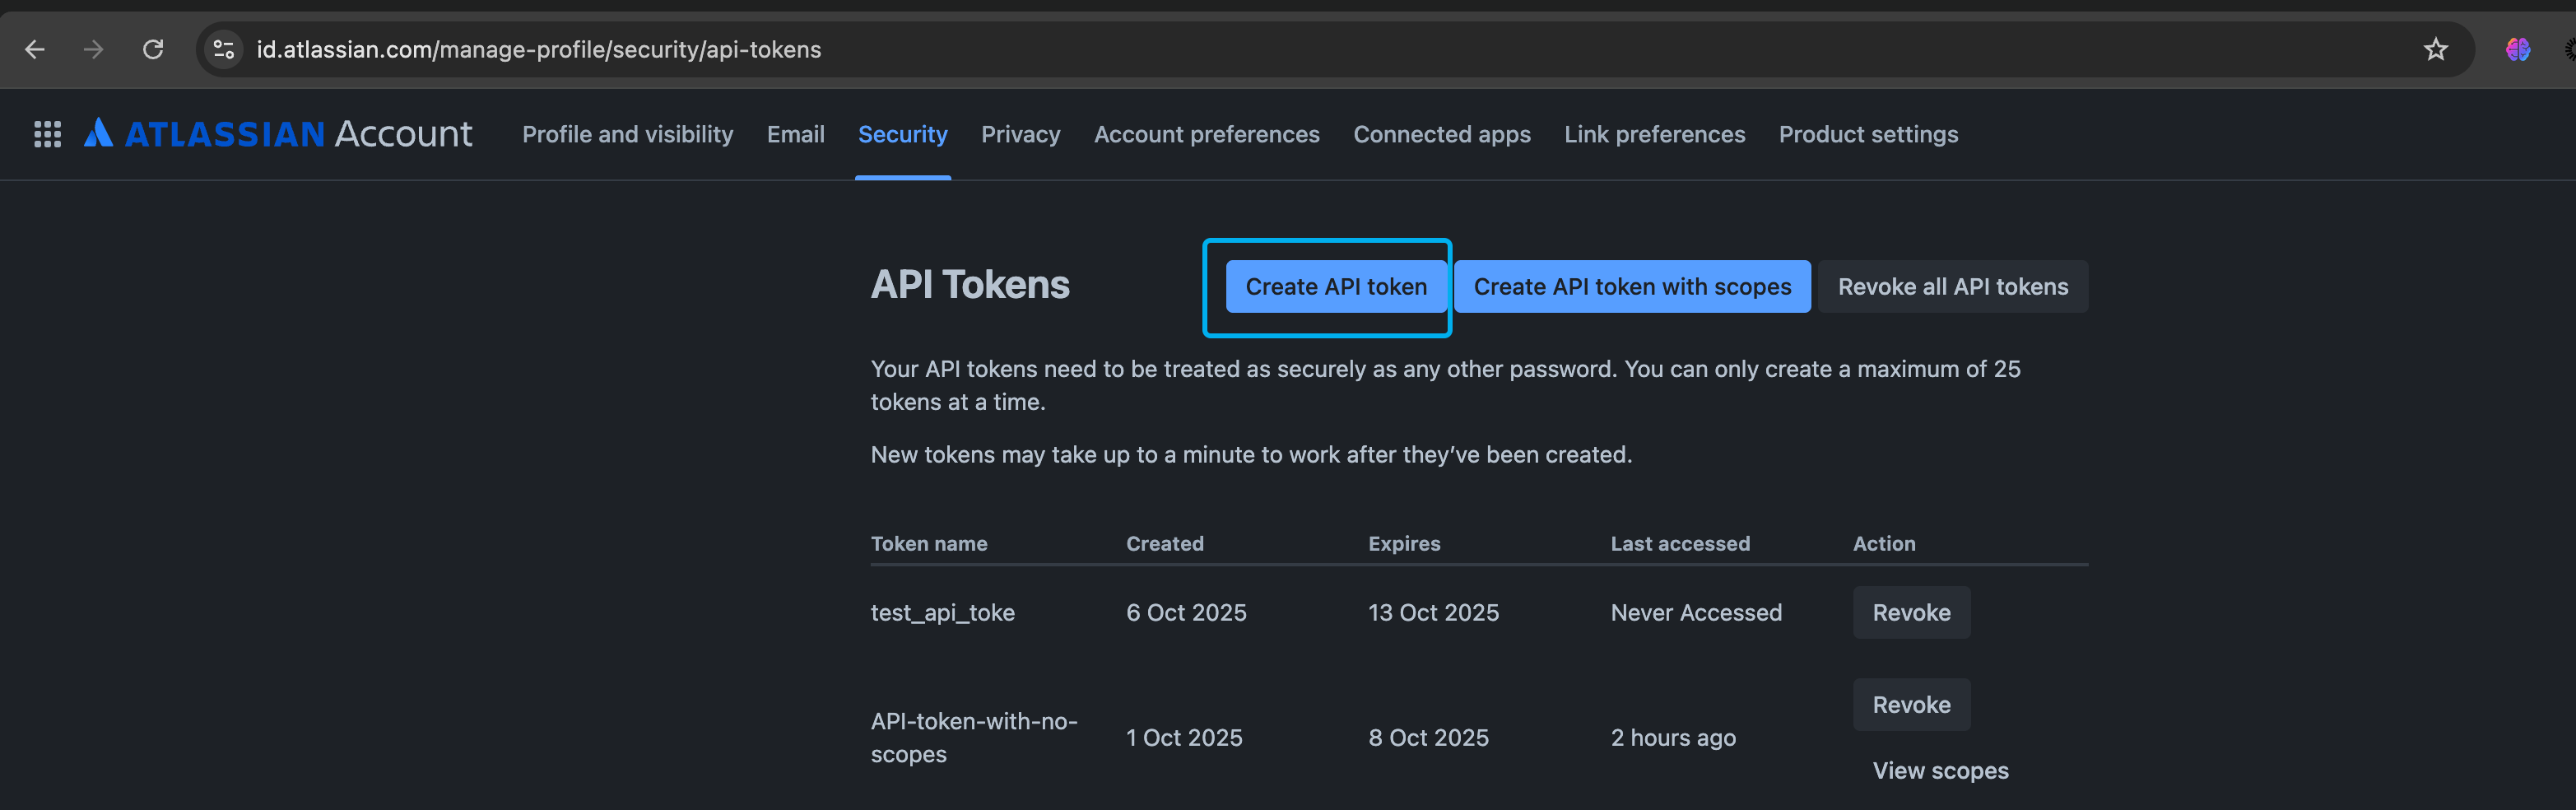
-
Once you’ve created the API token, it will be displayed for you to copy and save. Please note that this is a one-time view, so make sure to record it and store it securely for future use.
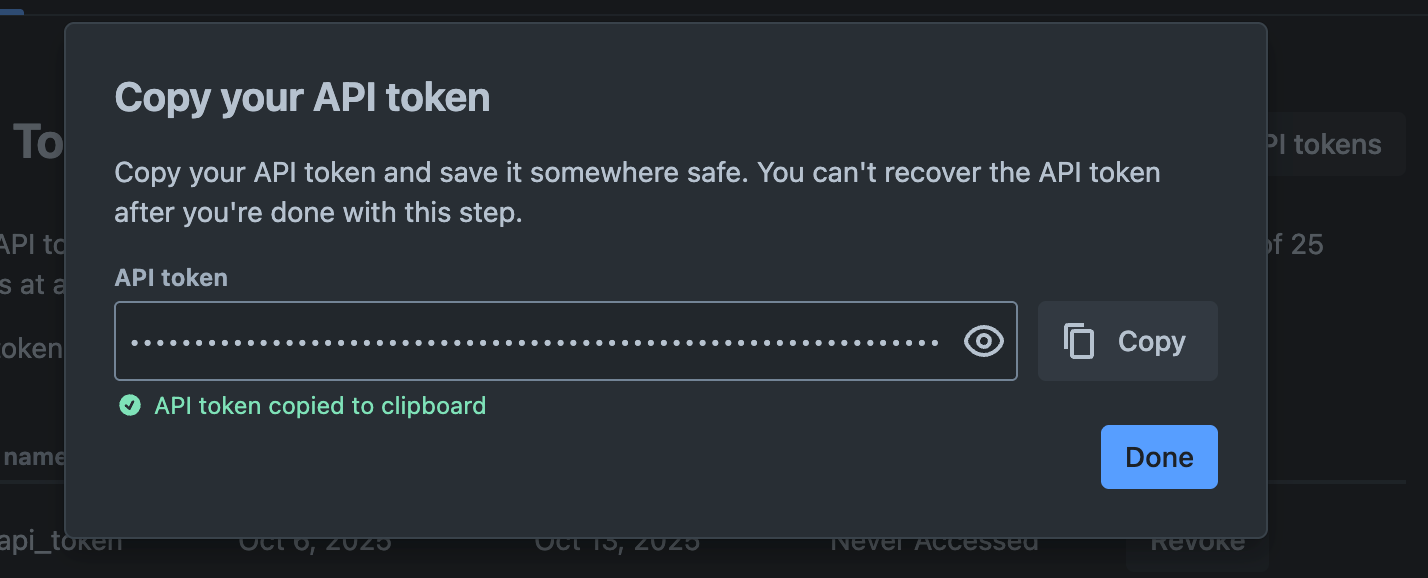
-
While creating the connector you will need to use this credential - Record the Service Account email address and this API token.
Testing your generated API token (Optional)
It’s a good practice to verify that your generated token has access to all the APIs needed for Moveworks ingestion. You can do this in Postman or any tool that supports CURL commands. Use Basic Auth for authentication, with the service account email as the username and the API token from the previous step as the password.
-
Content
curl --location 'https://testing-permissions-content.atlassian.net/wiki/rest/api/content' \ --header 'Accept: application/json' \ --header 'Authorization: Basic {your-credentials}' -
Permissions
- Once you have successfully hit the content API get a content ID and parse in the following CURL request
curl --location --globoff 'https://testing-permissions-content.atlassian.net/wiki/rest/api/content/{id}/restriction' \ --header 'Accept: application/json' \ --header 'Authorization: Basic {your-credentials}' -
Groups
curl --location 'https://testing-permissions-content.atlassian.net/wiki/rest/api/group' \ --header 'Accept: application/json' \ --header 'Authorization: Basic {your-credentials}' -
Users
curl --location 'https://testing-permissions-content.atlassian.net/wiki/rest/api/user/current' \
--header 'Accept: application/json' \
--header 'Authorization: Basic {your-credentails}'
Setup in Moveworks
Connector Creation
- Log in to your org's MyMoveworks portal
- Navigate to Moveworks Setup > Connectors > Built-in Connectors
- Click Create New
- Search and Select Confluence (Next Gen)
- Click on Next: Add Creds
- Input the following details
- Connector Name : Name this connector for your future reference. Once set, this name cannot be changed.
- Username: Enter the email address of the service account, that you are using for this connector.
- API Token: Enter the API token that you have generated in the previous step.
- Base URL: Enter the URL of your Atlassian instance.
-
Common Base URL: If you are using Confluence Cloud, select this option. This field requires the URL of your Atlassian instance. Open the Confluence application in your preferred browser and copy the URL. For Confluence Cloud, the URL follows this pattern:
https://your-instance-name.atlassian.net/wiki/homeCopy your instance name from this URL and paste it into the text field provided.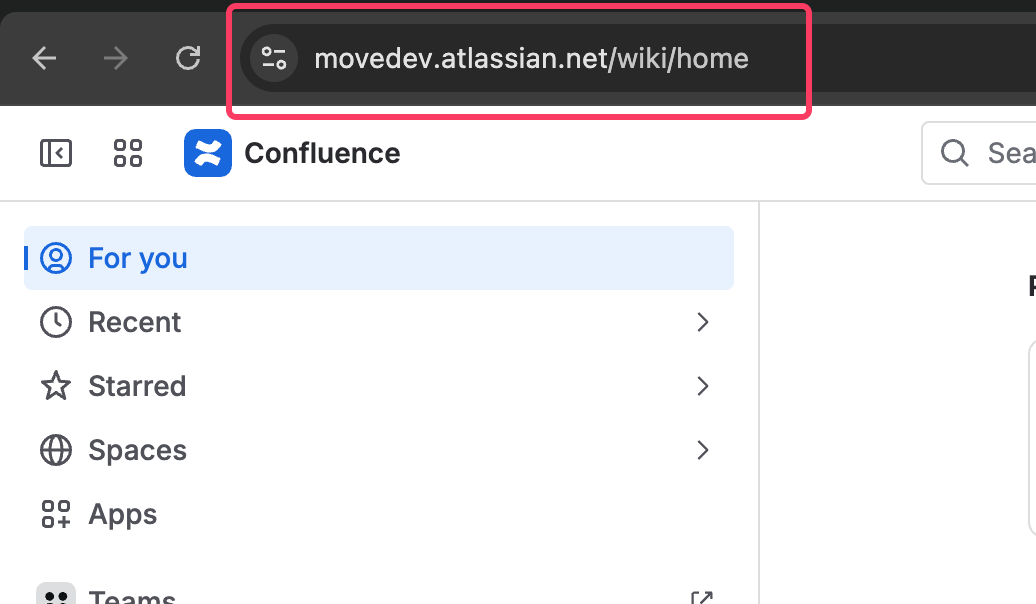
-
Custom Base URL: If you are using Confluence Data Center or Server, your Atlassian URL will vary based on your specific configuration. In this case, you’ll need to provide the full URL domain. Open Confluence in your browser and copy the complete URL from the address bar.
-
- Click Save. This connector will now be used to configure content ingestion from Confluence (cloud). Refer to the steps mentioned below.
Configuring Confluence (Cloud) for Enterprise Search
Initialising setup
- Log in to your org's MyMoveworks portal
- Navigate to Moveworks Setup > Answers > Ingestion > Enterprise Search
- Click on Create New or Get Started
- Select Confluence (cloud) from the dropdown list and click on Get Started
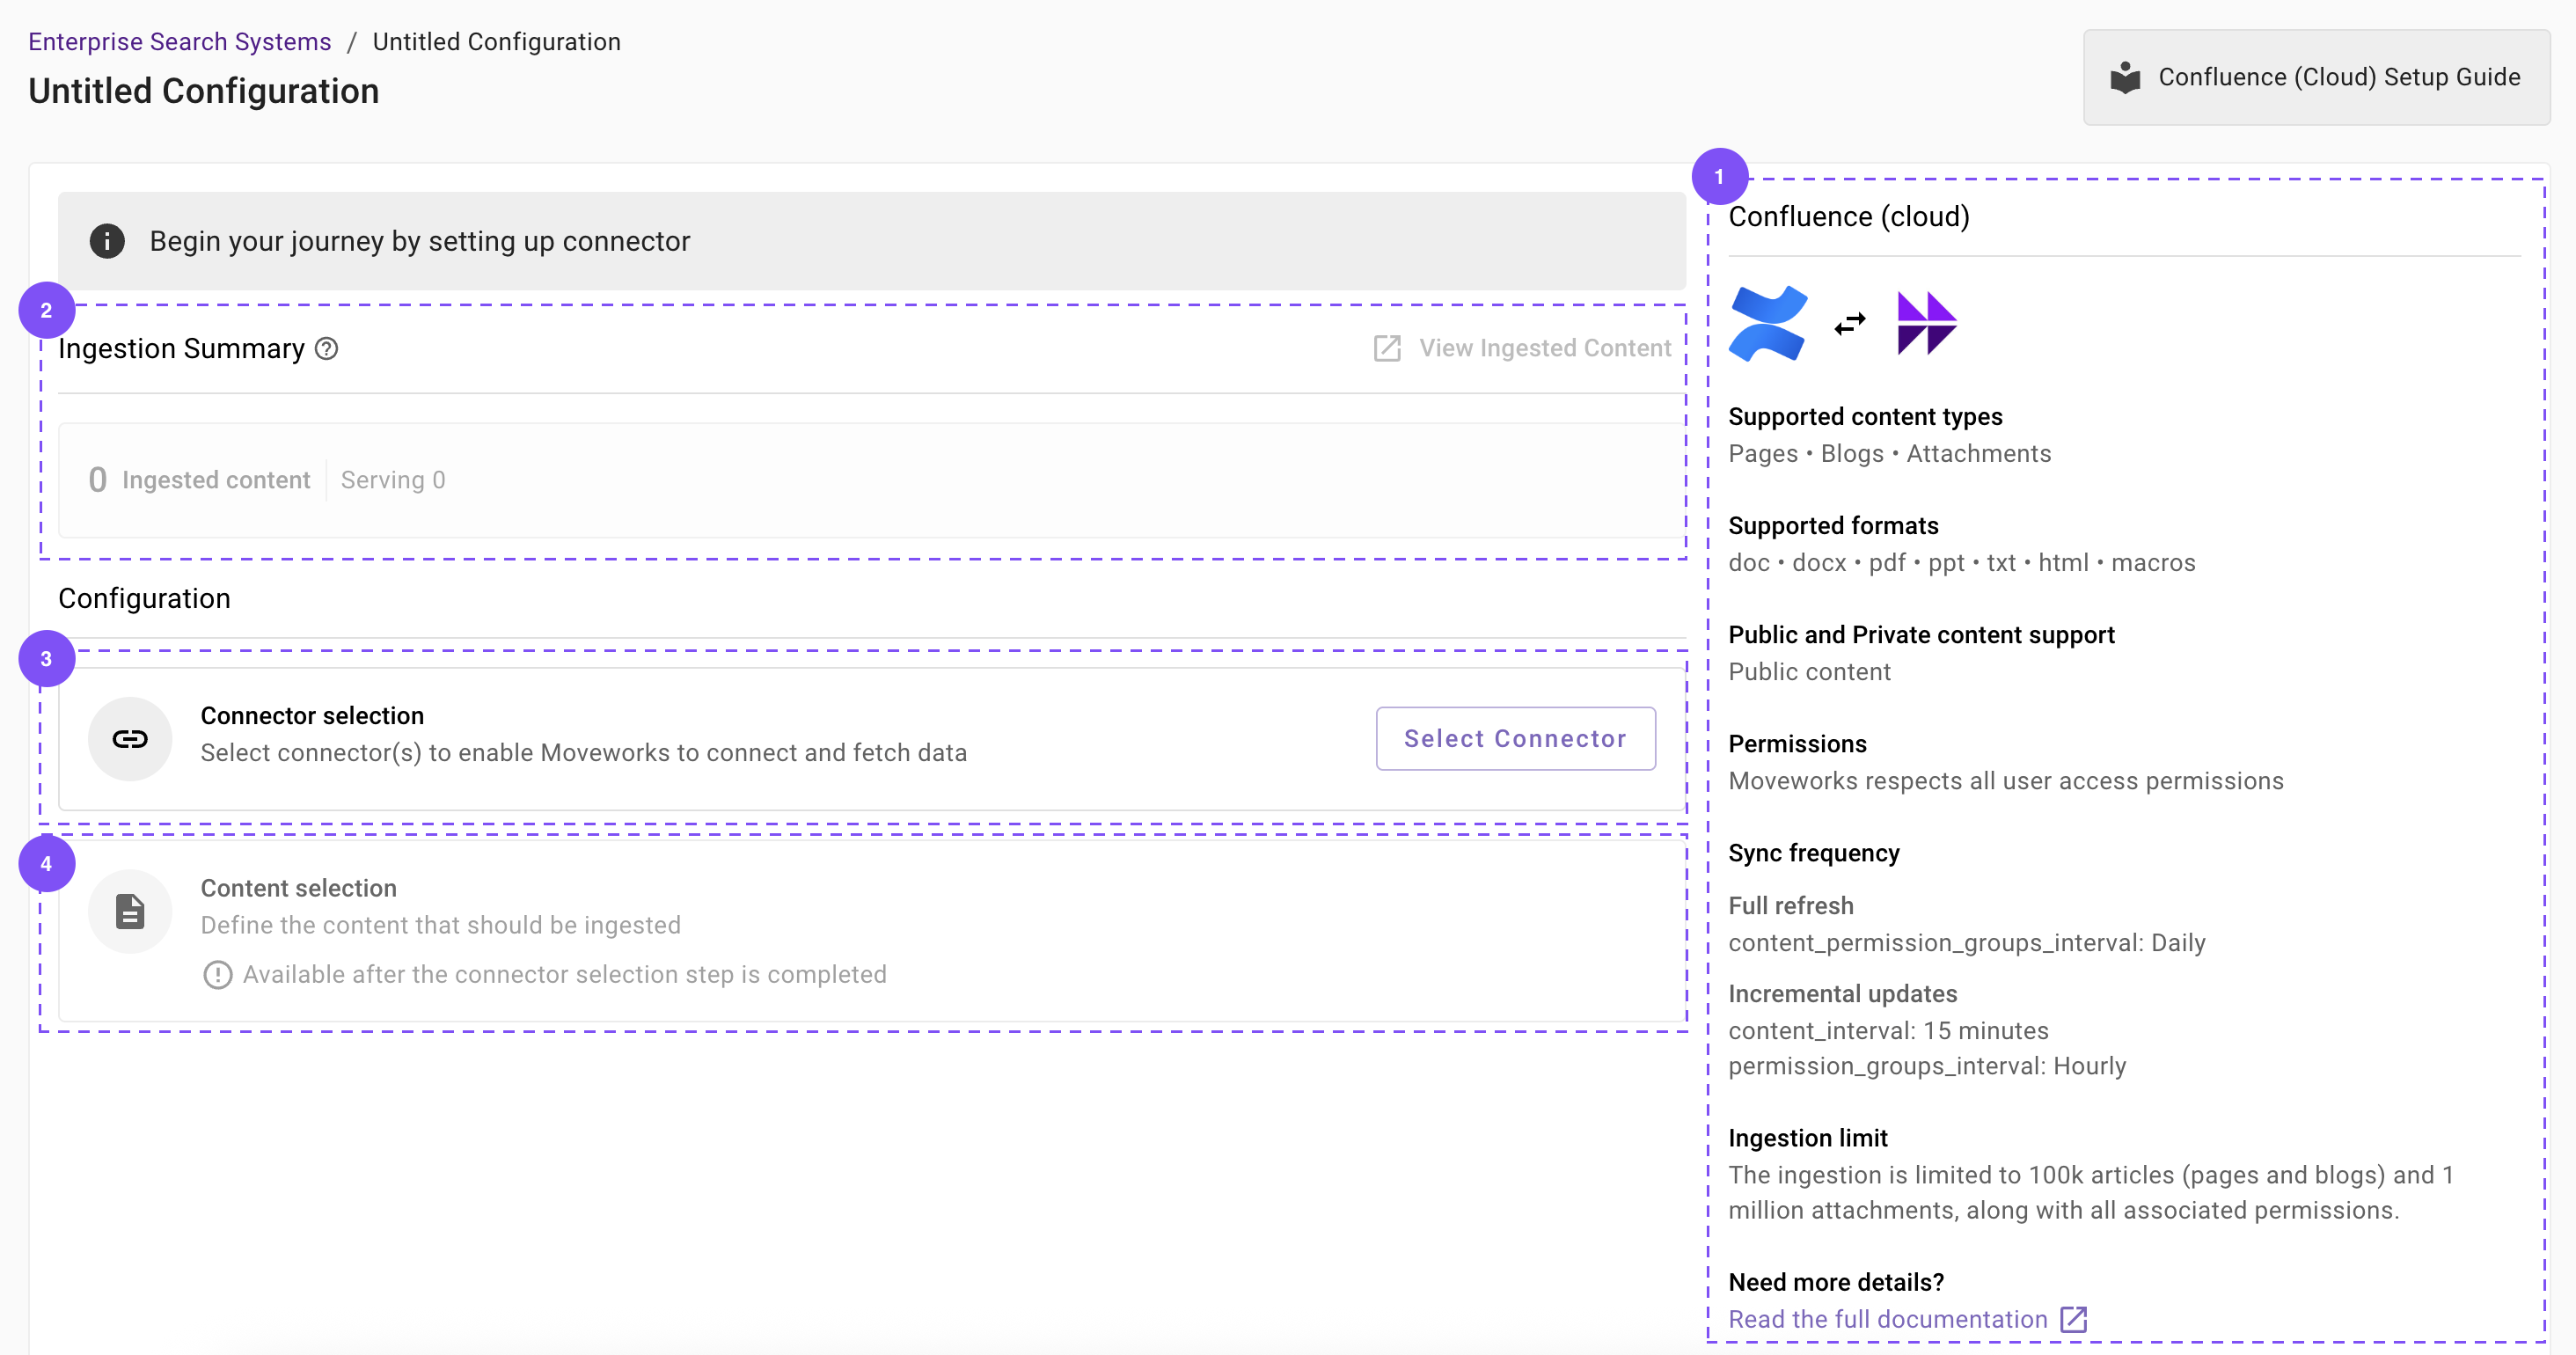
- You will be redirected to the Confluence ingestion overview page. In the overview page, you will find few info blocks and few configuration blocks.
- System Overview: This presents an overview of Confluence (cloud) support from Moveworks
- Ingestion Summary: This provides information on the count of records that has been ingested and serving. The values will appear after the first successful ingestion run.
- Connector Selection: In this configuration block, you are required to select the required connector to enable Moveworks to connect and fetch data
- Content Selection: In this configuration block, you are required to define the content that should be ingested within Moveworks
Connector selection and validation
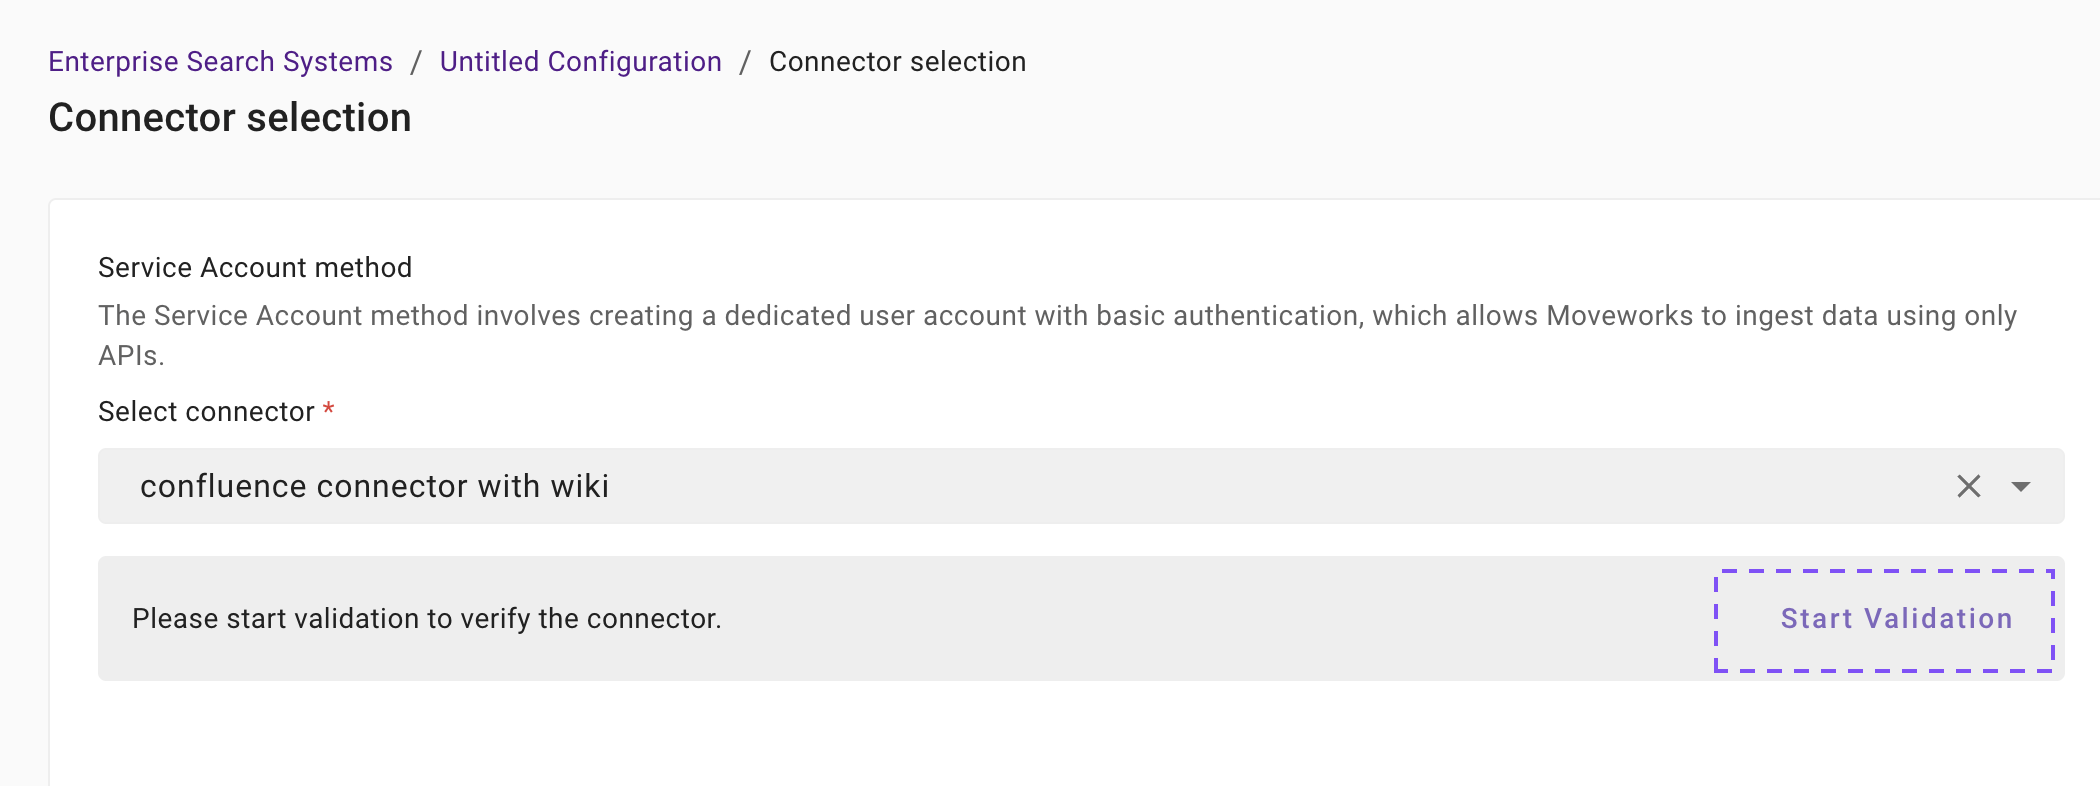
-
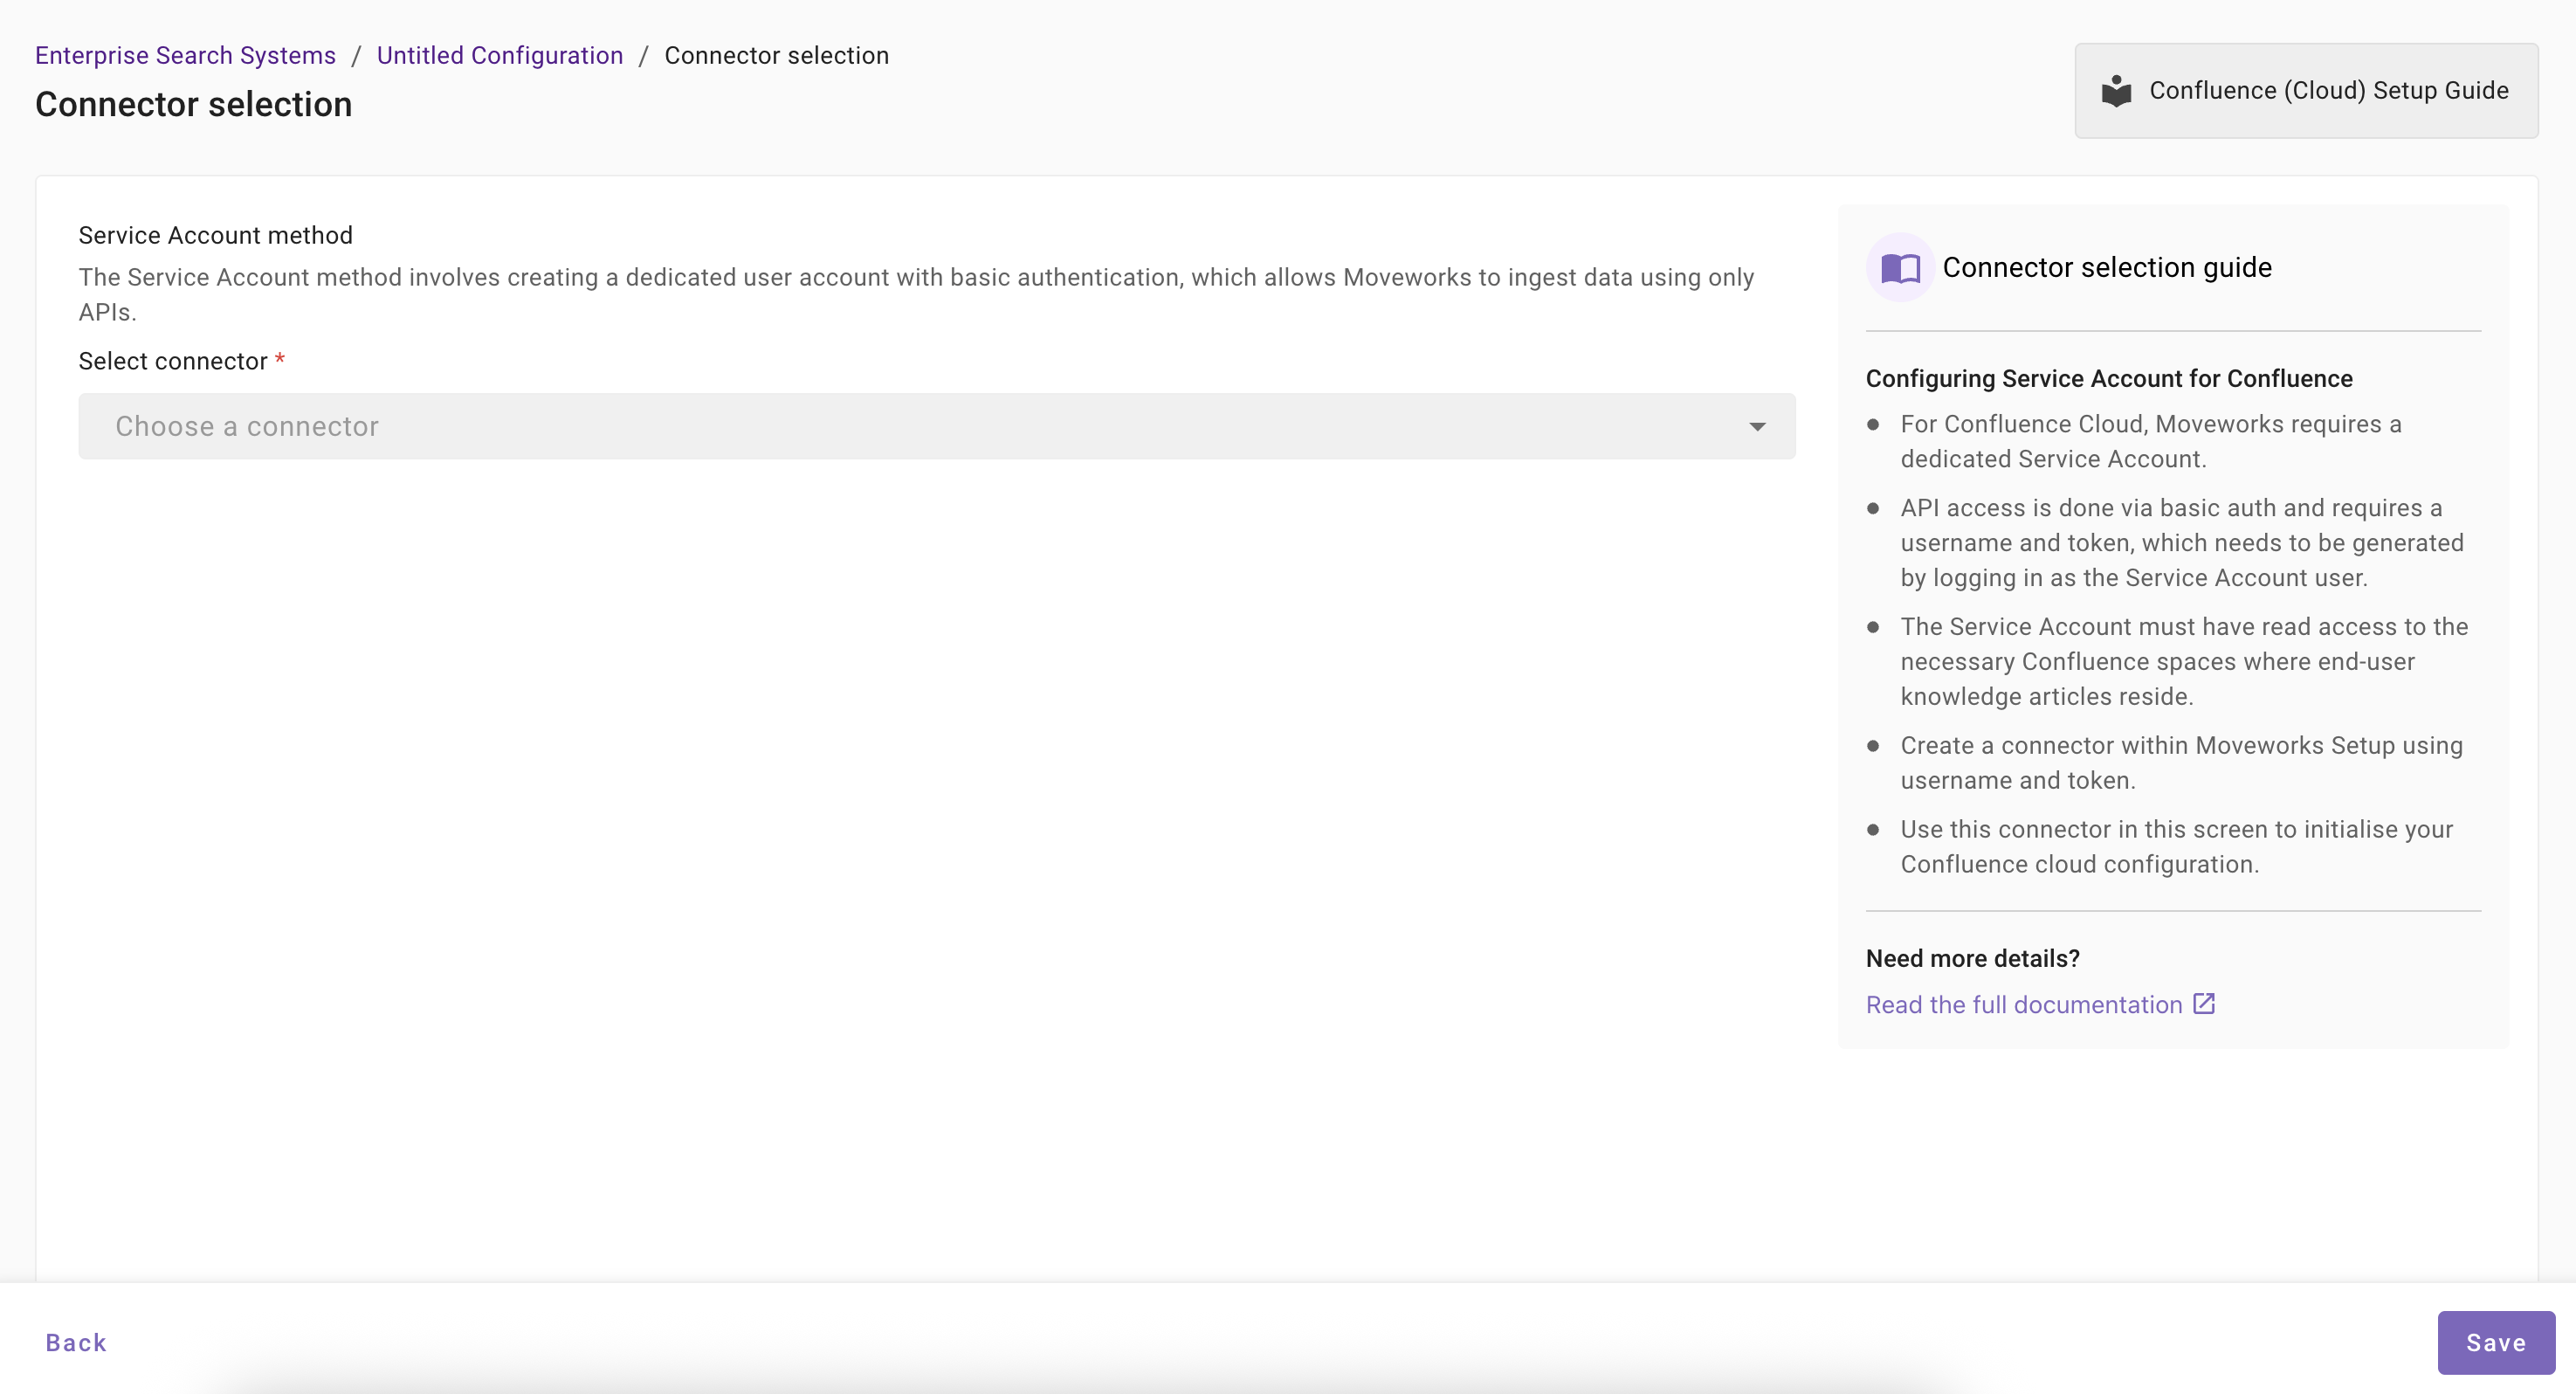
Once you click on Select Connector, a connector setup screen will appear as follows
-
Select the connector (from the dropdown) that you have created in the Connector Creation step.
Please note: Only the Confluence (Next Gen) connectors will appear in this list.
-
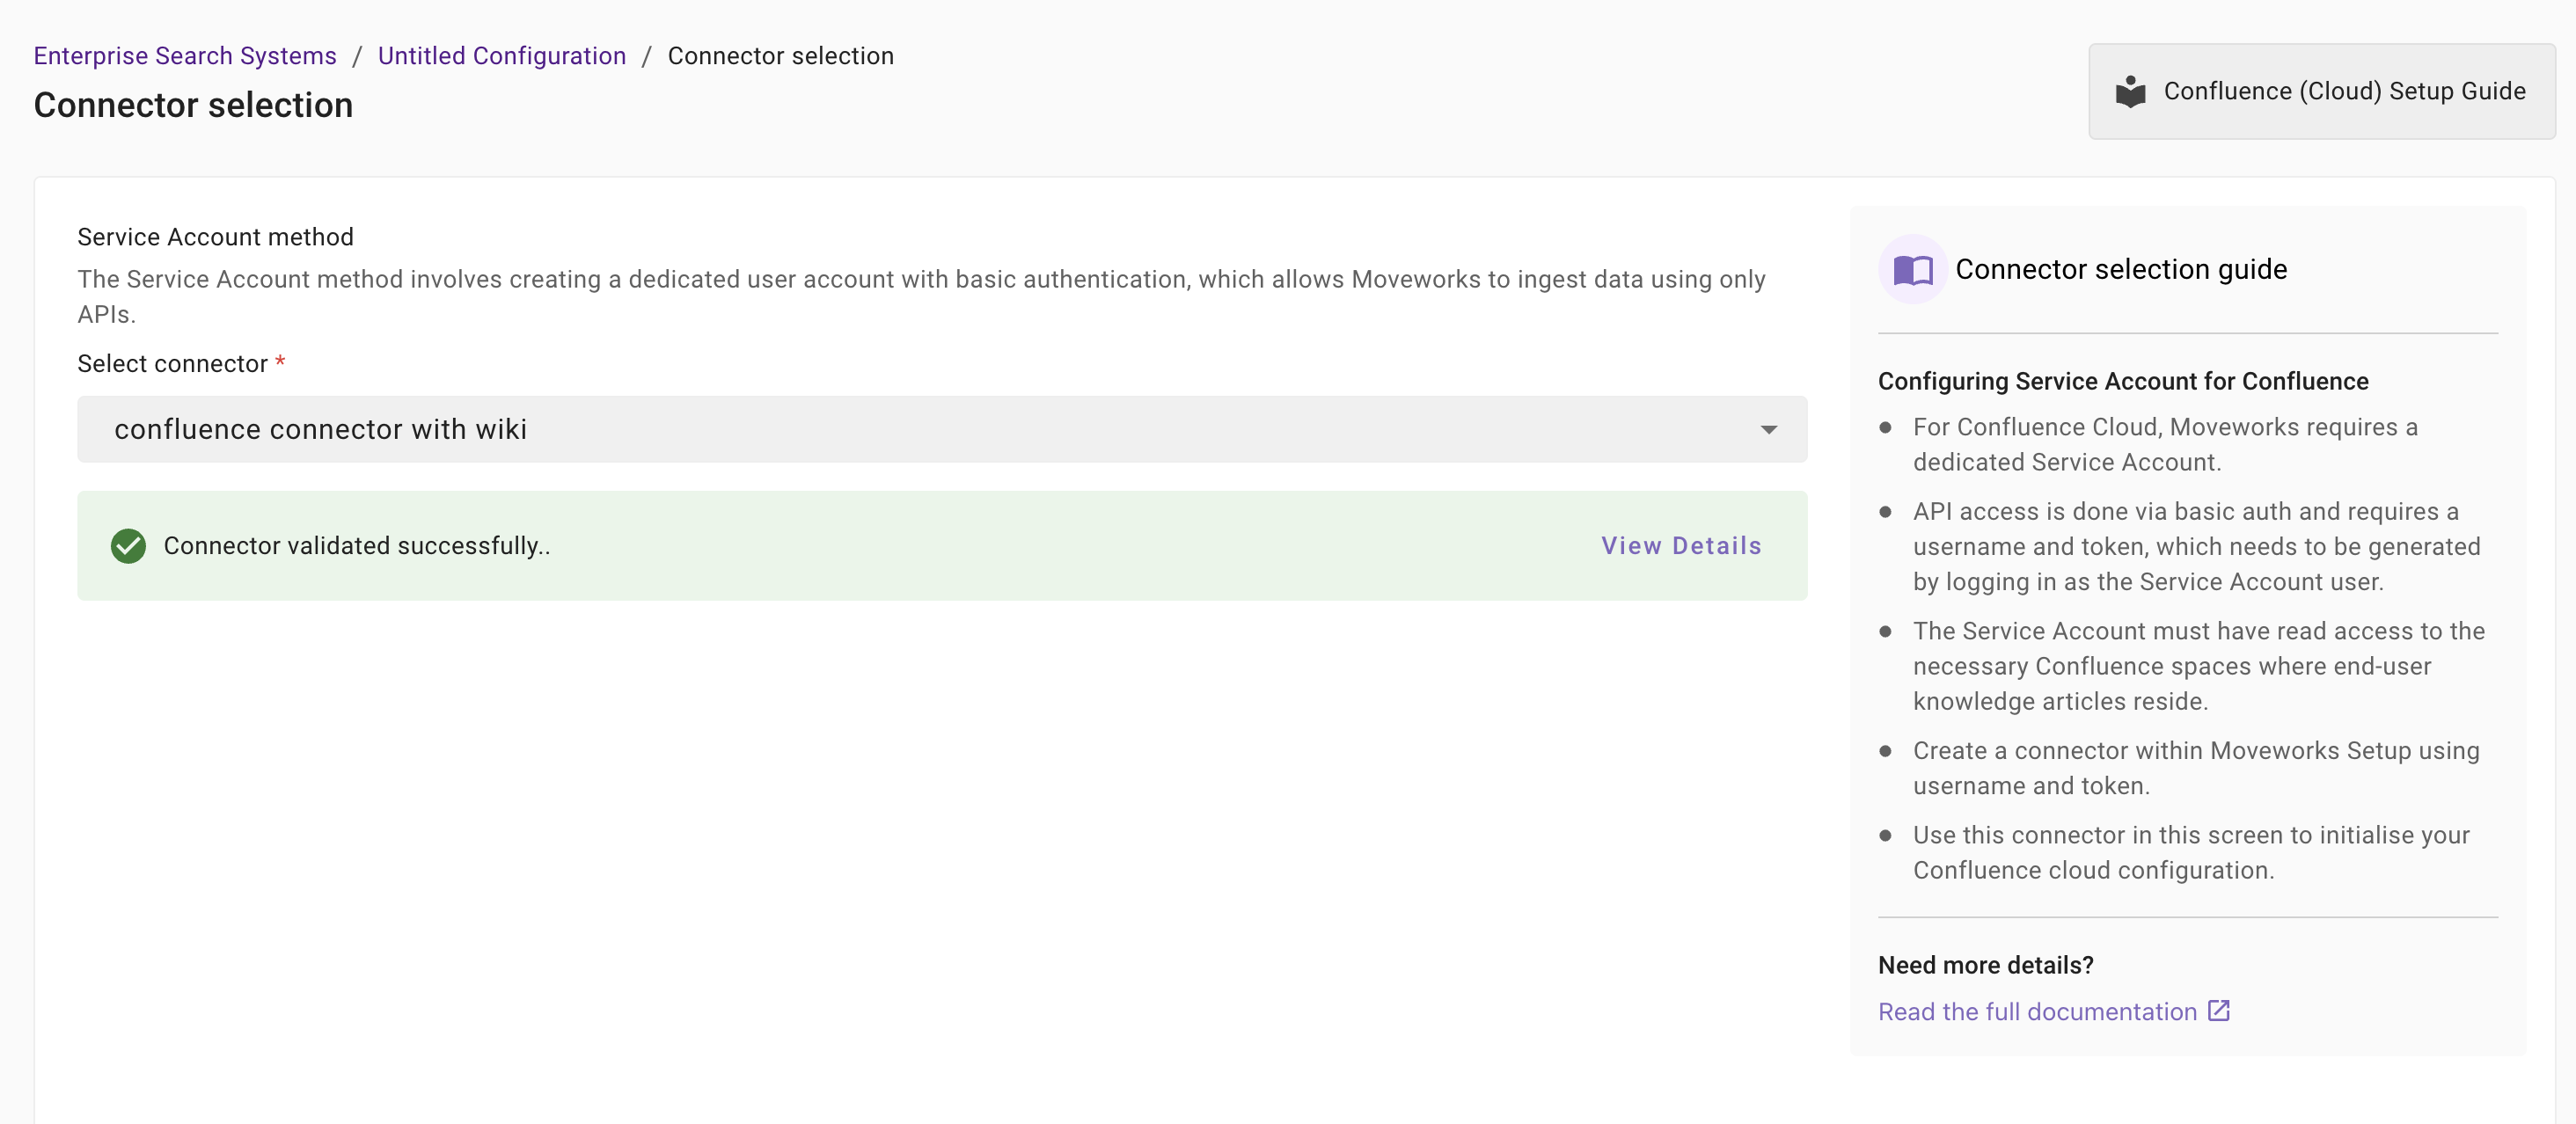
Once the connector is selected, you need to click on Start Validation to validate the connector credentials and required scope.
Connector Validation
This is a mandatory step in order to save the configuration and move to the next step.
Moveworks validates the selected connector to check:
- Auth: Moveworks validates if the connector has right credentials to authenticate
- Content: Moveworks validates if connector has right scopes to fetch content
- Permissions: Moveworks validates if connector has right scopes to fetch user permissions
- Users: Moveworks validates if connector has right scopes to fetch user data
- Groups: Moveworks validates if connector has right scopes to fetch user groups data
-
If the connector is validated successfully, you will see a green info banner as follows.
- If there are any credentials or scope issues, you will receive an error message as follows. Click on View Details to identify the issue. Refer to this step-by-troubleshoot guide (link to be added) to rectify any validation errors.
-
Once the connector is validated successfully, you will be able to Save the configuration.
-
Input the unique configuration name and Save.
At this stage, only the configuration entry is created. Ingestion doesn't start immediately after this step. You need to configure the Content Selection step to complete the journey. Refer to the next section for details.
-
Once the configuration is saved, you can view the unique configuration name at the top of the screen. You can also click the pencil 🖊️ icon to edit the configuration name.

-
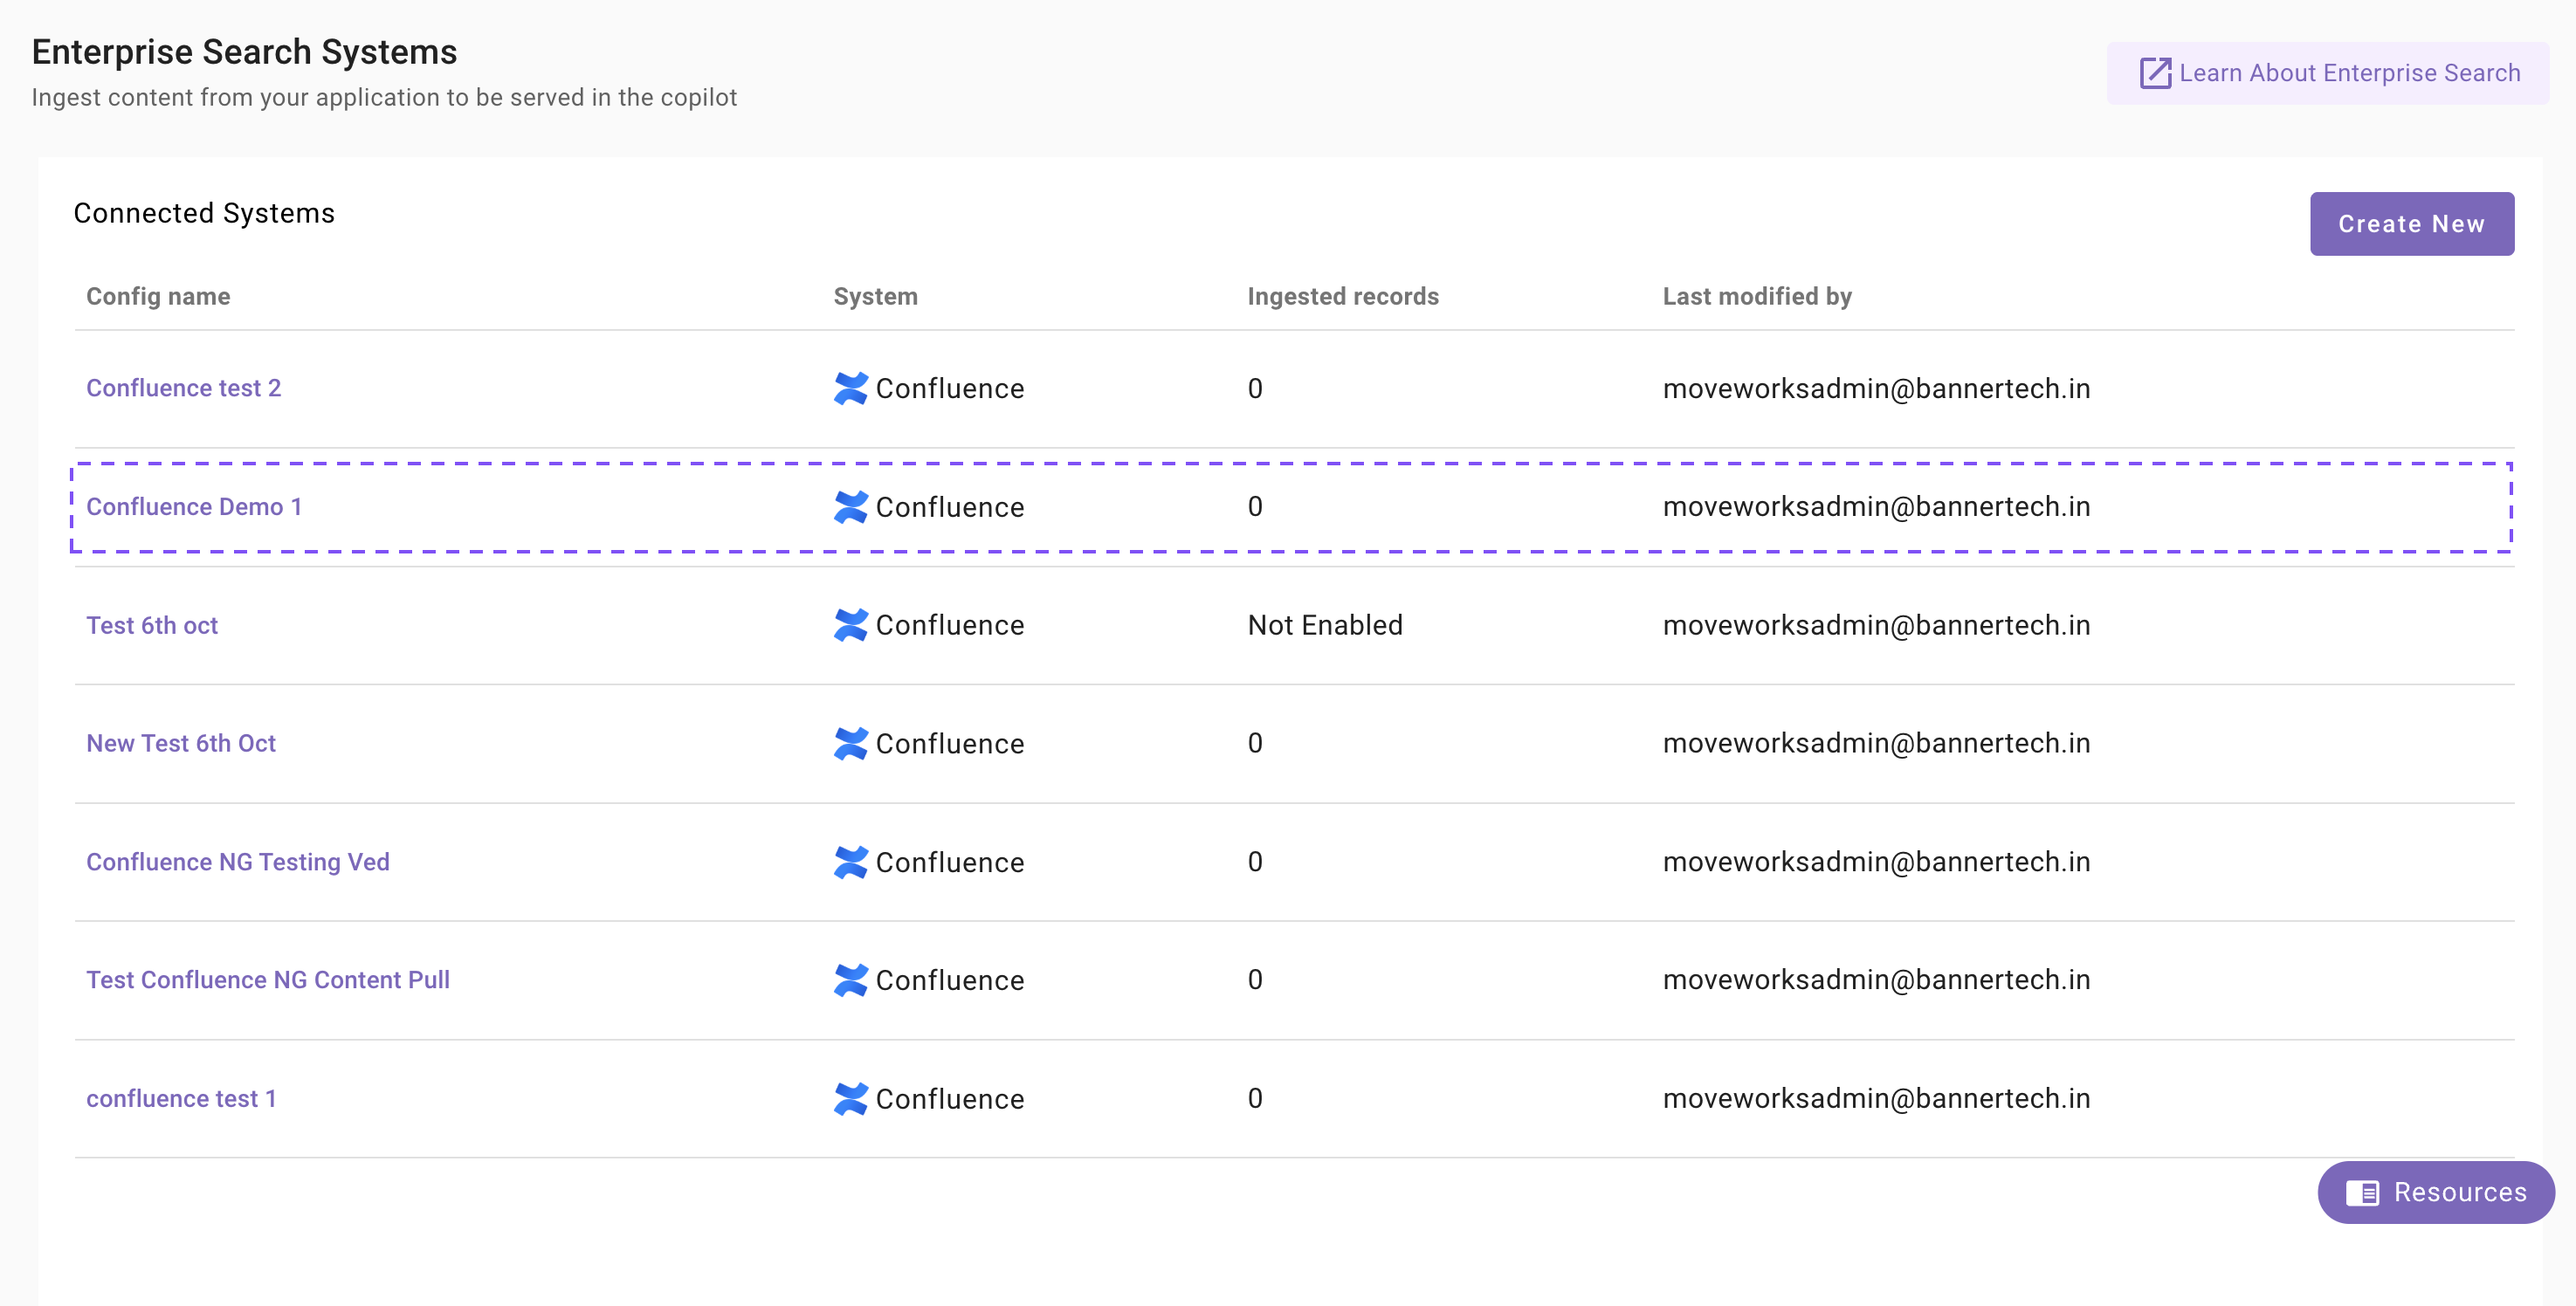
Additionally, you will start seeing an entry of your configuration in the Enterprise Search home page. You can click on your configuration to go to edit/ complete the configuration.
Content Selection
Once the connector selection step is complete and the configuration is saved, you will now be required to define the scope of content that will be ingested in Moveworks.
-
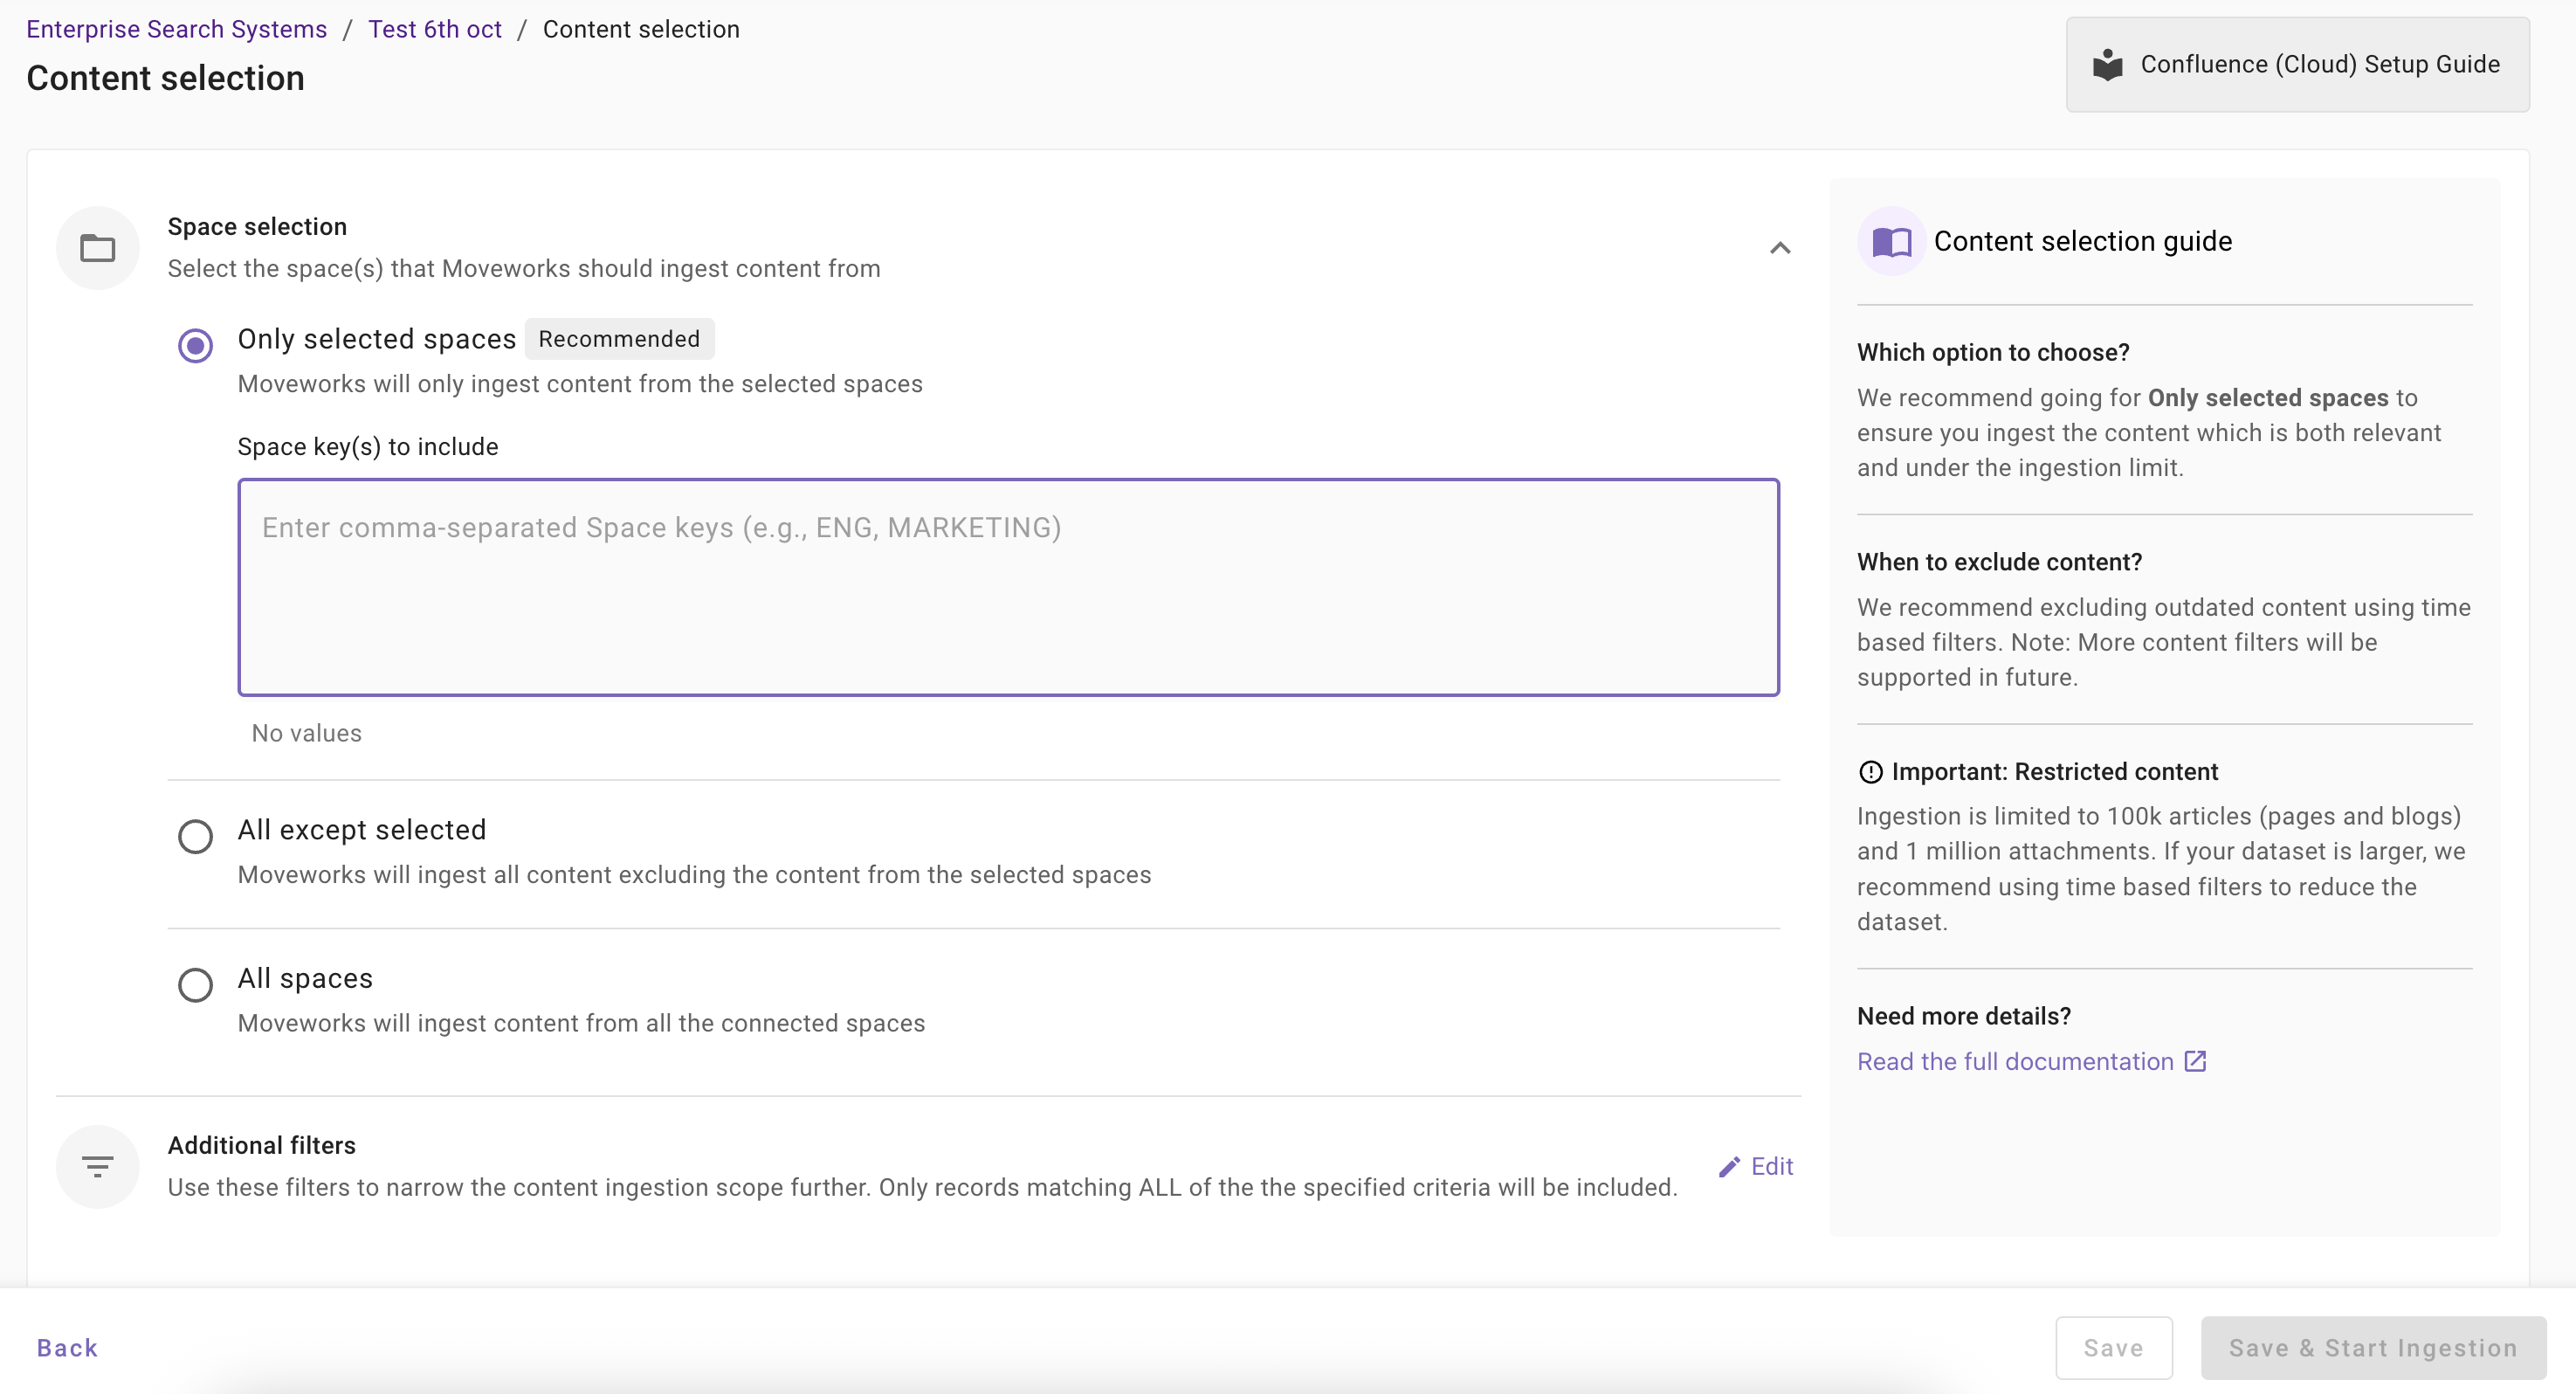
Once you click on Select Content, a content selection screen will appear as follows.
-
In this screen, you are required to define the Spaces from which Moveworks will ingest content and apply filters (optionally) to filter down the content further.
-
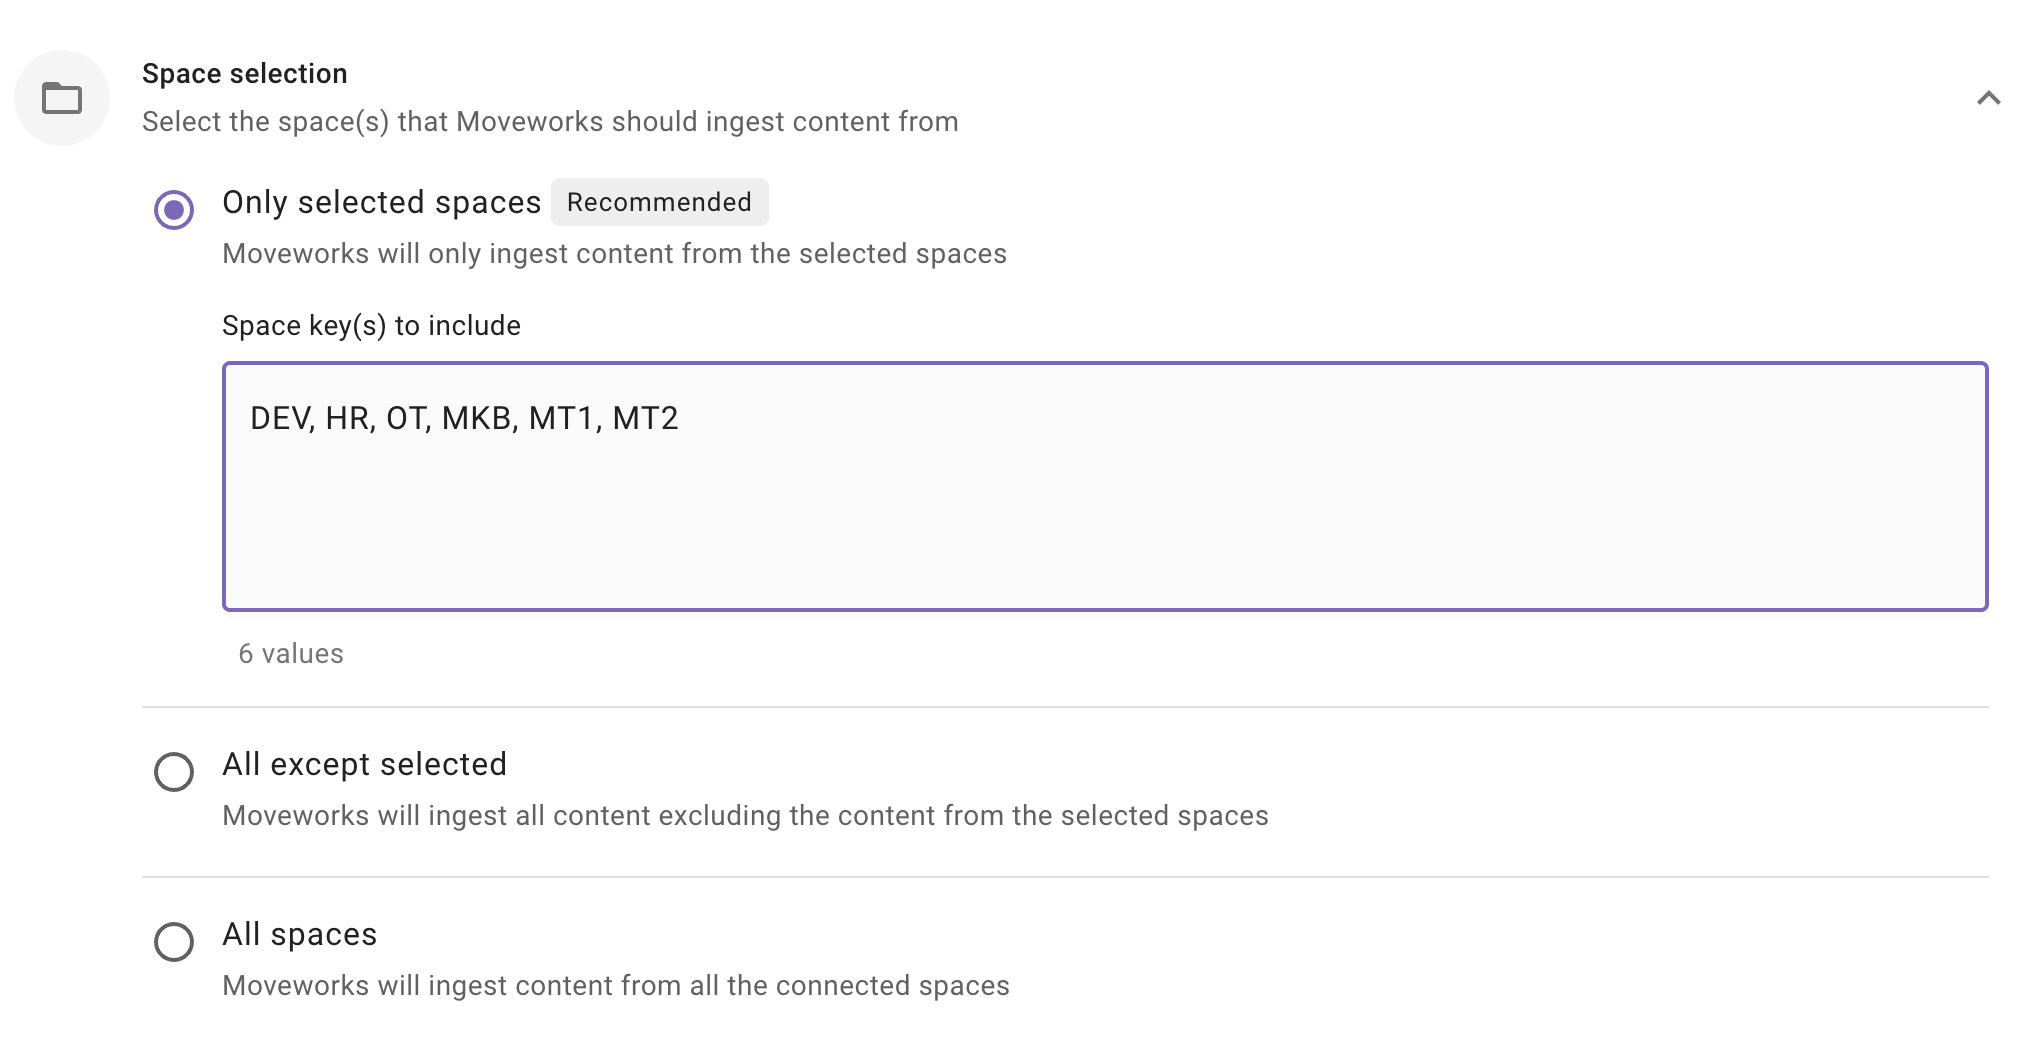
Space Selection: This is a mandatory configuration. This configuration defines which spaces Moveworks will crawl and ingest content from. As an admin, you get three options
-
Only selected spaces (Recommended): Moveworks will only ingest content from specified spaces.
When to choose this option? Choose this option if you want content to be served only from a subset of spaces that are accessible to the service account. For example - Let's assume, Service Account has access to 15 spaces, but you want content to be served only from 5 spaces, then you choose this method.
Important Note: The Service Account must have access to the specified spaces in order for Moveworks to crawl all spaces successfully.
How to configure? Enter comma separated Space Key(s).
-
All except selected: Moveworks will ingest content all except specified spaces.
When to choose this option?
Choose this option if you want content to be served from all except few spaces. For example - Let's assume, Service Account has access to 60 spaces, but you want content to be served from 58 spaces, then you choose this method and specific the 2 spaces from which Moveworks should not ingest.
Important Note: The Service Account must have access to the specified spaces in order for Moveworks to crawl all spaces successfully.
How to configure? Select this option and enter comma separated Space Key(s).
-
All spaces: Moveworks will ingest content all applicable spaces
When to choose this option?
Choose this option if you want content to be served from spaces that service account has access to. For example - Let's assume, Service Account has access to 20 spaces, and you want content to be served from all 20 spaces, then you choose this method.
Important Note: The Service Account must have access to the specified spaces in order for Moveworks to crawl all spaces successfully.
How to configure? Select this option. You are not required to specify the Space Keys in this scenario.
-
-
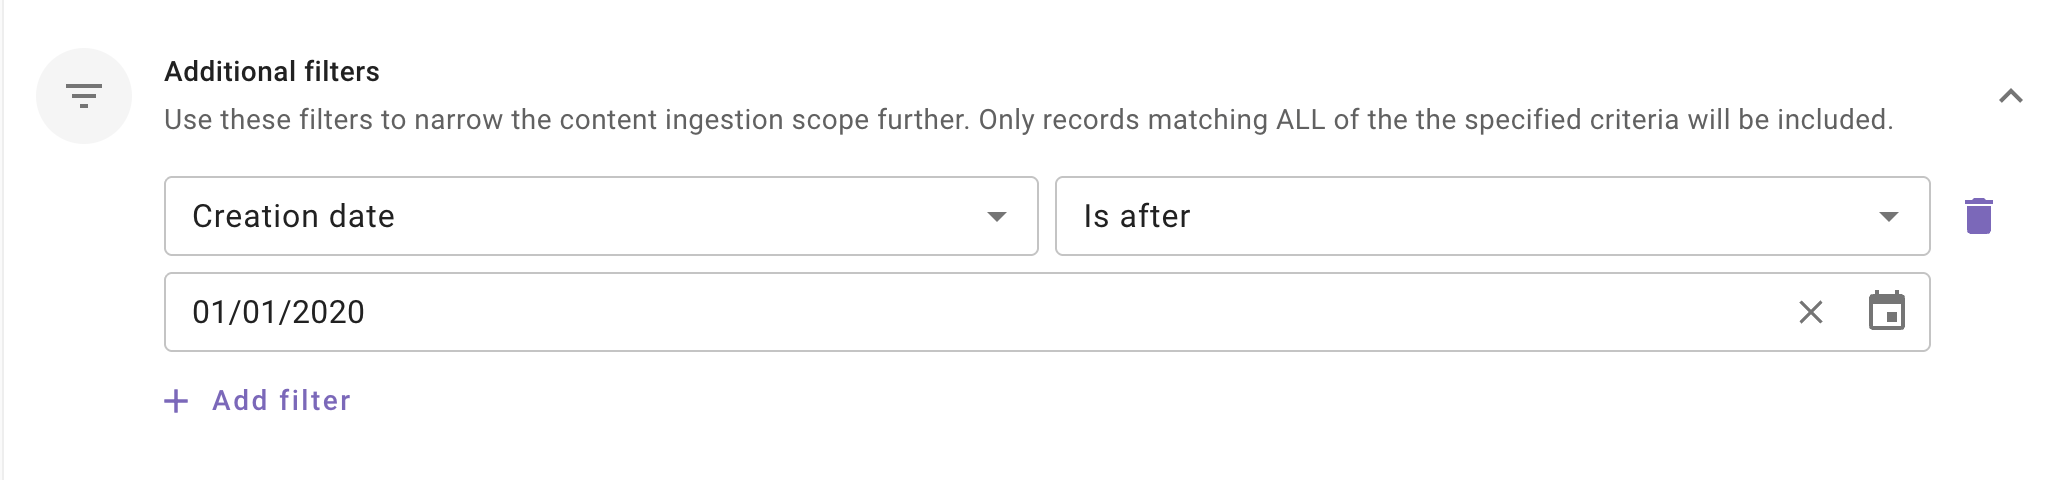
Additional Filters: Use these filters to narrow the content ingestion scope further. Only records matching ALL of the the specified criteria will be included.
This is an optional configuration. Moveworks recommend using these filters only if your dataset is very large (i.e. >1million records) so that only relevant content is ingested and served to your employees.
Currently following filters are supported:
- Modified date: Use this filter to include only those content records whose Modified date is after a specified date.
- Created date: Use this filter to include only those content records whose Created date is after a specified date.
Note: We support absolute dates only. Relative ranges (e.g., “last 7 days,” “older than 1 year”) are not supported.
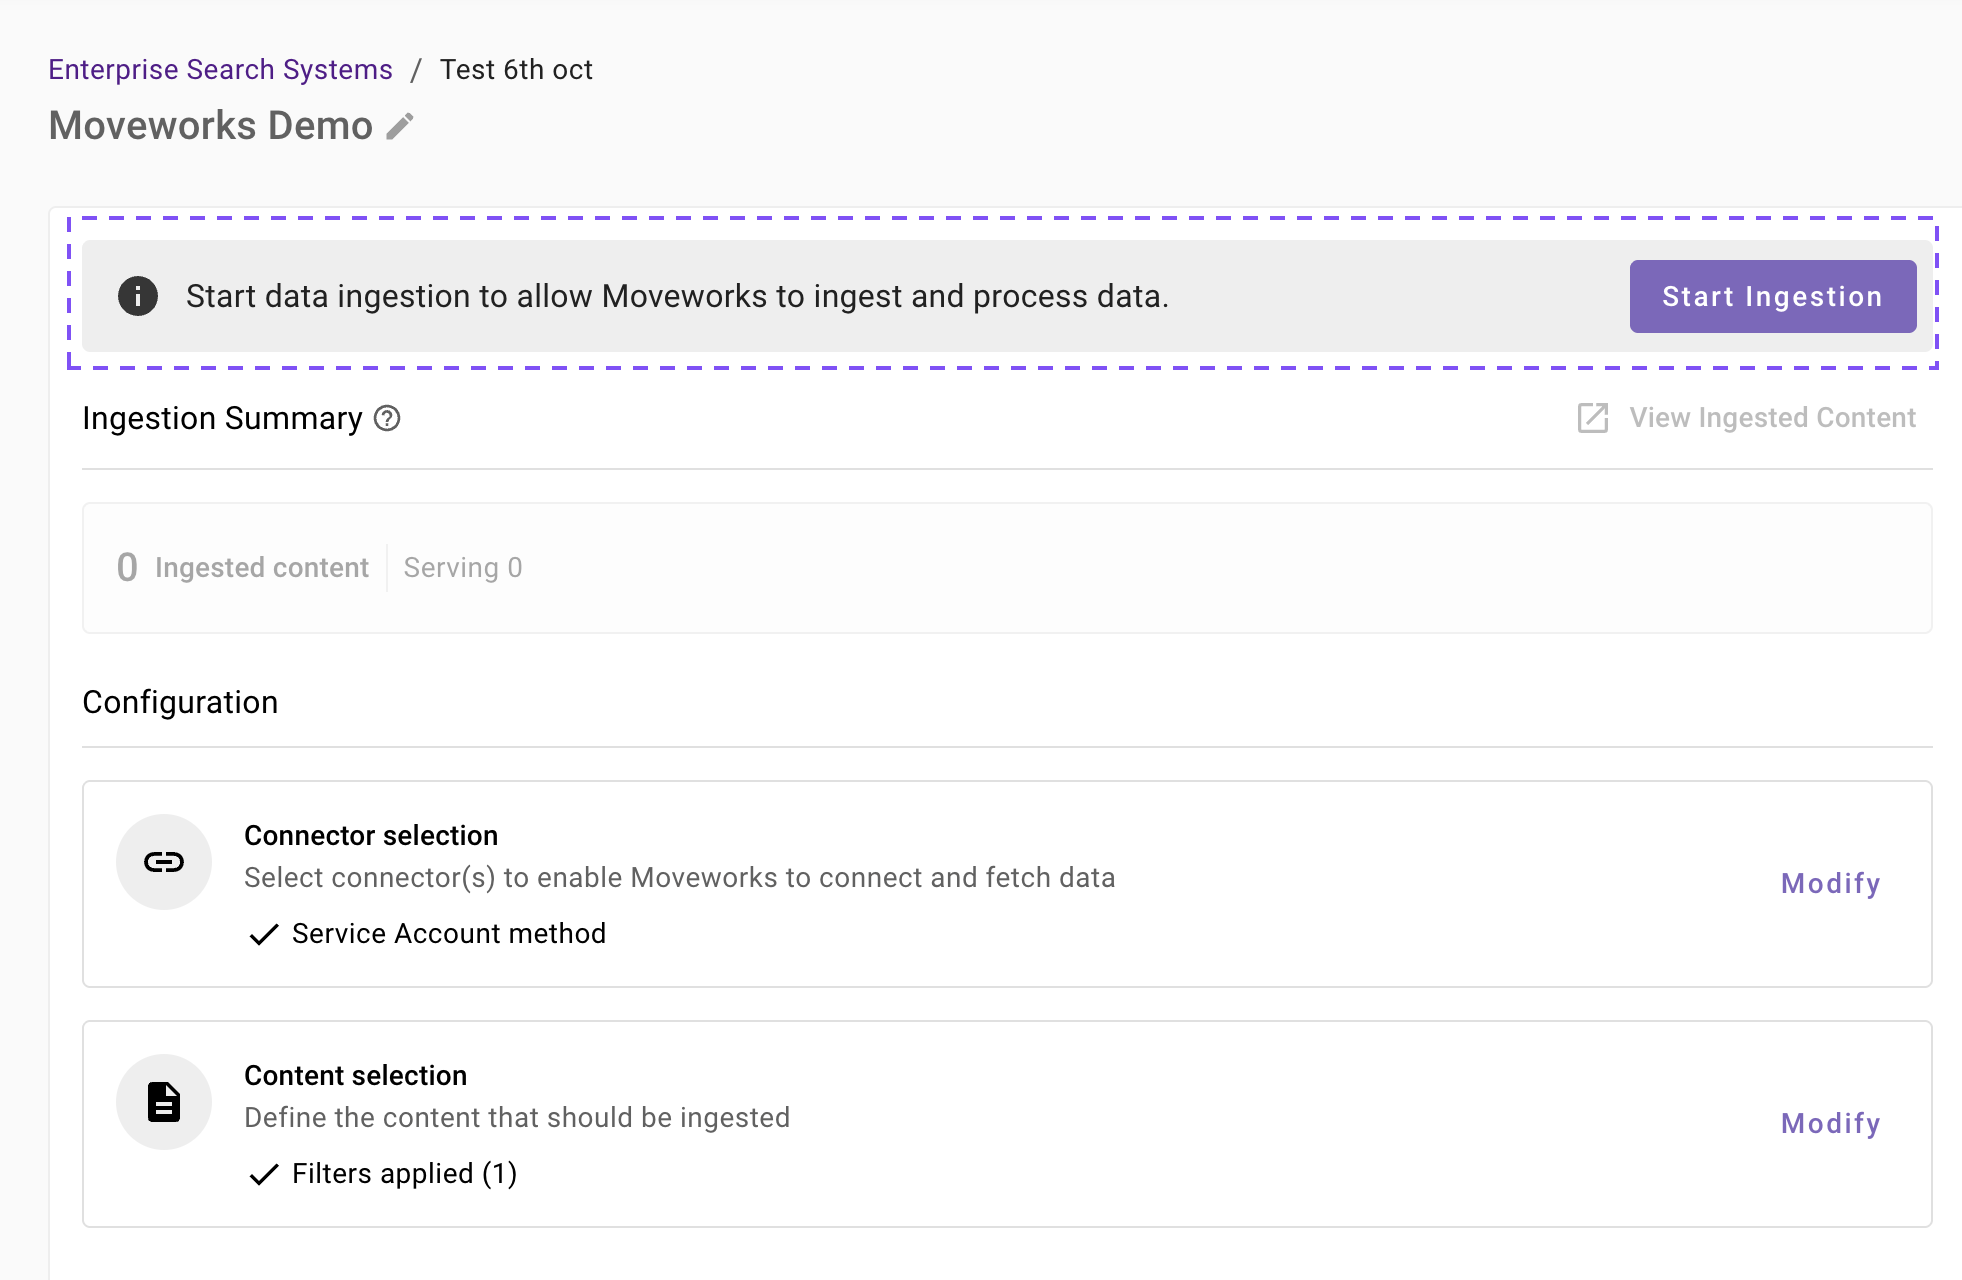
Save and Start Ingestion
Once Space selection is configured, you have two options:
-
Save: Clicking this will just save the configuration and not initiate the first ingestion crawl. Use this option, if you would want to complete your configuration in multiple sessions/ sittings.
-
Once you click on Save, you will be redirected to the Confluence overview screen
-
You will notice a banner that prompts you to Start Ingestion
-
Once you are satisfied with your configuration, you can click on Start Ingestion
-
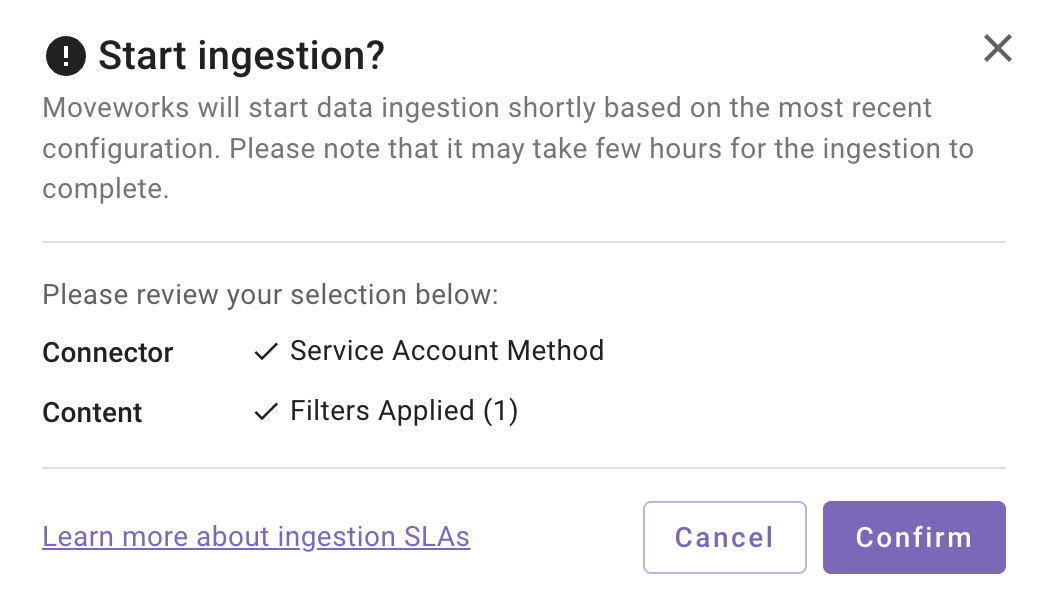
A confirmation popup will come that provides a summary of the configuration
-
Click on Confirm
-
After you click on Confirm, ingestion will start shortly.
-
For the first crawl to complete, this generally takes anywhere from few hours to 48 hours depending upon the size of the data.
-
-
Save and Start Ingestion: Click this option if you have completed and validated your content selection configuration and you are ready to initiate the first ingestion crawl.
-
A confirmation popup will come that provides a summary of the configuration

-
Click on Confirm
-
After you click on Confirm, ingestion will start shortly.
Important Note for Admins:
- It generally takes anywhere from few hours to 48 hours for the first crawl to complete depending upon the size of the data.
- You can review the status of ingestion via Data Ingestion Viewer and view ingested record in the Ingested File and Ingested Knowledge screens.
-
Troubleshooting Connector Validation Failures
This section helps you resolve common issues when validating your Confluence connector in Enterprise Search Configuration. Follow the steps below based on the error message(s) you're experiencing.
Error Message(s):
- "Validation failed: Invalid credentials or missing required scopes."
Possible Causes:
- Service Account is not part of any groups or belongs to groups that lack space access
- API token is expired
- Incorrect authentication credentials (email or API token)
- Connector is not setup correctly
Resolution Steps:
-
Check whether the Confluence connector is setup correctly
- The Base URL is correct and valid of the desired instance and in the format:
https://{your_domain}.atlassian.net/wiki - The email provided is valid
- API token is valid
- The Base URL is correct and valid of the desired instance and in the format:
-
Verify whether API token is not expired
- Go to Atlassian Account Settings → Security → API Tokens
- Confirm the token is active and hasn't expired
- If not, generate a new API token and provide it in the Confluence connector
-
Check Access to Confluence Spaces
- Log into Confluence with your credentials in
{yourdomain}.atlassian.net - Navigate to the spaces you want to bring in
- Confirm whether the desired group is added in the space, has view access and Service account is also present in the group (see via
admin.atlassian.com) - Contact your Confluence admin if you need help
- Log into Confluence with your credentials in
-
Try accessing the Confluence REST API directly
- Go to Moveworks Setup > Connectors > API Playground
- Import the Confluence connector you're using for Enterprise Search
- Test the relevant API endpoint for resources you got the error:
- Content
-
Test:
/rest/api/contentAPIcURL request for reference:
curl --location 'https://{{org_domain}}.atlassian.net/wiki/rest/api/content' \ --header 'Authorization: Basic {{api_key}}' -
Verify the expected result: list of content items returned in the API response
-
- Permissions
-
Test
/rest/api/contentand copy contentId from any content item in the API responsecURL request for reference:
curl --location 'https://{{org_domain}}.atlassian.net/wiki/rest/api/content' \ --header 'Authorization: Basic {{api_key}}' -
Test
/rest/api/content/{contentId}/restrictionusing the copied IDcURL request for reference:
curl --location 'https://{{org_domain}}.atlassian.net/wiki/rest/api/content/{{content_id}}/restriction' \ --header 'Authorization: Basic {{api_key}}' -
Verify the expected result: restriction details returned for the content item in the API response
-
- Groups
- Test:
/rest/api/groupcurl --location 'https://{{org_domain}}.atlassian.net/wiki/rest/api/group' \ --header 'Authorization: Basic {{api_key}}' - Verify the expected result: List of groups returned in the API response
- Test:
- Users
-
Hit
/wiki/rest/api/user/currentand copy the accountIdcURL request for reference
curl --location 'https://{{org_domain}}.atlassian.net/wiki/rest/api/user/current' \ --header 'Authorization: Basic {{api_key}}' -
Hit
/wiki/rest/api/user/memberof?accountId={{account_id}}using the copied account ID and then copy groupId from any group item in the API responsecurl --location 'https://{{org_domain}}.atlassian.net/wiki/rest/api/user/memberof?accountId={{account_id}}' \ --header 'Authorization: Basic {{api_key}}' -
Test
/wiki/rest/api/group/{groupId}/membersByGroupIdcuRL request for reference
curl --location 'https://{{org_domain}}.atlassian.net/wiki/rest/api/group/{{account_id}}/membersByGroupId' \ --header 'Authorization: Basic {{api_key}}' -
Verify the expected result: list of group members returned in the API response
-
- Content
-
Contact Moveworks Support
Reach out to Moveworks Support if the validation error(s) still persist.
Updated about 2 months ago