How To Configure Employee Comms
How To Create a Campaign
Prerequisites
- Ensure you have the appropriate permission to use Moveworks Setup. You can either have admin or user roles assigned in order to modify the audience builder config.
- Ensure the User Identity configurations has been completed.
- Ensure that your Employee Communications tool license is active for the Organisation.
Configuration
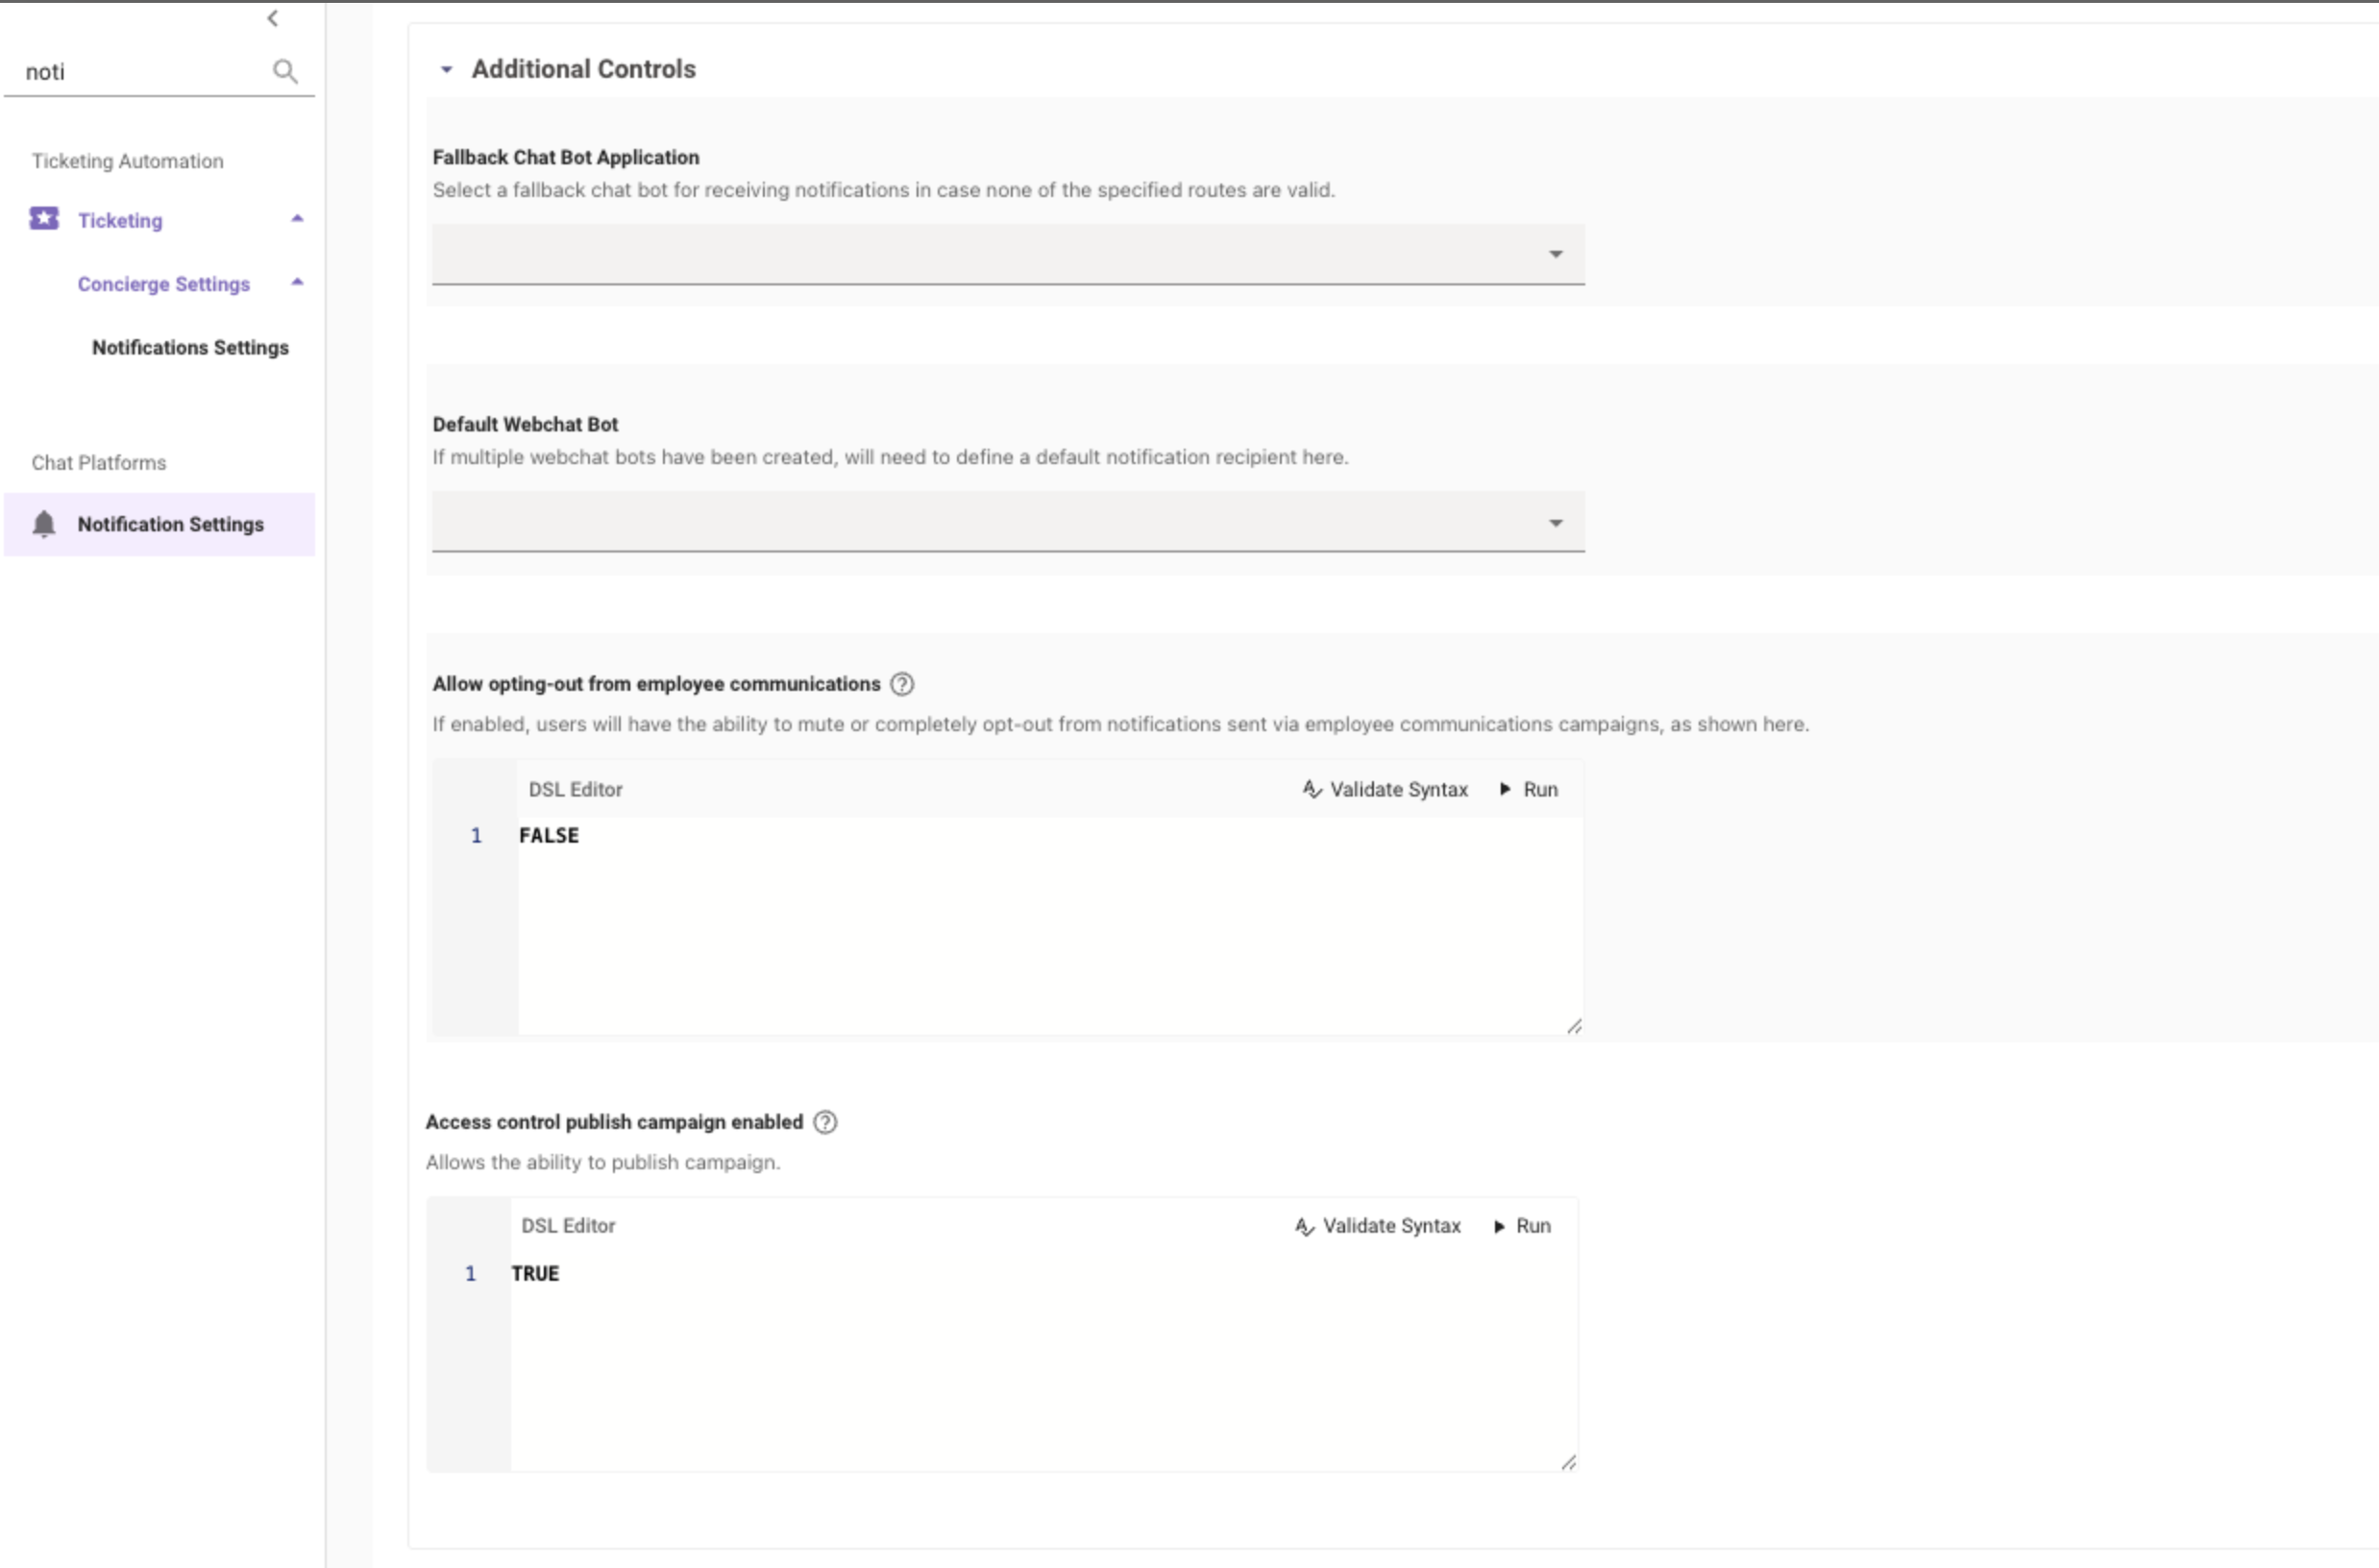
- Before we start creating a Campaign, we need to ensure the Control to allow Publishing of Campaigns is enabled.
-
In order to do this, Navigate to Notification Settings > Employee Comms (Broadcast Settings) > Additional Controls > Access control publish campaign enabled
-
This control can be set to TRUE, and then you can manage the access via roles and permissions on who is allowed to publish campaigns.
-
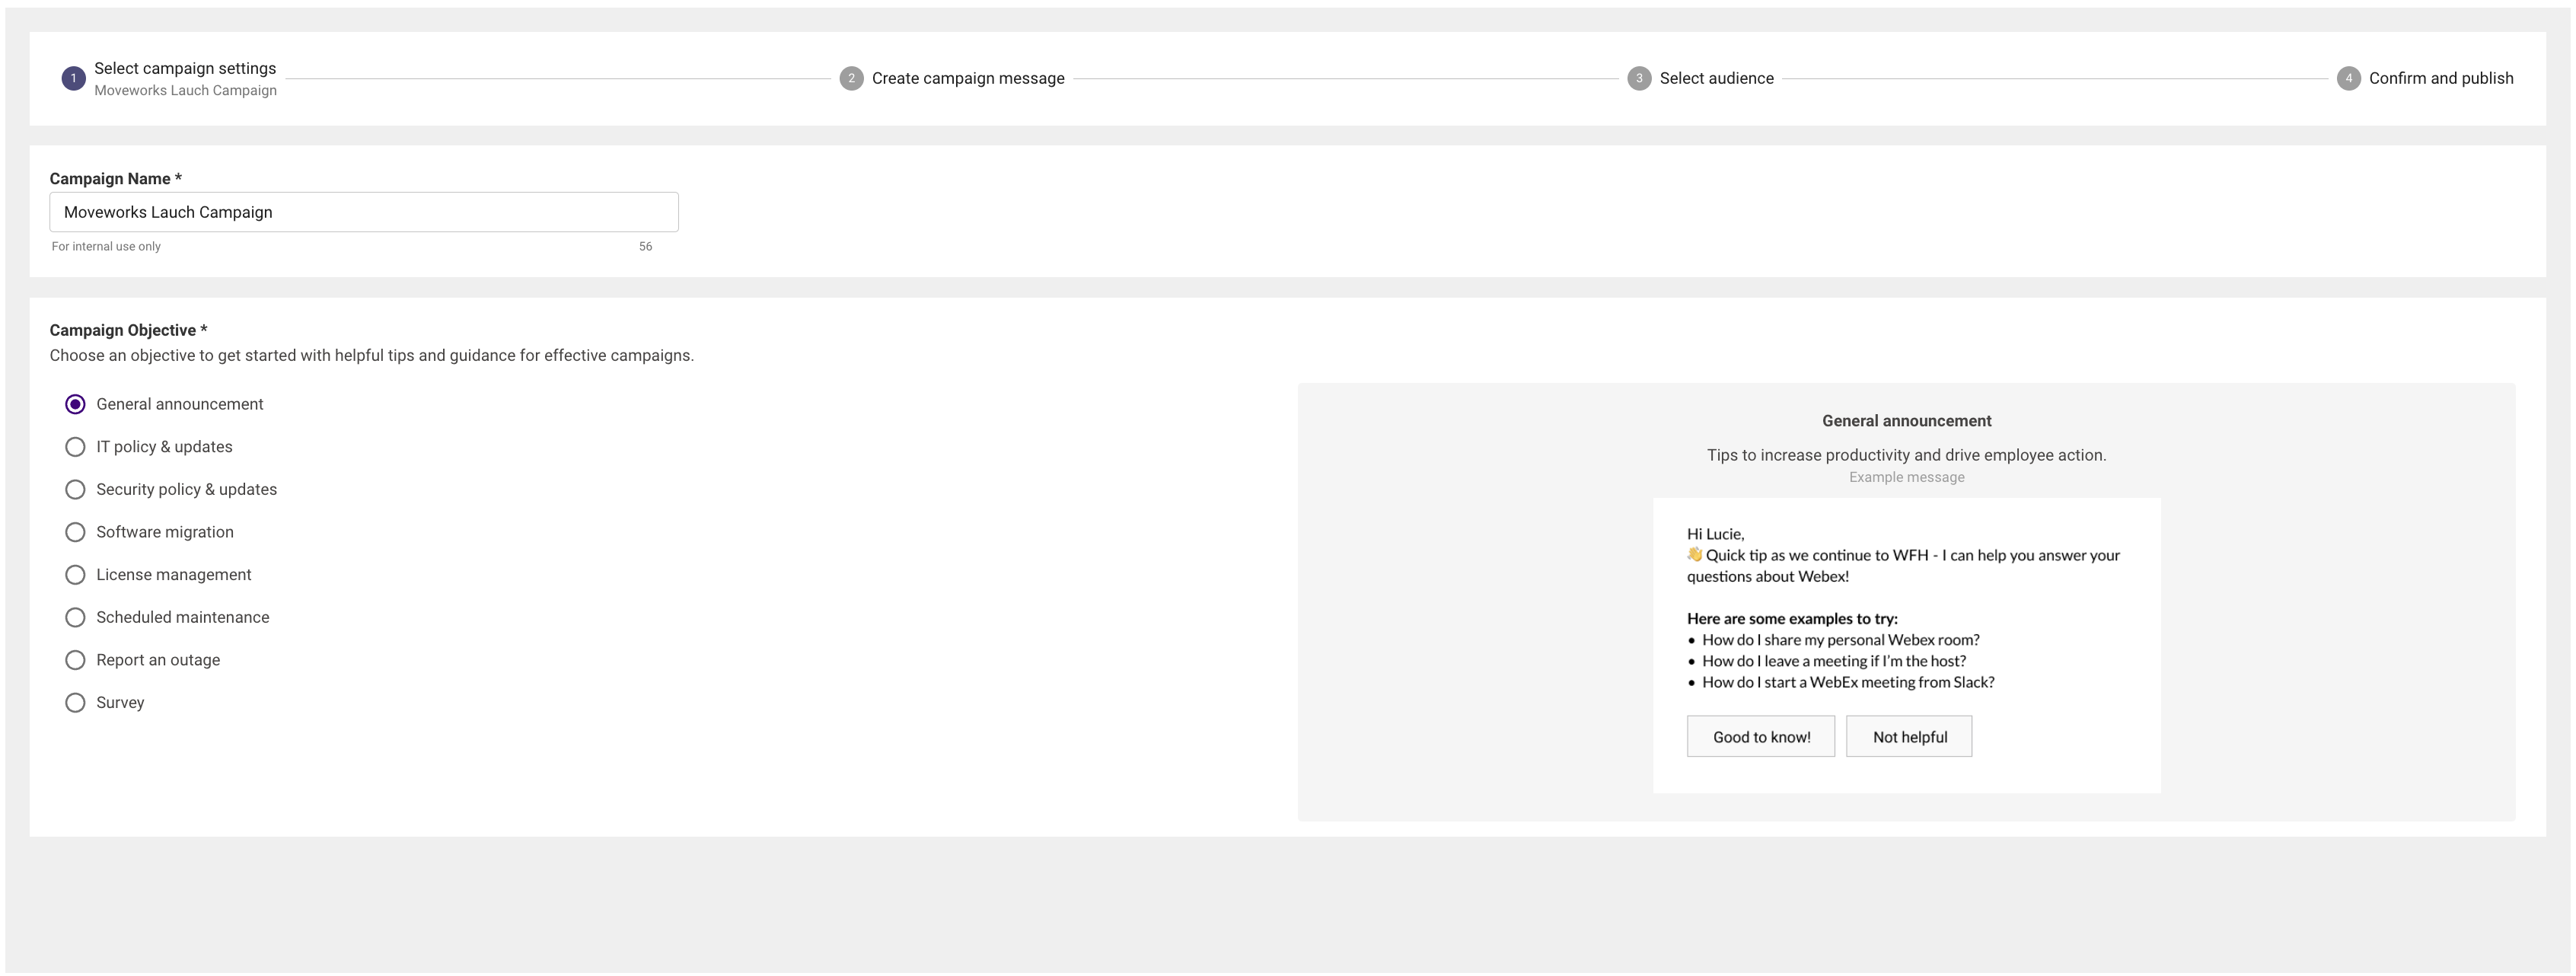
- Start by clicking on the Create Campaign button. This will open the Wizard flow which walks the users through the setup process of setting up a simple campaign.
- Campaign Name - Name of the Campaign.
- Campaign Objective - Choose the objective the campaign will serve on delivery. There is a preset list of types of Objectives which can be selected from. Selecting any one will reflect its preview on the right hand side of the screen. We are selecting General Announcement as an Example.
-
Next we need to define the content of the Campaign Message. The below fields allow us to customise how the message will show up to the user.

- Craft Message: Here you can write and format your campaign message. You can format the text in your message by making parts of it bold or italicized. Additionally, you can also embed links, and add single-tier lists to your campaign message.
Note: When crafting your message avoid using multi-tier or nested list as they are not supported in messages from the Moveworks AI Assistant.
- Add Emojis: Emojis can also be added to your campaign messages. See How can I add emojis? to learn more.
- Upload image (Optional): Here you can upload an image to customize the look of your campaign (jpg, png, gif with file size < 2MB).
- Customize Buttons: Here you can customize buttons and add up to five buttons for users to engage with in the campaign message.
- Button configuration: Here you can configure the button by changing the label or type. Buttons have two types:
- Text response: This type of button results in a follow up text response that can be written below.
- URL redirect: This type of button redirects the user to a new browser window.
- Feedback: This type of button allows users to give additional input directly in chat.
- Button configuration: Here you can configure the button by changing the label or type. Buttons have two types:
- Craft Message: Here you can write and format your campaign message. You can format the text in your message by making parts of it bold or italicized. Additionally, you can also embed links, and add single-tier lists to your campaign message.
Note: When crafting your message avoid using multi-tier or nested list as they are not supported in messages from the Moveworks AI Assistant.
-
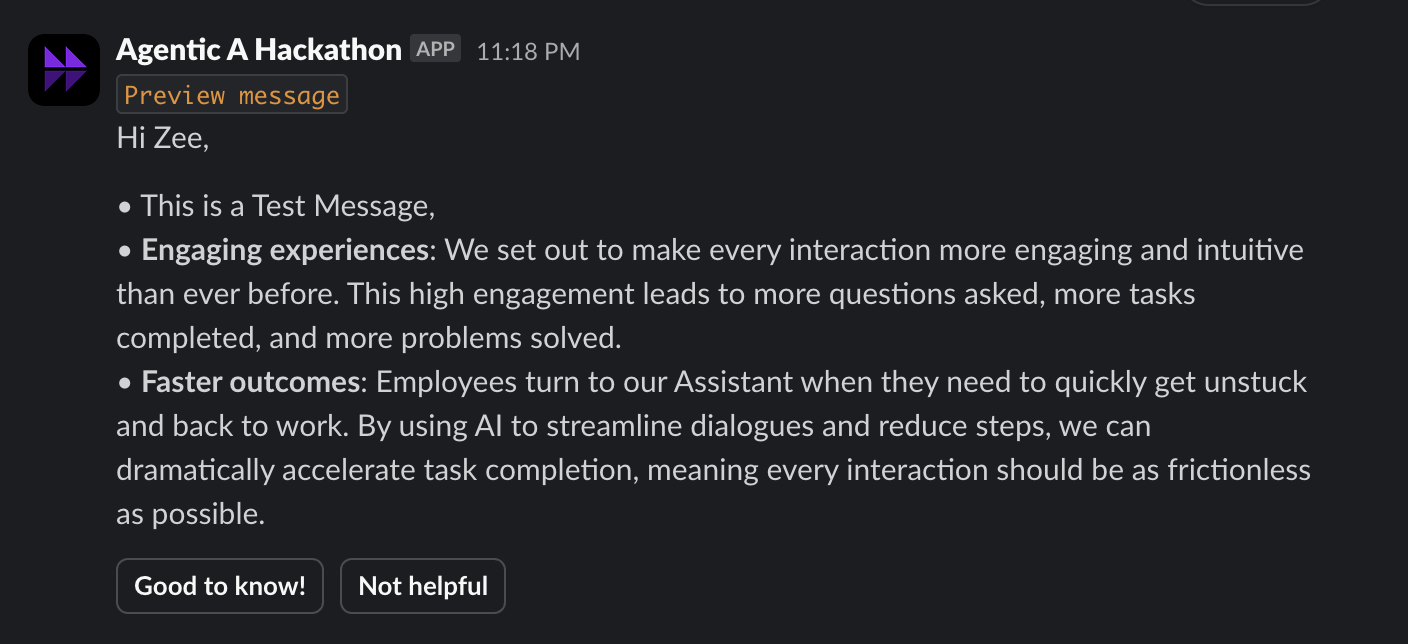
Before moving forward and selecting the Target audience for this campaign, we need to Preview this message in Moveworks AI Assistant in order to ensure the defined campaign looks good.
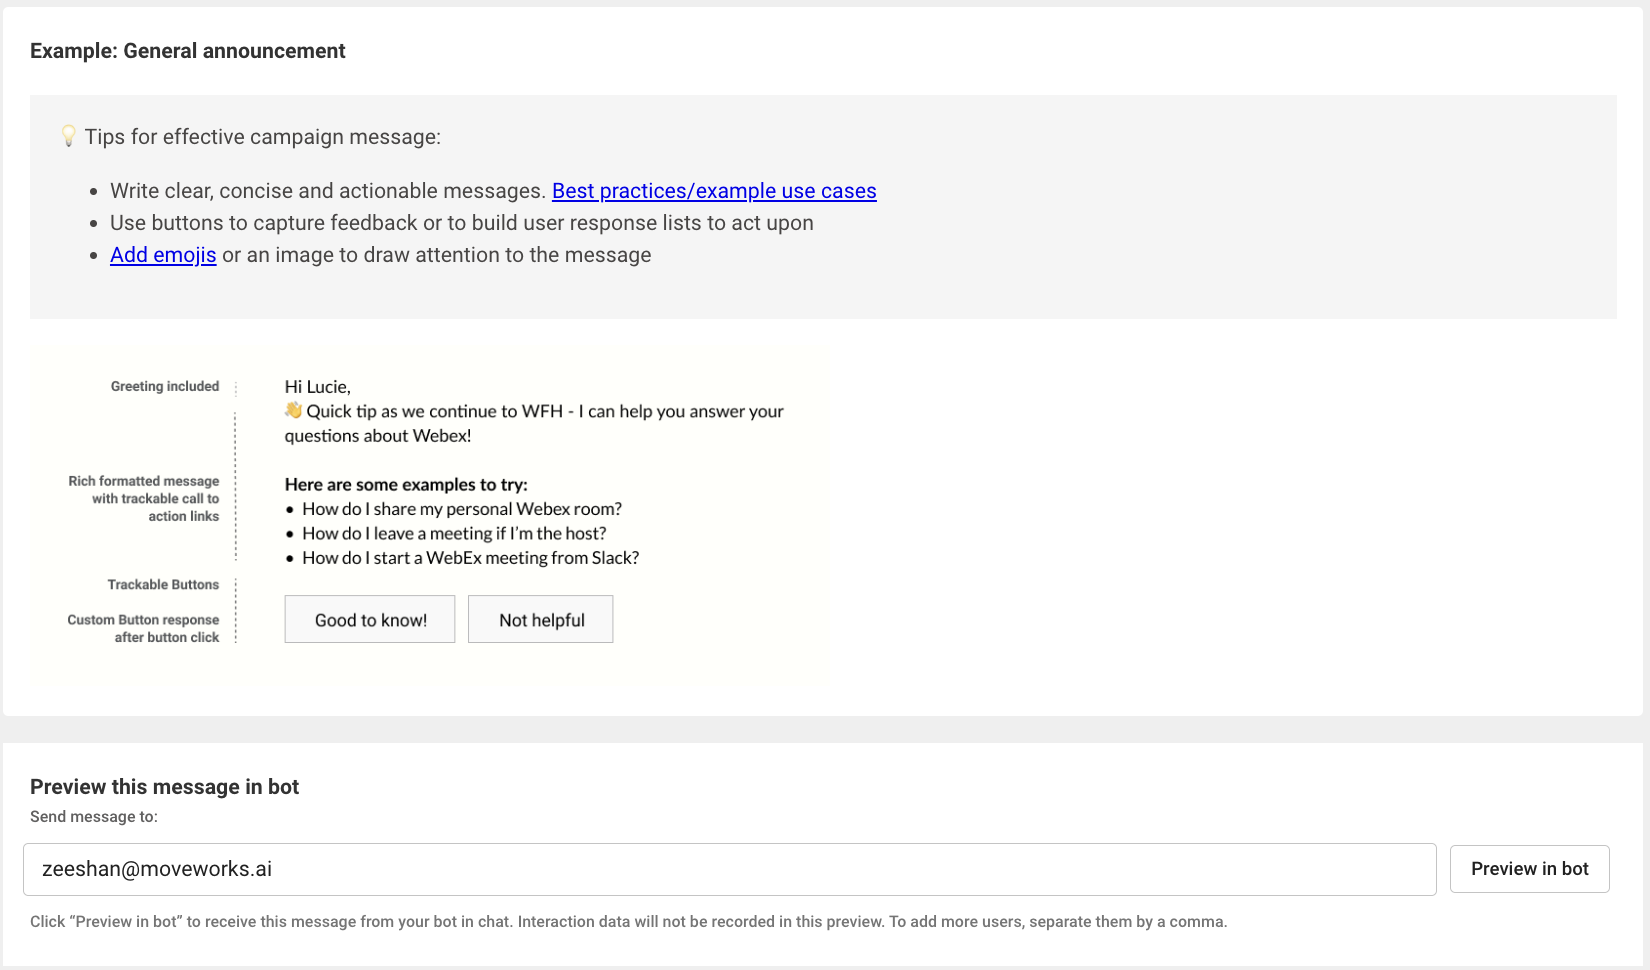
- To view your message in chat before sending it out to your audience, enter your email or other users’ emails, and click on Preview in Moveworks AI Assistant, to have the Moveworks AI Assistant send a preview of your campaign message. To add more than one user, separate each email with a comma.
- For organizations with on-the-fly translation, messages sent in Preview mode will be dynamically translated to the user’s preferred language. This is a suggested practice in order to verify the translation quality before sending the message out to a broader audience.
You cannot progress without previewing your message in Moveworks AI AssistantAny interactions with the preview message are not recorded for the purposes of analytics.
-
Once the preview has been tested we can move to the Select Audience step. This is where Moveworks builds the audience of employees that will be selected to deliver the communications. This configuration is essential to make sure that the right set of people receive the message at the selected date and time.
-
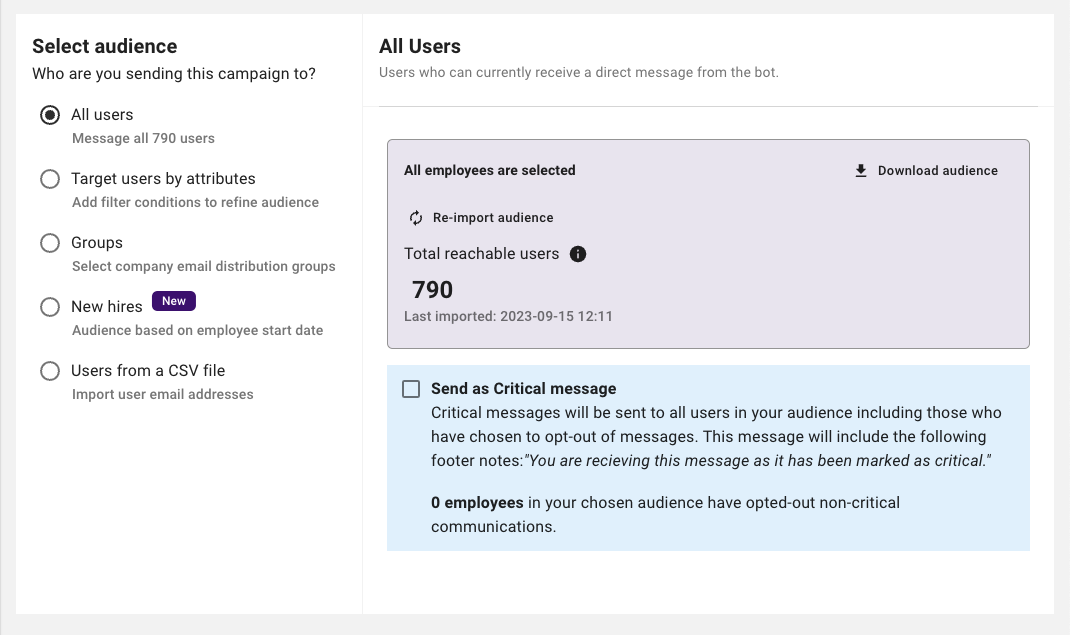
Select All users to send the campaign to all users who can currently receive a direct message from your Moveworks AI Assistant.
-
The number of total reachable users include all users who will receive this campaign as a direct message in chat. It does not include users who have set their personal notification preferences to opt-out of non-critical communications. The number of users who have done so and have muted notifications is shown below.
Note: You can refresh the total audience the message will reach by clicking on the Re-import audience button.
-
Download audience: You can click on Download audience to download a CSV file containing a list of all your users, along with various identity attributes the Moveworks AI Assistant has been able to pull from integrated systems. This data can be leveraged to confirm which users the Moveworks AI Assistant is able to chat with as well as filter by attributes such as role, location, and department to create custom audiences for your next campaign.
-
-
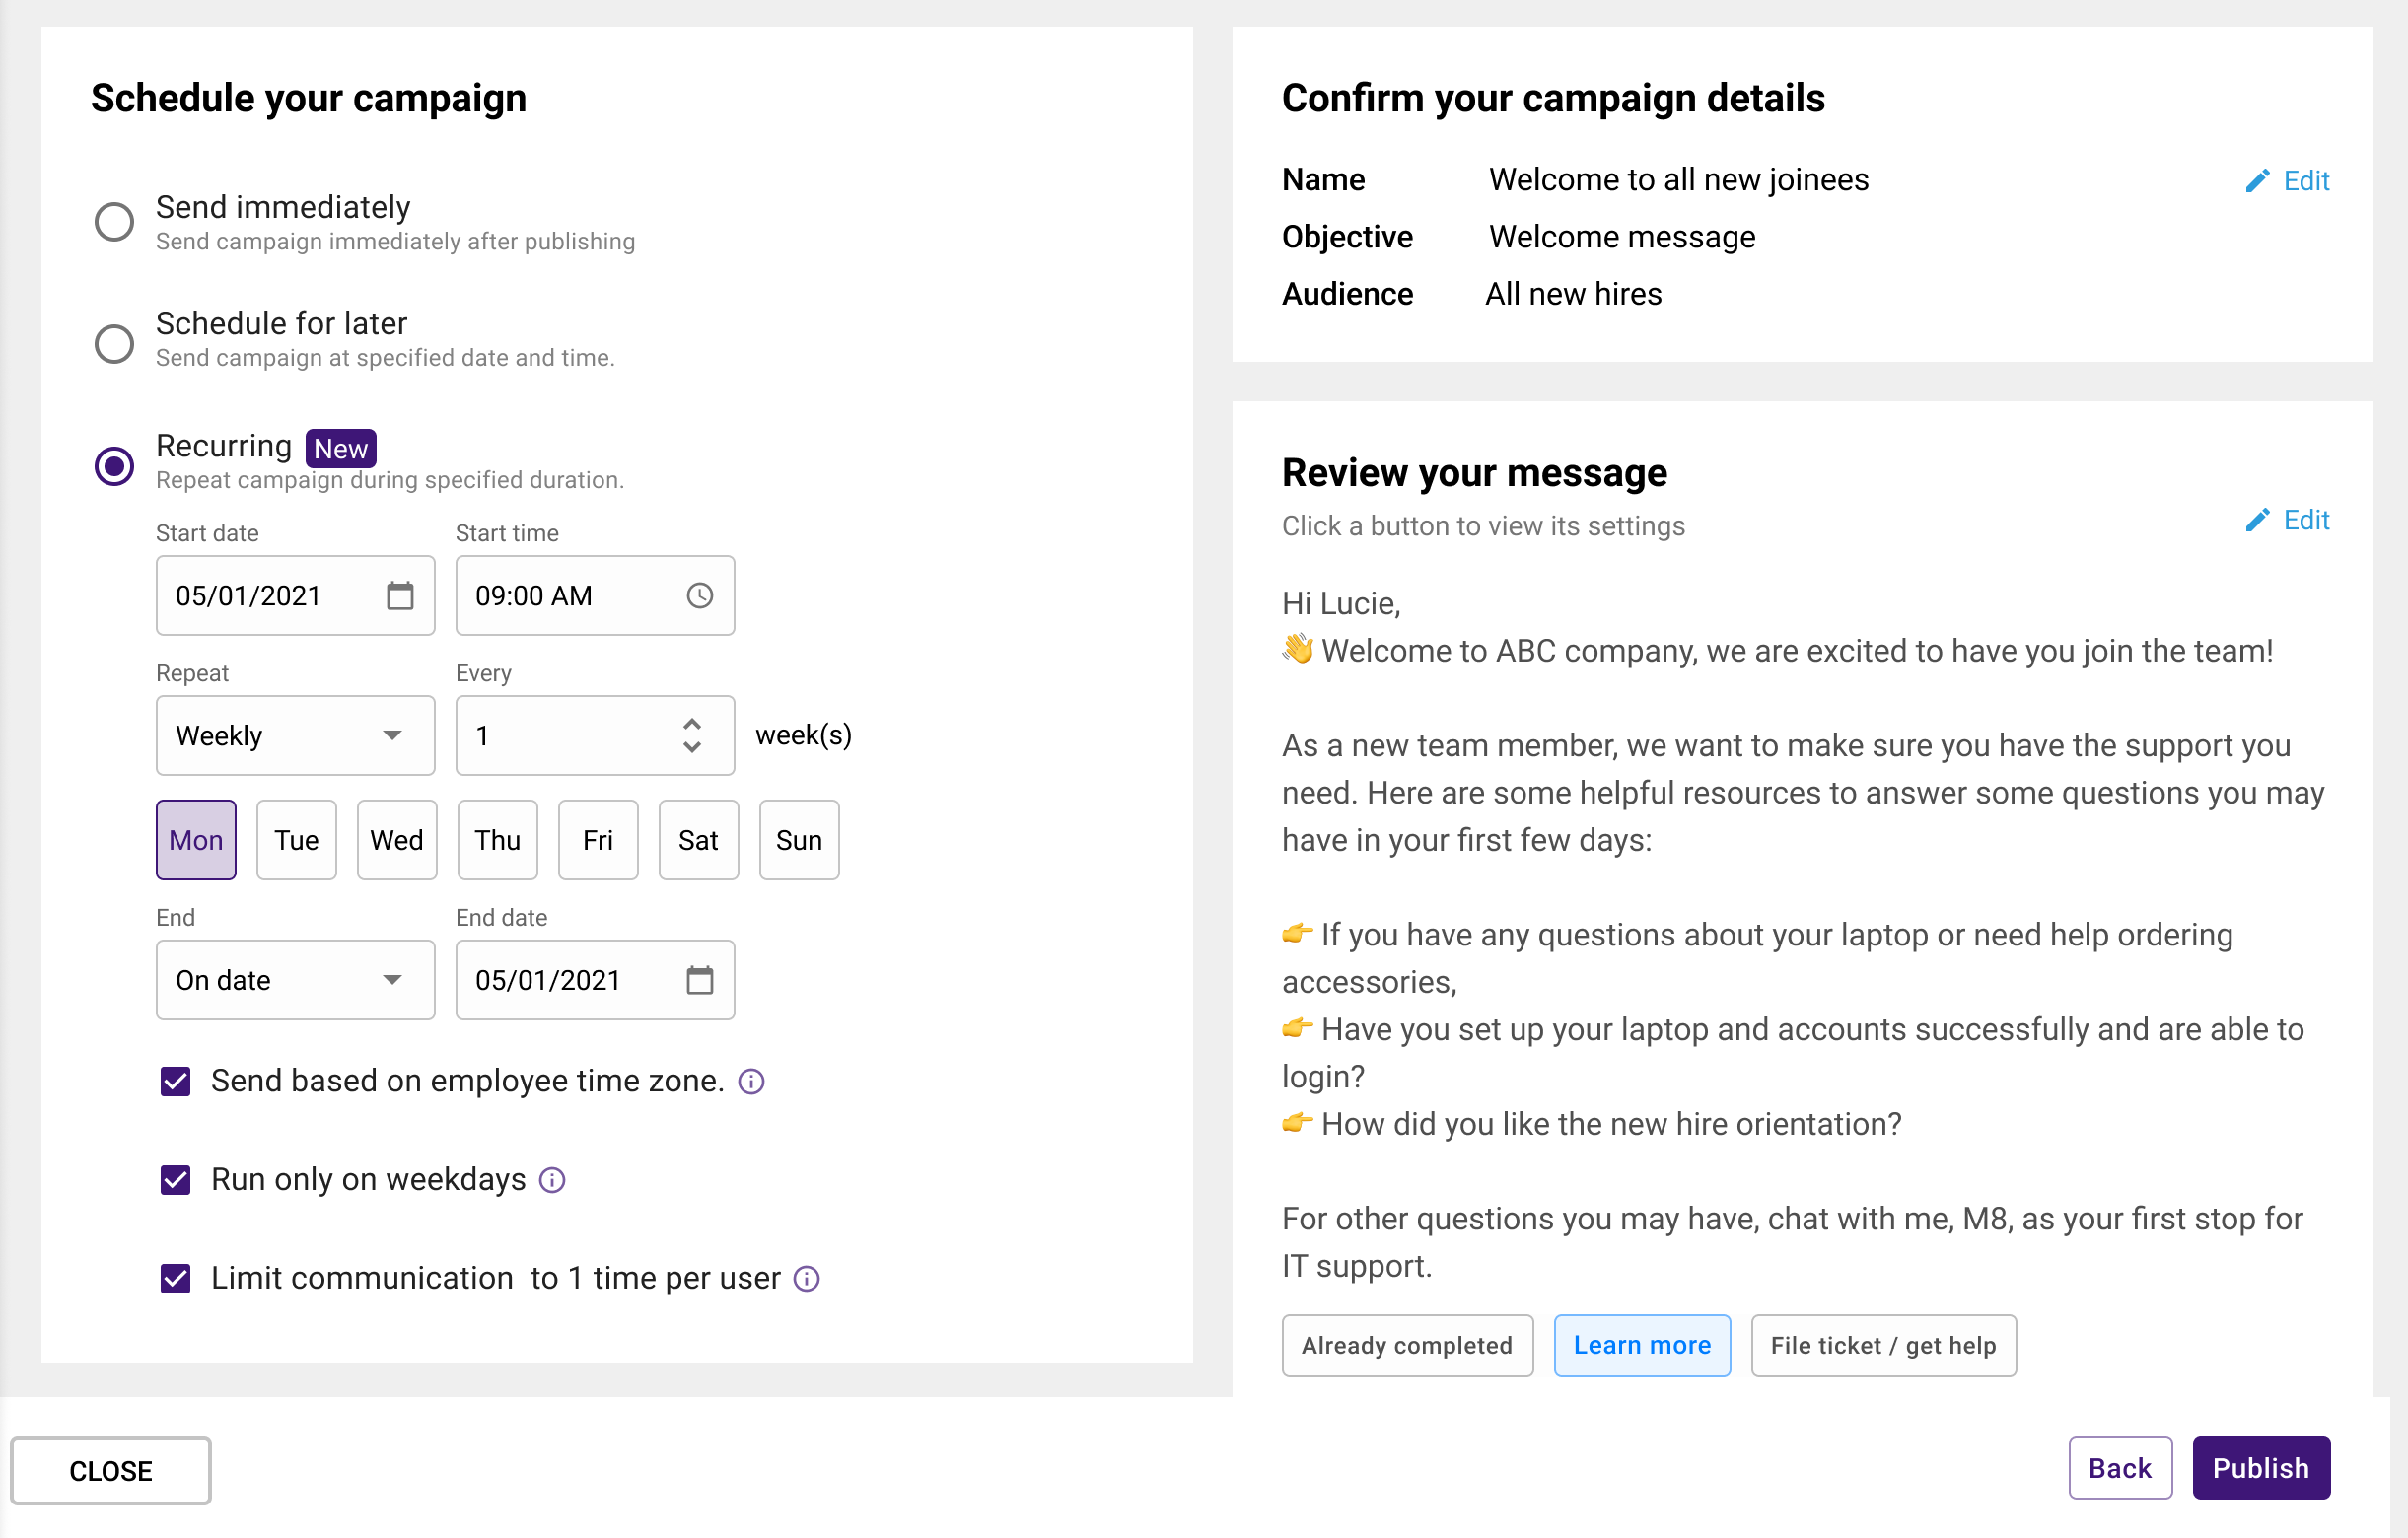
After the Audience has been selected, You can schedule when your campaign will be sent out by the below publishing options :
-
Send immediately: If you select this option your campaign will be sent out immediately after you click on Confirm and Publish.
-
Scheduled for later: If you select this option your campaign will be sent out at the date and time you specify.
-
Recurring Campaign: Selecting this option lets you communicate information that needs to be broadcasted periodically to all users or certain subsets of users (e.g. new hires). This could be helpful for notifying users of tasks or events that occur on a regular cadence. Recurring campaigns can be scheduled to occur daily, weekly, monthly or yearly. After you set a start date for the campaign, you have the option to pick an end date or set it as an infinite campaign, which means there’s no end date and the campaign message will be sent continuously at the chosen cadence. For example: if you create a weekly recurring campaign that is an infinite campaign, the campaign message will be sent weekly to the selected users continuously until the campaign is manually ended.
- Confirm your campaign details: Here you can review your campaign’s name, objective, and audience.
- Review your message: Here you can review your campaign’s final message as it would be presented to the User.
-
Validation
Once the campaign has been delivered to the users based on the Schedule described, you should see the campaign message in the AI Assistant like below.
How To Configure Audiences for Campaigns
Prerequisites
- Ensure you have the appropriate permission to use Moveworks Setup. You can either have admin or user roles assigned in order to modify the audience builder config.
- Ensure the User Identity configurations has been completed.
- Ensure that your Employee Communications tool license is active for the Organisation.
Configuration
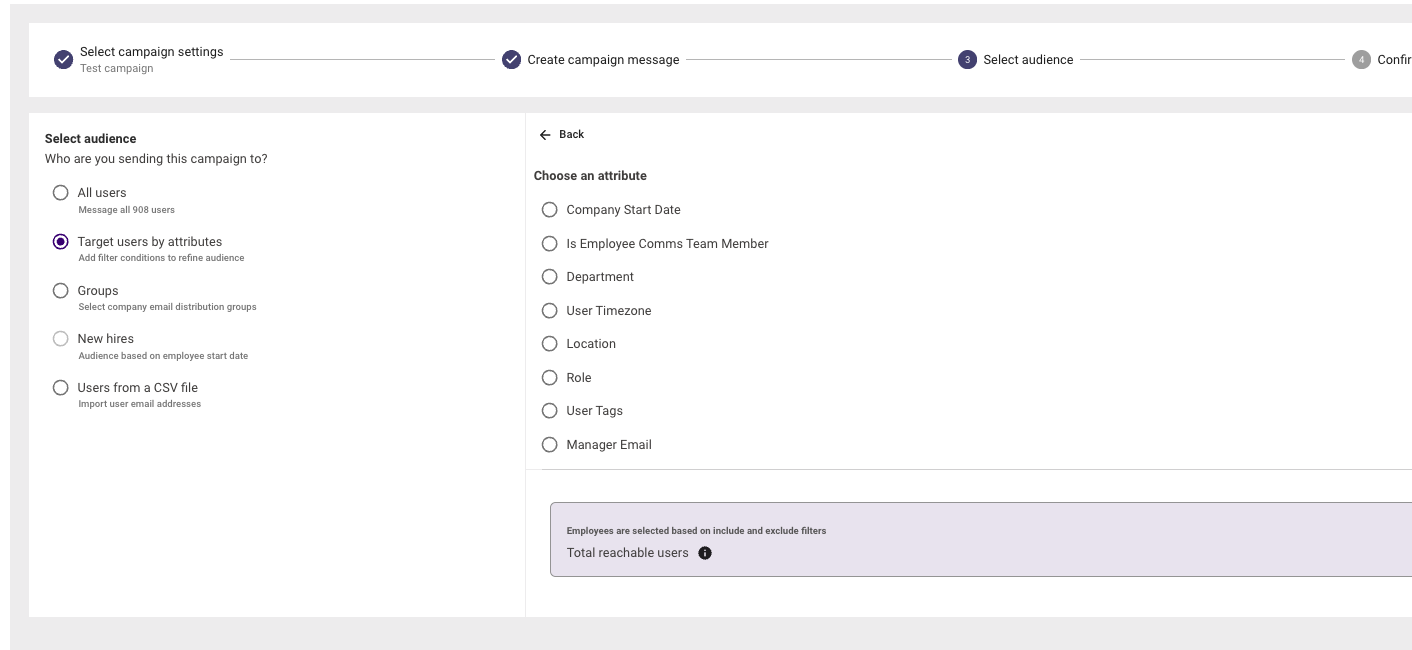
This guide walks you through how to select the target audience for a Campaign so it can be delivered to those users. This is done in the the Select Audience using the below methods.
All users
This is selected when we need to send the campaign to all users who can currently receive a direct message from the Moveworks AI Assistant.
In order to get the accurate count of Total reachable users we can click the Reimport audience button which will do a live check and pull the set of user which are currently reachable by the Moveworks AI Assistant. Note : You can also choose to Download the audience to do a check across who are the users.
Target users by attributes
This option is used to filter out which users the campaign will reach. You can create filters by leveraging ingested user attributes such as department, location, or other user meta data. This can be done by clicking on Advanced filters, then + Add New Condition by picking from the list of attributes to include or exclude users with this attribute from receiving the message.
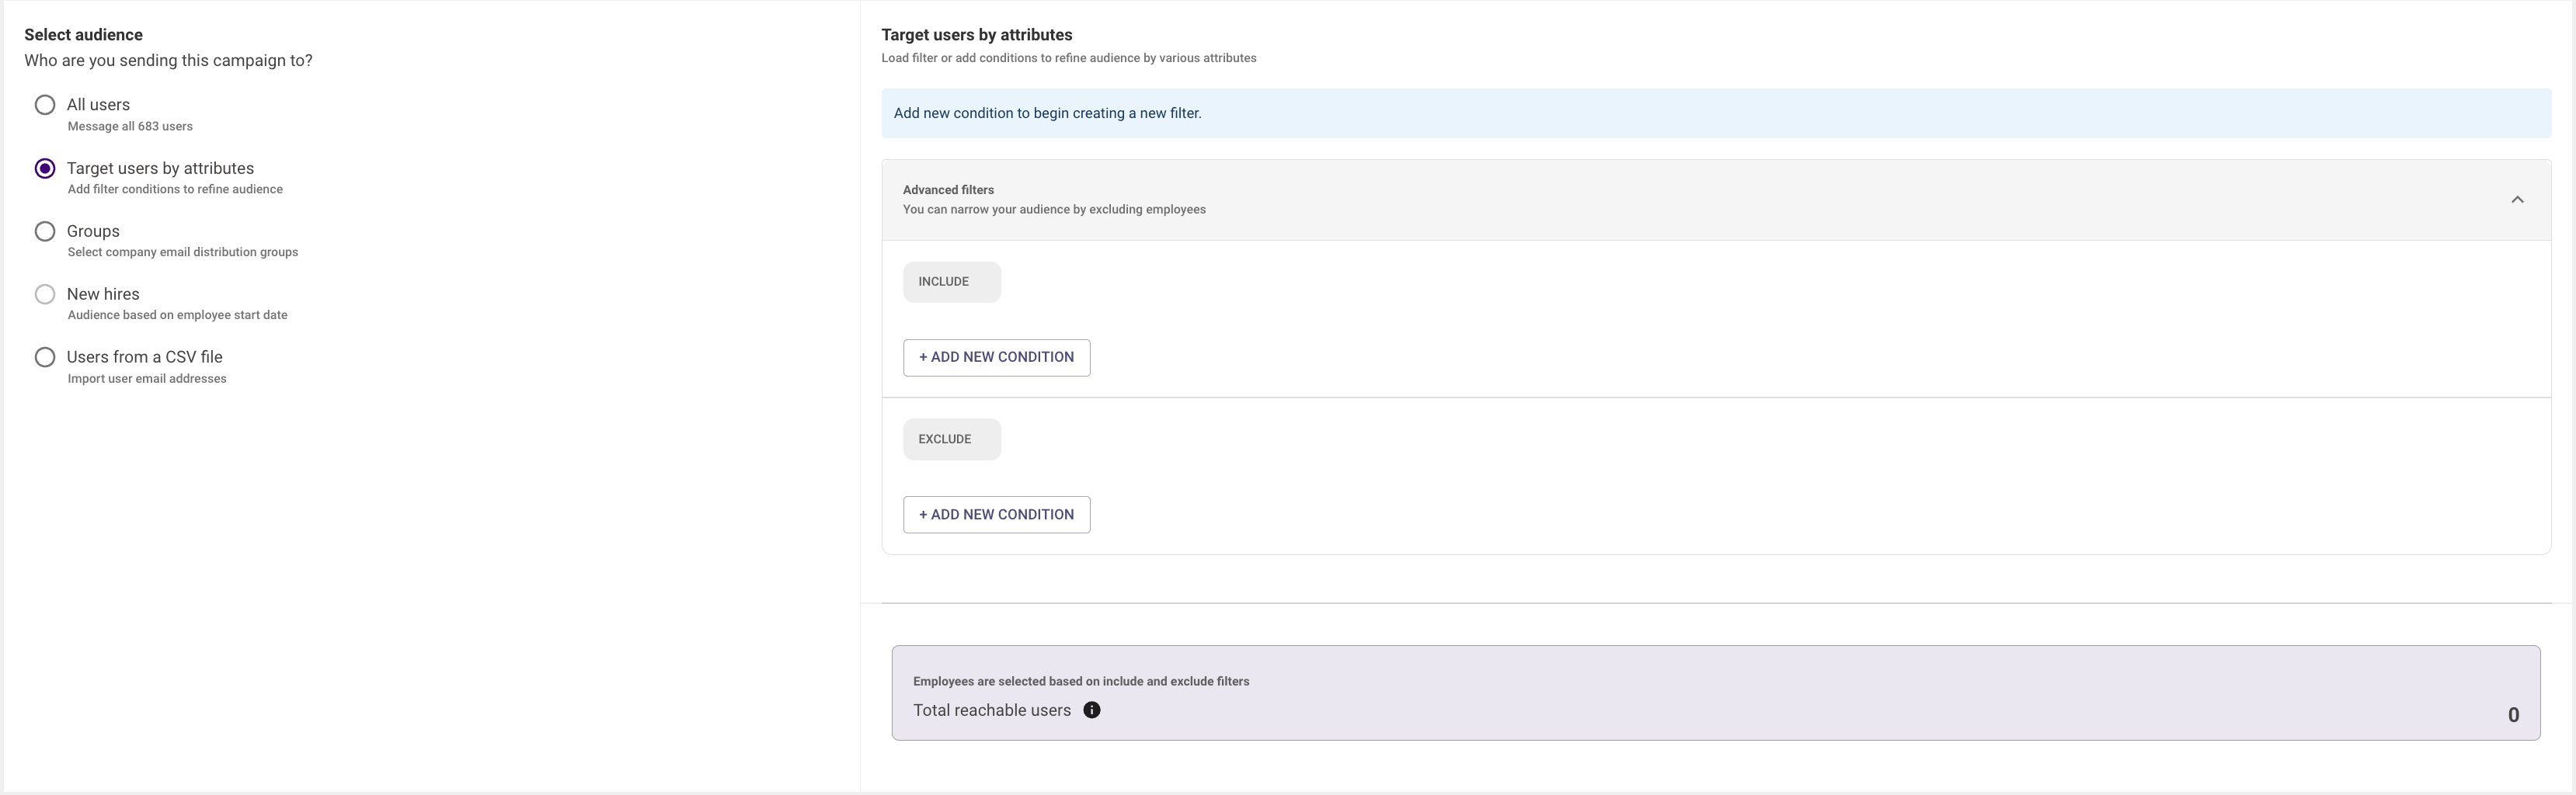
Clicking on either type of condition will display a list of attributes you can use to build the rule. In this example, we are selecting Department and Email Address. Note: The conditions added will form an AND rule.

Note: The attributes available come from the applications that have been integrated with your Moveworks AI Assistant. To add more attributes, please ensure the Attribute is part of the list of user attributes supported by Moveworks which is defined here and you can then follow this guide on How to create a Custom Attribute if one does not exist in the list.
Groups
This option can be chosen if you have email distribution groups within your organization, Moveworks can ingest these group details like the members of the group and use is as the audience for your campaign. Your campaign will then only reach the users in the distribution group you chose.
Moveworks currently supports ingesting groups from Google Suite, MS Graph, Active Directory and MS Exchange.Follow the Access requirements guide here for each of these integrations.
The Group name can be searched in the dropdown, if you have setup Group ingestion as called out here you should see the organisation groups listing here.
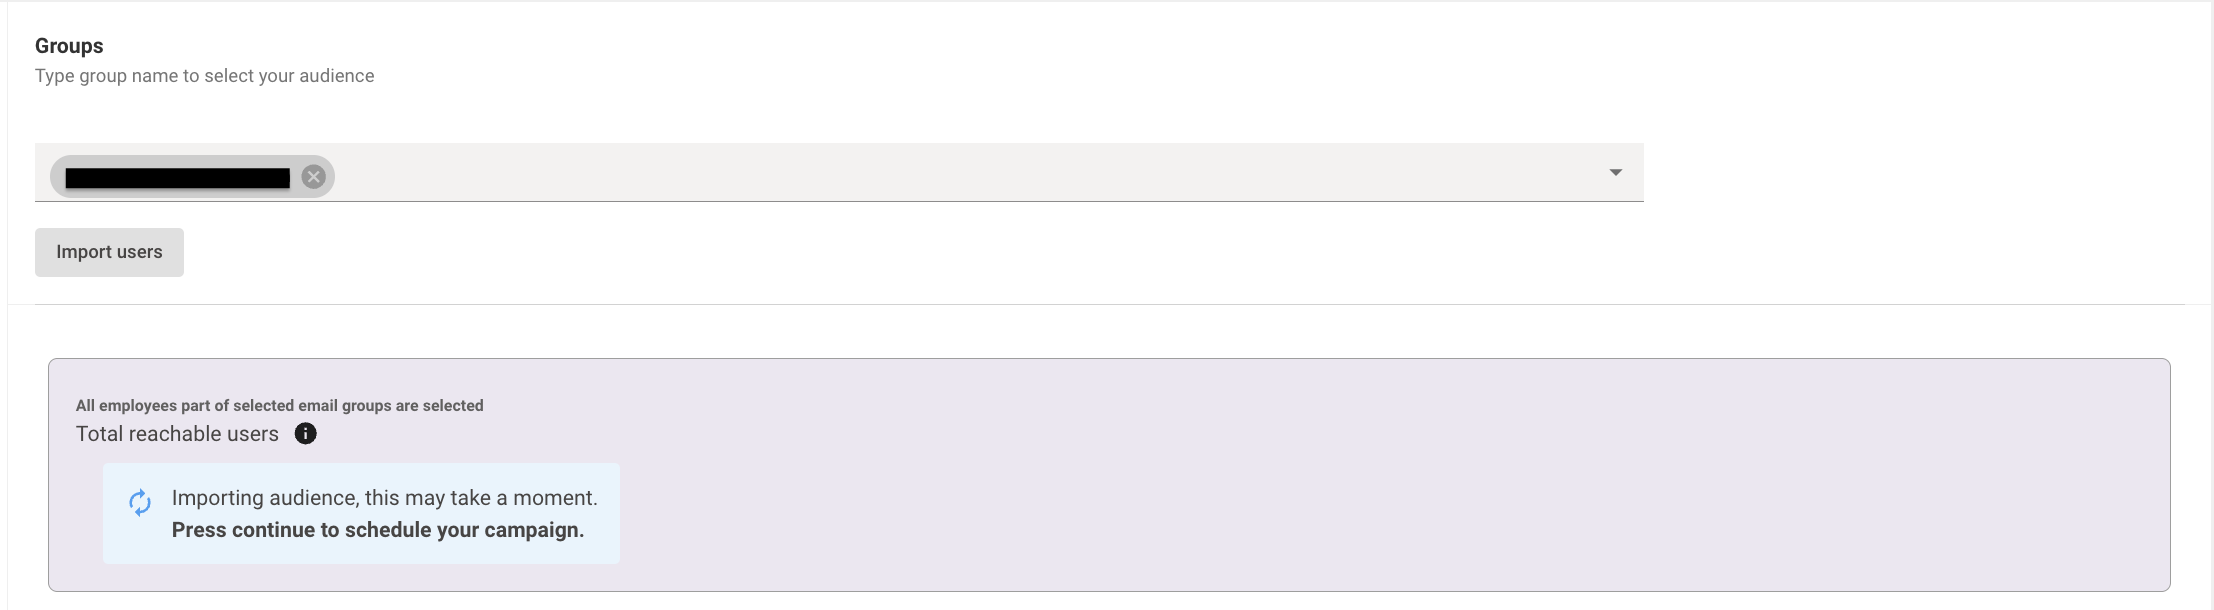
Please ensure to click on Import users so it was fetch the users from the Group and provide a count of Total reachable users.
New Hires
This option allows you to select new employees and the amount of time they have been with the organisation to build the audience who the campaign will be delivered to.
Note : The New Hire option might be greyed out if the below prerequisite has not been completed.
Prerequisite
In order to use this feature, We will need to ingest the start date of the employees from your database into the Moveworks identity system and map it to the field employee_start_date_ts.
Please follow this Guide on How To Ingest Employee Start Date. On the steps mentioned in the Guide have been completed the New Hire option will now be available to select.
You can configure the amount of days a new hire has to have completed since their start date to receive the campaign message by clicking on the dropdown New hire completing.

New hires will receive the message on the next day of completing the specified number of days in the organisation. Example: If the selected audience is new hires completing 4 days then they will receive the message on their 5th day.
You can also further add filters to the selected Audience to ensure the message is delivered from a specific department, location, etc., by clicking on Advanced filters. Follow the steps defined here to learn how to add filters to the audience.
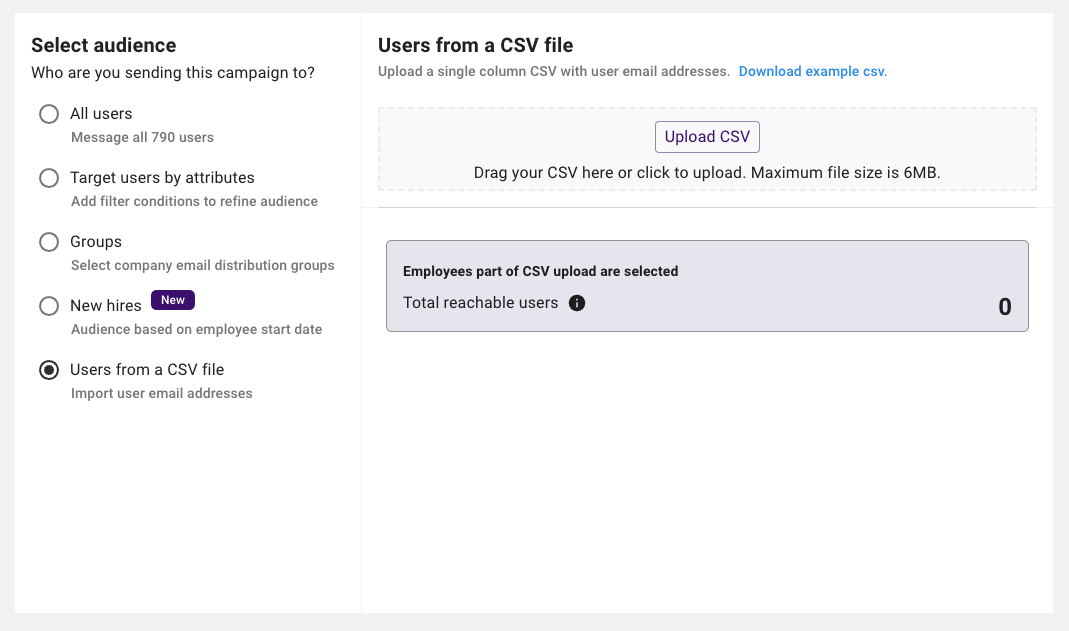
Users from a CSV File
Choosing this option allows the user to upload a single column CSV file with the email address of the user’s you’d like your campaign to reach. The users in this CSV file will be the audience for your campaign.
To ensure proper formatting, you can download a sample CSV file directly from the recipient configuration page. Once the CSV with your intended emails has been uploaded, Moveworks will will generate a count of the users who are reachable by the AI Assistant and thus will receive the campaign.
How To Check Campaign Engagement and Analytics
Prerequisites
- Ensure you have the appropriate permission to use Moveworks Setup. You can either have admin or user roles assigned in order to look at Engagement Analytics.
- Ensure Campaigns have been created and successfully completed running in order to check the analytics.
Walkthrough
On this page you can see a summary of the campaign’s details including the name, objective, status, audience, whether a campaign is recurring and its frequency when the campaign was published and who the campaign was created and published by.
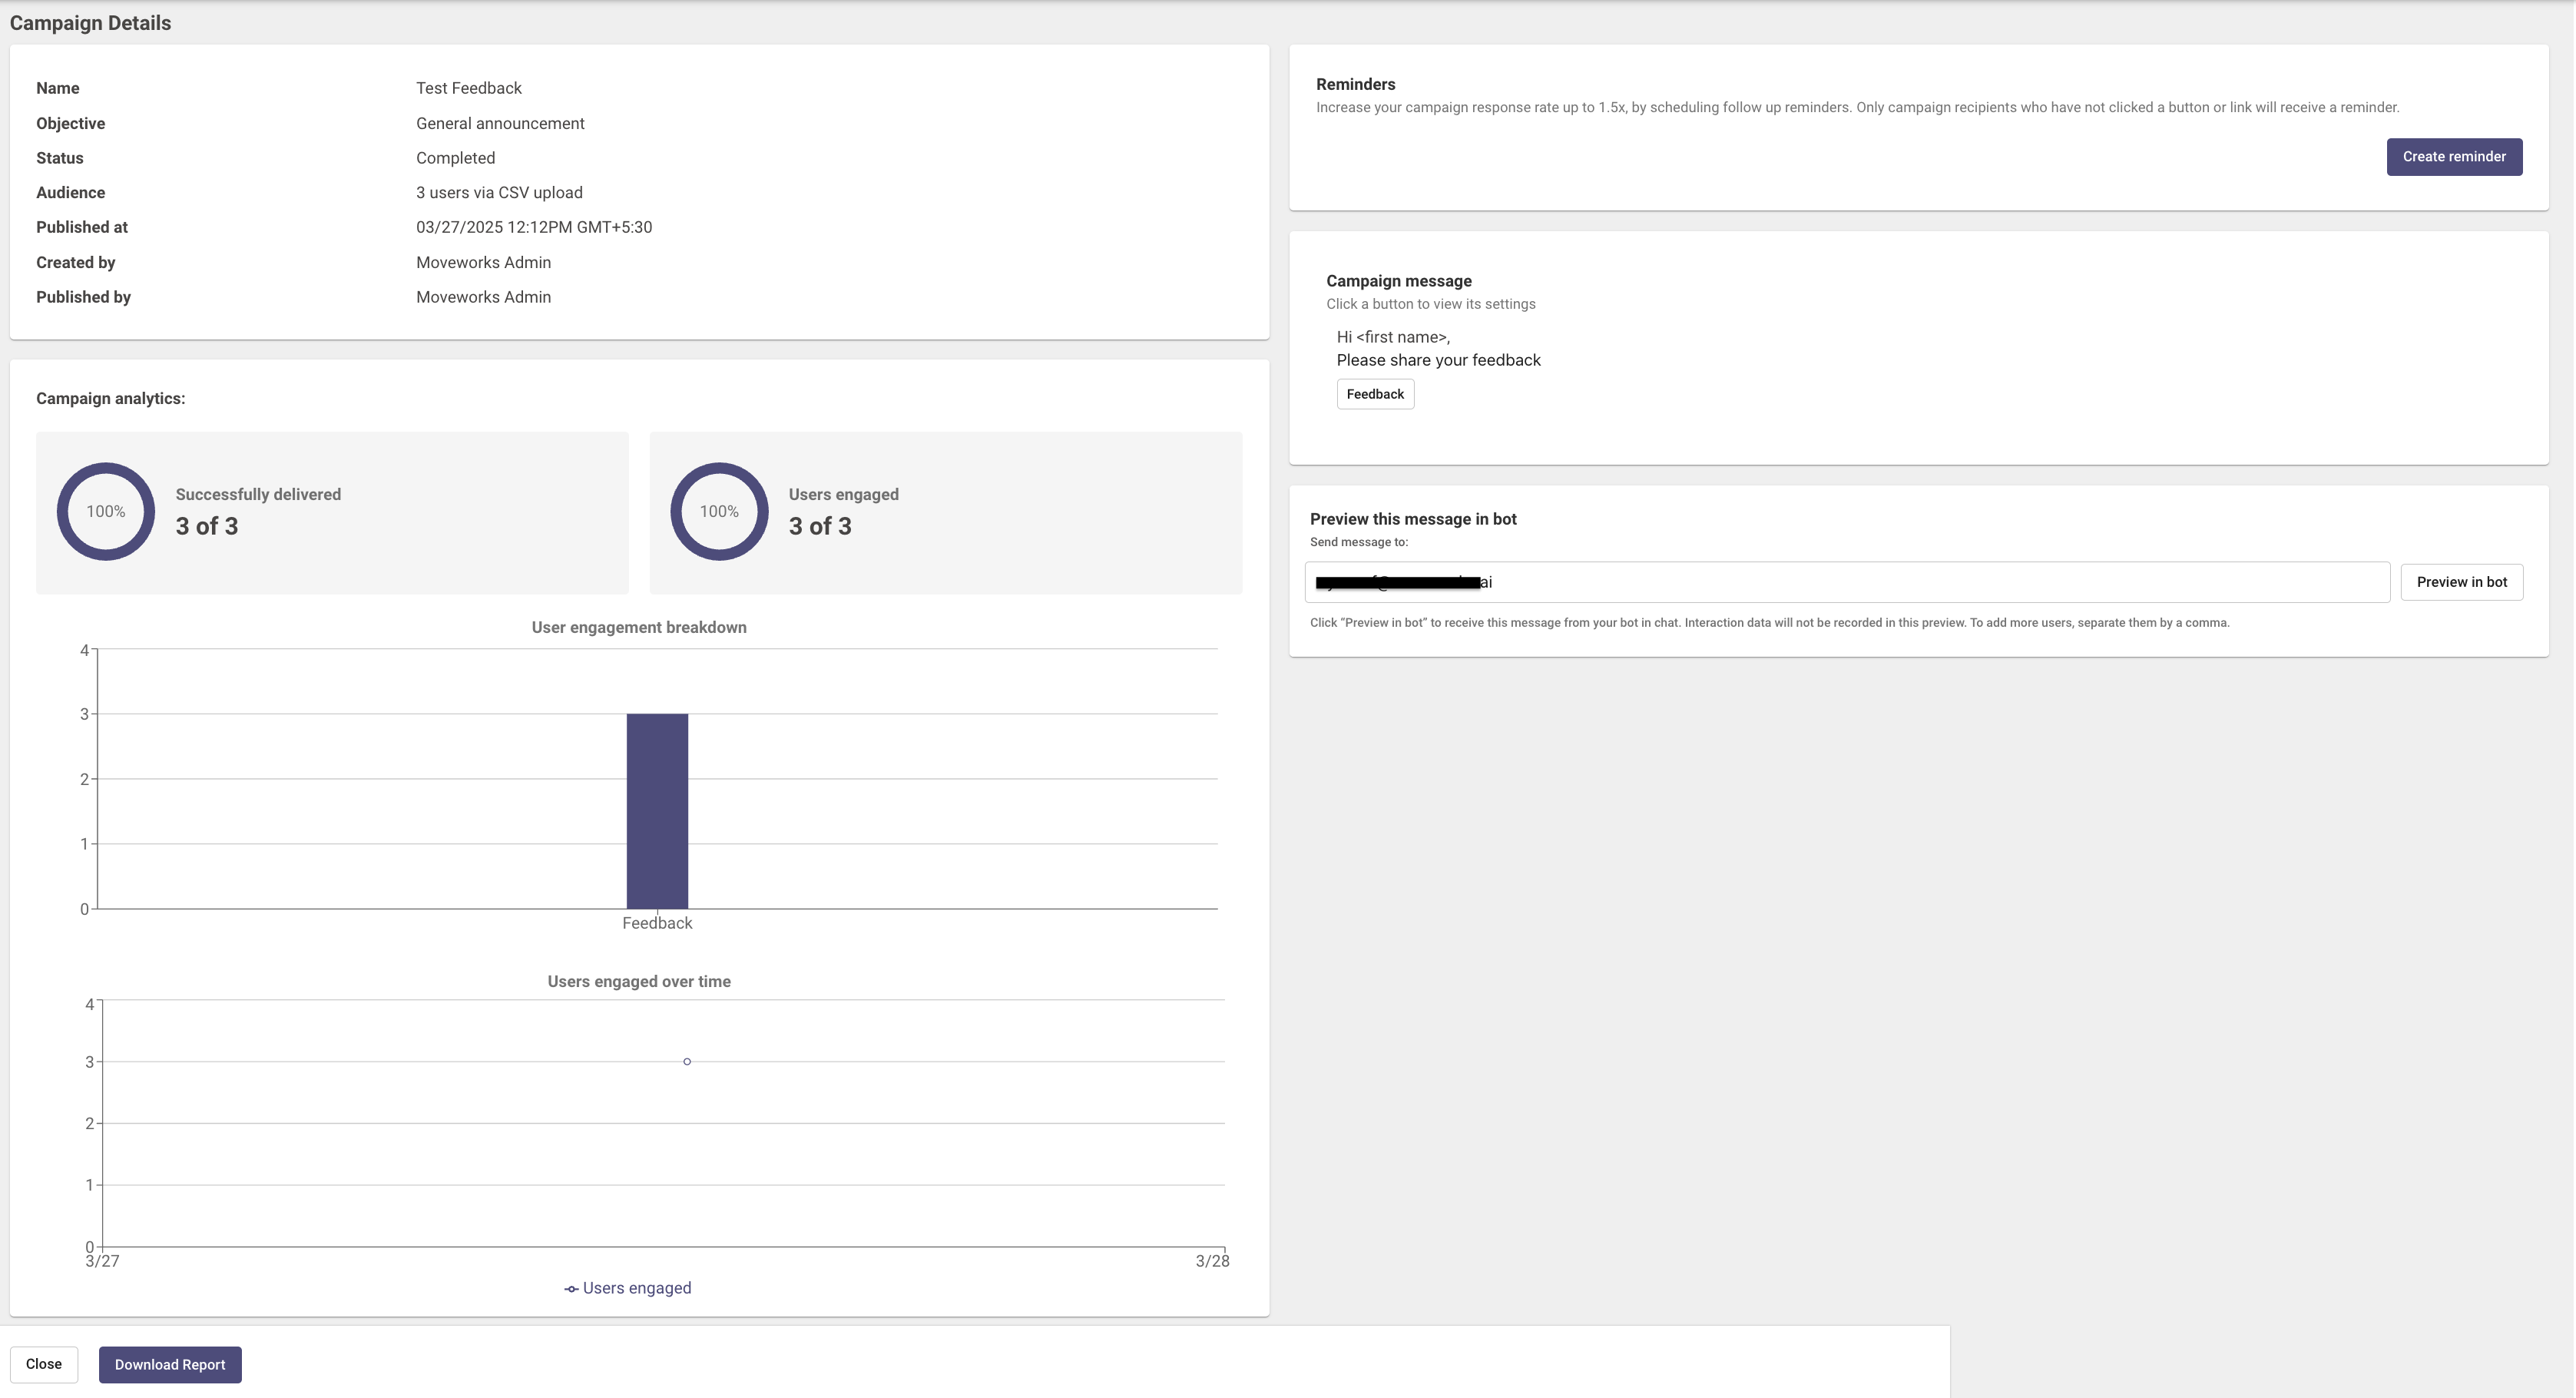
- Reminders - Here you can also click on Create reminder to schedule a follow up reminder in the form of a in-chat message to recipients who have not clicked on a button or link.
- Campaign Analytics - Here you can get a view of the campaign’s analytical information. This includes a graph with a breakdown of user engagement so far that shows the number of users who click on a button. There’s also a graph to show the number of users who have been engaged over time.
- Download Report - When you click on Download Report for a particular date, you will download a zip file, that once unzipped, contains a CSV file on the Notification Status of the campaign, and a second CSV file on User Interactions.
- Preview Message in Bot - Here you can provide a user email to test and check how the campaign message would look in the AI Assistant.
How To Add Custom Attributes as an Audience Filter
Prerequisites
- Ensure that the custom user attribute is defined and ingested per the How to Guides for People and Places Lookups doc.
Configuration
First, navigate to the Employee Communications settings.
- Click on Add + to create a blank entry for the custom attribute.
- Canonical Name should be the custom attribute name, prefixed with the keyword custom_attribute.
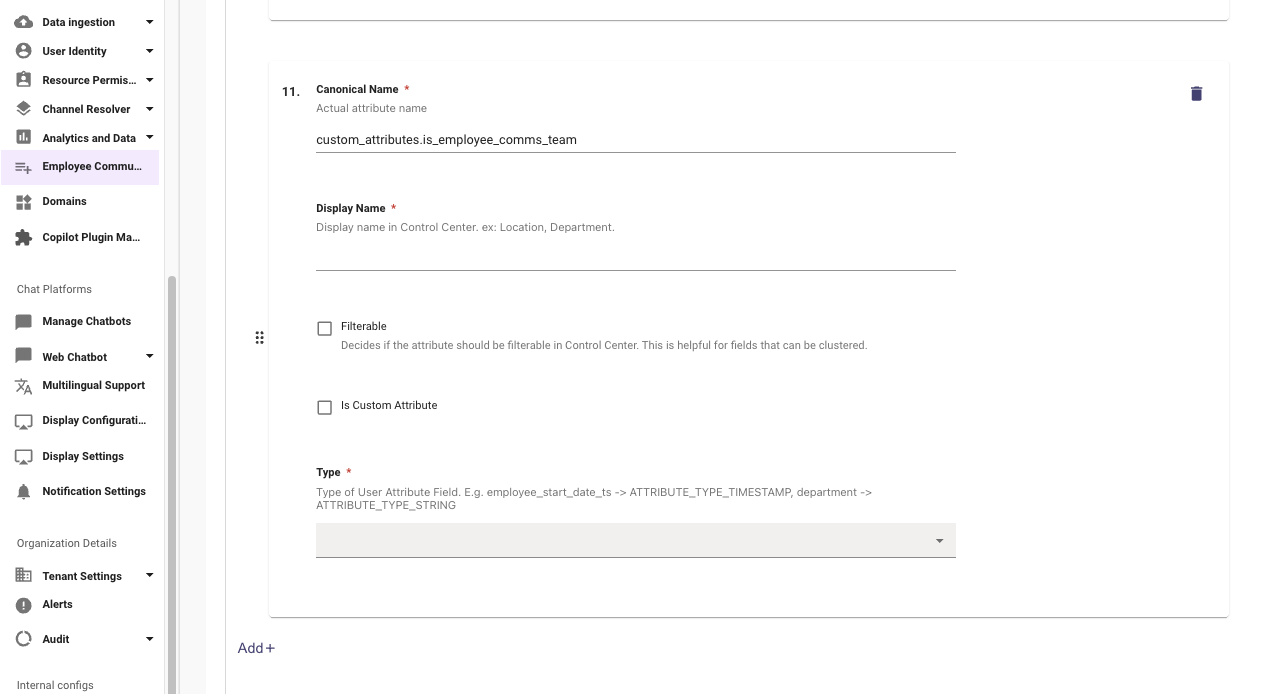
- Display Name is the display name that will be seen within the Employee Communications interface and can be named whatever is most relevant to the organization.
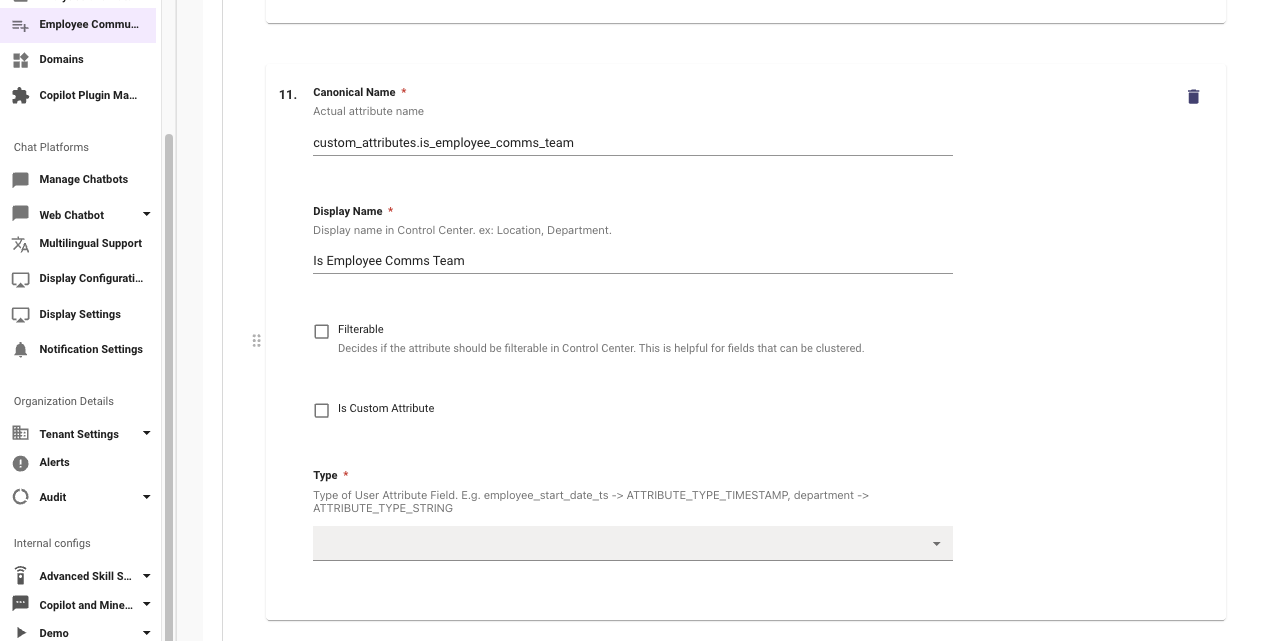
- Check the Filterable and Is Custom Attribute fields.
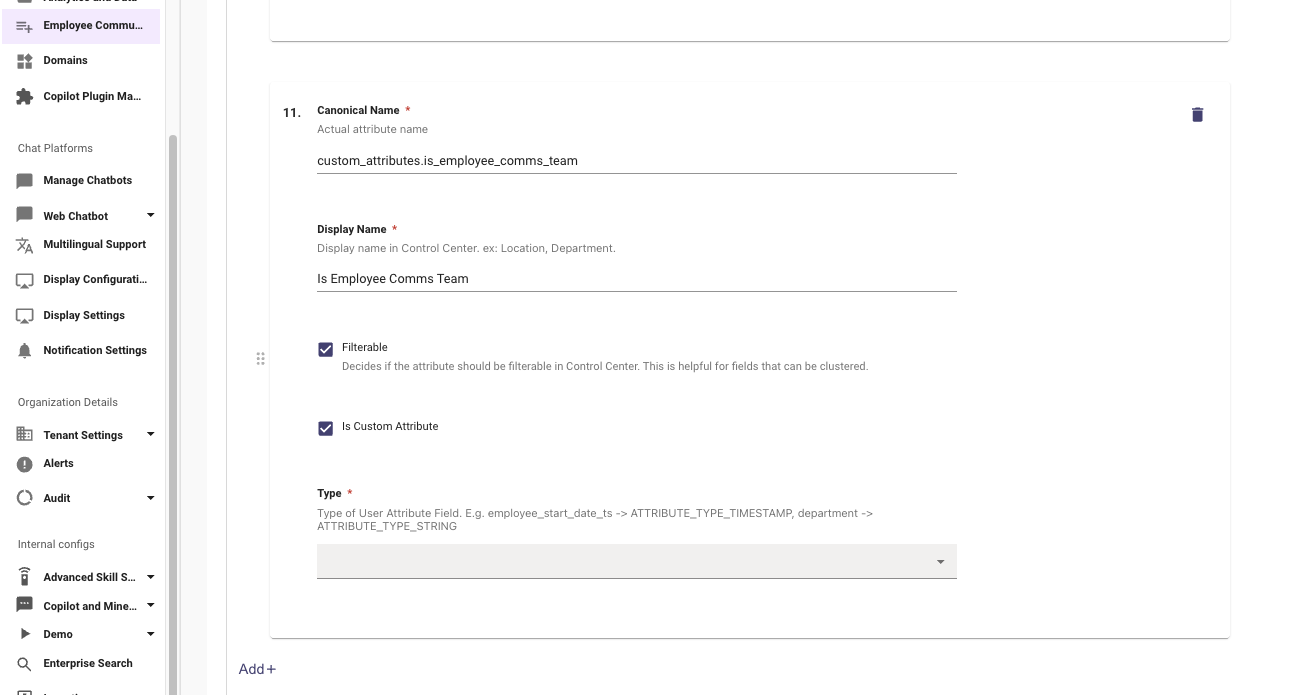
- The Type dropdown will be ATTRIBUTE_TYPE_STRING.
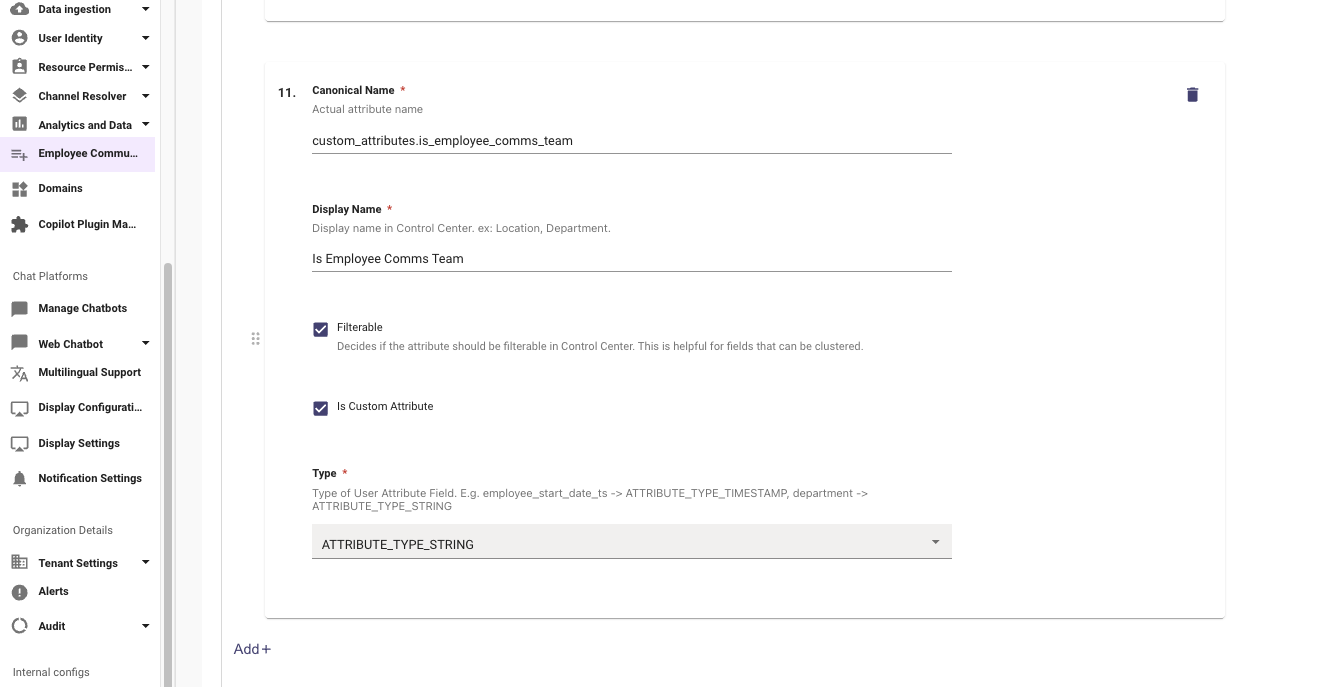
- Click Submit in the bottom right.
Validation
Now that the custom attribute is added, this attribute should be a radio button option when choosing Target users by attribute.
Updated about 1 month ago