Microsoft Entra Installation Guide (OIDC)
Prerequisites
Making edits?Before you edit your SSO configuration, make sure you are logged into MyMoveworks. Otherwise, you will not be able to log in and update your SSO configuration details.
Microsoft Entra Prerequisites
- Ensure you have Access to the Azure Admin Portal with the appropriate IAM permissions in Azure to register a new Enterprise Application.
Moveworks SSO Prerequisites
-
Your Moveworks Environment should be initialized in order to continue. (Verify with your Account Team if this has been completed)
-
Note the following values.
-
data_center_domain- the data center where your organization is hosted (see table below).Data Center data_center_domain United States (default) moveworks.com Canada am-ca-central.moveworks.com EU am-eu-central.moveworks.com Australia / Asia Pacific am-ap-southeast.moveworks.com Government Secure Cloud moveworksgov.com -
subdomain- your organization's login subdomain. This should match yourcustomer_id, which can be verified from the General Information Page.WarningMake sure to use the unique subdomain. For example, if you're organization's login subdomain is acme.moveworks.com, then your
subdomainis acme and yourdata_center_domainis moveworks.com which is part of the US Data center. -
customer_id- The unique identifier for your organization . This is stored as Org Name under Organization Details > General Information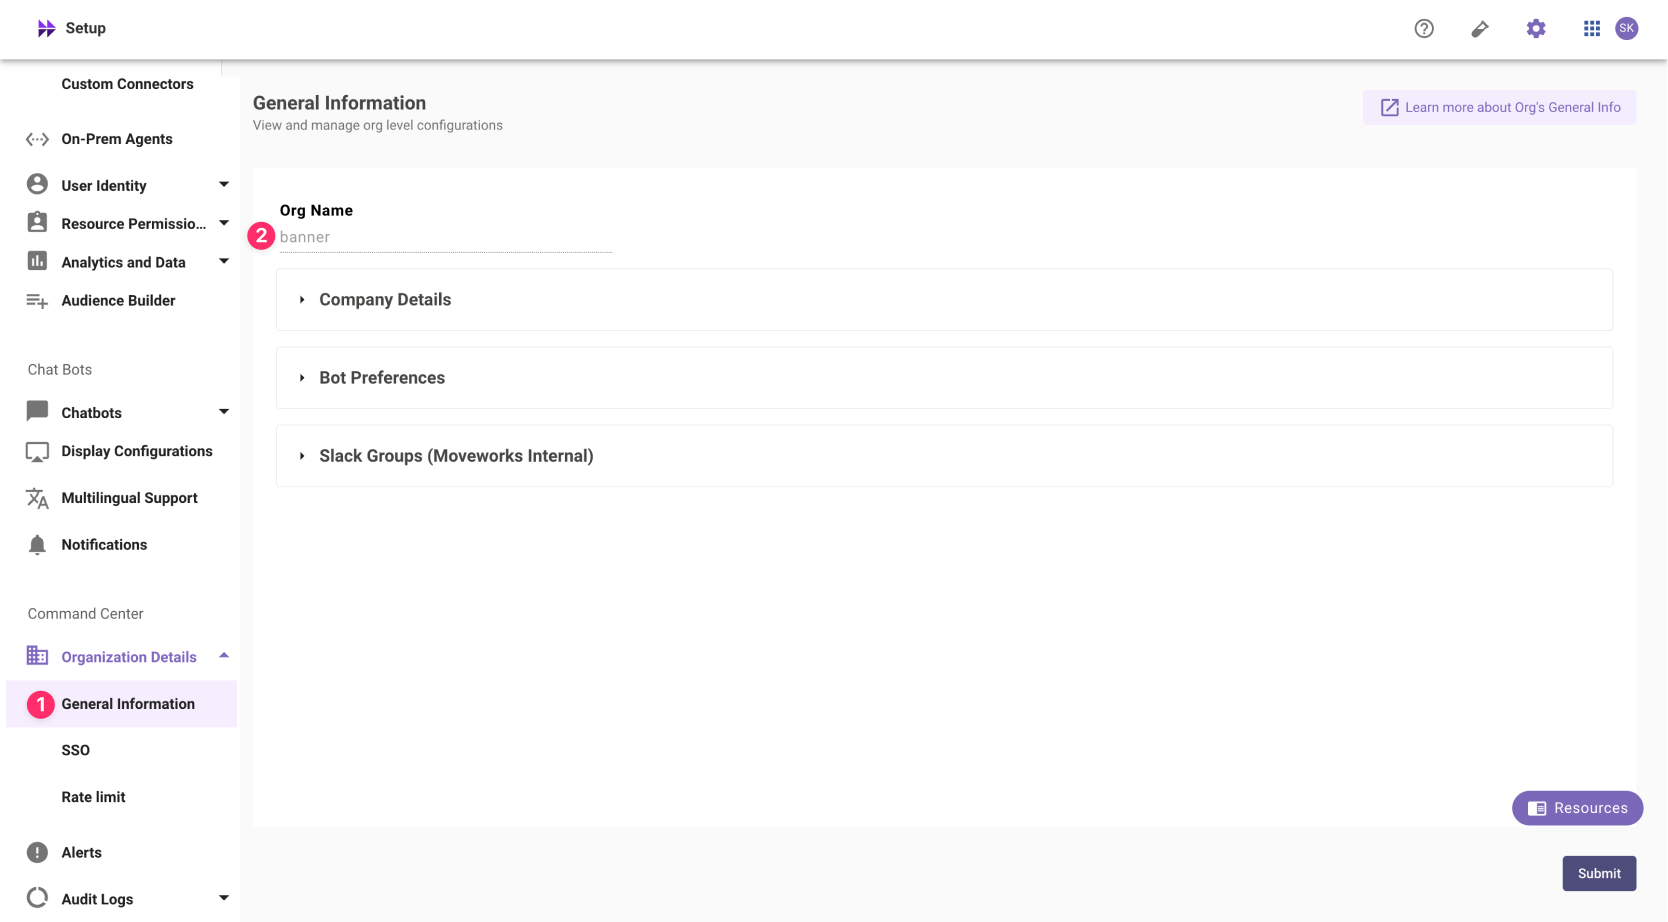 The Org name cannot be changed. Once set, the same value should be used in all cases.
In exceptional cases where you would like Moveworks to support your organisation with a different subdomain value. Please reach out to Moveworks Support.
-
Configuration Steps
Create OIDC Application
We recommend setting up a new/separate app registration for this step instead of reusing the App-reg created for the Teams bot setup
-
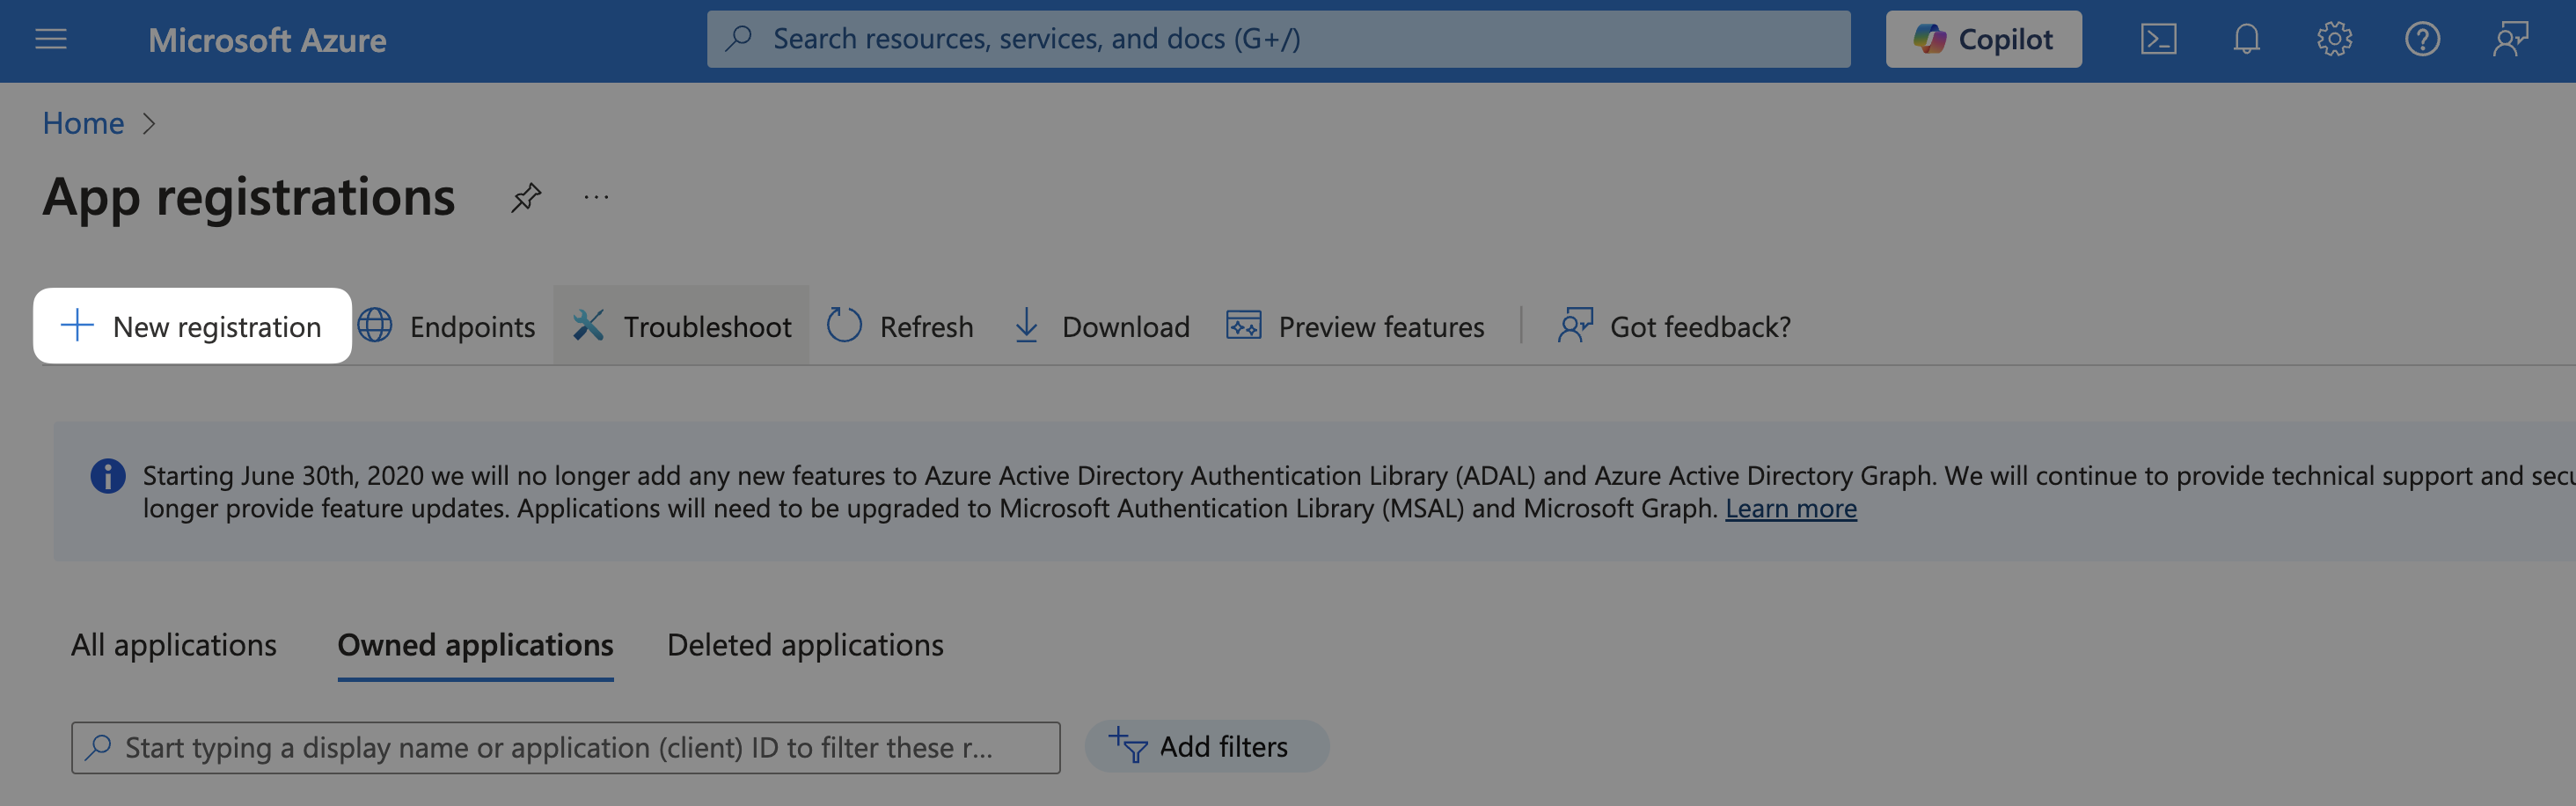
Find the App Registrations service

-
Select New Registration
-
Register the Application
- Name:
Moveworks - Supported account types:
Accounts in this organizational directory only
- Name:
-
Select Register
Configure Moveworks Settings
-
Go to Manage > Branding & properties and update the following:
-
Upload new logo:

-
Home Page URL:
https://{{subdomain}}.{{data_center_domain}}
-
-
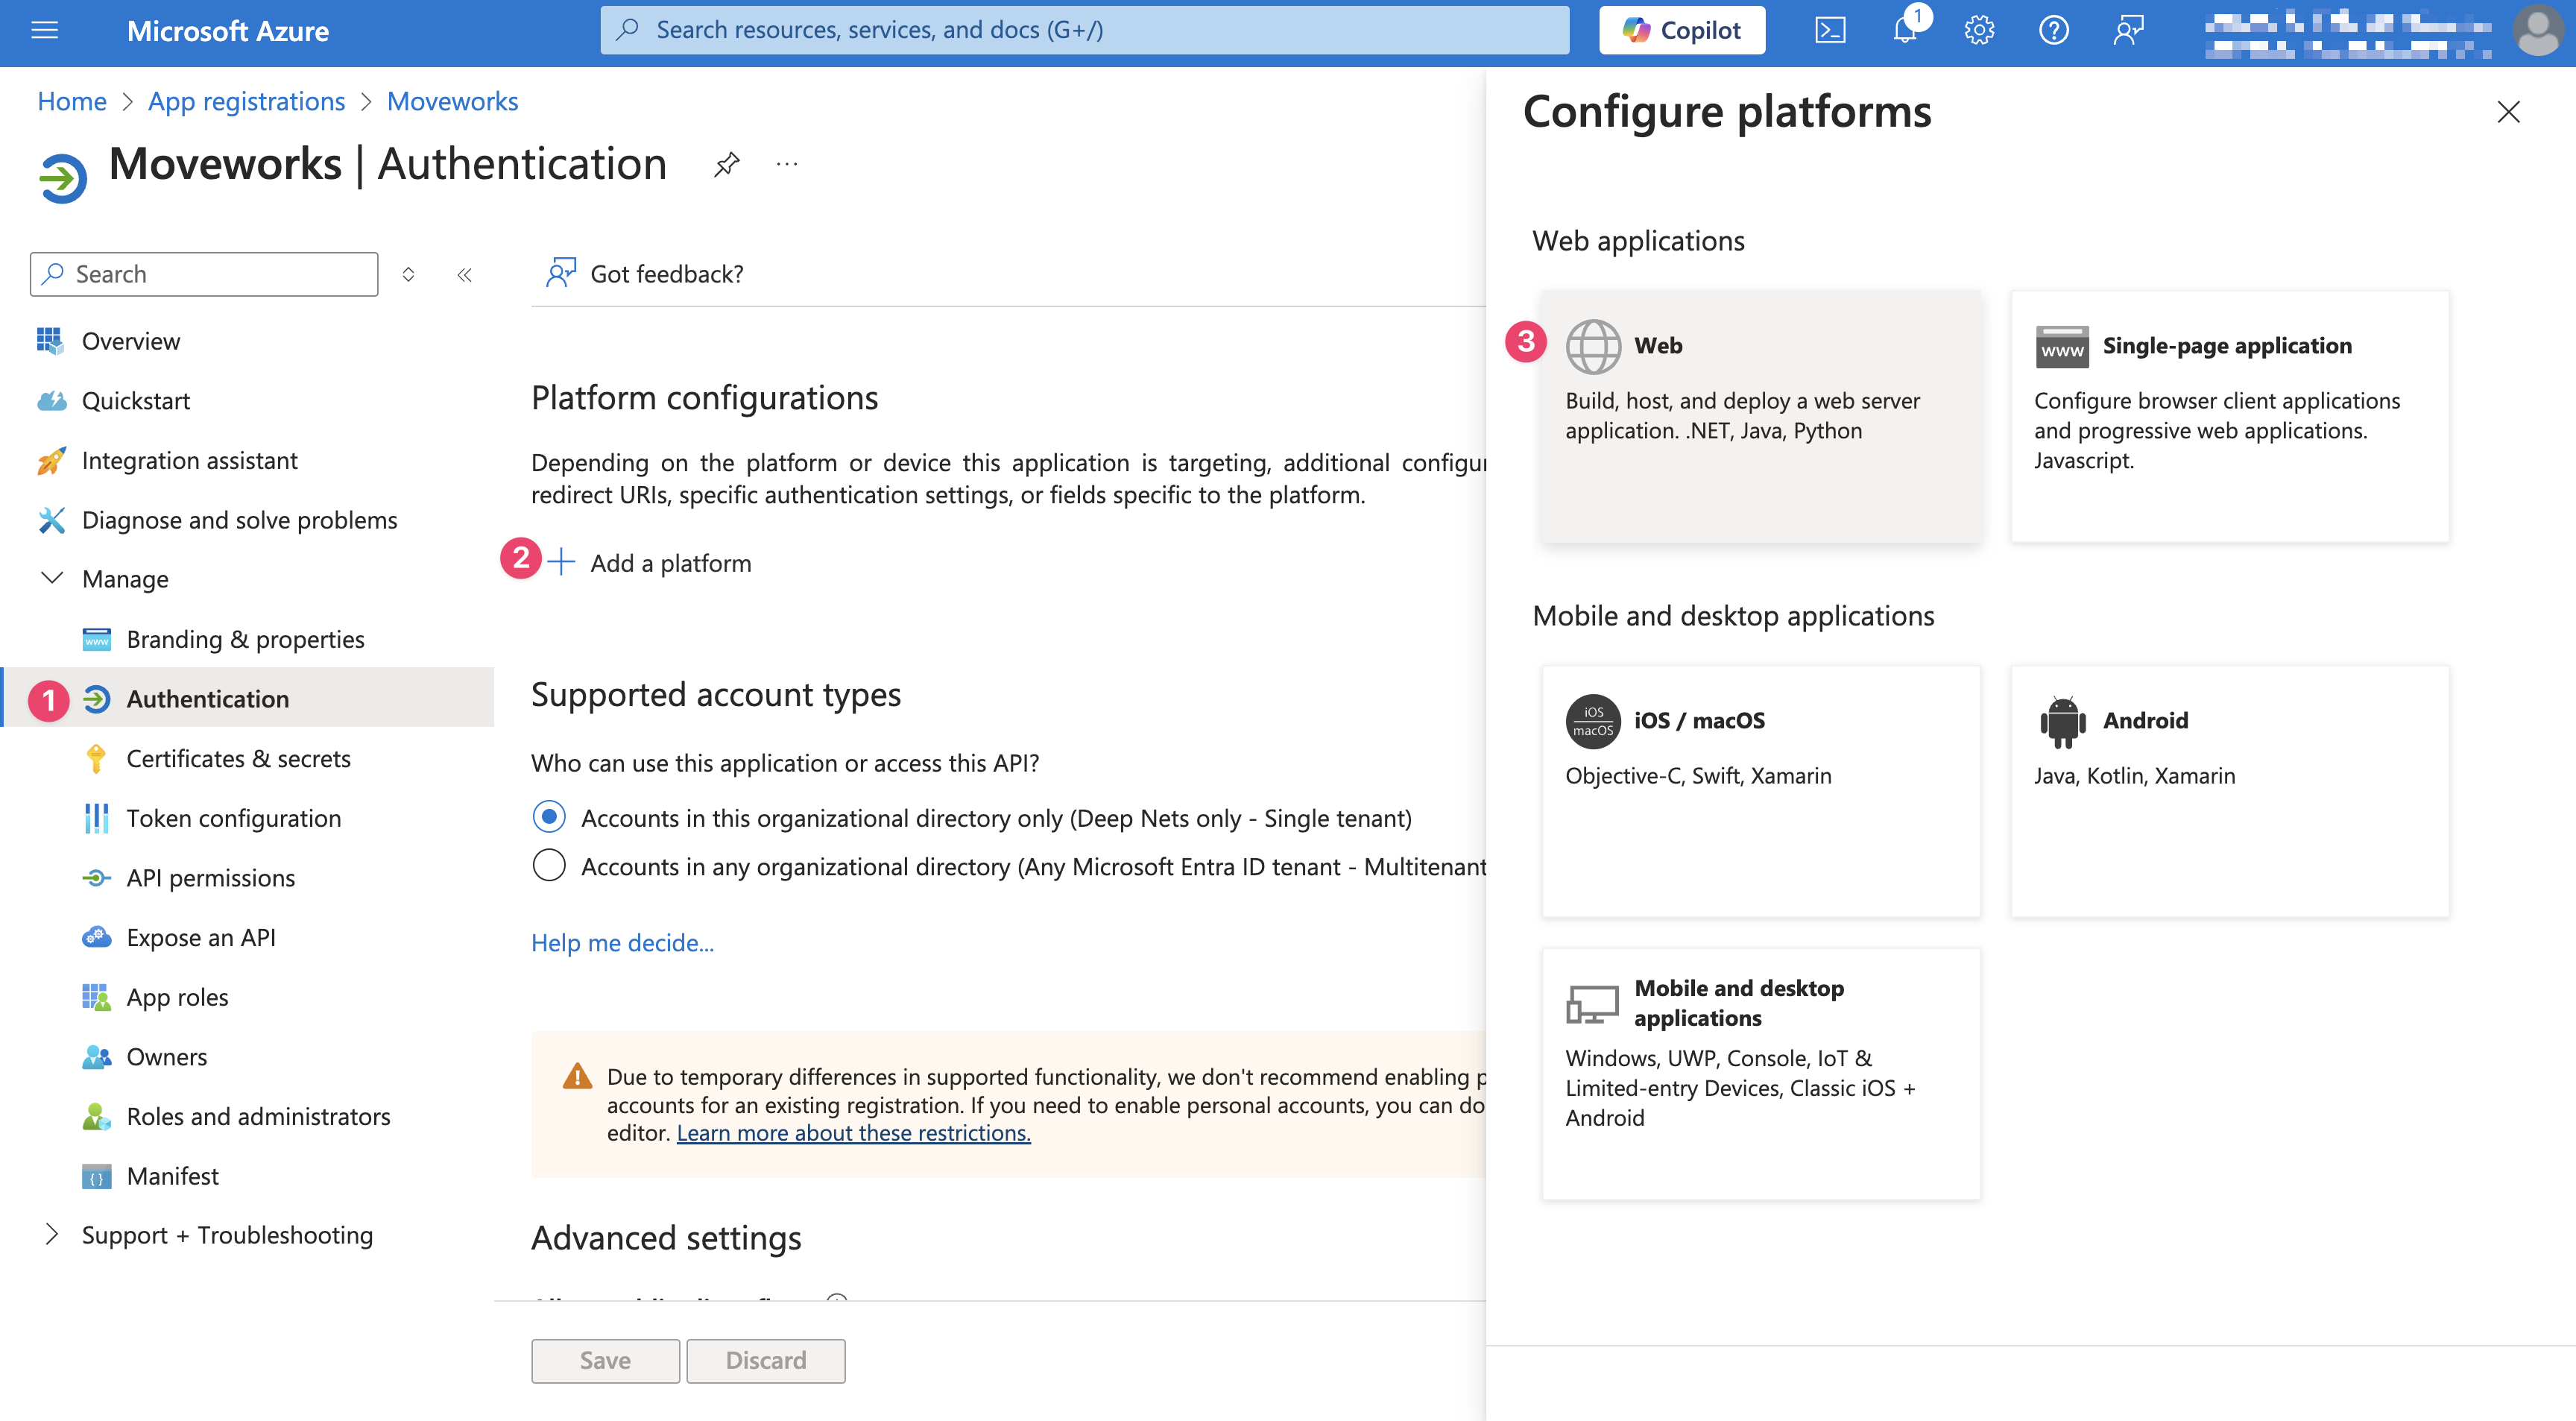
Go to Manage > Authentication, Select Add a Platform and choose Web
-
Add your Redirect URI as
https://{{subdomain}}.{{data_center_domain}}/login/sso/oidc
Add User Permission
- Go to Manage > API permissions. Select Add a permission and choose Microsoft Graph
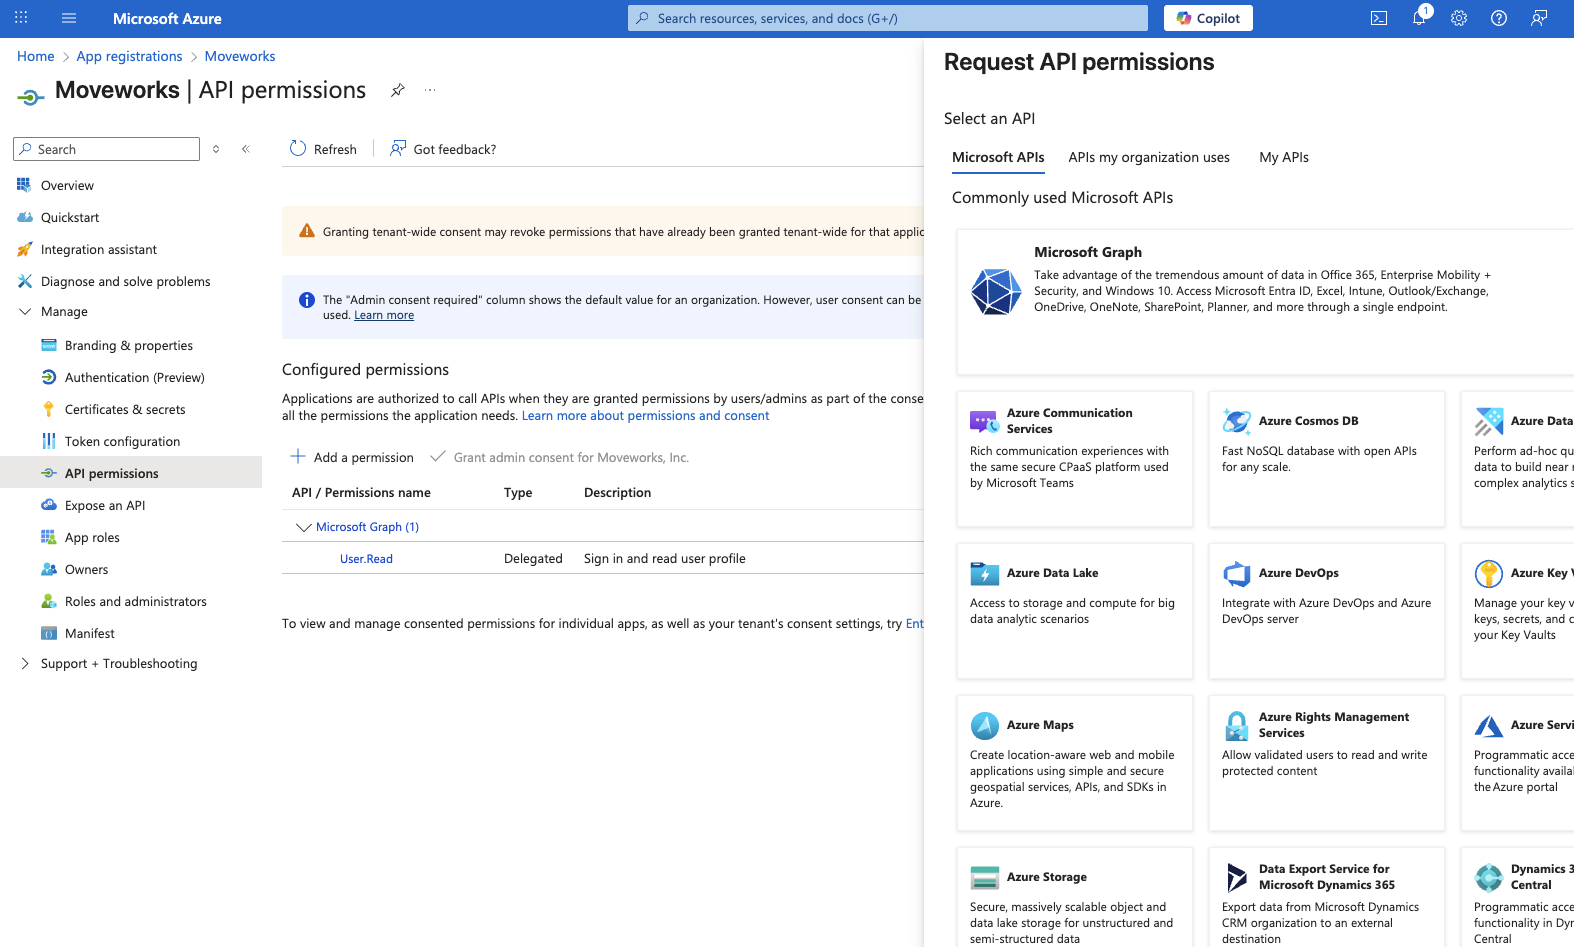
- Choose Application permissions
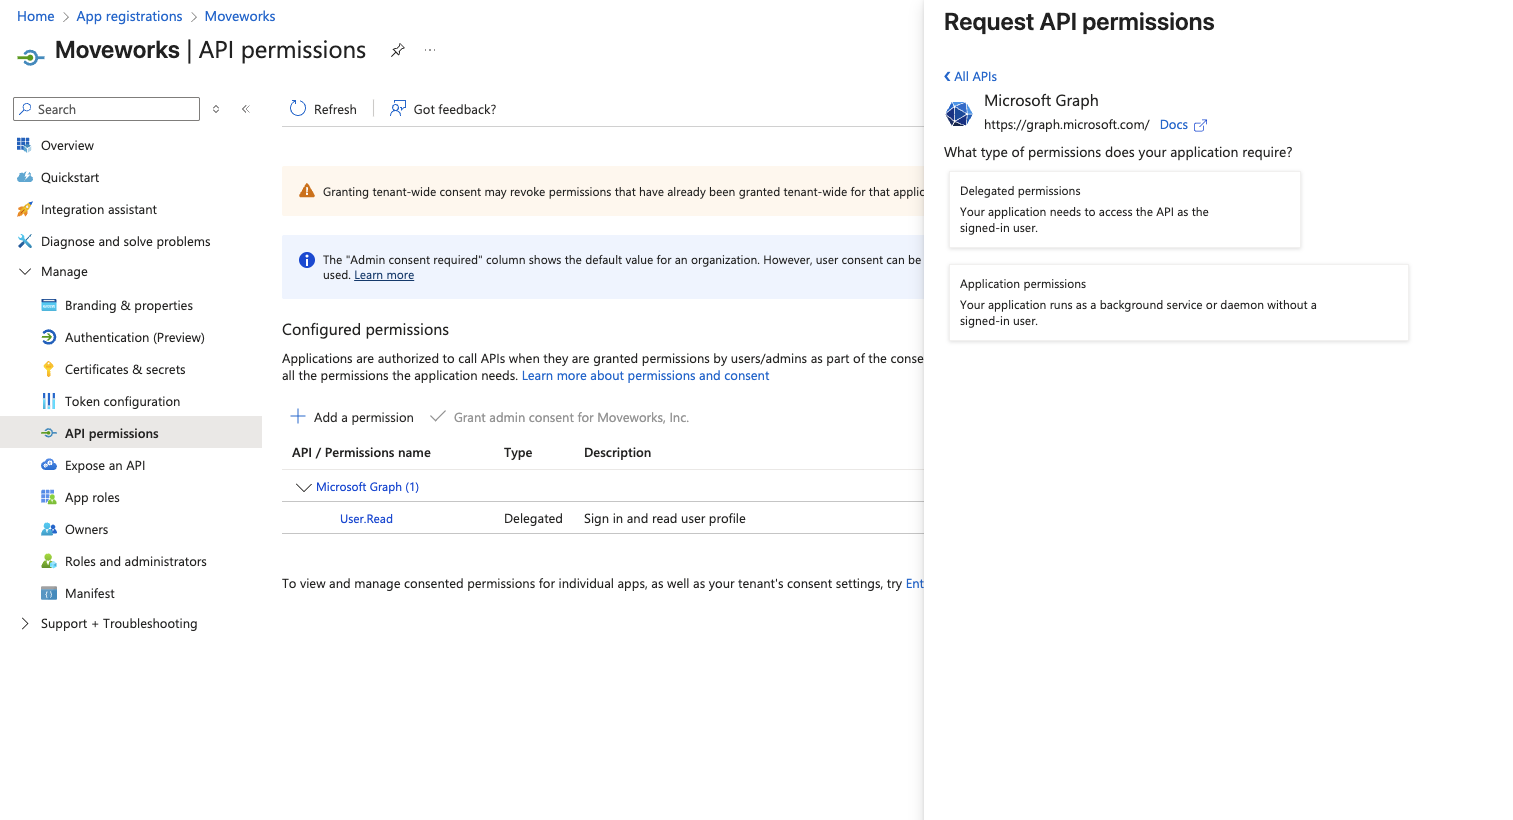
- Toggle on the User.Read.All permission
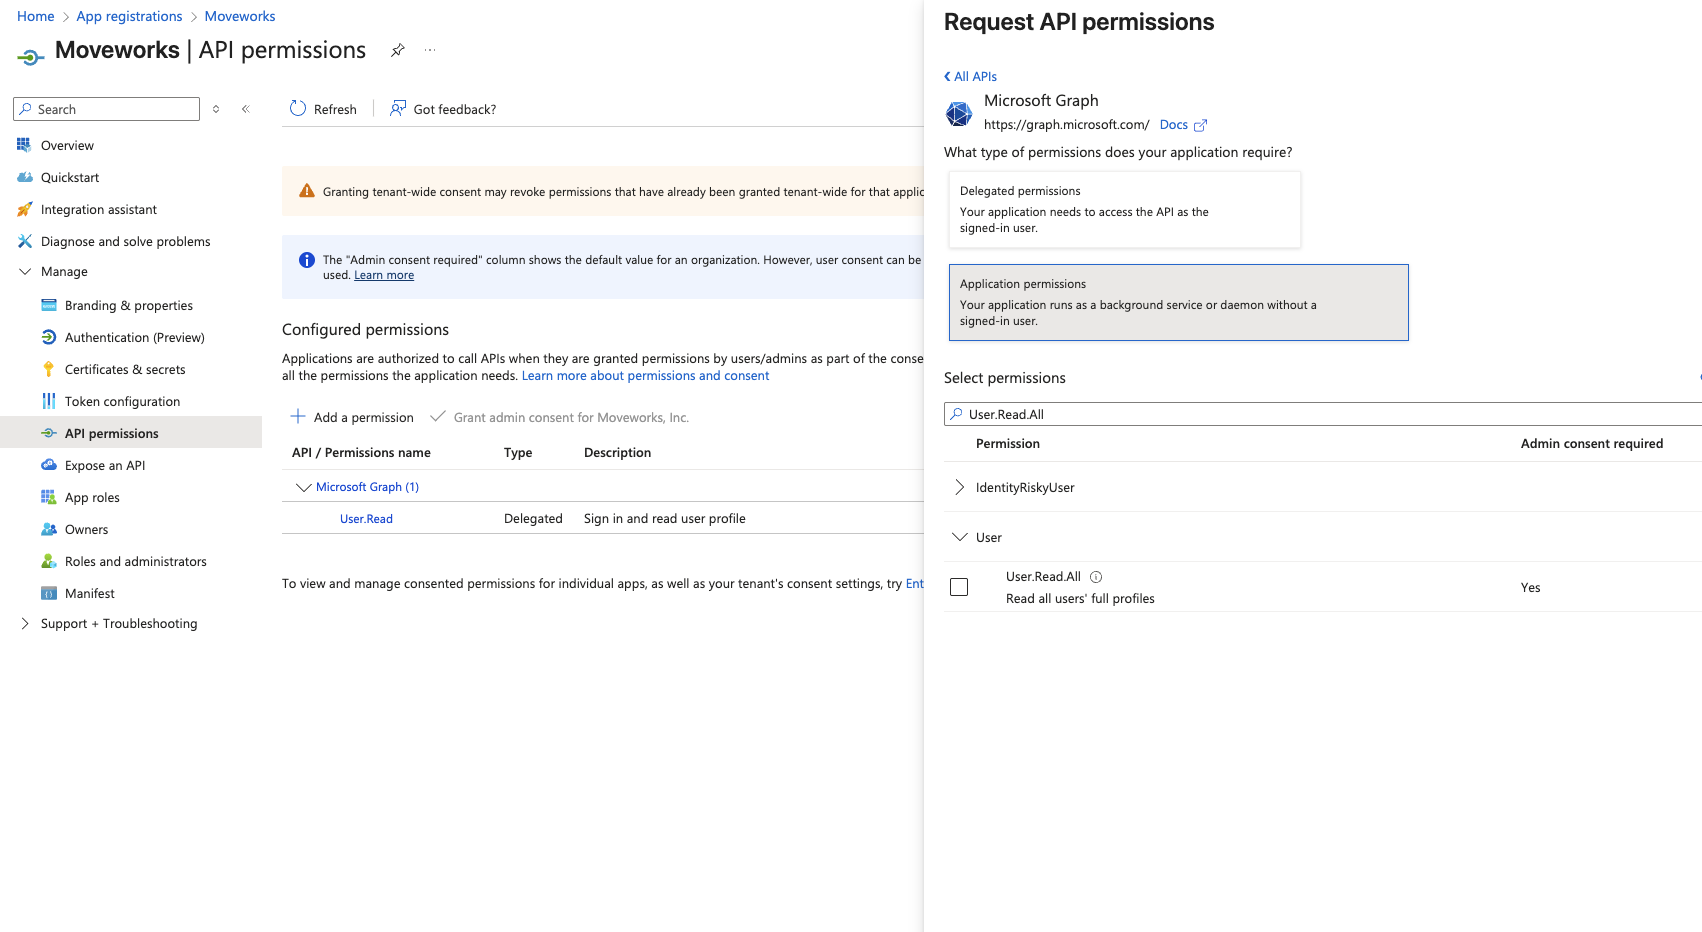
- Click Add permissions and ensure that the permission is Admin consented.
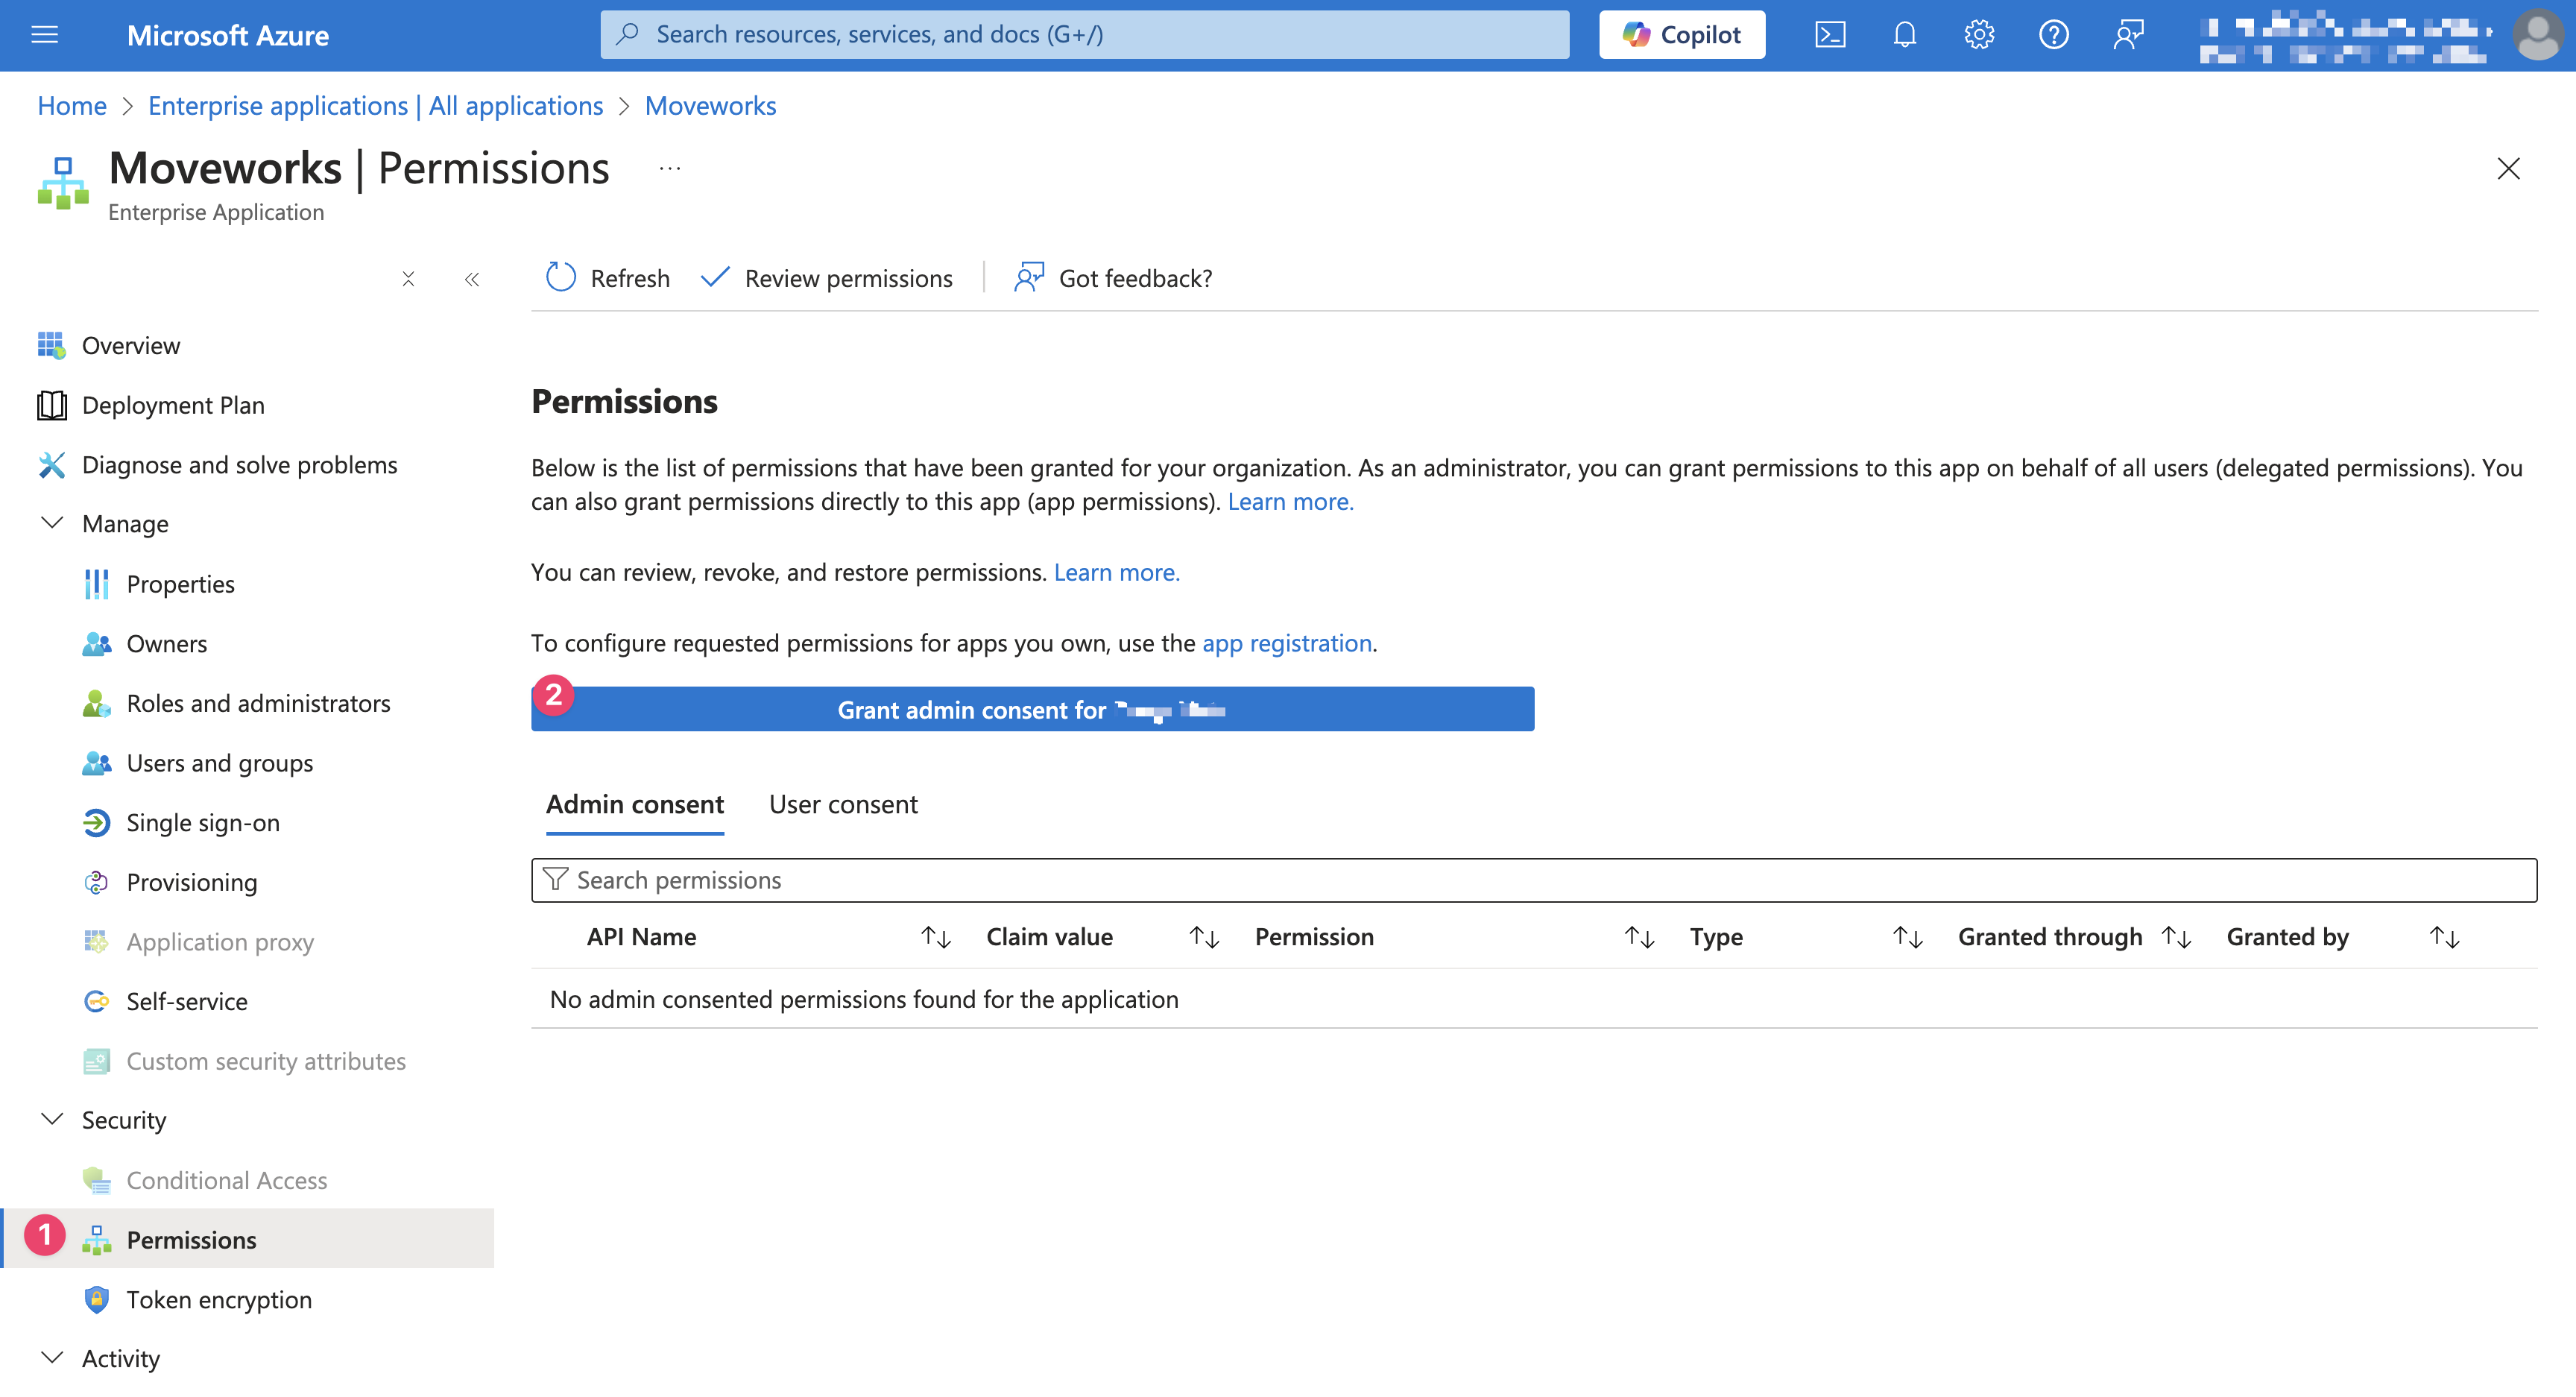
Enable User Access
-
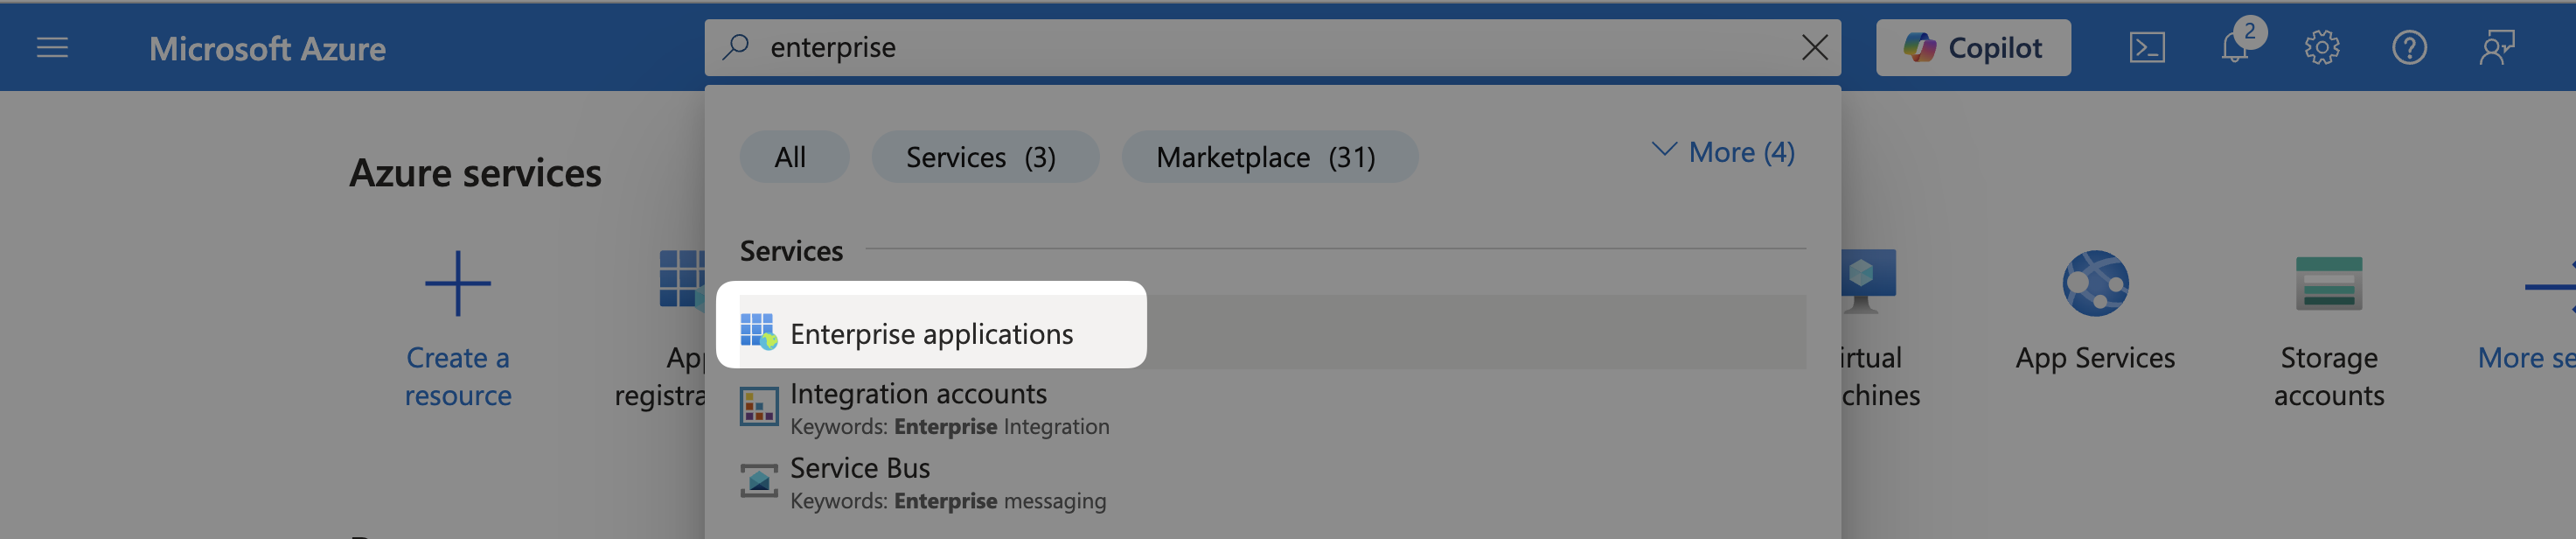
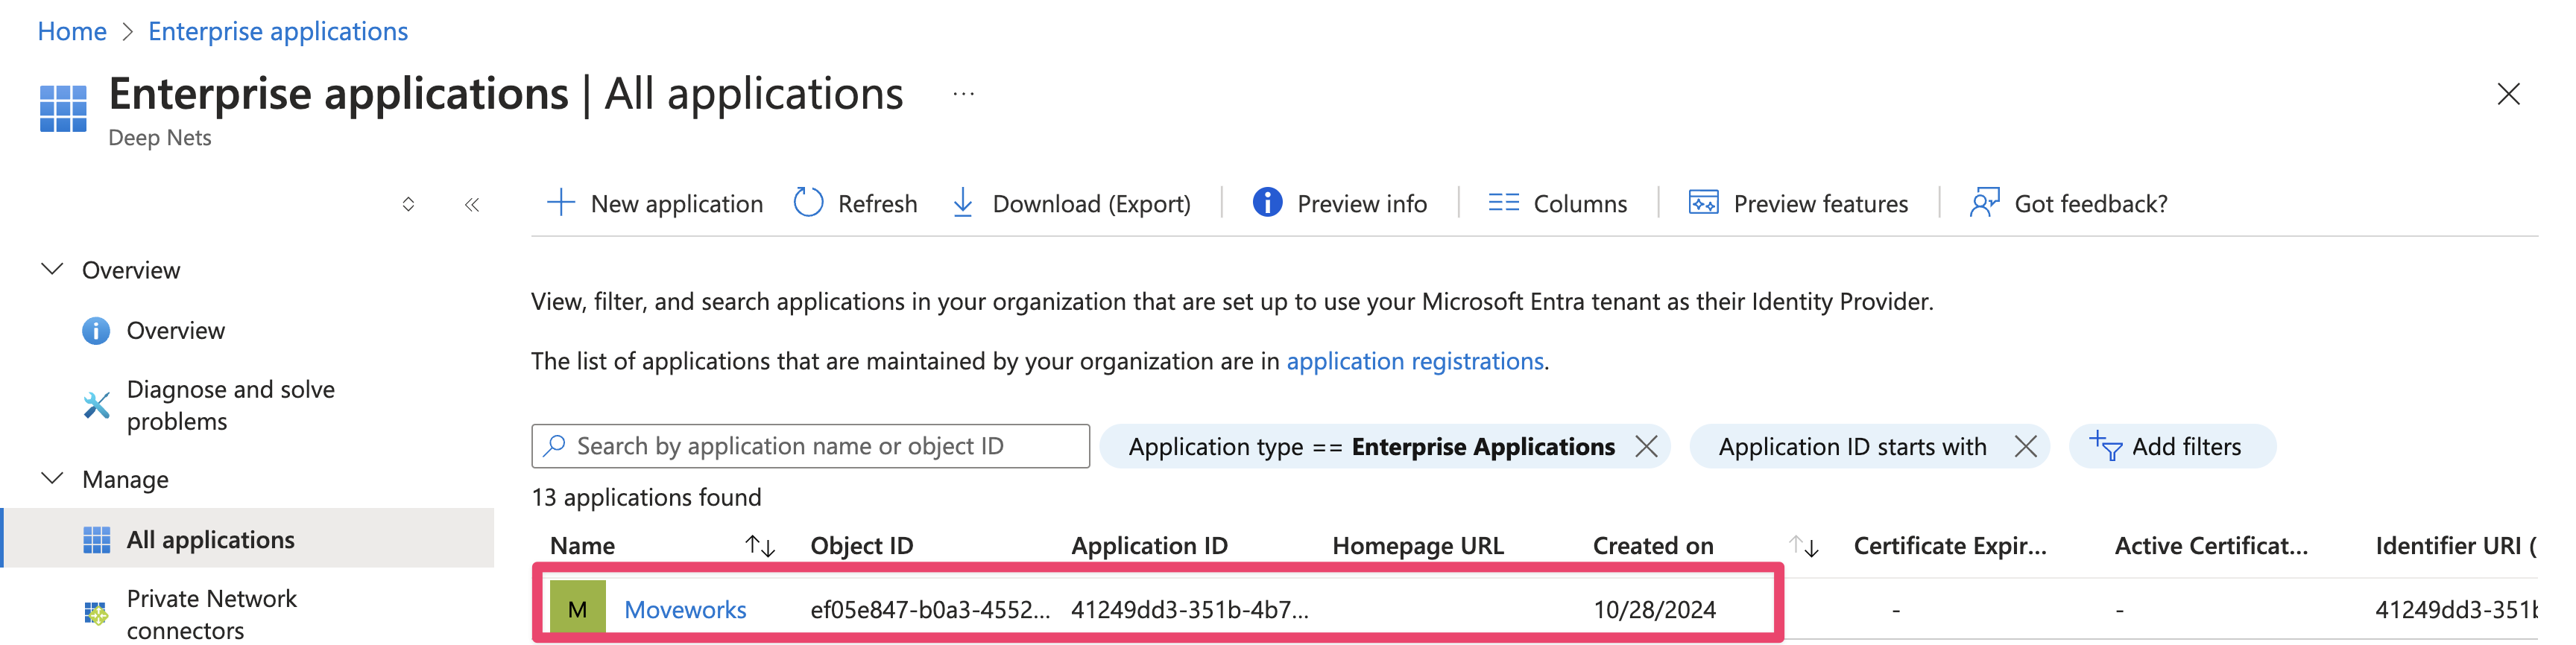
Go to Enterprise Applications
-
Find the application you created
-
Go to Security > Permissions and click Grant admin consent for {{your company}}.
Generate Client Secret
-
Navigate back to the App Registration page. The following settings are not available on the Enterprise Application page
-
Go to Certificates & secrets.
-
Click New client secret.

-
Add Description and Expires. We recommend selecting 24 months as the expiration policy.

-
Write down the Value as your
idp_secret
-
Go to the Overview tab and note down your Application (client) ID. This is your
idp_client_id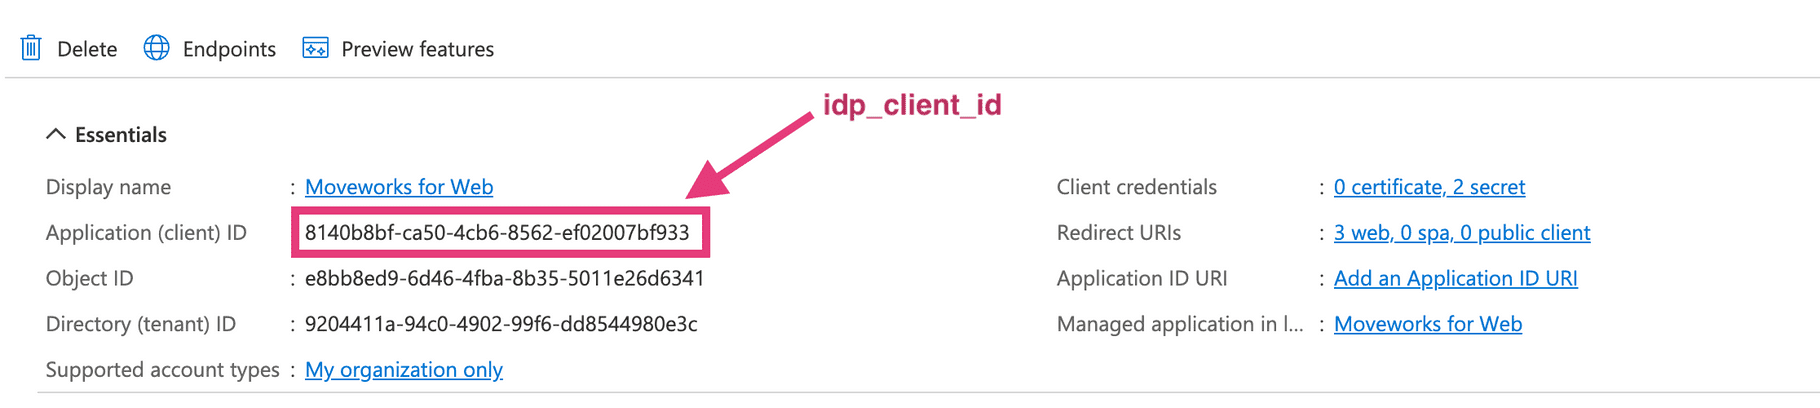
-
Click Endpoints > OpenID Connect metadata document and paste it in your browser
-
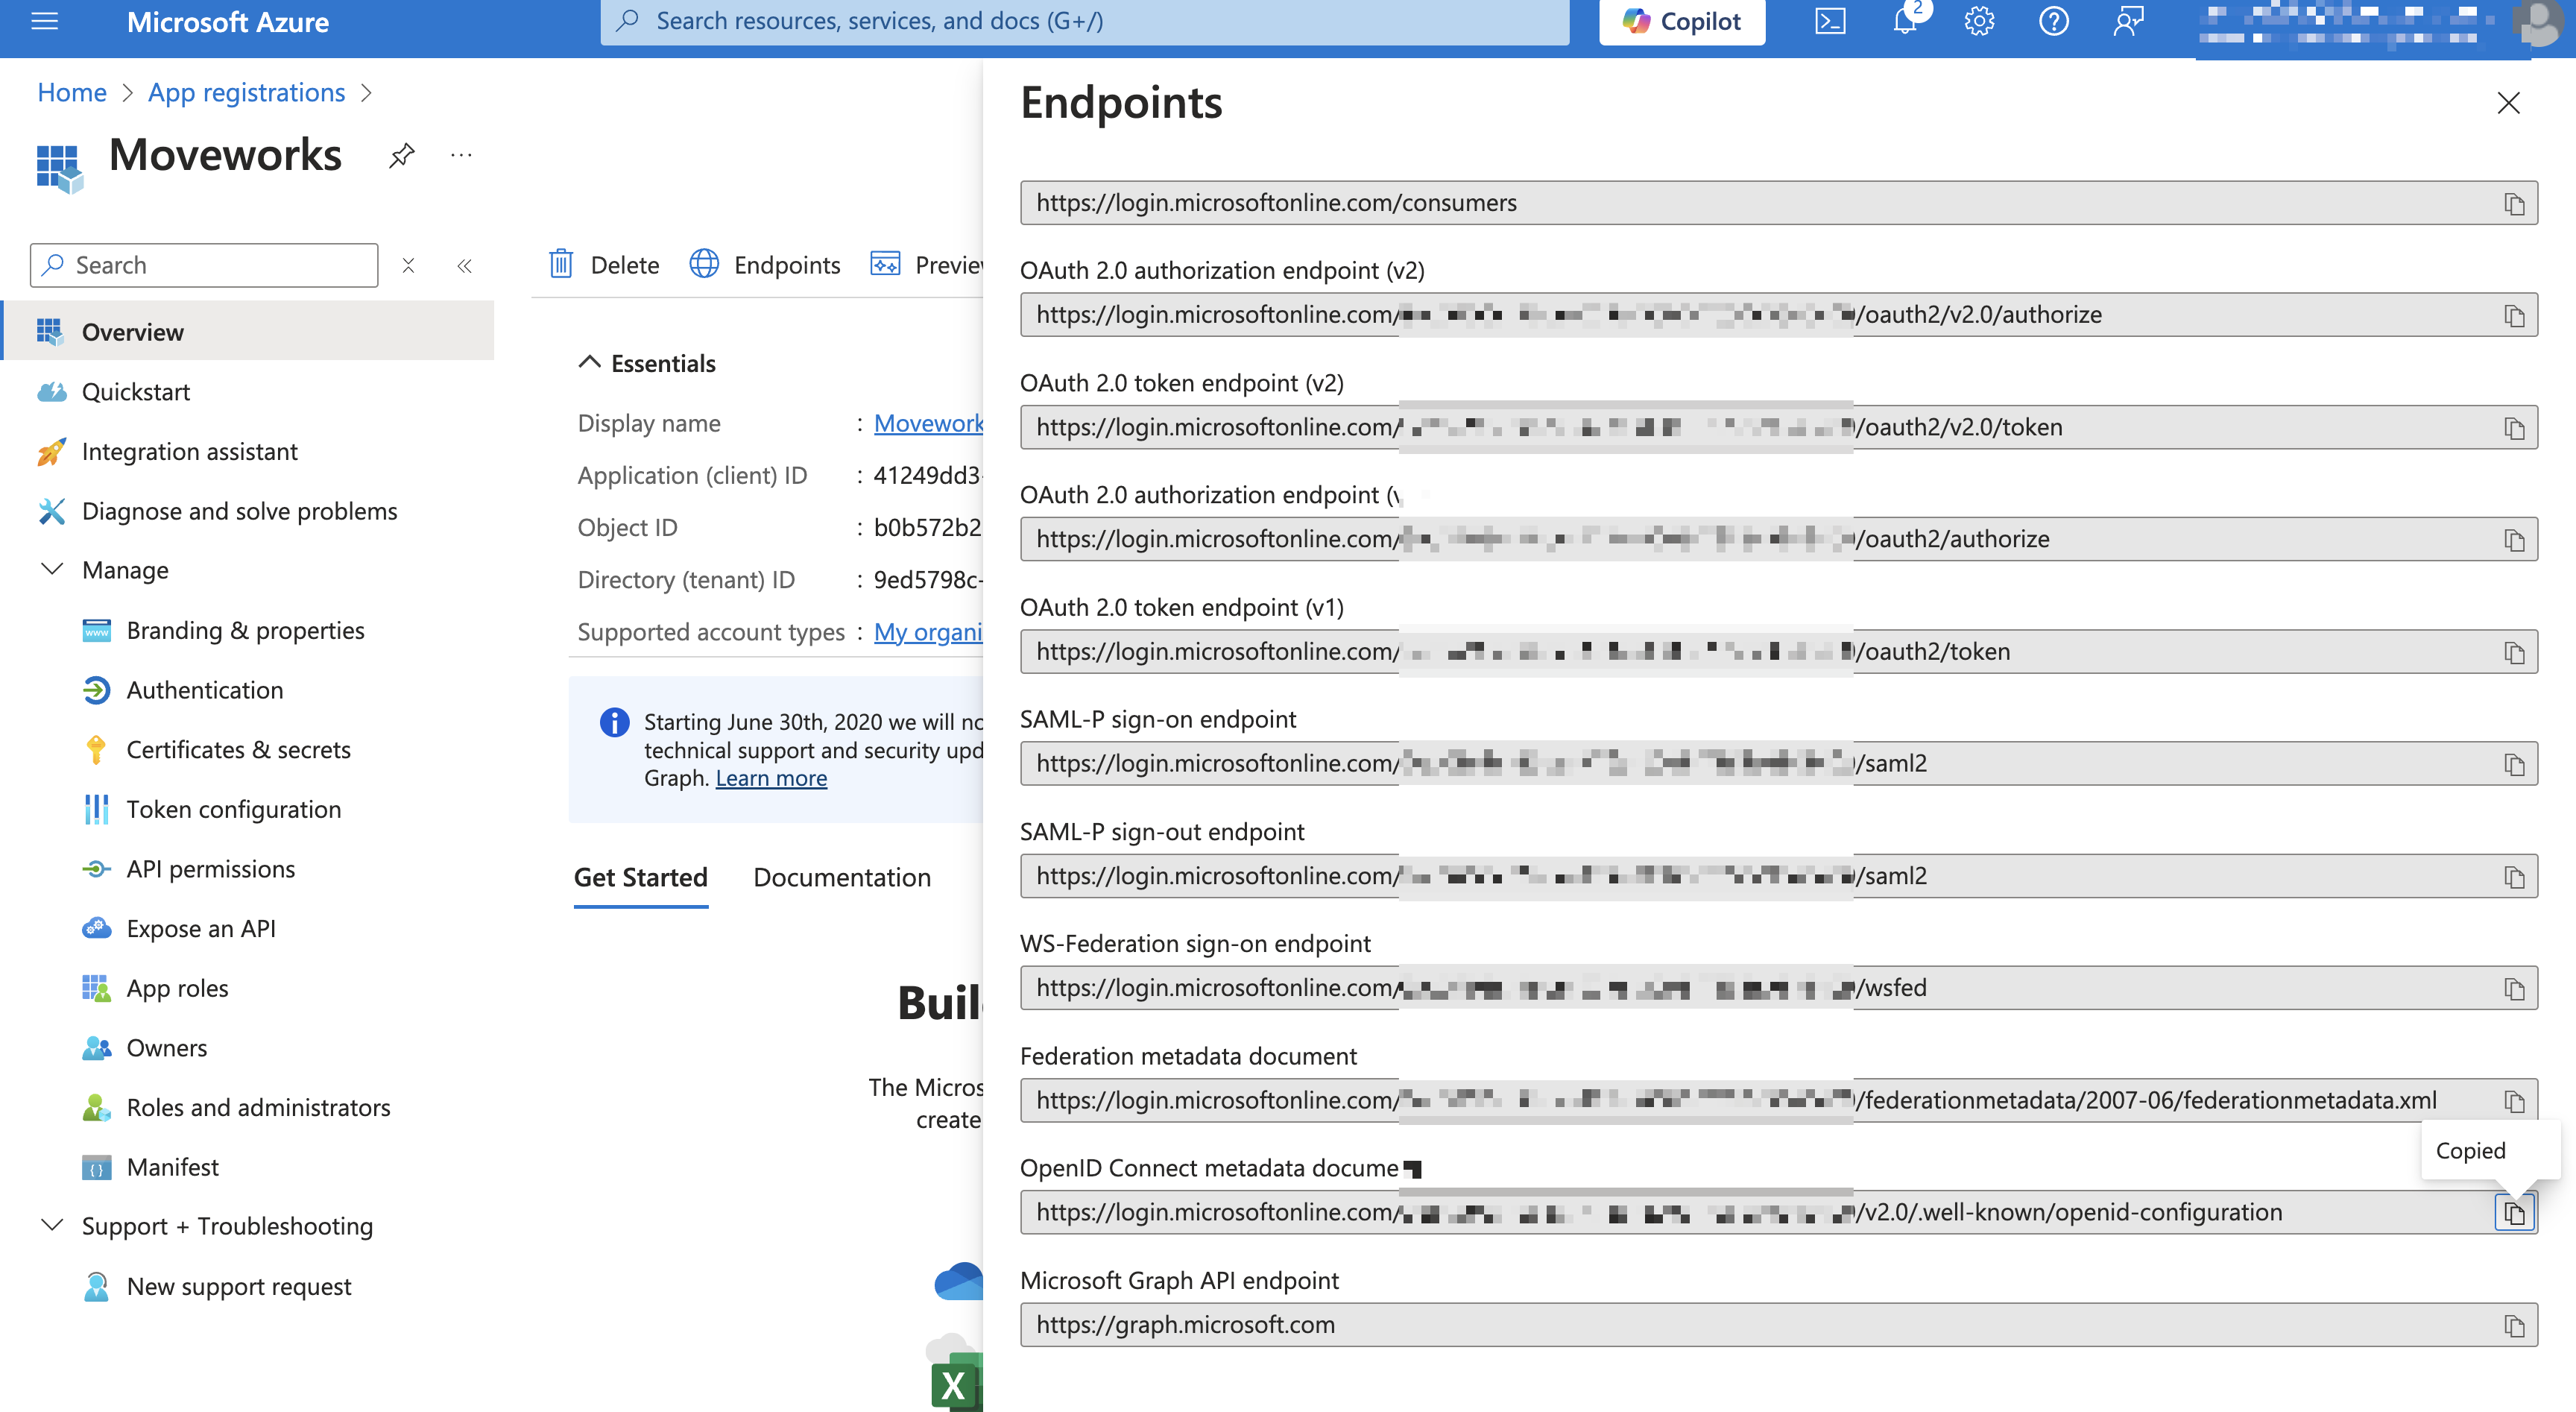
Copy the
issuerfrom the resulting JSON. This is youridp_issuer
Add SSO Configuration in MyMoveworks -
Navigate to SSO Settings in MyMoveworks
-
If you already see a
studioconfig, edit it. Otherwise, choose Create. -
Add your configuration using the values you've noted above
- Moveworks Product:
studio - Select Connector:
ms_graph - Authentication Protocol:
OIDC - IDP Redirect URL:
https://{{subdomain}}.{{data_center_domain}}/login/sso/oidc - IDP Issuer:
idp_issuer(from Step 7) - IDP Client Id:
idp_client_id(from Step 5) - IDP Client Secret:
idp_client_secret(from Step 4)
- Moveworks Product:
-
Click Submit.
-
Wait a few minutes, then attempt to log into your instance at
https://{{subdomain}}.{{data_center_domain}}
FAQ
Does Moveworks support reading user data such as 'upn' from a custom scope / additional claim?
- No - Moveworks will only request the openid, email, and profile scopes during the authentication process. By default, Moveworks will use the 'Mail' field from Entra to determine the logging in user. By default the email address from the user's 'Mail' field in Entra must match their email_addr field in their Moveworks User Record for the login to My Moveworks or Web Bot to be successfull.
- If the Entra mail value does not match the email_addr value in the Moveworks user record, follow these steps to map mail to the Moveworks idm_user_id field and change the SSO configuration in Moveworks to perform the user lookup on the idm_user_id field.
- Map the Entra mail field to idm_user_id:
- In Moveworks Setup navigate to user identity > import users and edit the existing configuration.
- Click next once to get to the Configure selected sources screen and toggle into advanced mode in the top right.
- Scroll to the Source-Specific User Attribute Mapping under the ms_graph Integration Id. You should see a section like the below which defines the mapping on user_id_info.user_idm_id_info
-
"user_id_info.user_idm_id_info": [ { "integration_id": "\"ms_graph\"", "system": "\"MS_GRAPH\"", "idm_user_id": "userPrincipalName", "external_id": "id" } ], - Update the mapping for idm_user_id to mail
"user_id_info.user_idm_id_info": [ { "integration_id": "\"ms_graph\"", "system": "\"MS_GRAPH\"", "idm_user_id": "mail", "external_id": "id"- The change will reflect in users' records following the next user import flow. After 24 hours, confirm the change has succeeded in Moveworks Setup by navigating touser identity > imported users. Enter a users name in Find Users to view their record. Click view profile and scroll down to the System Integration Attributes. Under Azure AD confirm the Idm User Id value has been updated to match the mail value in Entra.
- Update the SSO configuration to user idm_user_id as the user lookup field:
- In Moveworks Setup, navigate to Tenant Settings > Single Sign-on (SSO) and edit the existing SSO configuration.
- Under Identifier Type select IDM_USER_ID
- Map the Entra mail field to idm_user_id:
- If the Entra mail value does not match the email_addr value in the Moveworks user record, follow these steps to map mail to the Moveworks idm_user_id field and change the SSO configuration in Moveworks to perform the user lookup on the idm_user_id field.
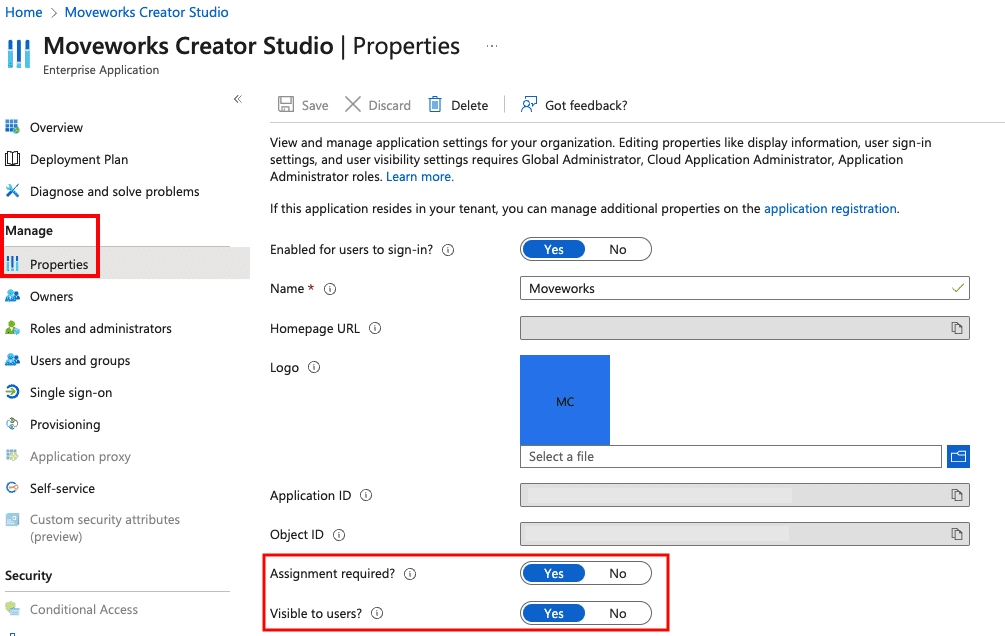
How do I assign users to an Entra Application?
-
Go to Enterprise Applications in Azure
-
Find the application you just registered.
-
From there, click Manage > Properties as shown below.
-
From the Properties page, toggle the Assignment required field to Yes, and Visible to users field to Yes as shown below.
-
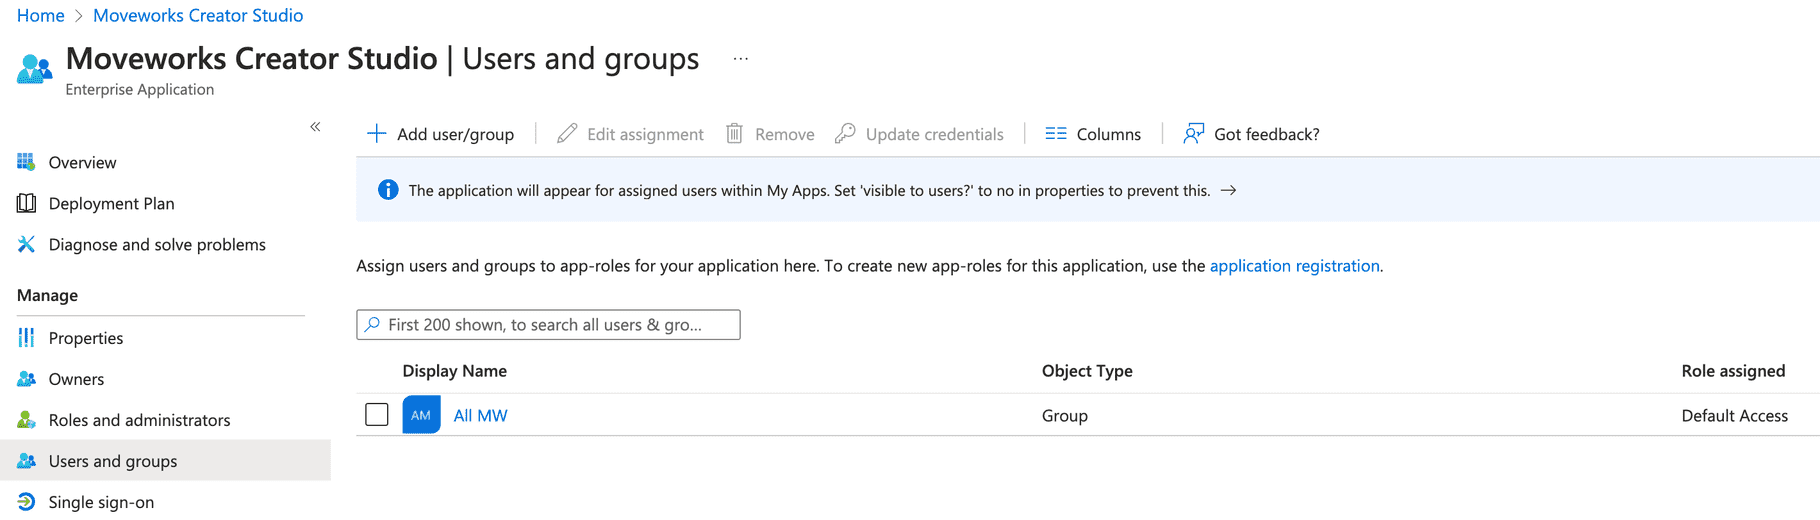
Navigate to the Users and groups section and assign the app to all users that need access to it either directly or via a group.
-
When your users navigate to the MyApps Portal after a few minutes, they should be able to see the app and login directly from there.

Updated about 1 month ago