Ticket Gateway: Configuration Guide
Ticket Gateway allows us to write custom HTTP actions, consisting of the endpoints discovered above, and create custom compound actions that the Moveworks platform uses to communicate with your external ticketing system.
The configuration process consists of five key steps:
-
Set up the connector – Establish a connection between Moveworks and your ticketing system.
- Navigate to the Moveworks Setup tool and go to the Built-in connectors page.
- Click +Create new and search for your system name.
- Select the authentication type you require and configure the details.
- Save the connector – This connector will be used while creating HTTP actions as well as in Moveworks Setup ticketing configurations.
-
Configure HTTP action endpoints – Define the API endpoints required for ticket actions (discovered in the previous section).
- The endpoints identified in the prerequisite step now need to be configured as individual HTTP actions.
- Use the Agent Studio product to create these HTTP actions.
- In the My Moveworks application, select Agent Studio and navigate to the HTTP actions section.
- Refer to this documentation for more details.
Let’s start creating HTTP actions. Follow the steps for specific actions required by Ticket Gateway:
Ensure that you configure all required HTTP actions:
- Required
- Create ticket action
- Connector: Select the connector you have created for the system. This will set the base URL and authentication details.
- API Path: Configure the API path based on your API discovery.
- Query Parameters: If your API path requires query parameters, add them in the query parameter section using mustache format, i.e.
{{variable_name}}. Usually, for creating tickets this is not needed, unless your system provides a different create-ticket API per ticket type. - Method: Select the HTTP method as POST.
- Request Body:
-
Add the request body with the fields required for ticket creation.
-
The system provides the following fields by default. If you are using an RTF Form (covered later), you will need to capture all RTF fields in this API call as well.
- The ticketing system automatically captures Description, Short Description, and Requester details when a user requests ticket creation from the AI Assistant.
- Define variables for these fields. These variables will later be mapped in the ticket gateway configuration.
{
  "description": "{{variable-1}}", //this variable maps to description
  "casetypecode": "3",
  "title": "{{variable-2}}", //this variable maps to the short description
  "customerid_contact": "contacts({{variable-3}})" //this variable maps to the end user ITSM ID
}
-
- Query ticket by ID
- Connector: Select the connector you have created for the system. This will set the base URL and authentication details.
- Method: Select the HTTP method as GET.
- API Path: Configure the API path based on your API discovery.
- Query Parameters: Add the
ticket_idin the query parameter section. This is usually required for this type of API. Adjust the value based on your API discovery.- Example:
/tickets?ticket_id={{ticket_id}}
- Example:
- Request Body: This API does not require a request body.
- Query ticket by requester
- Connector: Select the connector you have created for the system. This will set the base URL and authentication details.
- Method: Select the HTTP method as GET.
- API Path: Configure the API path based on your API discovery.
- Query Parameters:
- Add the
requester_idin the query parameter section. This is usually required for this type of API. Adjust the value based on your API discovery. Example:/tickets?requester_id={{requester_id}}. - Map a time window to limit the number of tickets to the last ~3 days. Set a query parameter to filter on
last_updated_time. The variable will depend on your API discovery.- Example:
/tickets?requester_id={{requester_id}}&start_date>{{start_date}}&end_date<{{end_date}}
- Example:
- Add the
- Request Body: This API does not require a request body.
- Query tickets by time range
- Connector: Select the connector you have created for the system. This will set the base URL and authentication details.
- Method: Select the HTTP method as GET.
- API Path: Configure the API path based on your API discovery.
- Query Parameters:
- Map a time window to define the time range. Set a query parameter to filter on
last_updated_time. Adjust the value based on your API discovery.- Example:
/tickets?start_date>{{start_date}}&end_date<{{end_date}}
- Example:
- Map a time window to define the time range. Set a query parameter to filter on
- Request Body: This API does not require a request body.
- Update state
- Connector: Select the connector you have created for the system. This will set the base URL and authentication details.
- Method: Select the HTTP method as PUT.
- API Path: Configure the API path based on your API discovery.
- Query Parameters:
- Add the
ticket_idin the query parameter section. This is usually required for this type of API. Adjust the value based on your API discovery.- Example:
/tickets?ticket_id={{ticket_id}}
- Example:
- Add the
- Request Body:
-
The request body must contain the state key, with its value set to a variable. The system provides this value based on the user action. For example, if a user closes a ticket, the external state value will be mapped according to the state mapping (defined later).
{
  "state": "{{variable-1}}" //this maps to the ticket state
}
-
- Add work-note
- Connector: Select the connector you have created for the system. This will set the base URL and authentication details.
- Method: Select the HTTP method as PUT.
- API Path: Configure the API path based on your API discovery.
- Query Parameters:
- Add the
ticket_idin the query parameter section. This is usually required for this type of API. Adjust the value based on your API discovery.- Example:
/add_notes?ticket_id={{ticket_id}}
- Example:
- Add the
- Request Body:
-
The request body should contain the mapping to the field where the comment is captured and the field that defines whether the comment is internal or external. The value for this field is provided by the system and added to the comment field. Details depend on your system—ensure you cross-check with your API discovery.
{
  "comment": "{{variable-1}}", //this maps to the comment provided by the end user
  "is_public": "false"
}
-
- Add comment
- Connector: Select the connector you have created for the system. This will set the base URL and authentication details.
- Method: Select the HTTP method as PUT.
- API Path: Configure the API path based on your API discovery.
- Query Parameters:
- Add the
ticket_idin the query parameter section. This is usually required for this type of API. Adjust the value based on your API discovery.- Example:
/add_notes?ticket_id={{ticket_id}}
- Example:
- Add the
- Request Body:
-
The request body should contain the mapping to the field where the comment is captured and the field that defines whether the comment is internal or external. The comment value is provided by the system when the end user provides a comment to the AI Assistant. Details depend on your system—ensure you cross-check with your API discovery.
{
  "comment": "{{variable-1}}", //this maps to the comment provided by the end user
  "is_public": "true"
}
-
- Add attachment
- Connector: Select the connector you have created for the system. This will set the base URL and authentication details.
- Method: Select the HTTP method as PUT.
- API Path: Configure the API path based on your API discovery.
- Query Parameters:
- Add the
ticket_idin the query parameter section. This is usually required for this type of API. Adjust the value based on your API discovery.- Example:
/add_attachments?ticket_id={{ticket_id}}
- Example:
- The file name is also required as a query parameter. This is fetched from the uploaded file details. Use the variable
{{file_name}}.- Example:
/add_attachments?ticket_id={{ticket_id}}&file_name={{file_name}}
- Example:
- Add the
- Request Body:
-
When the end user uploads an attachment, the file content is passed as a Base64 string in the request. Define a variable in the request body for this.
{
  {{variable-1}} //this maps to the Base64 string of the file content
}
-
- Resolve ticket (Only if this is a separate API from Update State)
- Connector: Select the connector you have created for the system. This will set the base URL and authentication details.
- API Path: Configure the API path based on your API discovery.
- Query Parameters:
- Add the
ticket_idin the query parameter section. This is usually required for this type of API. Adjust the value based on your API discovery.- Example:
/tickets?ticket_id={{ticket_id}}
- Example:
- Add the
- Method: Select the HTTP method as POST.
- Request Body:
-
To resolve a ticket, the status must be updated to "Resolved." The system passes this value when a user selects "Resolve issue" in the AI Assistant. The request body must contain the state key, with its value set to “RESOLVED” (or the equivalent value in your system).
{
  "state": "RESOLVED" //this maps to the resolved state in your external system
}
-
- Reopen ticket (Only if this is a separate API from Update State)
- Connector: Select the connector you have created for the system. This will set the base URL and authentication details.
- API Path: Configure the API path based on your API discovery.
- Query Parameters:
- Add the
ticket_idin the query parameter section. This is usually required for this type of API. Adjust the value based on your API discovery.- Example:
/tickets?ticket_id={{ticket_id}}
- Example:
- Add the
- Method: Select the HTTP method as POST.
- Request Body:
-
To reopen a ticket, the status must be updated to “New” (or “Active,” depending on your system). The system passes this value when a user selects "Reopen issue" in the AI Assistant.
{
  "state": "NEW" //this maps to the "New" state in your external system
}
-
- Create ticket action
- Optional – Only applicable if triage needs to be configured
- Update fields
- Connector: Select the connector you have created for the system. This will set the base URL and authentication details.
- Method: Select the HTTP method as PUT.
- API Path: Configure the API path based on your API discovery.
- Query Parameters:
- Add the
ticket_idin the query parameter section. This is usually required for this type of API. Adjust the value based on your API discovery.- Example:
/tickets?ticket_id={{ticket_id}}
- Example:
- Add the
- Request Body:
-
The request body should contain the field key and the respective value to be updated.
-
The system provides values for fields configured for updates. This is only needed for triage use cases. Define the key based on the update-ticket mapper and assign the variable.
{
  "description": "{{variable-1}}" //this maps to the description sent by the triage model
}
-
- Update assignment
- Connector: Select the connector you have created for the system. This will set the base URL and authentication details.
- Method: Select the HTTP method as PUT.
- API Path: Configure the API path based on your API discovery.
- Query Parameters:
- Add the
ticket_idin the query parameter section. This is usually required for this type of API. Adjust the value based on your API discovery.- Example:
/tickets?ticket_id={{ticket_id}}
- Example:
- Add the
- Request Body:
-
The request body must contain the assignment group key, with its value set to a variable. The system provides this value based on the triage model prediction.
{
  "assignment_group": "{{variable-1}}" //this maps to the assignment group sent by the triage model
	"assignee_id":"{{variable-2}}" //this maps to the assignee id sent by the traige model
}
-
- Update fields
-
Set up the Ticket Gateway configuration – Configure the compound actions for each TAS endpoint. Navigate to Moveworks Setup → Ticketing configurations, go to the Ticket Gateway setting, and click Create.
- Select the connector you created for the integration.
- For each TAS endpoint, you will see a step block. This is similar to configuring a compound action in Agent Studio. Only
actionsandreturnblocks are supported—no scripts or operators. - Structure of steps in Ticket Gateway configuration
-
A compound action is configured within a steps block. You can add one or more action block, each executing a specific HTTP call. The result of one action can be used as input for subsequent actions.
-
Each action within the
stepsblock contains:action_name: The unique name of a pre-configured HTTP action to execute.input_args: Defines the JSON payload sent to the HTTP action. You can map system-provided data into this JSON or use static values. This accepts Moveworks Data Mapping Syntaxoutput_key: A variable name to store the JSON response received from the action. This variable can be referenced in later steps or in the final output.
-
After all steps are executed, a final
returnblock is required.output_mapper: Maps the data stored in youroutput_keyvariables into the final JSON structure required by the Moveworks platform. For specific query actions, this output must align with the official Moveworks ticket schema.- The output_mapper is a JSON bender and thus it accepts Moveworks Data Mapping Syntax
-
Using the input context to create
input_argsLet’s take an example and understand how we will form a input_args for each action. Our use-case to configure action block of - Query ticket by time range. This end point is used by the Moveworks ticket poller. Every 30 seconds a API call is made to your system in order to fetch the recently created or updated tickets.
In this case - The
start_timeandend_timeis variable and is provided by the Moveworks system. This following block covers the context that is passed by the system.// Provided as data.context to your compound action { string start_time; string end_time; string ticket_type; }While creating the HTTP action we added placeholder variables for
start_timeandend_timewe now need to map it so these values can get propagated till the HTTP action level. These variables are wrapped underdata.context.{{variable_name}}ensure you usedata.contextininput_argssteps: - action: action_name: fetch_ticket_by_time_range # HTTP Action in Agent Studio output_key: raw_tickets input_args: start_time: data.context.start_time # Refering to start_time from input context end_time: data.context.end_time # Refering to the end_time from input context return: output_mapper: raw_tickets: - data.raw_ticketsRefer to this documentation to learn more about input context available on each HTTP action.
Chaining actions and using output of action in a subsequent action
If your HTTP action requires chaining of actions and parsing data from one action to another - This can be done in the ticket gateway configuration.
Let’s take a example of a scenario where your ticketing system needs chaining of two API calls in order to fetch a ticket the first API fetches the ticket and the second API is fetching the comments on the ticket. While ingesting the ticketing in Moveworks we also need the comments/ work-notes this enables multiple use-cases downstream such as
- Updating end users about a new comment made by a agent
- Using the added comment to categorize tickets in EXI
The output_mapper support Moveworks Data Mapping Syntax - We are using the
MERGE()function here to join results from two different HTTPsteps: - action: action_name: action_1 output_key: raw_ticket input_args: ticket_id: data.context.ticket_id.$SPLIT('-')[0] - action: action_name: action_2 output_key: ticket_comments input_args: ticket_id: data.raw_ticket.id #using the id of the ticket fetched in the first step return: output_mapper: raw_ticket: MERGE(): - data.raw_ticket - comments: data.ticket_commentsYAML Configuration Examples
Here are a couple of examples of how steps can be configured in YAML.
-
Example 1: Create ticket
This example only uses a single action to create a ticket and output of that action is a ticket generated in the external ticketing system.
steps: - action: action_name: create_ticket output_key: raw_ticket input_args: requestor_email: data.context.requestor.email requestor_id: data.context.requestor_external_itsm_user_id title: data.context.short_description description: data.context.description priority: "4" #static priority for all tickets that are created through Moveworks return: output_mapper: raw_ticket: - data.raw_ticket -
Example 2: Resolve ticket
steps: - action: action_name: resolve_ticket output_key: raw_ticket input_args: ticket_id: data.context.ticket_id.$SPLIT('-')[0] return: output_mapper: raw_ticket: - data.raw_ticket -
Example 3: Add comment (public)
steps: - action: action_name: add_comment output_key: raw_comment_response input_args: ticket_id: data.context.ticket_id.$SPLIT('-')[0] comment: data.context.comment -
Example 4: Update assignment
steps:
  - action:
      action_name: update_assignment
      output_key: raw_ticket
      input_args:
	      ticket_id: data.context.ticket_id.$SPLIT('-')[0]
	      assignee_group: data.context.assignee_group
	      assignee_id: data.context.assignee_id
-
Setting up the ticket output mapper
The
output_mapperis a required component that formats the final output to match the Moveworks ticket schema. The expected structure depends on whether the action returns a single ticket or a list of tickets. The value inside the output mapper should be aligned to one of the following schema type.
-
Single Ticket Schema
For actions expected to return a single ticket, the output must be a JSON object with the following structure.
This schema is required for these actions:
Query ticket by idGenerate ticket
{
  "id": "string", //required - This refers to UUID in API response for a ticket
  "external_id": "string", //required - This refers to the end user facing ticket id. This can be same as the "id" field
  "state": "string", //required
  "sub_state": "string", //optional - Substate can be configured in ticket destination state mapping
  "opened_at": "Timestamp", //required
  "closed_at": "Timestamp", //required
  "resolved_at": "Timestamp", //optional ( depends on system , some system have resolved as closed)
  "updated_at": "Timestamp", //required
  "resolved_by": "string", //required - This can be your email ID for ITSM ID - Whatever you map here should be mapped into Ticket attribute mapping
  "closed_by": "string", //required - This can be your email ID for ITSM ID - Whatever you map here should be mapped into Ticket attribute mapping
  "short_description": "string", //required
  "description": "string", //required
  "activity_log": [
    {
      "ts": "string",
      "by": "string",
      "full_text": "string" //Comment or worknote - Example : "Test comment"
    }
  ],
  "requested_for": "string", //required
  "assigned_to_user": "string", //required
  "external_url": "string", //required
  "display_ticket_id": "string" //required
}
-
Ticket List Schema
For actions that return multiple tickets, the output must be a JSON array of ticket objects. Each object in the array must conform to the Single Ticket Schema shown above.
This schema is required for these actions:
Query ticket by requesterQuery ticket by time-range
[
  { ... // Ticket Object 1 },
  { ... // Ticket Object 2 },
  ...
]
Example mapping for updated_by and requested_for : we map external_id of user_itsm_id_info to respective field of user in the external_system ( can be email or external_id)
"updated_by": {
    "CONDITIONAL()": {
      "condition": "_modifiedby_value",
      "on_pass": {
        "user_id_info.user_itsm_id_info": [
          {
            "external_id": "_modifiedby_value"
          }
        ],
        "external_system_identities.unknown_system.external_id": "_modifiedby_value"
      }
    }
  }
Internally in the ticket action service we resolve the user using this external_id and get other details of the user ( user_proto from iris) like name , email , employee details.
-
-
Set up Moveworks ticketing configurations – Finalize platform-level settings for seamless integration.
-
Complete Ticket Gateway configurations before proceeding with Ticket Action configurations.
This includes setting up ticket destinations, ticket attribute mapping, and payloads for the following actions:
- Create Ticket
- Update Ticket
- Resolve Ticket
- Reopen Ticket
-
Navigate to:
Moveworks Setup → Ticketing automation → Ticketing → Ticketing settingsReview this documentation to understand ticketing configuration and Moveworks terminology.
-
Create a new ticketing configuration:
- Click Create and select the connector you configured for the system.
-
Configure ticketing system details:
- Name for the ticketing system – Provide a name for this configuration.
- Select Connector – Choose the connector configured earlier (see guide).
- Bot Service Account ID – The service account ID of the Moveworks bot in your ticketing system.
- Ticket Redirect URL Format – Define the redirect URL format for tickets.
- Link to View All Tickets – Provide an end-user–facing URL where users can view all their tickets.
-
Add Ticket Destinations:
A ticket destination groups similar types of tickets. For example:
- Break-fix tickets → Incidents
- Hardware/software requests → Service Requests
-
Define configuration per destination: (Refer to the Moveworks Data Mapping Guide)
- Ticket Attribute Mapping – Map fields so Moveworks can interpret tickets from your system.
- Prefix Setup – Define prefixes for tickets (e.g.,
IT-xyz,HR-fed). - State Mapping – Configure state transitions so Moveworks can interpret workflows in your system:
- From states – Map existing system states to Moveworks states.
- To states – Match external system states to Moveworks’ states for action execution.
- Configure Payloads for each action (ensure fields match
input_argsand HTTP request body):- Create Ticket Payload – Sent to the ticketing system and parsed in the “create ticket” compound action.
- Resolve Ticket Payload – Used when resolving tickets.
- Update if Empty Payload – Updates empty fields; must be mapped in the update ticket HTTP action and compound action.
- Update Ticket Payload – Used for updates; if triage is enabled, ensure assignment group/fields are mapped here and in the compound action.
- Reopen Ticket Payload – Used when reopening tickets.
-
Configure Ticket Routing and Workflows (TGS configurations):
- Routing and workflows define the steps triggered when a user requests to create, update, or resolve a ticket.
- Refer to workflow documentation.
- Configure routing by selecting:
- A default workflow
- Conditional workflows based on ticket attributes
- Map workflows for Query, Create, Update, Resolve, and Reopen actions.
- TGS passes the payload through TAS and invokes the compound actions defined earlier.
-
Configure Identity Settings:
-
Refer to identity documentation.
-
Map the
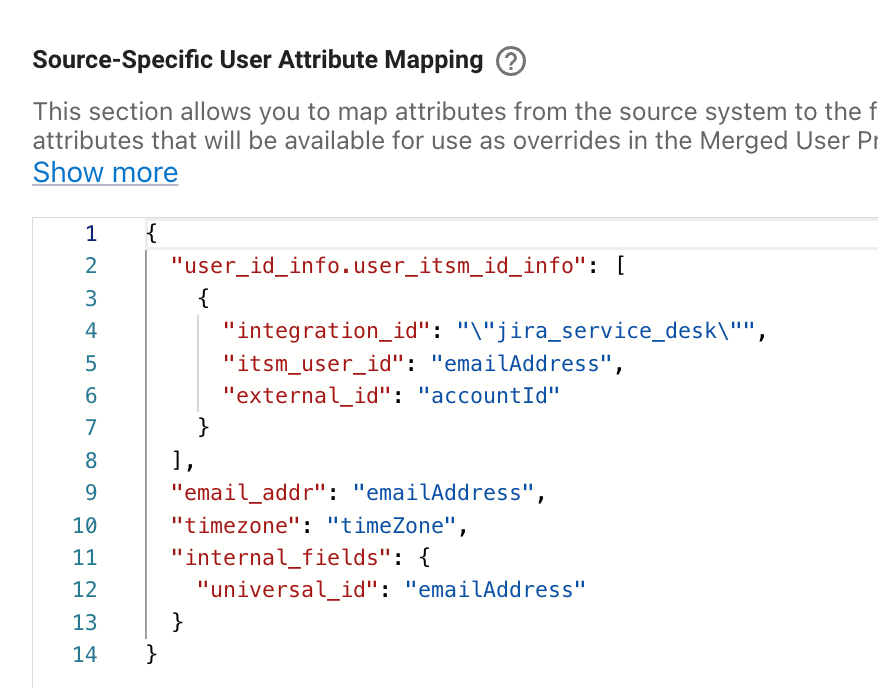
itsm_user_id(external user ID from your ticketing system). This ensures Moveworks correctly associates tickets with the user who created them. -
Example mapping
-
-
-
Updated 16 days ago