Configure Ticketing for Zendesk
This guide walks you through configuring ticketing in Zendesk so that Moveworks can create, update, resolve, comment, notify, and route tickets according to your workflows.
Before starting, make sure you meet the required access and permissions: See the Zendesk Access Requirements.
Prerequisites
-
Make sure you have the following before configuring:
- Service accountcreated in production in with all permissions outlined in the Zendesk Access Requirements document.
- Moveworks Zendesk Connector created in Moveworks Setup
-
If you'd like to limit the new ticketing integration to a specific list of users for testing, follow the steps below:
- Navigate to Resource Permissions > Permission Rules
- If you have an existing Zendesk integration rule edit it, or otherwise create a new record with the following setup:
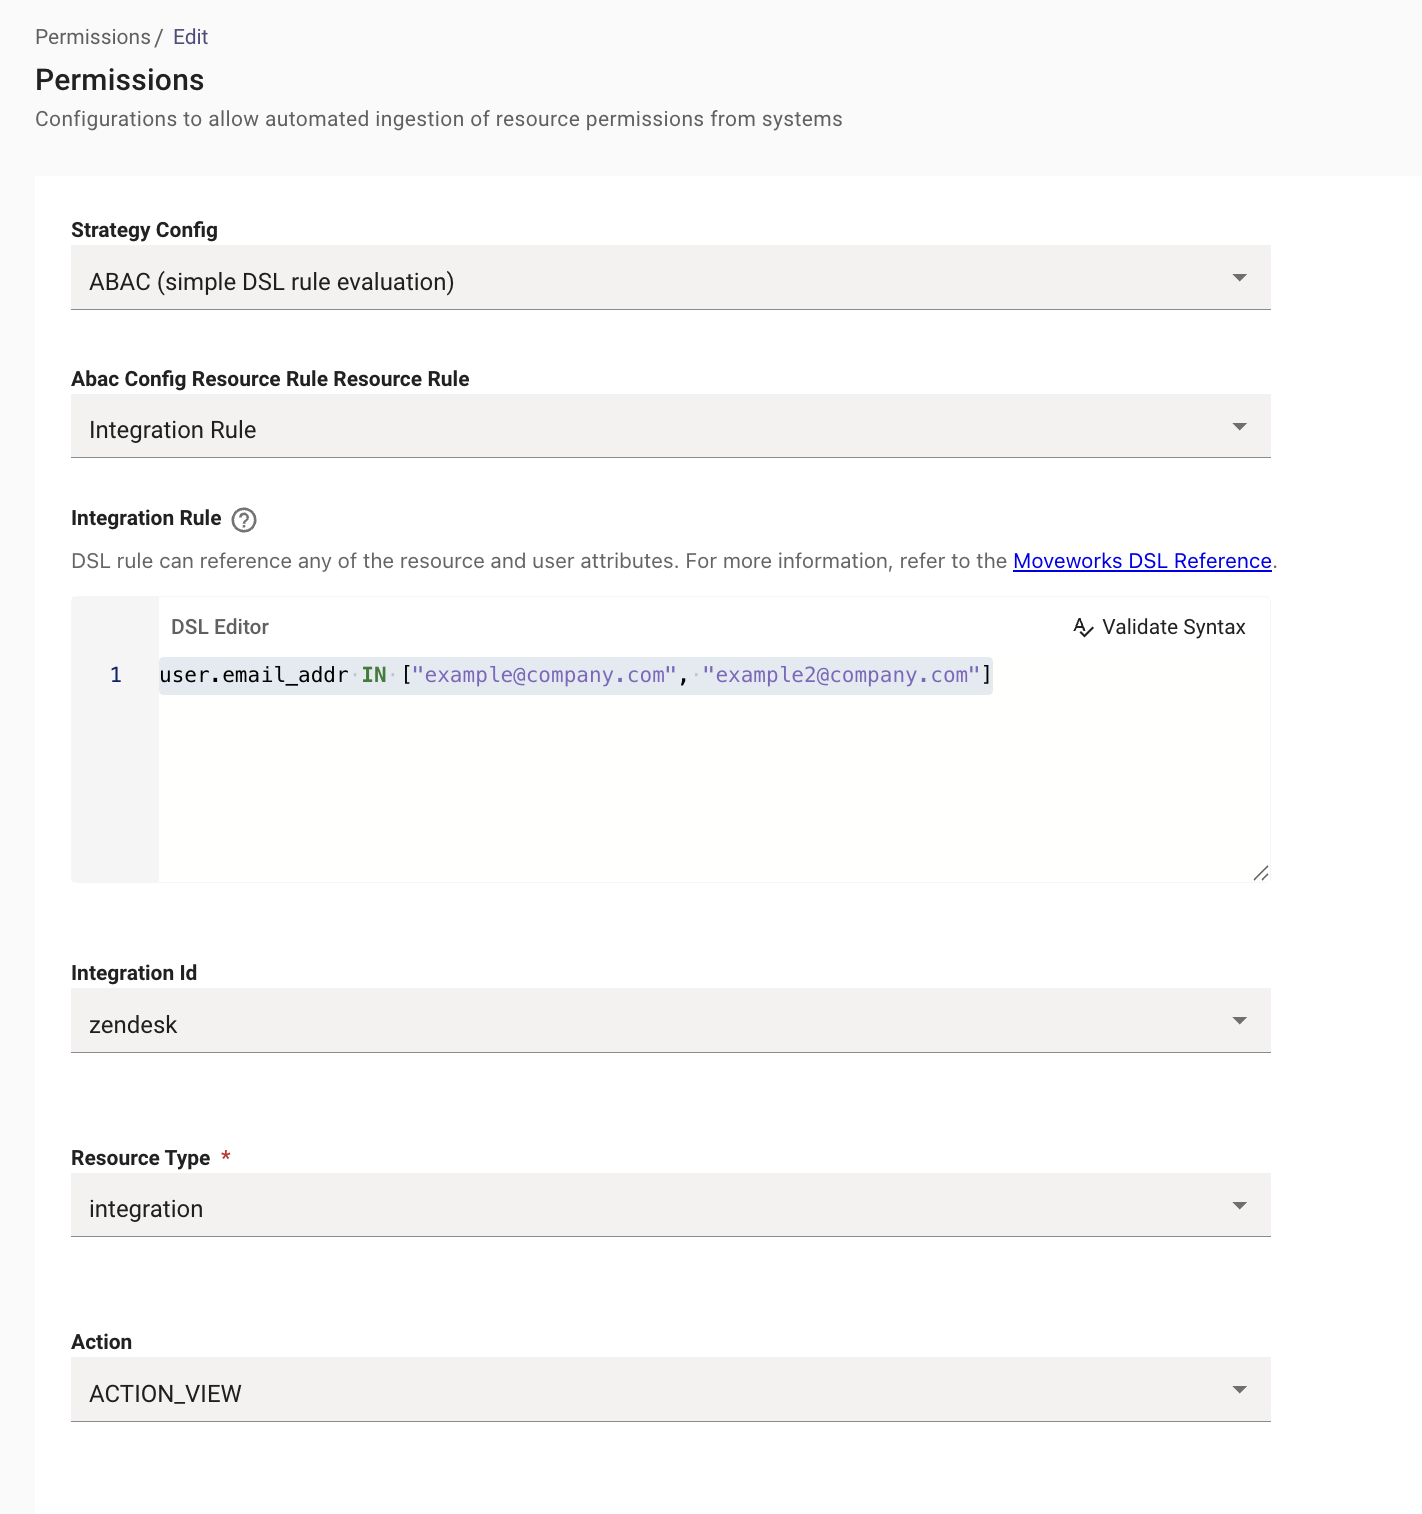
This setup will restrict ticket actions in Zendesk to the users specified in the Integration Rule. Be sure the change this permission configuration from ABAC to Public to all members of the organization prior to launching the new ticketing setup to all users.
Step 1: Create a new Ticket Mapping Configuration for Zendesk
- In Moveworks Setup, go to Ticketing > Ticket Settings > Ticket Mapping.
- Create a new configuration by clicking the "Create" button
- Input the following details:
- Name for the ticketing system - this can simply be "Zendesk" or "Zendesk" followed by the department name if your organization uses more than one instance of Zendesk.
- Note: If there are several departments using one instance of Zendesk, all of the ticketing setup will exist in the same ticket mapping record within Moveworks Setup. Multiple ticket mapping records are only needed if you have two different ticketing systems or multiple instances/environments of a ticketing system.
- Select Connector - Chose the Zendesk connector you created to connect to Zendesk
- Primary - Check primary if this system will be your primary/default ticketing system for ticket creation
- Bot Service account Id - Input the numeric Zendesk ID of the service account created for the Moveworks connector
- Link to view all tickets - Typically set to https://instancename.zendesk.com/hc/en-us/requests
- Leave the following options blank or unchecked:
- Ticket redirect URL format
- Select ticket actions that require user impersonation
- Hide view all ticket links
- Hide all ticketing system redirect links
- Allow ticket link redirects to ITSM system.
- Name for the ticketing system - this can simply be "Zendesk" or "Zendesk" followed by the department name if your organization uses more than one instance of Zendesk.
Step 2: Add Ticket Destinations
In this step, you will input the ticket types you use in Zendesk and map them to a Moveworks ticket type.
Zendesk has four defined ticket types: Question, Incident, Problem, and Task. Each of these ticket types will be mapped to a ticket type in Moveworks. We recommend mapping Incident and Problem to the Moveworks ticket type Incident and Question and Task to the Request ticket type.
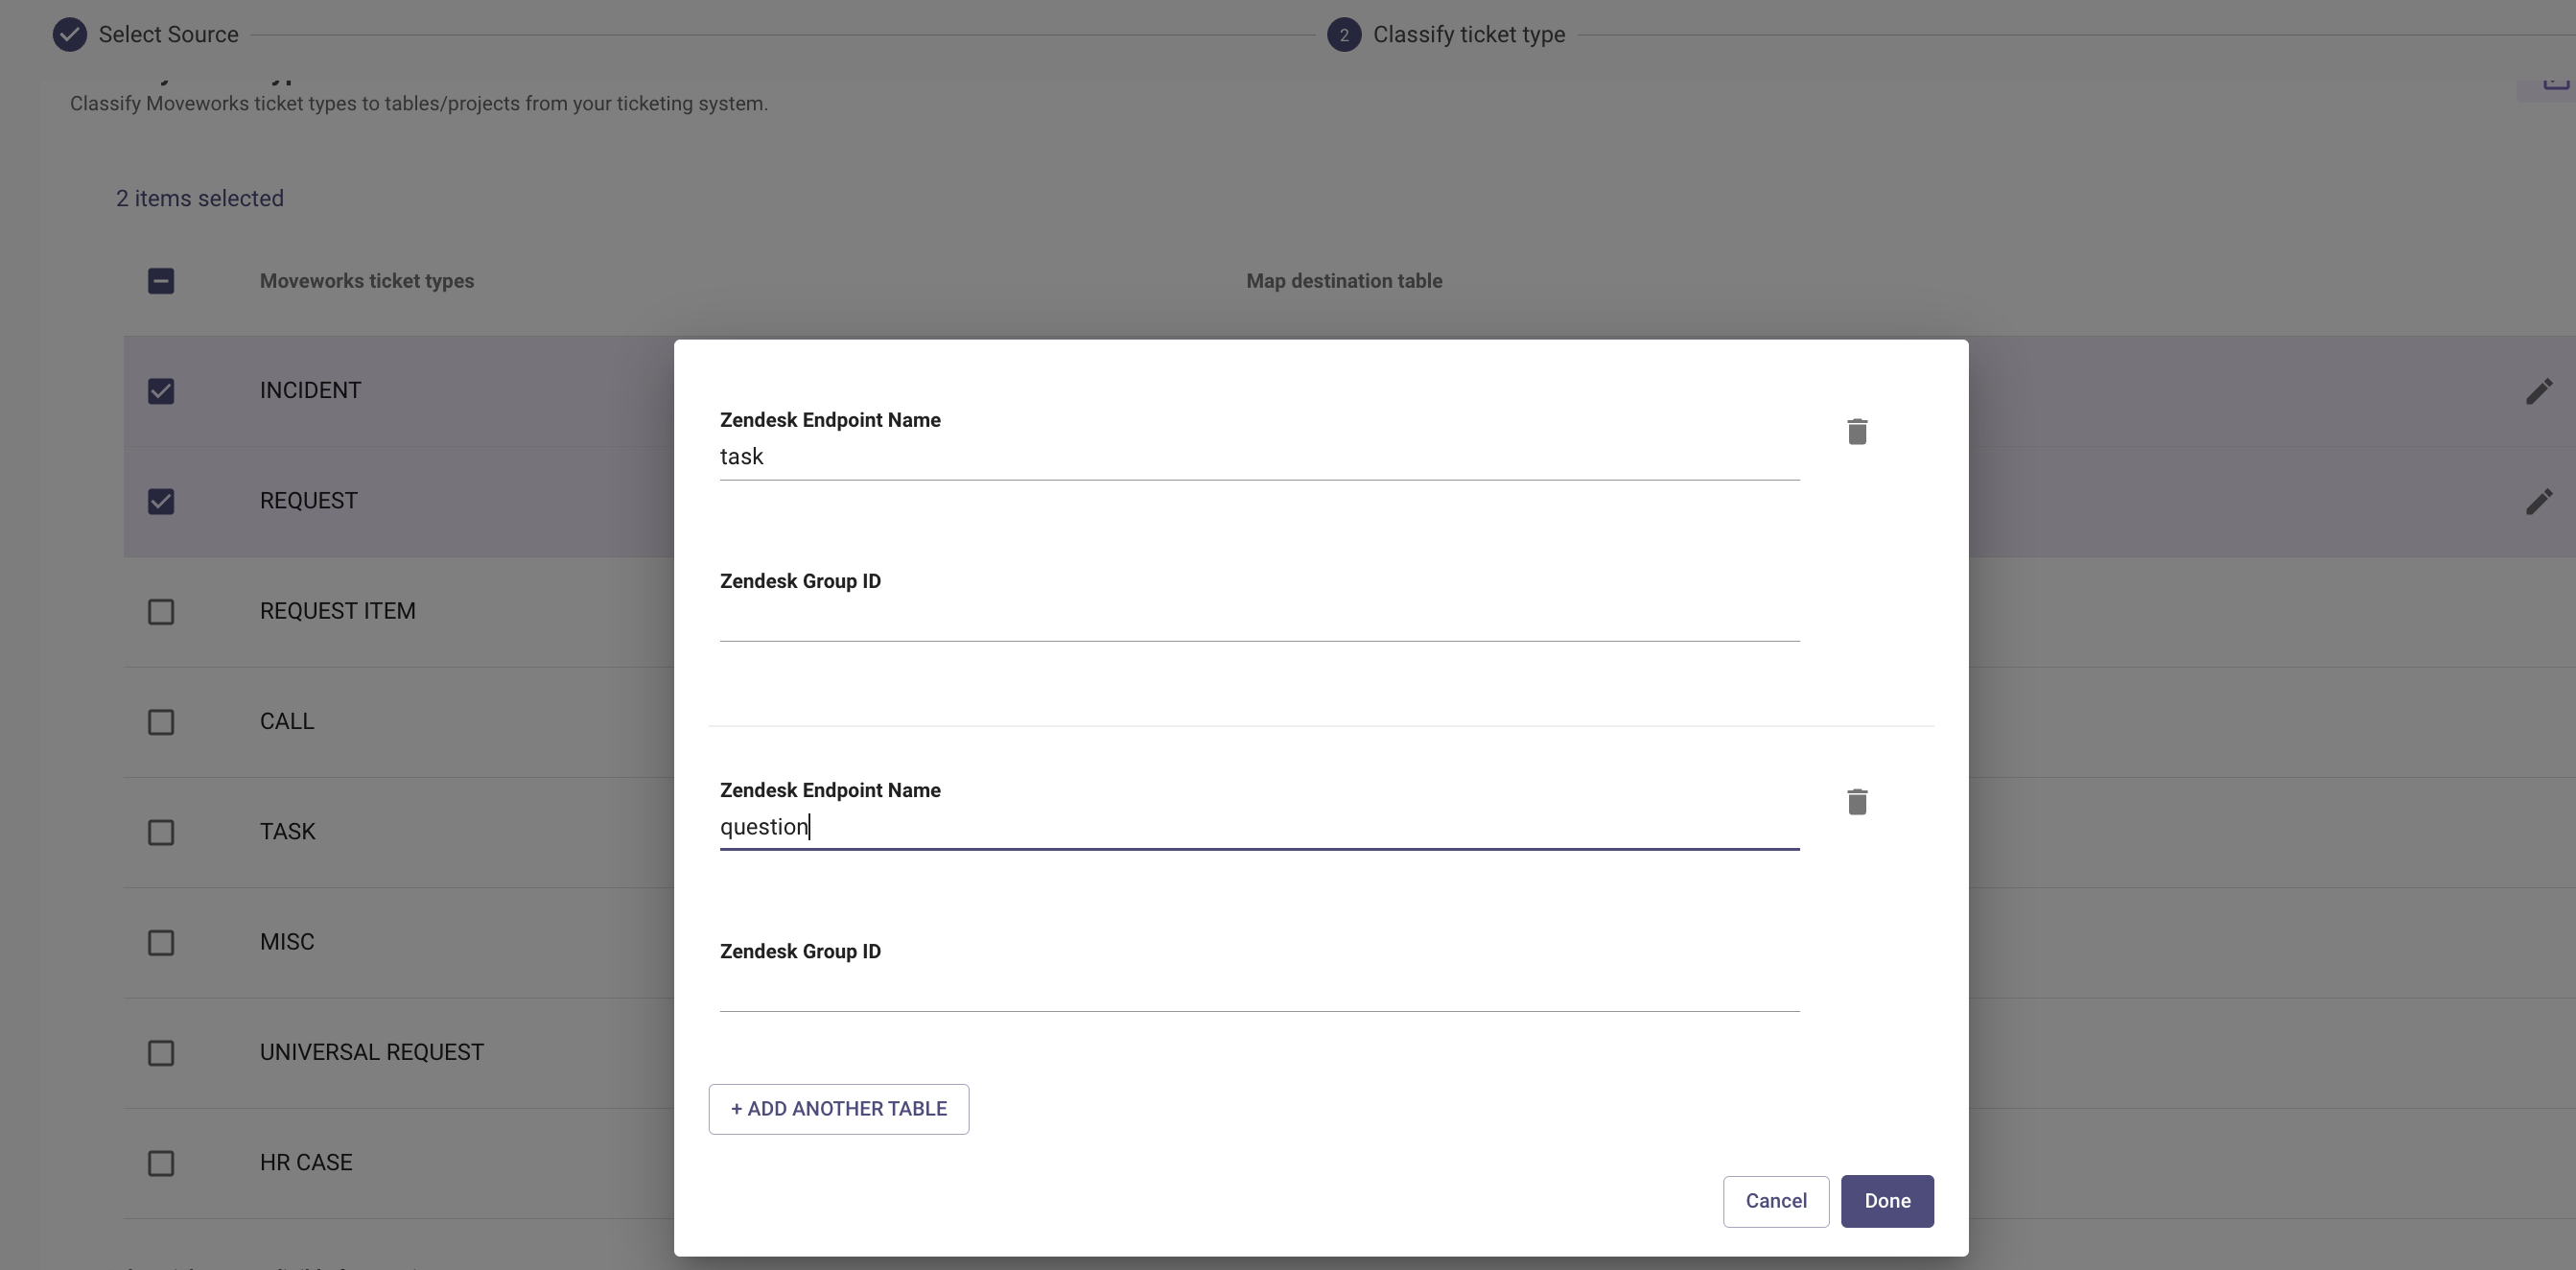
- Click Next: Add Destinations
- Check off the Moveworks ticket types you would like to map your Zendesk ticket types to
- Click the pencil to the right of the selected ticket type and input all ticket types that should map to the selected Moveworks ticket type
In the example below, we've mapped the Zendesk types 'incident' and 'problem' to the Moveworks 'Incident' ticket type.

In the example below, we've mapped the Zendesk types 'task' and 'question' to the Moveworks 'Request' ticket type
- Select ticket type eligible for polling - select all Moveworks ticket types that Moveworks should poll regularly to check for ticket updates. This is required for ticket update notifications, nudge notifications, and analytics.
- Select ticket type eligible for concierge - select all Moveworks ticket types that should be eligible for users to receive ticket update notifications via your AI Assistant. This is required for ticket update notifications and ticket nudge.
Step 3: Add Ticket Mappers
In this step you will define payloads for each action Moveworks will take.
- Click Next: Add Ticket Mappers
- Starting with the first ticket type, click the pencil to add the ticket attribute mapping. Ticket attribute mapping maps the Zendesk ticket fields to Moveworks defined ticket fields so that behind the scenes within Moveworks ticket fields are consistent across ticket types and ticketing systems.
- Click Ticket JSON Mapper and input fields to input the mapping in JSON. Within Moveworks Setup, you'll see keys on the left of the colon in red, which are the Moveworks defined ticket fields. To the right of the colon, you'll specify the field name from Zendesk to map to the Moveworks field.
Below is a standard Zendesk ticket attribute mapping example. You can copy and paste this into your attribute mapping. Review the fields to the right of the colon and update as needed if your organization has customized Zendesk.
{
  "closed_at": "$TIMECONV(dates.solved_at)",
  "contact_type": "via.channel",
  "assignment_group": "$TEXT(group_id)",
  "created_at": "$TIMECONV(created_at)",
  "id": "$TEXT(id)",
  "description": "description",
  "requested_for": {
    "CONDITIONAL()": {
      "condition": "$TEXT(requester_id)",
      "on_pass": {
        "user_id_info.user_itsm_id_info": [
          {
            "external_id": "$TEXT(requester_id)"
          }
        ],
        "external_system_identities.unknown_system": {
          "external_id": "$TEXT(requester_id)"
        }
      }
    }
  },
  "assigned_to_user": {
    "CONDITIONAL()": {
      "condition": "$TEXT(assignee_id)",
      "on_pass": {
        "user_id_info.user_itsm_id_info": [
          {
            "external_id": "$TEXT(assignee_id)"
          }
        ],
        "external_system_identities.unknown_system": {
          "external_id": "$TEXT(assignee_id)"
        }
      }
    }
  },
  "type": "type",
  "updated_at": "$TIMECONV(updated_at)",
  "resolved_at": "$TIMECONV(dates.solved_at)",
  "external_id": "$TEXT(id)",
  "created_by": {
    "CONDITIONAL()": {
      "condition": "$TEXT(submitter_id)",
      "on_pass": {
        "user_id_info.user_itsm_id_info": [
          {
            "external_id": "$TEXT(submitter_id)"
          }
        ],
        "external_system_identities.unknown_system": {
          "external_id": "$TEXT(submitter_id)"
        }
      }
    }
  },
  "short_description": "subject"
}-
Scroll down and repeat this setup for each ticket type. (You will see ticket attribute mapping multiple times on the page if you've configured multiple Zendesk ticket types. Be sure to populate the mapping for each one).
Note: You can select Use Same As Ticket Destination to use the same mapping you configured for the previous ticket type if the mapped fields are the same between the two ticket types.
-
Next, configure Ticket State Mapping for each ticket destination. Click the pencil next to Ticket State Mapping and choose Map Internal-External States
- Click Add under Map Internal-External States and choose NEW from the dropdown to define which Zendesk states correspond to NEW
- Under From External States Values list all of the states in Zendesk that are equivalent to NEW state. Standardly, Zendesk new state will be listed.
- Under To External State Value map the state that Moveworks should transition the ticket to if the user requests to reopen the ticket. Standardly, Zendesk "open" state will be listed.
- Next, repeat steps i,ii, and iii for the the following Moveworks State values: (We've input the standard configuration values for reference)
- WIP
- From External States Values: open
- To External State Value: open
- WAITING FOR USER
- From External States Values: pending
- To External State Value: pending
- RESOLVED
- From External States Values: solved
- To External State Value: solved
- CLOSED
- From External States Values: closed
- To External State Value: closed
- WIP
- Lastly, repeat steps i through iv for all Zendesk ticket types. You can choose Use Same As Ticket Destination if the state mappings are consistent between ticket types.
-
Next, specify the domain or department that the ticket type is used for by clicking the pencil next to Domain.
-
Next, configure the Prefix set-up. Click the pencil next to Prefix set-up to set the prefix. You can set the prefix to the ticket type such as "incident" or "task" or you can use a prefix like "ticket". This value will be prefixed to the ticket number in concierge ticket update notifications.
- Repeat this step for all Zendesk ticket types.
-
Next, configure the Table Name for each Zendesk ticket type. This value should match the ticket type such as "incident", "task", "question", "problem"
-
Next, configure the Create Ticket Payload for each Zendesk ticket type. The Create Ticket Payload defines which fields will be populated upon ticket creation. Click the pencil next to Create Ticket Payload and click Ticket JSON Mapper. To the left of the colon is the Zendesk field to populate. To the right of the colon is the hard coded value or variable to use to populate the field.
- Moveworks has several system variables that are used to populate ticket fields such as "description", "short_description", and "mw_user.requested_for". In addition to system variables, you can leverage Rich ticket filing to change the ticket filing experience to form based, and require users to populate additional variables which can then be used in ticket creation. For more information on Rich Ticket Filing review the Rich ticket filing documentation. Below is an example Create Ticket Payload mapping for Zendesk that demonstrates how to pass fields from a rich ticket filing form to a custom field (line 3) and pass a hard coded value such as group ID (line 16) or define type and priority (line 22 and 23):
{
  "custom_fields": {
    "$[\"12395974\"]": "category_rtf"
  },
  "requester_id": "requested_on_behalf_of OR mw_user.requested_for",
  "group_id": {
    "COALESCE()": {
      "items": [
        "group_id",
        "\"78832920\""
      ]
    }
  },
  "comment.body": "description",
  "subject": "short_description",
  "type": "\"incident\"",
  "priority": "\"normal\""
}-
Next, configure the Resolve Ticket Payload for each Zendesk ticket type. The Resolve Ticket Payload defines which fields will be populated upon ticket resolution. Click the pencil next to Resolve Ticket Payload and click Ticket JSON Mapper. To the left of the colon is the Zendesk field to populate. To the right of the colon is the hard coded value or variable to use to populate the field.
Below is an example Resolve Ticket Payload mapping for Zendesk used to populate a custom resolution notes field with a hard coded resolution note..
{
  "custom_fields": {
    "$[\"14125336807591\"]": "\"Resolved via AI Assistant\""
  }
}
Note: Update Ticket Payload and Reopen Ticket Payload are typically not necessary to configure.
- Click confirm setup to save the configurations you have input
Step 4: Set Up Workflows & Routing
Moveworks Ticket workflows allow you to create different ticketing workflows for ticket creation, update, resolution, and reopening. Common ticket workflow useage includes:
- Defining when to create specific ticket types. For example, by default, you may decide to create Zendesk Incident type tickets for all non specific user initiated requests but create a Task ticket for software provisioning and access account tickets.
- You may also use a different ticketing system for IT vs HR or other domains. Ticket workflows allow you to specify which ticket type is created for each domain.
- Adjusting ticket closure steps. Some organizations will choose to only allow users to leave a note on the ticket indicating it may be closed rather than fully closing the ticket state.
Follow the steps outlined in the Configure Ticket Workflows Guide to create your ticket routing conditions and ticket workflows.
Step 5: Add a File Ticket Handoff Item
To allow users to file your newly configured ticket type in AI Assistant, you'll need to create a new handoff item.
-
Navigate to Handoff > Handoff Settings
-
Create a new Handoff Category if necessary under Setup handoff categories
- You'll need to use the Category display key in step 4 so be sure to note it down
-
Create a new Handoff Item under Setup Items For Categories
-
You'll need to use the item display key in the next step so be sure to note it down.
-
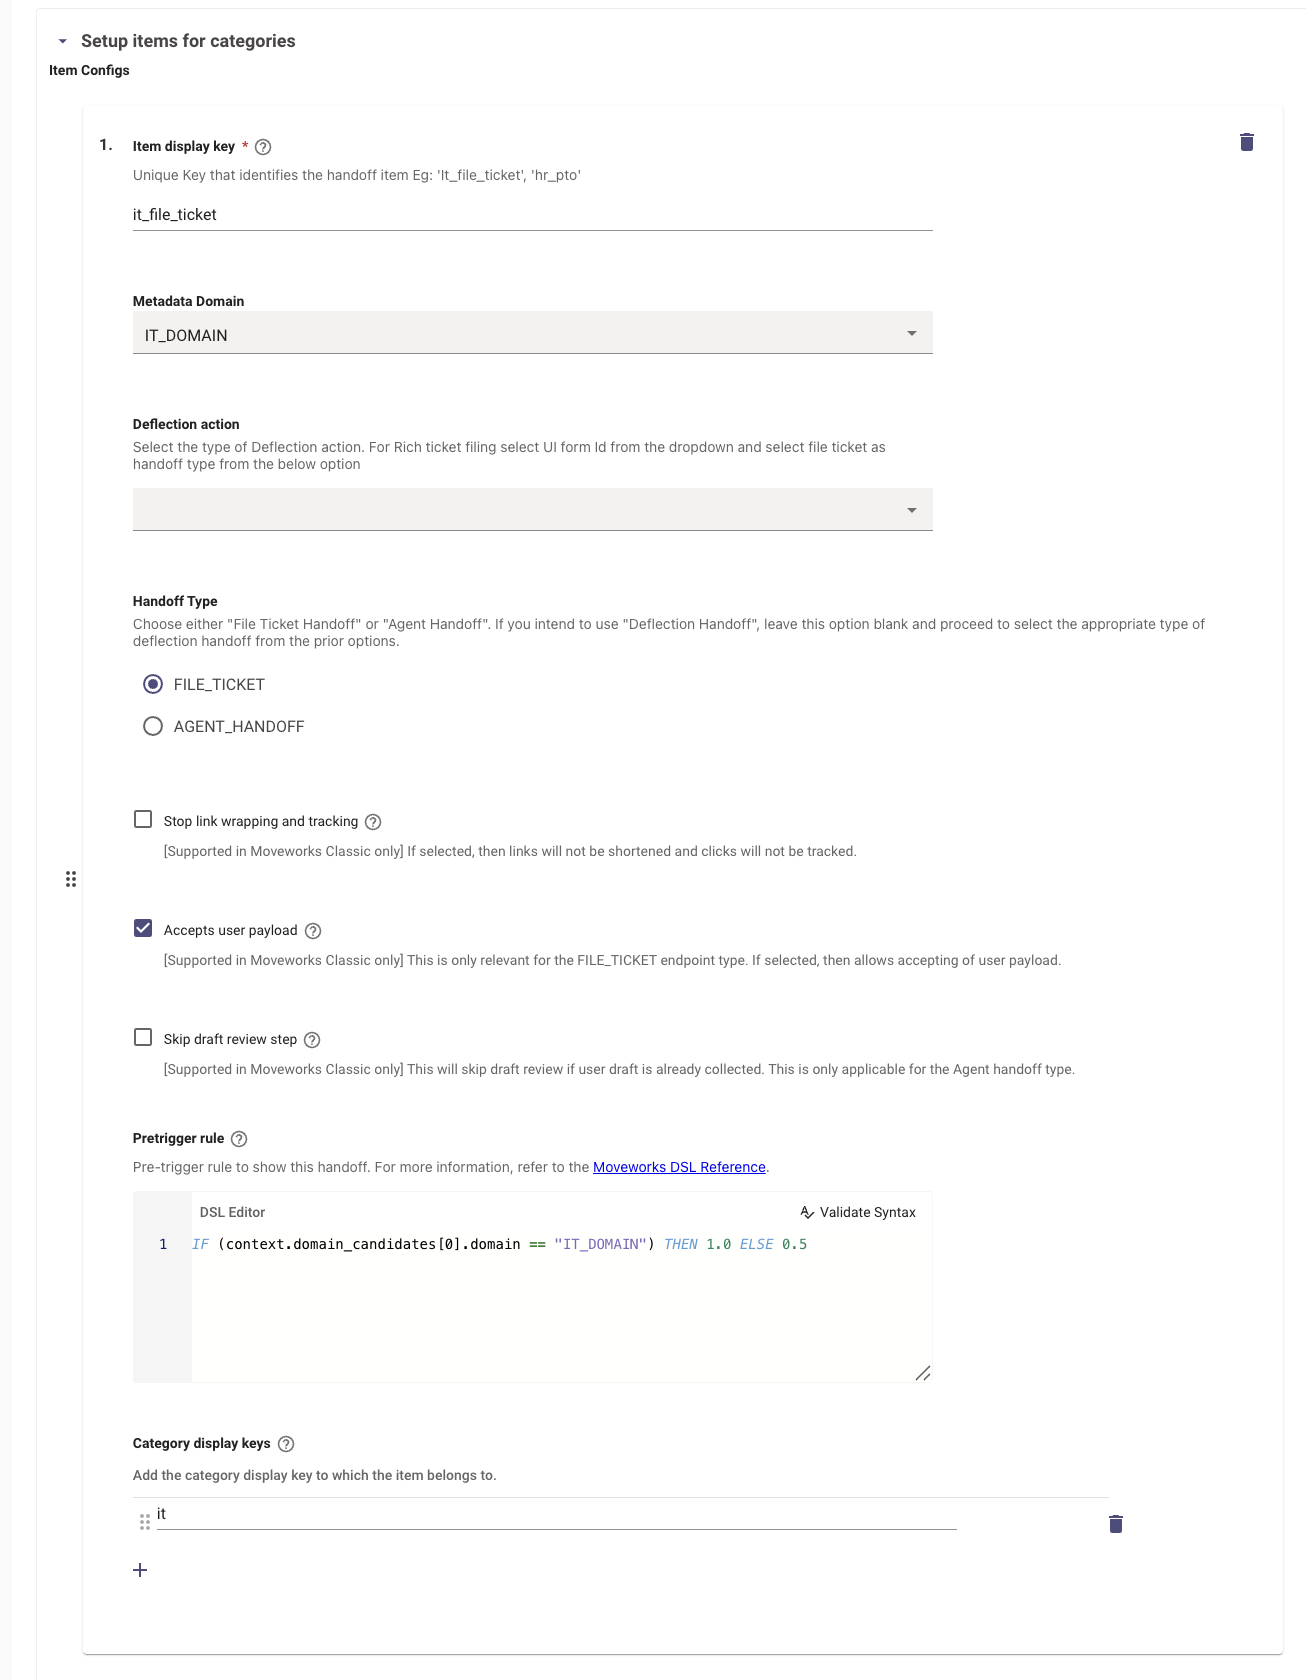
Note: You can restrict the handoff item to specific test users during the testing stage. To restrict the handoff item to a list of users, configure the pretrigger rule like the following:
IF (context.domain_candidates[0].domain == "IT_DOMAIN") AND user.email_addr IN ["[email protected]", "[email protected]"] THEN 1.0 ELSE IF user.email_addr IN ["[email protected]", "[email protected]"] THEN 0.5 ELSE 0.0Click Submit to save the configuration updates.
-
-
Next, define the labels for the category and handoff item you created in steps 2 and 3 by navigating to Display Configurations within Moveworks Setup.
-
Under Handoff, populate the following fields:
- Map of descriptions for handoff categories. Each key must match to a valid handoff category in Handoff config. (handoff_category_desc): - add the category display key from step 2 under Key and type a user facing description of the category under Value
- Under Map of actions for handoff items. Each key must match to a valid handoff item in Handoff config. (handoff_item_action_texts) add the item display key from step 3 under Key and add an action text such as Submit Ticket under Value
- Under Map of names for handoff items. Each key must match to a valid handoff item in Handoff config. (handoff_item_names) add the item display key from step 3 under Key and add a label such as File an IT Ticket under Value
- Under Map of names for handoff categories. Each key must match to a valid handoff category in Handoff config. (handoff_category_names) add the category display key from step 2 under Key and define the category label under Value
- Under Map of overviews for handoff categories. Each key must match to a valid handoff category in Handoff config. (handoff_category_overview_desc) add the category display key from step 2 under Key and define the category overview under Value.
-
Step 6: Add Zendesk as a User Import Source
This is a required step to enable ticket in Zendesk as your AI Assistant will need the users' Zendesk IDs to create tickets. Follow the steps below to add Zendesk as a user import source:
- Navigate to User Identity > Import Users
- Edit the existing configuration and add Zendesk under Select sources to ingest employees
- Click Next twice to advance to the Set Join Key.
- Typically, Zendesk will be set to the below join key, which specifies the email field from the Zendesk user record as the value to match that user record to their records in other systems.
"{"simple_eval": {"expression": {"rule_v2": "email"}}}"
- Typically, Zendesk will be set to the below join key, which specifies the email field from the Zendesk user record as the value to match that user record to their records in other systems.
For more information on user import configuration, review the User Identity Configuration Guide.
Updated 5 months ago
Configure Form Ingestion and Knowledge Ingestion