Employee Communications
Overview
Moveworks’ Employee Comms enables organizations to broadcast custom messages to all or a subset of users in your organization, via the Moveworks bot.
This allows administrators to alert users of important announcements such as new policies, software migrations, and changes to benefits. Employee Comms let you reach the right users with the right message, by letting you select which users will receive your curated message. The Moveworks bot can also tailor messages with information that is uniquely relevant to each employee, based on their location, employment status, department, etc. This ensures users are more likely to read messages from their organization and take immediate action.
Navigating Comms Homepage

Summary: An overview of the total number of campaigns sent to users via your Moveworks bot.
List of Campaigns:
- See a list of past campaigns
- The name of the campaign
- When the campaign was created
- The status of the campaign
- Whether or not it has been completed
- How many targeted users the message was successfully delivered to
- Engagement metrics
Admins can further interact with past campaigns by clicking on the three-dot icon under the Actions column to view details about the campaign, duplicate the campaign, copy campaign ID, and download a report. The report contains additional information on notification status and user interactions.
Status: This shows the current status of a campaign. The campaign could be completed, canceled, saved as a draft, or have a reminder scheduled. If a campaign is complete the date and time the campaign was started is shown.
Delivered To: This shows how many of the targeted audience for the campaign the message has been delivered to.
Engagement: This shows how many of the targeted audience interacted with the campaign message by clicking on a button or link in the in-chat message.
Actions: By clicking on the three dot icon in the Actions column you can take further action with a campaign. You can click on View Details to be taken to the Campaign Details page, Duplicate to create a new campaign with the same details, Copy campaign ID to get the campaign’s ID, and Download Report to download CSVs with information on Notification Status and User Interactions.
Managing Campaigns
Creating your campaign
Check Moveworks Academy to learn more about creating campaigns.
Select campaign settings
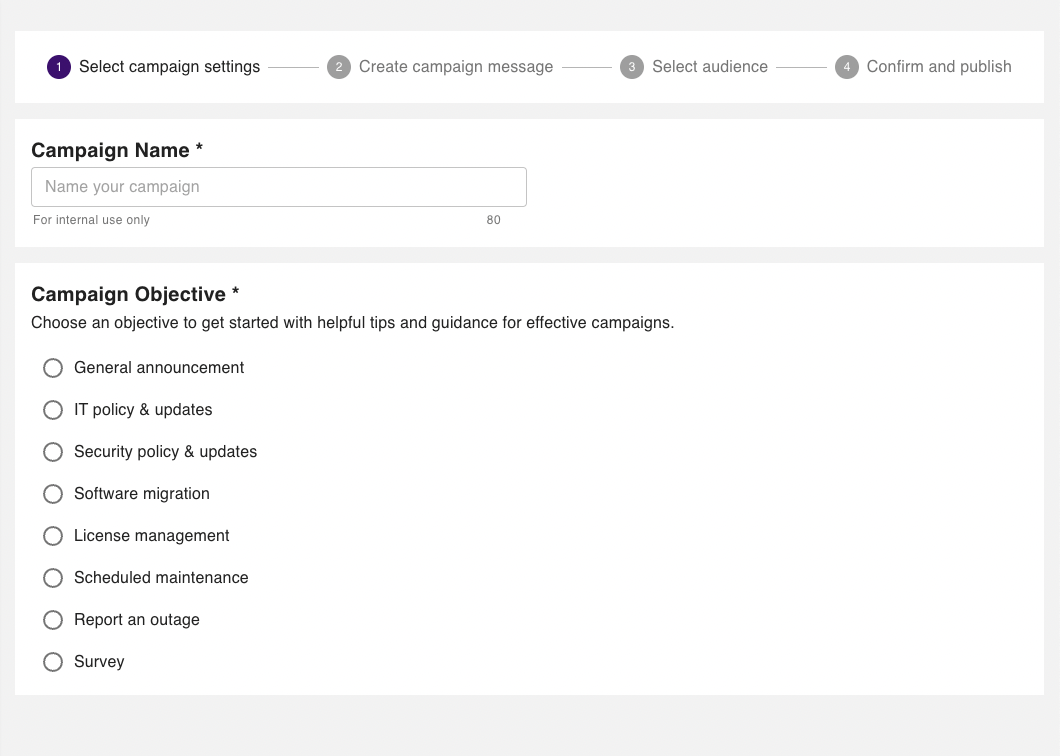
Campaign Name: Here you can provide a name for your new campaign.
Campaign Objective: Then, you can choose the objective of your campaign to get helpful tips and guidance for creating an effective campaign.
Create campaign message
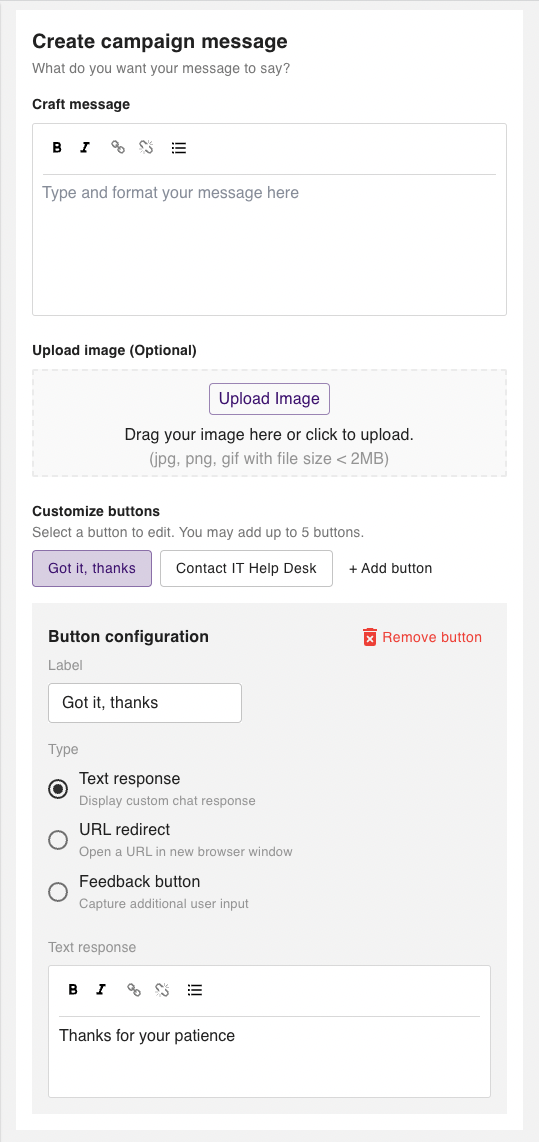
Craft Message: Here you can write and format your campaign message. You can format the text in your message by making parts of it bold or italicized. Additionally, you can also embed links, and add single-tier lists to your campaign message.
Note: When crafting your message avoid using multi-tier or nested list as they are not supported in messages from the bot.
Add Emojis: Emojis can also be added to your campaign messages. See How can I add emojis? to learn more.
Upload image (Optional): Here you can upload an image to customize the look of your campaign (jpg, png, gif with file size < 2MB).
Customize Buttons: Here you can customize buttons and add up to five buttons for users to engage with.
Button configuration: Here you can configure the button by changing the label or type. Buttons have two types:
- Text response: This type of button results in a follow up text response that can be written below.
- URL redirect: This type of button redirects the user to a new browser window.
- Feedback: This type of button allows users to give additional input directly in chat.
Preview this message in bot
To view your message in chat before sending it out to your audience, enter your email or other users’ emails, and click on Preview in bot, to have the bot send a preview of your campaign message. To add more than one user, separate each email with a comma.
Note: You cannot progress without previewing your message in bot. Any interactions with the preview message are not recorded for the purposes of analytics.
Select audience
All users
Select All users to send the campaign to all users who can currently receive a direct message from your bot.
The number of total reachable users include all users who will receive this campaign as a direct message in chat. It does not include users who have set their personal notification preferences to opt-out of non-critical communications. The number of users who have done so and have muted notifications is shown below.
Note: You can refresh the total audience the message will reach by clicking on the Re-import audience button.
Download audience: You can click on Download audience to download a CSV file containing a list of all your users, along with various identity attributes the bot has been able to pull from integrated systems. This data can be leveraged to confirm which users the bot is able to chat with as well as filter by attributes such as role, location, and department to create custom audiences for your next campaign.
Target users by attributes
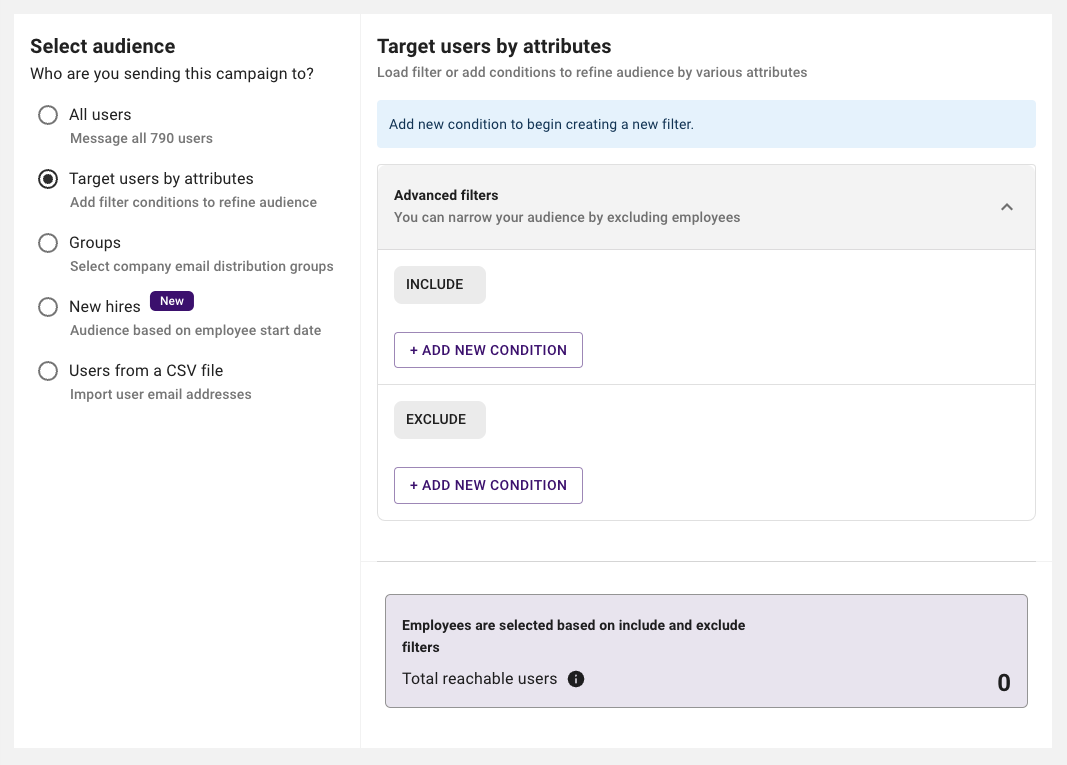
By selecting Targets users by attributes, you can filter out which users the campaign will reach. You can filter by user attributes such as department, location, or other user meta data. This can be done by clicking on Advanced filters, then + Add New Condition and picking from the list of attributes to include or exclude users with this attribute from receiving the message.
Note: The attributes available come from the applications that have been integrated with your Moveworks bot. To add more attributes, please reach out to our Customer Success team.
Email groups

By selecting Groups, you can choose an email distribution groups within your organization as the audience for your campaign. Your campaign will then only reach the users in the distribution group you chose.
Users from a CSV file
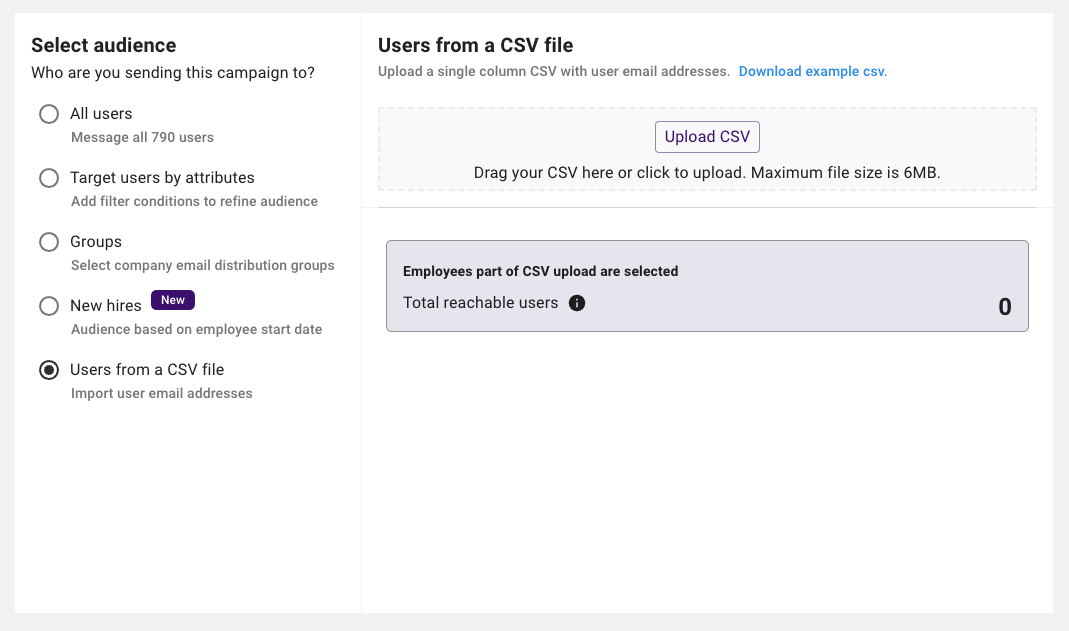
By selecting Users from a CSV file, you can upload a single column CSV file with the email address of the user’s you’d like your campaign to reach. The users in this CSV file will be the audience for your campaign.
Confirm and publish your campaigns
Check Moveworks Academy to learn more publishing campaigns.

Schedule your campaign
You can schedule when your campaign will be sent out by choosing:
- Send immediately: If you select this option your campaign will be sent out immediately after you click on Confirm and Publish.
- Scheduled for later: If you select this option your campaign will be sent out at the date and time you specify.
- Recurring: If you select this option your campaign will become a Recurring Campaign, which means it will be sent out repeatedly at the time time you specify for the duration in which you specify, or continuously if you choose to make the campaign infinite.
Confirm your campaign details: Here you can review your campaign’s name, objective, and audience.
Review your message: Here you can review your campaign’s message.
Check Campaign Engagement and Analytics
On this page you can see a summary of the campaign’s details including the name, objective, status, audience, when the campaign was published and who the campaign was created and published by.
Check Moveworks Academy to learn more about campaign engagement and analytics.
Reminders
Here you can also click on Create reminder to schedule a follow up reminder in the form of a in-chat message to recipients who have not clicked on a button or link.
Campaign analytics
Here you can get a view of the campaign’s analytical information. This includes a graph with a breakdown of user engagement so far that shows the number of users who click on a button. There’s also a graph to show the number of users who have been engaged over time.
Download Report
When you click on Download Report, you will download a zip file, that once unzipped, contains a CSV file on the Notification Status of the campaign, and a second CSV file on User Interactions.
(New!) Setting up campaigns for the New hires
Note: Please follow the instructions provided above to create your first campaign and set up the campaign body. After completing these steps, follow the instructions below to schedule the new hire campaigns for your audience.
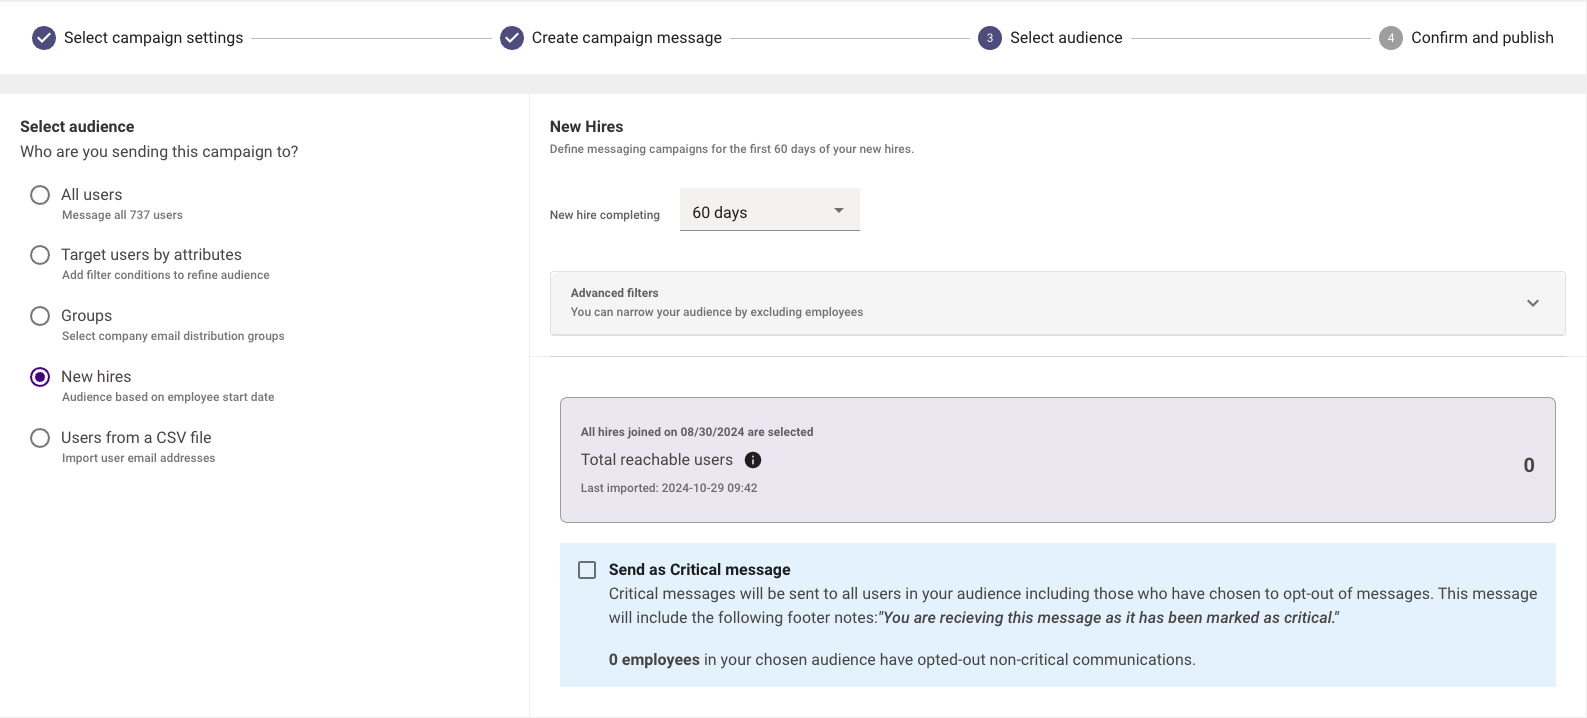
By selecting New hires, you can choose only new employees who have been with your organization for up to 60 days or less as the audience for your campaign. You can configure the amount of days a new hire has to have completed to receive this message by clicking on the dropdown next to New hire completing. You can also further specify the audience to only consist of new employees from a specific department, location, etc., by clicking on Advanced filters.
How are new employees detected?
We will ingest the start date of the employees from your database into our identity system and map it to the field employment_info.employee_start_date_ts, which is a part of our user roster and calculate the number of days they have spent in your organization.
For example, if employee X has joined on the 29th of September 2023 and this information is present in Okta, we will map this start date to employment_info.employee_start_date_ts.
If there isn't a timestamp to indicate when a user started, Moveworks will be unable to identity who is considered a new employee.
Confirm and publish
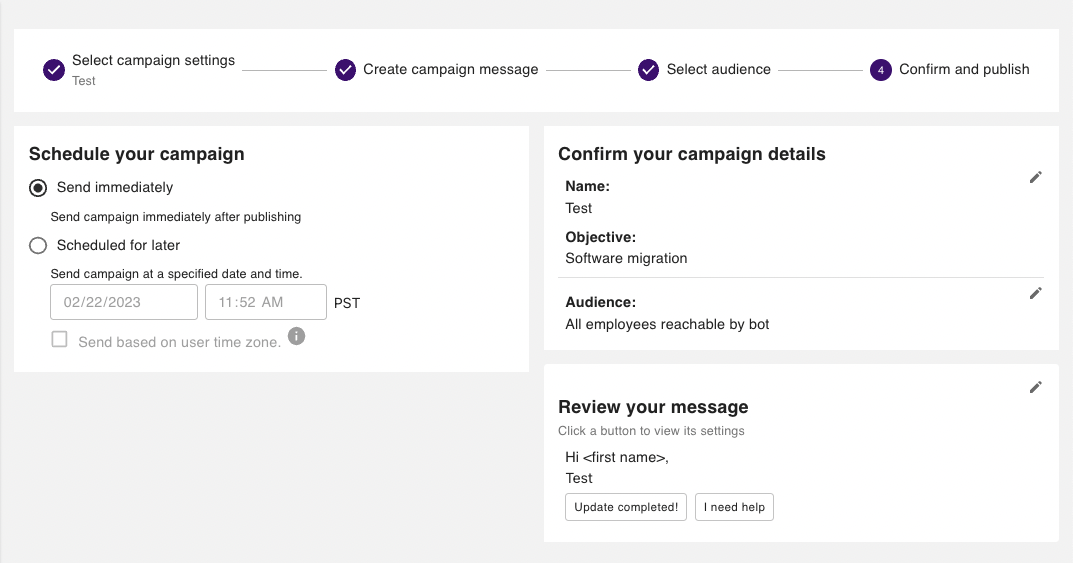
Schedule your campaign
You can schedule when your campaign will be sent out by choosing:
- Send immediately: If you select this option your campaign will be sent out immediately after you click on Confirm and Publish.
- Scheduled for later: If you select this option your campaign will be sent out at the date and time you specify.
- Recurring: If you select this option your campaign will become a Recurring Campaign, which means it will be sent out repeatedly at the time time you specify for the duration in which you specify, or continuously if you choose to make the campaign infinite.
Confirm your campaign details
Here you can review your campaign’s name, objective, and audience.
Review your message
Here you can review your campaign’s message.
(New!) Set up Recurring Campaigns
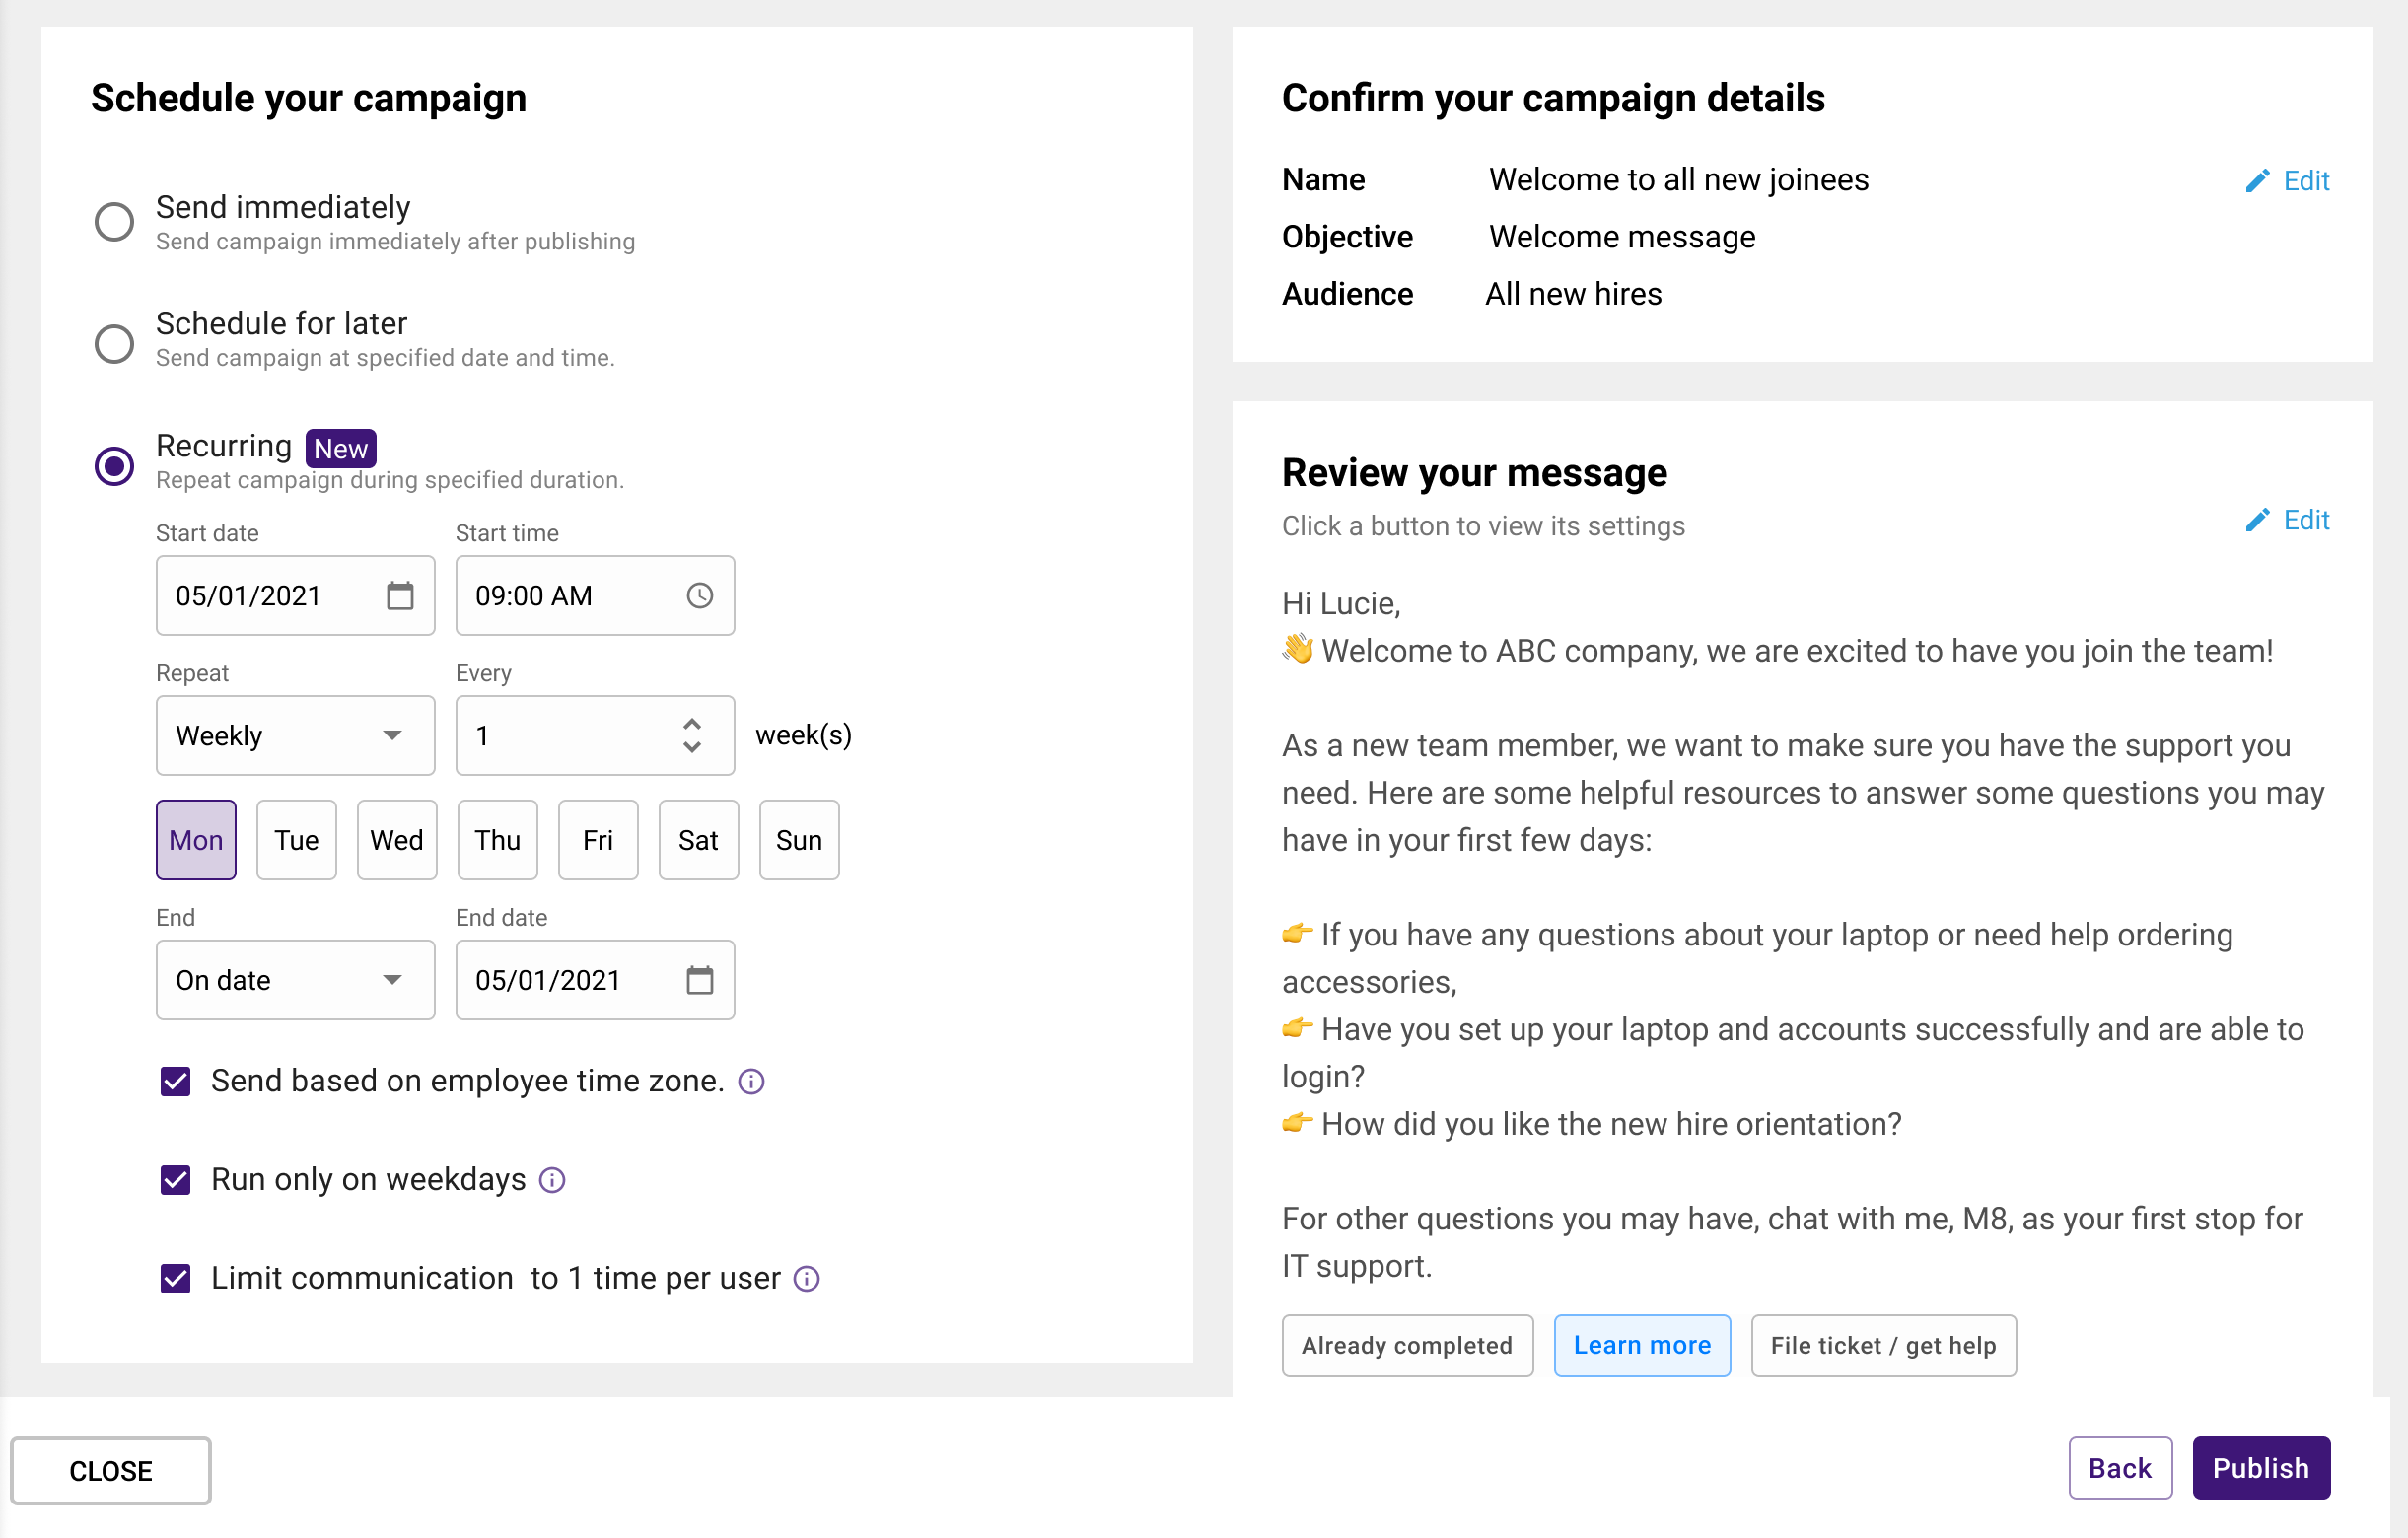
Recurring Campaigns lets you communicate information that needs to be broadcasted periodically to all users or certain subsets of users (e.g. new hires). This could be helpful for notifying users of tasks or events that occur on a regular cadence.
Recurring campaigns can be scheduled to occur daily, weekly, monthly or yearly. After you set a start date for the campaign, you have the option to pick an end date or set it as an infinite campaign, which means there’s no end date and the campaign message will be sent continuously at the chosen cadence. For example, if you create a weekly recurring campaign that is an infinite campaign, the campaign message will be sent weekly to the selected users continuously until the campaign is manually ended.
Note: You cannot schedule a recurring campaign to start the same day. Please schedule your recurring campaigns at least a day ahead of when you want the campaign to start, as they cannot be configured to begin the day of.
Recurring campaigns can be configured to be sent only on weekdays so as to respect the personal time of users. You can choose to send the message based on the user time zone to ensure that users are not disturbed outside of working hours.
Note: You cannot have a campaign message within a recurring campaign be sent out at a different time or date from the rest of the scheduled messages. You also cannot cancel a specific message in a recurring campaign run. For example, if you have a weekly recurring campaign that runs for four weeks, you cannot cancel week 3’s message.
Configuration options
Notification controls
Users can manage notifications with Employee Comms Notification Controls. Reach out to your Moveworks Customer Success team to enable Notifications Controls and choose how often users would like to be notified of employee comms. Notifications settings can be configured to:
- Allow all employee comms notifications
- Mute employee comms notifications for seven days
- Opt-out of all general comms notifications
Note: The notification control feature is for Employee Comms messages only. It does not control other types of notifications, such as ticket updates, approvals, etc.
Configure Notification Settings
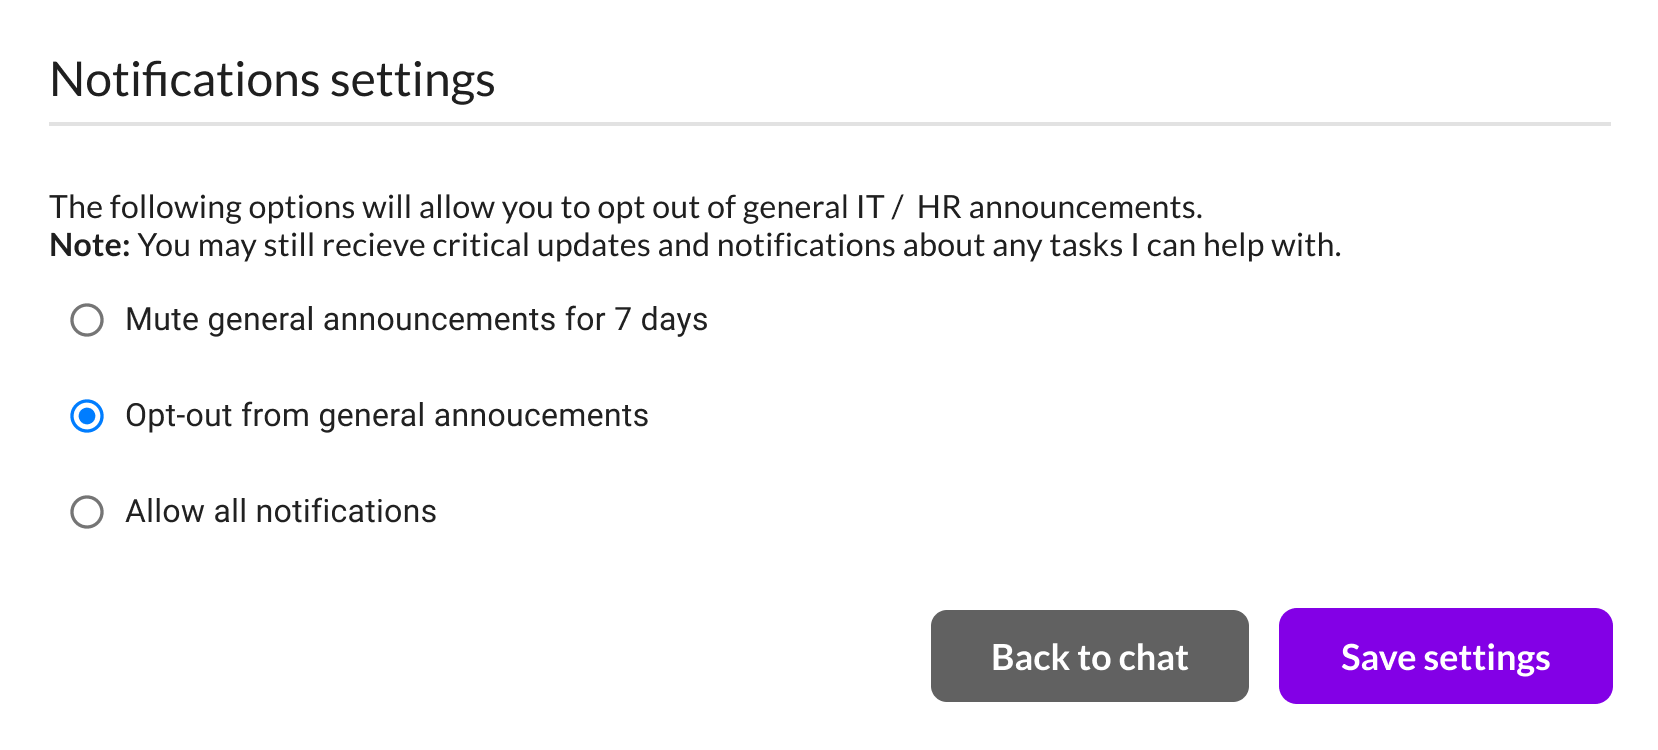
Once you’ve opted into the Notification Controls feature, all comms messages sent will contain a new footer link labeled: Manage notifications. Users will be able to click on Manage notifications to configure their notification settings.
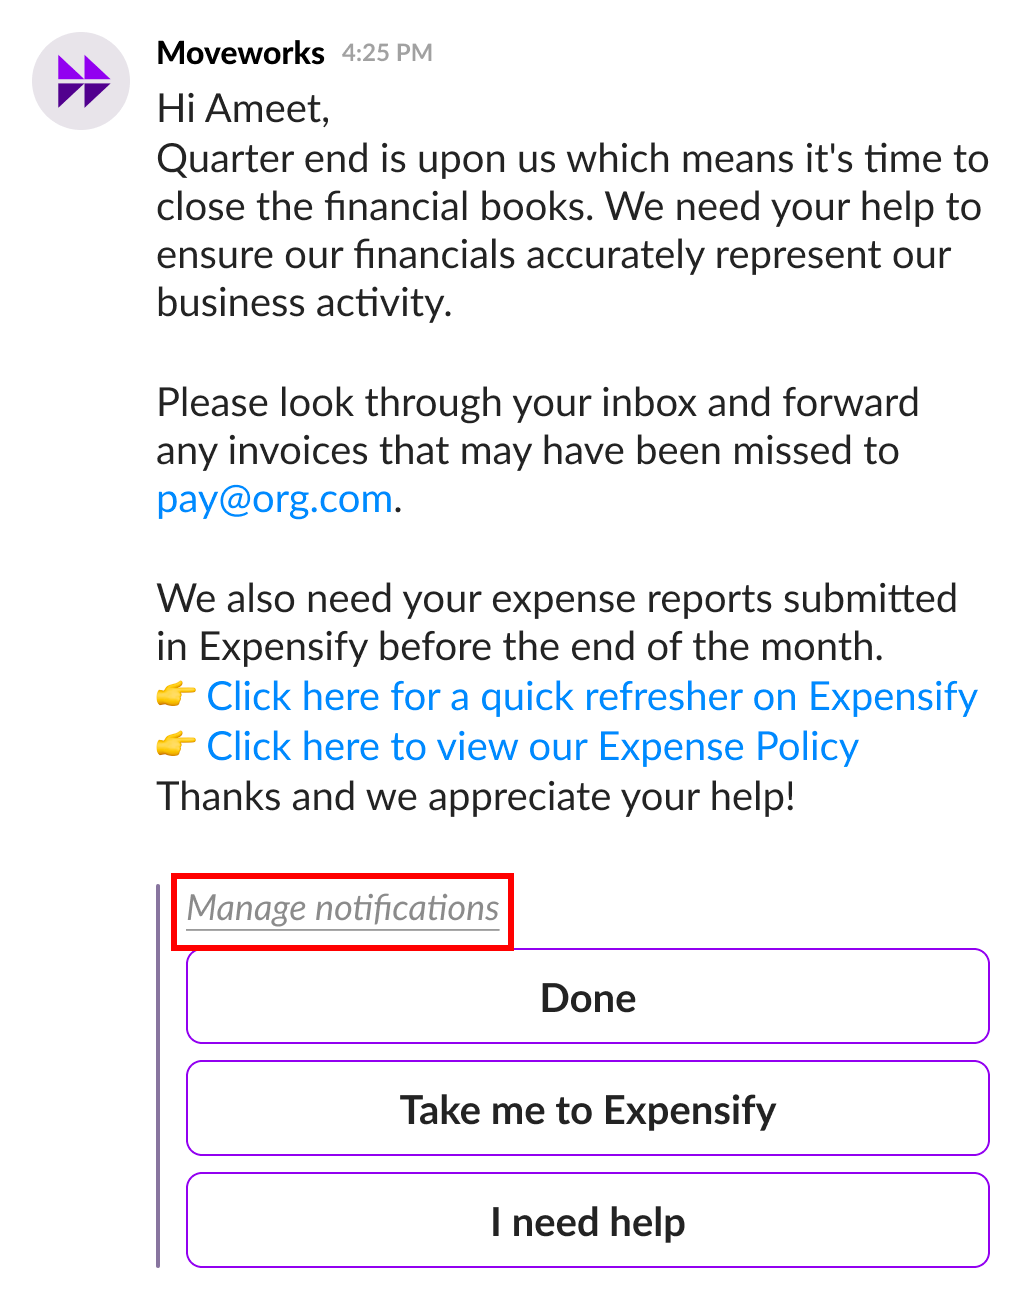
Users will then be taken to the Notification settings; where users can choose to mute all general announcements for a week, opt-out from all general announcements, or continue allowing all employee comms notifications. Users can then click on Save settings to update their notification preferences.
Users can update these settings at any time in the future, simply by clicking on the Manage notifications link again.
FAQs
Q: Can videos or gifs be included in Employee Comms campaign messages?
A: Animated gifs are supported in Employee Comms, and are limited to 2 MB.
Note: In Microsoft Teams, gifs will not be animated if the message is being viewed on the mobile version of MS Teams.
Videos are supported for Employee Comms in Slack. Videos embedded in campaign messages will appear as a thumbnail in chat.
Q: How can I add emojis?
A: Emoji are a fun and practical way to enhance your message formatting and can help illustrate the message you are trying to convey.
There are multiple ways to add emojis to your message:
- Slack emoji code: If you are a Slack user, you can use the same emojis used in Slack by entering the emoji code directly in the campaign message editor. e.g. 👋
- Unicode character: Enter the unicode character in the campaign message editor by copy & pasting emoji from a web reference ✅. Find a list of all emojis here.
Both methods will work across chat platforms (Slack, MS Teams, Google Hangouts, or Webex Teams). Be sure to preview your message in the bot to confirm if your message looks as expected.
Q: How can I have the buttons link out to outlook calendar invites?
A: To redirect users to an outlook calendar invite where they can respond to the invitation, without having to download the ics file, append the suffix ?download=1 to the URL.
Q: How do I enable Employee Comms notification controls?
A: This feature is not automatically enabled, please work with your Customer Success team to get this feature activated on your system.
Q: How long before links within Employee Comms messages expire?
A: In-text URLs and button links in Employee Comms messages are valid for 14 days
Updated 4 months ago