AI Assistant in Microsoft Teams (Non-App Store) Setup Guide
This guide will walk you through the process of setting up a Moveworks AI Assistant in Microsoft Teams. Along the way, you will capture the following information:
- Microsoft Graph App ID
- Microsoft Graph Tenant ID
- Microsoft Graph Secret Value
- Teams Application Link (to retrieve the app GUID)
Once you have these items, add the connector in Moveworks Setup by following this guide: System Connectors.
Pre-requisites
- Ensure that you have a Microsoft Azure Pay-As-You-Go subscription already setup (or some other subscription)
- The subscription must be applied under the global subscription filter.
- If it is not, search for the Directory + Structure configuration page and enable the subscription so that it shows up globally.
- Ensure that you have administrative rights to the main tenant in Microsoft Azure console
- This includes the ability to create resource groups under the above subscription.
- Ensure that you have a Teams administrator who can create and manage applications and set policies
- Ensure that you have an App Service Plan created so that you can create the resource successfully and avoid the Cannot create a v2 converged app error.
Ensure Proper Networking Allowlist Rules
If you are leveraging a Firewall, CASB, or VDI, and have another layer of network firewall rules. Ensure the following Moveworks owned domain is in an allowlist so that Moveworks can render content in Microsoft Teams Task Modules.
https://app.moveworks.ai
Capturing the Tenant ID
You can find the Tenant ID prior to the call by visiting the following URL. Replace <domain_name> with your company domain name.
https://login.microsoftonline.com/<domain_name>/.well-known/openid-configuration
You will receive a JSON response. Look for the key token_endpoint and find the Tenant ID in the url.
{"token_endpoint":"https://login.microsoftonline.com/<tenant_id_here>/oauth2/token" ….
Create the Azure Bot in Your Tenant
-
Navigate to https://portal.azure.com/#create/Microsoft.AzureBot
-
Fill out the information as follows:
-
Bot handle - should be named the AI Assistant name that was approved.
- You can use “Moveworks” as a placeholder if this has not been decided.
-
Subscription - This should default to "Pay-as-you-go” or another subscription that you have available.
-
Resource Group - Create new group for the bot.
-
Resource Group Location - Choose lowest latency.
- For example: "West US 2" if you are on the west coast, or "East US 2" if you are east coast based.
-
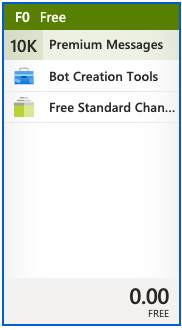
Pricing tier - Set this to F0 (this is a free tier).
- Note: While the licensing structure is pay-as-you-go for messages in premium channels, it is unlimited for standard channels such as MS Teams. Therefore when choosing F0 as the pricing tier, the bot resource does not cost anything and the bot will not incur any additional fees (resource groups are also free). For more information, see this page.
-
-
Messaging Endpoint leave this blank for now and we will revisit it later in the configuration.
-
Under Microsoft App ID,
-
Type of App - select Single Tenant for the selection.

-
-
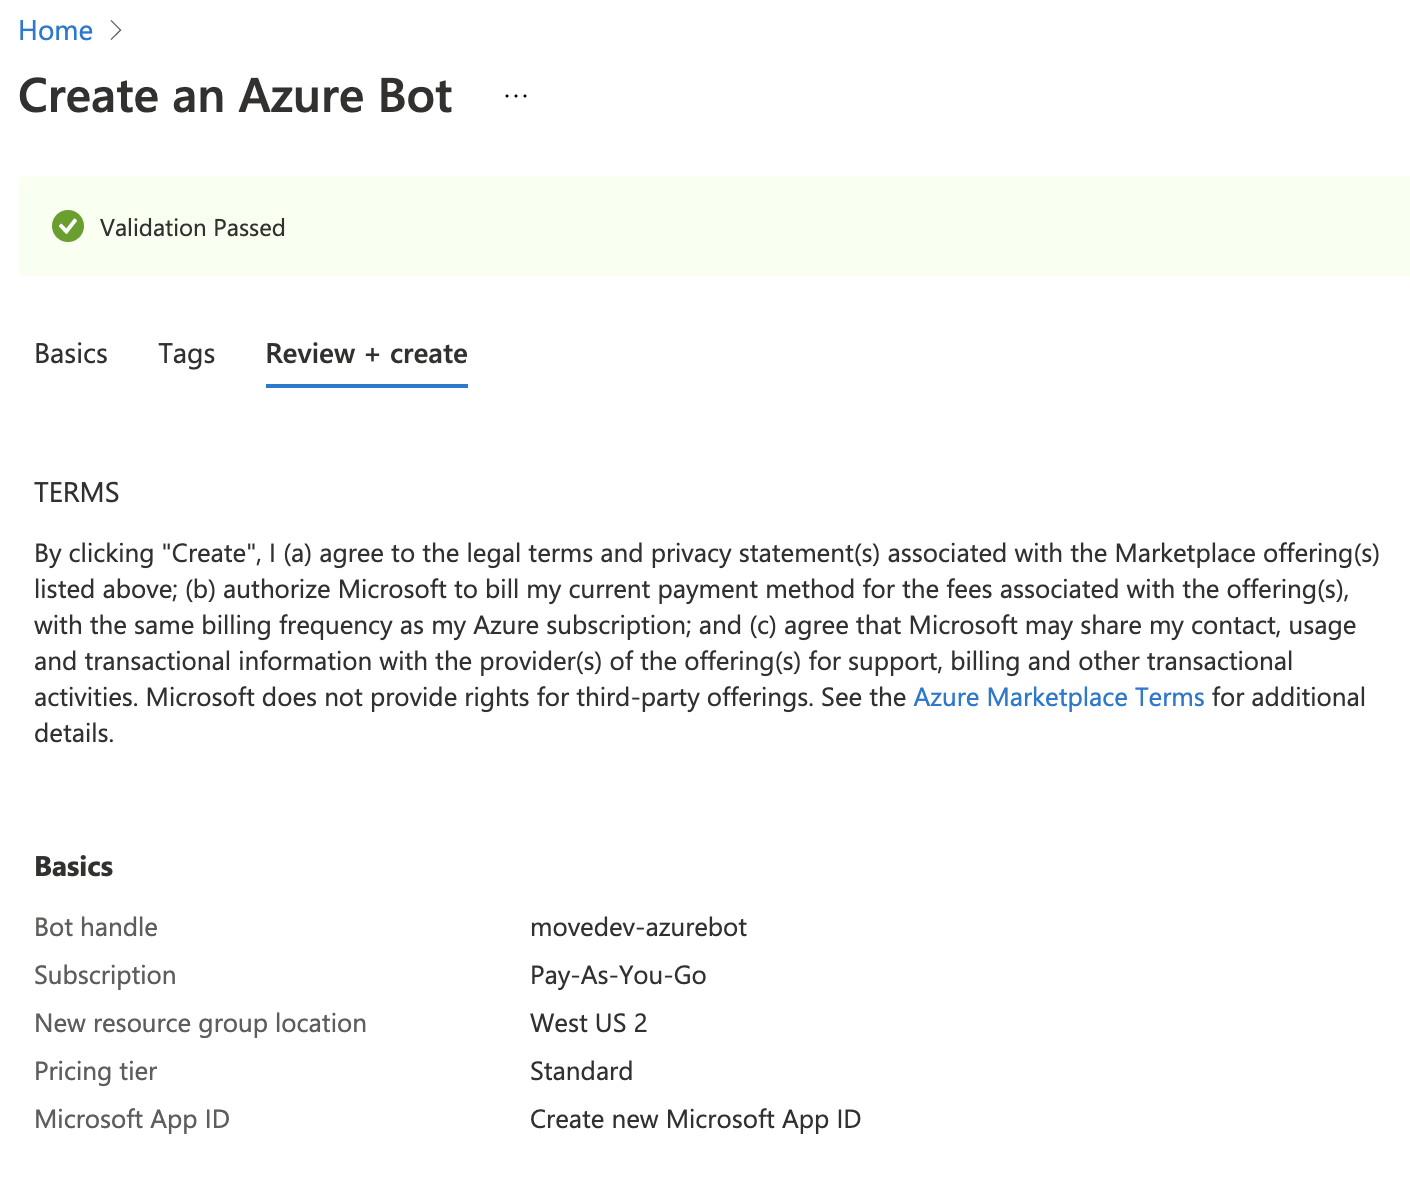
Select Create new Microsoft App ID and hit Review + create
- You will see “Validation Passed“.
- After reviewing the selections, hit Create and your deployment will be in process.
Configure the Azure Bot settings
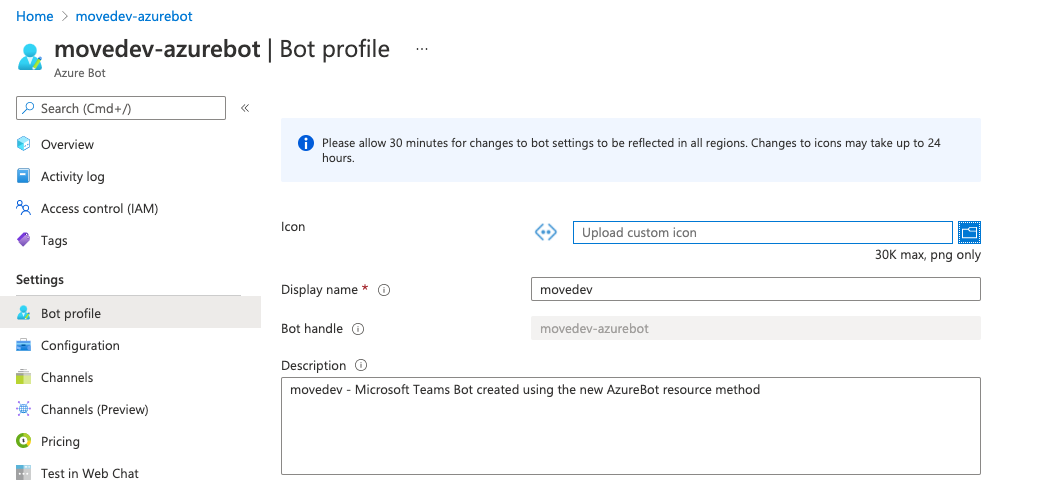
Find the Azure Bot that was created by waiting for the deployment to finish and then clicking on the “Go to resource” button. Or, by searching for the bot in the Azure console.
-
Navigate to Bot Profile on the left hand pane.
-
Upload the approved bot icon to the Icon field.
- Note: The bot icon MUST be 30x30 or 50x50, otherwise the icon will not reflect properly in Teams.
-
Set the Display name of the bot to the approved AI Assistant name or set this to “Moveworks” temporarily.
-
Click Apply.
-
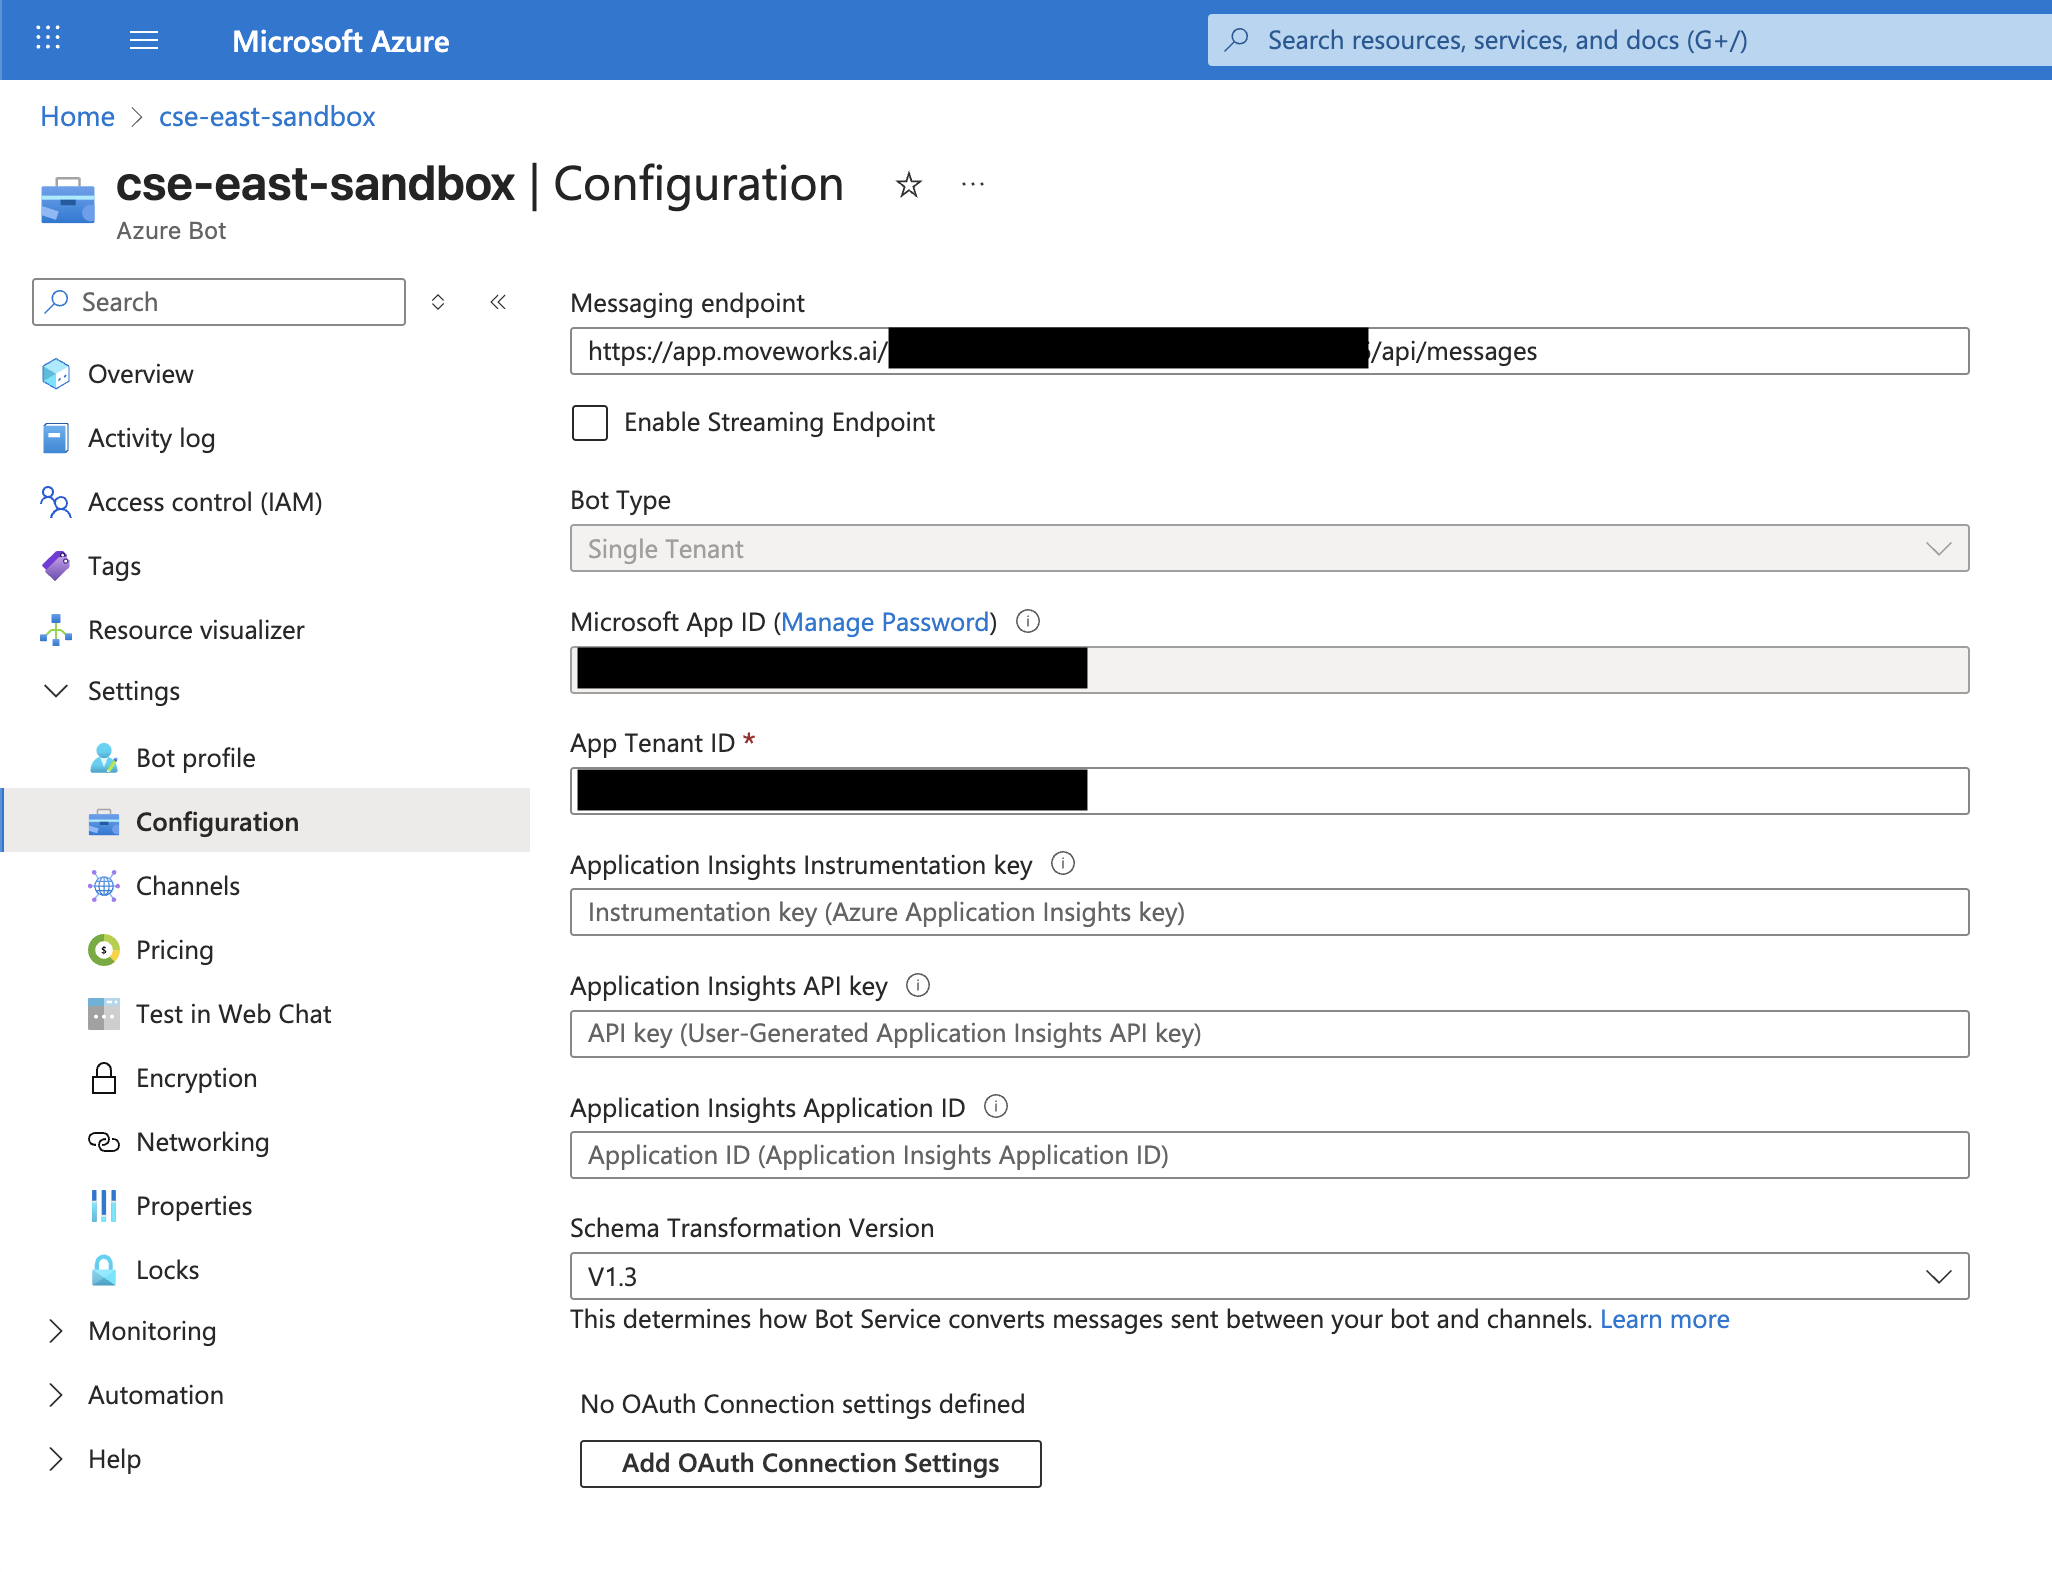
Navigate to Configuration on the left hand pane.
- Copy the Microsoft App ID
-
Add the following URL based on your region (where<MSappId> is the string in the "Microsoft App ID" you copied in the above step).
-
US Region:
https://app.moveworks.ai/<MSappId>/api/messages -
EU Region:
https://app.am-eu-central.moveworks.ai/<MSappID>/api/messages -
Canada Region:
https://app.am-ca-central.moveworks.ai/<MSappID>/api/messages -
Australia Region:
https://app.am-ap-southeast.moveworks.ai/<MSappID>/api/messages -
Note: If you are installing your Moveworks AI Assistant in a GovCloud, please follow this guide: https://help.moveworks.com/docs/microsoft-teams-bot-gcch-access-requirements
Only use non "US Region" messaging endpoints if your Moveworks tenant is not hosted in the US region.
If you have any questions please reach out to your Moveworks team.
-
-
Add the Microsoft Teams Feature Channel
-
Navigate back to your Azure Bot configuration.
-
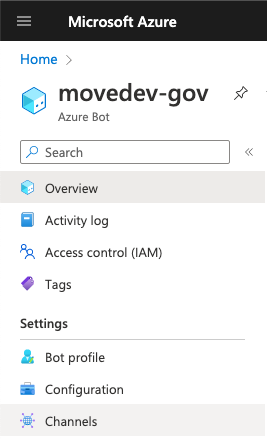
Select the Channels tab on the left. Beneath Add a feature channel, select the Microsoft Teams icon and on the next screen, click Save.
-
Grant API Permissions to Microsoft Graph token associated with the AzureBot
Generate Secret
- Under the Azure Bot settings, click on Manage Password (shown in parenthesis beside the Microsoft App ID title).
- Then click on Certificates and Secrets on the left hand pane.
- Under Client Secrets select the New client secret option.
- Enter a name such as “Moveworks Bot” and set an expiration date, we recommend 2 years. Please provide the Moveworks team with the exact date of expiration.
- Copy the Secret value and save it in a secure place.
- Make sure you do not skip this step as the Client Secret value will be blocked from plain text view after.
Add API Permissions
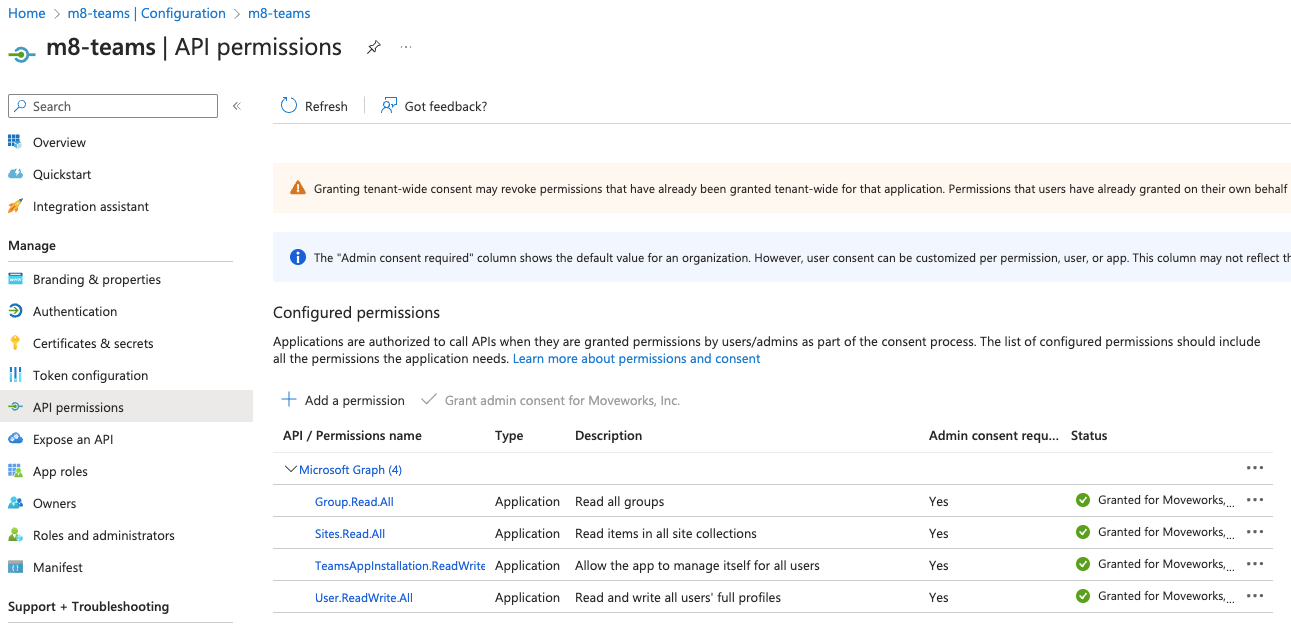
- Navigate to API Permissions on the left hand pane.
- On the Request API Permissions screen, select MS Graph.
- Select Application permissions instead of Delegated permissions for all below permissions in Steps 5-6.
- Add the necessary permissions for the Teams bot.
- User.Read.All
- TeamsAppInstallation.ReadWriteSelfForUser.All
- (Optional) If you are utilizing the O365 integration in Moveworks, please add the following permissions:
- Provision access to/create Office 365 groups:
- Group.ReadWrite.All
- Display end-user facing Sharepoint articles as an IT knowledge base:
- Sites.Read.All
- To direct users to apps or device actions in the InTune Company Portal:
- DeviceManagementApps.Read.All
- Provision access to/create Office 365 groups:
- Ensure all permissions have admin approval granted. Once granted the green check mark should appear.
Configure in Moveworks Setup
Next you will add the Teams and MS Graph connector to Moveworks Setup by following this guide: System Connectors, using the following information:
- Microsoft Graph App ID
- Microsoft Graph Tenant ID
- Microsoft Graph Secret
If you are connecting multiple Teams tenants to a single Moveworks organization, refer to the Multi-Tenant Moveworks Setup Guide for guidance on naming and mapping your connectors.
Follow implementation steps in this guide. The configuration is similar whether you are connecting a single tenant or setting up a multi-tenant environment.
Add the AI Assistant to Your Organization in Teams
You will need these assets to publish the app:
- color.png - the color AI Assistant icon (192 x 192)
- outline.png - the sidebar outlined AI Assistant icon (32 x 32)
- manifest.json - the AI Assistant configuration
Using the following file template to create the manifest.json file, replace the <MSAP_ID> and <AI_ASSISTANT_NAME > text in the template below, with your Microsoft App ID and the name of your AI Assistant respectively. If you have not decided on a name yet, you can use the name “Moveworks” as a temporary placeholder name.
{
    "$schema": "https://developer.microsoft.com/en-us/json-schemas/teams/v1.12/MicrosoftTeams.schema.json",
    "manifestVersion": "1.12",
    "version": "1.0.0",
    "id": "<MSAP_ID>",
    "packageName": "com.moveworks.bots",
    "showLoadingIndicator": false,
    "developer": {
        "name": "Moveworks.ai",
        "websiteUrl": "https://www.moveworks.ai",
        "privacyUrl": "https://www.moveworks.com/privacy-policy",
        "termsOfUseUrl": "https://www.moveworks.com/terms",
        "mpnId": "6107273"
    },
    "icons": {
        "color": "color.png",
        "outline": "outline.png"
    },
    "name": {
        "short": "<AI_ASSISTANT_NAME>",
        "full": "<AI_ASSISTANT_NAME>"
    },
    "description": {
        "short": "AI Assistant for enterprise data, automation, and info retrieval.",
        "full": "Hi! I am <AI_ASSISTANT_NAME>, an artificial intelligence (AI) Assistant that can find answers, automate tasks, and boost productivity."
    },
    "accentColor": "#000000",
    "bots": [
        {
            "botId": "<MSAP_ID>",
            "scopes": [
                "personal",
                "team"
            ],
            "supportsFiles": true,
            "isNotificationOnly": false
        }
    ],
    "validDomains": [
        "*.moveworks.ai",
        "*.moveworks.io",
        "*.moveworks.com",
        "*.*.moveworks.ai",
        "*.*.moveworks.io",
        "*.*.moveworks.com"
    ],
    "webApplicationInfo": {
        "resource": "https://moveworks.ai",
        "id": "<MSAP_ID>"
    },
    "configurableProperties": [
        "name",
        "shortDescription",
        "longDescription",
        "smallImageUrl",
        "largeImageUrl",
        "accentColor",
        "developerUrl",
        "privacyUrl",
        "termsOfUseUrl"
    ]
}
Prepare the Assets For Microsoft Teams.
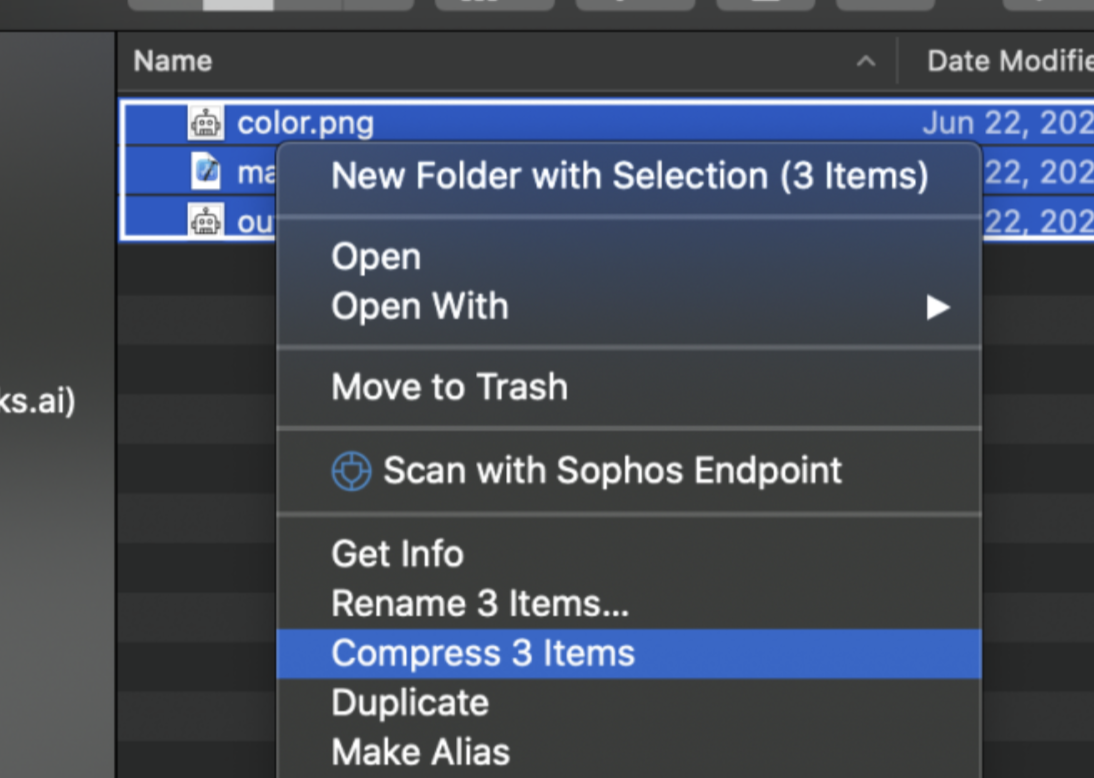
Zip the color.png, outline.png, and manifest.json files into a single zip file.
Example color.png file:
Example outline.png file (the file is transparent, so hard to see):

Tip: You can right click and save the example images in .png format as placeholders if the AI Assistant avatar has not been finalized yet._
Notes:
- This must be done on the same operating system that you will add the application from.
- If the files are zipped on a Mac, they must be uploaded to the Microsoft Teams app on a Mac. Vice-versa for Windows systems.
Do not place the items into a folder before zipping. Simply select the three files and compress them.
- Do not rename any of the files - the Teams client will expect the files to be named as listed above.
Deploy the AI Assistant to Microsoft Teams
- Open the Microsoft Teams Desktop App or navigate to the Microsoft Teams App in your browser.
- Click Apps (on bottom left corner).
- Click Manage your apps.
- Select Upload a custom app and then select the zip file that you generated.
- If you are an Admin of Teams, select Upload an app to your org's app catalog.
- If not, select Submit an app to your org.
- Select the zip file that you generated.
- Click Install.
Get the Microsoft Teams Application GUID
- Go back to the apps section of Microsoft Teams.
- Click on Built for your org.
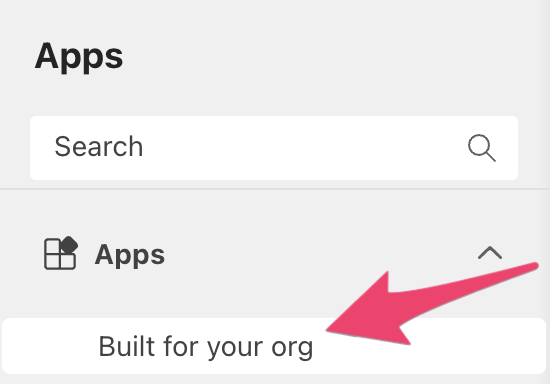
- Select your new bot
- Click the link icon to Copy link

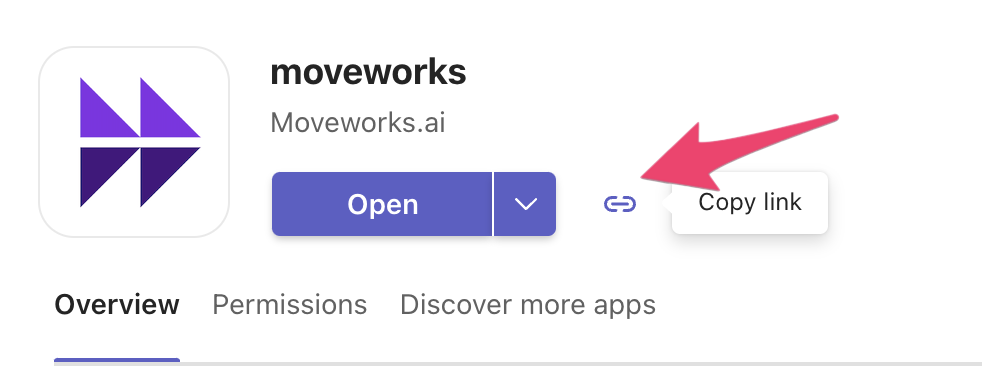
- The URL has the GUID required to set up the chat bot surface, as described here: https://help.moveworks.com/docs/deploy-bots#/
(Optional) Apply a Custom App Policy
Moveworks is able to ensure that the bot’s functionalities are only accessible by approved users during development. The AI Assistant will be visible in the MS Teams app store but users will not be able to communicate with it.
In some cases our customers would like to have more granular control over this access. You can do this in the Microsoft Teams Administration Console.
-
Navigate to https://admin.teams.microsoft.com/.
-
Go to the dashboard on the left → Select Teams apps> Setup policies -> Add New Policy.
-
Create a custom app policy to allow the AI Assistant you just created.
- NOTE: If a user is assigned a custom policy, that policy applies to the user. If a user isn't assigned a custom policy, the global policy applies to the user. This means if the org is using custom app setup policies already, then you will need to add the AI Assistant to all the app setup policies.
Pre-launch Steps
The steps below should be completed when the AI Assistant is ready for go-live.
Pin the App to the Microsoft Teams Sidebar
Pin for all employees
-
Visit admin.teams.microsoft.com.
-
From the options on the left, select Teams apps ⇨ Setup policies.
-
Click on the Global (Org-wide default) policy and then click Edit.
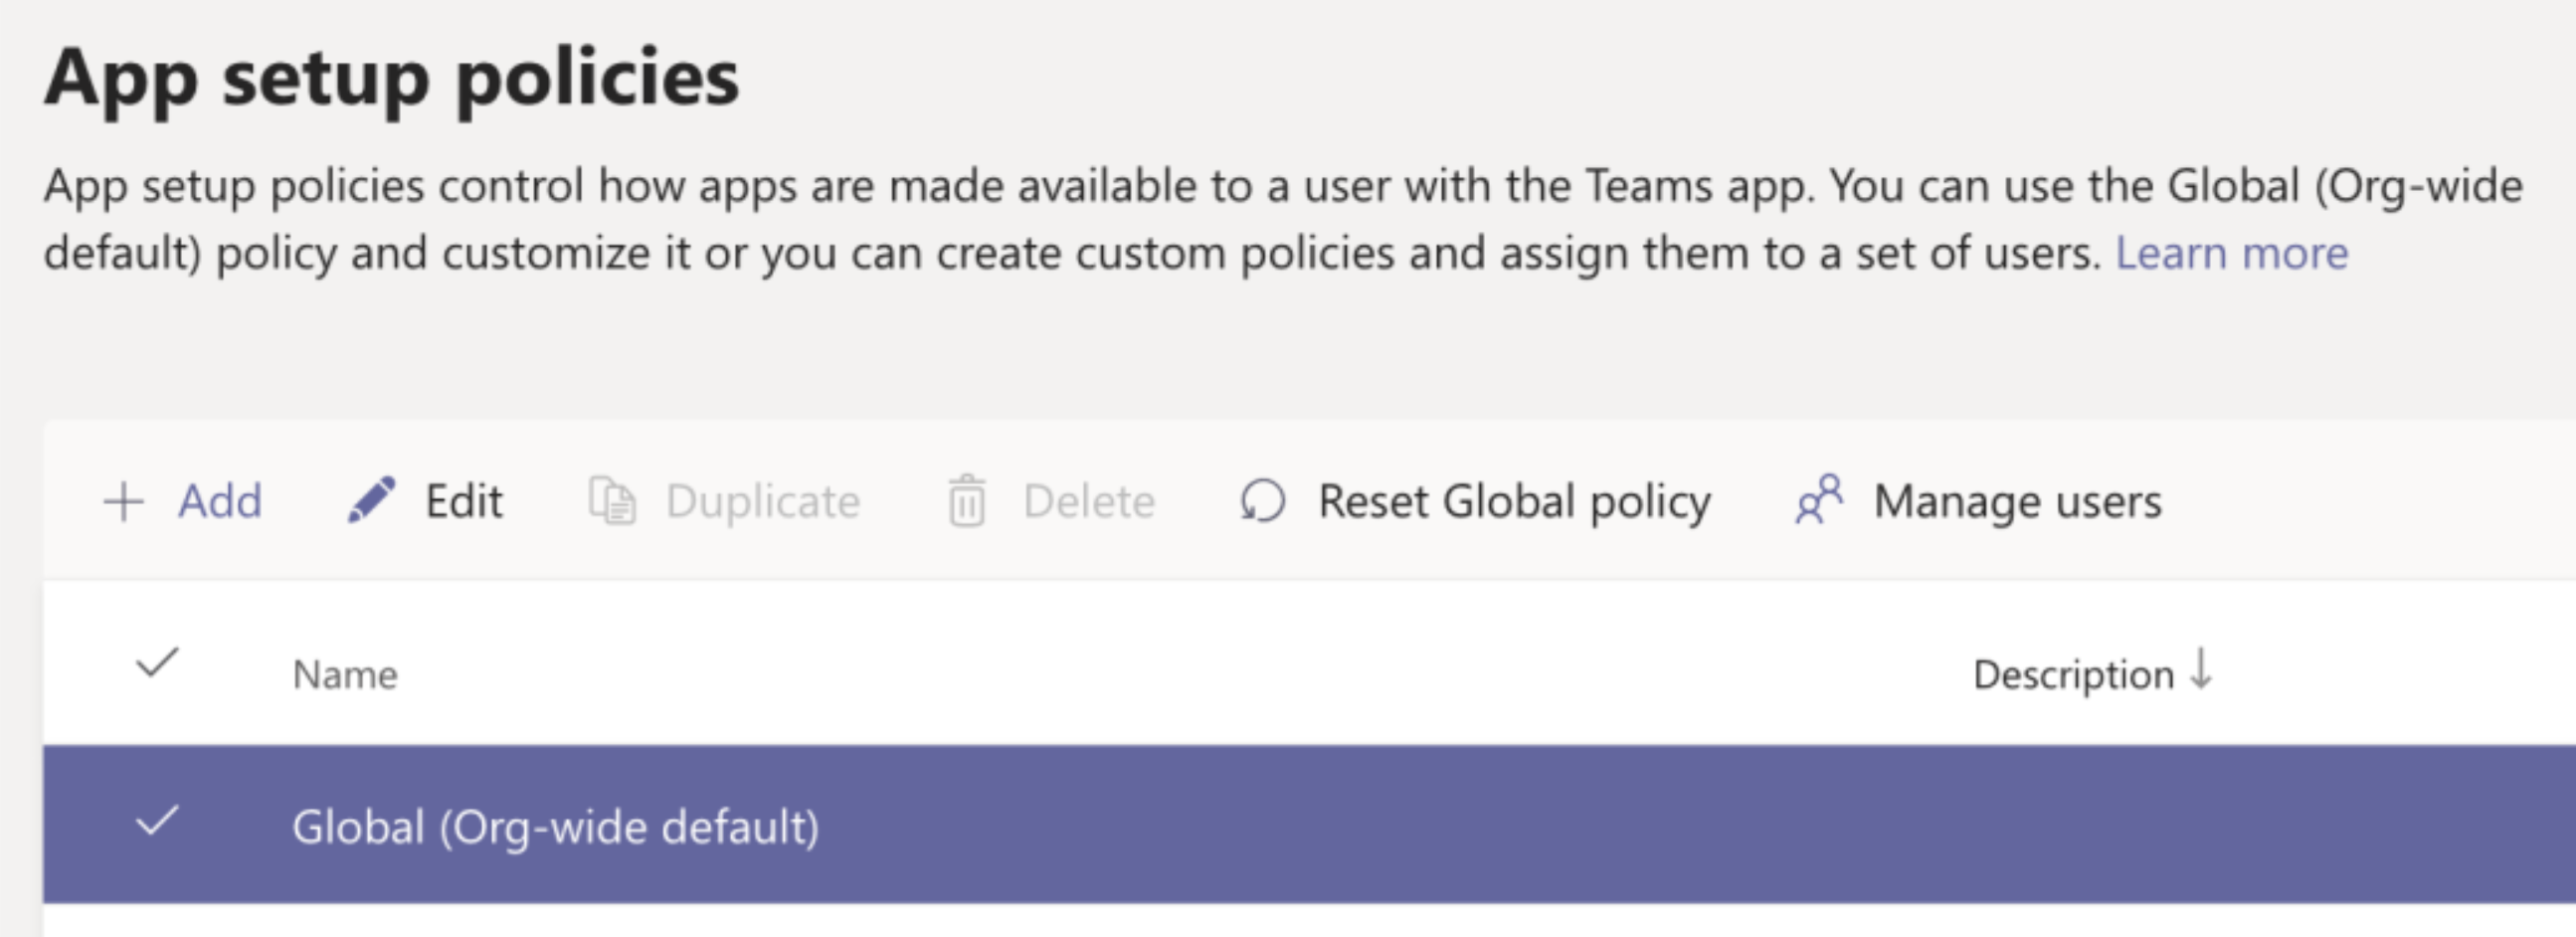
-
Toggle the order of the apps so that the installed AI Assistant application is below the Chat option.
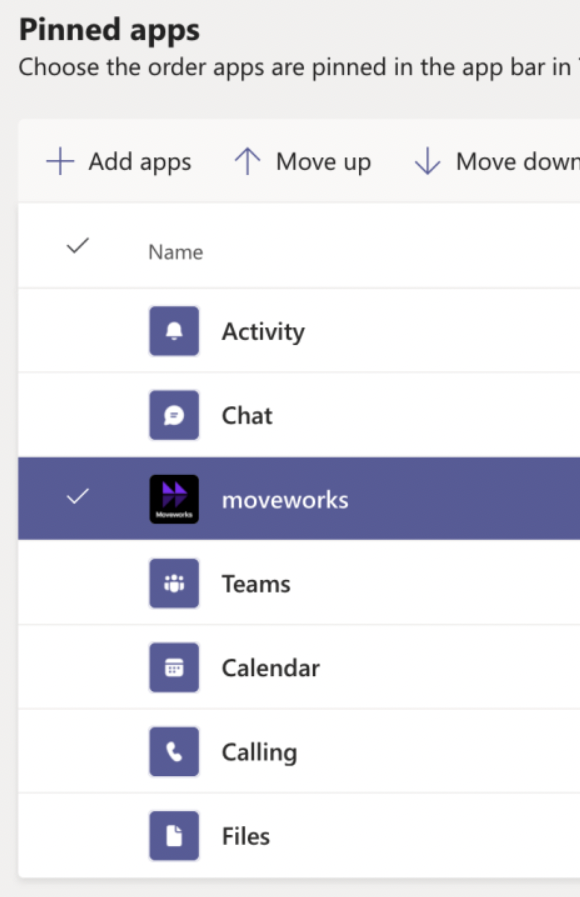
Pin Teams app for a specific group of users
- Visit admin.teams.microsoft.com.
- From the options on the left, select Teams apps ⇨ Setup policies.
- Click on the + Add button to create a new Teams app setup policy (more info here: https://docs.microsoft.com/en-us/MicrosoftTeams/teams-app-setup-policies)
- Toggle the order of the apps so that the installed AI Assistant application is below the Chat option.
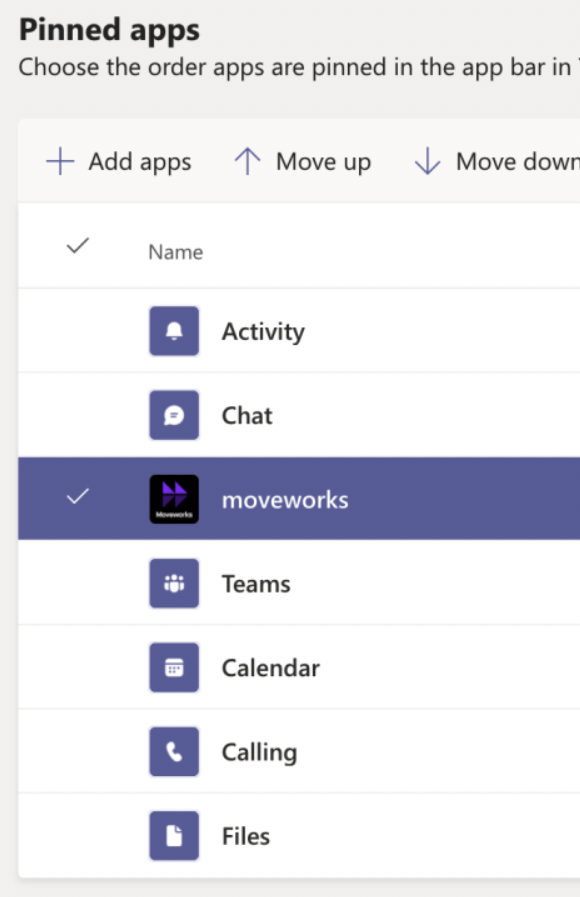
- Now you can select which users you want this specific policy to apply to. There are two options here - manual method and a Powershell method.
- Option A: Manually enter users to add to the policy
- Go back to the Setup policies page, select the newly created App setup policy and click Manage Users.
- Enter the names of users you want the policy to apply to. Click Apply..
- Option A: Manually enter users to add to the policy
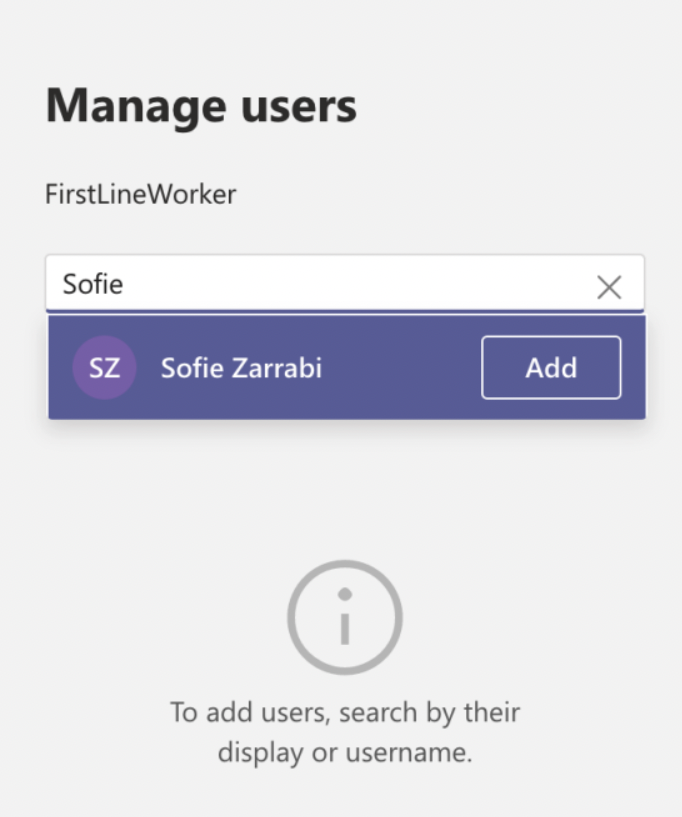
-
Option B: Create policy for a specific group of users in Azure using Powershell
-
Locate your group in Azure that you want to apply the policy to. Copy the object id for the group.
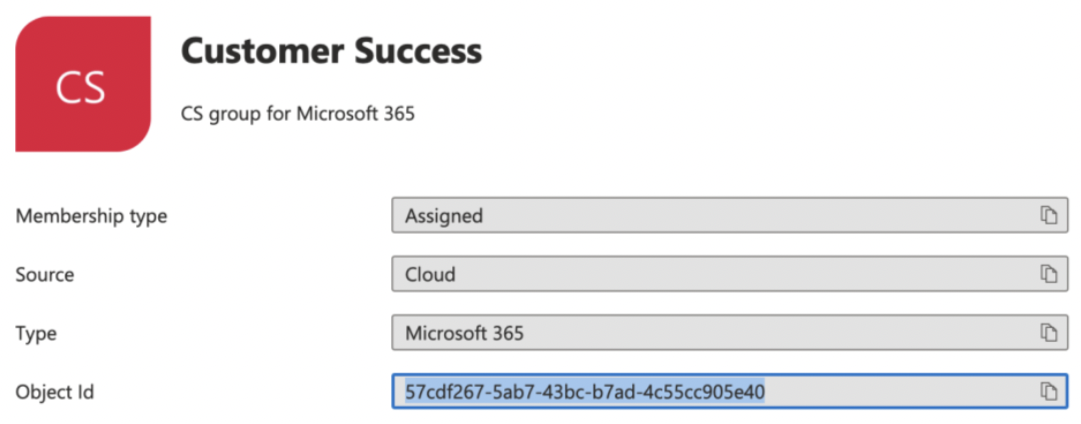
-
Open Powershell and enter the following commands. Once complete this can take up to 72 hours to take effect, depending on the size of the group. See here for more information.
New-CsGroupPolicyAssignment -PolicyType TeamsAppSetupPolicy -GroupId <group_id> -PolicyName "Moveworks Bot Users" -Rank 1

Get-CsGroupPolicyAssignment -GroupId <group_id>
Replace the group_id with the correct value above. The group_id is the Azure object id and “Moveworks Bot Users” is the name of the policy you used in the previous step.Example based on above:
New-CsGroupPolicyAssignment -PolicyType TeamsAppSetupPolicy -GroupId 57cdf267-5ab7-43bc-b7ad-4c55cc905e40 -PolicyName "FirstLineWorker" -Rank 1

Get-CsGroupPolicyAssignment -GroupId 57cdf267-5ab7-43bc-b7ad-4c55cc905e40
-
FAQ
Q: Can a user unpin the AI Assistant in Teams?
A: Moveworks AI Assistant can be unpinned from the sidebar in Microsoft Teams by the user.
Q: What's the behavior in Teams?
A: Moveworks AI Assistant will remain removed from the current Teams session, however once the user logs out of teams and logs back on the app setup policy kicks in and re-adds Moveworks Bot.
Q: Can a user move the left sidebar icon around?
A: user can move the Moveworks AI Assistant around in the left side bar, however the App Setup Policy will overwrite this once the user logs off and logs back onto teams.
Q: What should I do if I get an error when uploading the bot?
A: Try using Microsoft’s App Validation tool, this will tell you if there are any issues with the package you are uploading.
Updated 15 days ago