How To Guides for Access Software Plugin
How To Create a New Software or App for Provisioning
Creating a Self-Service Provisioning Software or App
- Navigate to Access Software > Software Catalog.
- Click on “Create”
- Input the name of the software or app.
Important note for Software NameUse the search input for this config to find the software/application entity you want to configure. These entity names are identifiers that are unique to Moveworks and serve our entity detection models to predict which application a user is referring to. Currently, search results will not include organization-specific entities. To configure those, contact Moveworks Support.
- Check the “Enable in Bot” field to enable the software. You can also do this step later.

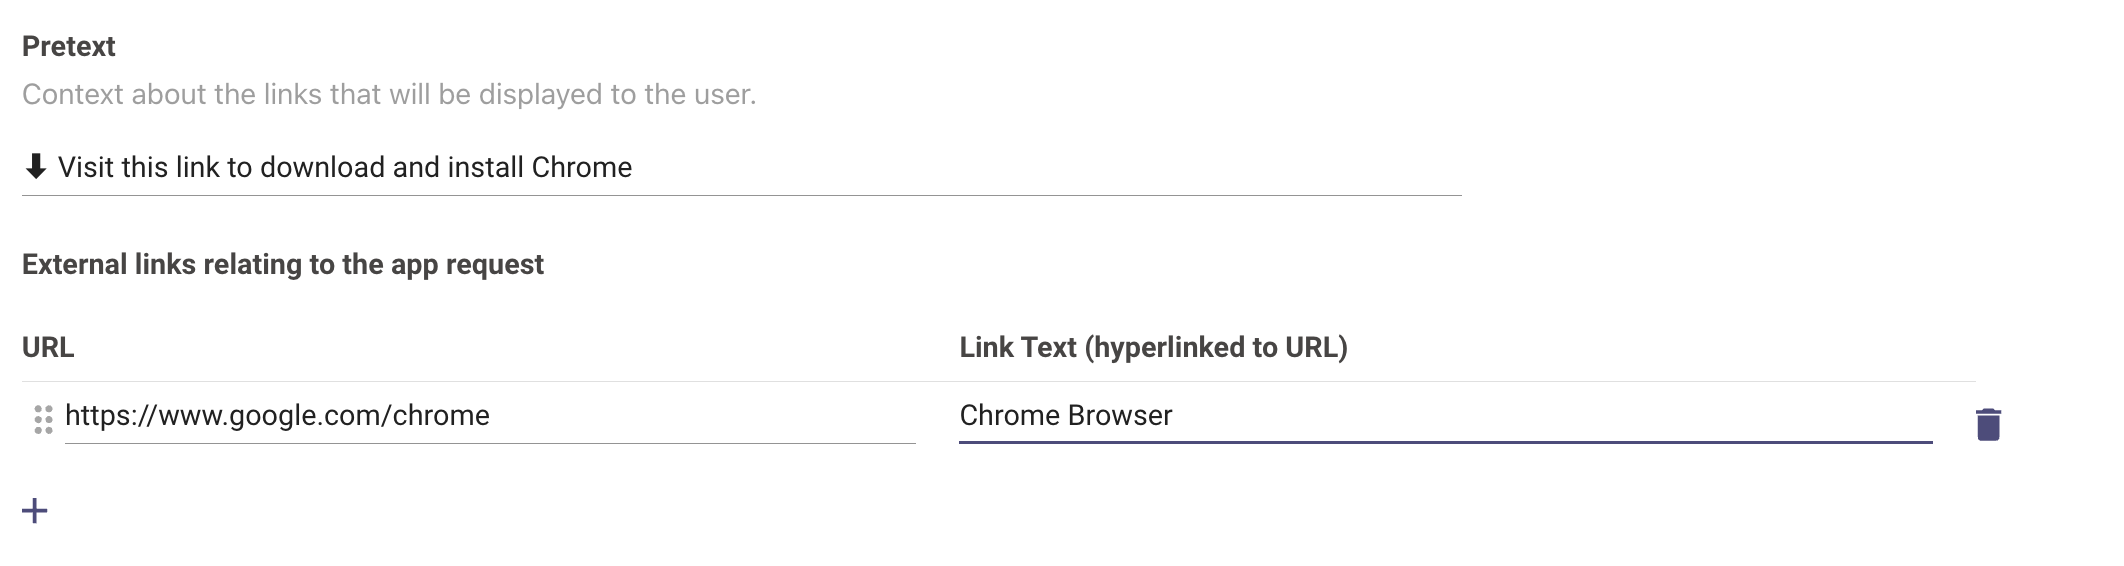
- Update the Pretext and External links. Refer to the below example for reference.

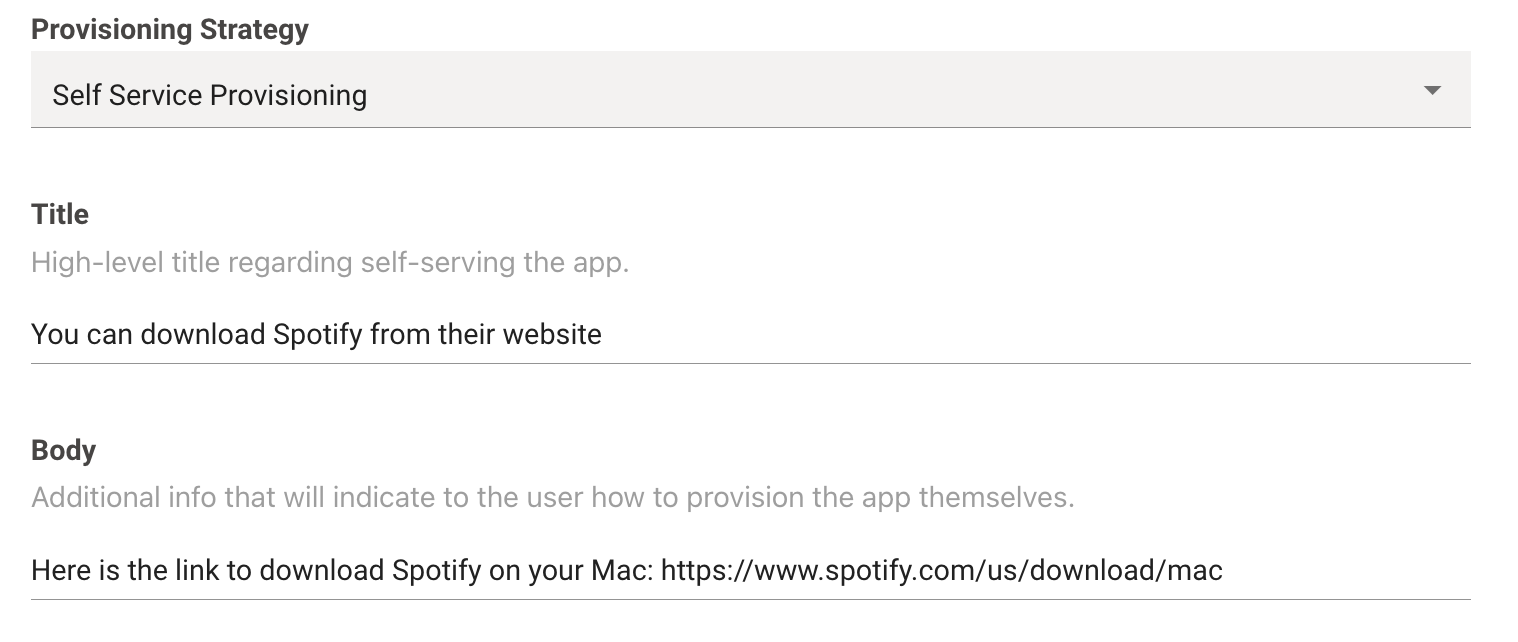
- Select Provisioning Strategy = Self Service Provisioning.
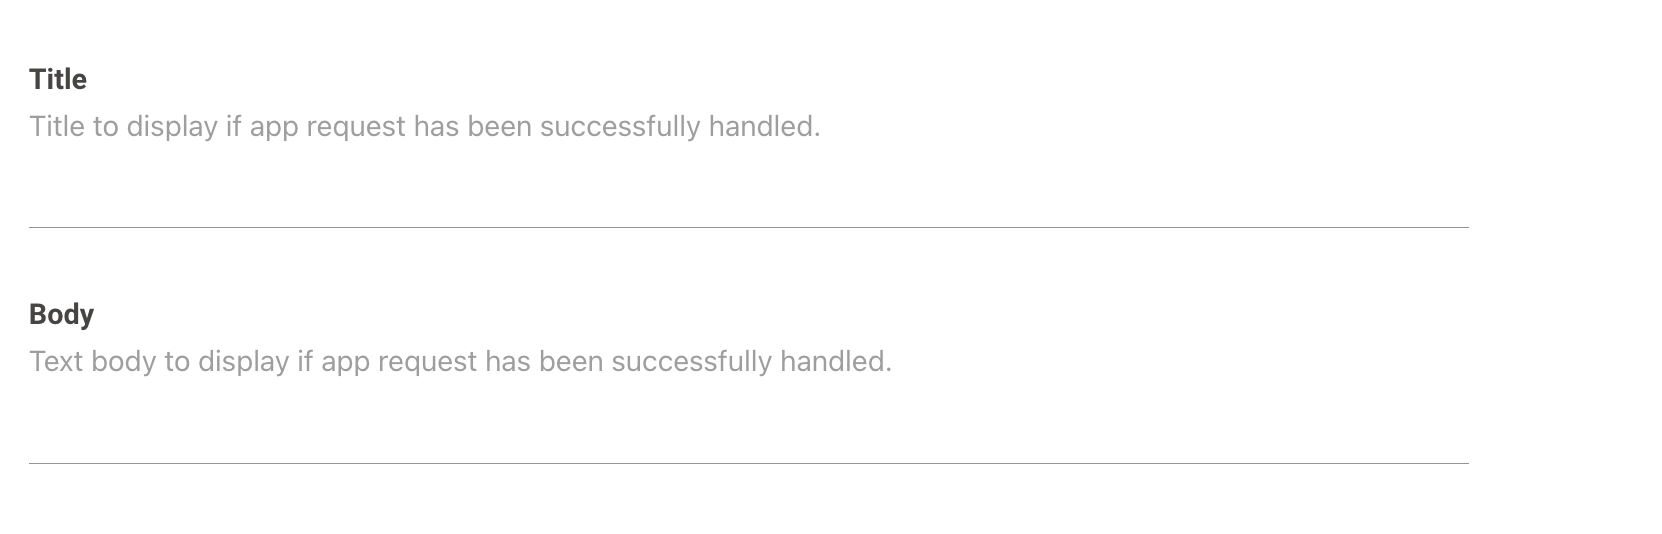
- Update the Title & Body as per your requirements for self-servicing the software.

TipIt is best to add a self-service URL in the self-service provisioning message body.
- Submit the changes.
- Once you submit the changes, you can see a new software catalog entry present in the home screen of Access Software module.
Creating a Group-Based Provisioning Software or App
- Navigate to Access Software > Software Catalog.
- Click on “Create”
- Input the name of the software or app.
Important note for Software NameUse the search input for this config to find the software/application entity you want to configure. These entity names are identifiers that are unique to Moveworks and serve our entity detection models to predict which application a user is referring to. Currently, search results will not include organization-specific entities. To configure those, contact Moveworks Support.
- Check the “Enable in Bot” field to enable the software. You can also do this step later.
- Pretexts & External links are more suited for self-service software & apps, therefore this is optional and can be skipped.
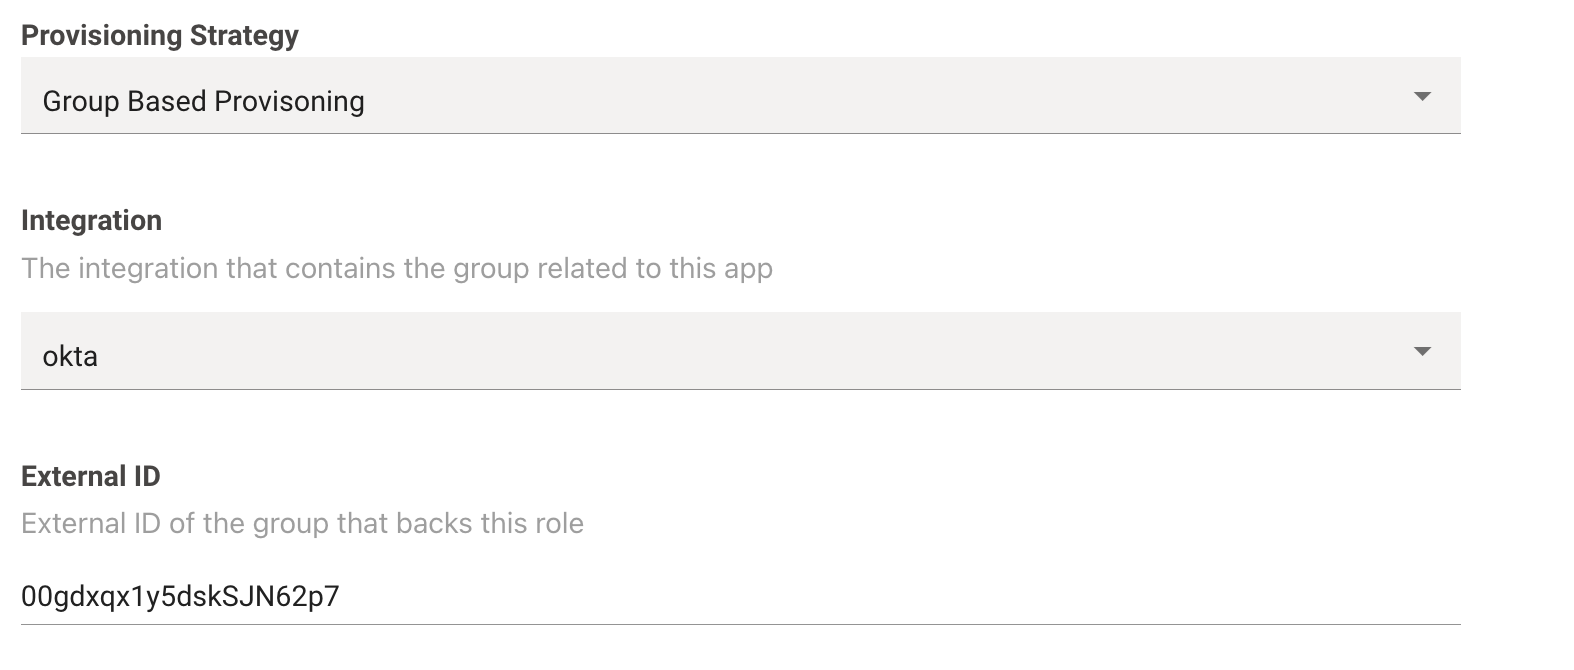
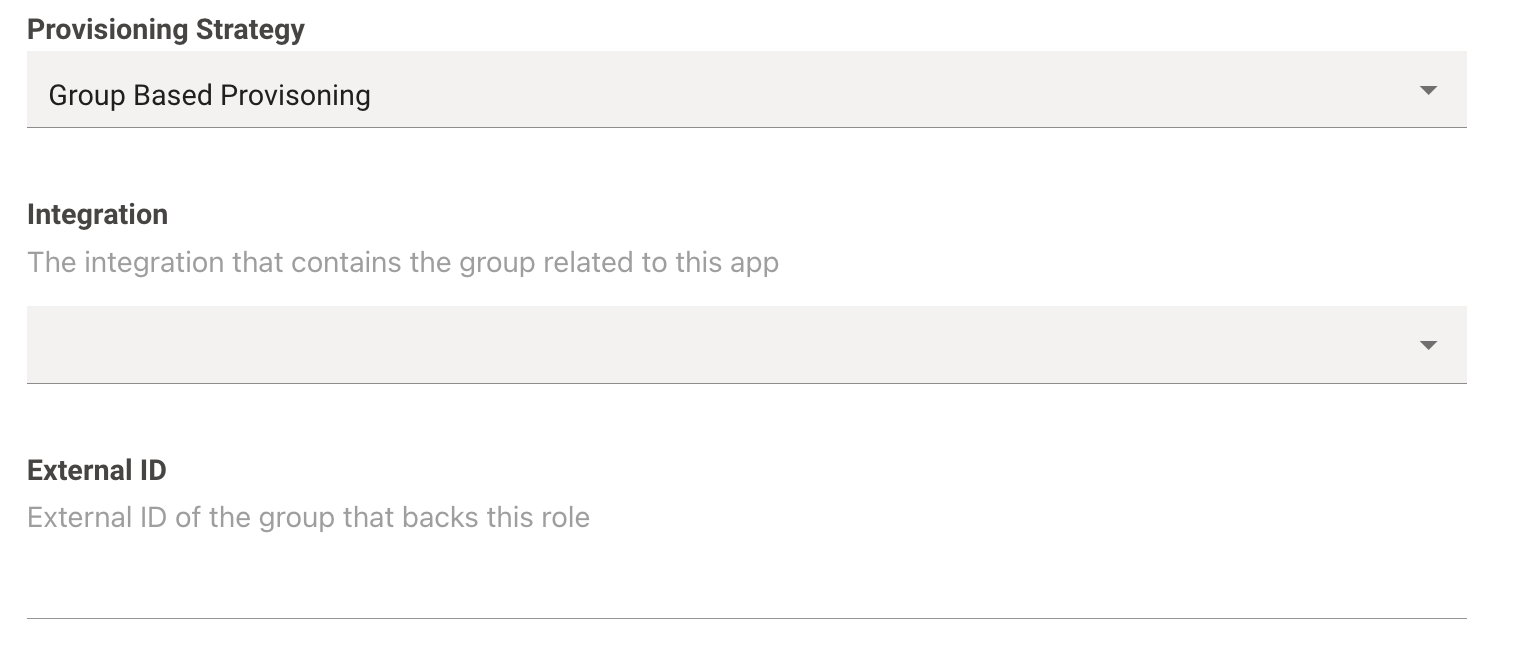
- Select Provisioning Strategy = Group Based Provisioning.
- Choose the Identity system Integration (e.g. Okta or Azure Directory) that contains the group related to this app.
- Input the corresponding External ID of the group that backs this role.
- For Okta, the External ID is the ID of the Group.
- For Active Directory, the External ID is the Distinguished Name, which is a sequence of relative distinguished names (RDN) connected by commas. e.g:
CN=App123,OU=Groups,DC=Company,DC=COM - For Azure AD/Entra, the External ID is the Azure Group Object ID.

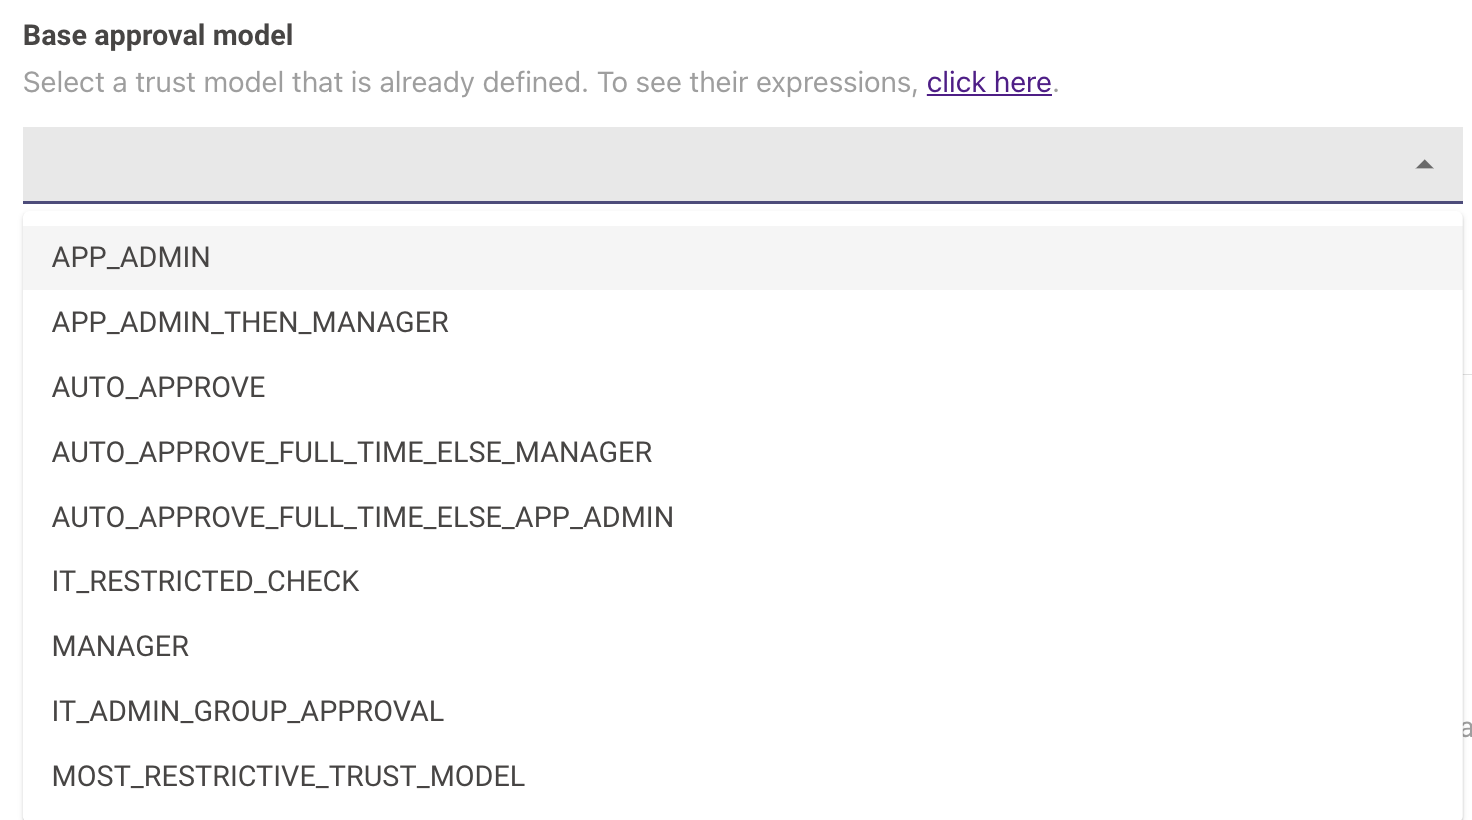
- Select the appropriate approval method for the software.
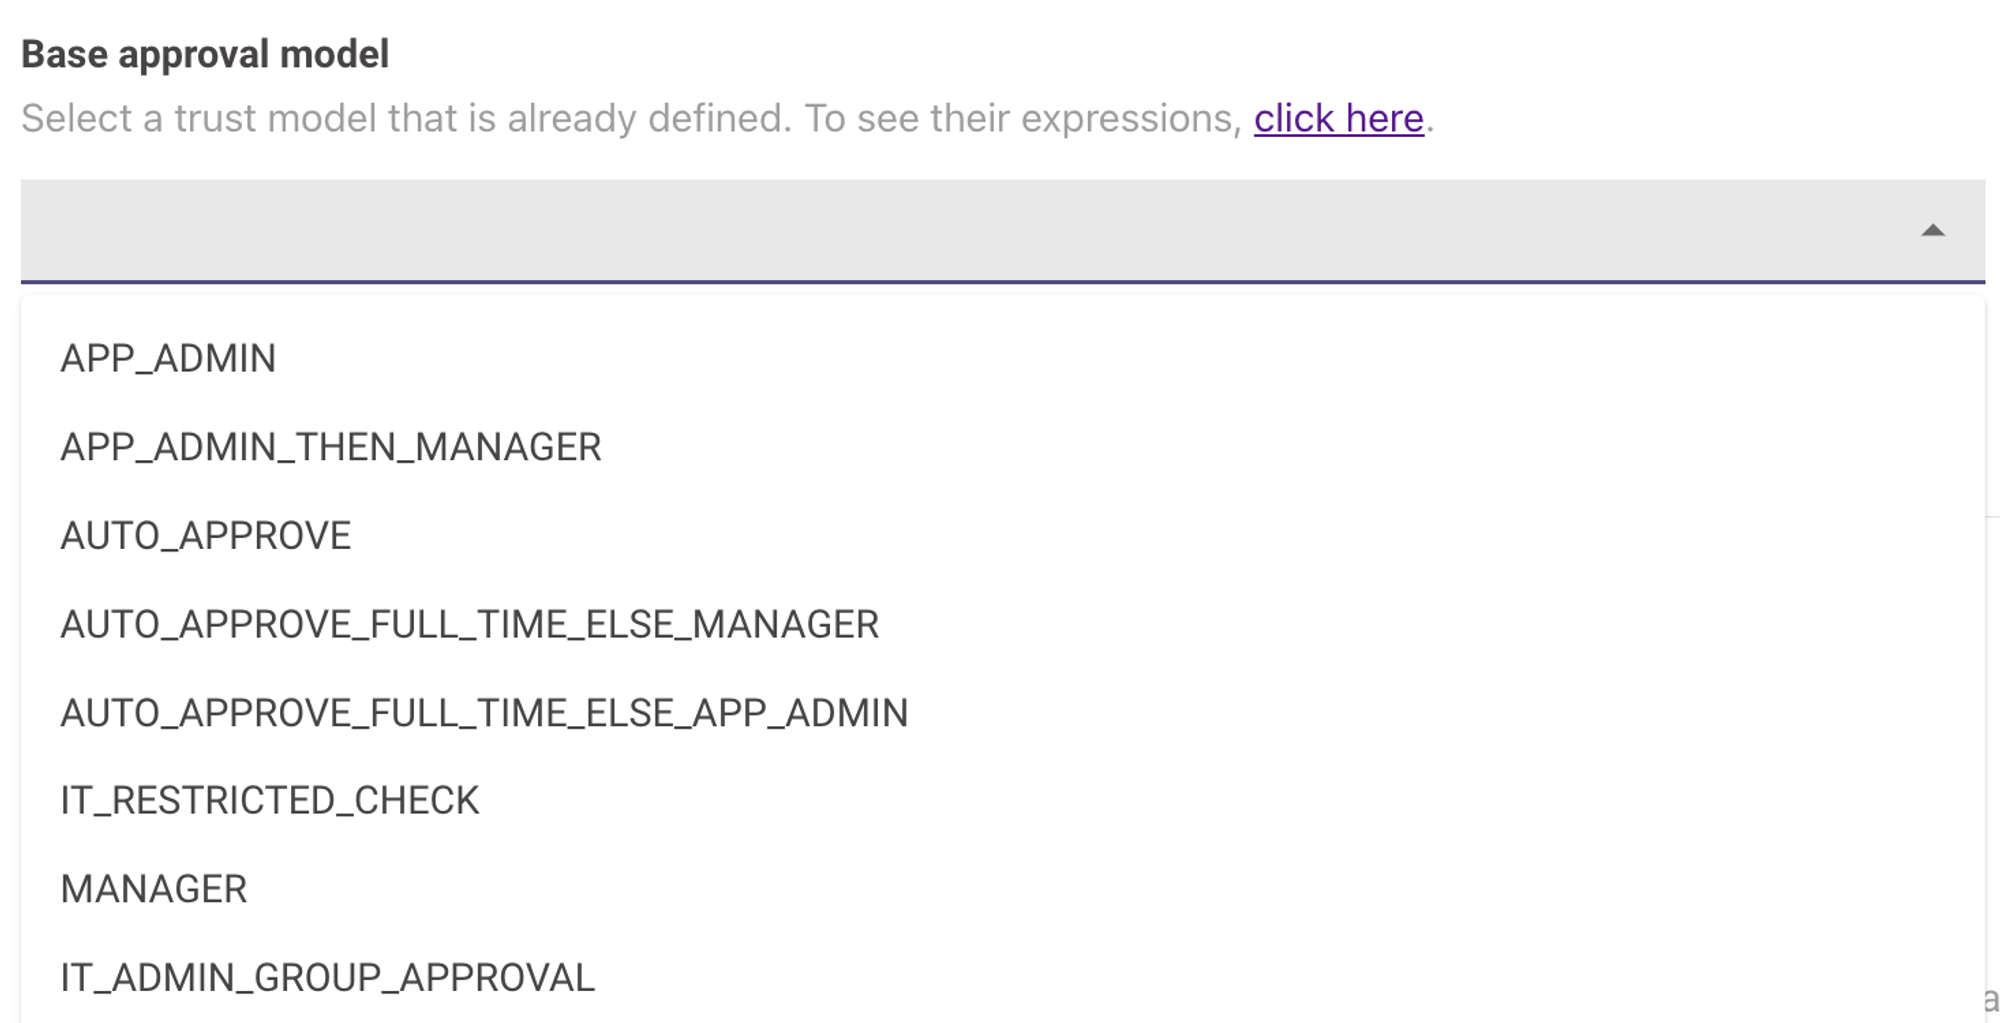
- Base Approval Method: These are pre-defined approval workflows. Most commonly used Base approval methods are mentioned below. You can learn more about Base Approval types [here](https://help.moveworks.com/docs/moveworks-setup-native-approval-settings
- AUTO_APPROVE: Here, tasks or requests are automatically approved, bypassing the need for an approving authority.
- APP_ADMIN: The Application Administrator's approval is necessary to carry out certain functions.
- MANAGER: This type of approval requires the consent of the individual's Manager.
- APP_ADMIN_THEN_MANAGER: A two-step approval process. First, the App Admin needs to approve. If approved, the workflow moves to require the Manager's approval.
- Custom Approval Method: This is more suited, if Base approval method workflows do not suffice your org’s requirements for software provisioning. Customer Approval workflows are created separately in Moveworks Native Approvals module.
- Base Approval Method: These are pre-defined approval workflows. Most commonly used Base approval methods are mentioned below. You can learn more about Base Approval types [here](https://help.moveworks.com/docs/moveworks-setup-native-approval-settings
- Select the appropriate approval type
- If you have selected App_Admin or App_Admin_Then_Manager, then you will be required to add the email address of the Admin to which the approval will be sent.

- Business justification question can be updated using below config

-
You can update the ticketing related workflows from the following configs
- Disable provisioning: If checked, we will not provision the app to the user, even if their request is approved.
- Disable ticket closure: If checked, we will leave the ticket open after the app is successfully provisioned so the support agent can manually take further actions.
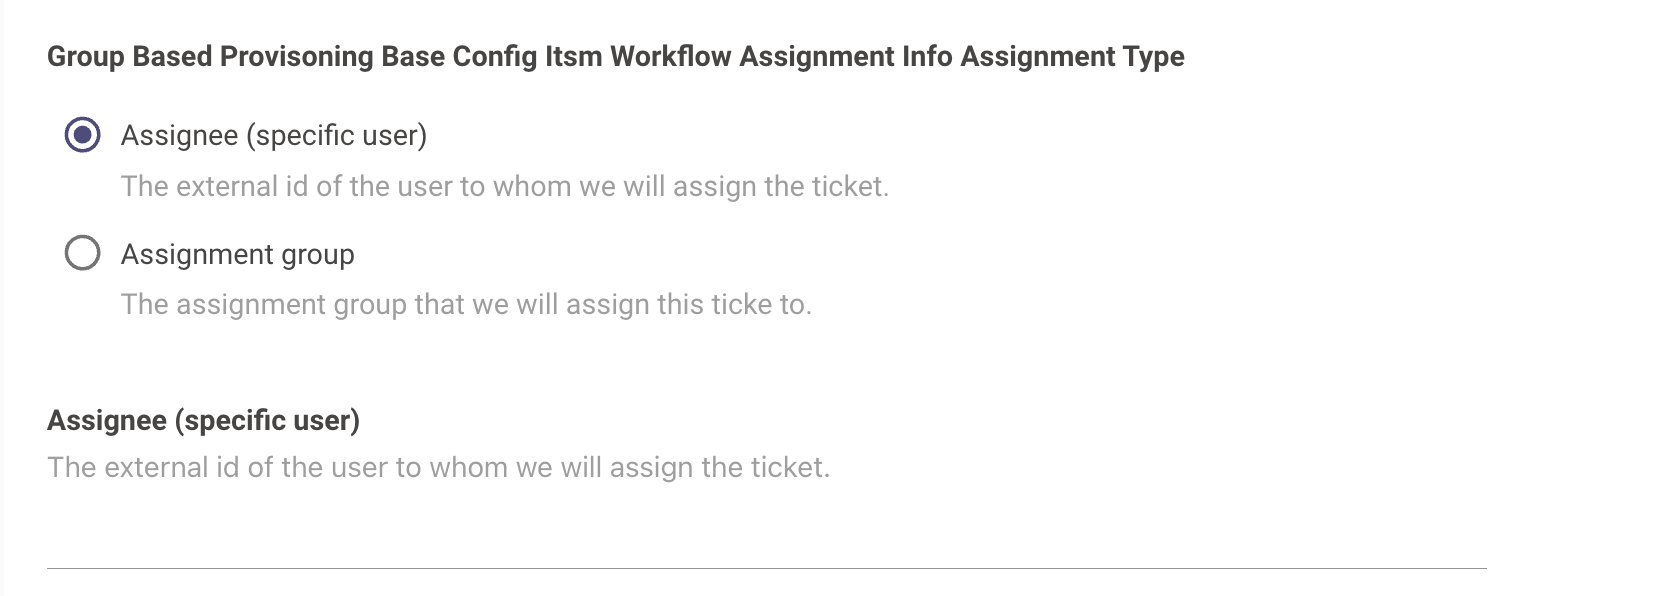
- Define or Update assignment of the ticket: You can either assign the ticket to a user or to an assignment group. For that, select the appropriate ticket assignee and input the details (External ID of the user in case of specific user; Assignment Group name in case of Assignment Group.
-
You can also update the texts to display once the software is successfully provisioned to the requester using following configs.

- You can add a text to display to the users if they already have access to the app using Provisioned user instructions config.

- Submit the changes.
- Once you submit the changes, you can see a new software catalog entry present in the home screen of Access Software module.
Creating a Role-Based Provisioning Software or App
- Navigate to Access Software > Software Catalog.
- Click on “Create”
- Input the name of the software or app.
Important note for Software NameUse the search input for this config to find the software/application entity you want to configure. These entity names are identifiers that are unique to Moveworks and serve our entity detection models to predict which application a user is referring to. Currently, search results will not include organization-specific entities. To configure those, contact Moveworks Support.
- Check the “Enable in Bot” field to enable the software. You can also do this step later.
- Pretexts & External links are more suited for self-service software & apps, therefore this is optional and can be skipped.
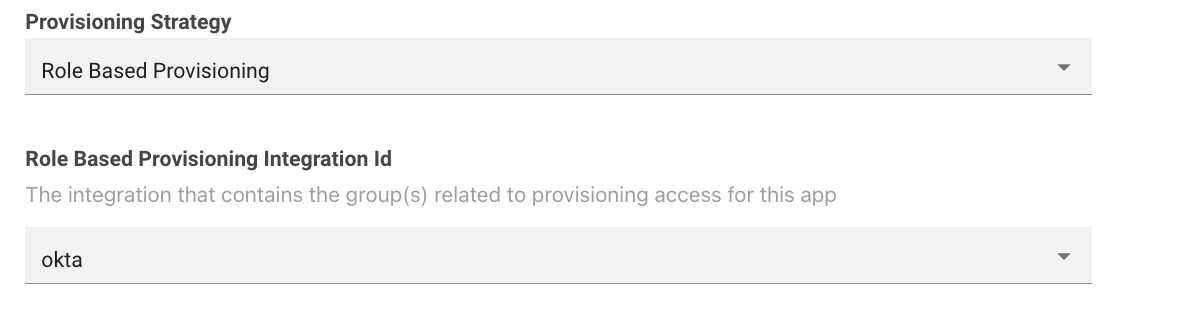
- Select Provisioning Strategy = Role Based Provisioning.
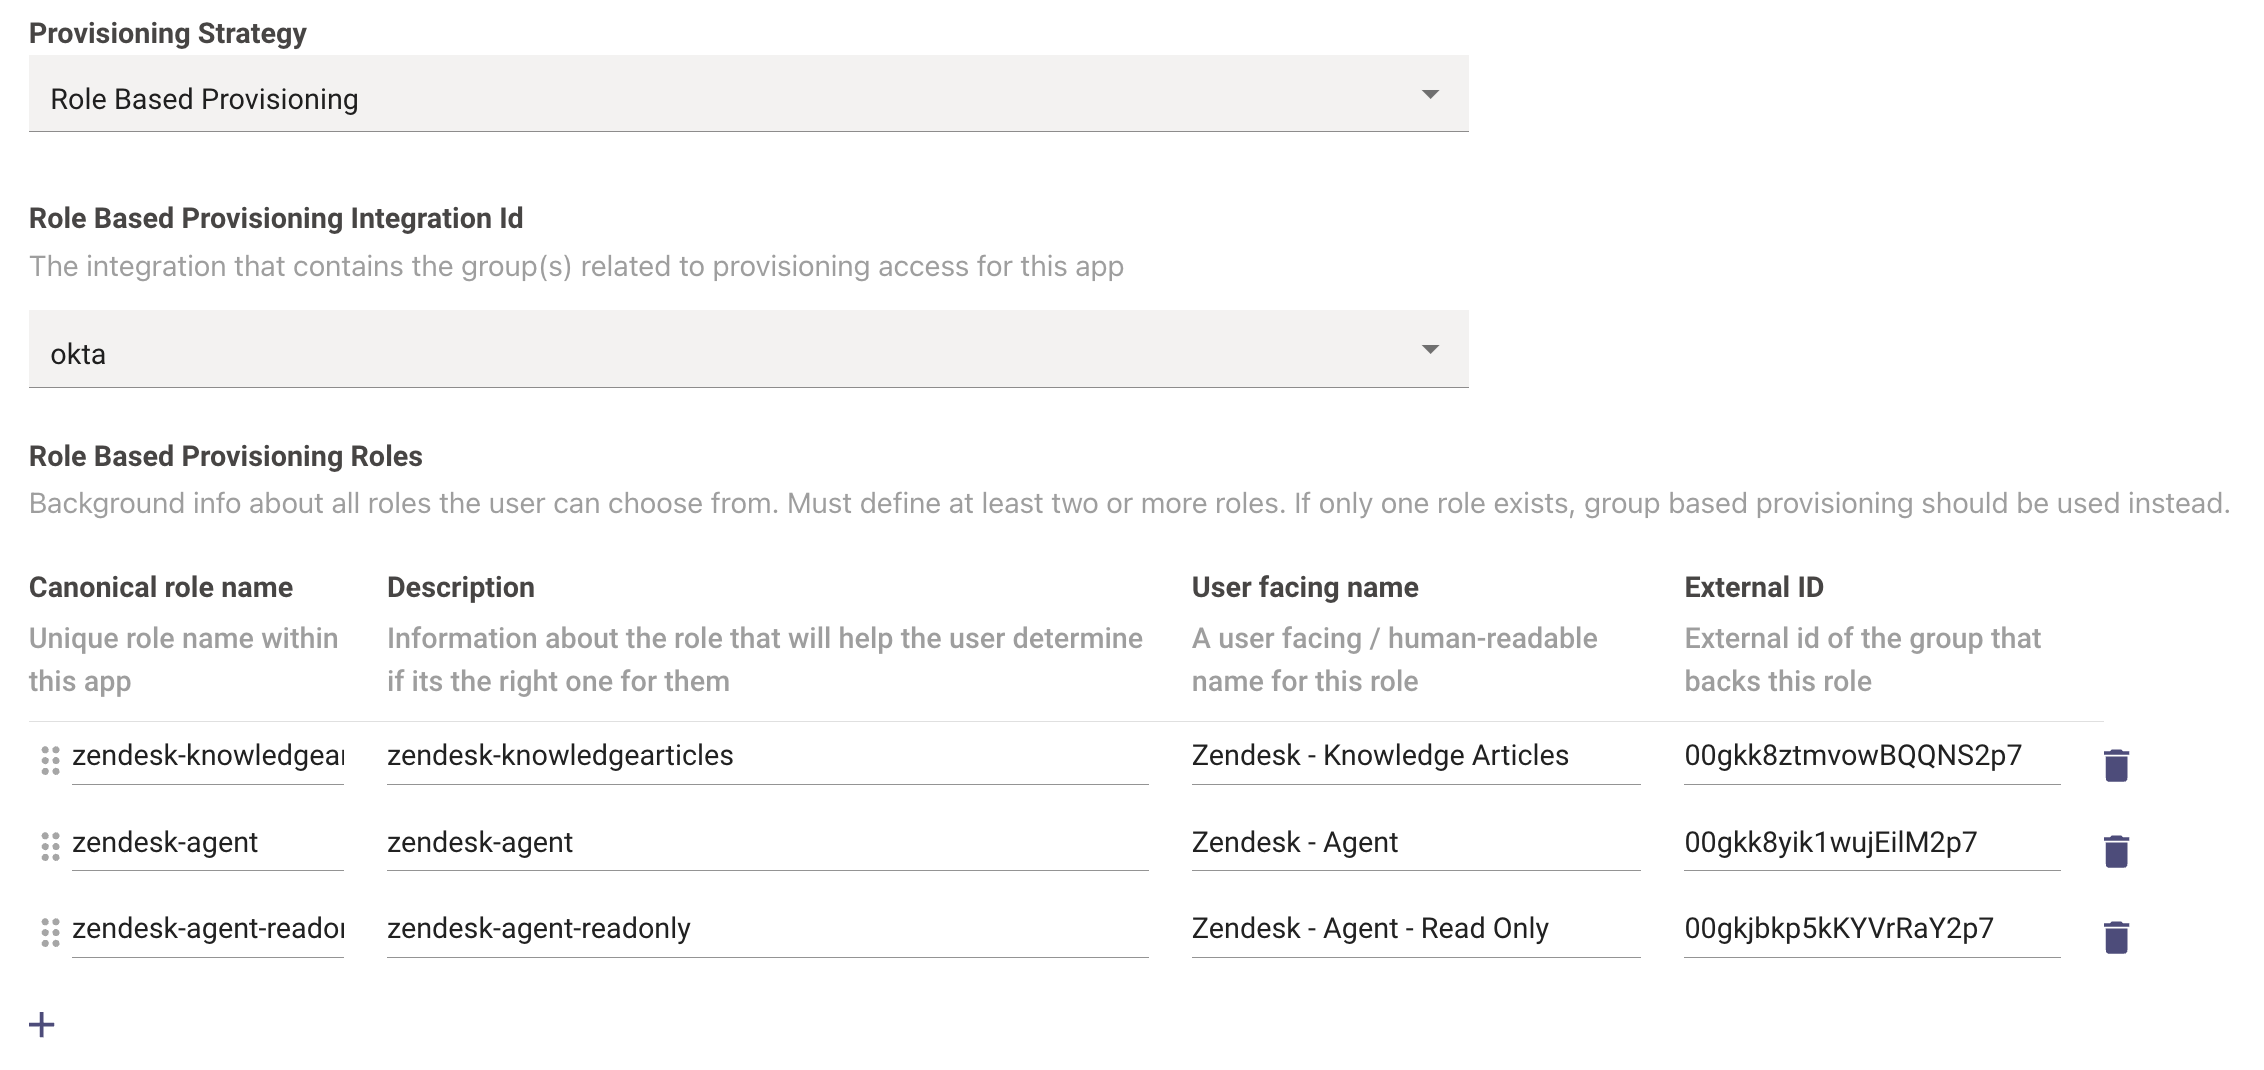
- Choose the Integration (e.g. Okta or Azure Directory) that contains the group(s) related to provisioning access for this app.

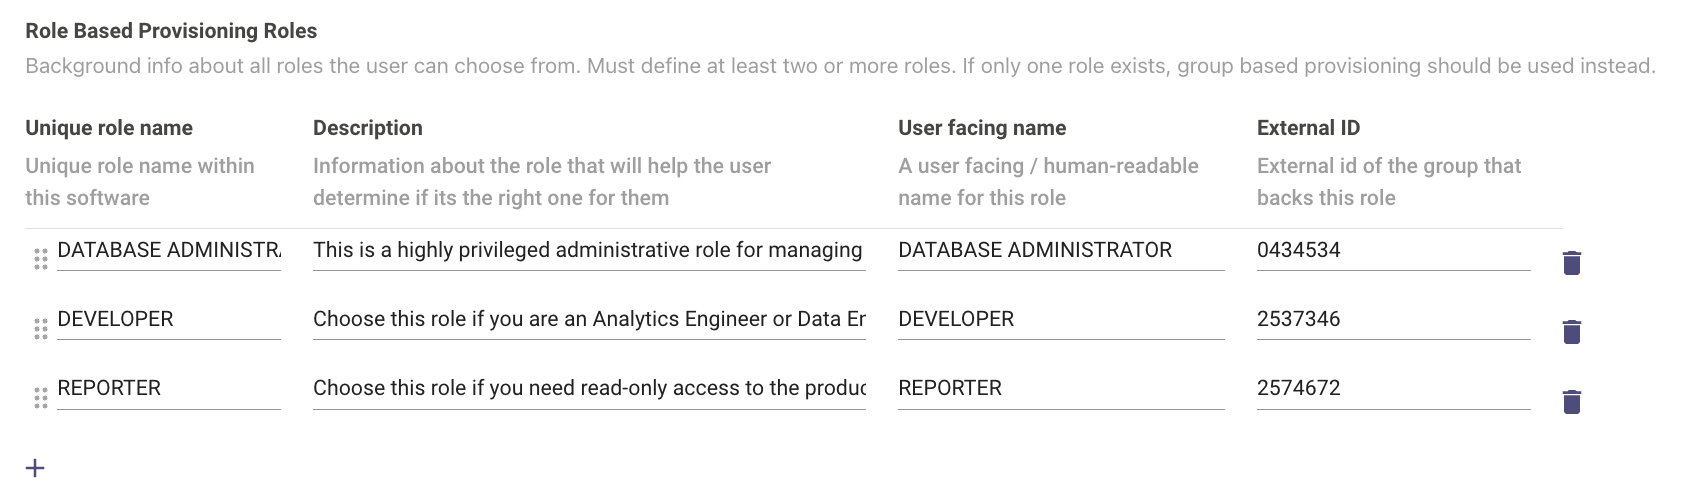
- Now we need to define the different roles for the software to be provisioned with, This is defined in the Role Based Provisioning Roles section :
- To add a new Role, Click on the + icon
- Add the Unique Role Name which exists within the App.
- Next we input the Description so that users can determine which role is right for them
- Add a user-facing name for the role, so its easily identifiable.
- Finally we need to add the corresponding External ID of the group that backs the role (This should be derived from the corresponding provisioning system like Okta or AD).
-
If you wish to delete a role
- Click on the delete icon against the role. Please make sure, there are atleast 2 entries in the Role-based provisioning.
- If you wish to update a role, simply change the canonical role name, description, user-facing name or external ID as per needs.
- You can add a hint text, that a user can use to decide which role would suit them the best. Note this is an optional field and can be left blank.
-
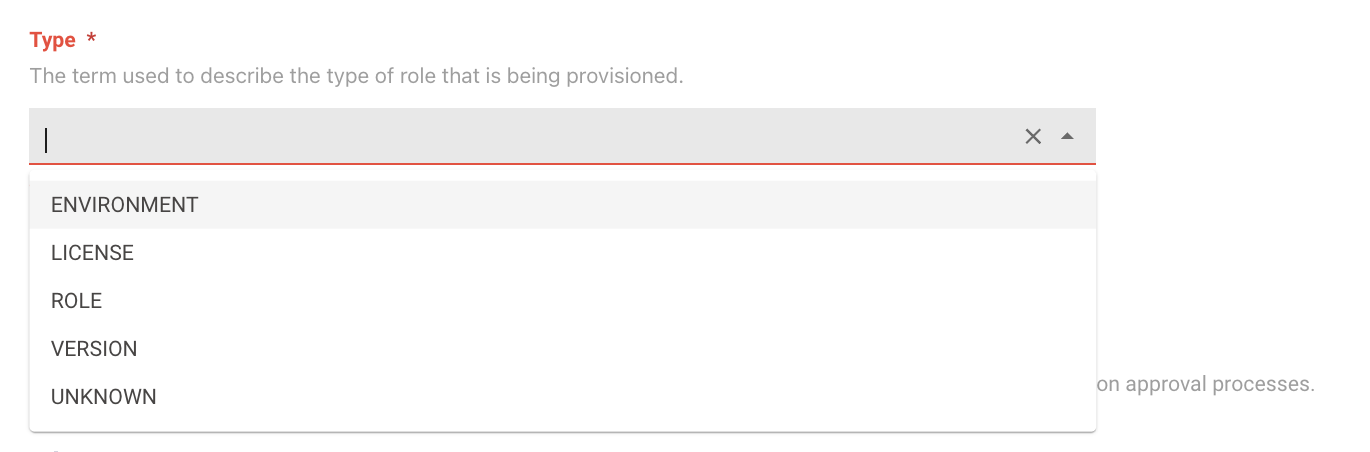
We also need to define the Type of the role that will be provisioned.There are 4 kinds of Types which can be selected.
-
ROLE - Default ROLE type which is assigned to the user when requesting App or Software
-
ENVIRONMENT - An Environment level role which might exist for the App or Software
-
LICENSE - A License Based role which is associated with the App or Software
-
VERSION - A version based role which is associated with the App or Software
-
UNKNOWN - This is picked when the user is unsure about the Type of the role being provisioned.
-
The Type config does not influence any changes in the AI Assistant behaviour with the user when requesting softwareThis control is used in the Ticket which is filed when the user requests for a Software or Application. Depending on the Type of Role selected the AI Assistant will add a Worknote to the filed ticket which will include this information.
- Select the appropriate approval method for the software.
- Base Approval Method: These are pre-defined approval workflows. Most commonly used Base approval methods are mentioned below. You can learn more about Base Approval types [here](https://help.moveworks.com/docs/moveworks-setup-native-approval-settings
- AUTO_APPROVE: Here, tasks or requests are automatically approved, bypassing the need for an approving authority.
- APP_ADMIN: The Application Administrator's approval is necessary to carry out certain functions.
- MANAGER: This type of approval requires the consent of the individual's Manager.
- APP_ADMIN_THEN_MANAGER: A two-step approval process. First, the App Admin needs to approve. If approved, the workflow moves to require the Manager's approval.
- Custom Approval Method: This is more suited, if Base approval method workflows do not suffice your org’s requirements for software provisioning. Customer Approval workflows are created separately in Moveworks Native Approvals module.
- Select the appropriate approval type
- If you have selected Add_Admin or Add_Admin_Then_Manager, then you will be required to add the email address of the Admin to which the approval will be sent.
- Business justification question can be updated using below config
- You can update the ticketing related workflows from the following configs
- Disable provisioning: If checked, we will not provision the app to the user, even if their request is approved.
- Disable ticket closure: If checked, we will leave the ticket open after the app is successfully provisioned so the support agent can manually take further actions.
- Define or Update assignment of the ticket: You can either assign the ticket to a user or to an assignment group. For that, select the appropriate ticket assignee and input the details (External ID of the user in case of specific user; Assignment Group name in case of Assignment Group.
- You can also update the texts to display once the software is successfully provisioned to the requester using following configs.
- You can add a text to display to the users if they already have access to the app using Provisioned user instructions config.
- Submit the changes.
- Once you submit the changes, you can see a new software catalog entry present in the home screen of Access Software module.
How To Manage already Provisioned Softwares
Self Service provisioning use-cases
Updating Self-Service instructions for the Software or App
- Navigate to Access Software > Software Catalog.
- Click “Edit” corresponding to the software for which you update the self-service instructions.
- Ensure you have provisioning strategy selected as Self Service provisioning
- Update the Title & Body as per your requirements for self-servicing the software. Tip: It is best to add a self-service URL in the self-service provisioning message body.
Updating Pretext & External links related to the app
- Navigate to Access Software > Software Catalog.
- Click “Edit” corresponding to the software for which you update the pretext and external links related to the app.
- Ensure you have provisioning strategy selected as Self Service provisioning.
- Update the Pretext and External links. Refer to the below example for reference.
- Submit the changes.
Group-based provisioning use-cases
Updating the External ID of the Identity system
- Navigate to Access Software > Software Catalog.
- Click “Edit” corresponding to the software for which you update the External ID of the group.
- Ensure you have provisioning strategy selected as Group based provisioning
- Change the External ID of the group that backs the software role.
- Submit the changes.
Role-based provisioning use-cases
Adding or Updating Roles for a Software Catalog
-
Navigate to Access Software > Software Catalog.
-
Click “Edit” corresponding to the software for which you wish to update roles for the software.
-
Ensure you have provisioning strategy selected as Role based provisioning
-
Now we need to define the different roles for the software to be provisioned with, This is defined in the Role Based Provisioning Roles section :
-
To add a new Role, Click on the + icon
-
Add the Unique Role Name which exists within the App.
-
Next we input the Description so that users can determine which role is right for them
-
Add a user-facing name for the role, so its easily identifiable.
-
Finally we need to add the corresponding External ID of the group that backs the role (This should be derived from the corresponding provisioning system like Okta or AD).
-
-
If you wish to delete a role
- Click on the delete icon against the role. Please make sure, there are atleast 2 entries in the Role-based provisioning.
-
If you wish to update a role, simply change the canonical role name, description, user-facing name or external ID as per needs.
-
Submit the changes.
Update Hint to the user to indicate which role would suit them best
- Navigate to Access Software > Software Catalog.
- Click “Edit” corresponding to the software for which you wish to update hint to the user to indicate which role would suit them best.
- Ensure you have provisioning strategy selected as Role based provisioning
- Update the hint that a user can use to decide which role would suit them the best. Note this is an optional field and can be left blank.
- Submit the changes.
Common use-cases
I want to enable/ disable a software or app for in-bot provisioning
- Navigate to Access Software > Software Catalog.
- Click “Edit” corresponding to the software which you want to enable or disable.
- Uncheck the field “Enable in Bot” if you wish to disallow provisioning of the software and vice-versa.
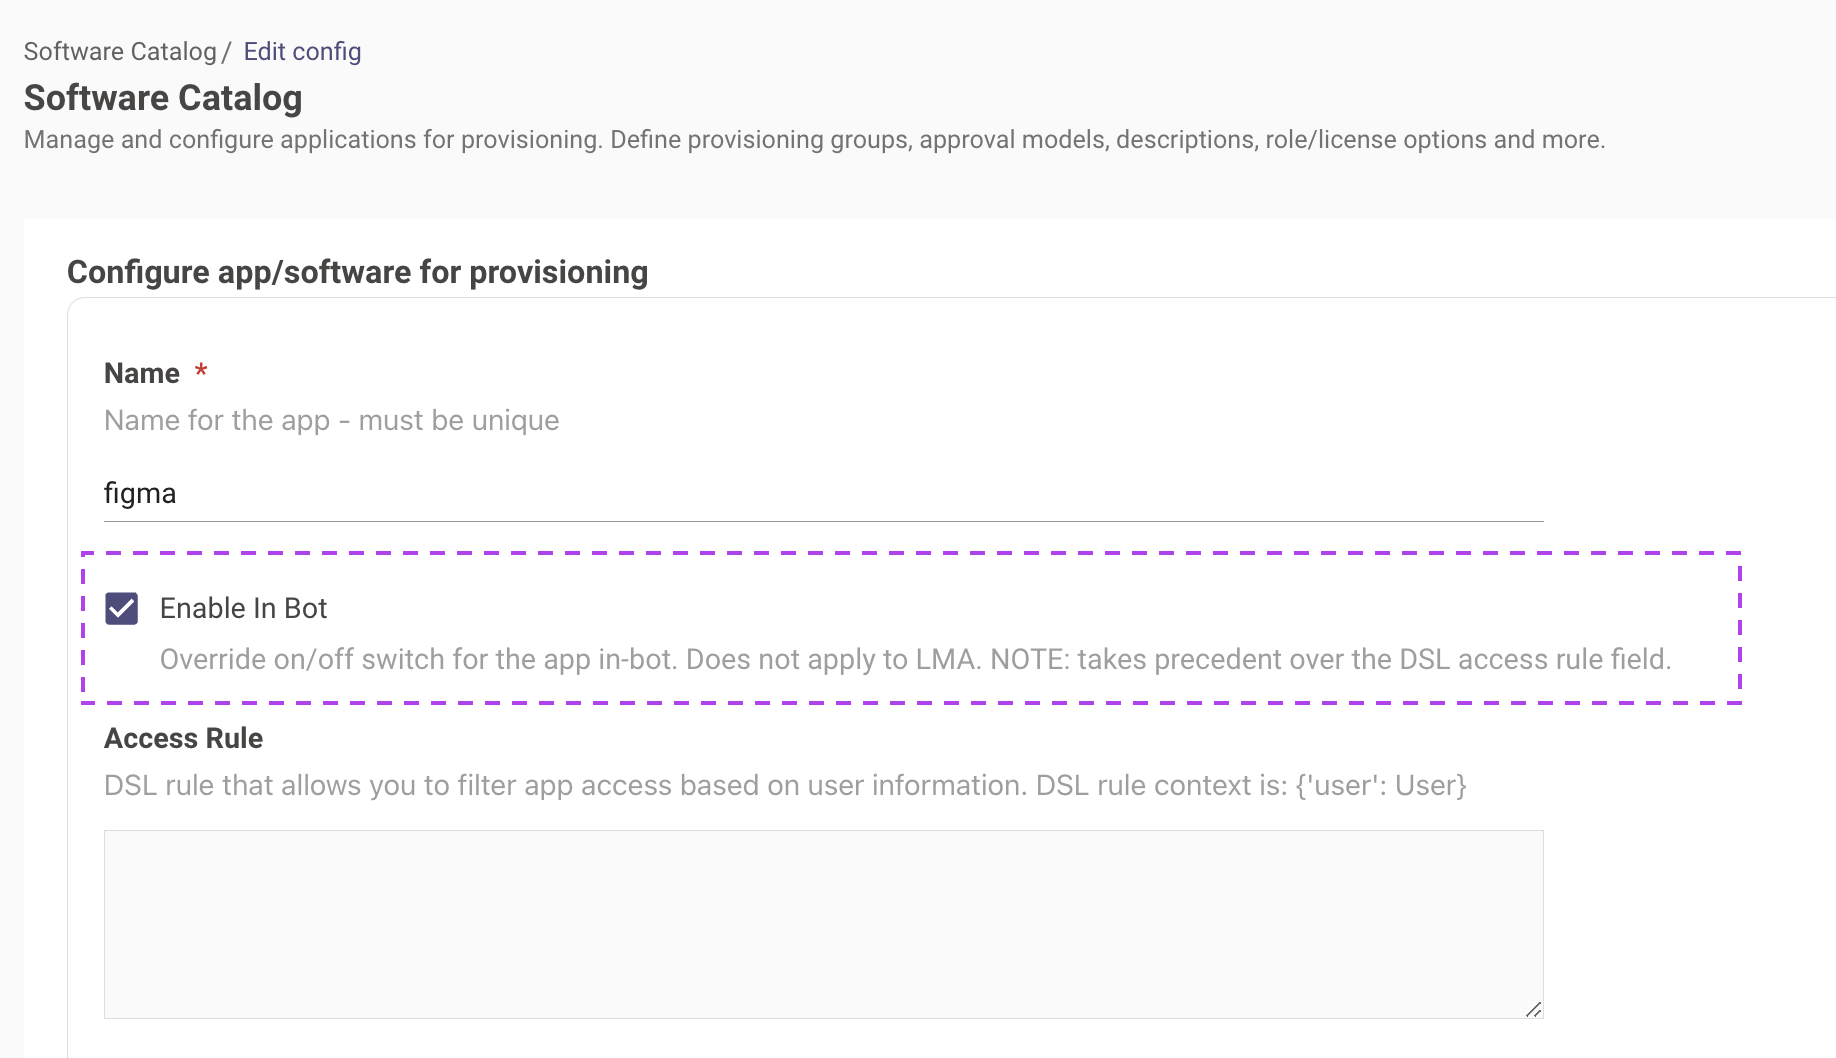
- Submit the changes.
Important Note:
- “Enable in Bot” configuration takes precedence over Access rule.
- With the Access Rule configuration, admins can do a limited rollout for specific users to test the software provisioning and later turn it ON for all employees.
Currently this field is not available for customers to edit. It will be made available shortly.
I want to change the provisioning system
- Navigate to Access Software > Software Catalog.
- Click “Edit” corresponding to the software for which you wish to change the provisioning system.
- Ensure you have provisioning strategy selected as Role or Group based provisioning.
- Click on the Integration dropdown in case of Group based provisioning. In case of Role based provisioning, click on the Role based provisioning integration ID.
NoteIf you are changing the provisioning system, corresponding External ID(s) should be updated in the Group or Role based provisioning configs.
- Submit the changes.
I want to change the approval flows
-
Navigate to Access Software > Software Catalog.
-
Click “Edit” corresponding to the software for which you wish to change the approval flows.
-
Ensure you have provisioning strategy selected as Role or Group based provisioning as Approval flows are applicable only for these provision types.
-
Case 1: If Approval method = Base approval
-
Click on the base approval model dropdown and select the desired approval type.
-
If you are changing the base approval model to App_Admin or App_Admin_then_Manager, you will be required to input the Admin email in the config field.

- For more details about different base approval models, refer this help page.
-
-
Case 2: If Approval method = Custom approval
-
Click on the custom approval model dropdown and select the desired approval type.

-
If your desired custom approval model is not present and needs to be created afresh, you will be required to created a custom approval flow in Moveworks Native Approvals first and then update here.
-
-
Submit the changes.
I want to update provisioning related messages & questions
- Navigate to Access Software > Software Catalog.
- Click “Edit” corresponding to the software for which you wish to update provisioning related messages & questions
- Updating Business justification text/ question
Business justification question can be updated using below config (depending upon which provisioning type, you are opting for).


- Updating Post-provisioning message
Provisioning message can be updated using following configs.
- Updating message for the user when software is already provisioned
This can be changed by updating the provisioned user instructions config.

- Submit the changes.
I want to update ticketing related workflows
- Navigate to Access Software > Software Catalog.
- Click “Edit” corresponding to the software for which you wish to update the ticketing related workflows
- Disable provisioning: If checked, we will not provision the app to the user, even if their request is approved.
- Disable ticket closure: If checked, we will leave the ticket open after the app is successfully provisioned so the support agent can manually take further actions.
- Define or Update assignment of the ticket: You can either assign the ticket to a user or to an assignment group. For that, select the appropriate ticket assignee and input the details (External ID of the user in case of specific user; Assignment Group name in case of Assignment Group.
- Submit the changes.
How to Deploy Custom URL Protocols
Admins can deploy custom protocols to have users easily run approved applications. For example, you can use this to set up deep links that execute Windows Executables such as .exe files locally for various purposes such as running scripts. These steps walk through how to approach this for the Moveworks bot.
- Create a custom URL protocol, and then use a Group Policy Object (or another preferred method of system management) to deploy the configuration to all endpoints.
- Follow this guide or this post for more details.
- Moveworks can then present this link where applicable (see below section for use cases).
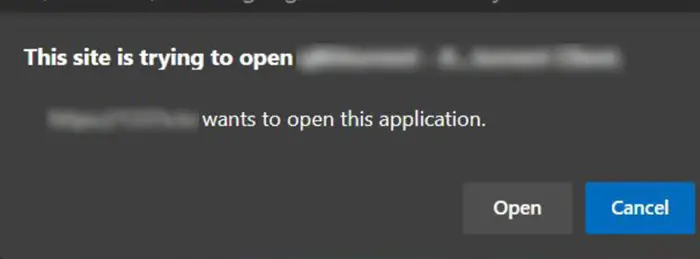
- Note: Moveworks wraps these links for tracking & analytics purposes (e.g:
https://app.moveworks.ai/?132689). This means links will immediately bounce to browser, and then redirect tocustom_protocol://, which will then link to the local.exefile.
- Note: Moveworks wraps these links for tracking & analytics purposes (e.g:
Note: Depending on your organization’s browser settings, links may result in the browser asking for permission to open the .exe.
Recommendation: You can deploy browser settings for Edge, Chrome, Firefox, etc. to auto accept your custom protocol. See this post for more details.
Moveworks Use Cases
Once deployed to your employees, these links can be used in Moveworks for the following purposes:
- Software Access: Provide a deep link to an executable file as part of the Software Access skill (with or without provisioning an IDAM group).
- Account Access: Provide a deep link to an executable file (e.g. password reset tool) when the user is required to reset an expired password or when they forgot their password.
Updated 6 months ago