How To Guide for Access Groups Plugin
How To Configure Integration with Exchange On-Prem
The Moveworks Group Access plugin integrates directly with Active Directory, however groups created through the plugin may not automatically be Exchanged mail-enabled, based on your individual organization's setup.
In order to make Moveworks-created groups Exchange mail-enabled, the following sample script can be used.
High-Level Overview
- Moveworks creates group in a temporary OU in Active Directory.
- Powershell script is set to run nightly, and queries all groups in this temporary OU. (You can use AD Task Scheduler on AD Server to execute this script.)
- Script then adds attribute to make each group mail-enabled.
- Script moves groups into final OU
Sample Script
#  1.  Connect to local exchange environment
#  2.  Query groups in the Temp OU.
#  3.  Store all groups in an array
#  4.  Run "Enable-DistributionGroup -Identity groupname" on each group in the array
#  5.  Move groups to OU=User Created Distribution Lists,DC=org,DC=com when done
#  6.  Schedule this to run every night.

# Load AD Module
Import-Module ActiveDirectory

# Load Exchange Snapin
$Session = New-PSSession -ConfigurationName Microsoft.Exchange -ConnectionUri http://sv2wnexmb01.global.company.com/PowerShell/ -Authentication Kerberos
Import-PSSession $Session

# Get list of Groups not Mail Enabled from the Temp OU
$groupsToProcess = Get-ADGroup -SearchBase "OU=Temp,OU=Distribution Lists,DC=company,DC=com" -Filter *

ForEach ($ADGroup in $groupsToProcess) {
    $grpDistName = $ADGroup.DistinguishedName

    # Enable email for each group
    Enable-DistributionGroup -Identity $ADGroup.DistinguishedName

    # Delivery management
    Set-DistributionGroup -Identity $ADGroup.DistinguishedName -RequireSenderAuthenticationEnabled $false

    # move group to final OU
    Move-ADObject -Identity $grpDistName -TargetPath "OU=Distribution Lists,DC=company,DC=com"
}
Considerations
- When creating the DL in-bot, group additions can happen immediately and this gets carried over when the group is picked up by the nightly job.
- Be sure to replace the placeholder values with actual values. This script may require additional modifications based on your company’s setup.
How to enforce naming conventions when creating a group
- Navigate to Group Access > Plugin Settings
- Scroll down to the DL validation JSON bender configuration.
- Here you can write a configuration like the one below to enforce naming conventions e.g:
{
  "email": {
    "CONDITIONAL()": {
      "context": {
        "val": {
          "EVAL()": {
            "expression": "$REPLACE(val OR \"\", \"[\\\\~#%&*,{}$\\/:<>?|\\\"]\", \"\") OR NULL",
            "args": {
              "val": {
                "CONDITIONAL()": {
                  "context": {
                    "val": "$SPLIT(email OR \"\", \"@\")[0] OR NULL"
                  },
                  "condition": "val",
                  "on_pass": "val.$REPLACE(\"\\.pdl\", \"\").$REPLACE(\"_\", \"-\")"
                }
              }
            }
          }
        }
      },
      "condition": "val",
      "on_pass": "$CONCAT([val, \"[email protected]\"])"
    }
  }
}
This Moveworks DSL configuration transforms an email address by extracting and cleaning the username portion, then reconstructing it with a standardized company domain. The process works by first splitting the input email on "@" to get the username, then conditionally cleaning it by removing special characters (like backslashes, tildes, hashes, etc.) and replacing underscores with hyphens while also stripping any existing ".pdl" suffix. If the cleaned username exists after this sanitization, it concatenates the result with "[email protected]" to create a standardized email format, otherwise it returns null - essentially converting various email formats into a consistent company email structure with ".pdl" as a prefix to the company domain.
How do I enable the create DL skill/ Add user to DL skill/ Remove user from DL skill ?
Plugin controls can be used to enable or disable a skill.
- Navigate to the AI Assistant Plugin Management config and go through the available plugin controls.
- Enable the plugin for the respective skill using the plugin control.
How do I select the approval model for the create DL skill/ Add user to DL skill/ Remove user from DL skill ?
By default, the Moveworks Platform contains pre-built approval expressions that can be referenced by skills to implement consistent approval behavior. These expressions define who can approve requests and under what conditions.
Key Approval Models
- Basic Approvals
- APP_ADMIN: Routes approval to application administrators
- MANAGER: Routes approval to the requestor's manager
- AUTO_APPROVE: Automatically approves the request
- Trust-Based Models
- STANDARD_TRUST_MODEL: Auto-approves for users with OWNER/MANAGER/MEMBER roles, or if requestor is the manager, otherwise requires DL owner approval
- MOST_RESTRICTIVE_TRUST_MODEL: Only auto-approves for DL owners, requires DL owner approval for all others
- LEAST_RESTRICTIVE_TRUST_MODEL: Auto-approves for open GSuite groups, role holders, and managers
- Fallback Models
- STANDARD_WITH_FALLBACK_TO_MANAGER: Uses standard trust model but falls back to manager approval if DL owners not found
- MOST_RESTRICTIVE_WITH_FALLBACK_TO_MANAGER: Uses most restrictive model with manager fallback
- MOST_RESTRICTIVE_WITH_FALLBACK_TO_DL_MANAGER: Uses most restrictive model with DL manager fallback
- Sequential Approvals
- APP_ADMIN_THEN_MANAGER: Requires both app admin AND manager approval
- MANAGER_THEN_DL_OWNER: Requires manager approval followed by DL owner approval
If you would like to modify the approvals logic, you will need to override the approval logic in the approvals module by creating a new approval record with the same key name corresponding with the approvals module for the skill:
- Navigate to Access Management > Moveworks Approvals
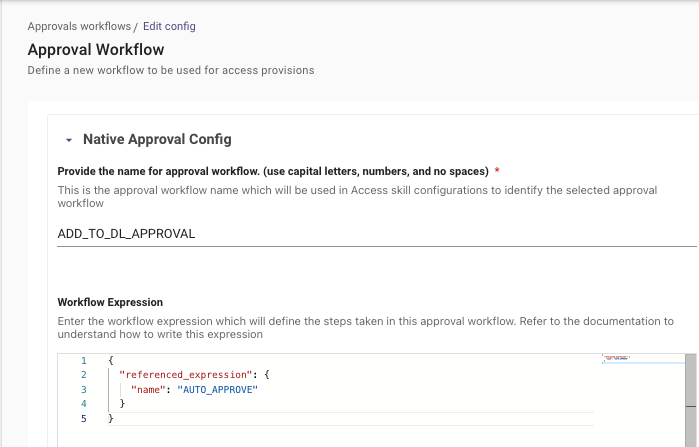
- Select Create on the top right
- Provide the name for approval workflow.
- CREATE_DL_APPROVAL
- ADD_TO_DL_APPROVAL
- REMOVE_FROM_DL_APPROVAL
Updated 17 days ago