How to Guides for User Identity Plugin
How To Configure Bot Access Rule for Users
This feature control allows users to enable or disable the bot access for your employees. You can enable it for all the users that you have ingested, or enable for some of them, or disable for some of them. This can be done by writing DSL rules under this feature control. Click this link to learn how to write DSL rules.
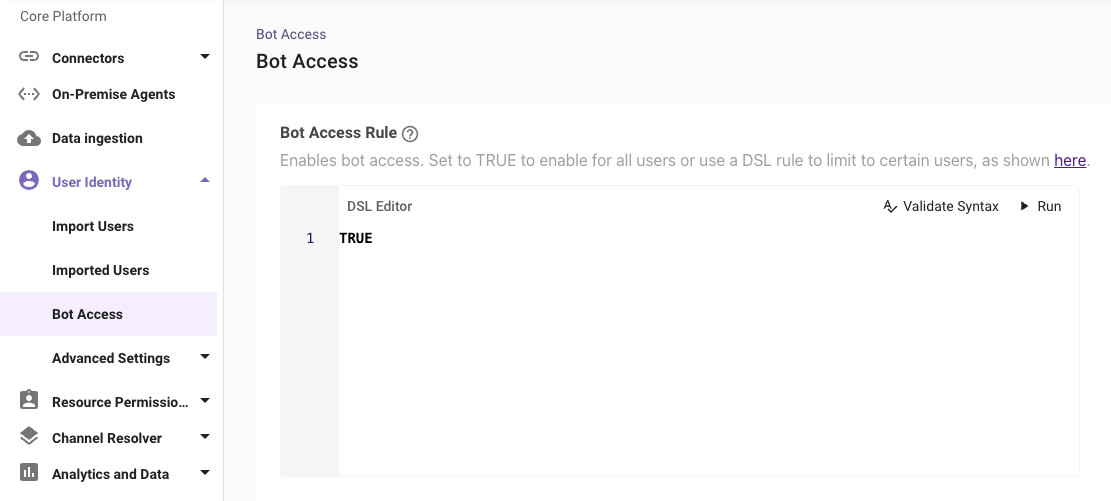
- Setting the value TRUE in the rule field enables access to all the Enabled Users in the Moveworks Platform.
- Setting the value FALSE in the rule field disables access to all the users in the Moveworks Platform.
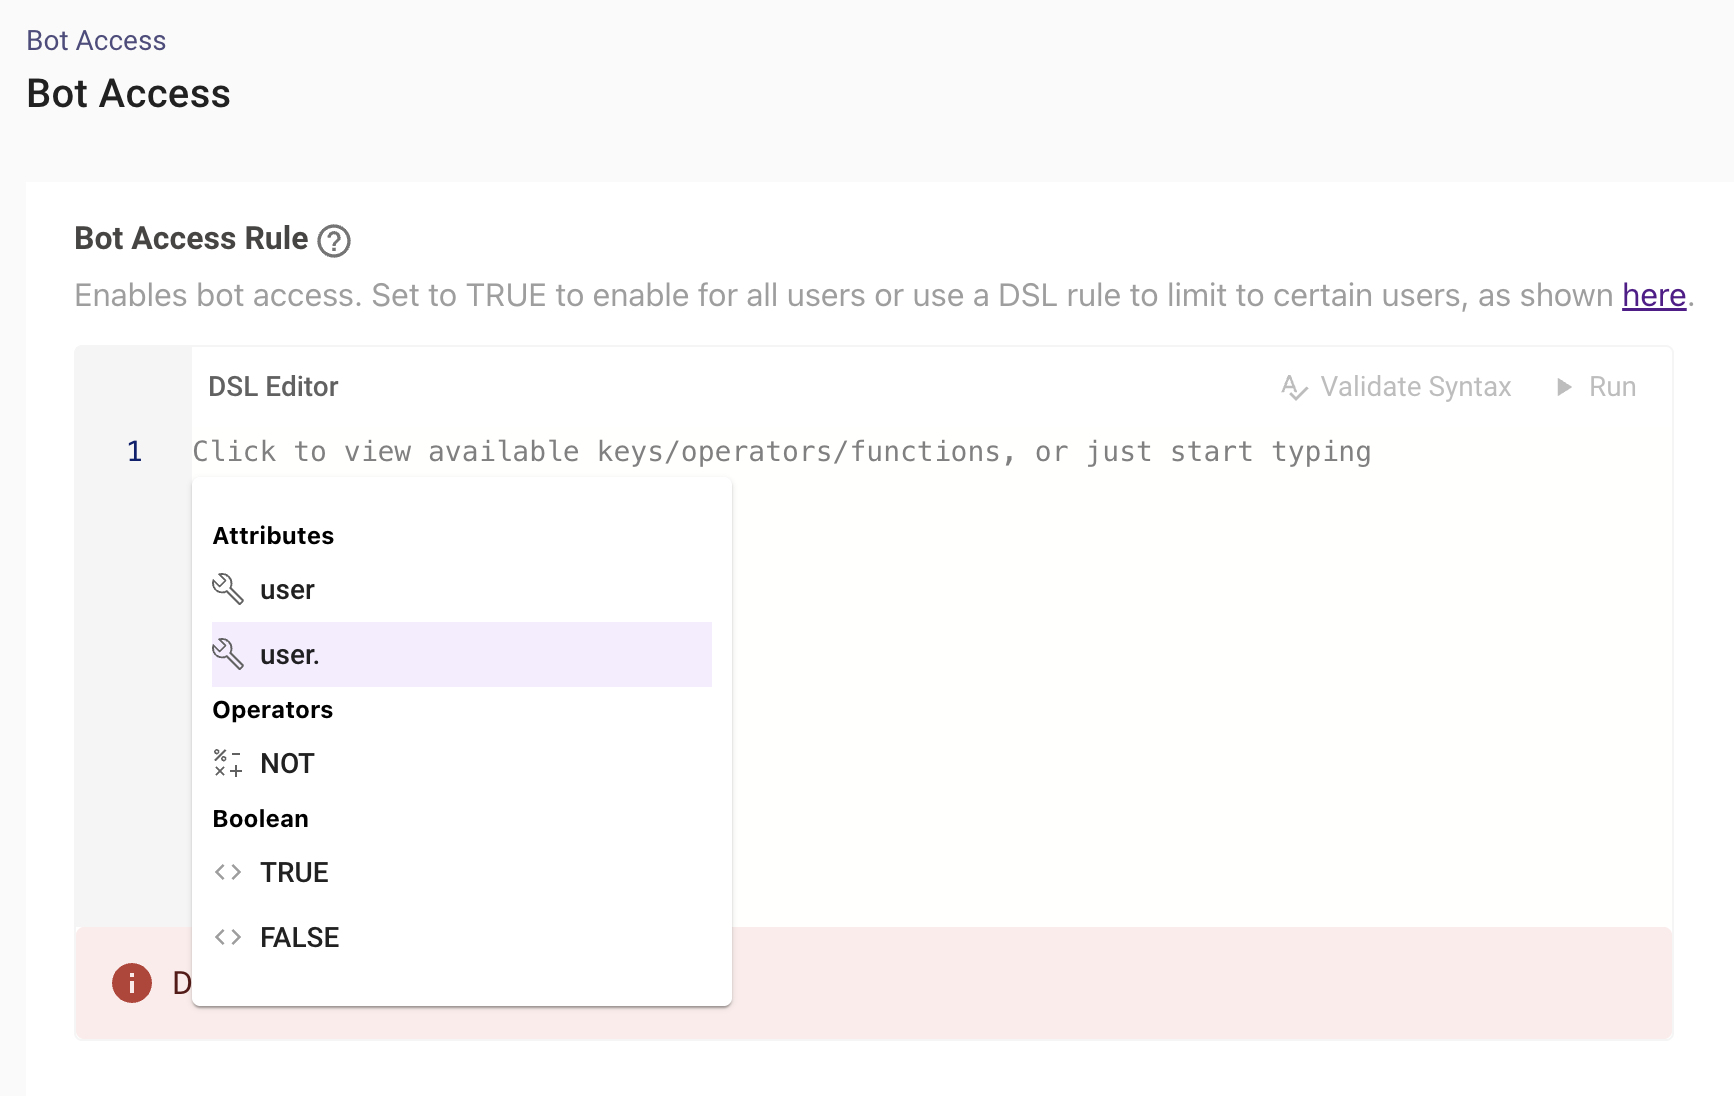
You can also write DSL rules using the attributes list in the field like below :
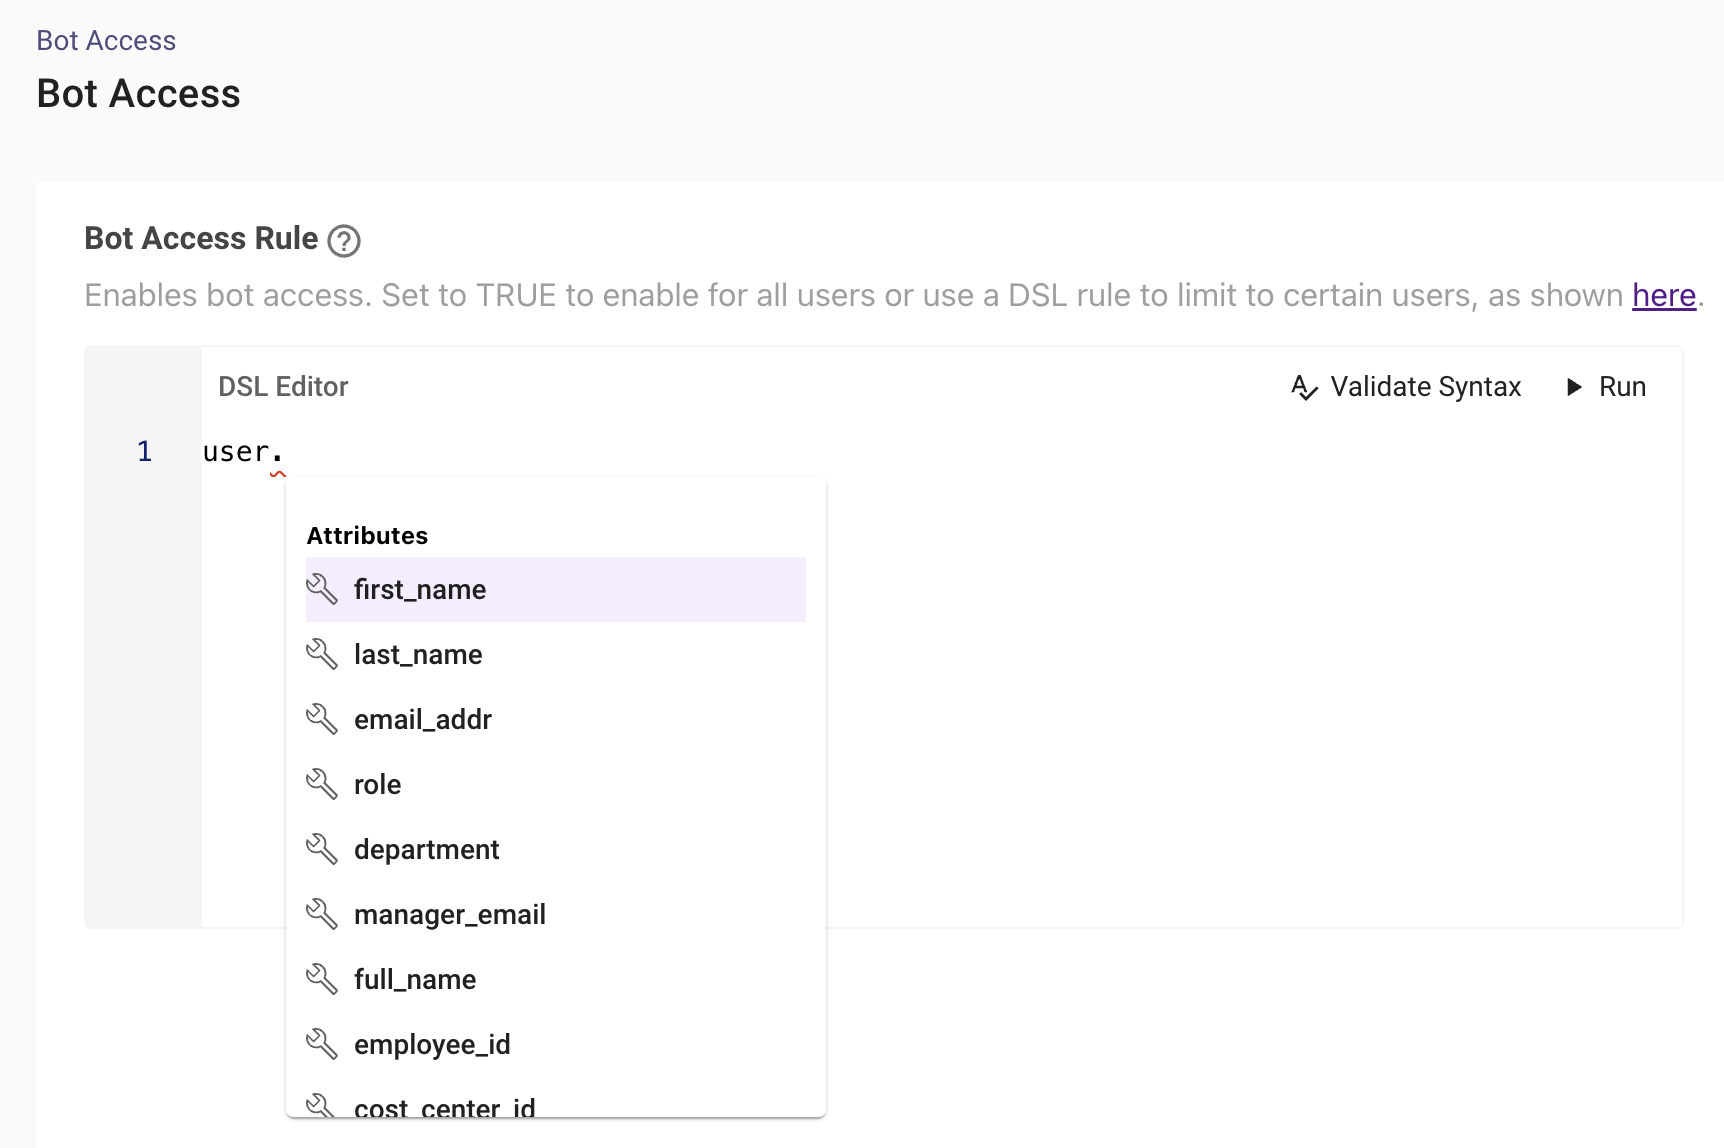
Here is the list of attributes under the user category which can be used to write the rule and permission them based on identity data.
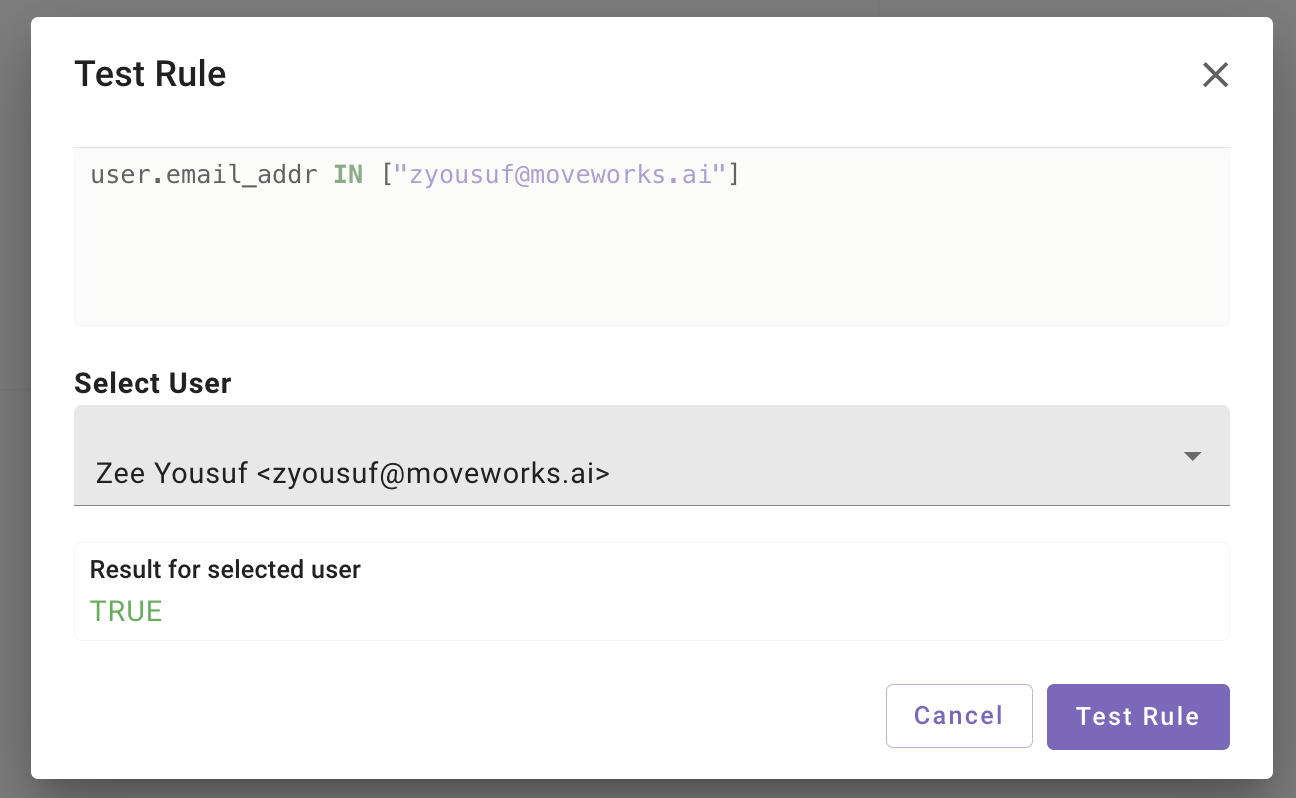
In the below example we are using the user email to filter the users but we can also use any of the other attributes and provide a list of them :
user.email_addr IN ["[email protected]", "[email protected]"]Validation
Once the rule has been set click on the Validate Syntax button to ensure the rule has been written correctly before testing the Rule using the Run Button.
Clicking on the Run Button opens a new view where we see a preview of the rule we are testing against. Keep in mind this preview rule is not editable, you will have to make the change on the DSL Editor rule.
Select User - Search for users in the Moveworks platform which the rule can be tested against. Only one user can be selected at a time.
Here is an example of the Rule being tested
How To Enable Bot Access Rule for ONLY users with Chat Identity
To enable the bot access rule only for users with a valid chat identity, you can use the following rule by checking the external_system_identities on the user object e.g:
Slack:
user.external_system_identities.slack.external_id**Microsoft Teams: **
user.external_system_identities.msteams.external_idHow To Filter out Duplicate Users
While importing users from the source systems, certain attributes need to be unique for every single user in order for the Moveworks to be able to function as expected. These attributes are the following -
- Email Address
- Identifier in the ITSM system (Jira, ServiceNow etc.)
- Email in the ITSM system
- Identifier in the Chat system (Slack, Teams etc.)
- Email in the Chat system
- Identifier in the IDAM system (Active Directory, Okta etc.)
- Email in the chat system
In case any of these attributes are the same for two or more users then Moveworks will not import identity information for any user until this issue is resolved.
Within the “Duplicate Users” tab you will have the option to download a csv list of users that have one or more of these attributes conflicting with another user.
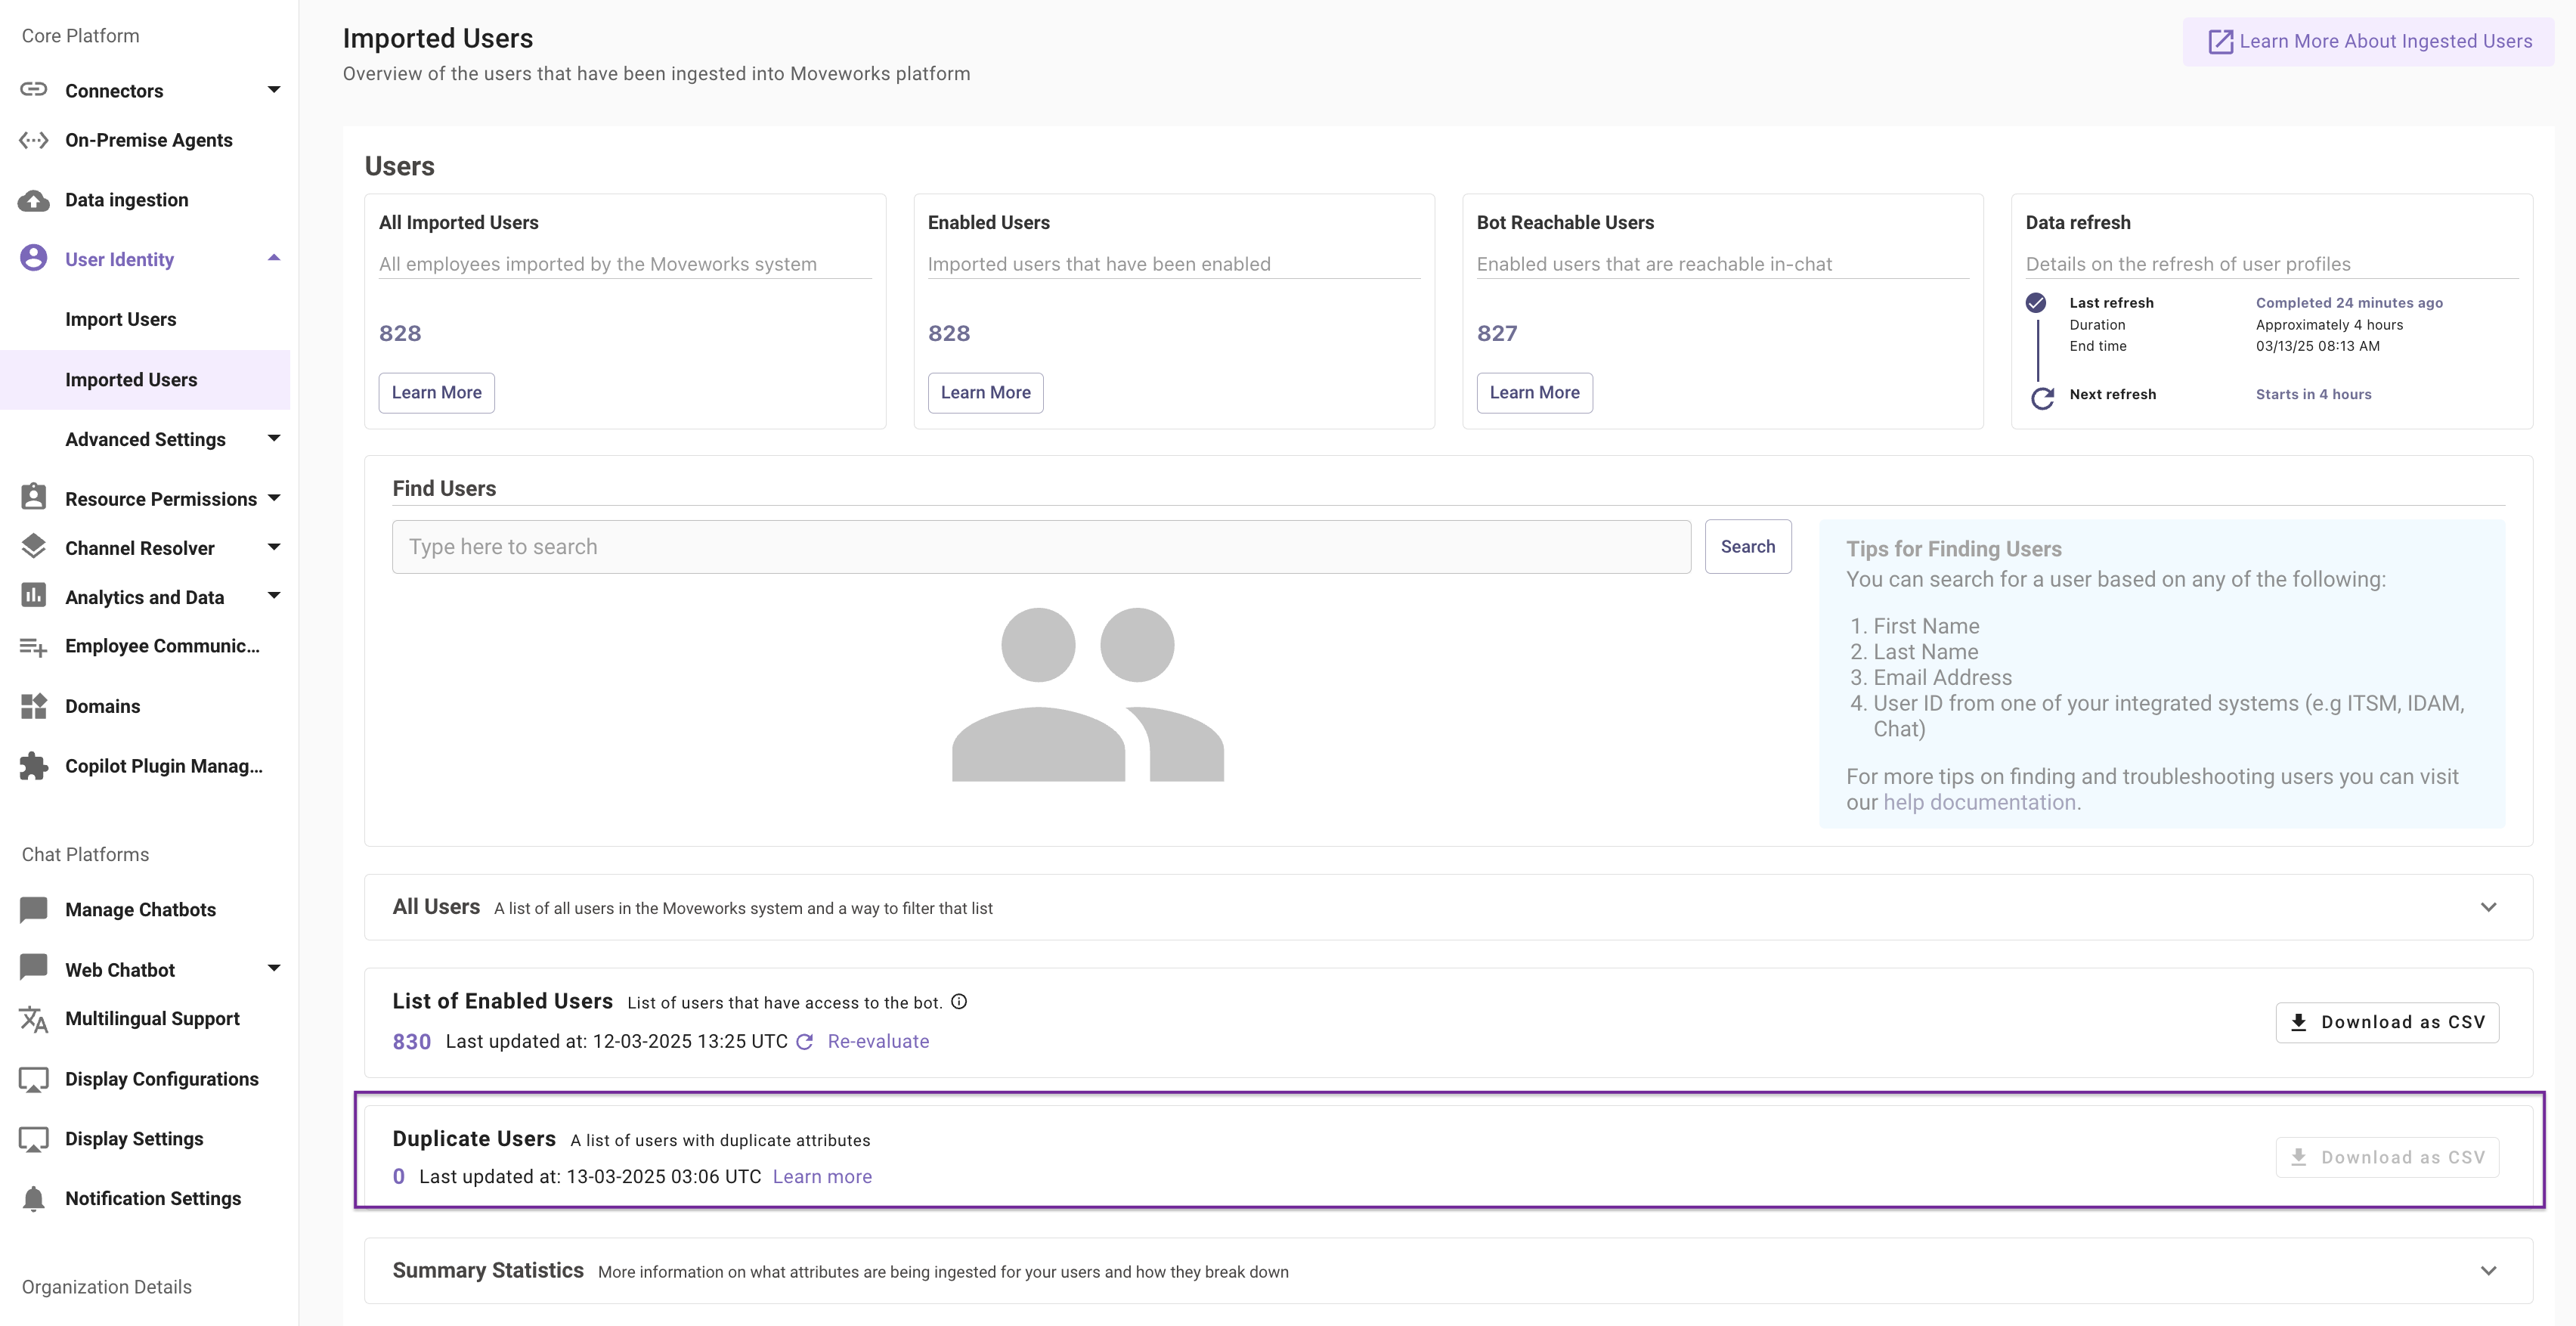
In the csv file, the “email”, “first name” and “last name” columns display information that identify the users that have the same attributes, the “Conflicting Key” column will indicate the system (ITSM, IDM, Channel) from which these attributes are being imported. You have two options to resolve this issue -
-
Delete one of the users from the source system. Eg: If John Doe with the email [email protected] and Jane doe with the email [email protected] have a conflicting “ITSM User Id” then deleting either one of these profiles from the ITSM system will resolve the issue
-
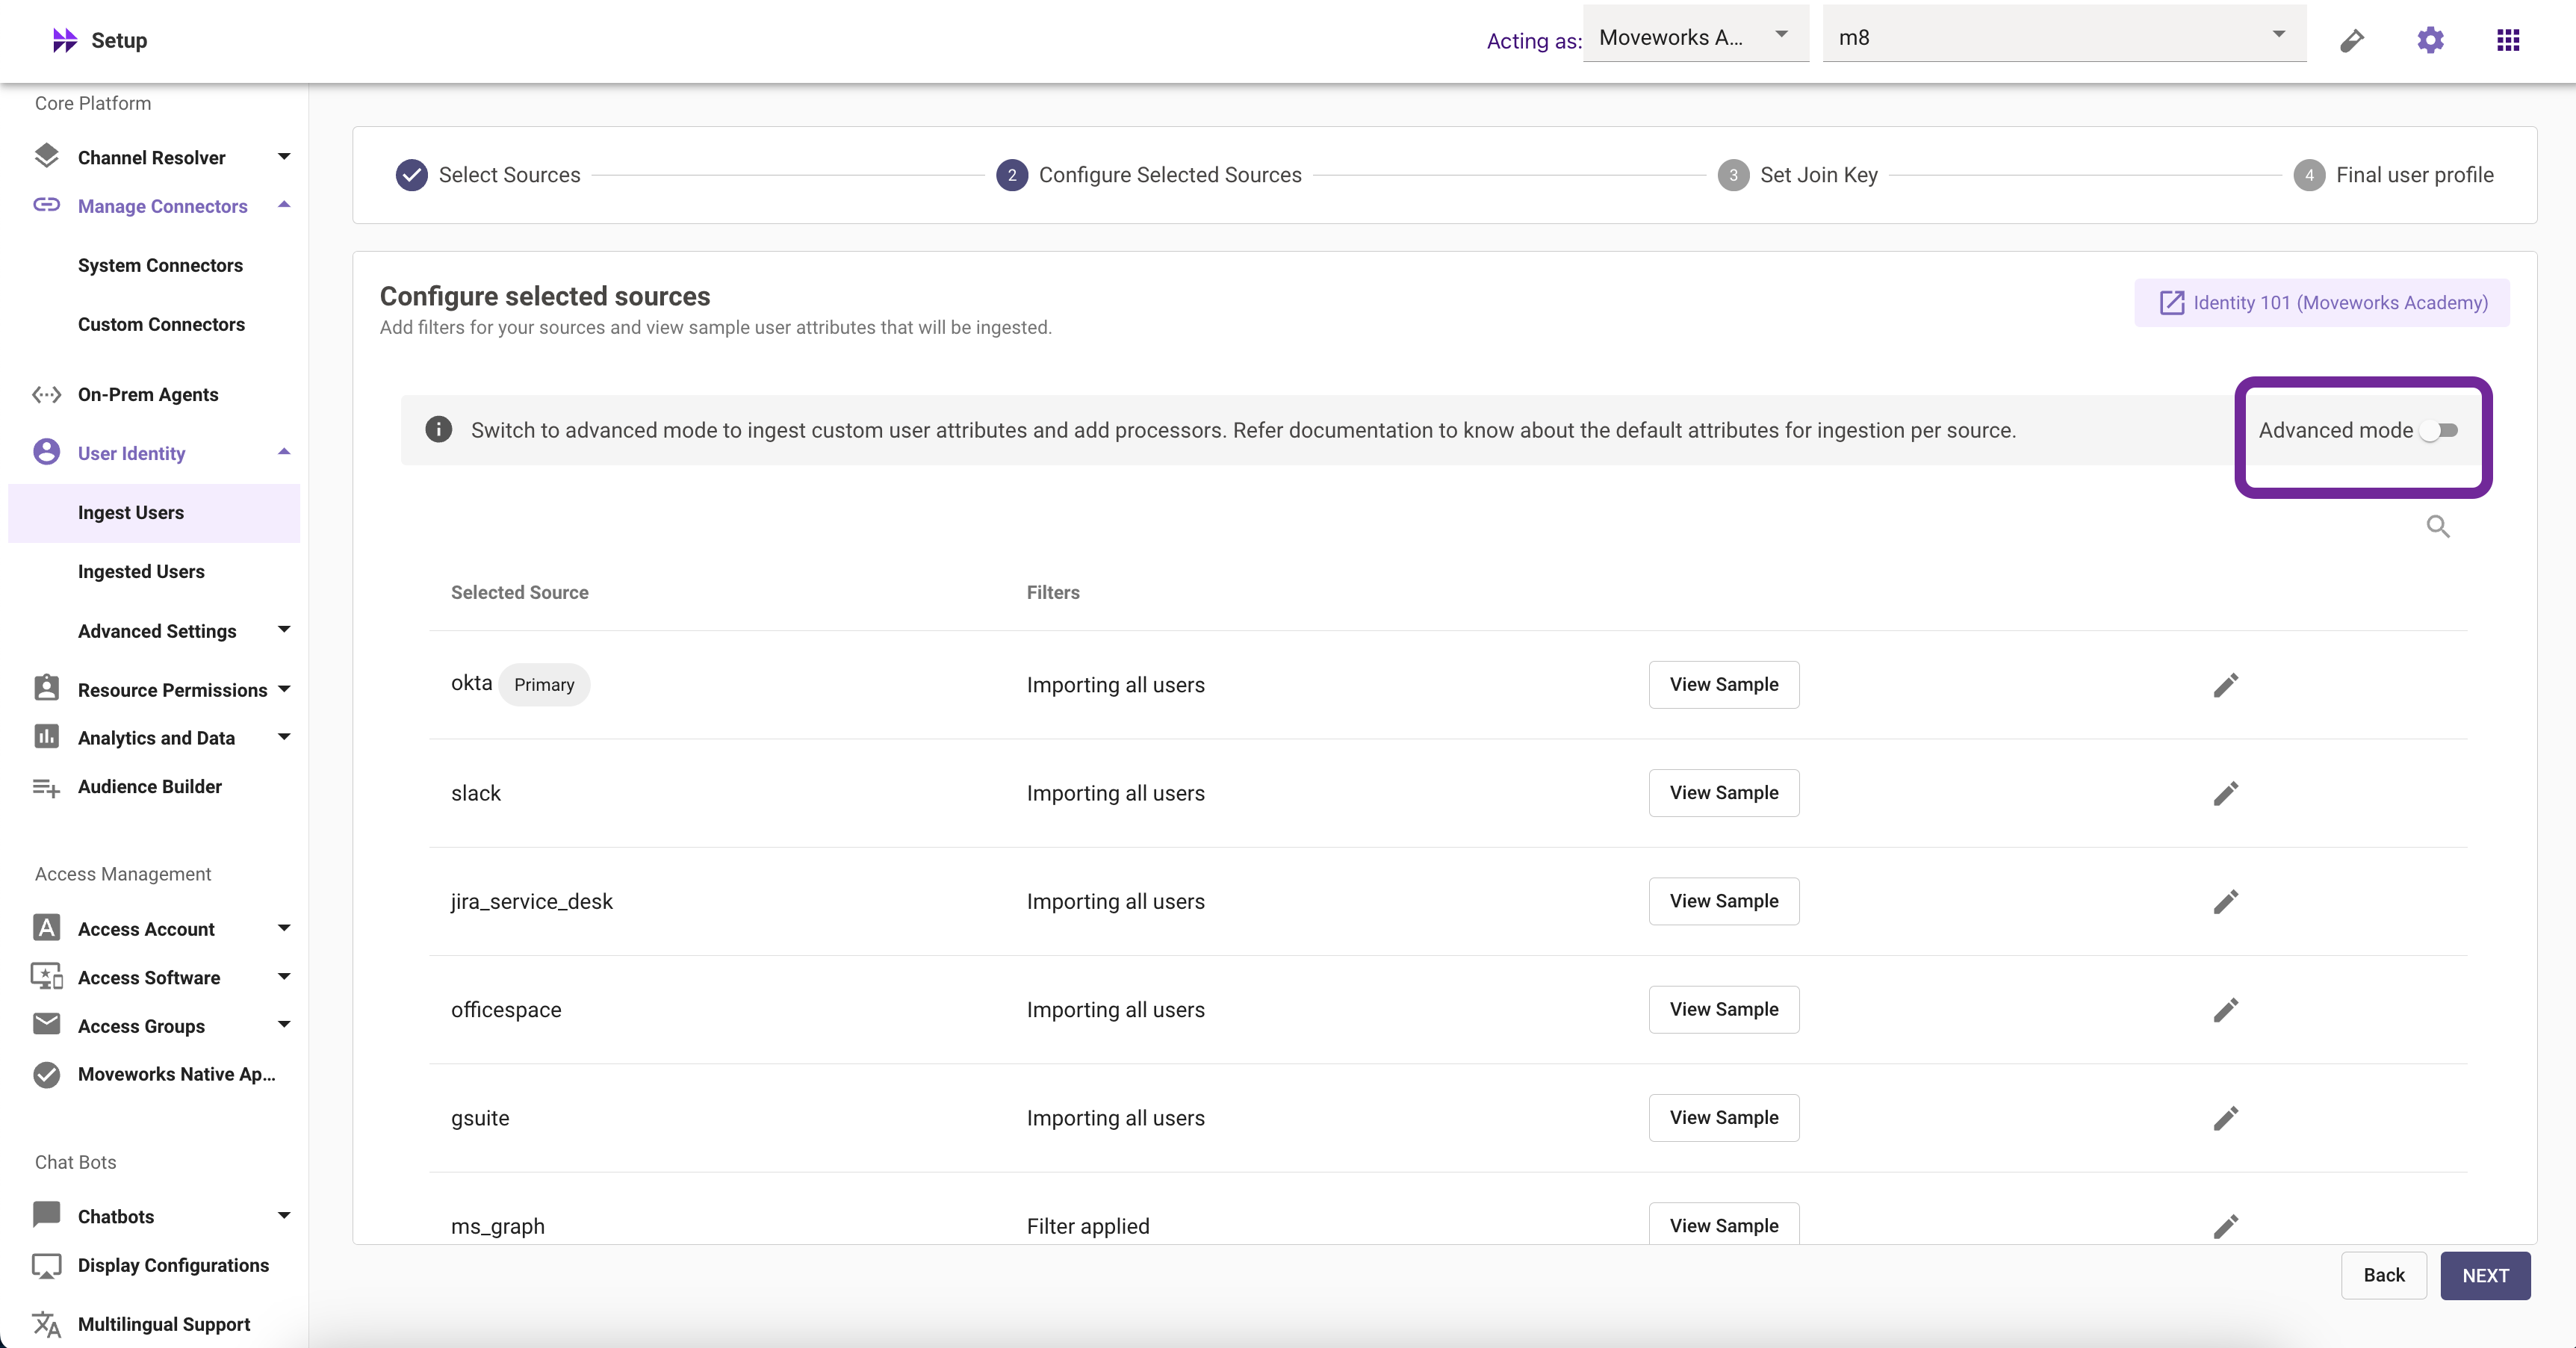
Filter out these users within the”Configure Selected Users” step of ingesting users.
- Go to “Advanced Mode” and identify the system from which a user needs to be filtered out
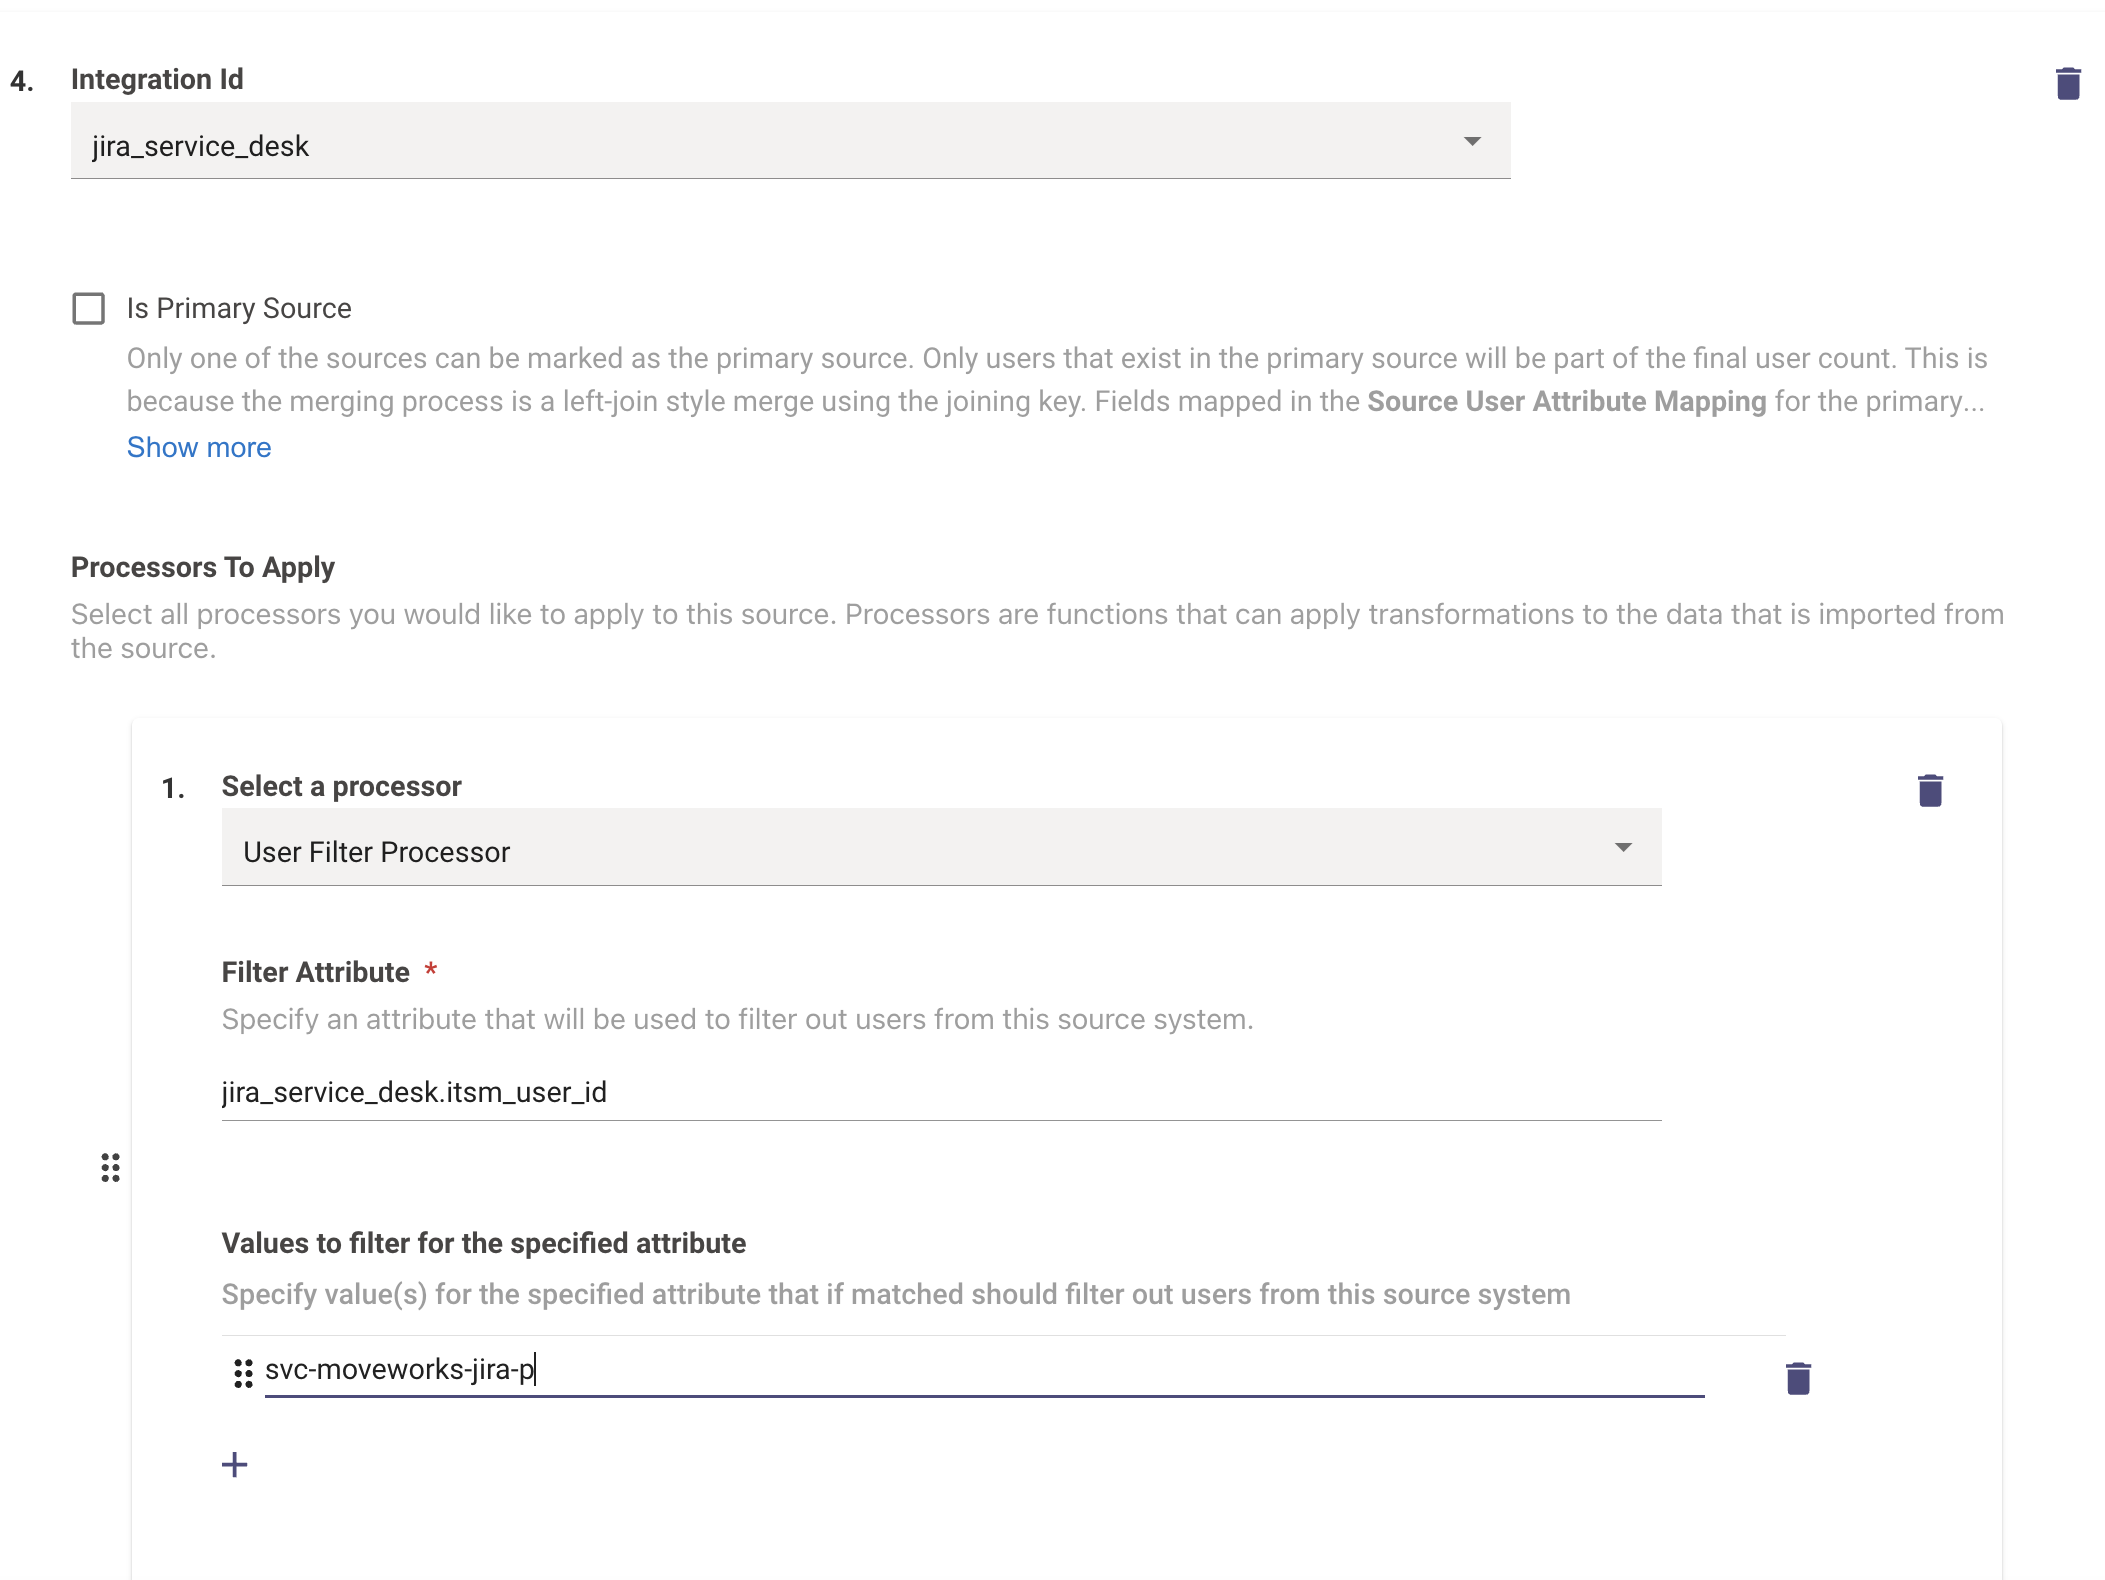
- Add a processor within the system and in the dropdown select “User Filter Processor”
- Specify the attribute for which you want to provide the value. This will usually be of the form “integration Id.external_id” eg: ms_graph.external_id. (External Id is the unique id for a particular user within this system)
- Enter the ids that need to be filtered out. These can be retrieved from the downloaded csv file in the “Conflicting Key” column. You can decide which user you want to filter
- Click on submit and verify this has been successful by checking the status of user ingestion after a few hours
Example
| First Name | Last Name | Conflicting Key | Conflicting Value | |
|---|---|---|---|---|
| [email protected] | svc | -moveworks-jira | itsm user id | svc-moveworks-jira-p |
| [email protected] | itsm user id | svc-moveworks-jira-p |
From the table it is clear that the ITSM User Id Attribute is the same for two accounts. The ITSM system is Jira for the above organisation so within MW Setup this is what filtering will look like:
Validation
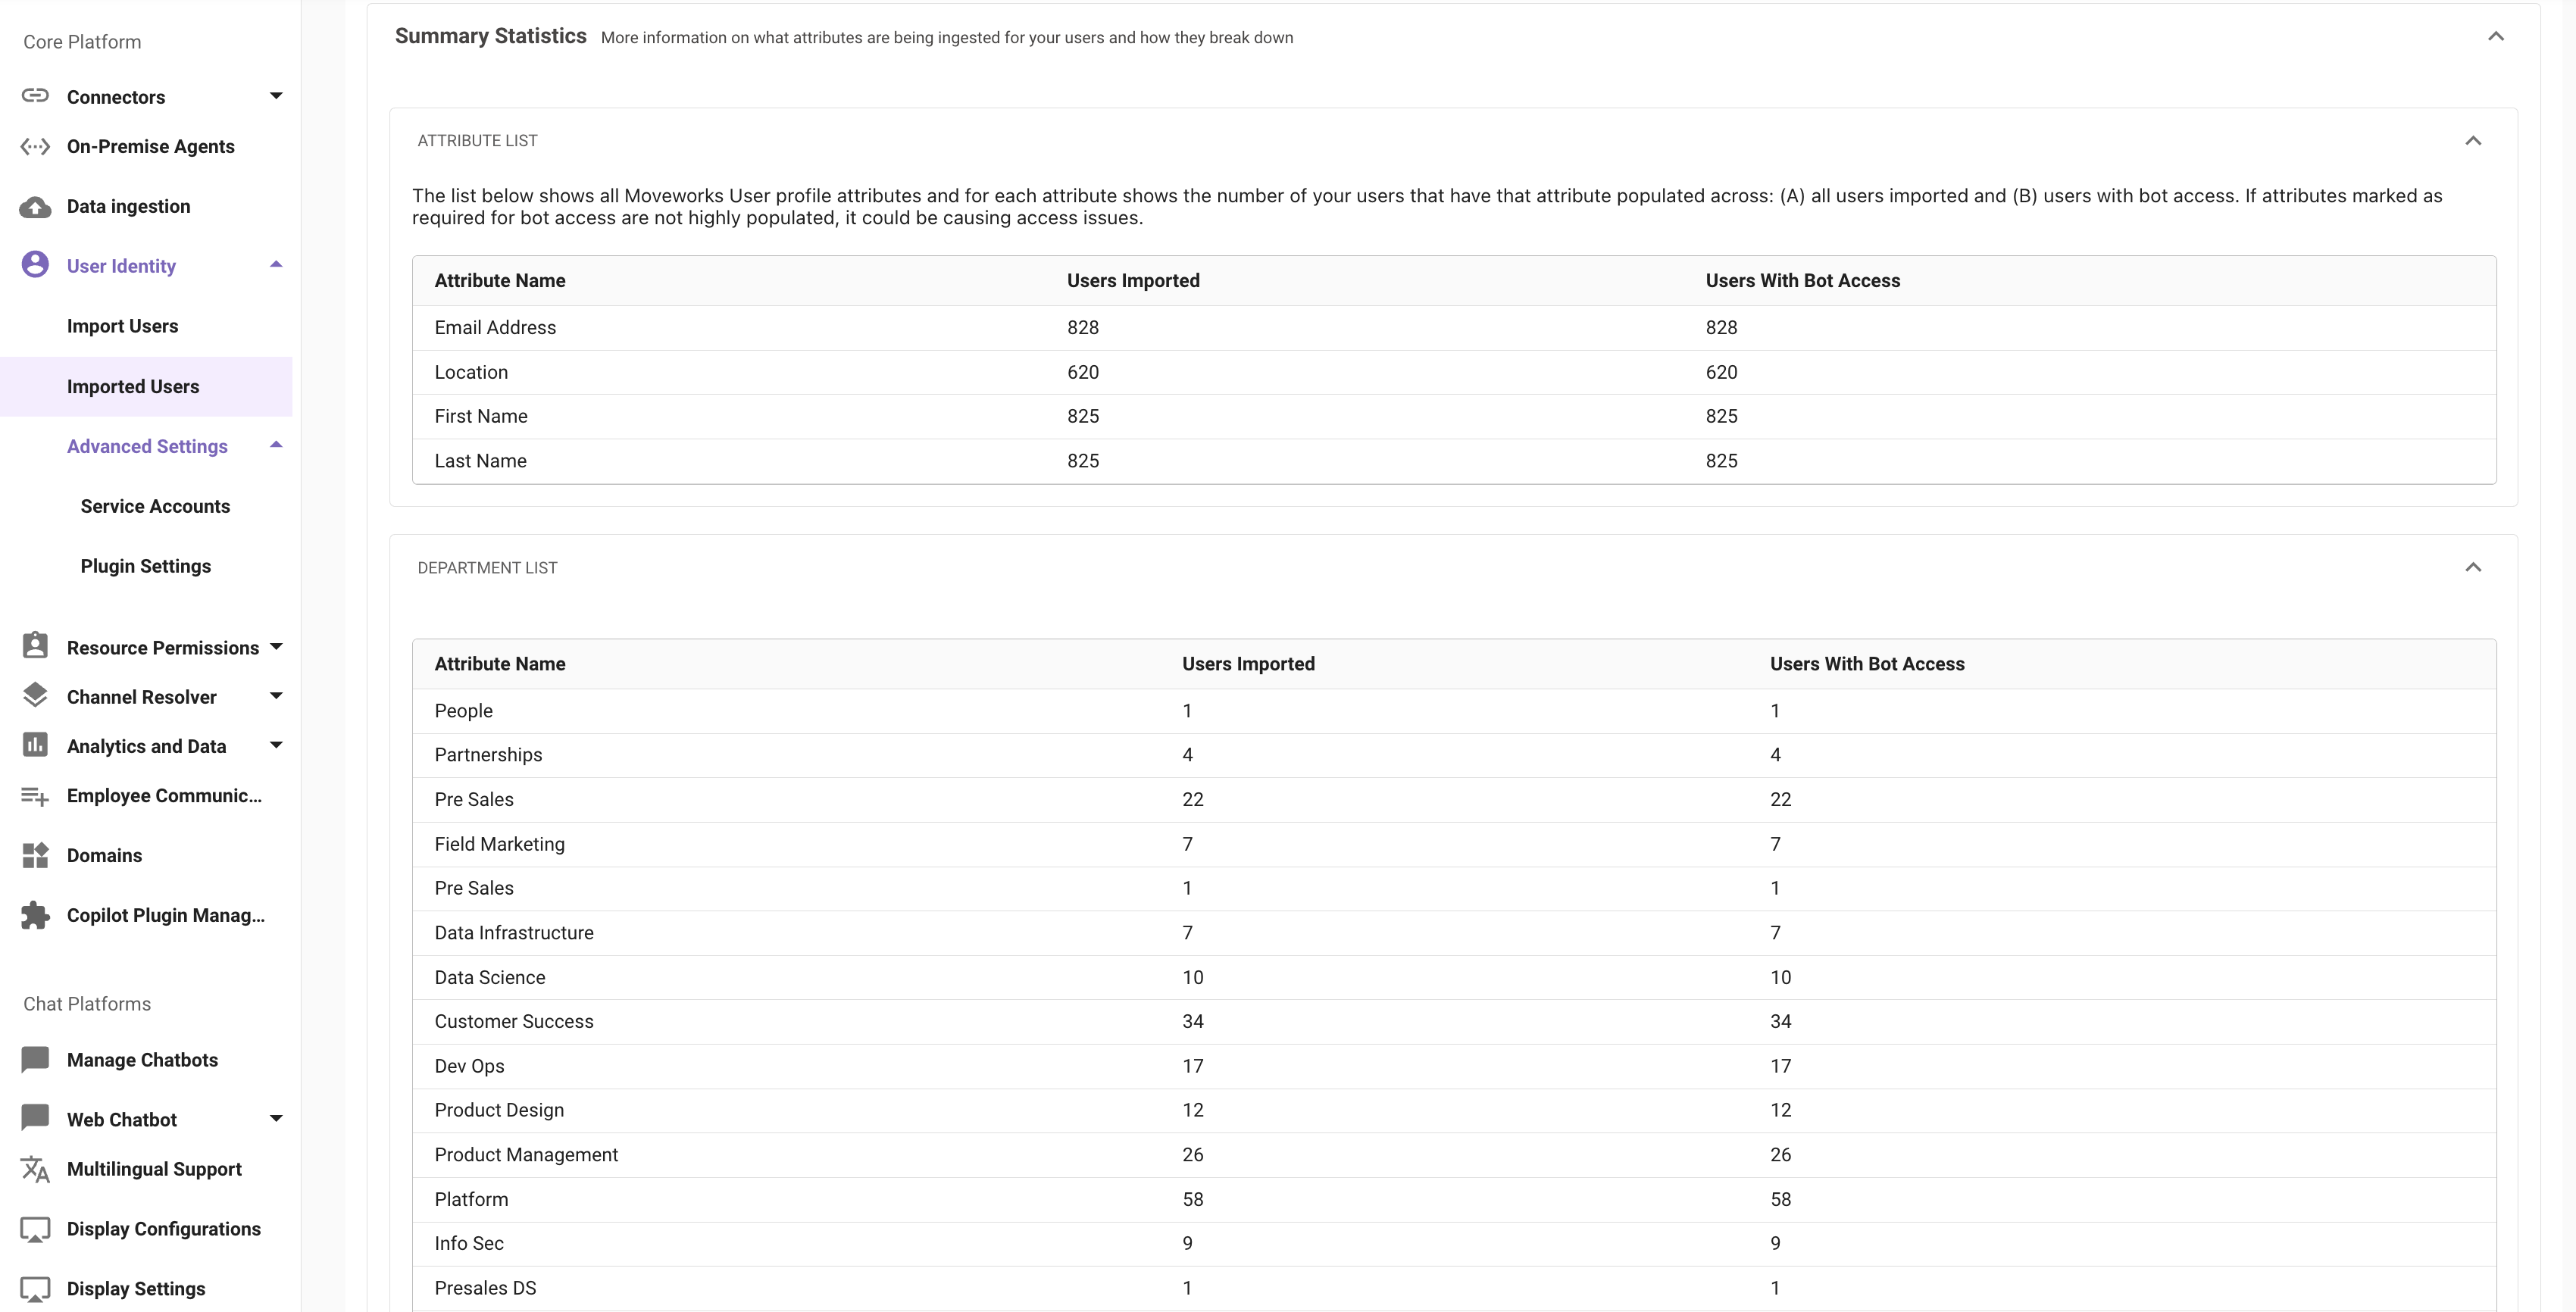
- Once the users have been filtered out wait for the next ingestion run to take place based on theIngestion Schedule here. Once that is complete you can check the Imported Users view where the Duplicate user count should be 0.
How To Find the source of an Identity Attribute
In the Imported Users View we have a section which includes all the Attributes being ingested.
Due to engineering limitations, we cannot expose what source the attribute is coming from in the attributes table. In order to understand the source of an attribute, admins can:
-
Navigate to User Identity > Import Users under Core Platform.
-
Proceed to Configure selected sources step and switch to Advanced mode
-
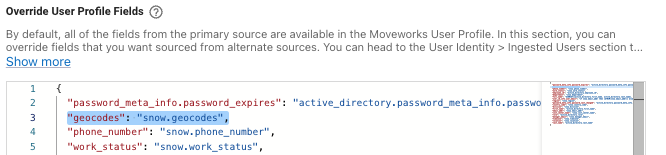
Scroll to the bottom of the page and review the Override User Profile Fields Mapper to confirm if the attribute you are searching for has been overridden with another source.
- For eg. If the primary source is Okta and I want to know the source for “Phone number” attribute, I will first go the override user profile fields config to check the config. If the attribute is found here, the source will be as per the entry in the this config. In the below mapper the data is coming from slack as the source.
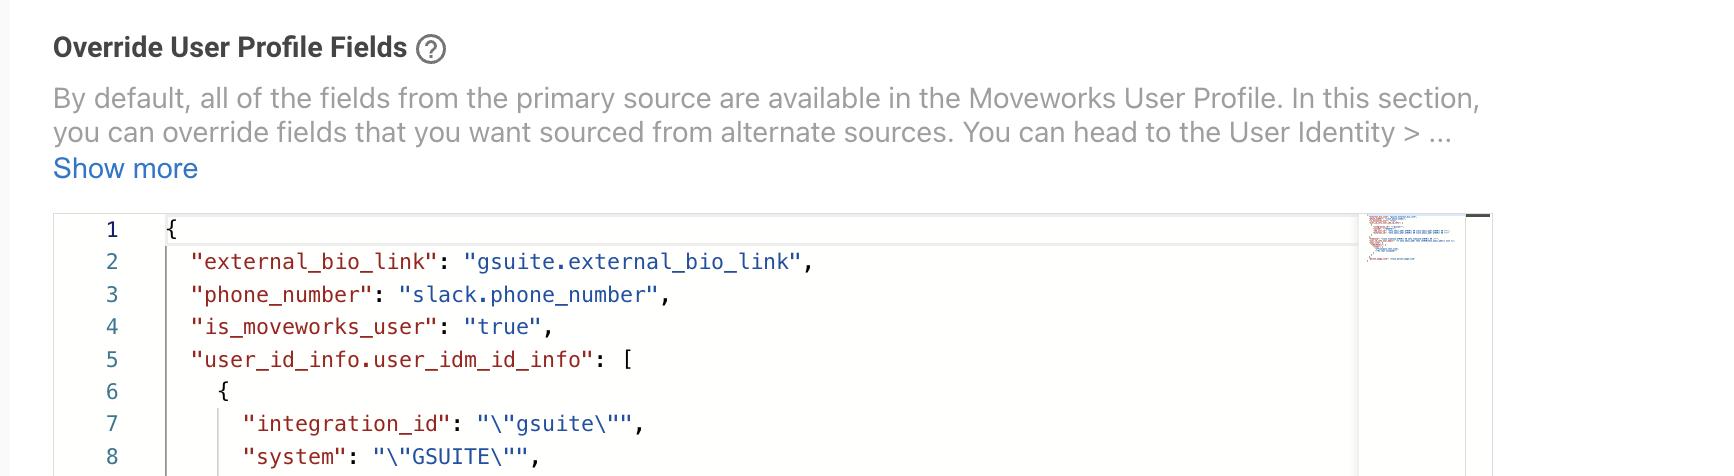
- If the attribute you are looking for is not present in the override bender, then the source of the attribute is going to be the primary source of user identity.
- Note: The troubleshooting steps slightly differ in case of custom attributes. Custom attributes are generally defined in the Source-Specific User Attribute Mapping config of that identity source.
How To Define overrides for Identity Attributes
When configuring Identity Ingestion, In the first step we define the external sources which will be connected to in order to ingest the user identity data from them. Please ensure the required connectors have been created to interact with the source systems. If not, please follow this guide for Access Requirements in the source system and the steps to Setup Connectors.
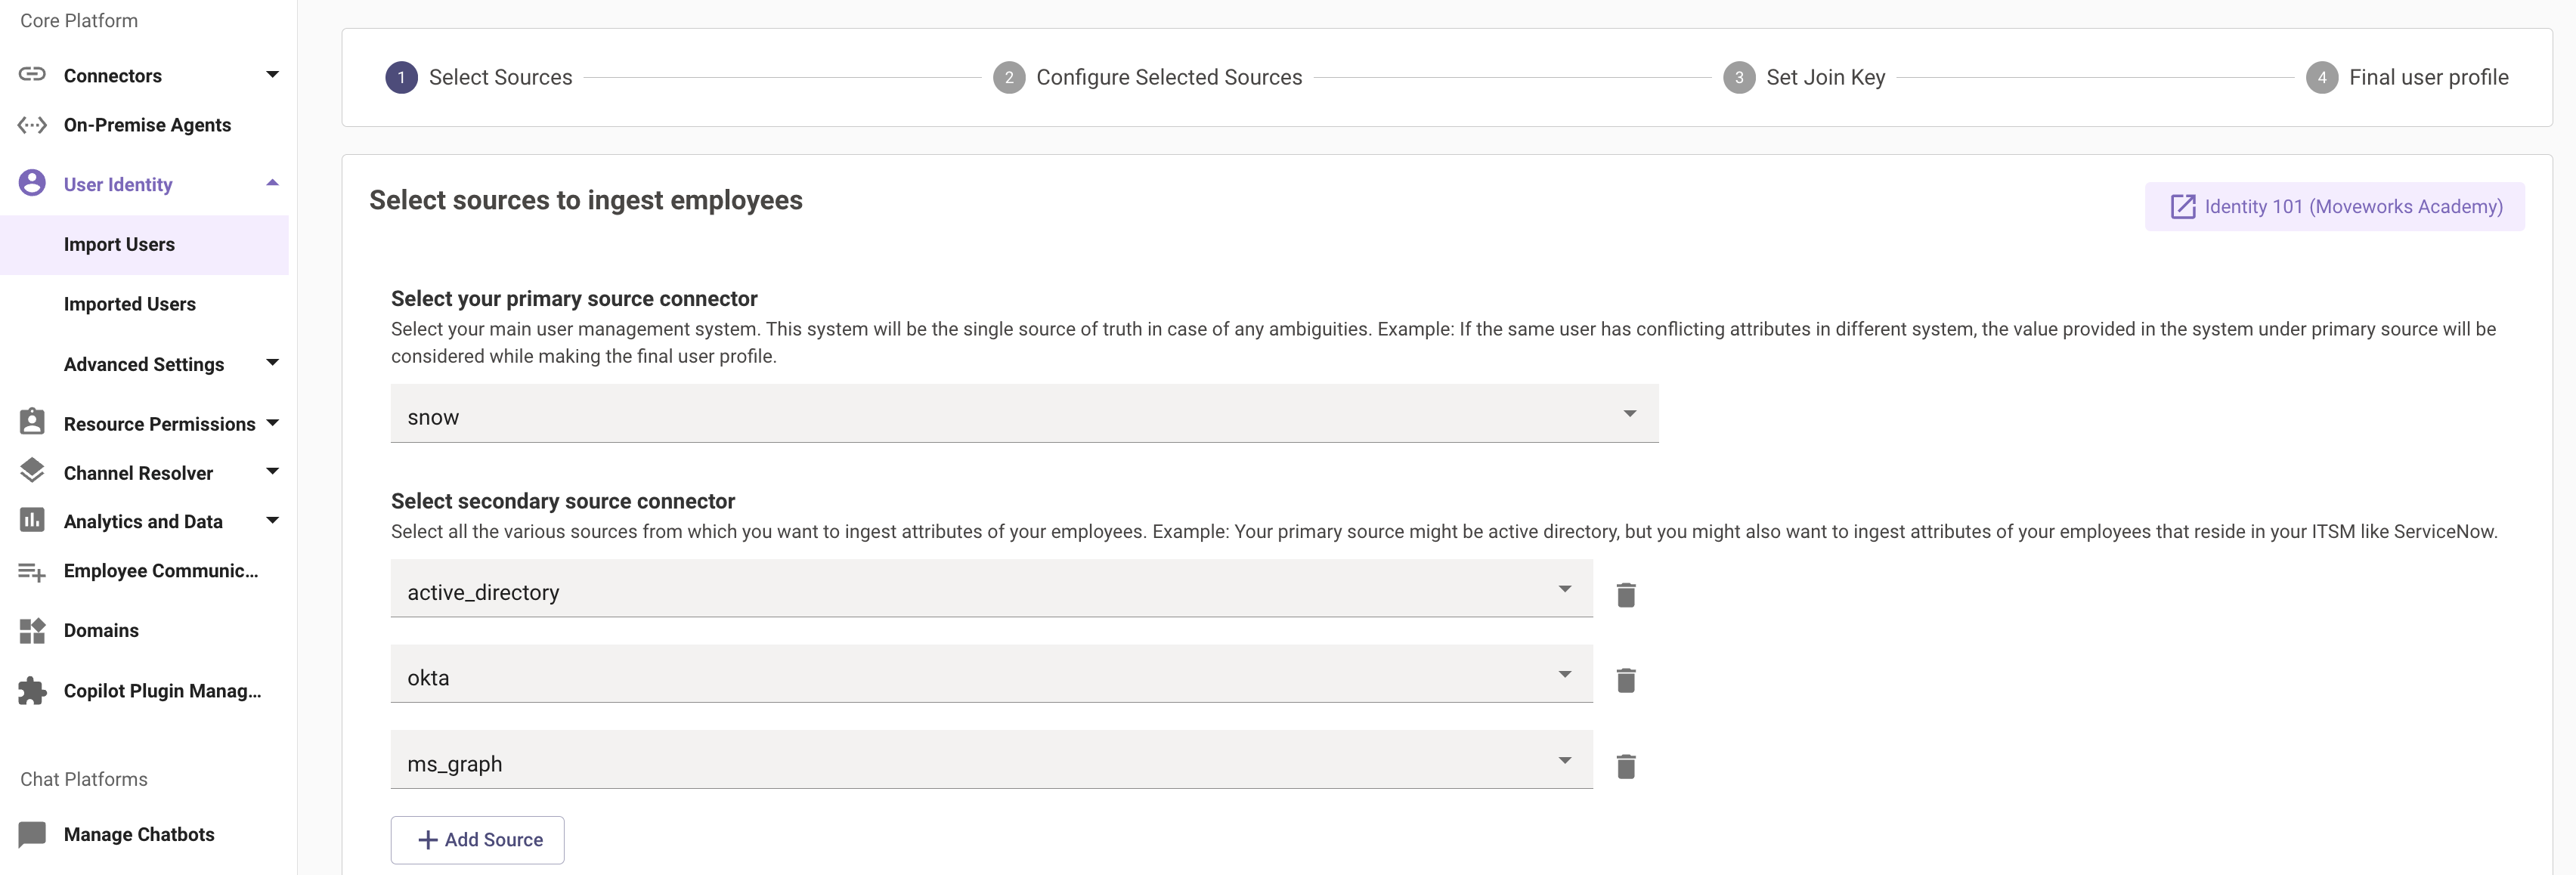
We have a categorisation under the sources here which is split between the Primary Source and the Secondary sources. When we are ingesting user data from multiple sources, they all would have some similar attributes like Email, Phone Number, Department, Manager email etc.
The data for all these attributes will only come from the Primary source unless we override the final User Mapper to include the attributes and map them to the secondary sources.
- In order to do this as part of the Configure selected sources we need to switch to the Advanced mode.
- Look for the Override User Profile Fields Mapper, where the user will need to define the override for the attributes.
In the below example ServiceNow is the Primary source but the customer wants the the first_name info to come from Microsoft Graph instead. In order to do this :
- Ensure the required attribute is being mapped in the Source-Specific User Attribute Mapping for Microsoft Graph, this is crucial before we can use this source as an override. In this scenario we need to ensure the first_name attribute is being mapped
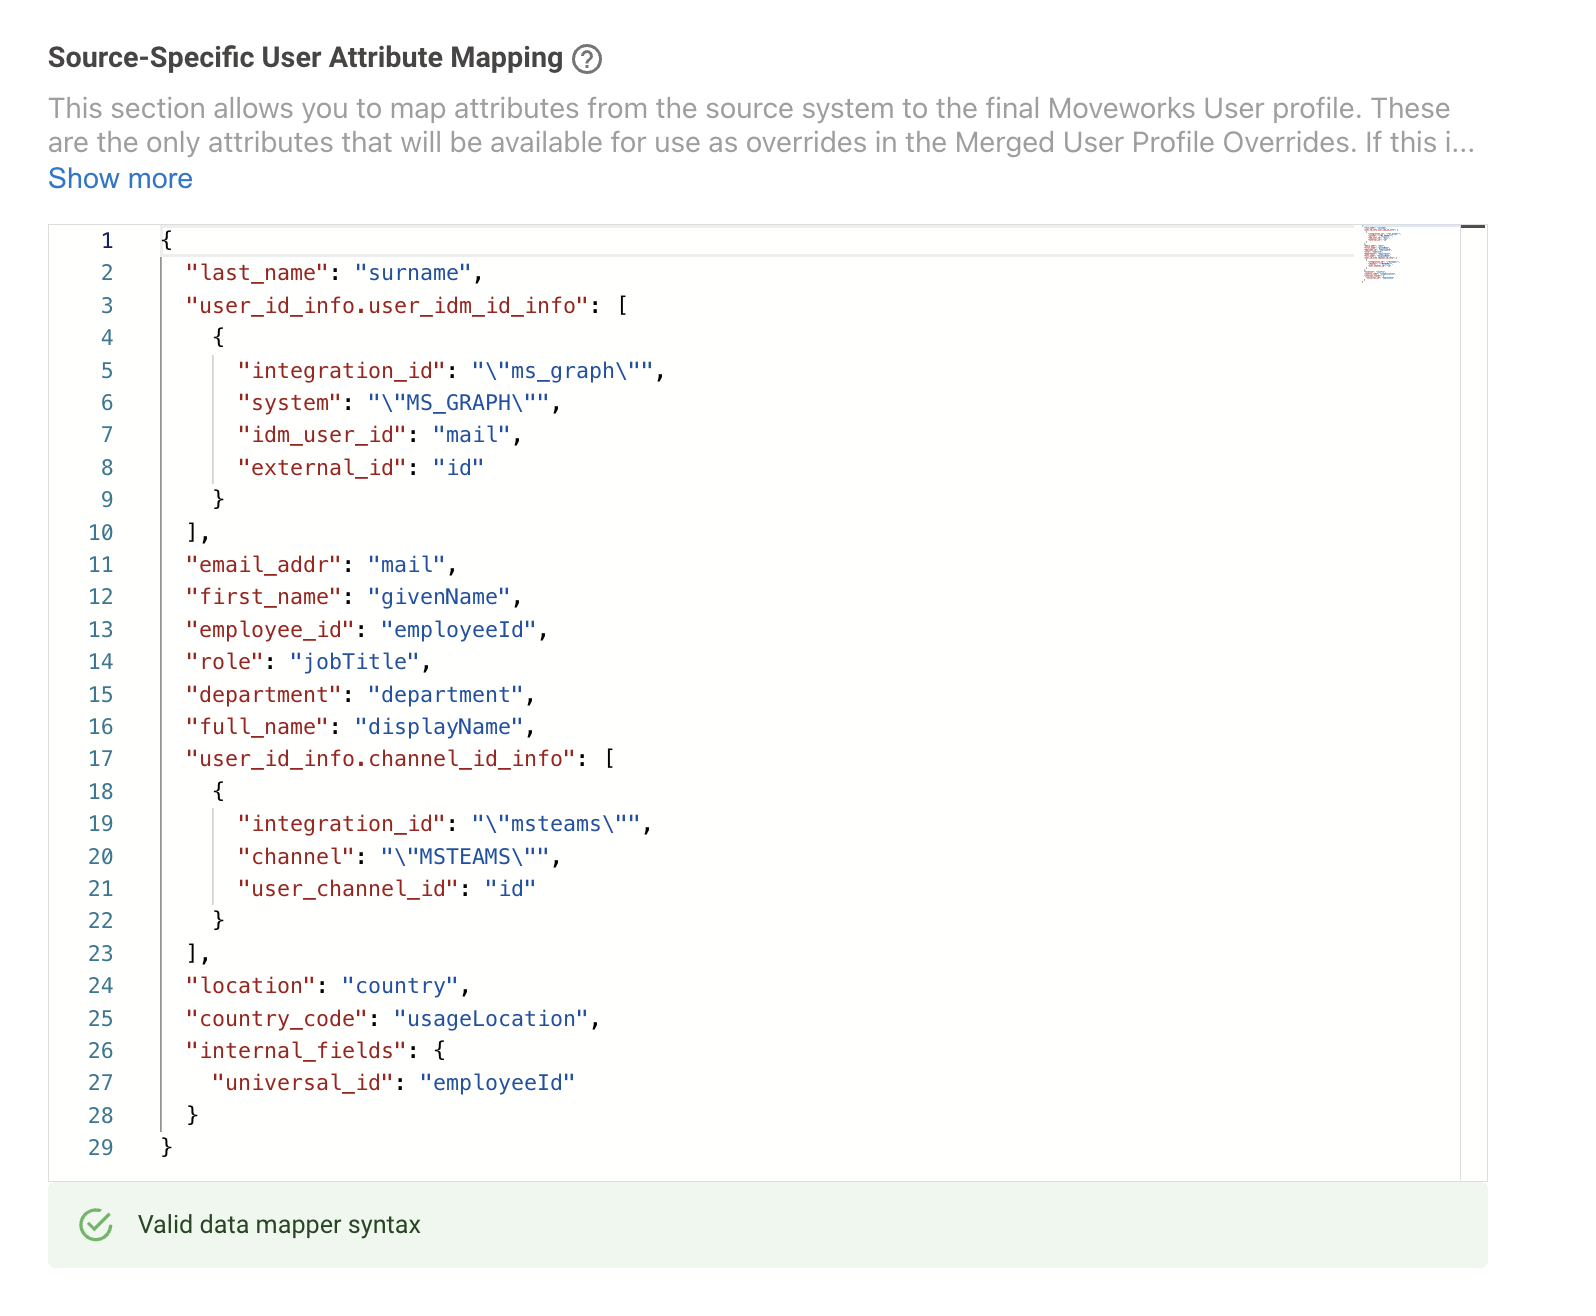
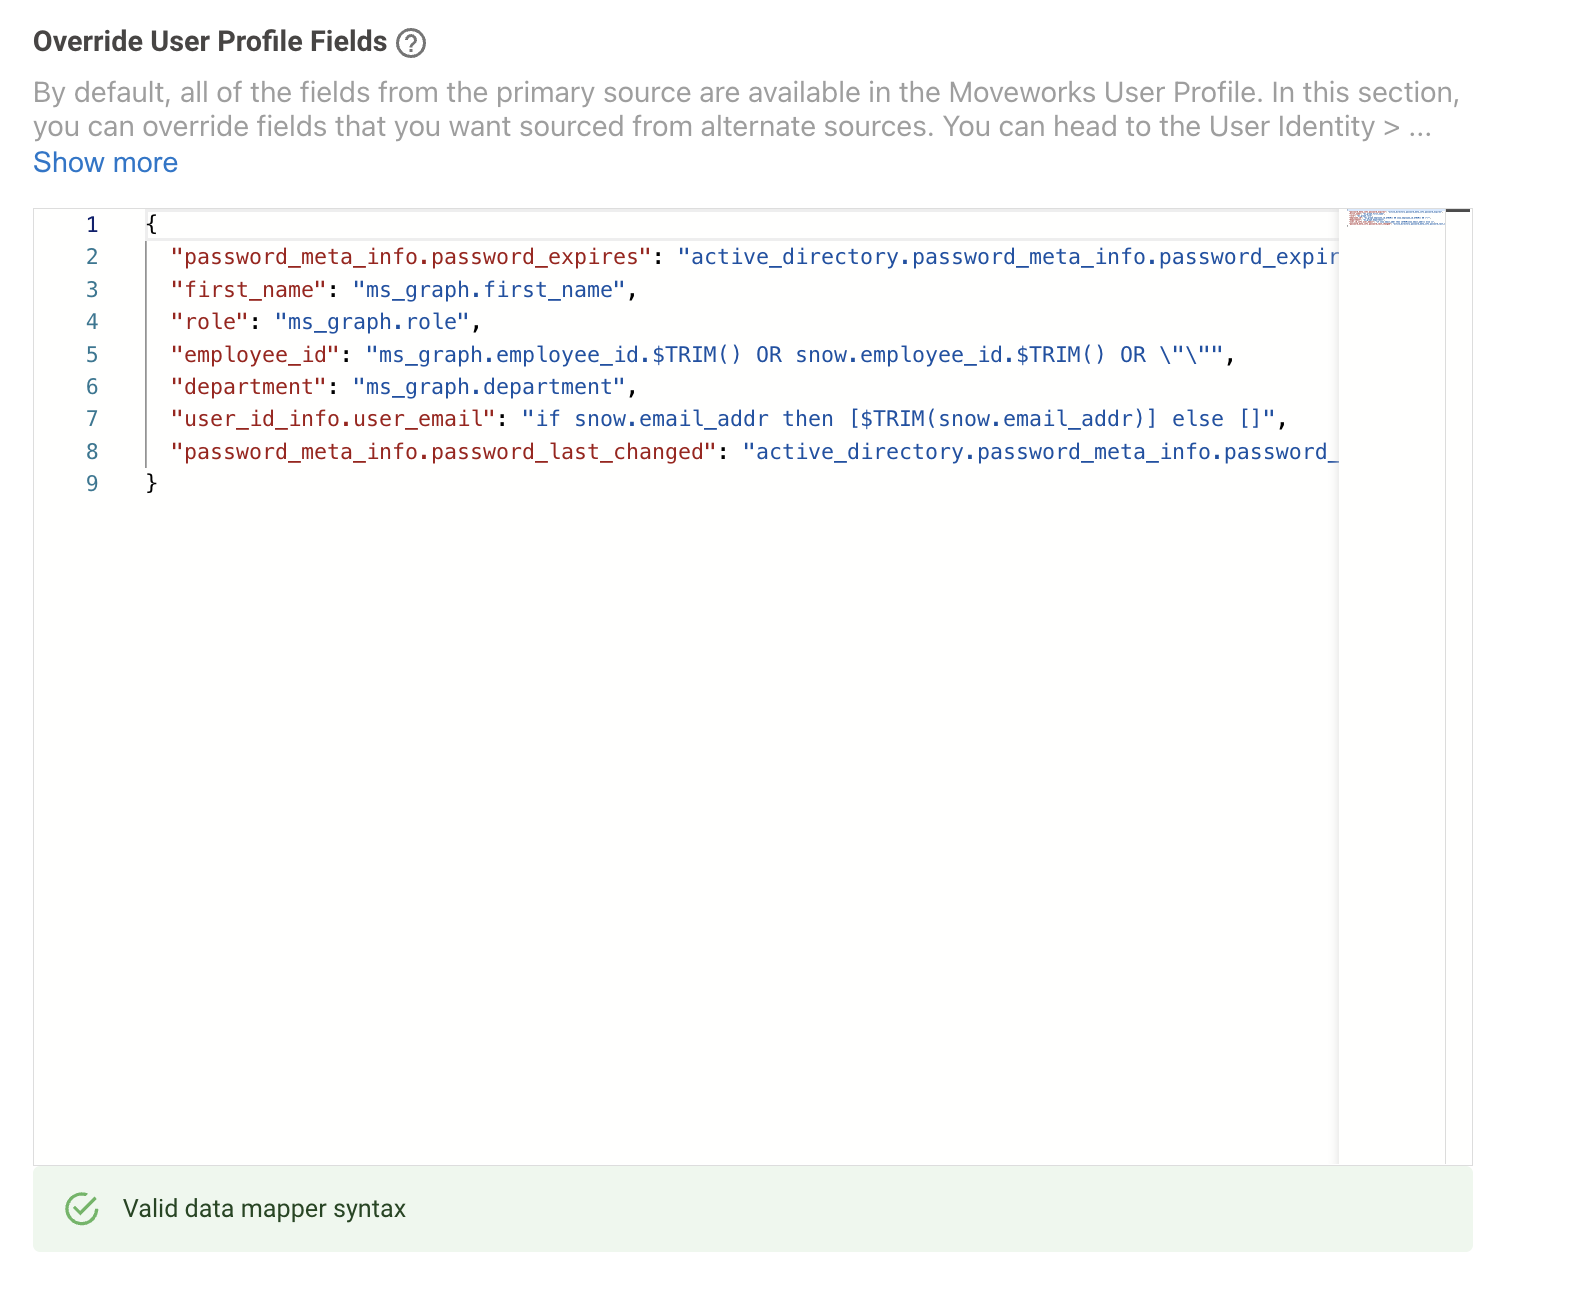
- Once the attribute has been defined in the source mapper, we need to add this attribute in the Override User Profile Fields as below. We need to define the source name where the attribute is coming from and the attribute name
"first_name": "ms_graph.first_name"
Validation
In order to validate if the attribute data is now coming from the secondary source system would need an Identity Ingestion cycle to complete. Post this you can visit the Imported Users View and search for the user to go into their Profile View. Here you would be able to view the value of the Attribute and confirm if this is as expected.
How To Configure User Tags based on Conditions
When permissioning users across the Moveworks Platform, it is easy to use the common attributes like email, name etc. to write the DSL rules and maintain a list. This however means that admins would need to manage these rules and maintain them actively to avoid any issues in the AI Assistant.
But what if we could define a Tag to all the users based on a condition and leverage this tag when writing the DSL Rules that would apply to all the users. This is where we can utilise the Moveworks DSL Language in a more advanced manner.
In order define User Tags we need to navigate to the Import Users Configuration and go to the Configure selected sources step where you need to switch to the Advanced mode.
In the Advanced view you would need to add the user tag in the below format in the Source-Specific User Attribute Mapping JSON field.
Here is an example of how Moveworks can assign different User Tags defined here using a Conditional Rule.
"user_tags": {
    "FILTER()": {
      "items": [
        "\"BASIC_USER\"",
        {
          "CONDITIONAL()": {
            "condition": "(memberOf AND (\"CN=Moveworks-Admins,OU=CO Objects,OU=Corporate,DC=internal,DC=moveworks,DC=com\" IN memberOf))",
            "on_pass": "\"HAS_ACCESS_TO_BOT\"",
            "on_fail": "\"VIP\""
          }
        },
        {
          "CONDITIONAL()": {
            "condition": "((\"[email protected]\" IN email))",
            "on_pass": "\"EXECUTIVE\""
          }
        }
      ]
    }
  }
Breakdown of the Logic This code block above assigns tags to the user_tags attribute. It uses a FILTER() function to process a list of potential tags and remove any that evaluate to null or empty.
Here's what each part does:
- "BASIC_USER": This is a static tag. Every user processed by this code will automatically be assigned the BASIC_USER tag.
- First CONDITIONAL(): This block checks if a user is part of a specific Active Directory group.
- Condition: It checks if the memberOf attribute exists and contains the specific distinguished name "CN=Moveworks-Admins,...".
- On Pass: If the user is in that group, they are assigned the HAS_ACCESS_TO_BOT tag.
- On Fail: If the user is not in that group, they are assigned the VIP tag instead.
- Condition: It checks if the memberOf attribute exists and contains the specific distinguished name "CN=Moveworks-Admins,...".
- Second CONDITIONAL(): This block checks for a specific user.
- Condition: It checks if the user's email address is [email protected].
- On Pass: If the email matches, the user is assigned the EXECUTIVE tag.
- On Fail: There is no on_fail clause. This means if the condition is false, this block produces no tag. The FILTER() function will discard the empty result.
Here is another common user tag example where users are specified by email address and role:
"user_tags": {
    "FILTER()": {
      "items": [
        "\"BASIC_USER\"",
        {
          "CONDITIONAL()": {
            "condition": "mail IN [\"[email protected]\", \"[email protected]\"))",
            "on_pass": "\"TESTER\""
          }
        },
        {
          "CONDITIONAL()": {
            "condition": "role IN [\"Executive\", \"VP\"]"
            "on_pass": "\"VIP\""
          }
        }
      ]
    }
  }
This configuration will tag specific users as a TESTER to prevent their testing activity from entering the analytics dashboards and tag users with a specific role as VIPs which can be used to filter ticket notifications or other features from applying to those users.
Validation
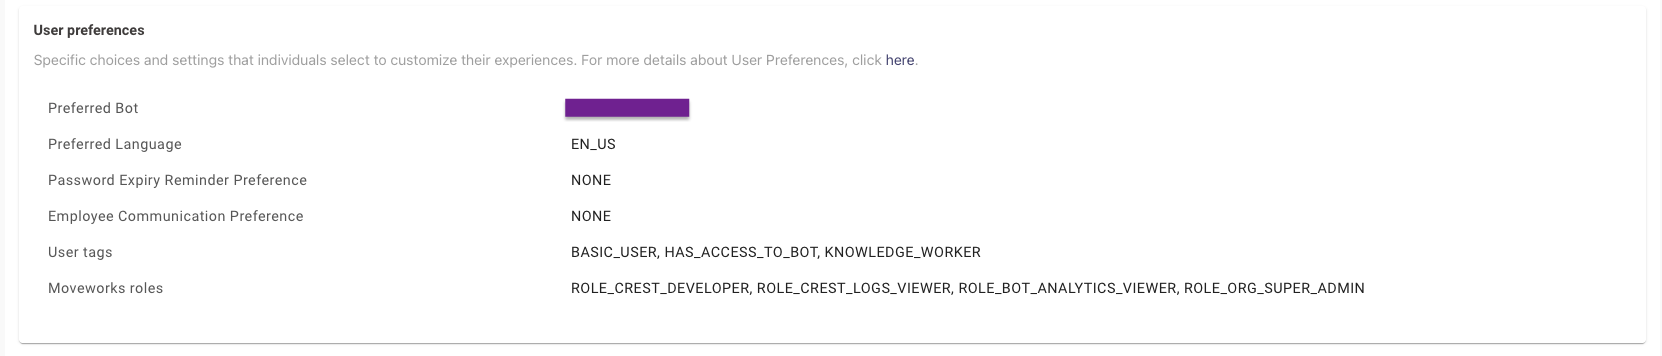
In order to validate if the User Tag has been assigned to a user, Moveworks would need an Identity Ingestion cycle to complete. Post this you can visit the Imported Users View and search for the user to go into their Profile View. Here you would be able to view the user tags assigned to the user under the User preferences section.
How To Ingest Employee Start Date Information
As part of the User attributes which are imported on the Moveworks end during Identity Ingestion, one of the most common attributes utilized by customers is the employee_start_date field. This attribute is used to create Audience groups for sending out Employee Communication messages out to new hires.
To import this attribute field we need to carry out the following steps :
- Start by navigating to User Identity > Import Users under Core Platform. Here you will need to identify which Source system contains the employee start date information.
- In the Configure Selected Sources step you will need to switch to the Advanced Mode
- In this example, the start date information is present in the ServiceNow Source system under the attribute name u_last_hire_date. This attribute needs to be mapped to the Moveworks Key in order for the information to be successfully ingested and stored.
- Moveworks has an attribute
employment_info.employee_start_date_tswhich is used to store the employee start date information coming from the source system. This is defined in the Source-Specific User Attribute Mapping Editor in the config.
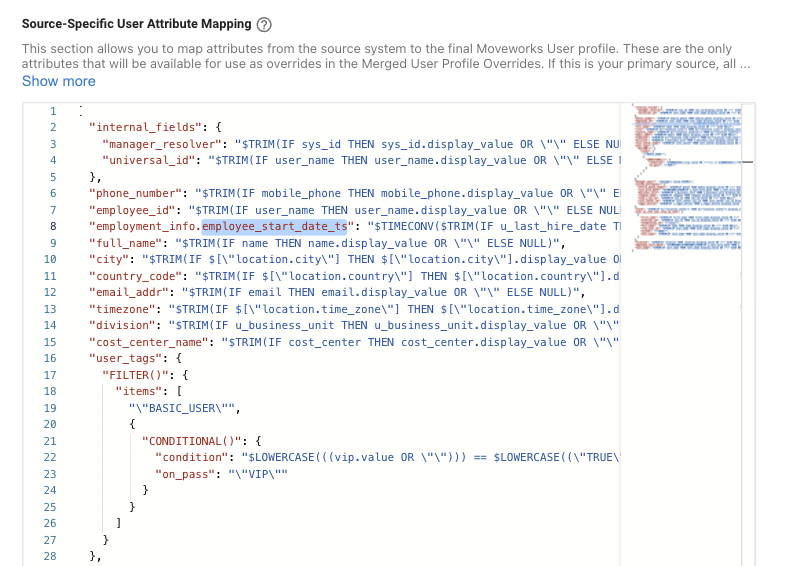
- Here you can see the attribute u_last_hire_date which stores the employee start date on the source system end, this has been mapped to
employment_info.employee_start_date_tsNote : We are using some functions here like $TIMECONV which converts the ingested timestamp into Moveworks understandable format ans stores it. The IF condition is present to avoid accidental Ingestion failures if the data stops propagating."employment_info.employee_start_date_ts": "$TIMECONV($TRIM(IF u_last_hire_date THEN u_last_hire_date.display_value OR \"\" ELSE NULL))" - Once the mapping is complete click on Submit to save the configuration.
Validation
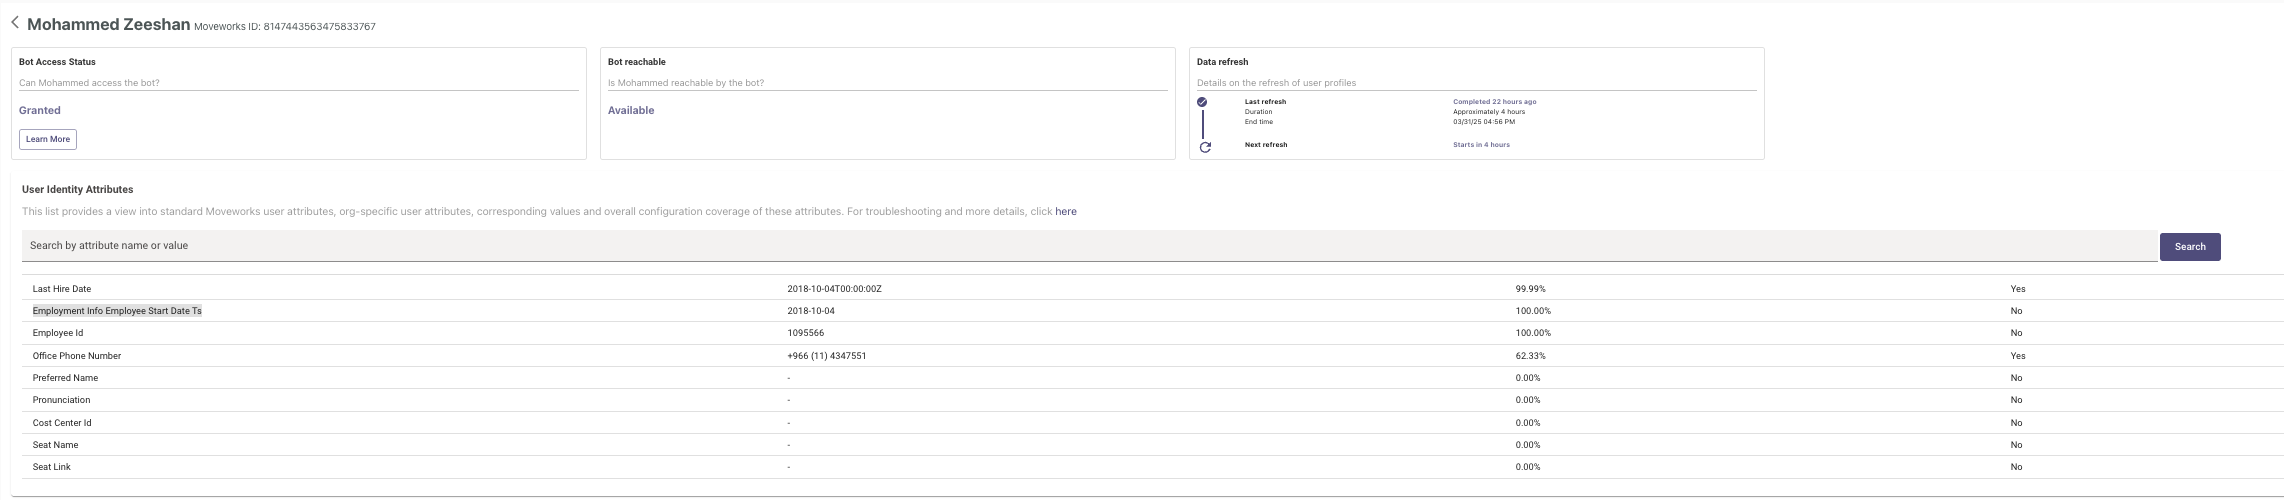
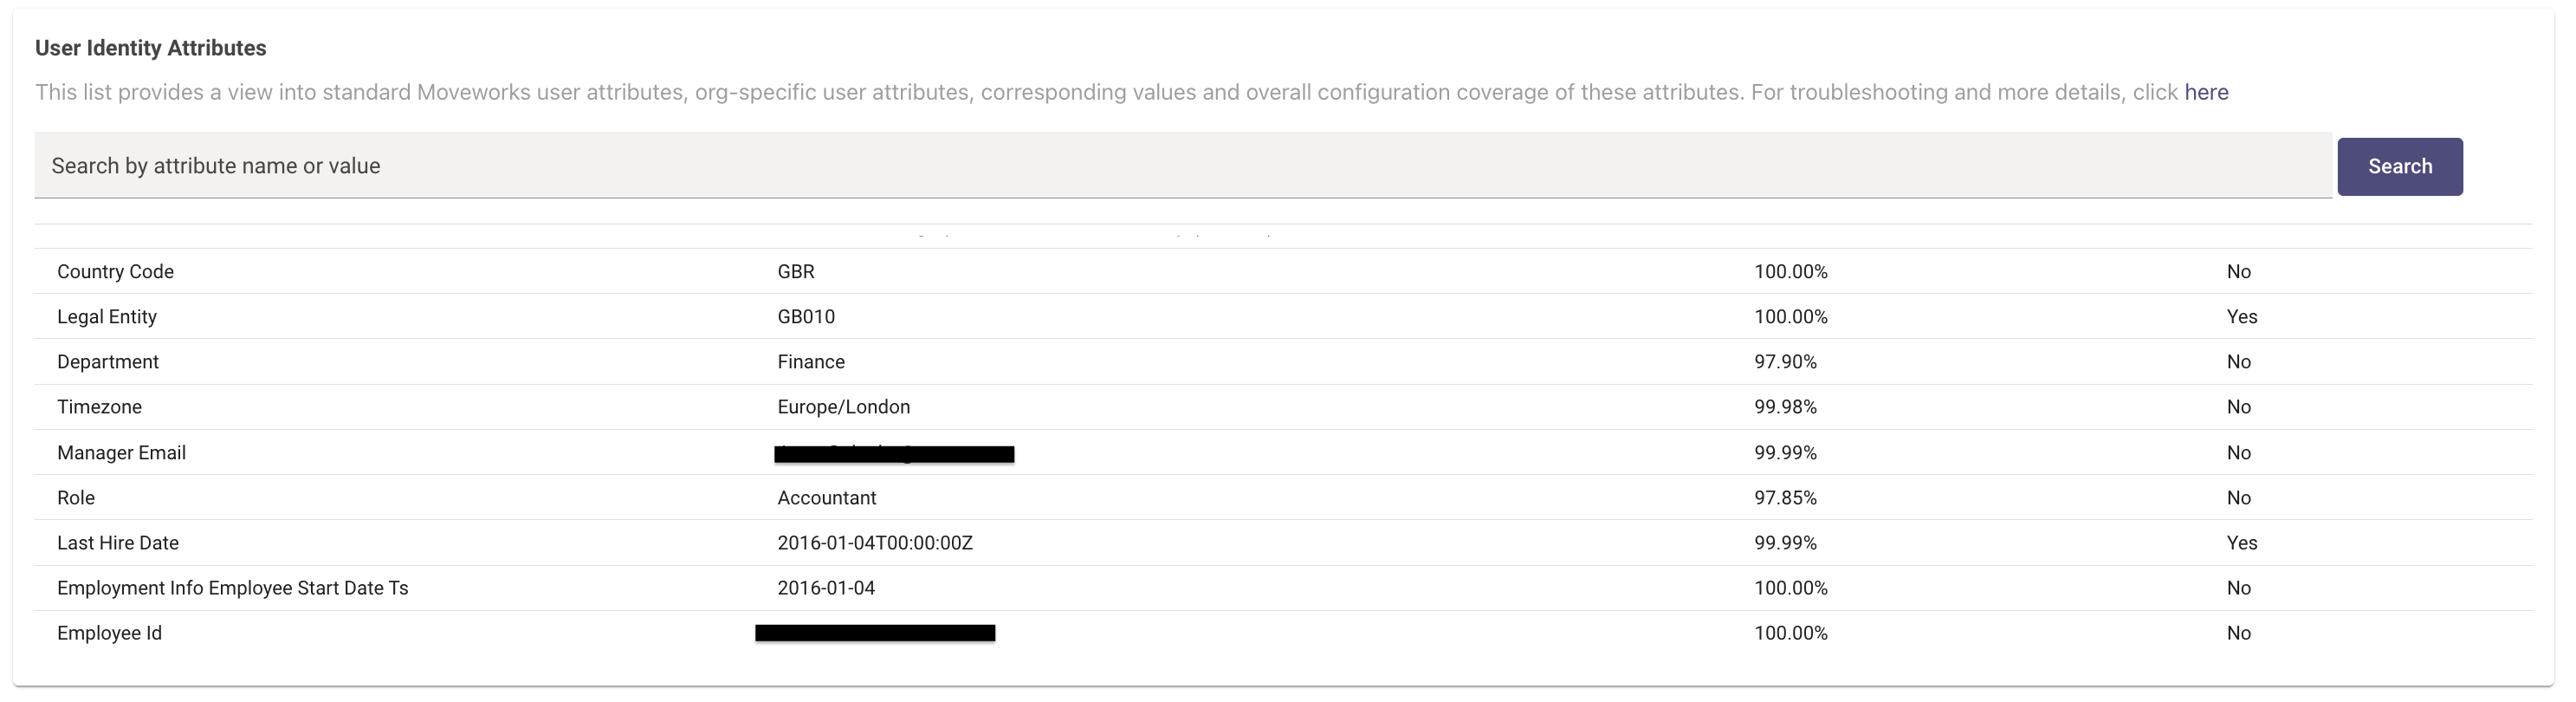
In order to validate if the Employee start date information has been ingested, you need to wait for the next ingestion run to take place based on the Ingestion Schedule here. Once ingestion is complete you can verify if Employment Info Employee Start Date Ts has populated for the user record.
You can do this by searching for a user name in the Search field and then checking the Identity Attributes list where the Attribute should now have a value.
How To Configure Custom Attributes for Identity Ingestion
When ingesting identity attributes from source systems, you may come across some attributes which are custom to the system and are not recognised by Moveworks, this could range from unique IDs for the records, or a Division ID which needs to be ingested on the Moveworks end.
- In order define Custom Attributes we need to navigate to the Import Users Configuration and go to the Configure selected sources step where you need to switch to the Advanced mode.
- In the Advanced view you would need to add the custom attribute in the Attribute list first in order for it to be fetched in the API call. In the below example we have added legal_entity in the Attributes list.
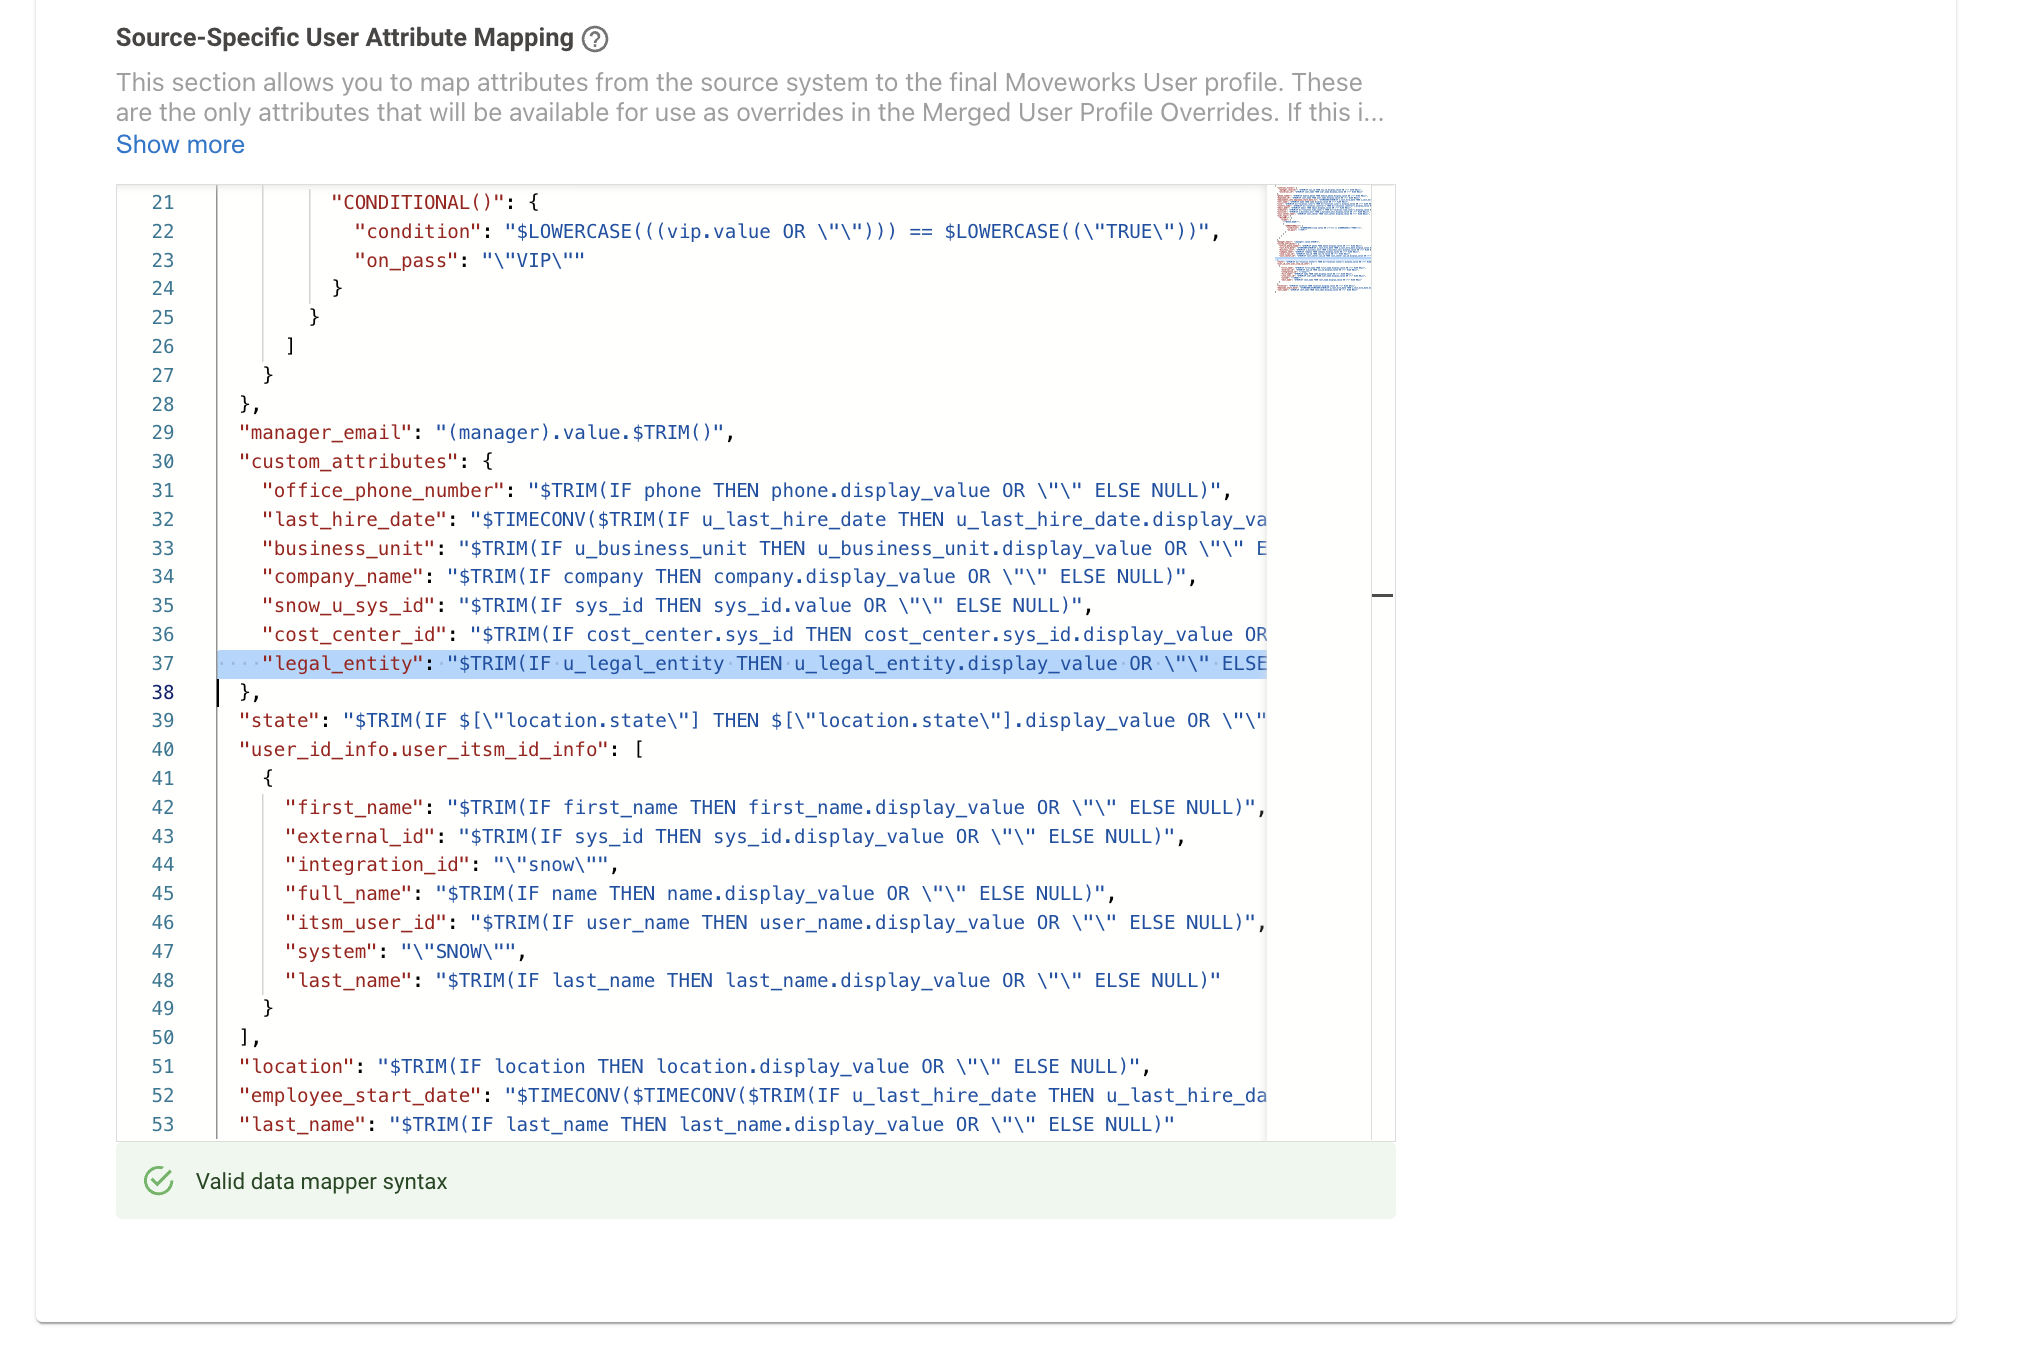
Next we need to map this custom attribute In the Source-Specific User Attribute Mapping JSON field. Here is an example of how we have defined it in the mapper. When doing this ensure there is a Custom Data attribute defined on the Moveworks end as well to house the info in.
- In this case we are calling it legal_entity which we will also need to add to the Attribute directory in a later step.
"legal_entity": "$TRIM(IF u_legal_entity THEN u_legal_entity.display_value OR \"\" ELSE NULL)"
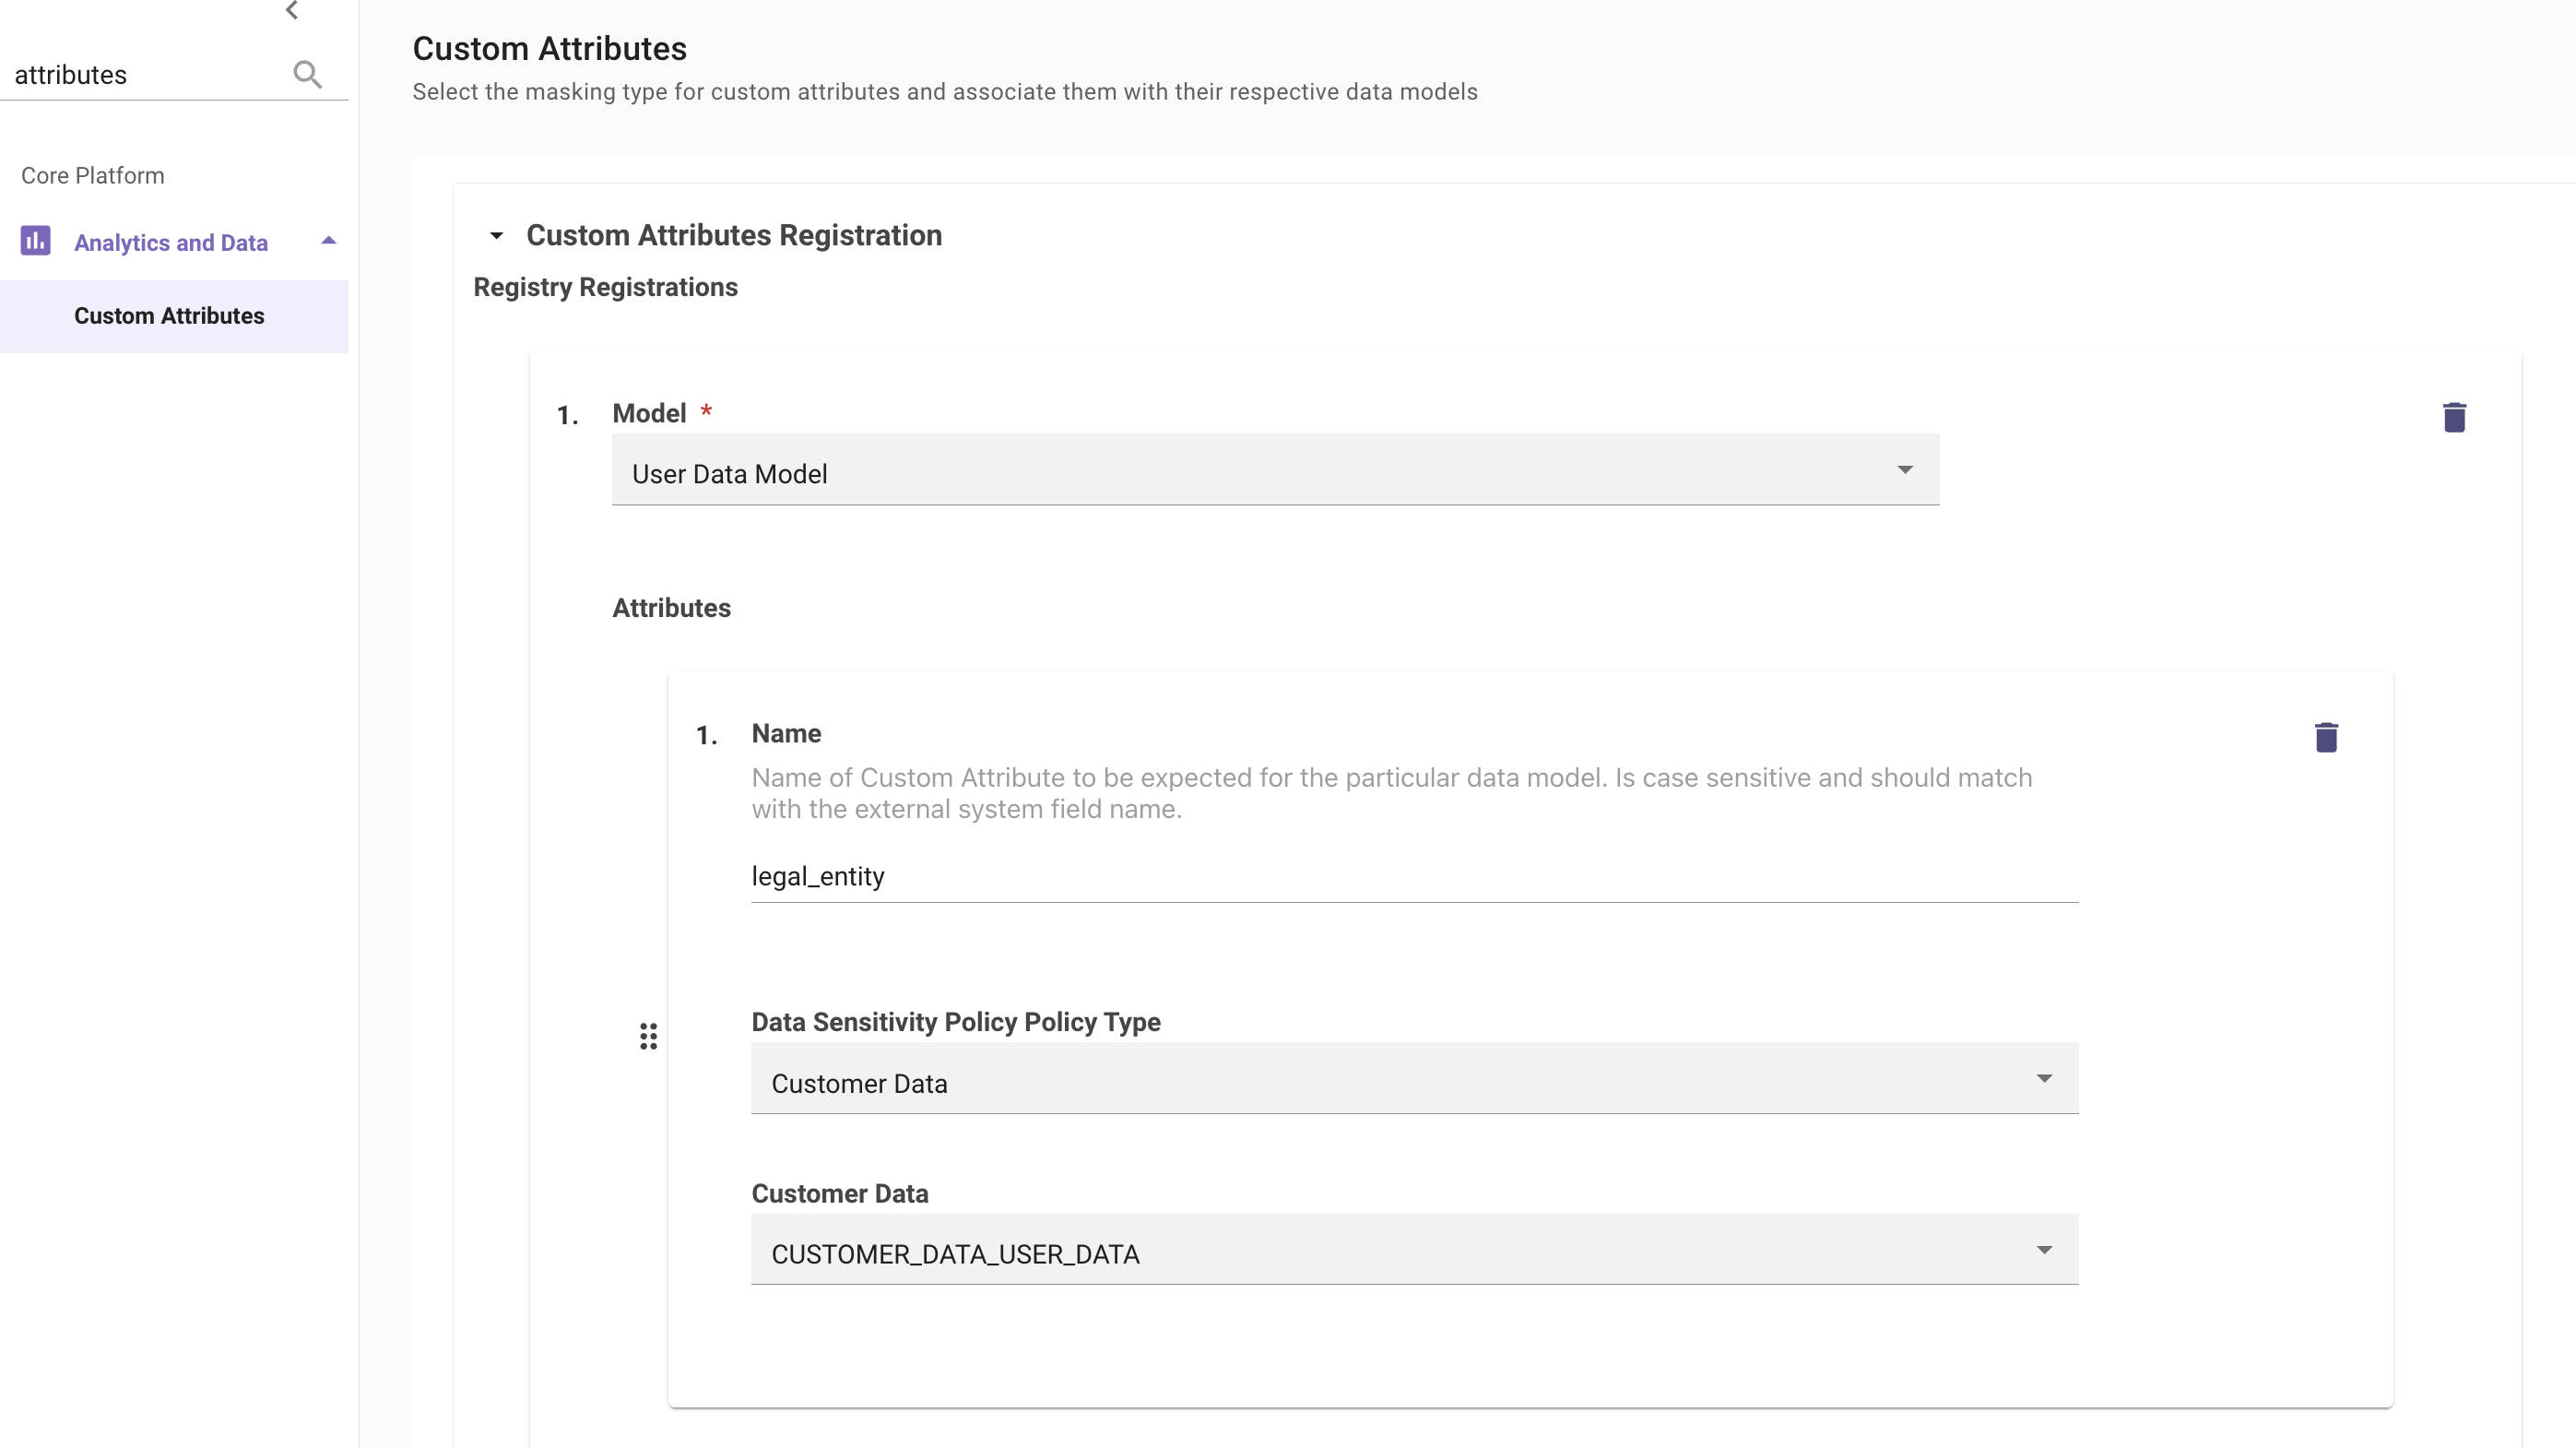
Once the mapping has been completed, Moveworks needs to recognise the attribute internally so this needs to be added to the Custom Attributes Config which can be found under Analytics and Data.
- Moveworks requires the custom attribute to be added to its internal registry.
- Model Type : User Data Model
- We then need to define the Name of the Attribute which was defined in the previous step (legal_entity).
- Data Sensitivity Policy Policy Type : Customer Data
- Customer Data : CUSTOMER_DATA_USER_DATA
Validation
In order to validate if the custom attribute has been ingested, Moveworks would need an Identity Ingestion cycle to complete. Post this you can visit the Imported Users View and search for the user to go into their Profile View. Here you would be able to view the attributes ingested for the user under the User Identity Attributes section. If the ingestion is successful we will see the field listed under here.
How To Remove an Attribute from User Ingestion
- Navigate to User Identity -> Import Users
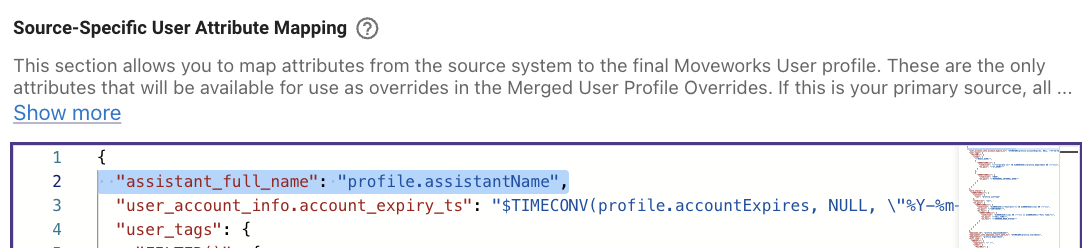
- Navigate to advanced mode, and go to the ** Source-Specific User Attribute Mapping** for the integration that you are importing the attribute from.
- In the JSON mapping, remove the line that contains the mapping of the attribute. In the example below, if I remove line 2, it would remove mapping
profile.assistantNamefrom the source system
How To Filter Users based on Source System API Query with ServiceNow
When importing users from the source systems, Using API query filters in systems like ServiceNow has substantial benefits, including improved performance, efficiency, data accuracy, security, and cost savings. By applying filters to your API queries, you ensure that you are fetching only the data you need, making your integrations smarter and more efficient.
Filters can be applied in a bunch of different ways within Moveworks, which can be done post ingestion or prior to ingestion taking place. In this example we are using an API query filter which is configured pre-ingestion for ServiceNow.
- In order to define a filter for the source system, we need to navigate to the Import Users Configuration and go to the Configure selected sources step where you can click on the edit icon for the respective source.
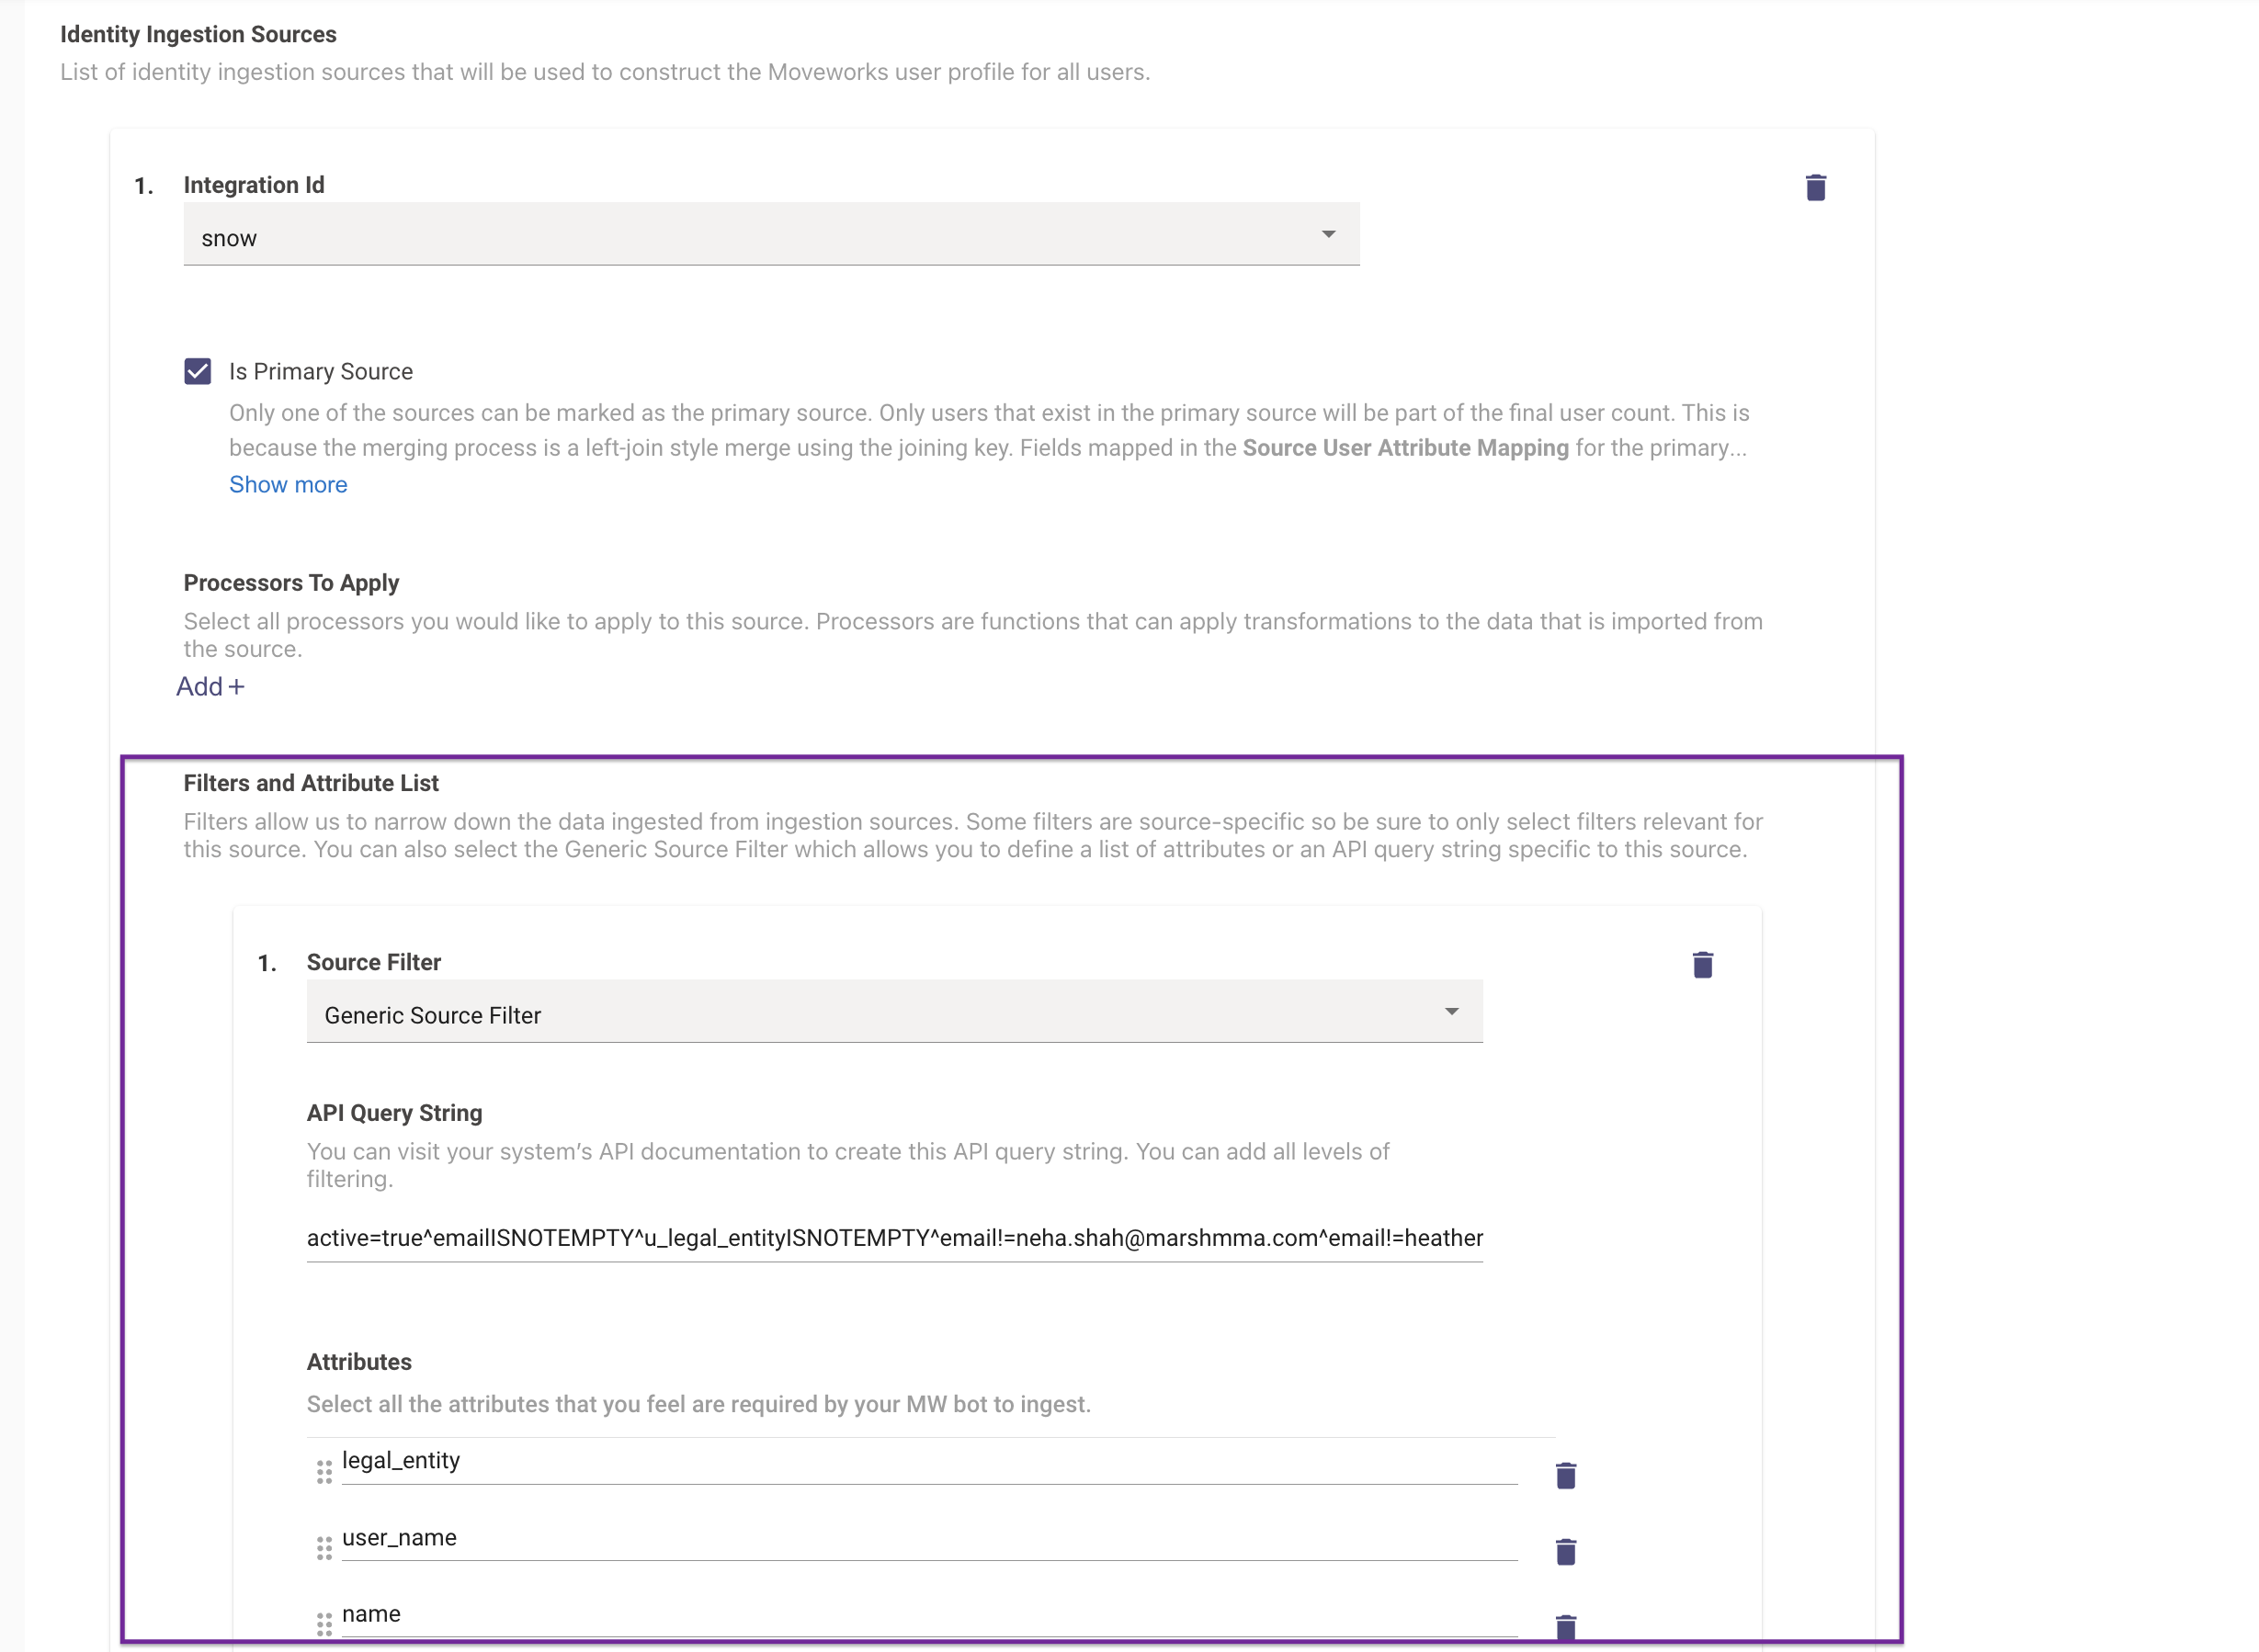
- This will open up the "Filters and Attribute List" section which you can add by clicking on the **"+" icon. **Here is where you can define the API Query to be used for filtering out the ingestion data.
Here is an example of what an API Query filter looks like for ServiceNow where we are only fetching the users who :
- Are Active
- Email is not empty
- Email is not equal to [email protected]
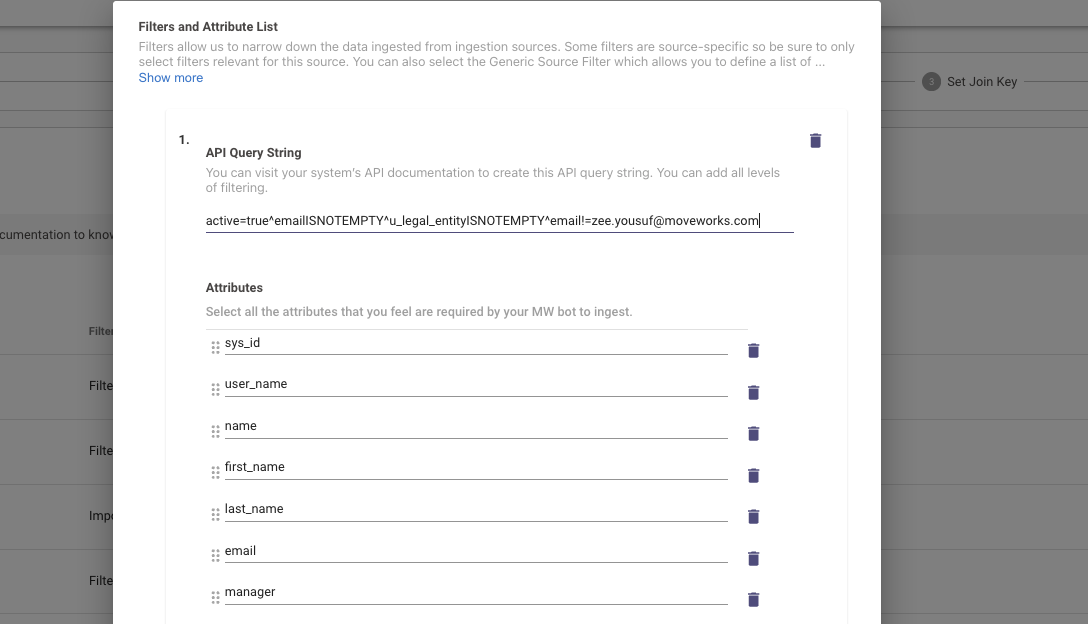
active=true^emailISNOTEMPTY^u_legal_entityISNOTEMPTY^[email protected]
API Query filtering is only supported by some source systems like Microsoft and ServiceNow.If you are running into issues with defining filters, Please reach out to Moveworks Support Team.
Note : Always ensure to test the filter using API Tester tools like Postman to ensure that the data is being returned as expected before defining it on the Moveworks end.
Validation
In order to validate if the ingested user data is respecting the filter which was defined, Moveworks would need an Identity Ingestion cycle to complete. Post this you can visit the Imported Users View and search for the user to go into their Profile View.
Here you would be able to view the ingested users by downloading the CSV file for "List of Enabled Users" where you can search by user emails to ensure they have not been ingested during the cycle and are respecting the filter.
How To Filter Out Customer Accounts in Jira Cloud
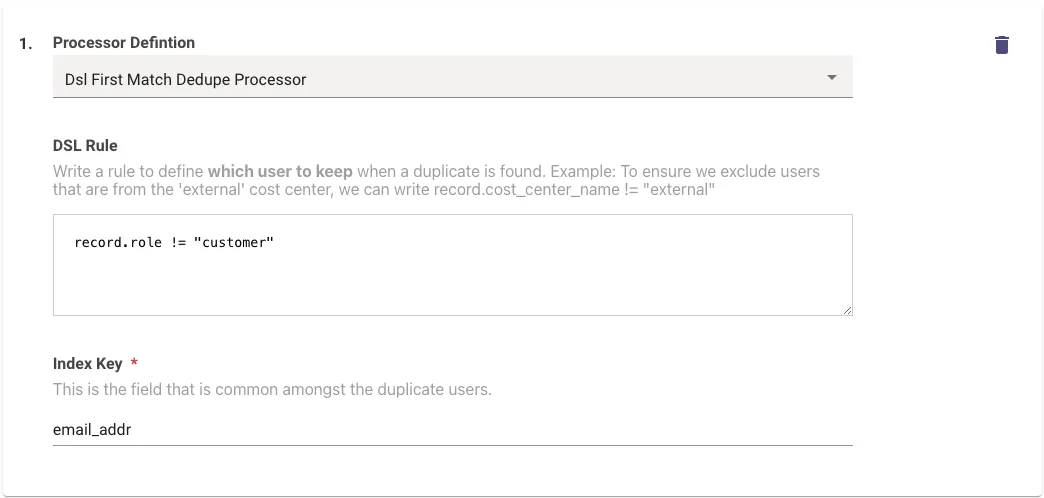
If your Jira instance has both customer and atlassian accounts for the same set of users, Moveworks User Identity may pick up the wrong record for ingestion.
Add a processor in the jira_service_desk section in the User Identity ingestion like below to do this:
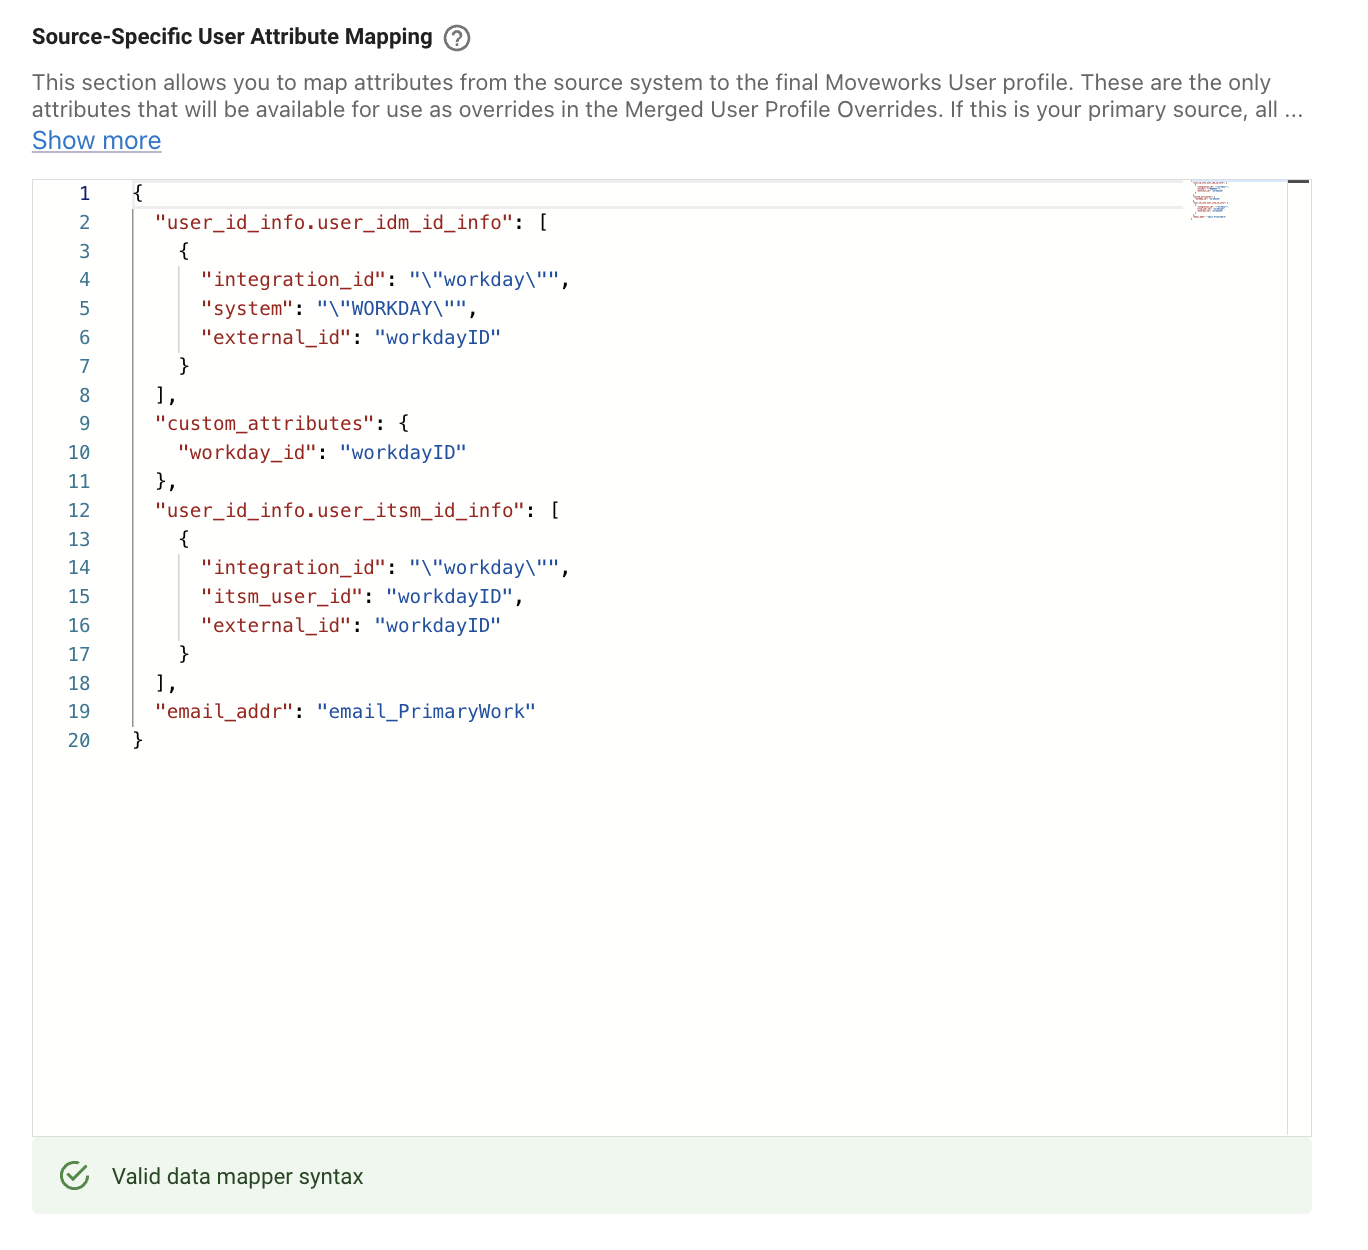
How To Filter Users based on WQL with Workday
When importing users from Workday as the source system, Using Query filters Moveworks ensures that you are fetching only the data you need. In the case of Workday we need to leverage the Workday Query Language(WQL) in the API call in order to filter the users.
In order to allow Moveworks to leverage WQL in the Filter for Identity Ingestion we need to ensure the configuration option has been selected to enable it.
- To do this please navigate to Connectors > Built-In Connectors where you will see a list of connectors present in your Environment.
- You can create a new Workday connector by clicking on the Createbutton or edit an existing one by clicking on the Edit Button.
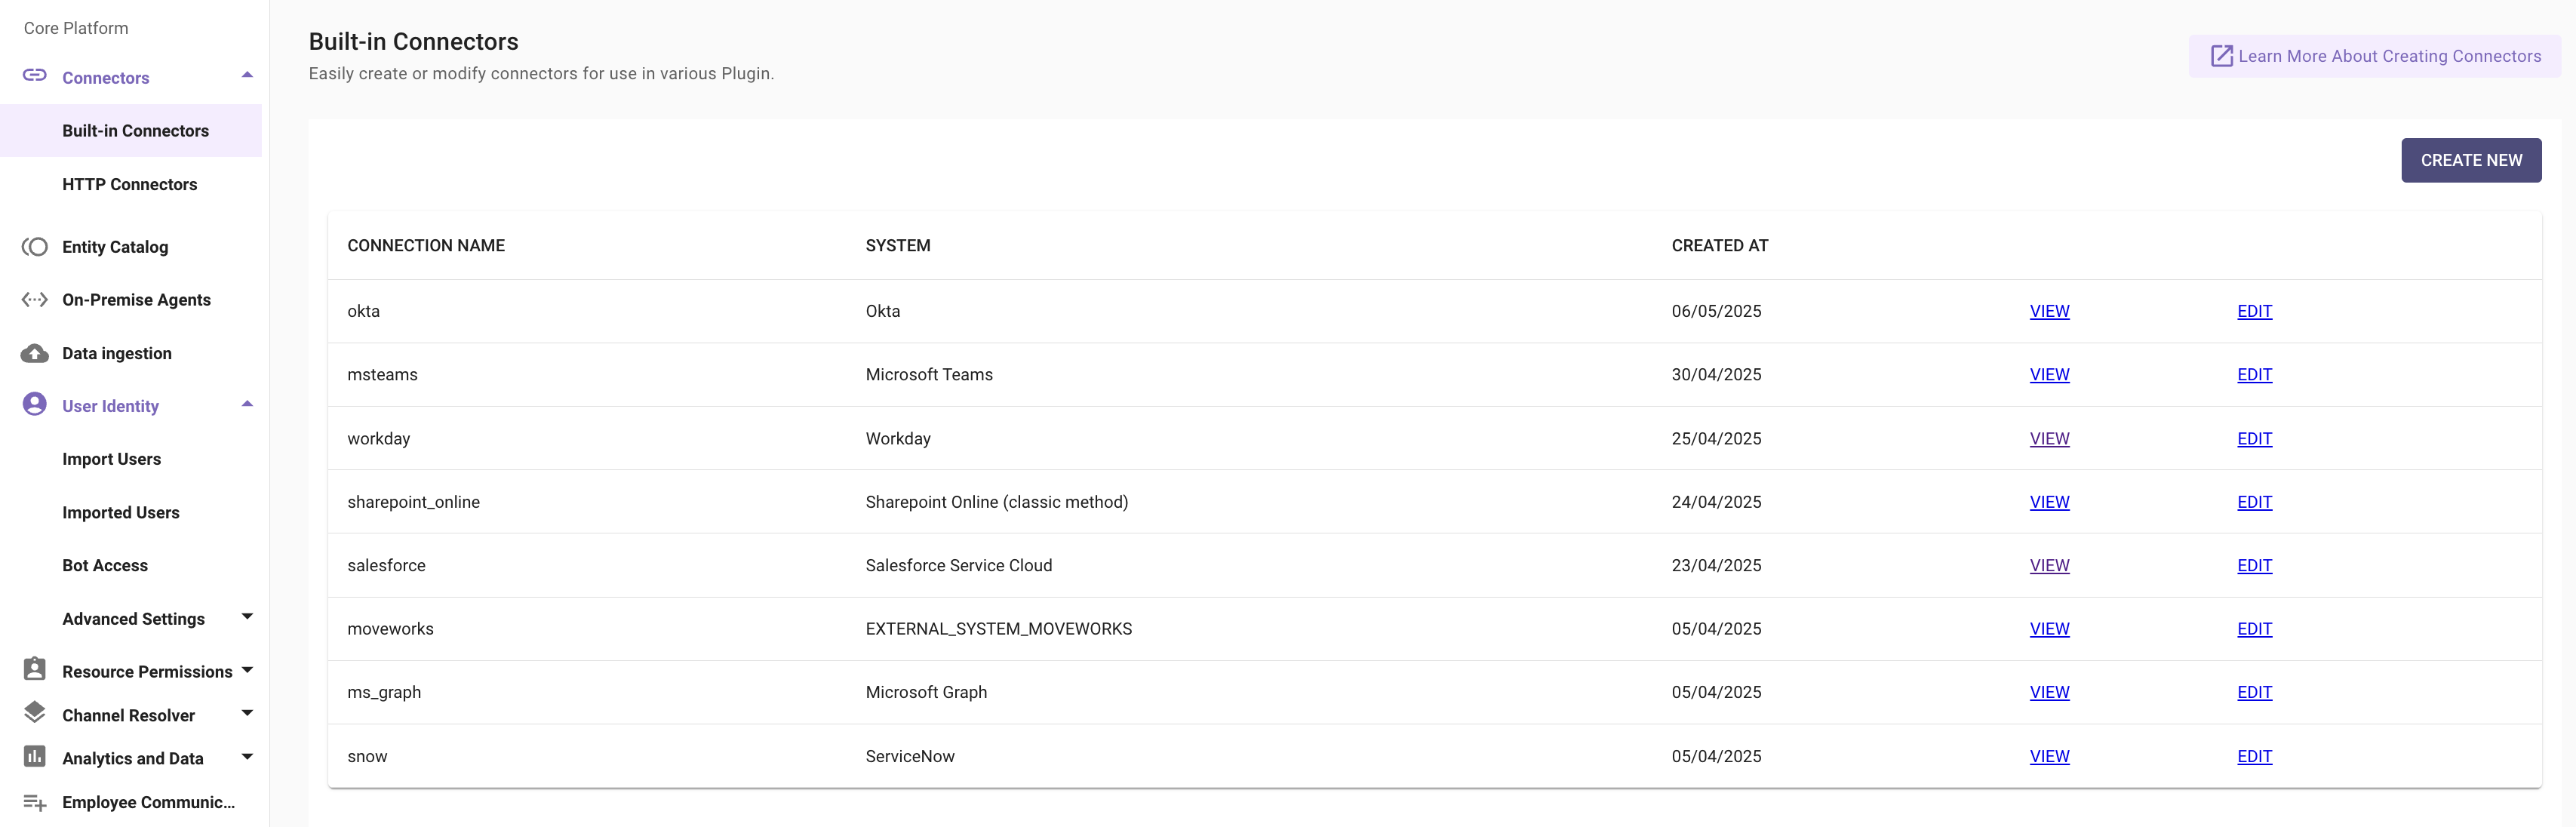
- Inside the Workday Connector you will come across an option Enable WQL (Workday Query Language) in Identity Ingestion checking this Box will allow Moveworks Identity Ingestion configuration to leverage WQL if a filter is defined.

- Submit the Connector update after making this change.
Now we can define the WQL in the Identity Ingestion Configuration in order to filter out the users.
- Navigate to the User Identity > Import Users and go to the Configure selected sources step where you need to switch to the Advanced mode.
- Under the Workday Identity Source Configuration, You can add a Source filter under the **Filters and Attribute List ** by clicking on the Add button.
- Here we need to add a filter for the Source system here so the Generic Source Filter option is selected.

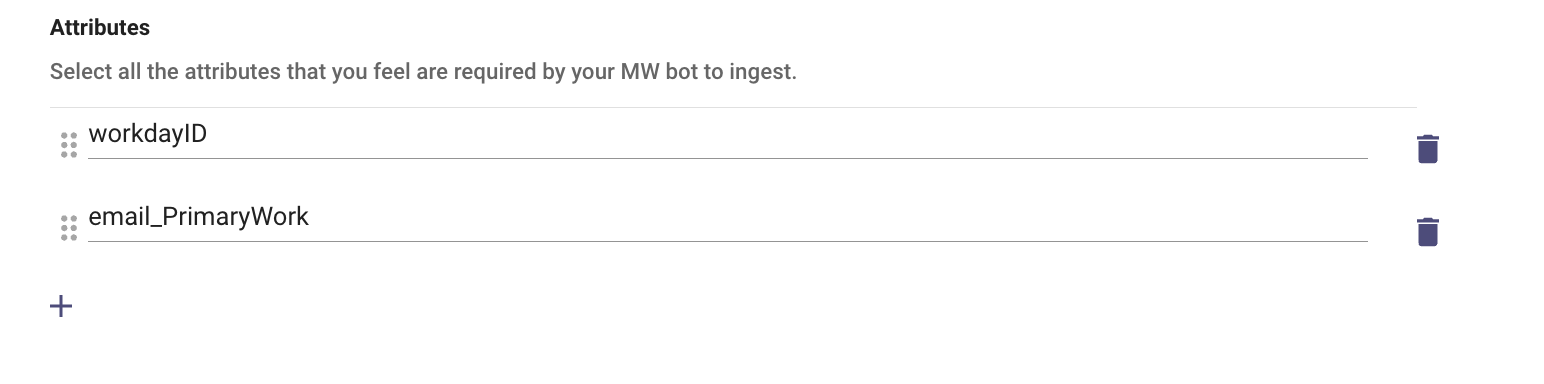
- Under the API Query String we can define the Query in the WQL format. Which will follow the similar structure.
- We are using a SELECT function on a set of Attributes like workdayID, email_PrimaryWork from a Table on the Workday end.
- We then filter down based on the condition provided here which is based on email_PrimaryWork
SELECT workdayID, email_PrimaryWork FROM indexedAllWorkers (dataSourceFilter = indexedAllWorkersFilter, includeSubordinateOrganizations = false, isActive = true) WHERE email_PrimaryWork = "[email protected]"- Please remember to define the Attributes being used in the Query so Moveworks can ingest and then process the filter.
- Now that the filter has been defined we can complete the Identity mapper which will ingest the User data.
Now we are good to submit the configuration which will now filter users based on the WQL being provided which will now be leveraged by Moveworks.
Validation
In order to validate if the ingested user data is respecting the filter which was defined, Moveworks would need an Identity Ingestion cycle to complete. Post this you can visit the Imported Users View and search for the user to go into their Profile View.
Here you would be able to view the ingested users by downloading the CSV file for "List of Enabled Users" where you can search by user emails to ensure they have not been ingested during the cycle and are respecting the filter.
How To Ingest Password Metadata
The password_meta_info.password_last_changed object is used to calculate when a Password Expiry notification should be sent to a user. This field needs to be mapped to the user roster if using the Access Account plugin.
Configuration
Navigate to Core Platform -> User Identity -> Import Users.
- Click Edit.
- Click Next in the bottom right.
- Click the Advanced mode toggle in the upper right
- Click Continue
- Navigate to the source system that has the password last set information.
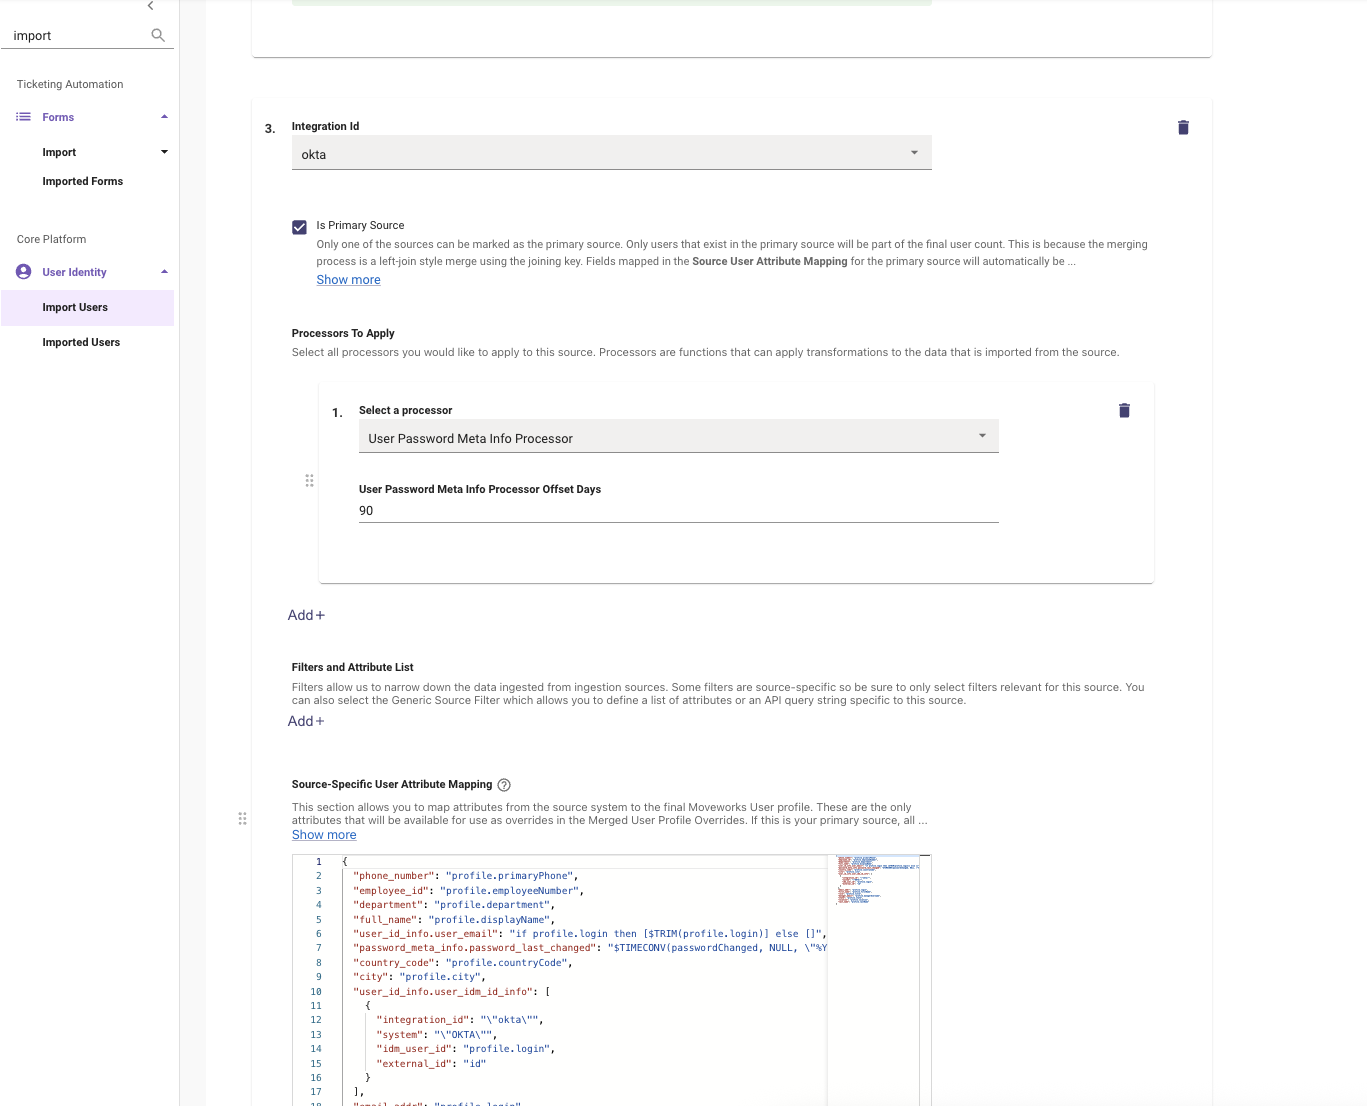
- Under Processors to Apply, click Add + and choose the User Password Meta Info Processor.
- Within this processor, add the User Password Meta Info Processor Offset Days number which aligns with how long a users password will last (90 days, 180 days, etc.).
- This is how Moveworks will calculate when a user's password will expire.
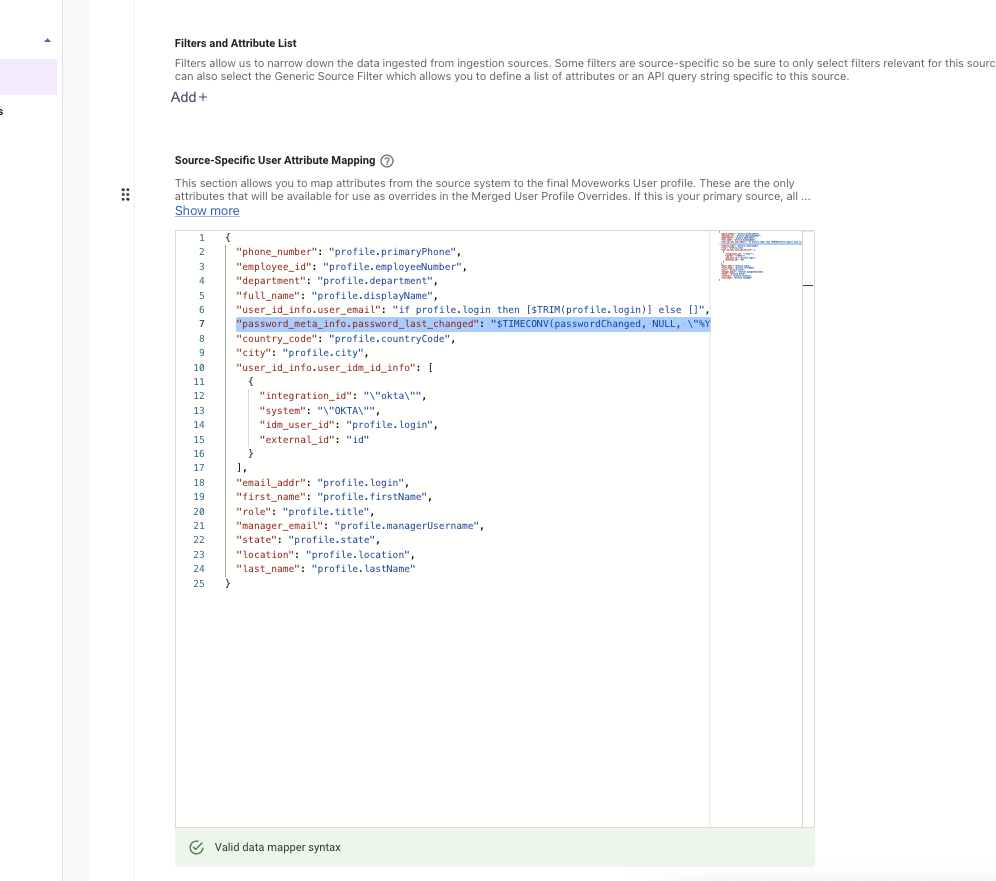
- Map the password_meta_info.password_last_changed object within the data mapper to pull this field into the user roster.
- Example for Okta:
"password_meta_info.password_last_changed": "$TIMECONV(passwordChanged, NULL, \"%Y-%m-%dT%H:%M:%SZ\", NULL, NULL, FALSE)",
- Example for Okta:
- Click Submit
Validation
To successfully validate if the password meta info field is populating, you will need to wait for an Identity Ingestion cycle to complete. After this, the Password Meta Info should be mapped to the user roster. You can use the User Identity > Imported Users page to check the user details on a specific user to confirm the data is being mapped properly.
How To Map Active Directory Group Membership for AI Assistant Access
Use this method if you need to map membership of an AD group to access to the AI Assistant.
-
When configuring the
active_directorysource in User Identity, underFilters and Attribute List, confirm thatmemberOfis listed as an attribute.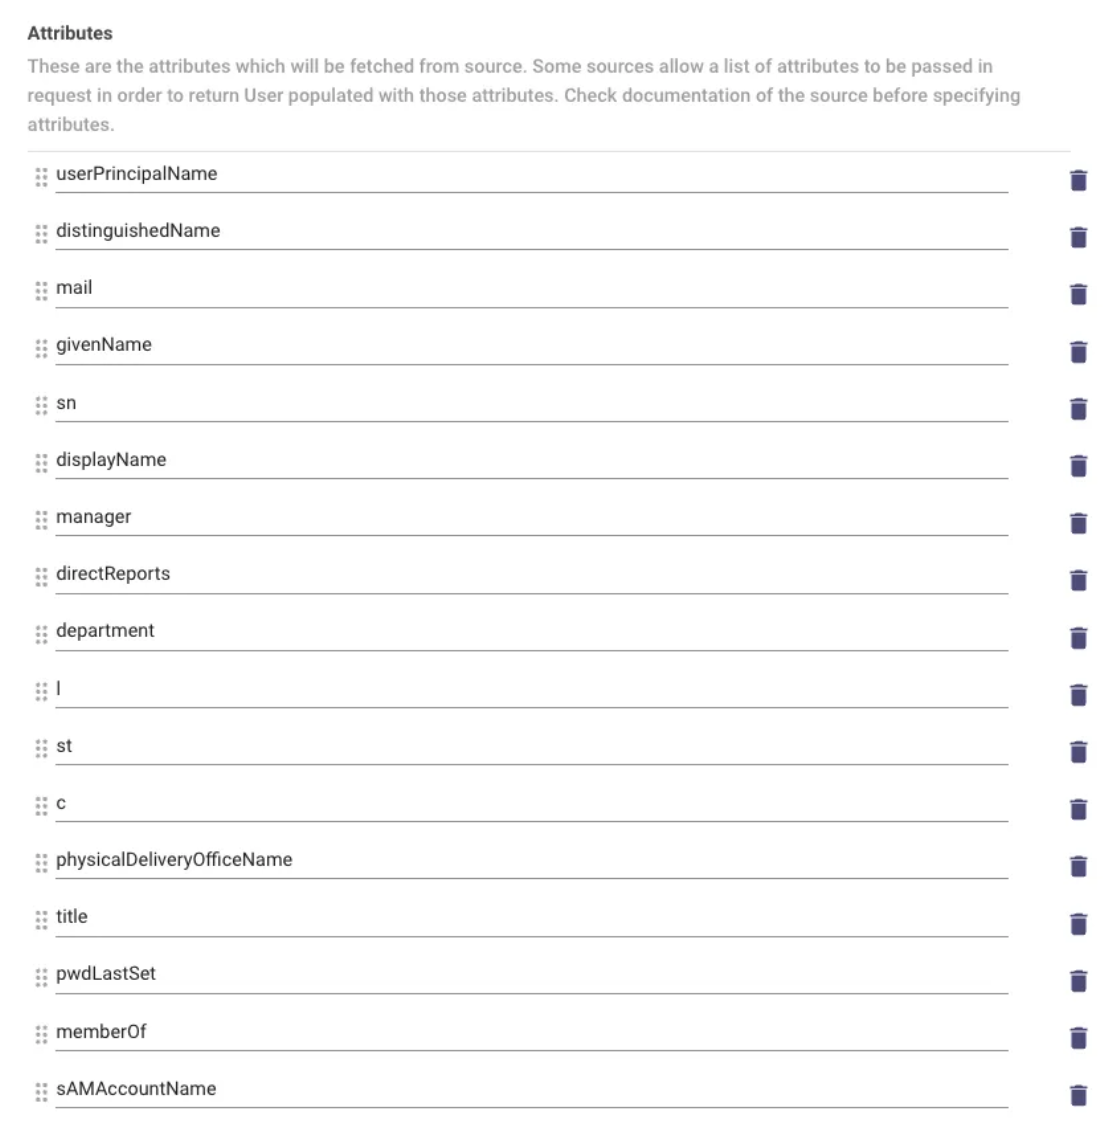
-
Under
Source User Attribute Mapping, add the following to your mapper and replace with the DN of the group. This will add theHAS_ACCESS_TO_BOTuser tag to users who are part of the specified group.
"user_tags": {
    "FILTER()": {
      "items": [
        "\"BASIC_USER\"",
        {
          "CONDITIONAL()": {
            "condition": "(memberOf AND (\"{{DN OF AD GROUP}}\" IN memberOf))",
            "on_pass": "\"HAS_ACCESS_TO_BOT\""
          }
        }
      ]
    }
}- Under
User Identity > Bot Access, add the following rule to ensure only users who are part of this group have access to the assistant:
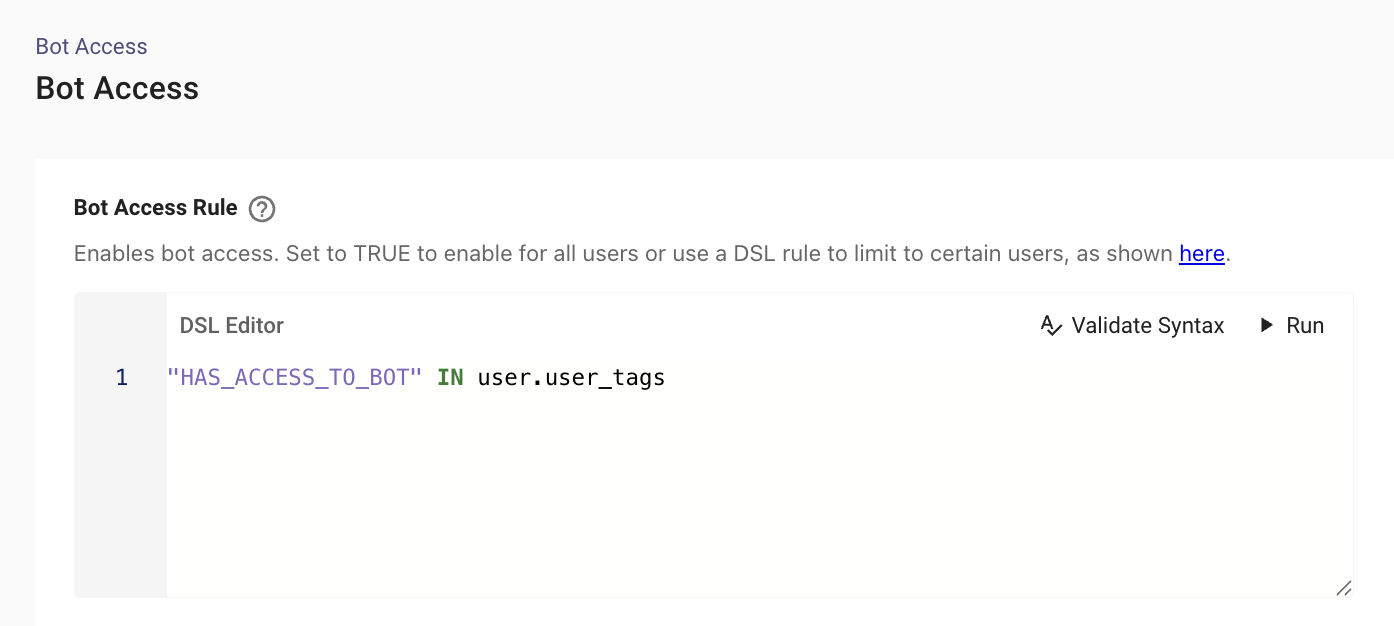
How To Ingest User GeoCode Information
The Moveworks AI Assistant can provide personalised search results to a User based on their Profile Boosting which relies on the Geocode information for that user to be ingested on the Moveworks end.
In order for the Search results to be personalised, we need to start by ingesting the GeoCode information from the integration system which houses it. Location information could live in any of your integrations (Okta, AD, ServiceNow, Active Directory etc.).
Configuration
In order to extract this information, You can leverage the User Geocode Processor which pulls the location information of the user and then maps that to the associated GeoCode. Before doing so make sure the below steps have been completed :
- Integration System Connector has been created and tested.
- Identify the Attribute which houses the location information.
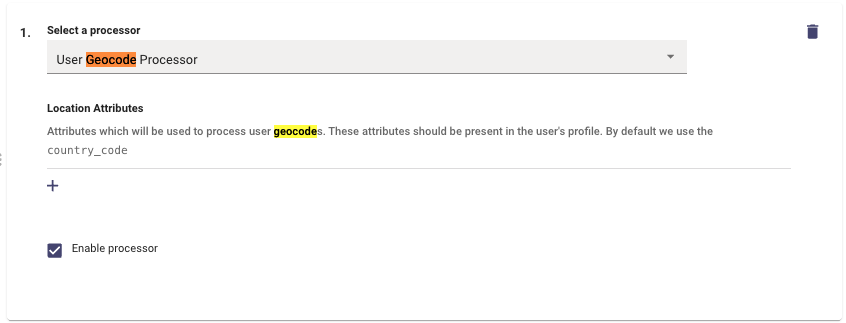
Currently, we apply the GeoCode Processor on the country_code field of the Integration. Therefore, it is preferred to have the values be as clean as possible the country name string such as: United States, France, India.
Please Note : Having the abbreviated country codes such us US, CA, etc. Might not work in some cases. For example, the country code IL is ISO-standardized code for Israel, however, the geocode extractor may confuse it with the Illinois state in the USA. We cannot override any geolocation calls.
If you have more than a single Identity System which is using the GeoCode Processor, Please follow the below steps :You can only ingest GeoCode information from a single Source system so you would need to override the attribute in Override User Profile Fields
How to Map Manager to User Identity
Mapping the manager email when you have access to the manager_email field in the user’s object
Say you have access to the manager’s email. Then you can map it directly by accessing the available key
{"manager_email": "managerEmail"}In the example above, managerEmail would be the key from the external system that we are mapping to manager_email on the Moveworks User object.
Mapping the manager email when you have a reference
However, in most cases you will have access to some other field that references the manager - in ServiceNow we generally have a reference to a ServiceNow sys_id that refers to the user’s manager as seen in the JSON below from the ServiceNow Table API. In Active Directory, you may have the manager attribute that contains the distinguished name of the user who is the user's manager.
"manager": {
    "link": "https://dev-abc123.service-now.com/api/now/table/sys_user/554b11f697d4e5542939bb8fe153af9e",
    "value": "554b11f697d4e5542939bb8fe153af9e"
}
First we map the manager_email field in our user object to the value of the reference field we get from ServiceNow from the manager user reference field.
{
"manager_email": "(manager).value.$TRIM()"
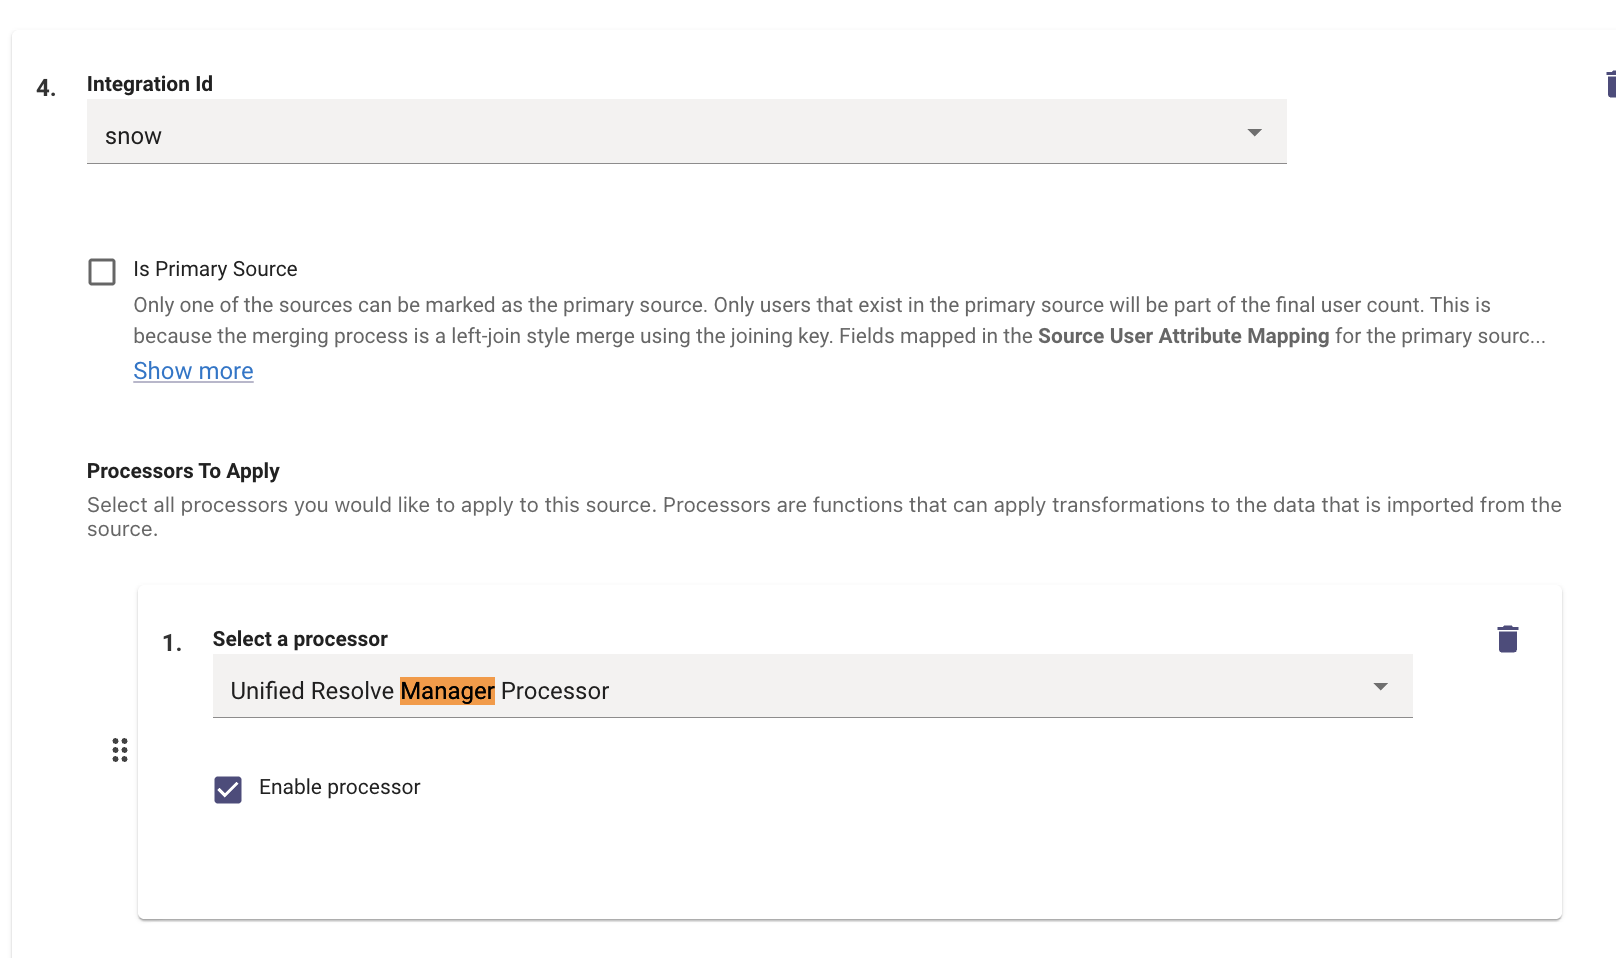
}Then under the identity source mapping, also map sys_id under manager_resolver :
  "internal_fields": {
    "manager_resolver": "$TRIM(IF sys_id THEN sys_id.display_value OR \"\" ELSE NULL)"
  }
Then enable the UnifiedManagerResolverProcessor for the integration we are mapping.
How to remove Test Users from Analytics Dashboards
A common user tag you may want to apply is to specify a TESTER By doing so, we can eliminate this user’s interactions from Moveworks Analytics dashboard. This is common since we may have stakeholders that are using the AI Assistant more often, and we don’t want to include them in our reporting.
Example
"user_tags": {
    "FILTER()": {
      "items": [
        "\"BASIC_USER\"",
        {
          "CONDITIONAL()": {
            "condition": "$LOWERCASE(((email.value OR \"\"))) IN [\"[email protected]\",\"[email protected]\"]",
            "on_pass": "\"TESTER\""
          }
        }
      ]
    }
  }
How to map VIP users
In this example below, we check the vip.value field being returned from ServiceNow's user import to ensure it matches up to TRUE , in that case the user is given the user_tag VIP.
"user_tags": {
          "CONDITIONAL()": {
            "condition": "$LOWERCASE(((vip.value OR \"\"))) == $LOWERCASE((\"TRUE\"))",
            "on_pass": "\"VIP\""
          }
        }
Validation
In order to validate if the Employee GeoCode Information has been ingested, you need to wait for the next ingestion run to take place based on the Ingestion Schedule here. Once ingestion is complete you can work with the Moveworks Support Team to check if the Geocode information has been ingested successfully
Updated 3 months ago