How To Guides for Handoff Plugin
How To Configure Handoff Settings
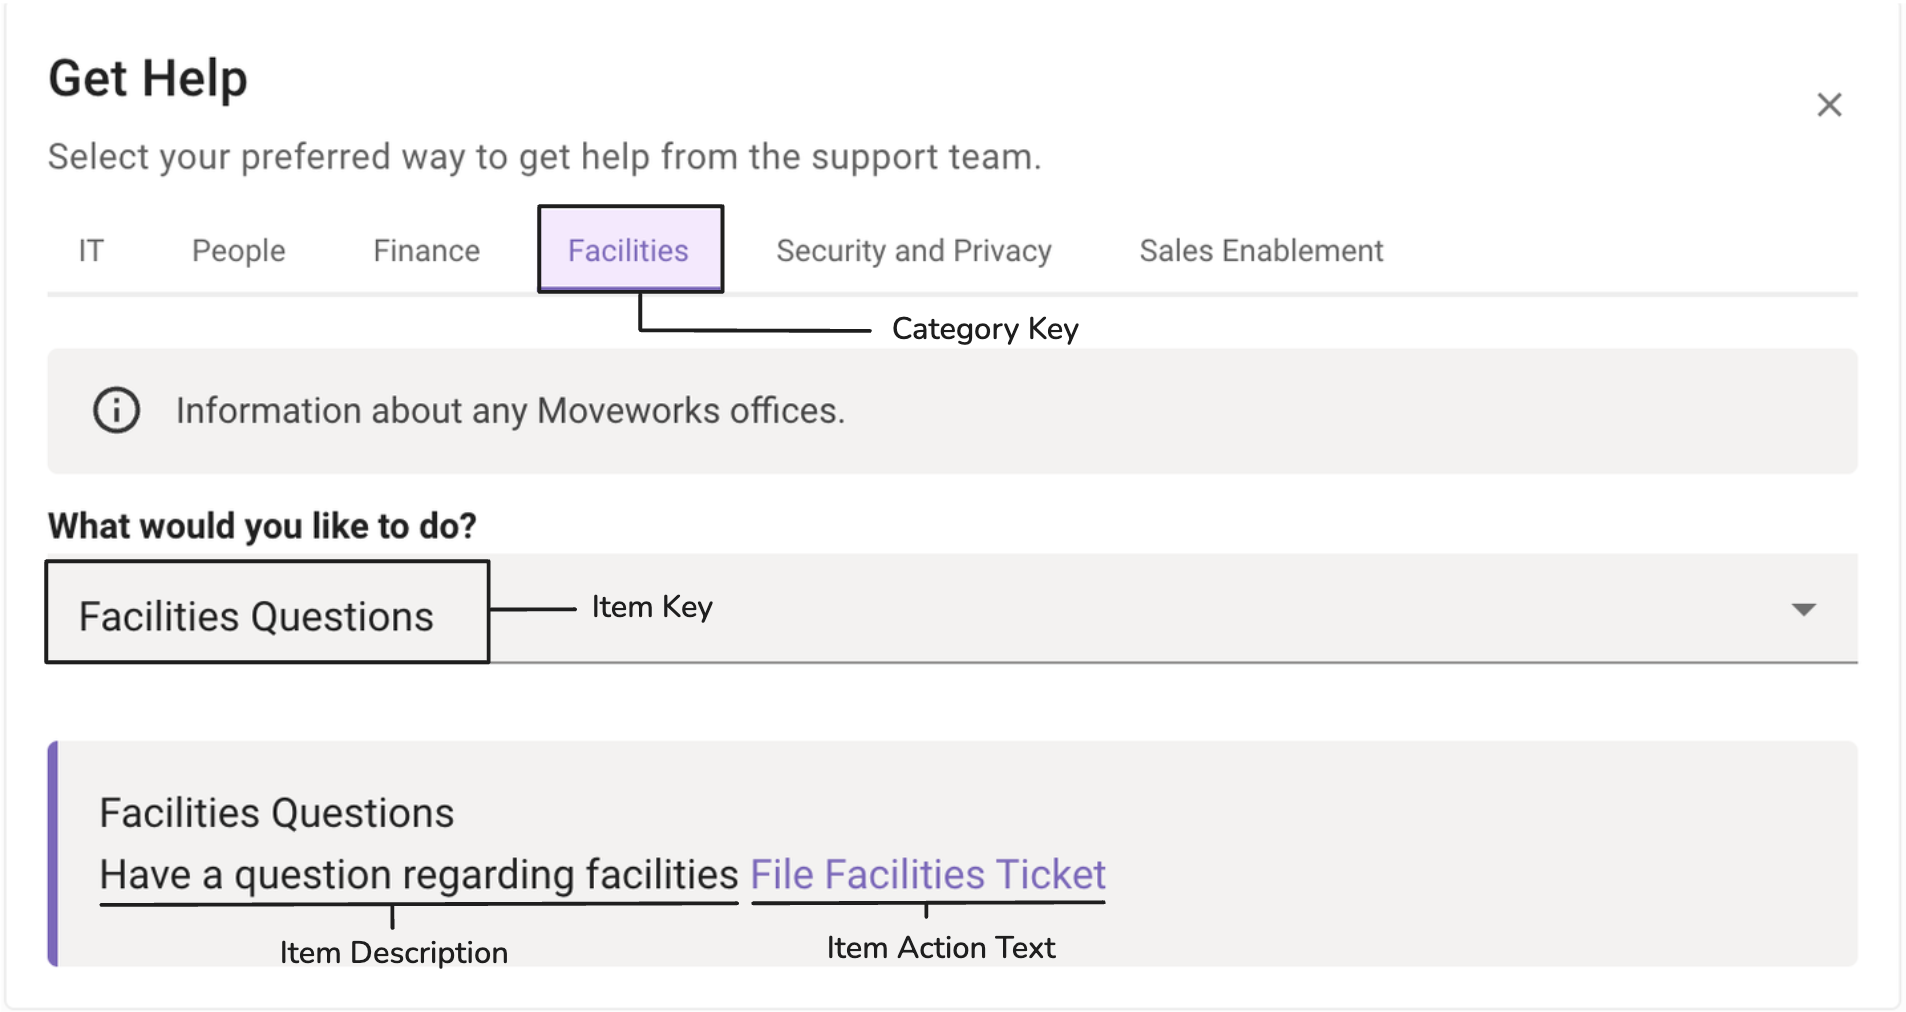
In this configuration, you are required to define those categories which will be displayed to the user during the handoff process which is present in the Get Help option which is present in each chat card, as portrayed in the image.

These are various Handoff categories which can be configured using the below steps. In this example we will be configuring the IT Domain.
Configuring Handoff Categories
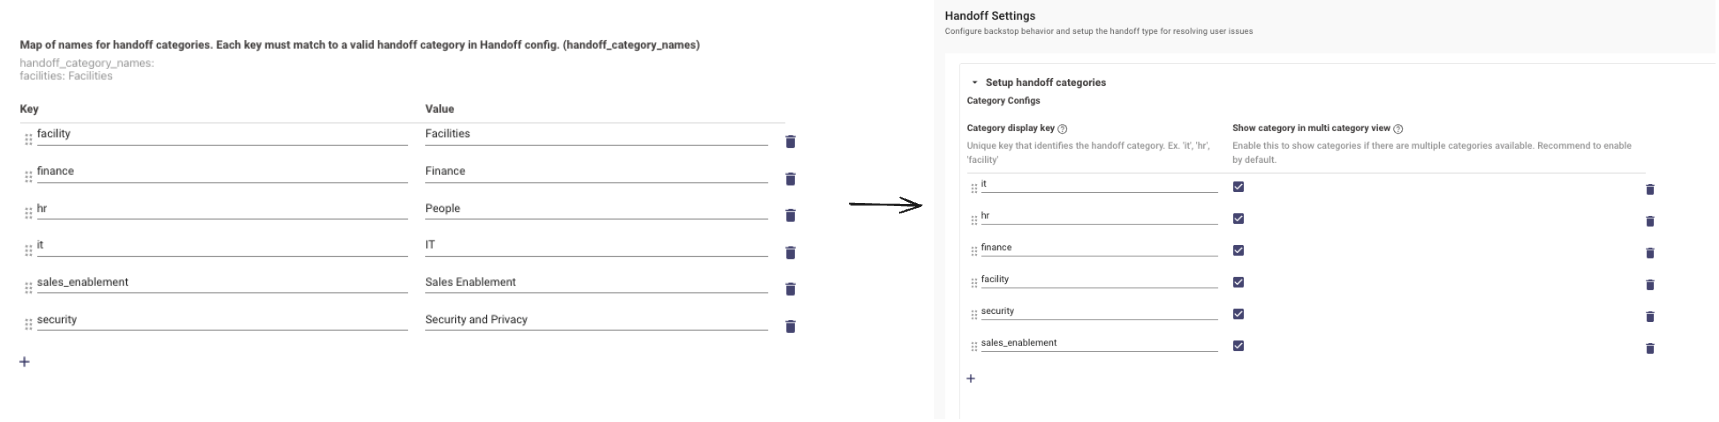
Start by navigating to Handoff > Handoff Settings. In order to present a Domain in the Handoff Page, We need to first define it as a category.
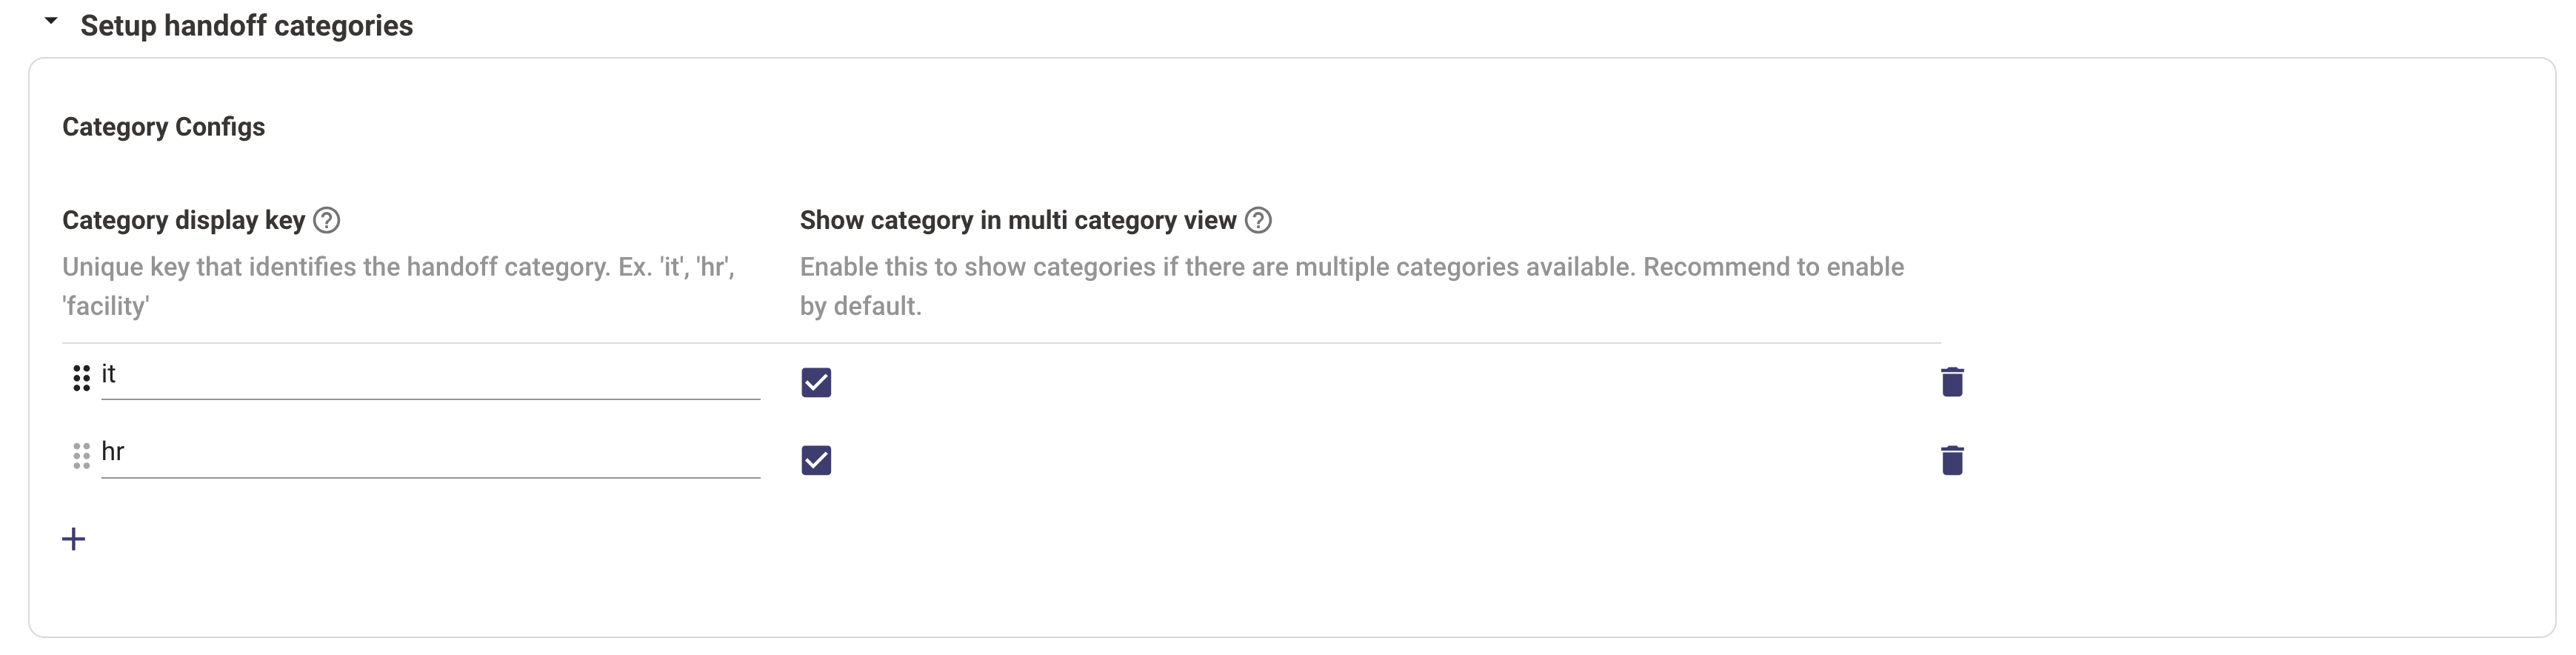
Please ensure you have checked the box for each category after defining the domain so they show up in the final Handoff card.
Once a category has been defined we can create Item keys which are associated with it. The item keys are used to define different kind of handoff settings.
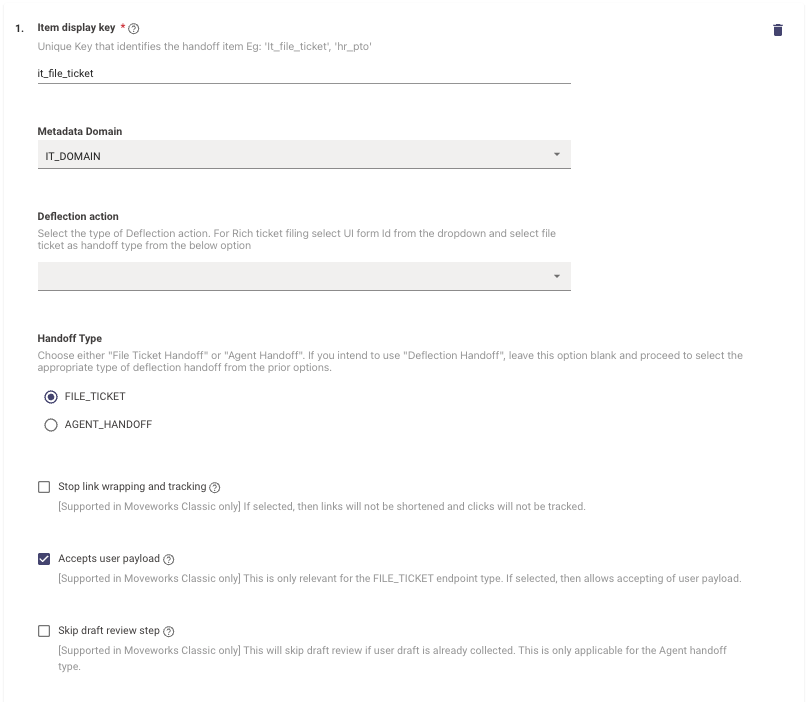
File Ticket Handoff
This handoff type allows users to file the default ticket type which has been configured during the Ticketing Configuration.
-
Item Display Key: Provide a key name here which defines the context of the handoff Item. Ensure the key name is written using underscores for spaces. Ex : it_file_ticket
-
Item Metadata Domain: Choose the appropriate domain for the item. Here is a list of domains which can be selected. If you are using a custom domain, select
OTHERas the Metadata Domain. -
Deflection Action: This is an optional field which should be used, If you wish to enable deflection handoff which will be presented as a button or link to the user, select a deflection action from the following options:
-
URL
-
Email
-
Chat channel ID
-
Rich ticket filing form
Leave Handoff Type empty for URL, Email, or Chat Channel deflections unless they lead to ticket creation. For ticket-related redirects, select 'File Ticket'.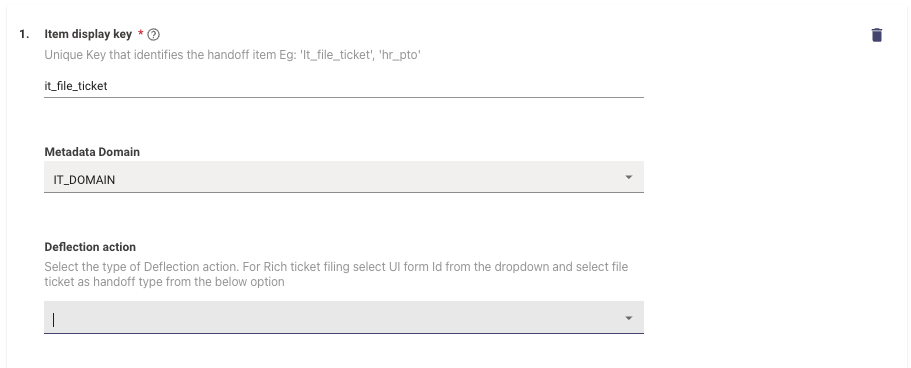
-
-
Handoff Type: Choose File Ticket Handoffto support ticket creation through the Handoff route or if you've previously selected Rich Ticket Filing as part of the Deflection action.
A Handoff type must be selected if the Deflection action is set to Rich Ticket Filing.
-
Link Click Track Option: Opt for this if you wish to prevent Moveworks from counting link clicks for resolutions and displaying a shortened version of the URL.
-
Access to User-Created Ticket Data: Enable this if you desire to access the user's data while filing the ticket. It is recommended to keep this enabled if you've chosen File Ticket in the Handoff Type.
-
Skip Draft Review Option: Choose this if you prefer to bypass the draft review stage. This control is only applicable for the Agent Handoff Type.
-
Pre-Trigger Rule: A Domain Specific Language (DSL) rule determines when the handoff gets triggered. This is typically tied to the category the item key is created for—if a handoff is detected for a domain, it gets activated. Educate yourself more about DSL here.
-
In this scenario since we are defining an item key for the category IT the DSL rule will be as follows
IF (context.domain_candidates[0].domain == "IT_DOMAIN") THEN 1.0 ELSE 0.5 -
For custom domains use the following rule format:
IF (context.destination_candidates[0].name == "CUSTOM_DOMAIN_NAME") THEN 1.0 ELSE 0.5
-
-
Select Category Display Key: Choose the category this item falls under. Multiple categories can be defined for a single Item key. Once set, this item will appear in all the chosen categories.
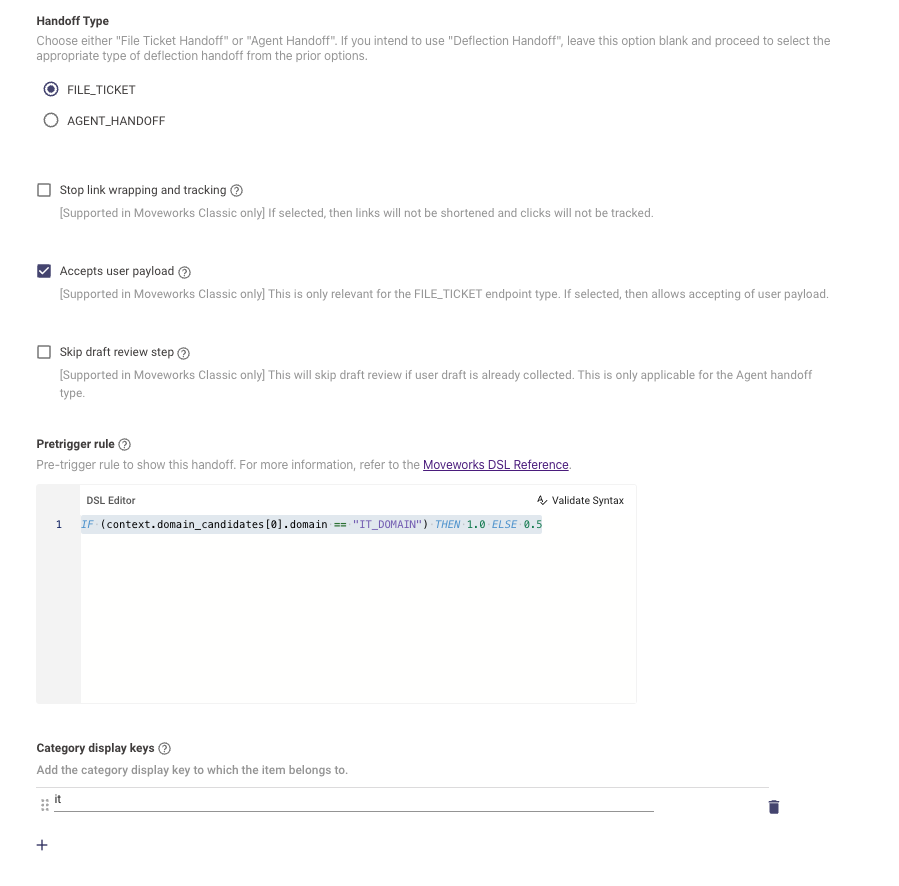
Please ensure the Category Display Key value is similar to the Category defined earlier.
Agent Handoff
This handoff type allows users to start a Live Chat with an Agent on their External ITSM system. The configuration steps for Agent Handoff are similar to the previous Handoff Type with the below differences :
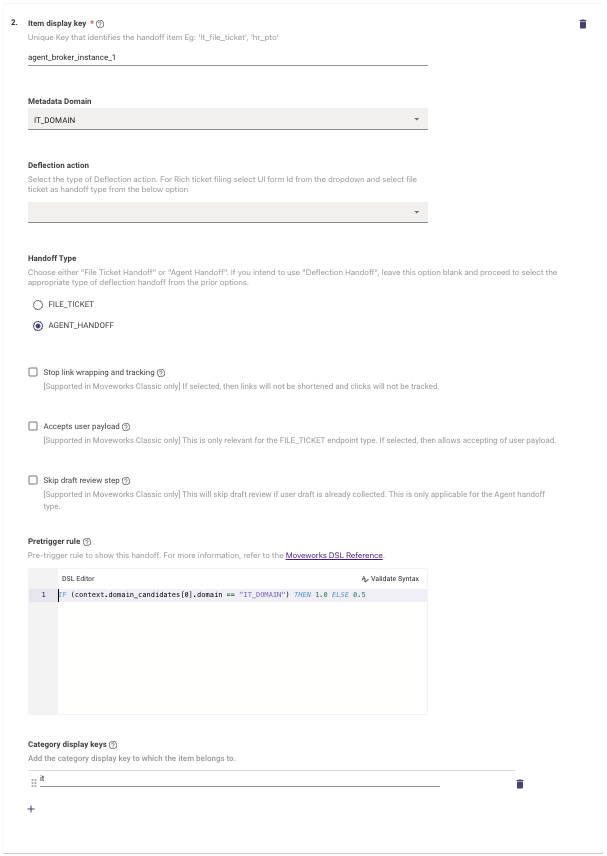
- Item Display Key: Provide a key name here which defines the context of the handoff Item. Ensure the key name is written using underscores for spaces. Ex : agent_broker_instance_1
- Item Metadata Domain: Choose the appropriate domain for the item. Here is a list of domains which can be selected.
- Deflection Action: This is an optional field which should be left empty when the Handoff Type is Agent Handoff.
- Handoff Type: Choose Agent Handoffto support the transition to Live Agent Chat in the Assistant.
Deflection Handoff
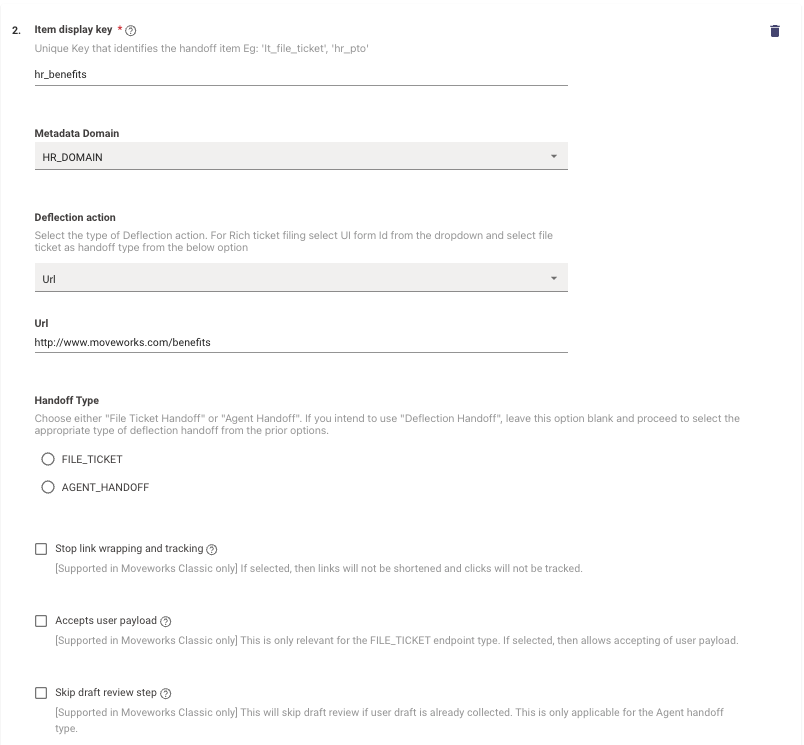
Deflection Type Handoff is configured for Items which provide users with a button or a link that redirects them to the appropriate route selected in the Deflection Action Type. Lets take the example of an HR Domain Item key here :
- Item Display Key: Provide a key name here which defines the context of the handoff Item. Ensure the key name is written using underscores for spaces. Ex : hr_benefits
- Item Metadata Domain: Choose the appropriate domain for the item. Here is a list of domains which can be selected. If you are using a custom domain, select
OTHERas the Metadata Domain. - Deflection Action: This is an optional field which should be left empty when the Handoff Type is Agent Handoff.
- URL - Define a URL which will be provided to the user as a hyperlink in the Handoff card for this category.
- Email - Define an Email the users could reach out to for help regarding requests from this category.
- Chat channel ID - This is the ID of the channel in Slack which the user can be redirected to when interacted with.
- Rich ticket filing form - The ID of the Moveworks Form which has been setup for Ticketing Filing using Rich Ticket filing configuration.
- Handoff Type: Leave this control without any selection to allow for Deflection actions to be presented.
Once the Handoff Settings have been completed, please ensure the respective Display configurations for the created items keys have been completed as well.
How To Configure the Display Fields for Handoff Items
In order to define the Handoff Categories and Item keys are presented to the user. Lets consider the example of the below Handoff Setting and what Display keys need to be setup for it.
We need to configure the display values for these items by navigating to the Display Configurations setting under the Chat Platform Module. Under the Handoff Section the below configurations need to be completed.
handoff_category_names
This is where users can define which categories are configured in Handoff and what their Display value should be presented as in the Assistant.
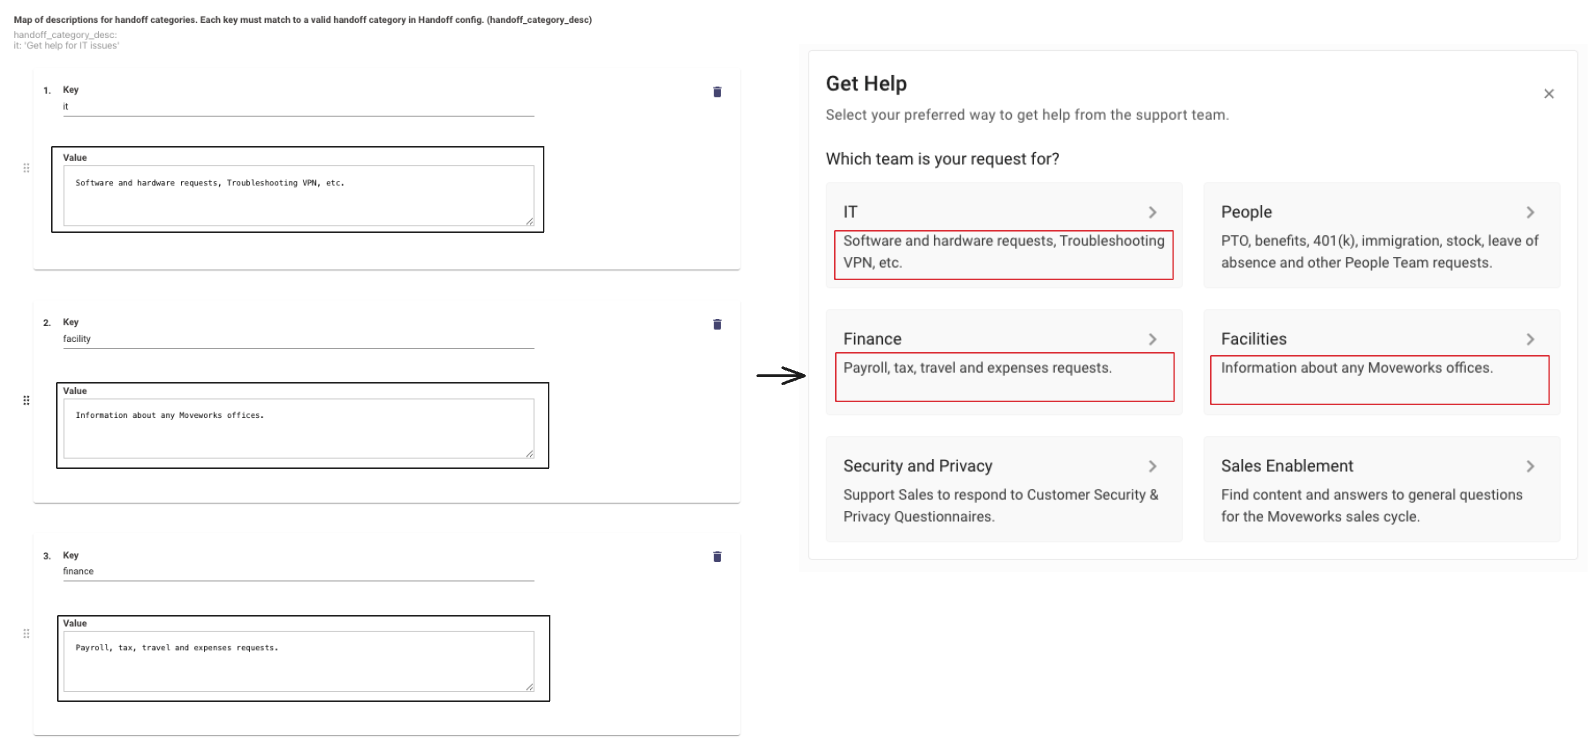
handoff_category_desc
Once the category names have been defined, we can provide those categories with a short description before it is selected by the user.
Please ensure to provide the category key you are defining the description for. Here is what the resulting Handoff Card looks like.
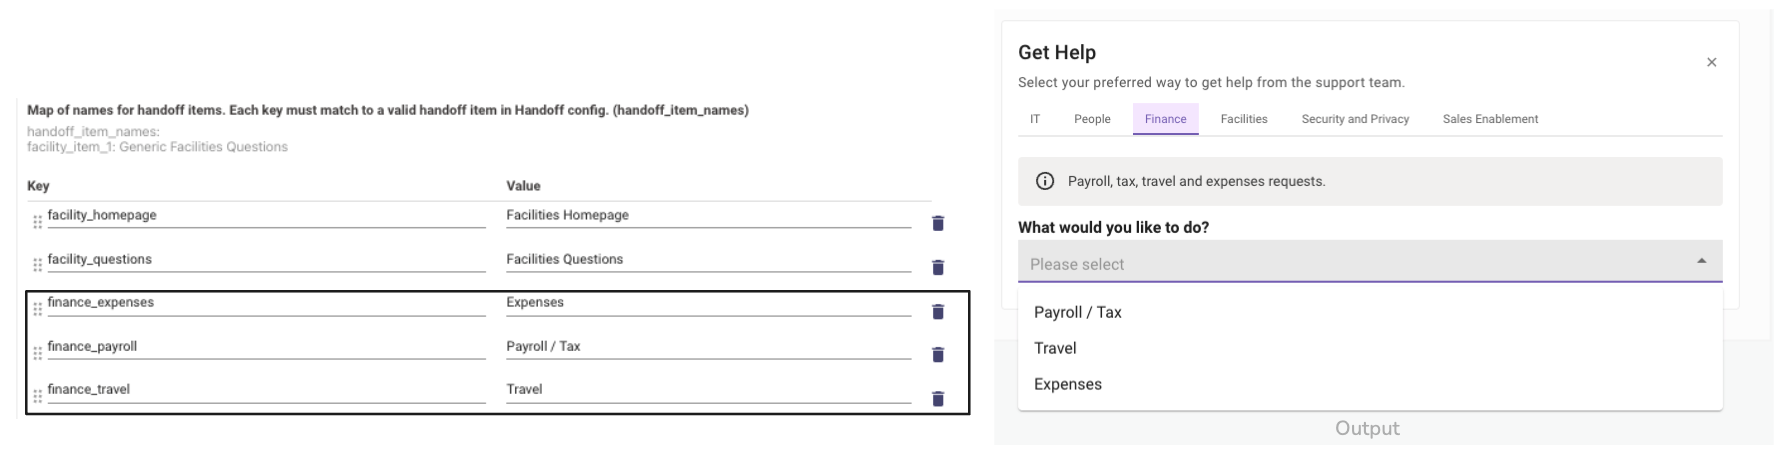
handoff_item_names
Once the user selects a category in the Handoff card, they are presented with the choice of different items which can be selected to find the appropriate help. In order to present these items we need to define their names which will be presented in the Assistant.
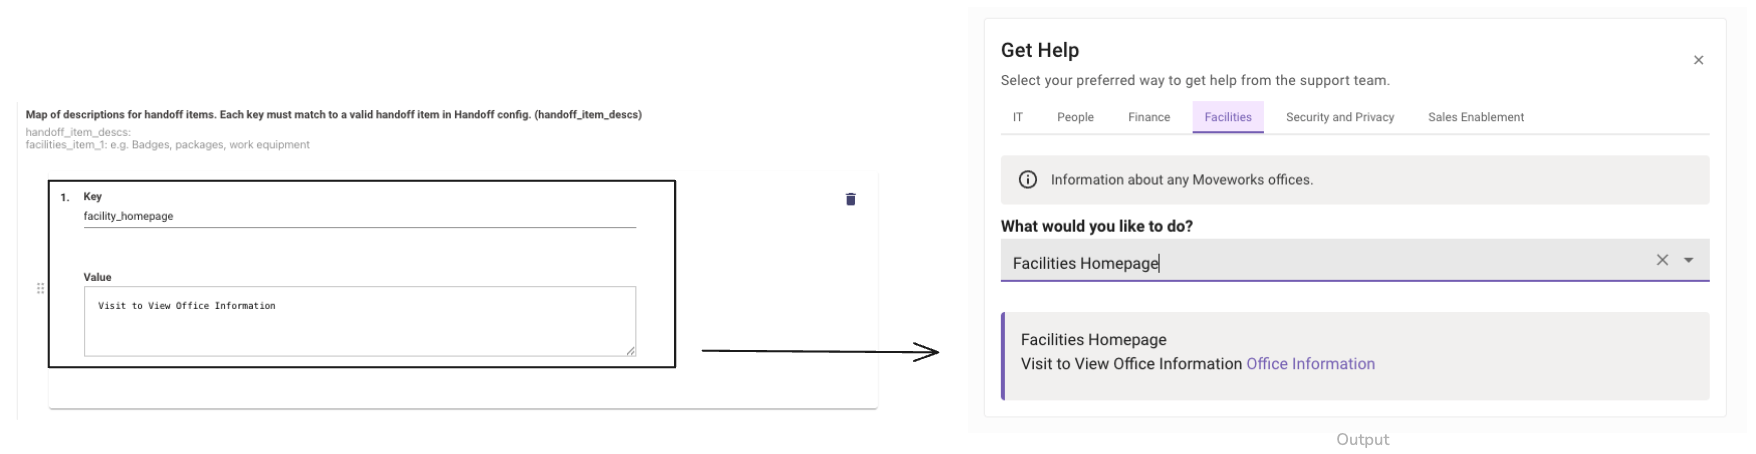
handoff_item_descs
Each Item key under a category can be provided with a Description which gives the user more information about how to seek help.
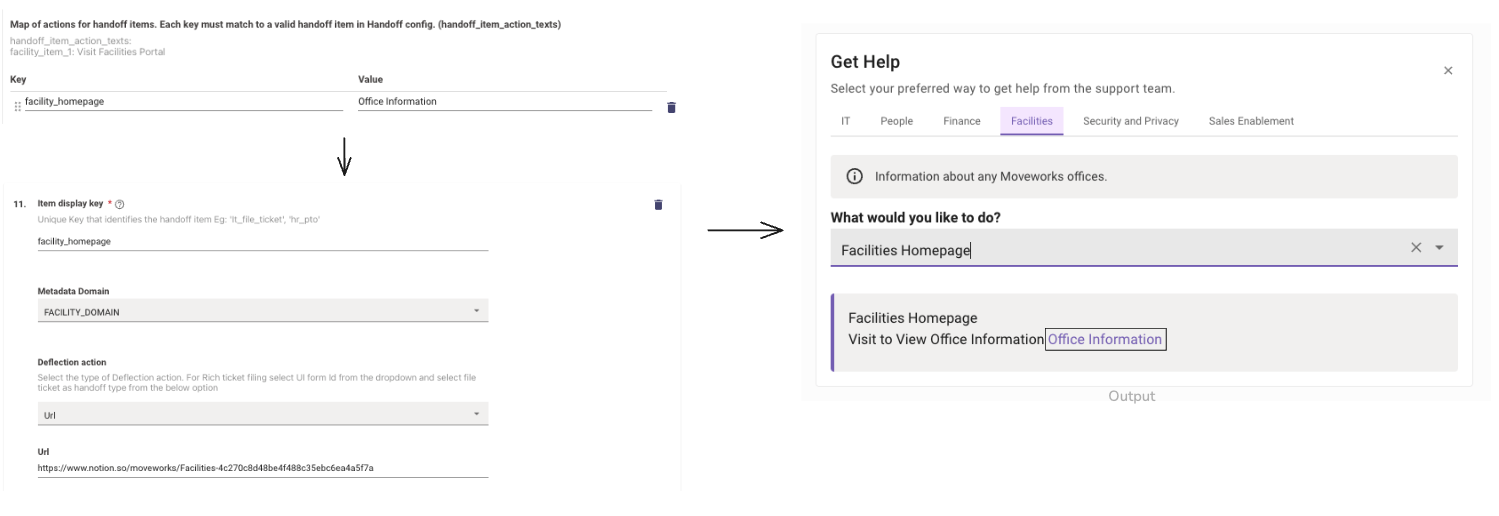
handoff_item_action_texts
If the item key being defined has a deflection action associated with it, in order for the user to interact with the deflection we need to provide an action text which will be presented as a hyperlink to the user.
- In the case of the below example, we are defining the action text for the Item key facility_homepage called Office information.
- This will be presented to the user as a hyperlink in the Handoff card, but please ensure the Deflection action for the item key has been defined in the Handoff Settings as a prerequisite.
How To Configure Live Agent
In order to configure Live agent Handoff, Please ensure the preliminary steps to create Live Agent Handoff have been completed.
Start by navigating to Handoff > Handoff Settings. Follow the steps in the guide here to learn more about how to configure Live agent Handoff.

Once the Handoff is setup we can navigate to Handoff > Live Agent Handoff where we will configure the rest of the Live Agent Settings. Create a new entry here or edit an existing one.
- Handoff Identifier - The Item key which was set to Agent Handoff in Handoff settings needs to be provided here. In this example the key is agent_broker_instance_1
- Trigger Rule - Here you can provide the condition that will be used to determine when this handoff will be executed. Ex. If you only want this handoff to appear for users who are experiencing an IT issue.
context.domain == "IT_DOMAIN"- Configuration - Please select the type of configuration to be setup which in this case isAgent Broker Handoff.
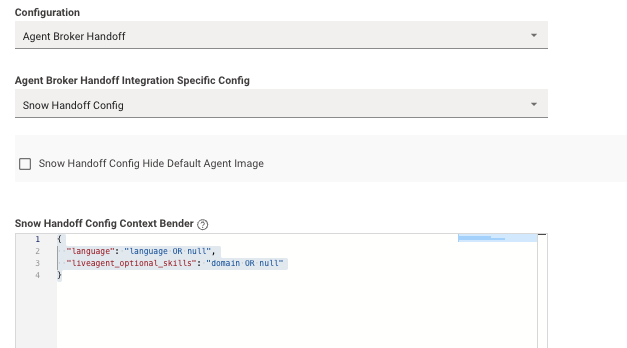
- Agent Broker Handoff Integration Specific Config - This is a list of all the Systems which support Live Agent Chat functionality in Moveworks. We are using Snow Handoff Config for this example as we are connecting to the Live agent in ServiceNow.
- Snow Handoff Config Context Bender - There are two ways you can setup queues in ServiceNow either simple or dynamic:
- If these are simple, they don’t expect any value to be sent by Moveworks and by priority, chat should be routed to that simple queue.
- For dynamic / advanced, Moveworks needs to pass that context to route the chat to that specific queue. For example if the live agent platform expects domain and language, then configure to pass this information in the Live Agent Handoff. In this example language and liveagent_optional_skills should match with the variables that they expect on their specific queue in SNOW.
To learn more about ServiceNOW, read Exploring Advanced Work Assignment
{
  "language": "language OR null",
  "liveagent_optional_skills": "domain OR null"
}
- Select Connector - Select the Connector Moveworks will leverage to establish the Live agent Chat connection
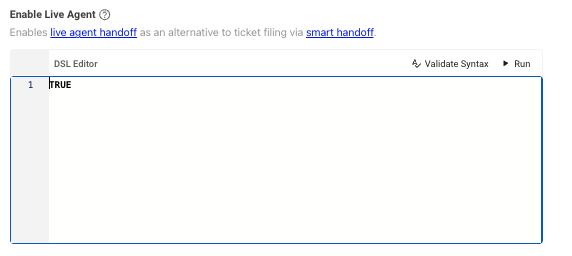
- Enable Live Agent - This control defines if Live Agent Chat can be invoked in Moveworks by the user.
- This setting is a DSL rule which can be written in a number of different ways.
- But the most common method would be setting this to TRUE or FALSE to globally enable of disable this Agent Handoff to the users
How To Configure Custom Domain Handoff
Moveworks currently supports a default set of Domains which can be used to define the Handoff Card. These domains are defined here . But sometimes there might be a domain on the enterprise which does not fall under the predefined categories which might require the setting up of a new Domain definition.
Moveworks supports multiple custom domains, each with unique handoff instructions which can be defined.
Creating a new Domain
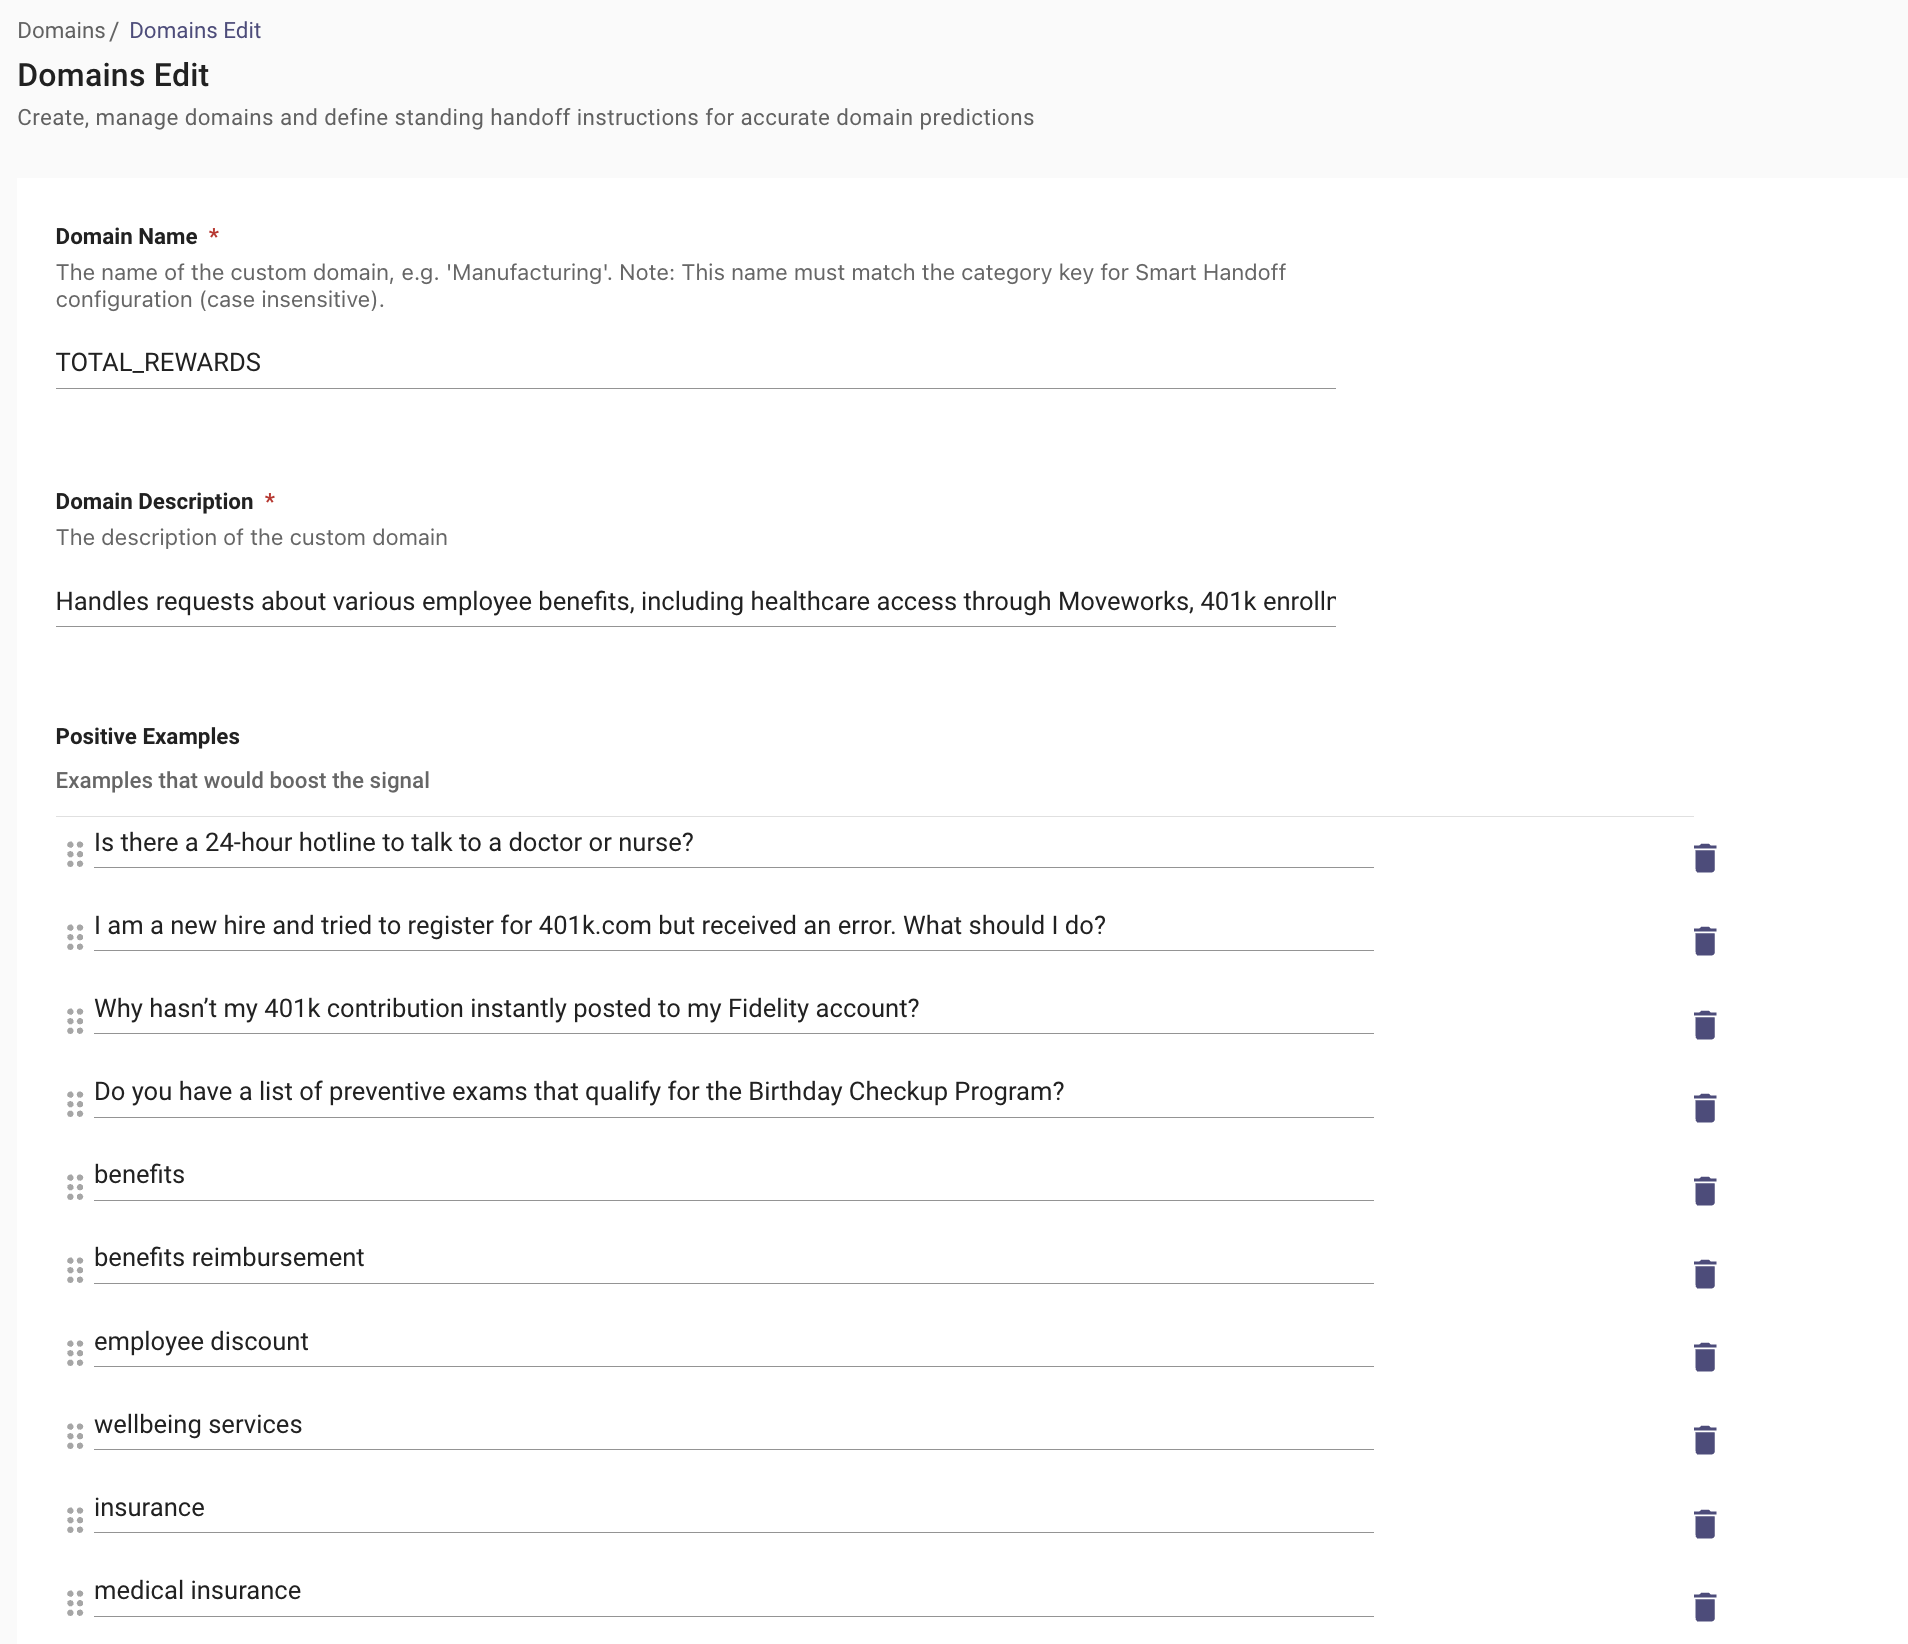
- Start by navigating to Moveworks Setup > Domains in the Core Platform section. Here you can create a new domain or edit and existing one.
- Configure the following fields on the page:
- Domain Name: The specific name assigned to the custom domain, such as "TOTAL_REWARDS" or "MANUFACTURING". Ensure this is written in CAPS and the same will be defined in the Handoff config later.
- Domain Description: Detailed description that defines the scope of the custom domain.
- Positive Examples: Specific utterances that should be classified under this custom domain, which help to strengthen domain matching.
- Negative Examples: Specific utterances that should not be classified under this custom domain, which help to prevent misclassification.
Defining the Handoff Configuration
Once the Domain has been created we need to configure the handoff instructions in order for the Handoff card to be updated.
- Navigate to Handoff > Handoff Settings under the Ticketing Automation Module.
- Define the new category for the domain we just created which is "total_rewards", Ensure you define the category to be same as the the domain name but in lower case.
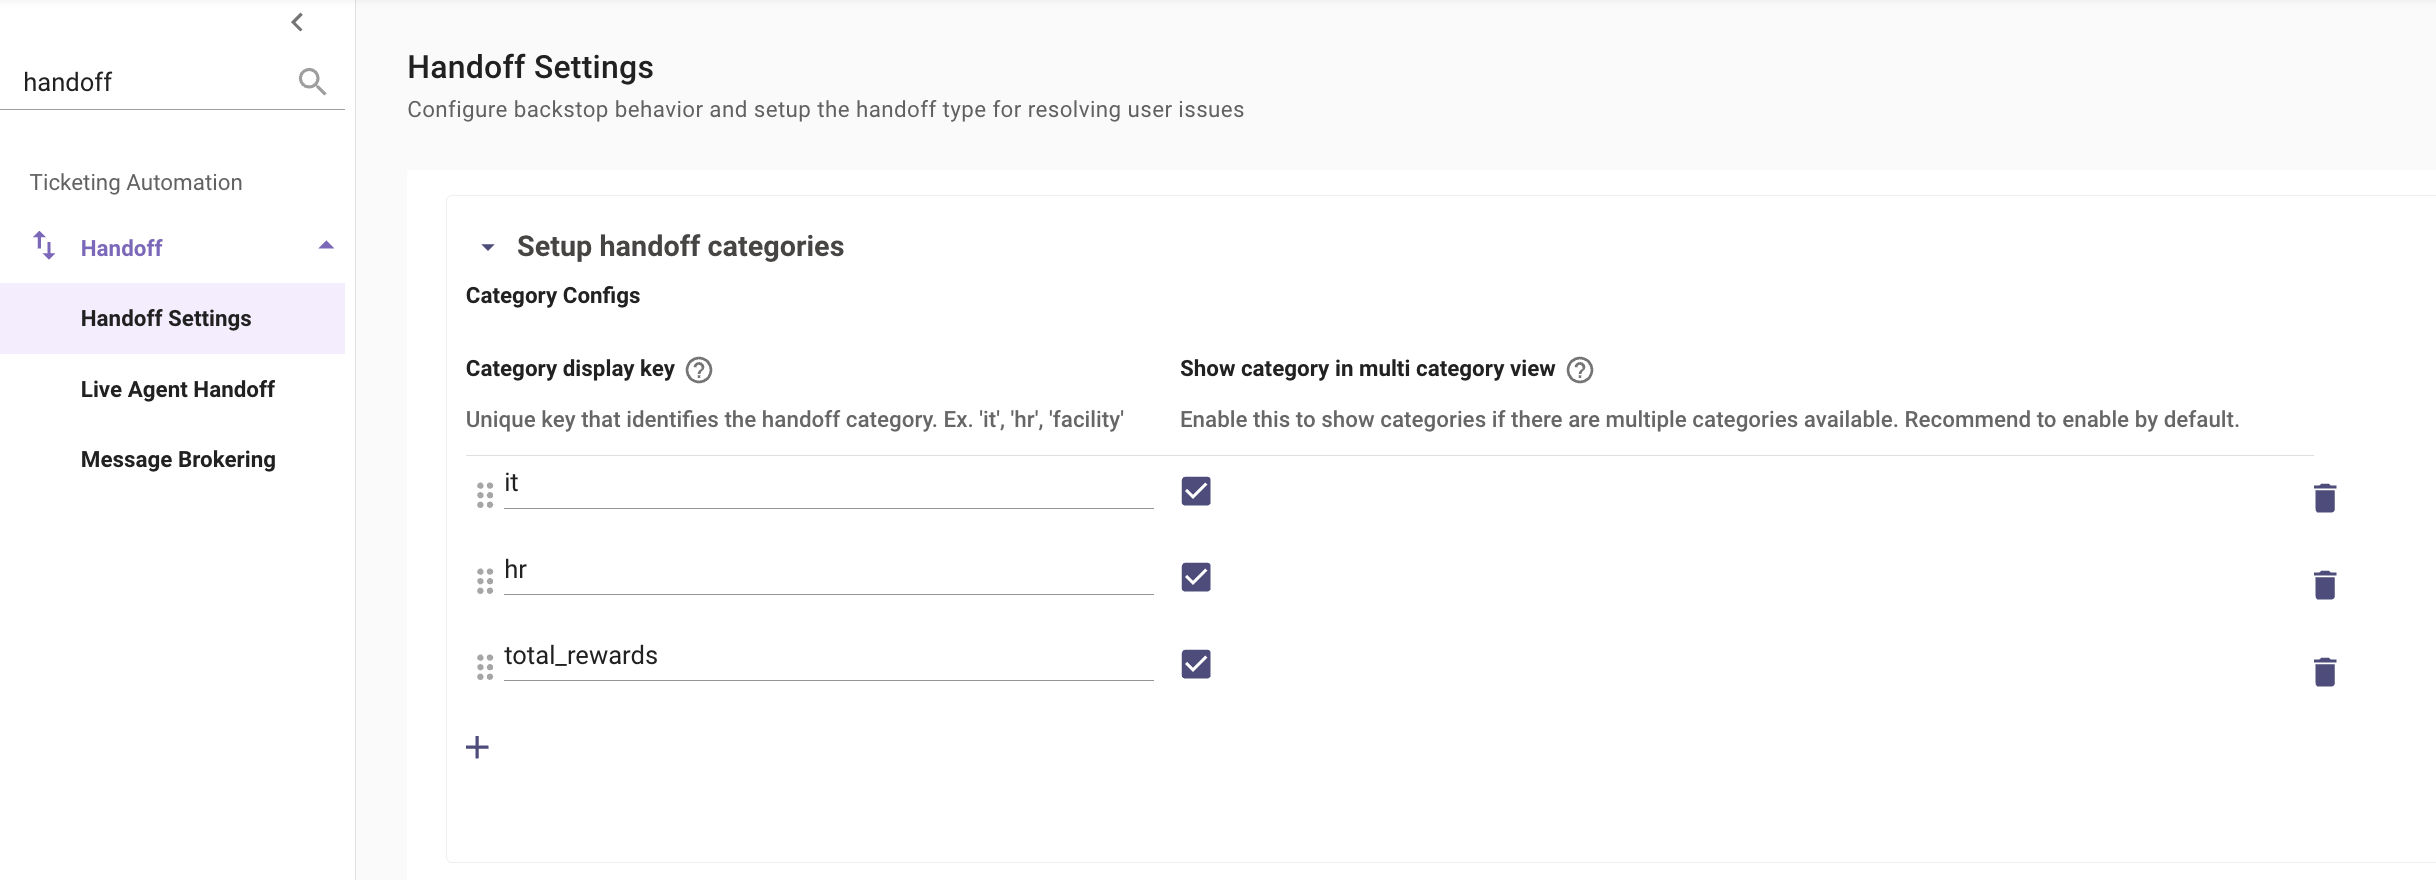
-
Now we can define the Items associated with the total_rewards category. Here is an example of a URL Deflection Action type handoff. Since this is a URL Type Handoff we do not need to Accept user Payload.
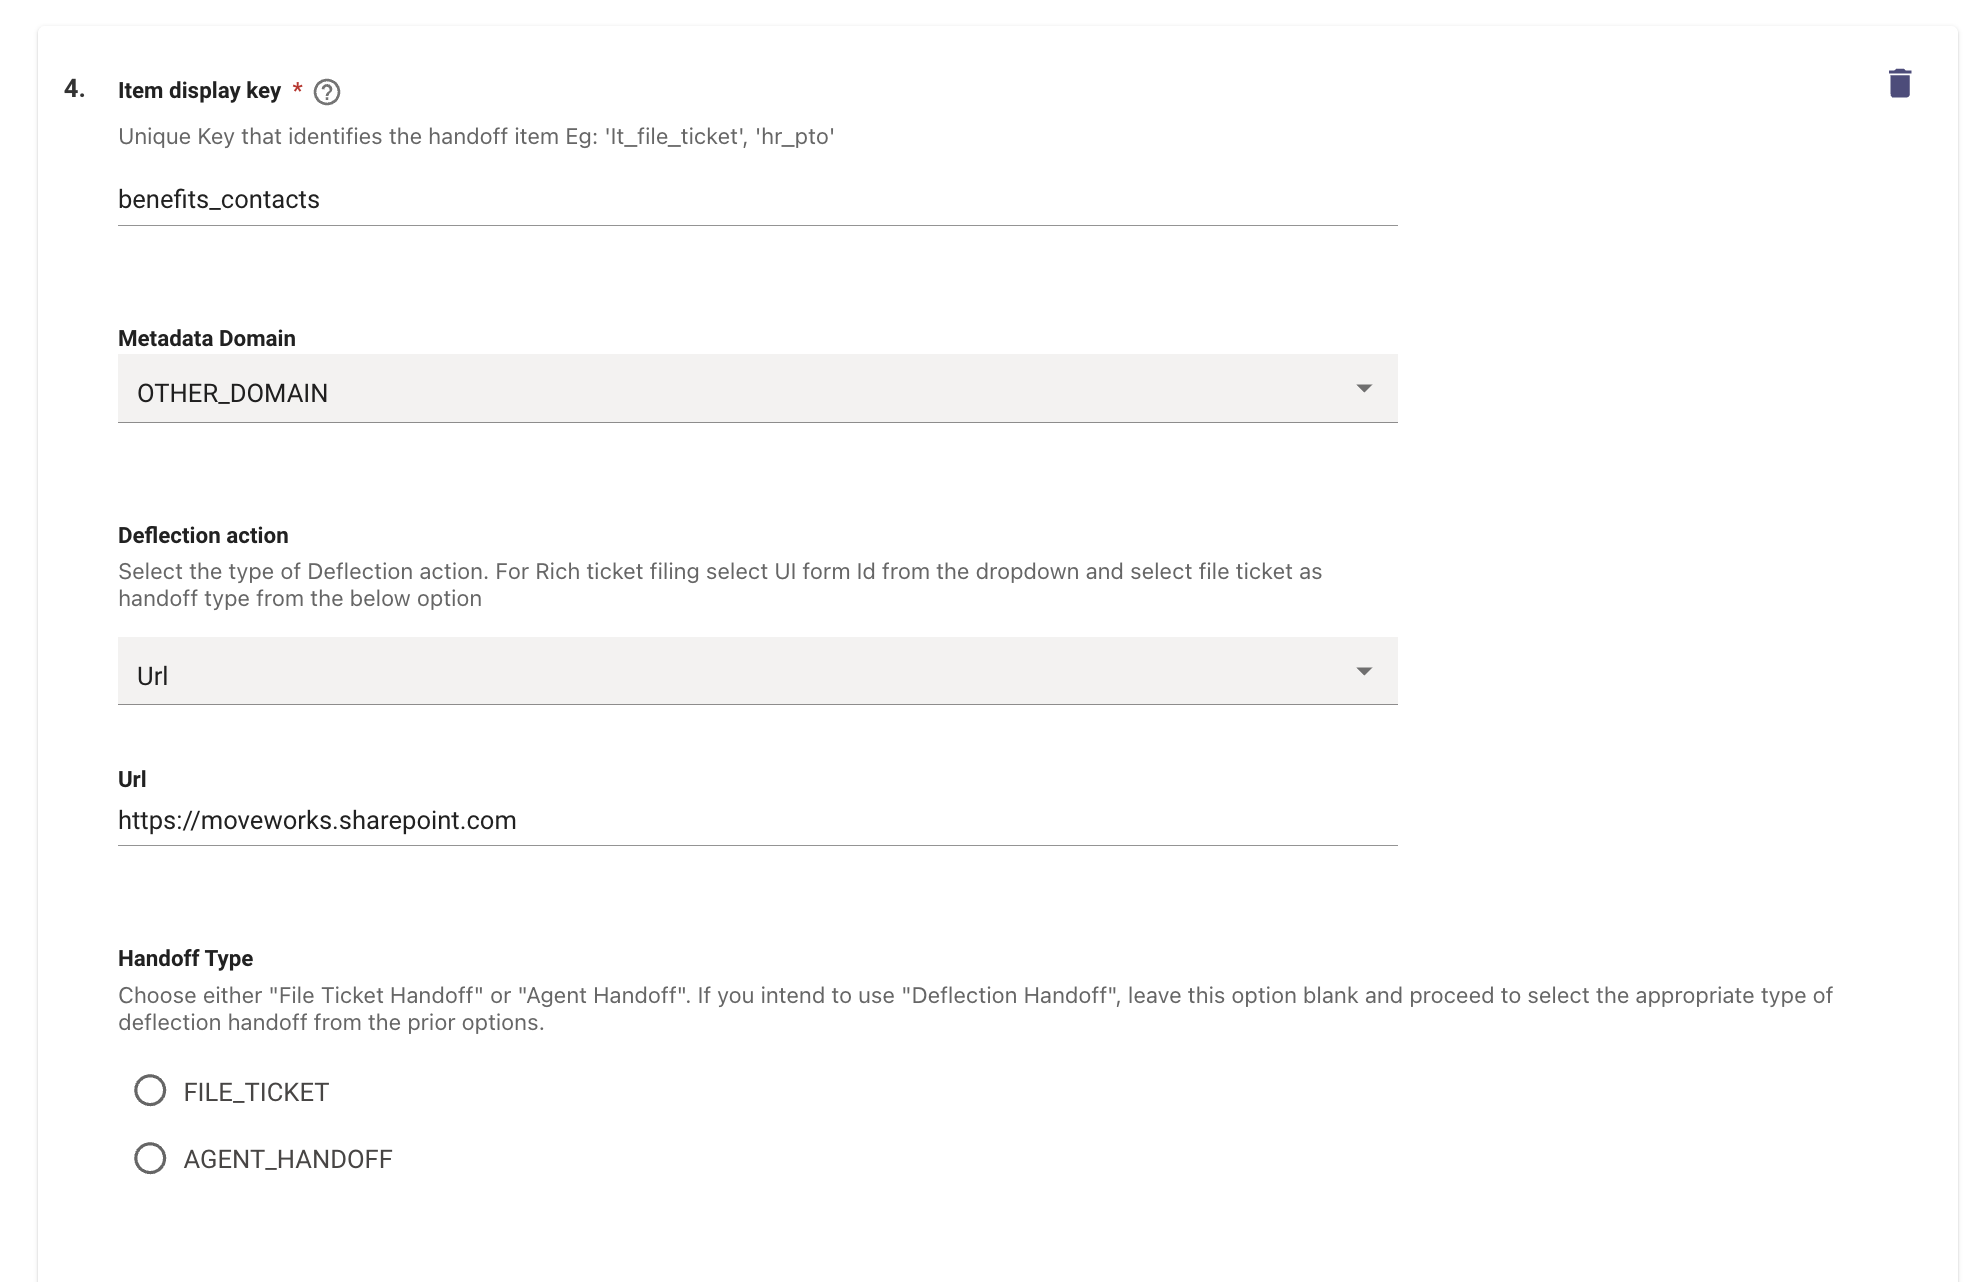
-
The Pre-trigger rule for custom domains should just use the Domain Name which was defined when creating the domain. It should not contain _DOMAIN like the default domains.
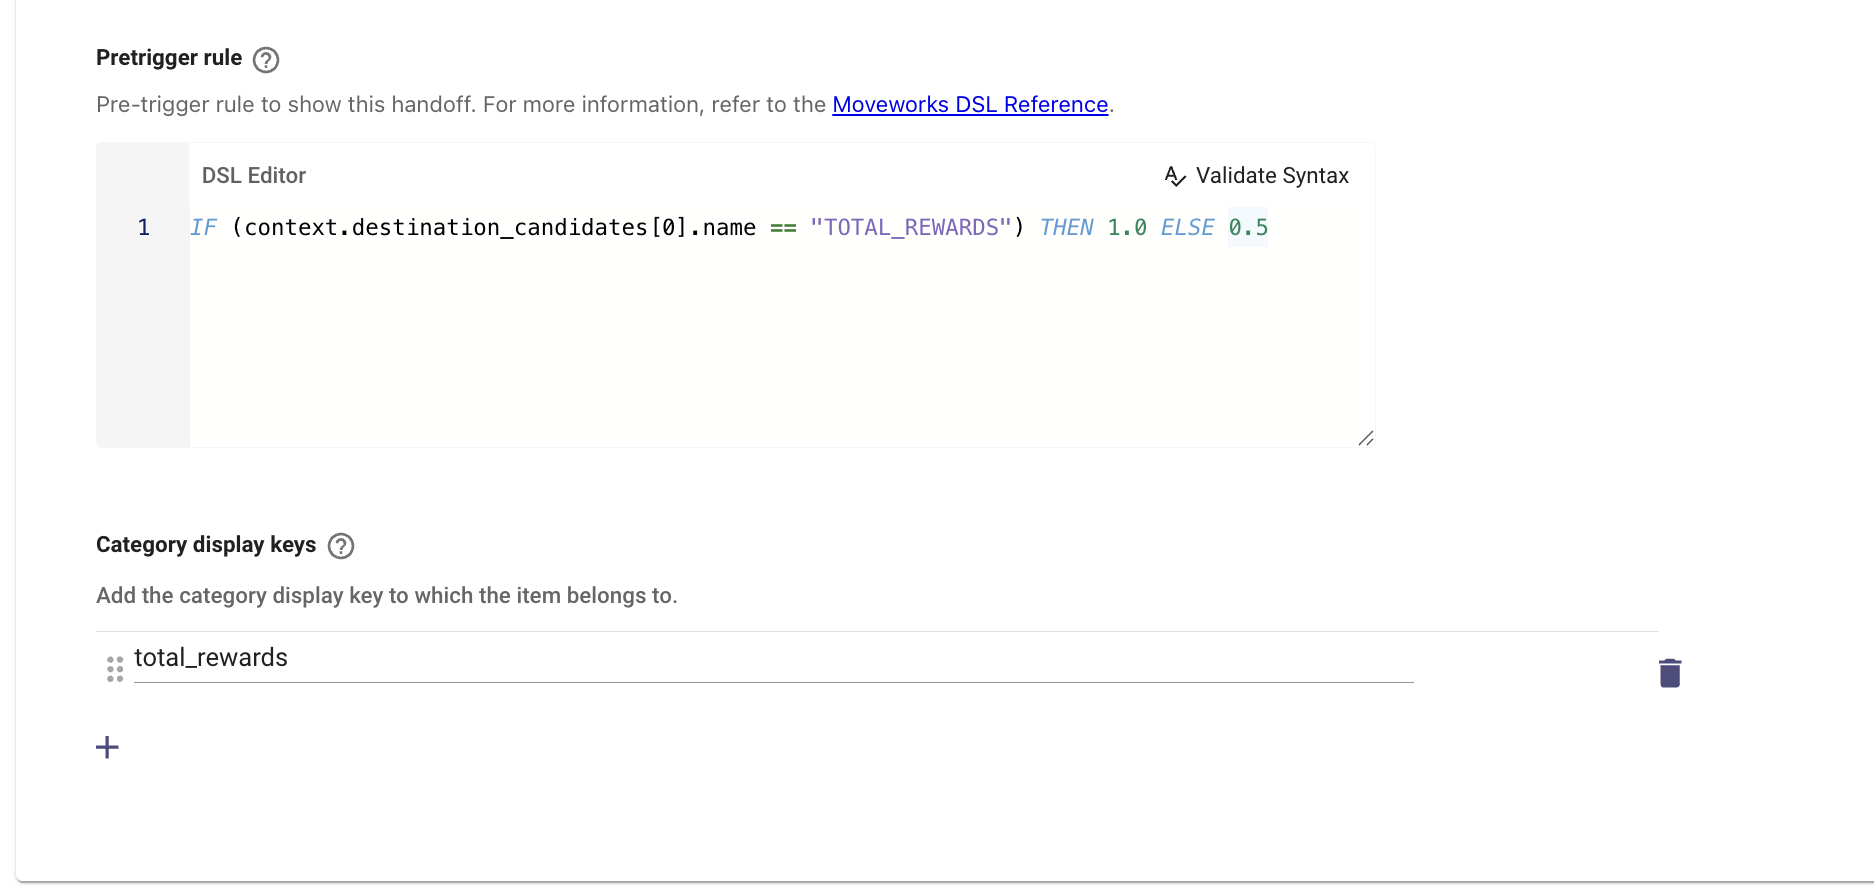
- In order for a custom domain to be "Recommended", we need to ensure the domain name being used in the DSL Rule should be the same as the domain name which was created. This enables the handoff to be evaluated equally along side other categories.
- When configuring the the DSL rules, they all must use context.destination_candidates[0].name which will define the predicted domain based on the customer utterance and this would need to be used in the Rule.
Once the Handoff Configuration is complete, Navigate to the Display Settings Config to provide a UI Label to the items we just created. The hierarchy of configs which needs to be completed are :
- handoff_item_names - This is what defined the UI Label of the Handoff Item. It will show up under the misc category.
- handoff_item_descs - This is the description which defined the scope and context of the Handoff Type.
- handoff_item_action_texts - This is the label which will be presented to the user as an intractable element. In the case of this example we can label is "File Misc Ticket in Portal"
Validation
Test the new custom domain with handoff instructions within Moveworks AI Assistant. This can be checked by going to the Get Help option.
Note : Admins may need to wait for changes to propagate; however, it depends on how big is the change. If the admin is simply adding a few examples (<10) it should take less than 2min. If admins are adding a whole new config and >10 examples, then it may take ~5min.
How To Configure Message Brokering
https://help.moveworks.com/docs/moveworks-setup-message-brokering-settings
Updated about 1 month ago