Scheduled Triggers
Overview
Scheduled Triggers enable Moveworks ambient agents to execute automations at specific times or intervals without user interaction. Unlike webhook triggers, which respond to real-time events, scheduled triggers run on a predefined cadence, ideal for recurring tasks like sending reminders, generating reports, or syncing data.
Who is this for?
Builders creating automations that run periodically, such as daily status updates, weekly compliance checks, or monthly data syncs.
How it works
At a Glance
- Schedule Configuration: Define a trigger's cadence using a Cron, Interval, or Calendar schedule in the Plugin Editor.
- Trigger Activation: The system evaluates the schedule and initiates an event at the specified time.
- Plugin Execution: The corresponding plugin is triggered, and your configured process (actions, notifications, etc.) runs.
Process Flow Diagram
flowchart LR
    A[Schedule Defined<br/>Cron, Timezone] --> B[Trigger Evaluated<br/>Time Match]
    B --> C[Generate Event]
    C --> D[Evaluate Plugins<br/>Conditions Match]
    D --> E[Execute Actions<br/>API Calls, Notifications]
    E --> F[Log Outcomes]
Key concepts
- Cron Schedule: Defines the schedule using standard cron syntax (e.g.,
0 9 * * *for daily at 9 AM). Specify the timezone to ensure accurate timing. - Interval Schedule: The simplest way to run a plugin on a repeating cadence (e.g., "every 30 minutes").
- Calendar Schedule: The best choice for scheduling a plugin to run at one or more specific, non-recurring dates and times.
What’s in scope in today?
We support a rich set of scheduling options to cover the majority of time-based automation use cases.
In scope: Flexible scheduling using Cron expressions, simple recurring intervals (seconds, minutes, hours), and specific date/time selections via a calendar. Full support for time zones and start/stop conditions.
Out of scope: This trigger type is designed for proactive, scheduled automations only and does not support reactive triggers based on system states or external events. Specifically, the following are not supported:
- Polling: You cannot use this feature to repeatedly check an external system for a state change (e.g., "check an API every minute for a new ticket"). Scheduled triggers are "fire-and-forget" actions based on time, not system states.
- Real-Time Events: This trigger type is designed for proactive, scheduled automations only. It does not listen for or react to real-time events from external systems; for that functionality, please see Webhook Triggers
Configuring a Scheduled Trigger
To get started, navigate to Create New Plugin in Agent Studio and select the System tab within the Trigger configuration block. This is where you'll set up the automated execution for your plugin.
From the Select Trigger Type dropdown, choose Schedule. This will reveal the different scheduling options available to configure when your plugin should run.
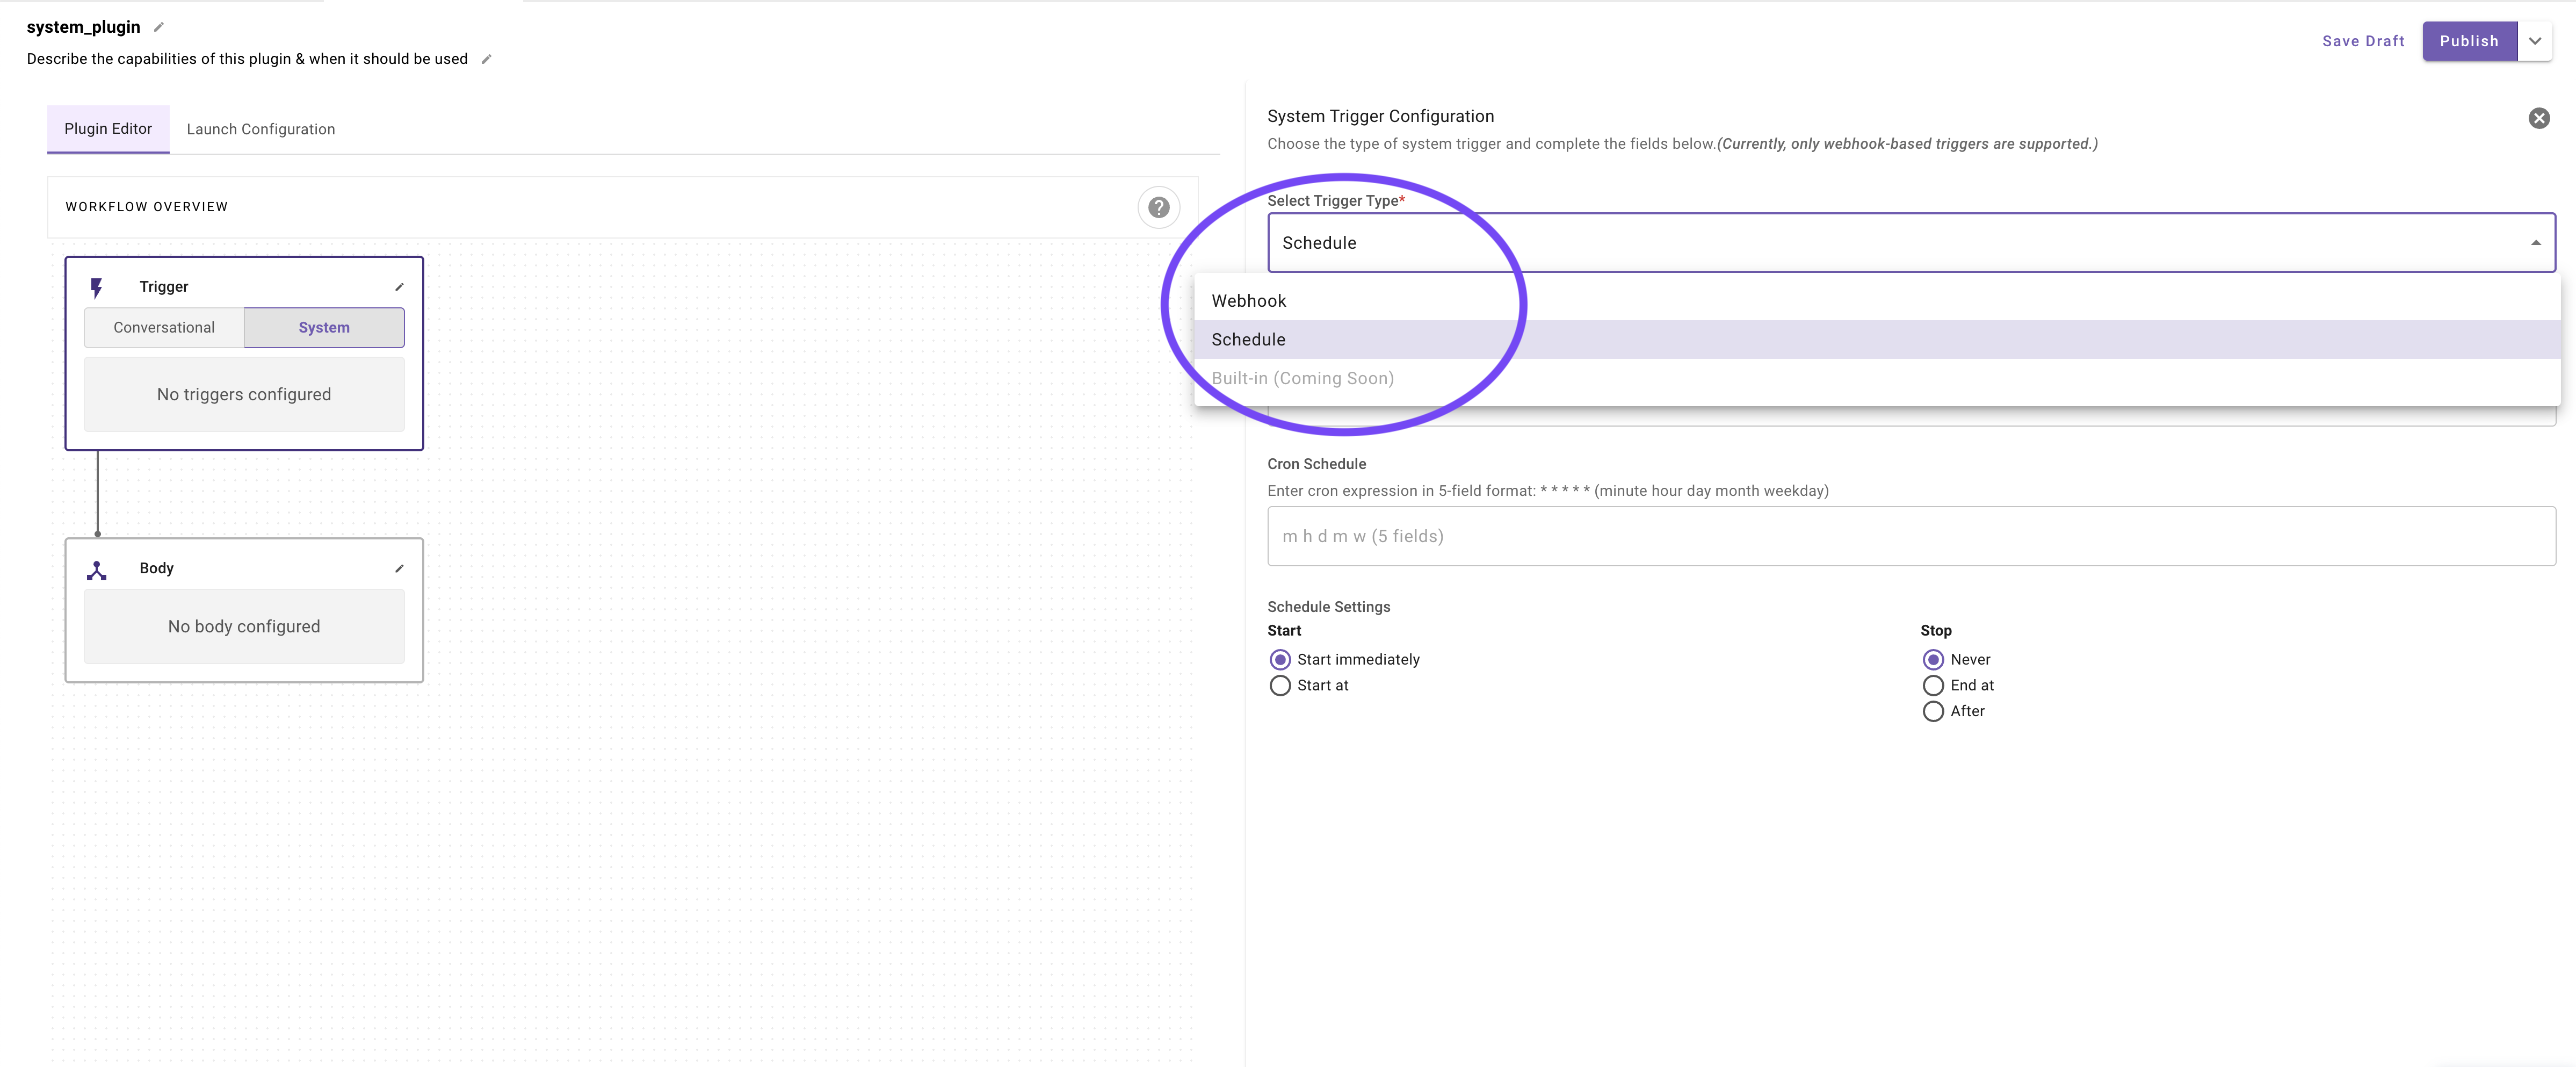
Schedule Types
You can choose from three types of schedules to trigger your plugin: Cron Schedule, Interval Schedule, and Calendar Schedule. Each offers a different level of control over the timing of your plugin's execution.
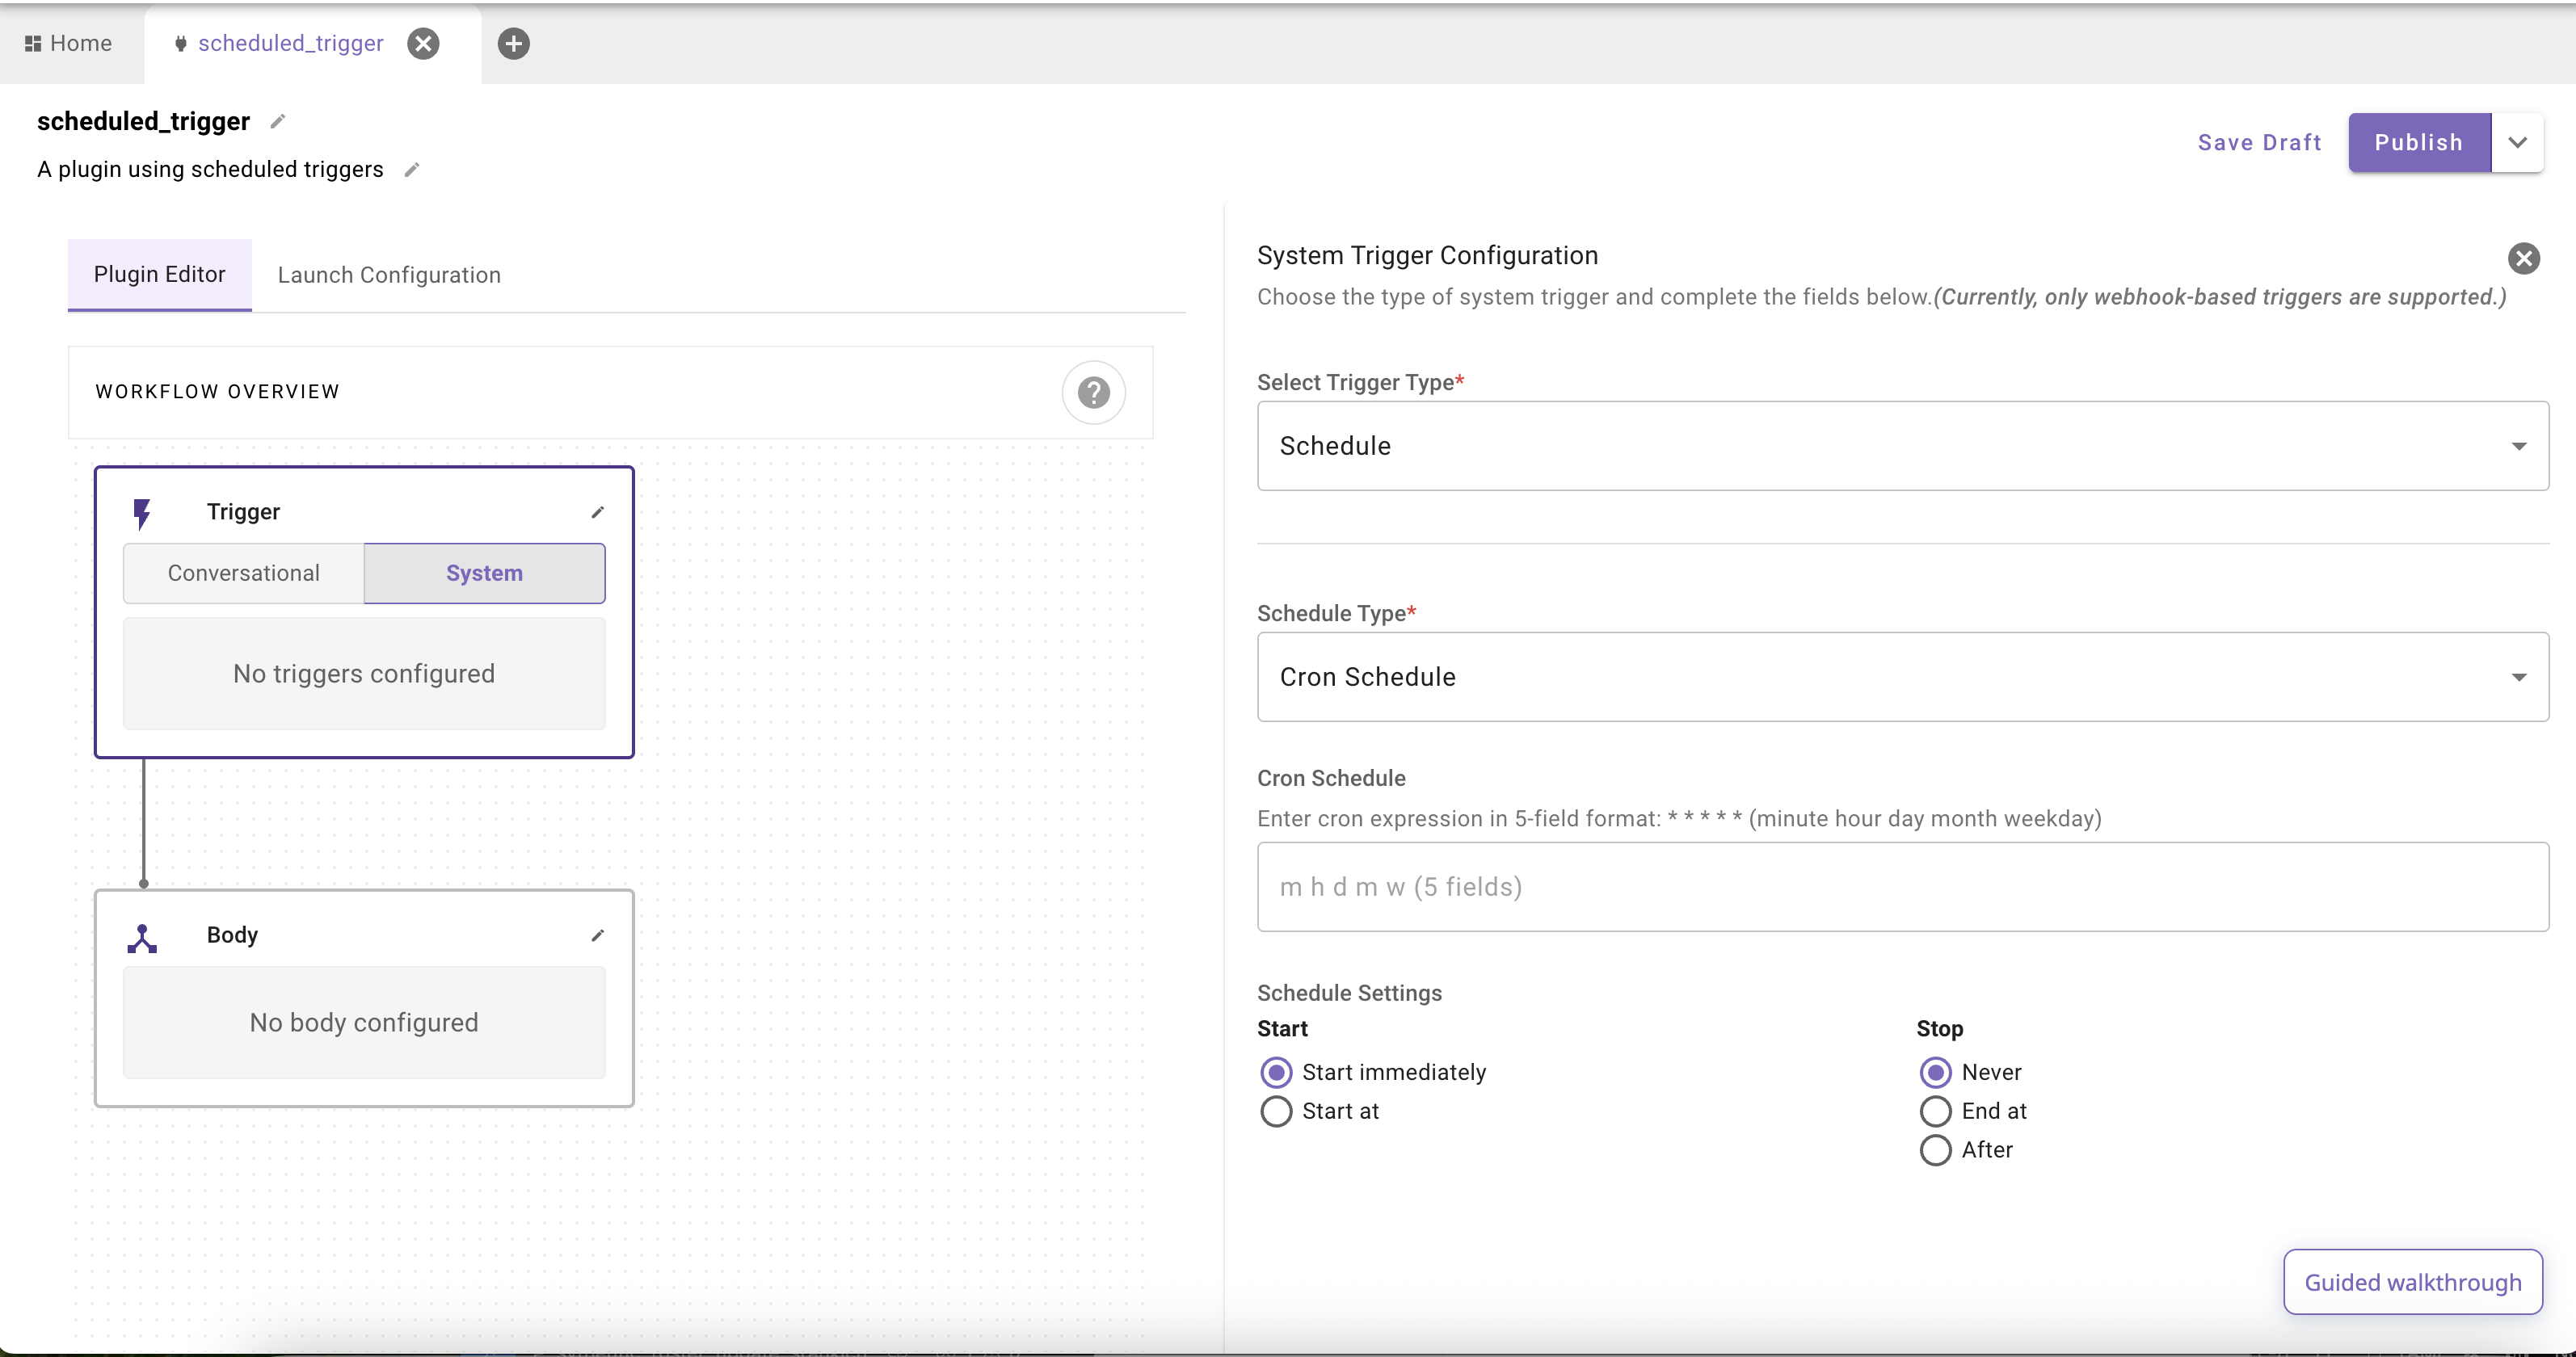
Cron Schedule ⏱️
A Cron Schedule uses a cron expression to define a recurring schedule. This is a powerful option for complex schedules, like running a task at the beginning of every hour during business days.
- Cron Schedule: Enter a standard 5-field cron expression in the format:
minute hour day-of-month month day-of-week.- Example:
0 9 * * 1-5would run the plugin at 9:00 AM every Monday through Friday.
- Example:
Recommendation: Test your cron expressions before saving
Use the crontab guru site to test your cron expressions. They also provide a comprehensive set of examples. Here are some common patterns you might want to use:
When Cron Every 5 minutes */5 * * * *Every hour at :00 0 * * * *Every 2 hours 0 */2 * * *Daily at 9:00 0 9 * * *Weekdays at 9:00 0 9 * * 1-5Mondays at 6:30 30 6 * * 1First day of month at 08:00 0 8 1 * *Sundays at midnight 0 0 * * 0
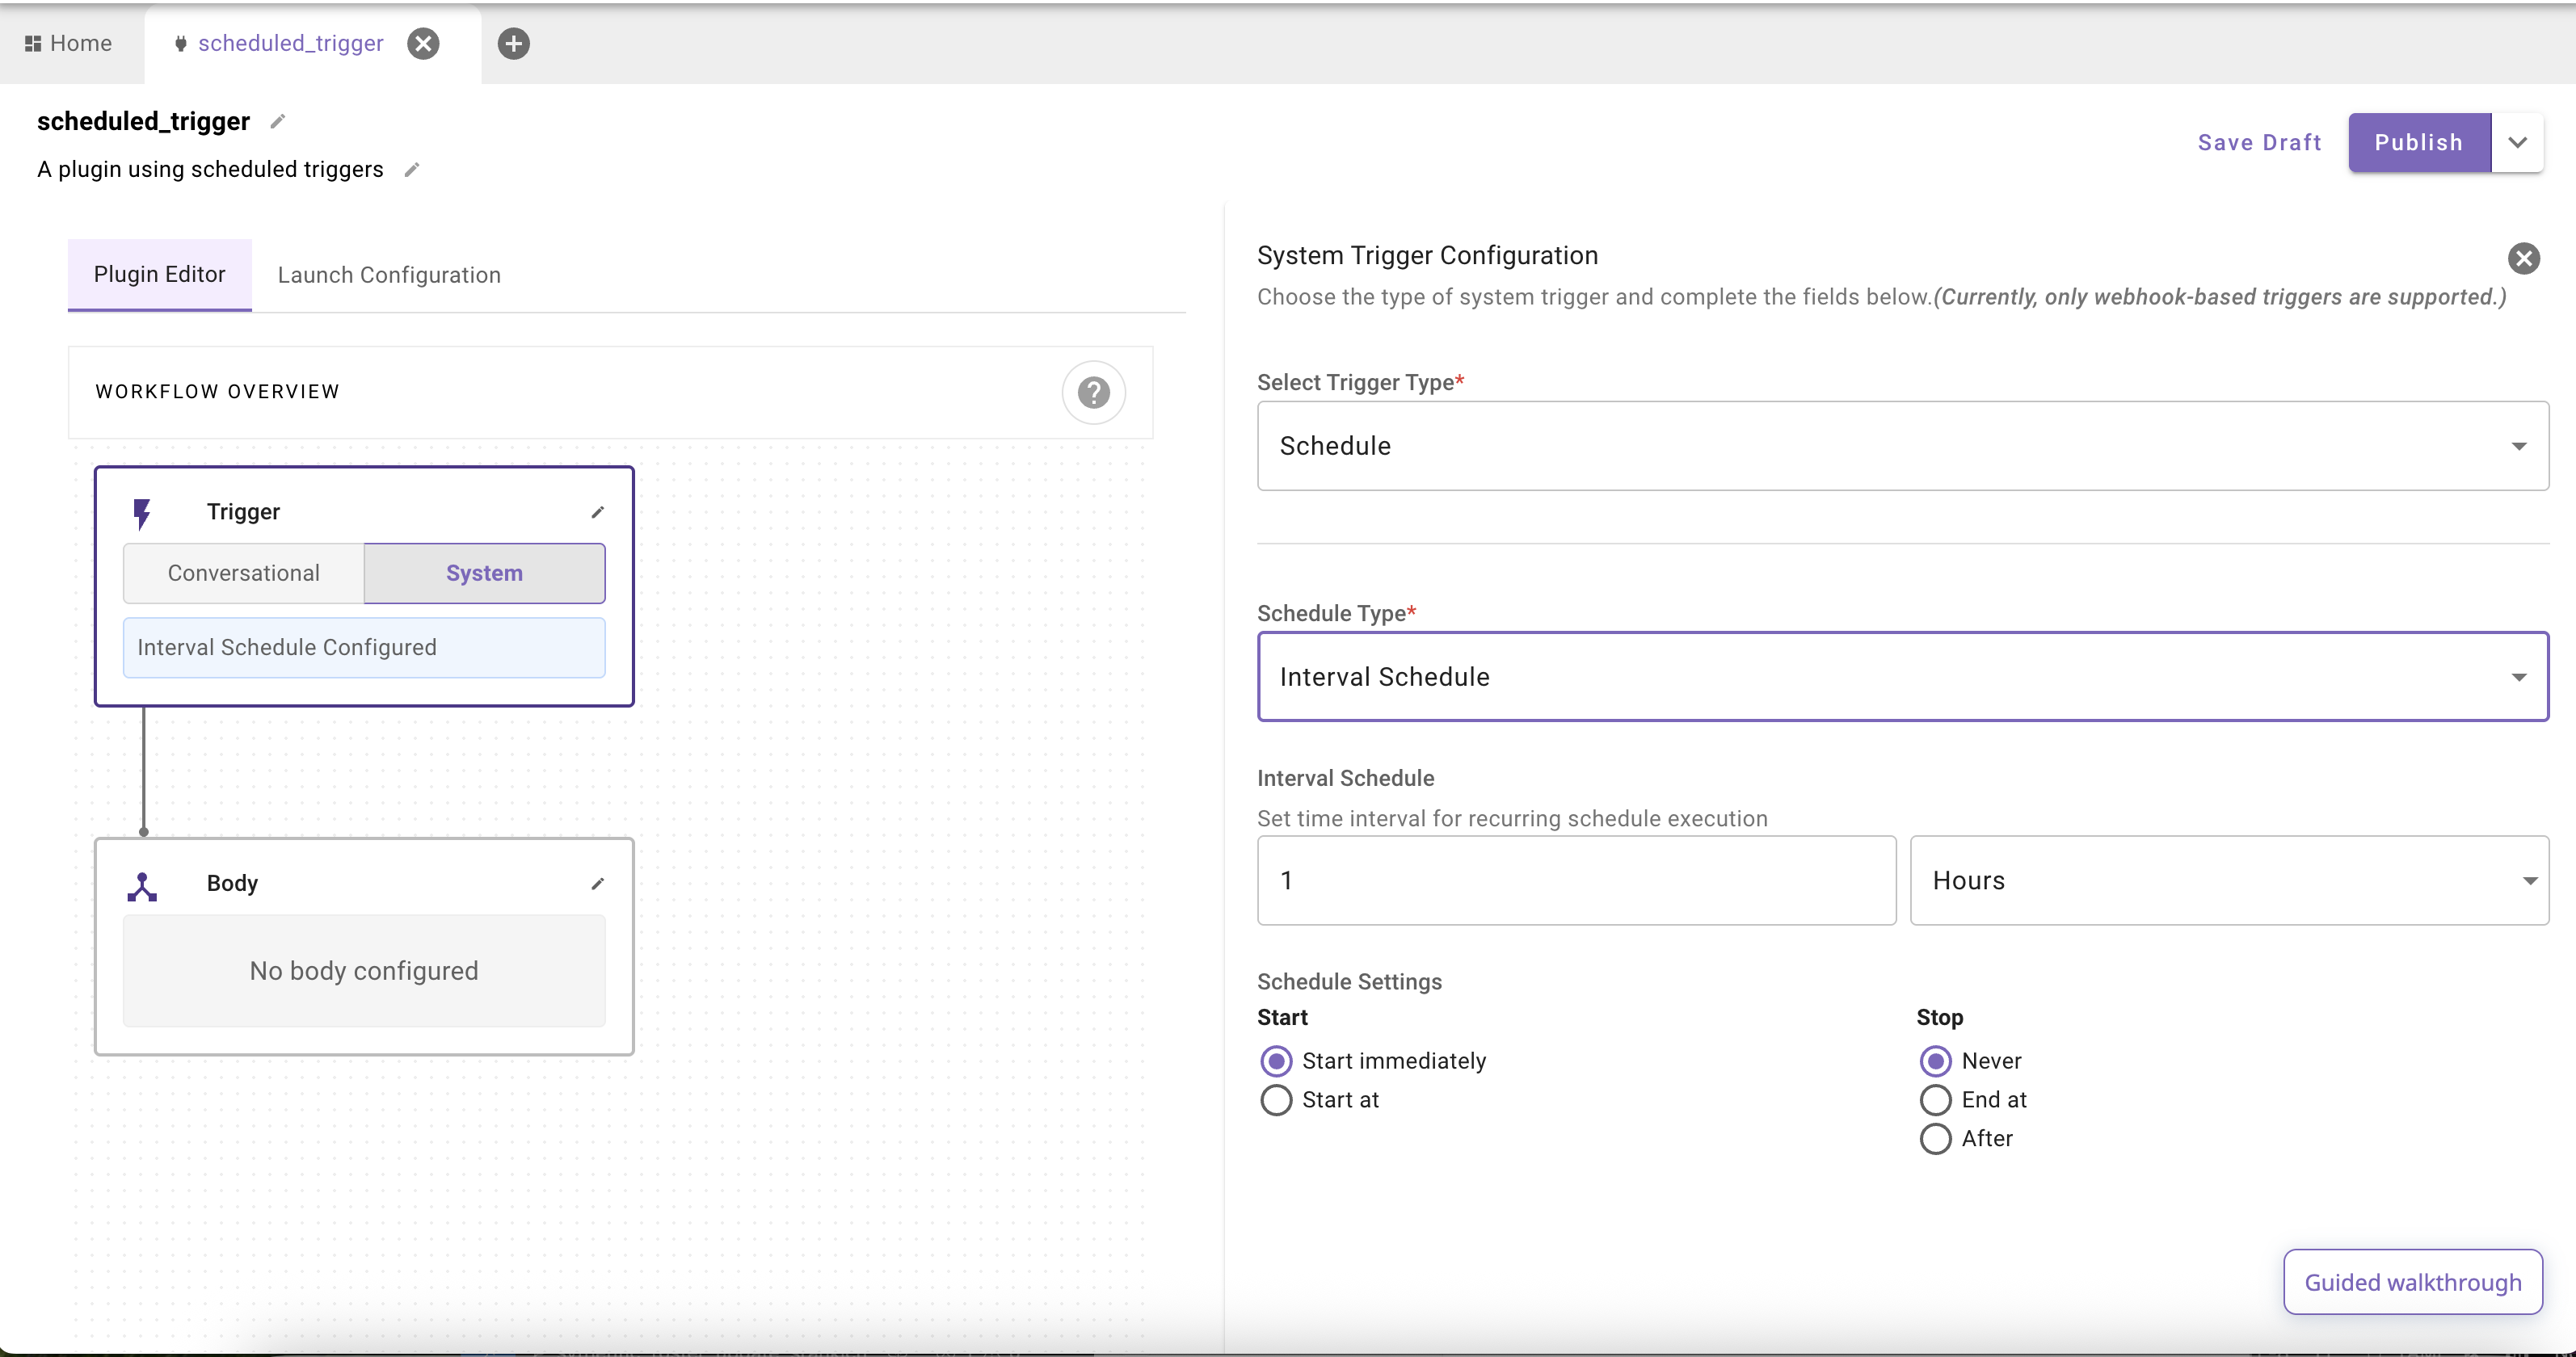
Interval Schedule 🔄
An Interval Schedule is perfect for running a plugin repeatedly at a regular frequency, such as every 15 minutes or every 24 hours.
- Interval Schedule:
- Enter a number for the time interval.
- Select the time unit from the dropdown: Days, Hours, Minutes, or Seconds.
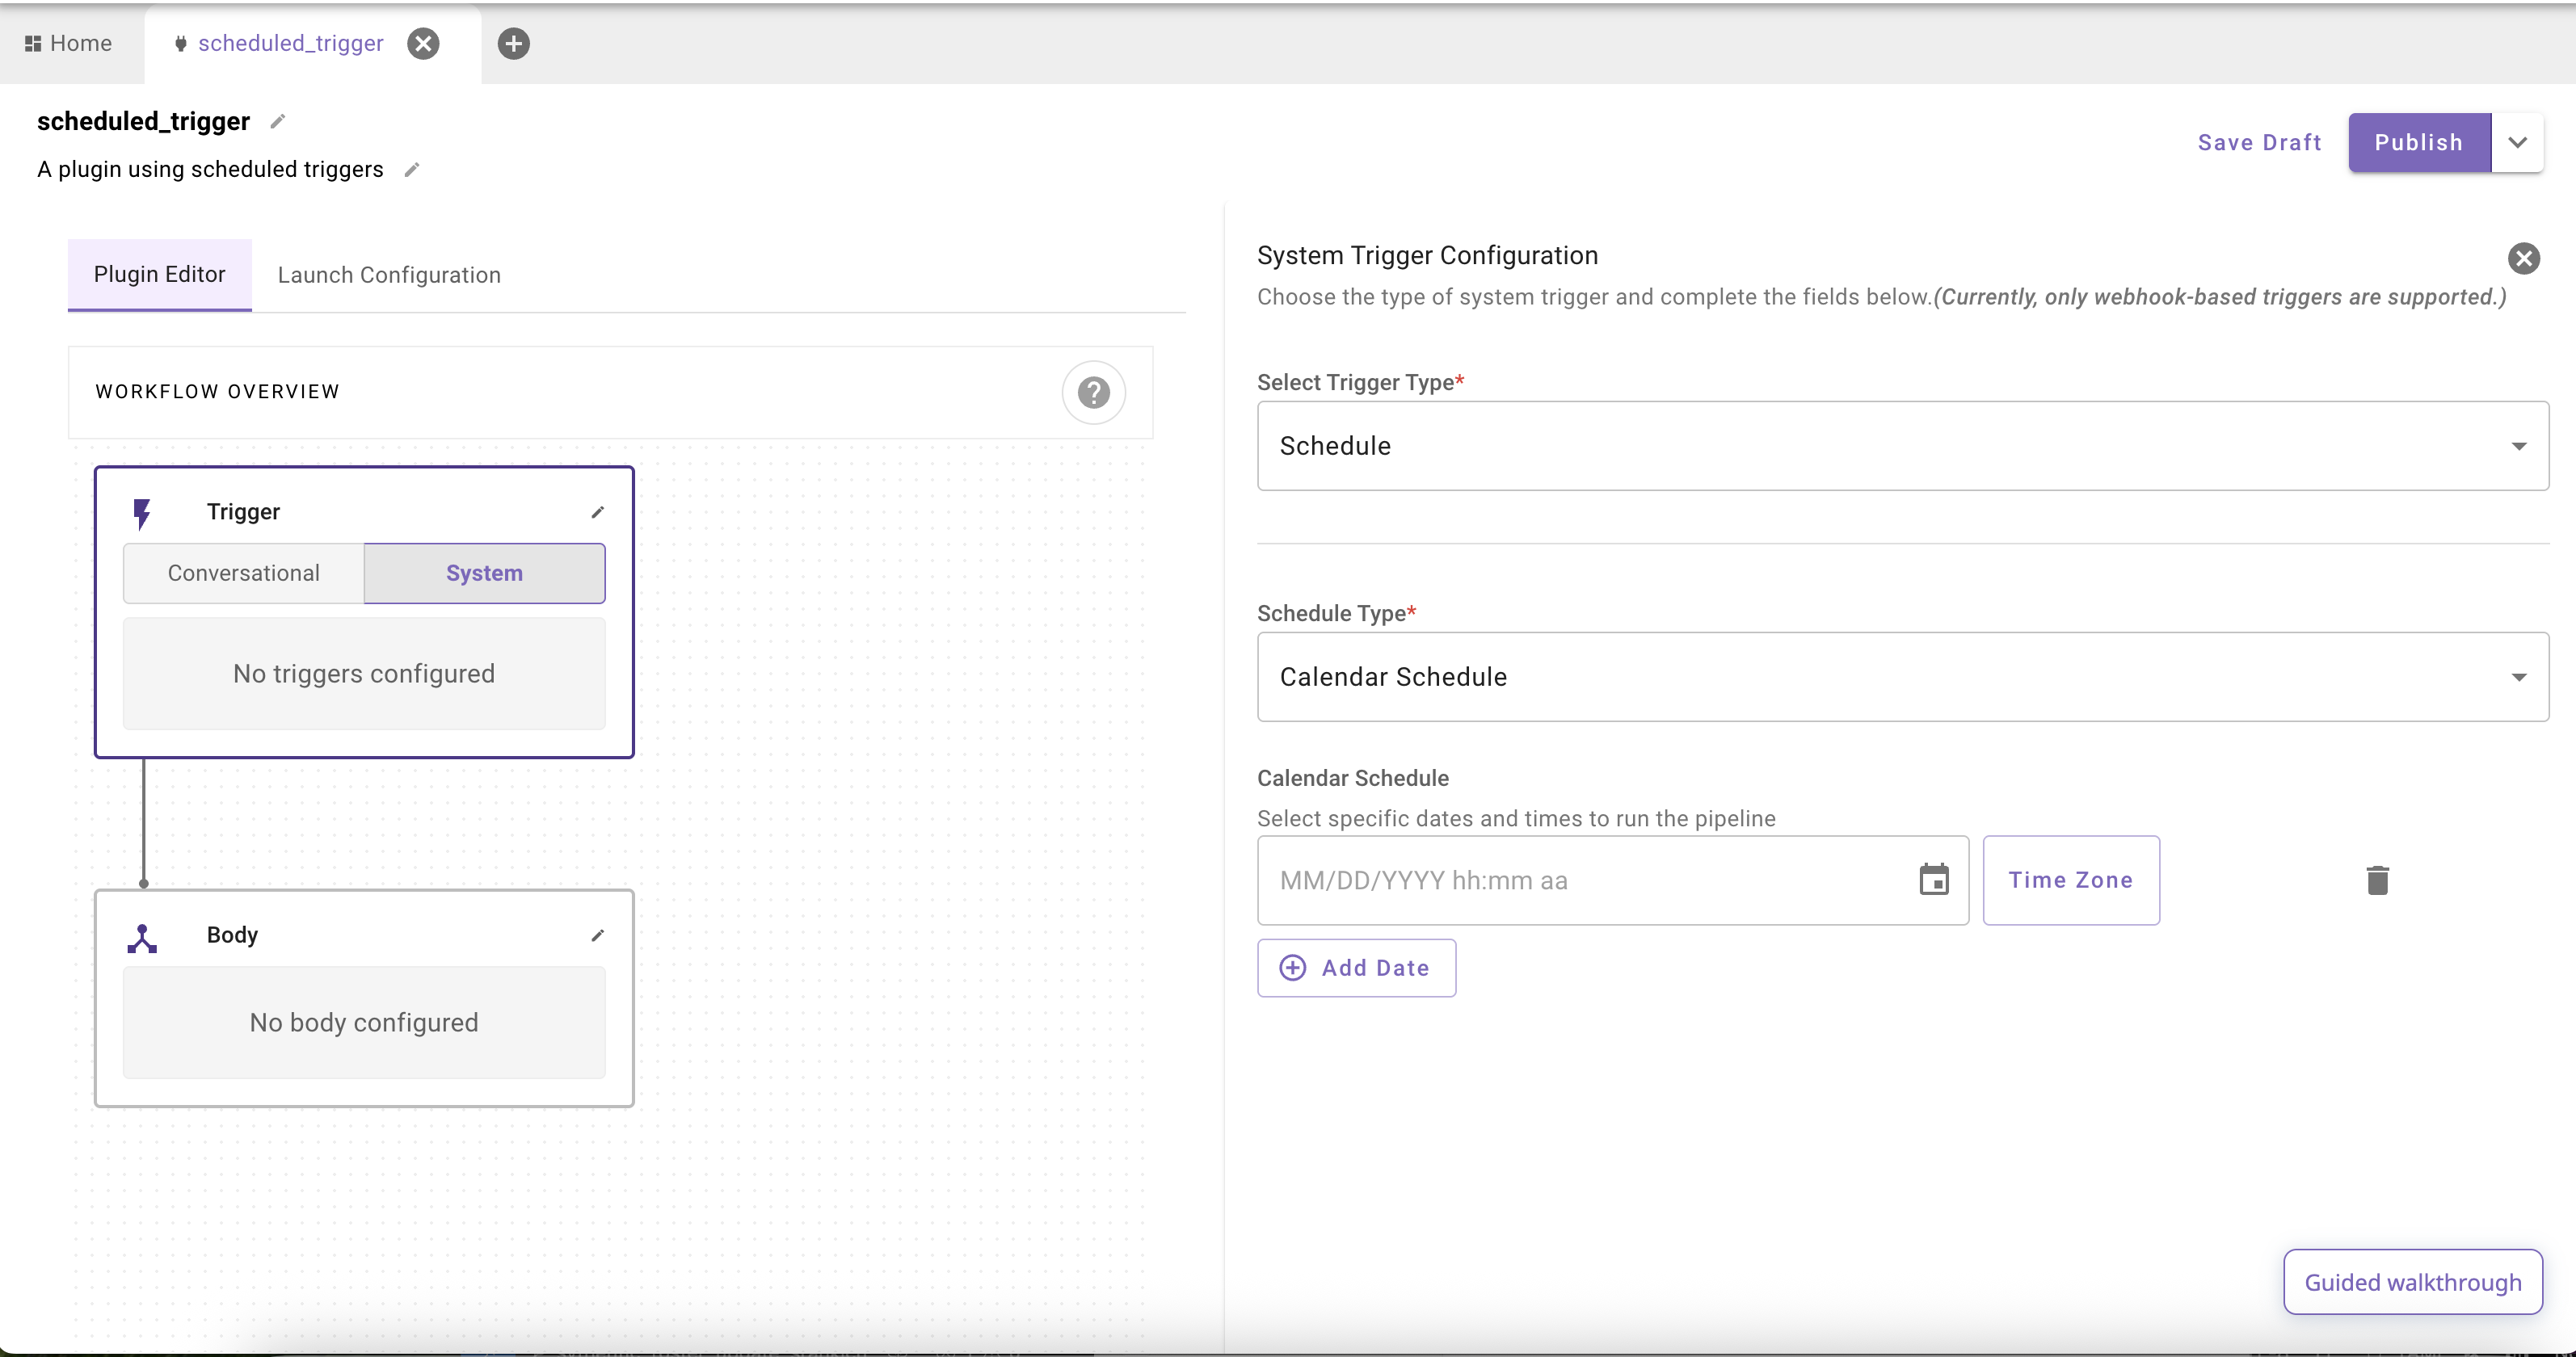
Calendar Schedule 🗓️
A Calendar Schedule lets you pick specific dates and times for the plugin to run. This is ideal for one-time events or tasks that need to run at very specific, non-repeating times.
- Calendar Schedule:
- Click the calendar icon to open the date and time picker.
- Select a specific date and time.
- Click Time Zone to ensure the trigger fires at the correct time for your desired location.
- You can click Add Date to add multiple specific execution times.
Common Schedule Settings
For Cron and Interval schedules, you also need to define when the schedule should start and stop.
- Start:
- Start immediately: The schedule becomes active as soon as the plugin is published.
- Start at: Choose a specific date and time for the schedule to begin.
- Stop:
- Never: The schedule will run indefinitely until the plugin is disabled or reconfigured.
- End at: Choose a specific date and time for the schedule to stop.
- After: Specify a certain number of executions after which the schedule should stop.
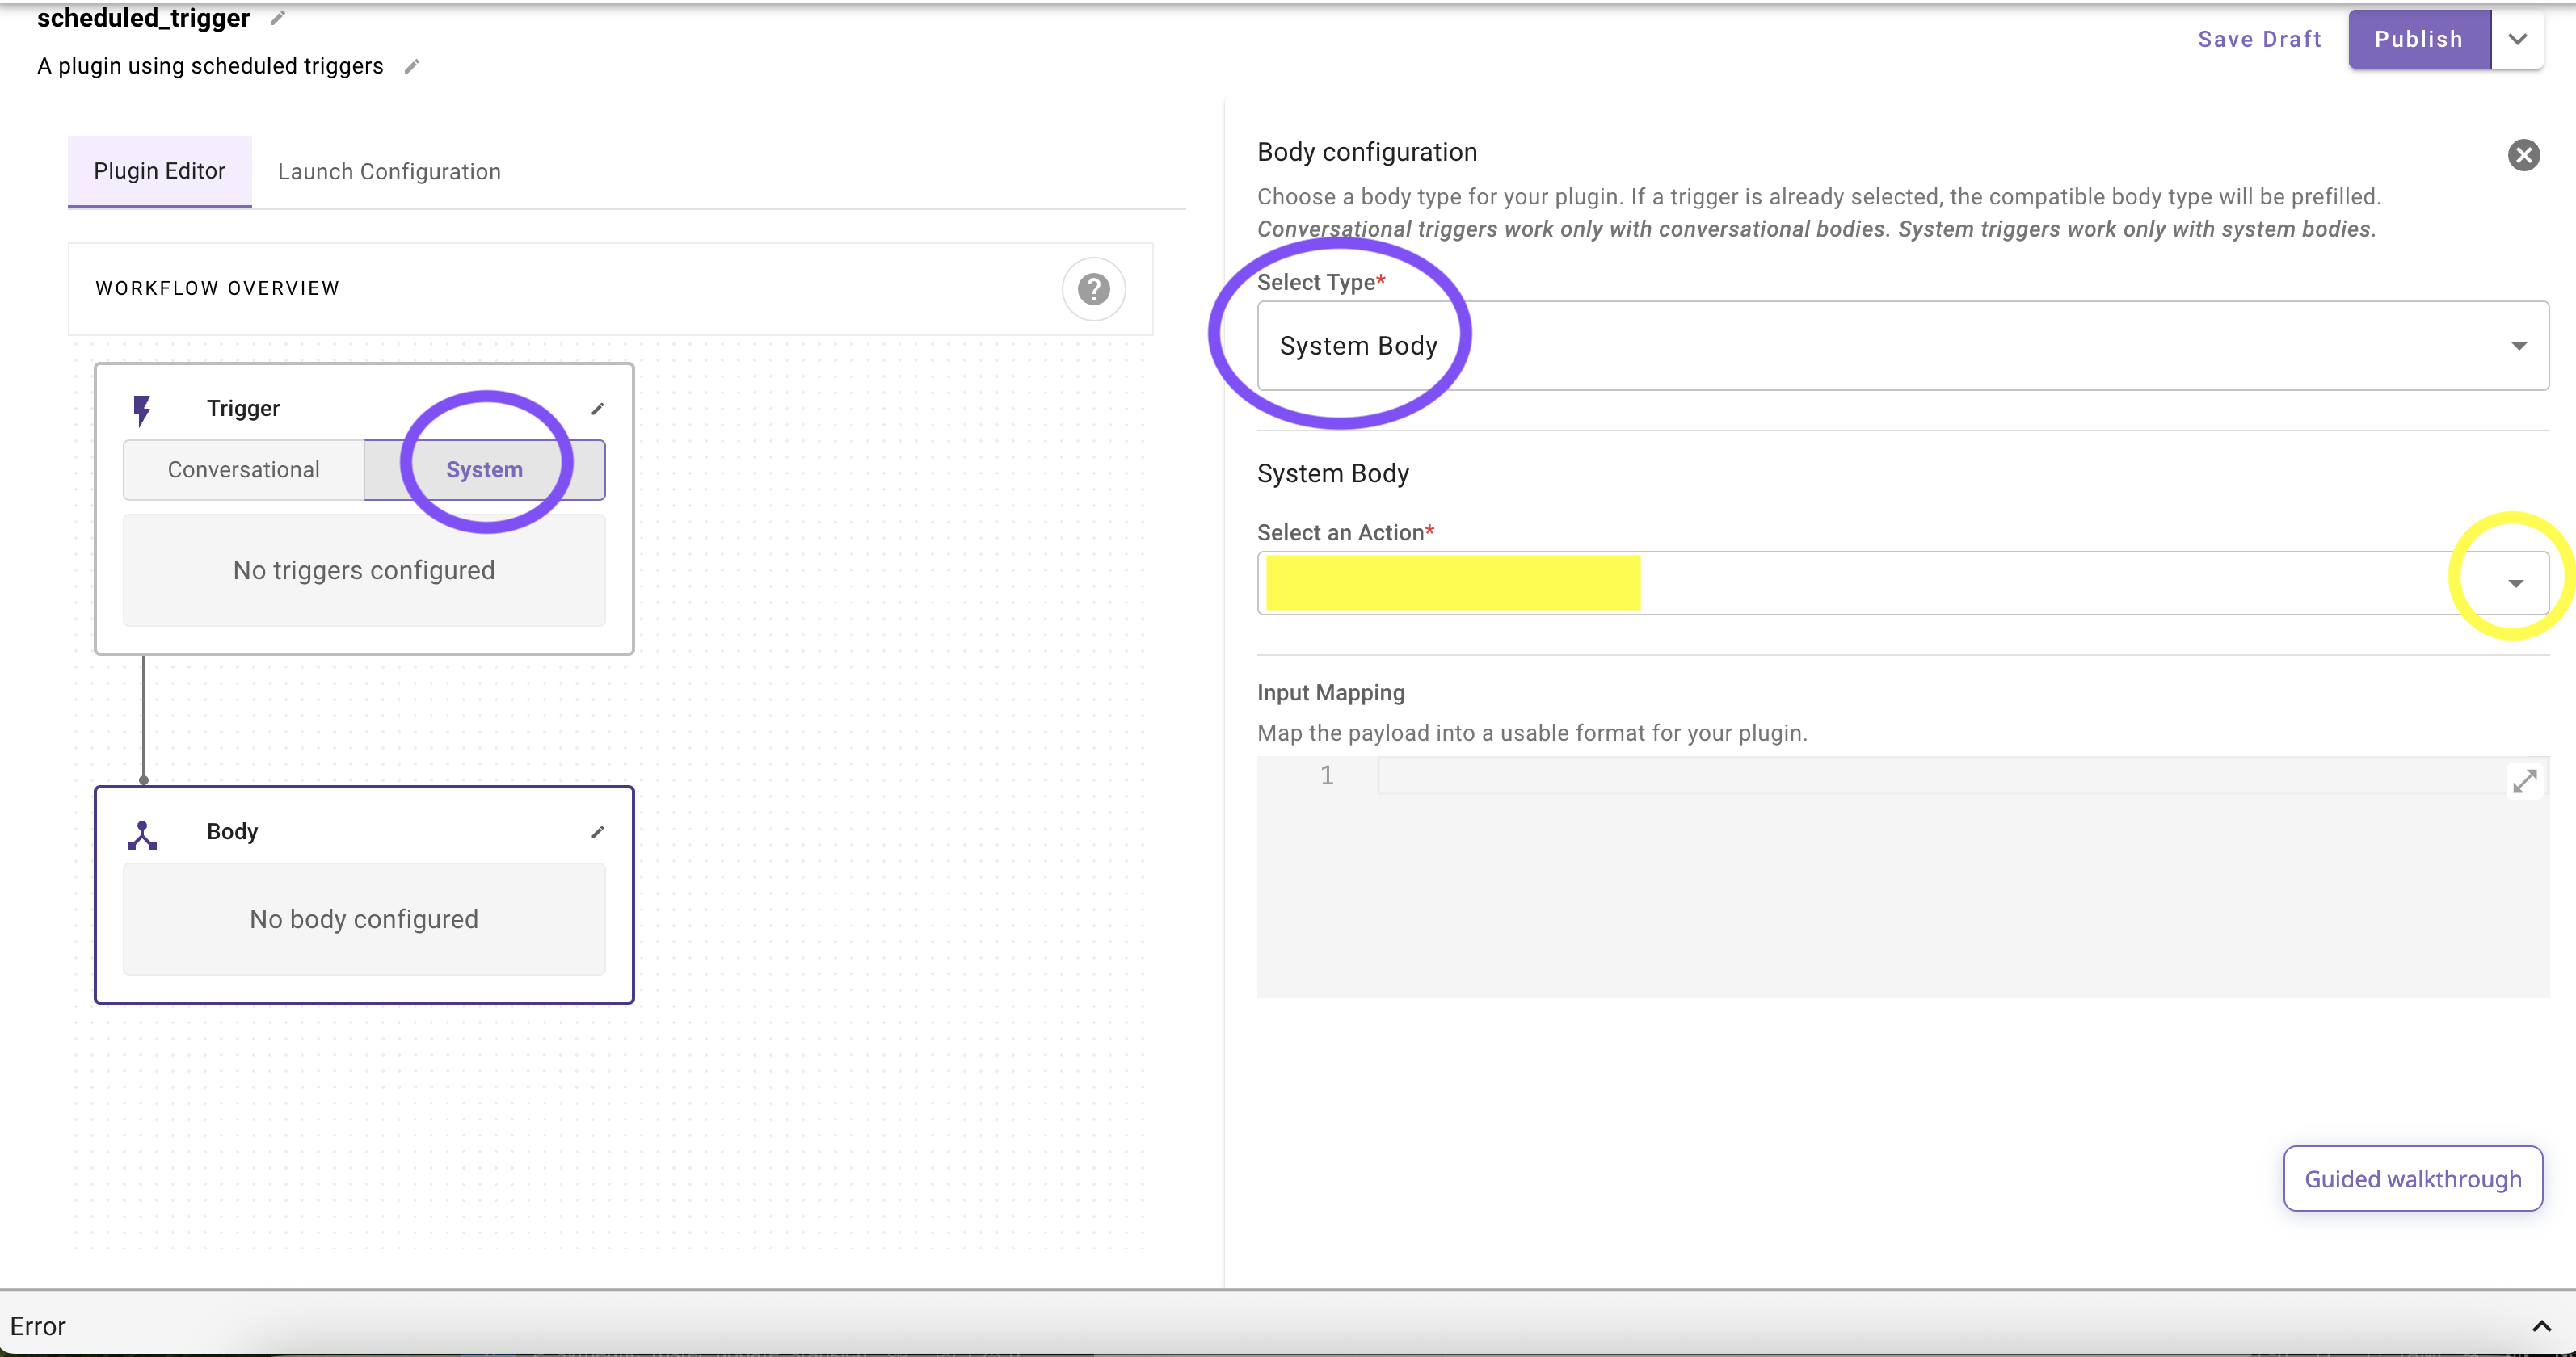
Body Configuration
Once your trigger is configured, you must define what the plugin does when it runs. Because scheduled triggers are system-initiated and don't start with a user conversation, their configuration is different from conversational triggers.
- In the Body block, choose the System Body type. Conversational Processes are not available for scheduled triggers.
- From the Select an Action dropdown, choose the process you want to run. You can select a direct HTTP Action or a Compound Action.
Initiating a Conversation from a Scheduled Trigger
Ambient Agent PSA
Ambient agents run system processes kicked off by system triggers (schedules/webhooks). They do not start with a user identity. This is different from conversational plugins, which always execute in a user context. As a result:
- The only way to contact a user from a system plugin is via
notify.notifycan include buttons to start a conversation or approve/deny actions. See the Compound Action: notify key documentation- Actions that rely on user-consent OAuth (per-user connectors) won’t work from a system-triggered run because there is no signed-in user.
- Notify limitations
- Cannot notify people in bulk (e.g., entire org) or in batches (e.g., “everyone in Eng”).
- If notifications need to be sent to multiple users, use loops to send individual notifications.
- Do not loop over large user lists -- keep lists small to avoid rate limits and noisy experiences.
While you cannot select a conversational process directly, you can still initiate a conversation or collect additional input from a user. To do this, you must use a Compound Action that includes a notify key.
The notify key allows your plugin to proactively send a message to a user, which can include buttons to start a conversational flow.
- To trigger a conversational process or gather input: Use a Compound Action with a
notifykey. - For more details on syntax and examples: See the Compound Action: notify key documentation.
Launching and Managing Scheduled Plugins
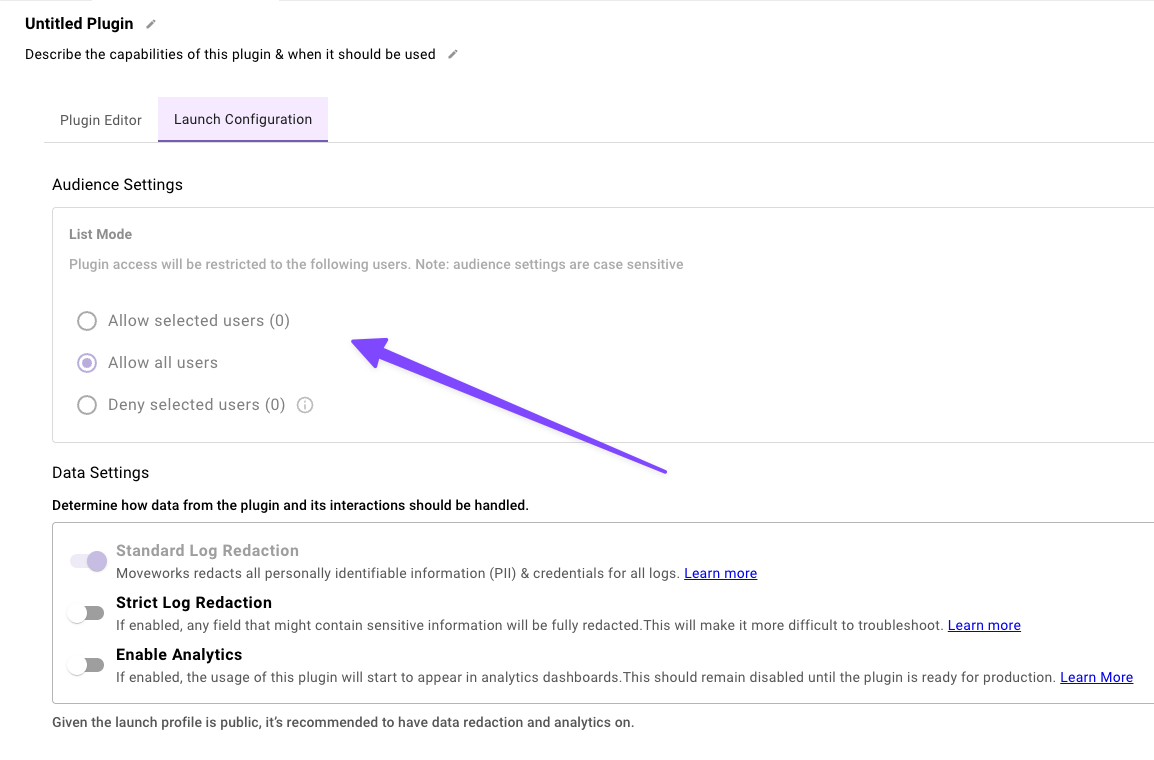
Audience settings disabled: If a system trigger (webhooks or plugin) is selected for a plugin, you will notice the Audience Settings panel in Launch Configuration will be grayed out. Why?
- Conversational triggers always require at least one audience (e.g. “Allow all users” or a test user group) before publishing. But system triggers, by contrast, don’t depend on end-user invocation. Because they run automatically on a schedule or incoming event, audience configuration is not required to publish.
Trigger "Active" toggle:
- Each scheduled trigger has an Active toggle in its configuration.
- The toggle is set to Active by default.
- Turning the toggle "on" means the schedule will fire at its defined times.
- Turning it off immediately stops future executions, even if the plugin is still published.
- Use this toggle as the quickest way to pause/resume a recurring schedule without un-publishing the plugin.
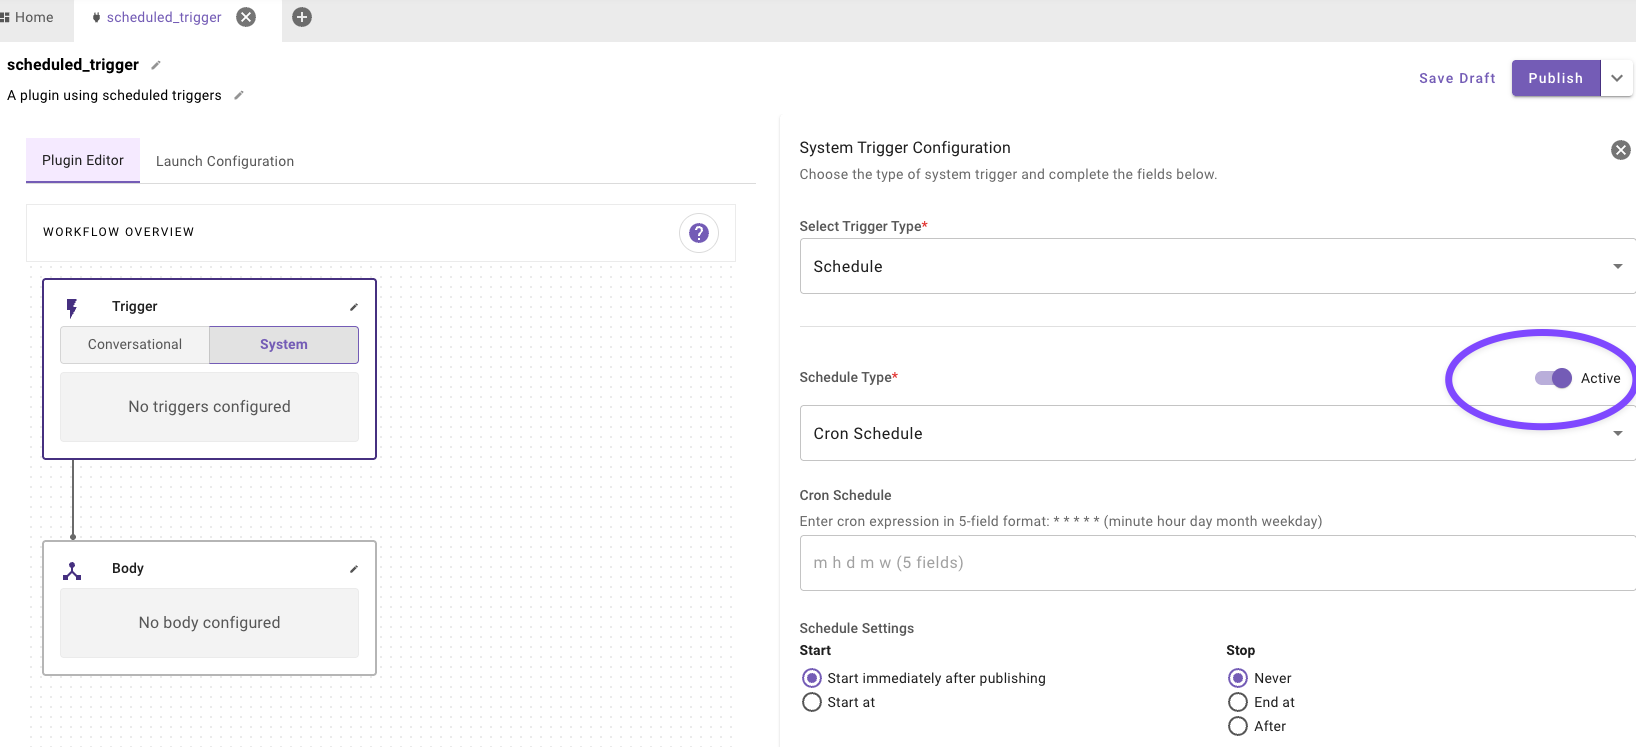
Publish vs. Active: Publishing makes the plugin available on the platform, but only the Active toggle actually starts or stops the trigger. Both must be enabled for executions to occur.
Limitations and Expected Behavior
- One trigger paradigm per plugin. A plugin can be triggered by system triggers or by conversational triggers (one or many), but not both. Duplicate the plugin if you need both paradigms.
- Multiple plugins per event. A single event can trigger multiple plugins if the conditions match.
- Restarting an expired schedule. If a schedule has finished all of its runs (e.g., an interval with a limited recurrence count), it becomes dormant. Simply re-saving / publishing the plugin without changes will not restart it. To restart a dormant schedule, either: (a) choose Start immediately after publishing (writes a new start time), or (b) edit the schedule (cron/interval) and then Publish.
- Missed runs (24-hour window). If the scheduler or a required downstream service is unavailable and one or more scheduled runs are missed, Moveworks automatically backfills all missed scheduled occurrences within the last 24 hours once service is restored. Older misses are dropped.
- "Start immediately after publishing" behavior. When you choose "Start immediately after publishing" (applicable for cron & interval only), the schedule becomes active after a 2-minute buffer.
- Activation buffer: When you choose "Start immediately after publishing" (applicable for cron & interval only) and publish there’s a short (~2-minute) warm-up while the scheduler registers.
- After publishing: why “Start immediately” becomes “Start at”: When you choose "Start immediately after publishing" and publish, we persist an explicit start_at timestamp (the publish time). When you return to the editor, the Start control will show:
- "Start at" selected, with the publish time pre-filled (often in the past).
- Helper text (or info state): “Start time is in the past, only the next scheduled run will execute.”
- Start time in the past If you configure Start at with a time in the past, the trigger will not backfill missed runs. Instead, it simply becomes active and executes on the next scheduled occurrence according to the cron/interval definition.
Updated 2 months ago