Quickstart #1: Basic Task Agent
Overview
Welcome to Agent Studio, your comprehensive platform for creating intelligent AI agents that transform how work gets done. Agent Studio empowers your organization to automate complex business processes through intuitive, low-code development tools that connect seamlessly with your existing systems.
In today's fast-paced business environment, the ability to automate routine tasks while maintaining flexibility and intelligence is crucial for staying competitive. Our Agent Studio platform meets this need by providing a complete ecosystem for building, deploying, and managing AI agents that work alongside your teams to enhance productivity and drive innovation.
With Agent Studio, you can create customized AI agents that understand natural language, execute complex actions across multiple systems, and learn from interactions to continuously improve. Whether you're looking to streamline IT support, enhance customer service, or optimize internal workflows, Agent Studio gives you the tools to build intelligent solutions that address your specific business challenges.
This guide teaches you how to build your first Task Agent -- just one of the many intelligent agents you can create with our platform. You'll discover how Plugins extend your agent's capabilities, how to configure slots for gathering information, how to set up launch rules, and how to implement triggering mechanisms that make your agent responsive to user needs.
Learning Objectives
This Quickstart guide provides a comprehensive walkthrough on how to build a simple Task Agent that will allow a user to easily check their PTO (Paid Time Off) balance. As part of the building process you'll learn how to:
- Set up and test HTTP Actions.
- Configure Conversational Processes.
- Understand and set up Slots.
Prerequisites
- Access to "Agent Studio" App.
- Basic understanding of Actions.
Background
Before getting started, here are some terms and concepts to get you up to speed.
What is an Agent?
Agents are AI-powered digital workers who can understand natural language requests, reason through complex problems, and act on users' behalf across your organization's systems. Unlike traditional automation tools, agents combine the power of large language models with secure system access to create truly intelligent automations.
Types of Agents
Task Agents
Task Agents are designed to handle specific, well-defined tasks that typically involve a single request and response cycle. They excel at executing discrete actions like checking statuses, submitting tickets, or retrieving information. Task Agents are perfect for automating routine operations that previously required manual intervention.
Process Agents
Process Agents manage multi-step workflows that span across different systems and may require sequential actions. These agents can coordinate complex business processes that involve decision points, conditional logic, and multiple backend systems. Process Agents are ideal for automating end-to-end workflows like employee onboarding or change management processes.
Proactive Agents
Proactive Agents monitor systems and data to initiate actions without explicit user requests. They can detect patterns, anticipate needs, and take preemptive steps to address potential issues before they impact operations. These agents provide value through timely interventions based on predefined triggers and conditions.
Ambient Agents
Ambient Agents work continuously in the background, learning from interactions and improving over time. They build a contextual understanding of your organization's operations and can offer insights or assistance based on observed patterns. Ambient Agents enhance the overall intelligence of your automation ecosystem.
Agent Studio Overview
Agent Studio is a comprehensive environment where you can discover, create, deploy, and monitor AI agents throughout their lifecycle. It provides an intuitive interface for developers and business users to collaborate on agent creation without deep AI expertise. The studio offers templates, testing tools, and analytics to streamline the development process.
What is a Plugin?
Plugins are the building blocks that give agents their capabilities. Each Plugin represents a specific function or integration that can be added to an agent, allowing it to perform certain actions or access particular systems. Plugins become powerful AI agents when deployed in your AI Assistant, enabling seamless automation across your digital landscape.
A Plugin in the new Plugin Workspace is comprised of 3 key components:
- A Trigger. Defines the situations under which the AI agent should execute a Plugin.
- A Launch Configuration. Specifies which end users should have access to a Plugin.
- A Process. Contains the actual execution logic of the Plugin.
In this guide, we'll be building a Plugin that is triggered conversationally and runs a Conversational Process. A Conversational Process contains the definitions of data that a Plugin needs & the steps executed by a Plugin.
Triggers and Launch Configurations are existing concepts but the Conversational Process is new.
📖 Learn more about Launch Configurations
📖 Learn more about Conversational Processes
What exactly goes into a Conversational Process?
A Conversational Process houses the logic that defines what a Plugin actually does. There are several key building blocks involved in a Process: Activities (key steps to execute throughout the process), Decision Policies (controls when to run certain activities), and Slots (values that the process needs to make decisions and execute activities).
- Activities. Key steps to perform throughout the process. For example, an Activity can involve taking action in some external system, or sharing a piece of configured content back to the end user.
- Decision Policies. Represent decision points in a process, which can control when to run certain Activities.
- Slots. Values that the process needs in order to effectively execute. For example, Slots may be required in order to execute Activities and make Decisions. There are a few interesting properties of Slots that we can leverage, for example:
- Input Validator. Ensures that a Slot value meets a certain condition (via DSL rule).
- Slot Inference Policy. Specifies whether an AI Agent can automatically infer a value for the slot.
- Resolver Strategy. Determines how an AI agent can get a value for the Slot. For example, a Resolver can help resolve natural language values to API values that a Process will need to use.
What You'll Build
The objective of the Plugin you're about to build is to allow an employee to get their PTO (Paid Time Off) balance. (This would fall under the category of Task Agents).
Before starting to build, we always recommend that you first map out the desired end user experience and the overall building blocks of the Conversational Process.
Here is an example of the end-user experience we hope to enable:
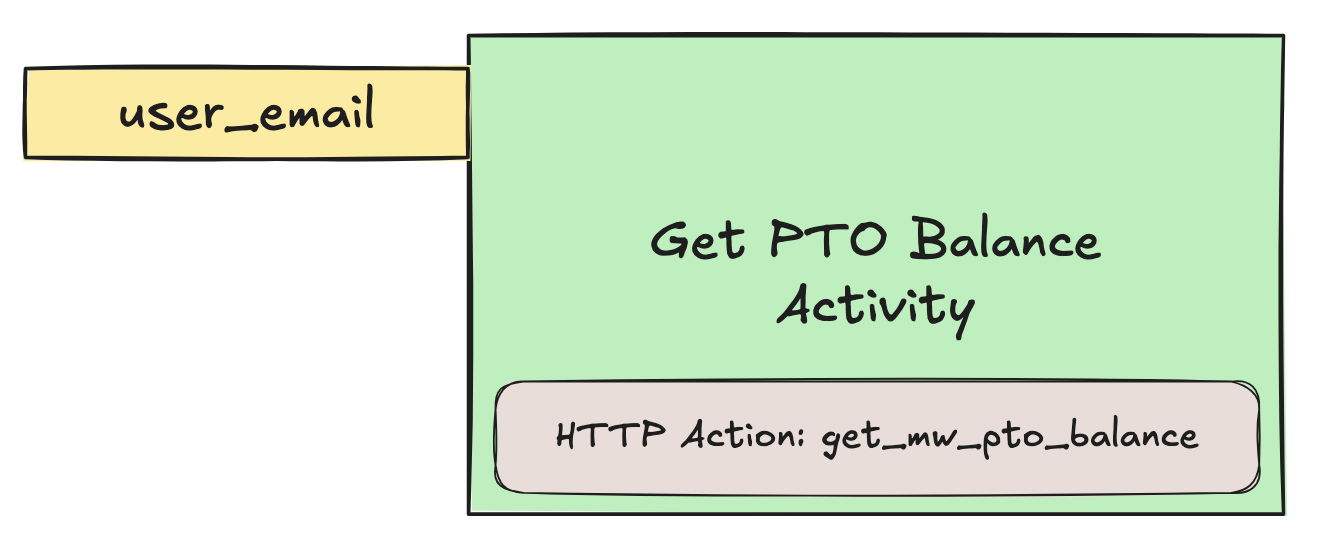
To get to this experience, the Conversational Process should consist of one Activity (powered by an HTTP Action) and one user email Slot required in order to run the Activity:
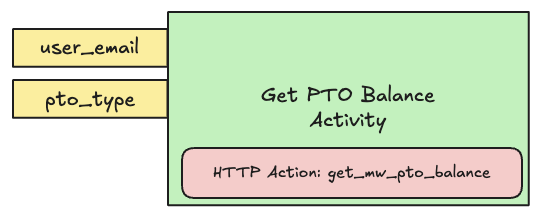
Note: This single-Activity Process does not require any Decision Policies.
You'll build an end-to-end working Plugin via these phases:
- Set up an Action (HTTP Action).
- Build the Conversational Process, containing the 1 Activity (using the Action set up in the previous phase) and the 1 Slot, as illustrated above.
- Add the Conversational Process to your AI Agent by launching a Plugin.
Let's get started!
Phase 0: Set Up Your Connector
Important building notes if you are using the Moveworks Developer Labs environment
- If you are working in a Moveworks lab environment, name anything you save (Plugin, Action, Data Type, etc.) with
<fullname>_<descriptive_name>
- For example:
lucasrollo_Submit_PTO_Action- When launching your Plugin, make sure to only launch to yourself! You can do this by going to Your Plugin > Launch Configuration > Allow Selected Users > the email on your credential card
You may be able to skip this phase if you've completed another Agent Studio Quickstart guide.You can skip this phase if:
- You have already created a
firstname_lastname_moveworks_purpleconnector.This section will walk you through how to set up your own connector to the Moveworks Purple API (which powers the Actions used in the Quickstart guides), so no need to repeat this step if you've done it before.
In this guide, the PTO data that your Action will access lives behind the Moveworks Purple API Connector. To access this data via your Action, you need to set up a (reusable) connector:
-
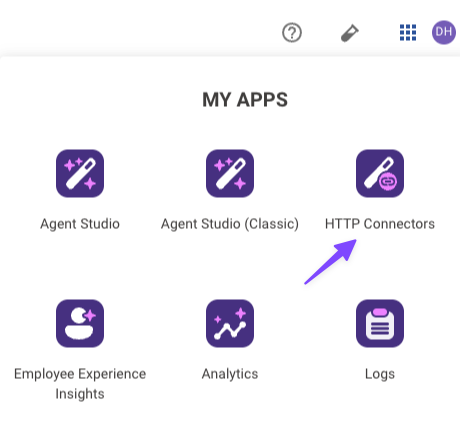
Navigate to the App Picker in the top right corner of Agent Studio.
-
Click on "HTTP Connectors", which will take you to another browser tab.
-
Click "Create" in the top right corner.
-
Fill out the following information for your Connector (be sure to replace "firstname" and "lastname" with your corresponding information).
Field Value to enter (replace "firstname" & "lastname" with your info) Connection Name firstname_lastname_moveworks_purpleDescription firstname_lastname_moveworks_purpleBase Url https://marketplace.moveworks.comAuth Config No Auth -
Click "Save" on the bottom right corner.
You're now fully ready to start building. On to Phase 1!
Phase 1: Set Up Your Action (Get PTO Balance)
Important building notes if you are using the Moveworks Developer Labs environment
- If you are working in a Moveworks lab environment, name anything you save (Plugin, Action, Data Type, etc.) with
<fullname>_<descriptive_name>
- For example:
lucasrollo_Submit_PTO_Action- When launching your Plugin, make sure to only launch to yourself! You can do this by going to Your Plugin > Launch Configuration > Allow Selected Users > the email on your credential card
We'll start by creating an HTTP Action that can query an external system for a user's PTO balance.
-
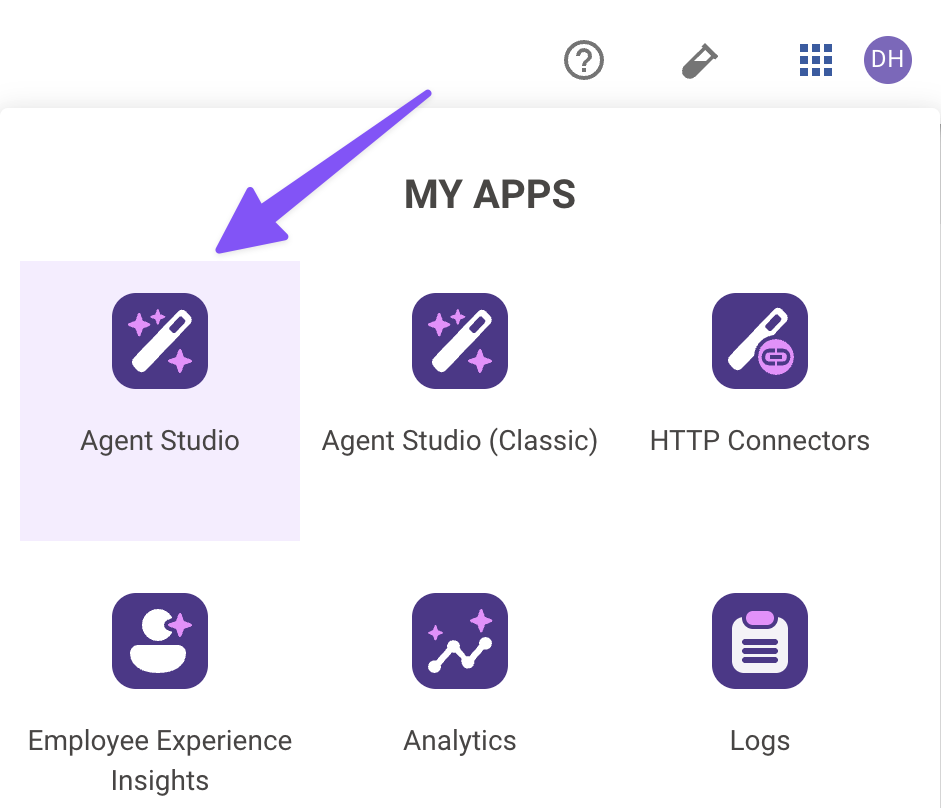
Navigate to the App Picker in the top right corner. Click on "Agent Studio".
-
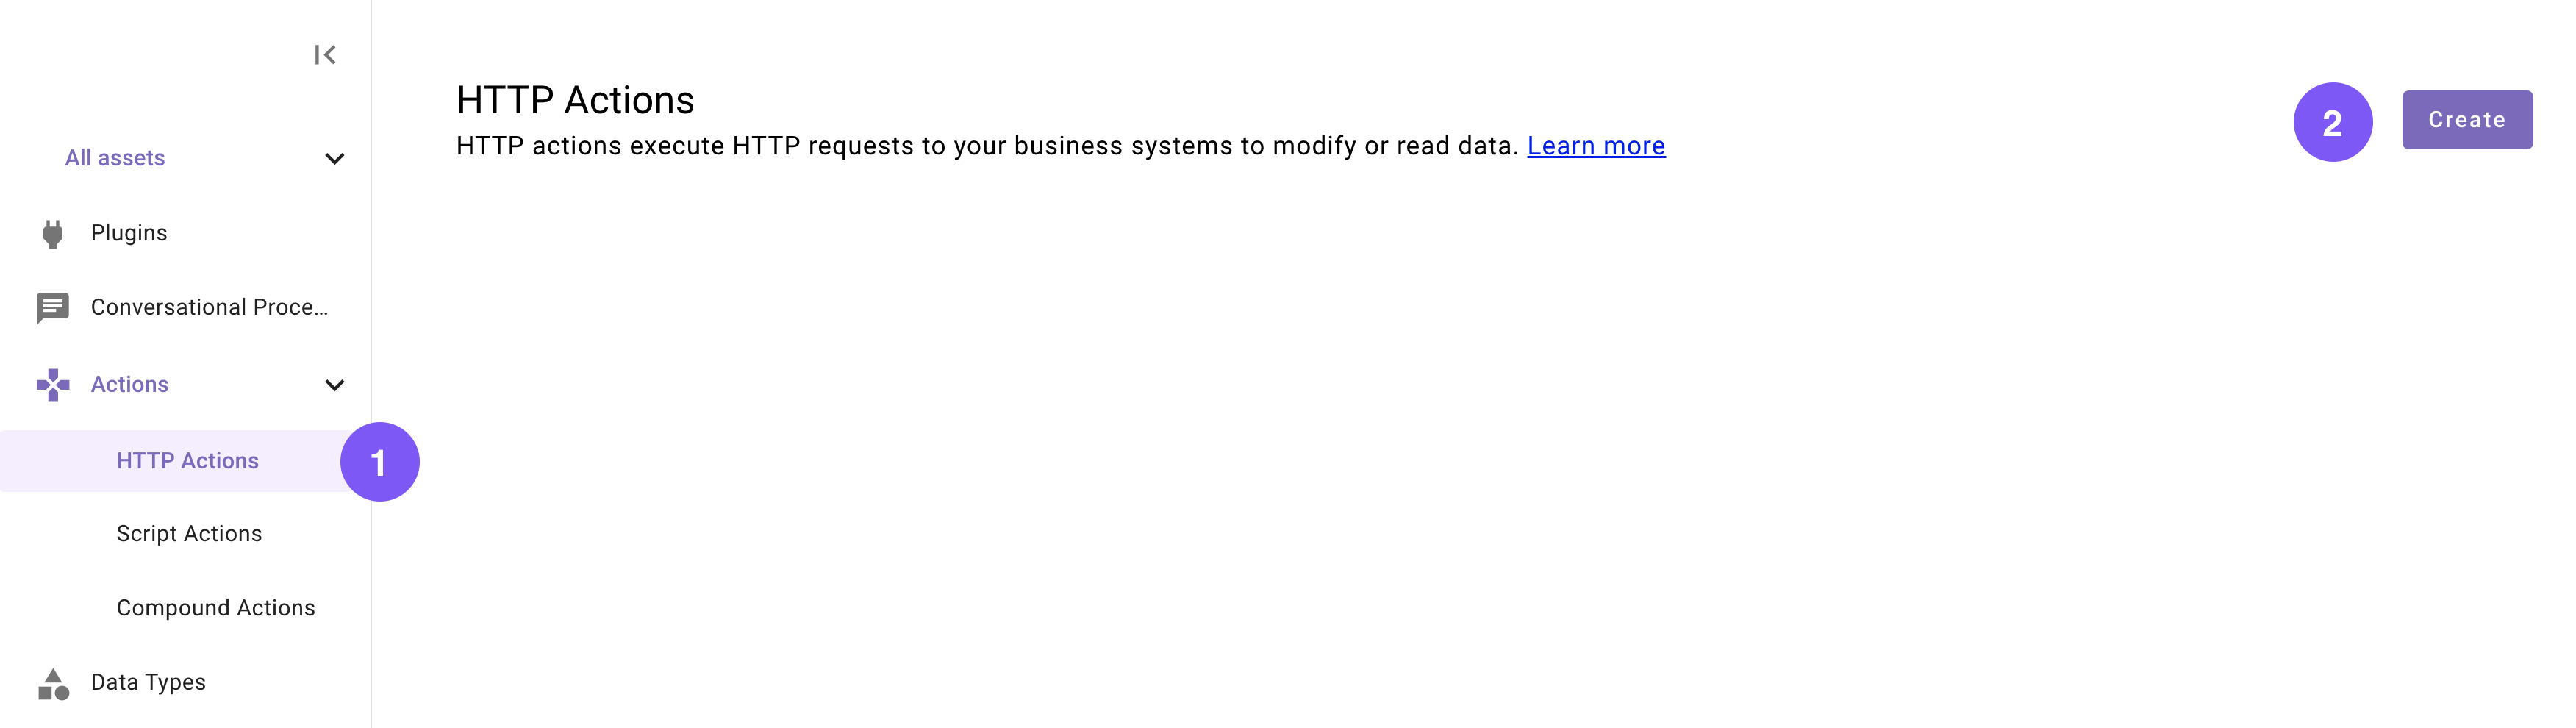
Navigate to a new HTTP Action.
-
Click "Create".
-
Set the following Title and Description for your Action (be sure to replace "firstname" and "lastname" with your corresponding information).

Field Value to enter (replace "firstname" & "lastname" with your info) Title firstname_lastname_get_mw_pto_balance_actionDescription Fetches the PTO balance for a given user -
Enter the details of your API:
-
Click on the "Import" icon to the right of the "TEST" button.
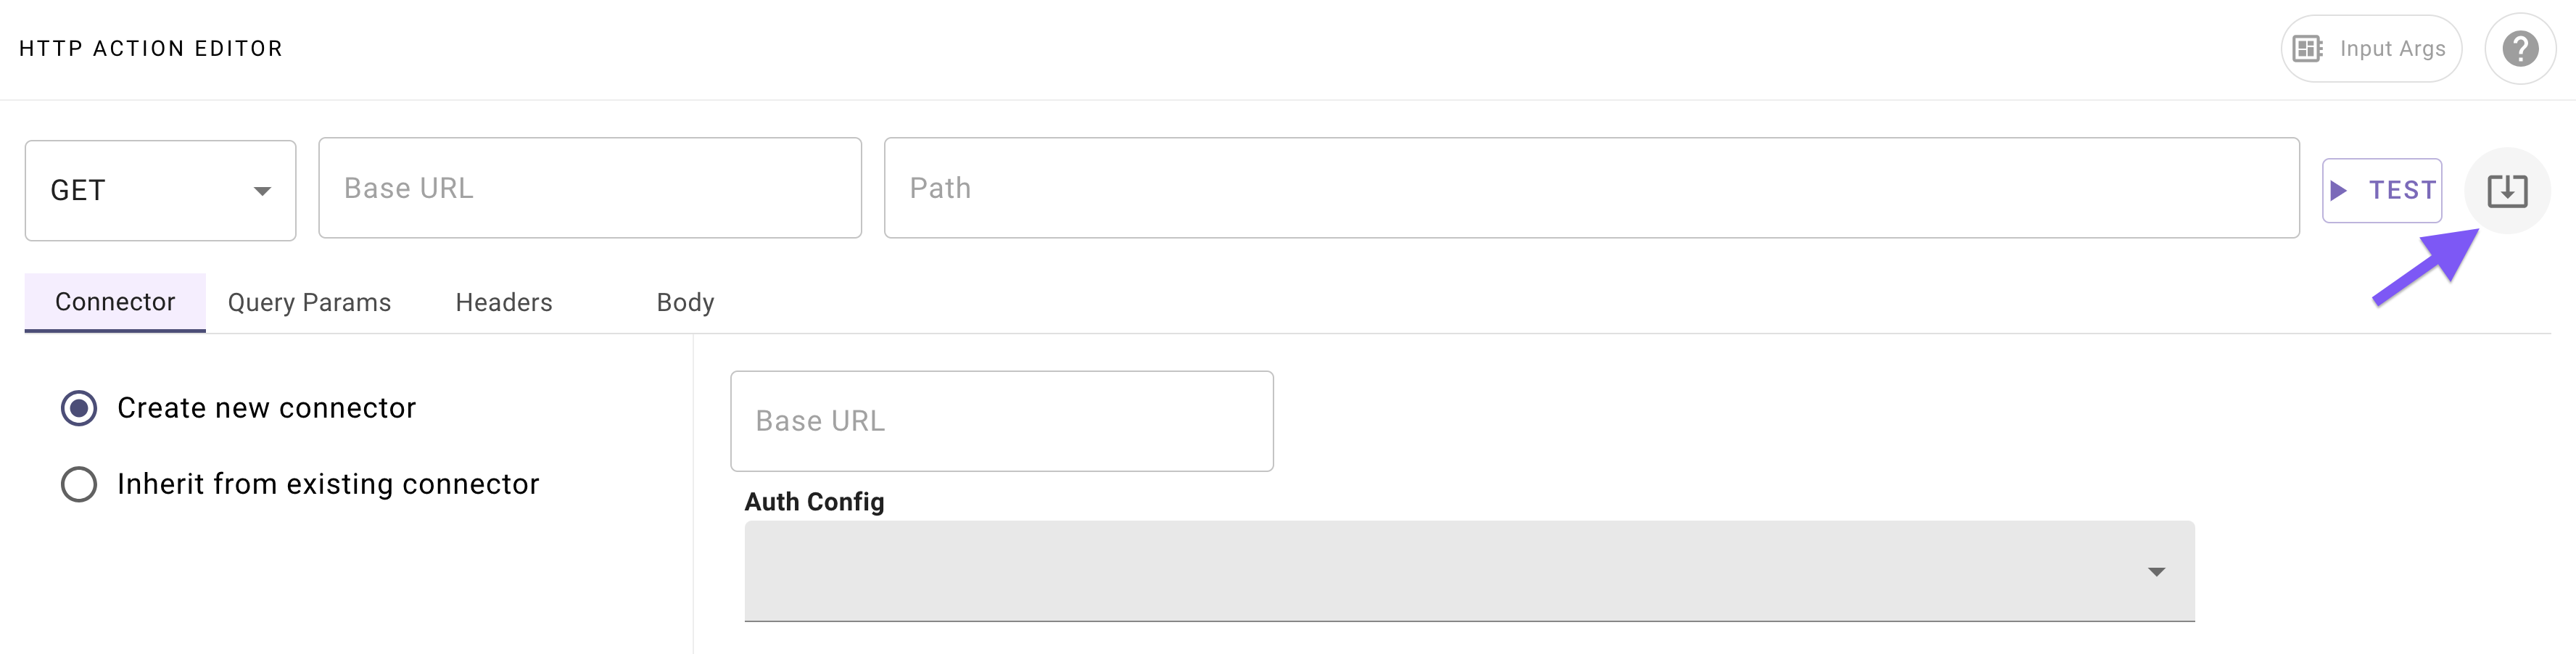
-
Paste the following cURL command (this represents an endpoint which has one dynamic user email query parameter):
curl -X GET "https://marketplace.moveworks.com/api/purple-suite/hris/pto-balance?email={{email}}&pto_type={{pto_type}}" -
Click "Import" (your Action should now be auto-populated with details).
-
-
Add your Connector.
-
Navigate to the Connector tab.
-
Select the "Inherit from existing connector" radio button.
-
Select the Connector you created in Phase 0 from the dropdown (e.g.
firstname_lastname_moveworks_purple).
-
-
Define a formal input argument to represent the "user email" input this Action requires:
-
Click on the "Input Args" button near the top right corner.

-
Fill out the following details for your
emailargument:Field label Value to enter/select Argument Name emailData Type Select "string" Example Value [email protected]Description The email address of the user to fetch PTO balance forRequired Check the box
-
Fill out the following details for your
pto_typeargument:Field label Value to enter/select Argument Name pto_typeData Type Select "string" Example Value vacationDescription The pto balance type of the user you are fetching forRequired Check the box -
Hit "Save" and hit the "X" icon to close this "Input Arguments" pop up.
-
-
Test your Action:
-
Click on the "TEST" icon (to the right of the endpoint URL definition).
-
Inspect the Console to verify that you receive a successful response:

You should see: Status Code 200, a PTO result object, and a response schema of the returned object.
-
-
Click "Publish". Review details, and click "Publish" once again.
Congratulations! You've set up your first Action.You should see your Action marked as "Published" in the HTTP Action library. In the next phase, you'll use this Action in a Conversational Process, as part of the main Action Activity in that process.
Phase 2: Build Your Conversational Process
Important building notes if you are using the Moveworks Developer Labs environment
- If you are working in a Moveworks lab environment, name anything you save (Plugin, Action, Data Type, etc.) with
<fullname>_<descriptive_name>
- For example:
lucasrollo_Submit_PTO_Action- When launching your Plugin, make sure to only launch to yourself! You can do this by going to Your Plugin > Launch Configuration > Allow Selected Users > the email on your credential card
You will now leverage the action you just created to retrieve your user's PTO balance. (Conversational processes will often involve multiple actions, but we'll keep it simple for this use case).
In this phase, you'll 1) build a user_email Slot, and 2) an Action Activity to fetch PTO balance (which requires the user email Slot as input). Here's a reminder of the bird's-eye view for our Process.
-
Navigate to a new Conversational Process (navigate to the library and click "Create").

-
Set the following title and description for your Conversational Process (be sure to replace "firstname" and "lastname" with your corresponding information).
Field Value to enter (replace "firstname" & "lastname" with your info) Title firstname_lastname_get_mw_pto_balance_processDescription Fetches the PTO balance for a given user -
Add a new Slot to represent the user email that this process will need to collect. 📖 Learn more about Slots.
-
Click on the "Slots" button near the top right corner of the editor.

-
Click "Create New" in the Slots pop up.
-
Fill out the following details for your Slot:
Field label Value to enter/select Name pto_typeData Type Select "string" Slot Description The type of PTO balance the user is fetching for.Slot Validation Policy Leave blank Slot Validation Description Leave blank Slot Inference Policy Leave as is (Infer slot value if available) -
Before saving this slot you will add an Resolver strategy. You want to power this Slot with a Static Resolver.
-
At the very bottom of the Slot creation popup, click on "Resolver Strategy" and "Create".
-
Click "+ Add Method".
-
Fill out the following initial details for your Method.
Field Label Value to enter/select Method Name choose_from_existing_pto_balance_typesMethod Type Select Static
-
-
Add the following Static Options for your Static Resolver Method. (Note: the "Raw Value" column contains the actual values that your "get mw pto balance" HTTP Action expects in order to successfully retrieve the type PTO balance).
Display Value Raw Value VacationvacationSicksick- Click the "X" in the top right corner of the "Strategy Definition" pop up.
-
-
Hit "Save" (scroll to the bottom of the slot popup) and hit the "X" icon to close this "Slots" pop up.
-
-
Build an Action Activity that will perform the retrieval of a user's PTO balance. 📖 Learn more about Activities.
-
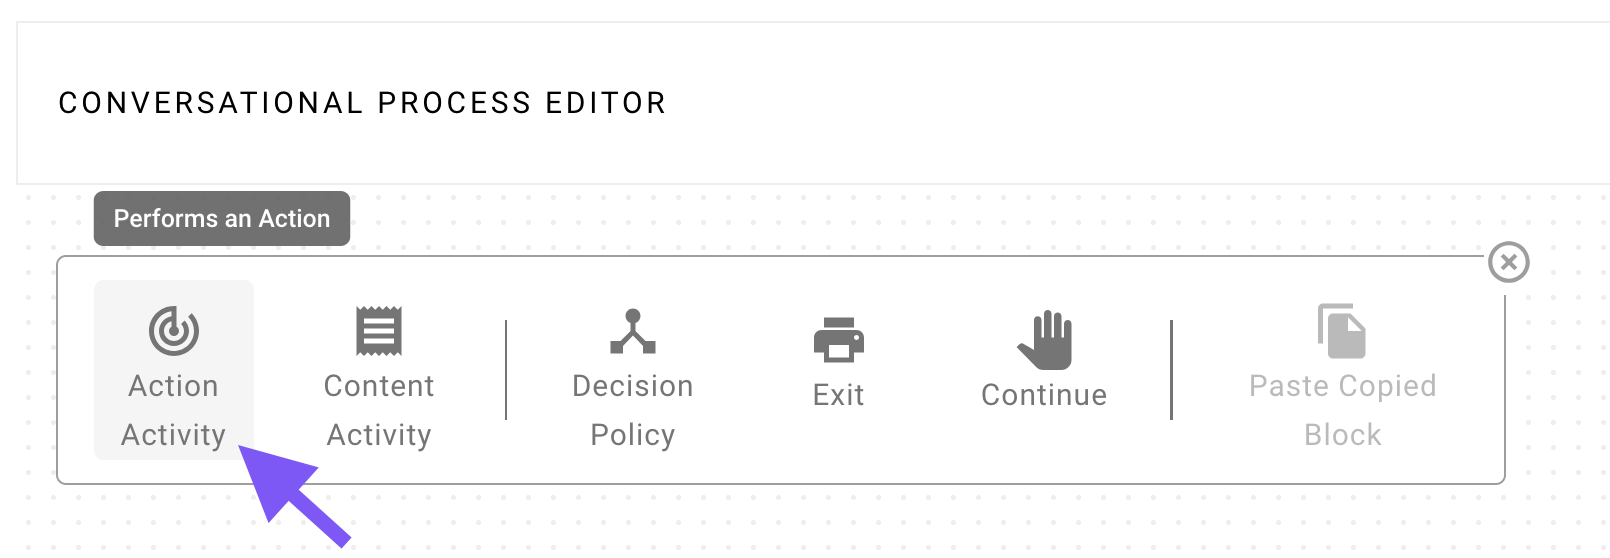
Click on the "+ Add a block to your process" button in the main section of the editor.
-
Click on "Action Activity".
-
Fill out the following details for your Action Activity, which mostly involves connecting your Slot to the input(s) of the HTTP Action (and mapping the result of the Action back to the Conversational Process):
Field label
Value to enter/select
Action
*Select the
firstname_lastname_get_mw_pto_balance_actionAction that you built in Phase 1 *Required Slots
Select the
pto_typeSlot that you addedInput mapping
pto_type: data.pto_type.valueemail: meta_info.user.email_addrOutput Mapping (".dot_walk_here" box)
.pto_result.pto_detailsOutput Key
pto_balance_resultConfirmation Policy
Leave unchecked
-
-
Click "Validate" (Located in the top right corner. Click on the caret icon next to the Publish button). If everything went well so far, the Console (bottom of the editor) will say "Validation successful".
-
💡Pro-tip: You can also use the following hotkeys to validate without pressing the button:
On a MacOS machine On a Windows machine Cmd + Shift + V Ctrl + Shift + V
-
-
Click "Publish". Review details, and click "Publish" once again.
Awesome! You've just built the main part of this Plugin: the Conversational Process.We're ready for the last step: now you'll launch a Plugin — this packages the Conversational Process into a tool that your AI Agent can use directly.
Phase 3: Launch a Plugin
Important building notes if you are using the Moveworks Developer Labs environment
- If you are working in a Moveworks lab environment, name anything you save (Plugin, Action, Data Type, etc.) with
<fullname>_<descriptive_name>
- For example:
lucasrollo_Submit_PTO_Action- When launching your Plugin, make sure to only launch to yourself! You can do this by going to Your
In our final section, you’ll learn how to add your Conversational Process to a Plugin, and control the Triggering scenarios of your Plugin, and specify which end users are allowed to use your Plugin.
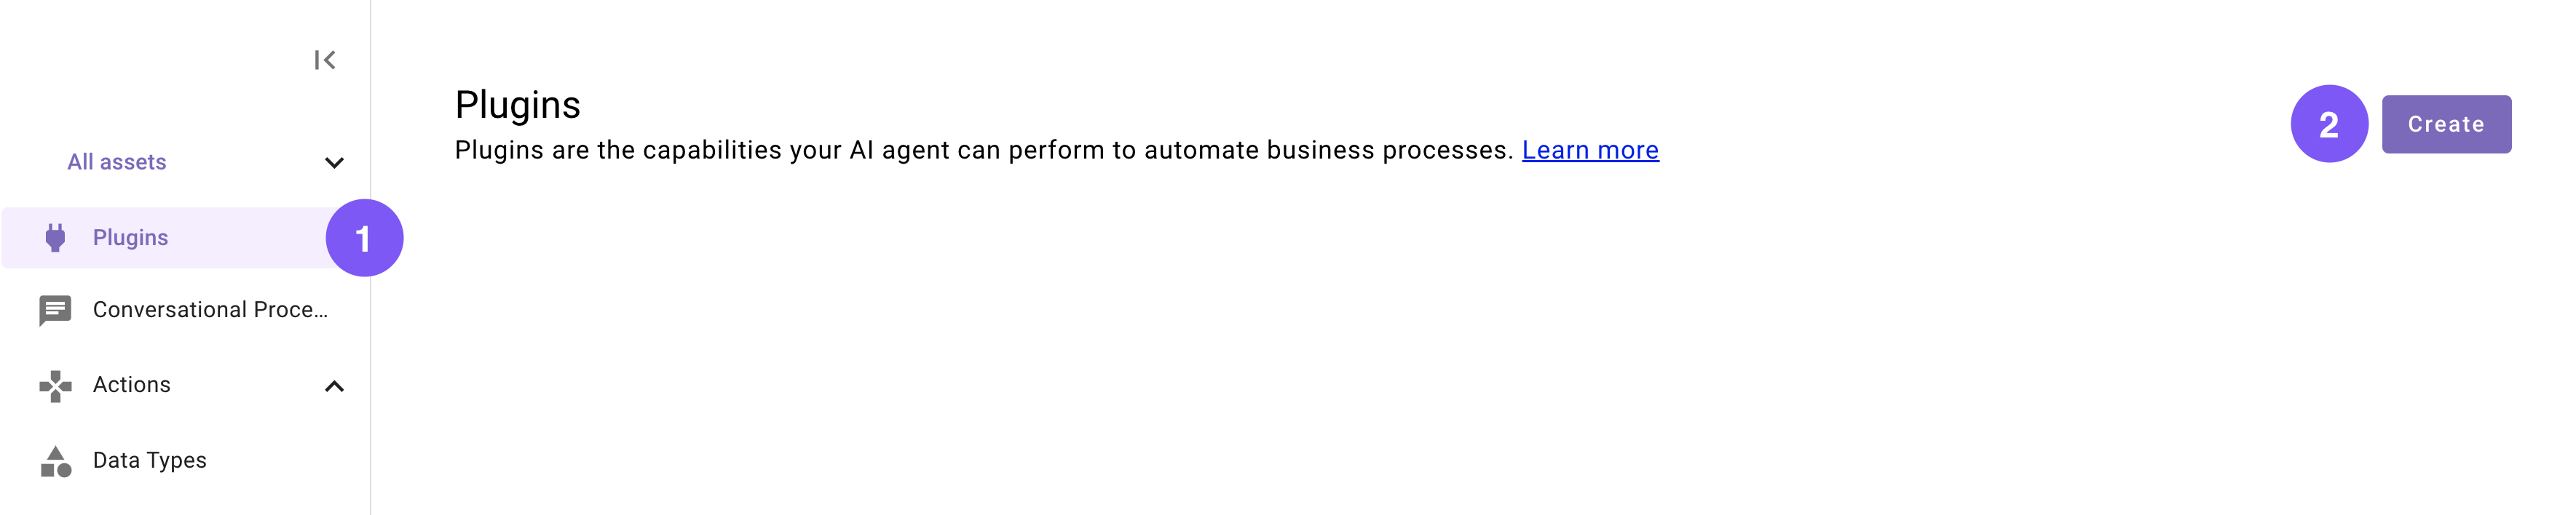
-
Navigate to a new Plugin (navigate to the library and click "Create").
-
Set the following title and description for your Plugin (be sure to replace "firstname" and "lastname" with your corresponding information).
Field Value to enter (replace "firstname" & "lastname" with your info) Title firstname_lastname_get_mw_pto_balanceDescription Fetches the PTO balance for a given user -
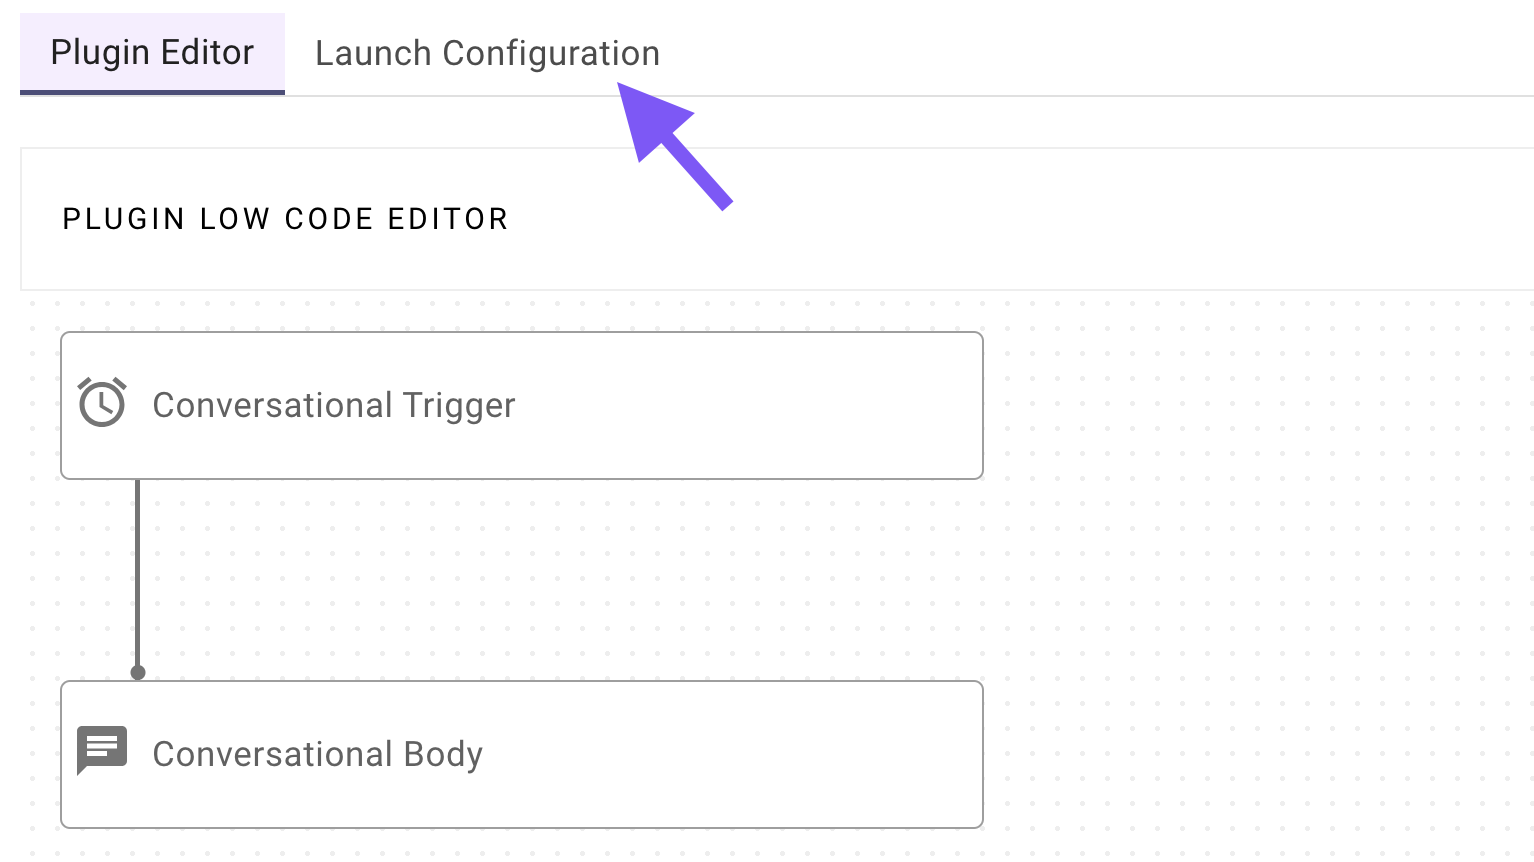
Define a Conversational Trigger. 📖 Learn more about Natural Language Triggers.
-
Make sure the Conversational tab is selected and click "No Triggers Configured".
-
In the panel that appears on the right, either:
-
Approve (click "Trigger") 5 of the auto-generated suggested positive examples, or
-
Add the following recommended utterances:
Utterances to add How can I check my current paid time off balance?Can I take PTO next week?I want to take PTO the first week of MayCheck PTO balanceWhat is my remaining paid time off balance
-
-
-
Choose your Conversational Process (the one you built in Phase 2).
- Click on "No body configured".
- In the panel that appears on the right, search for and select the Conversational Process that you built in Phase 2 (should be named
firstname_lastname_get_mw_pto_balance_process)
-
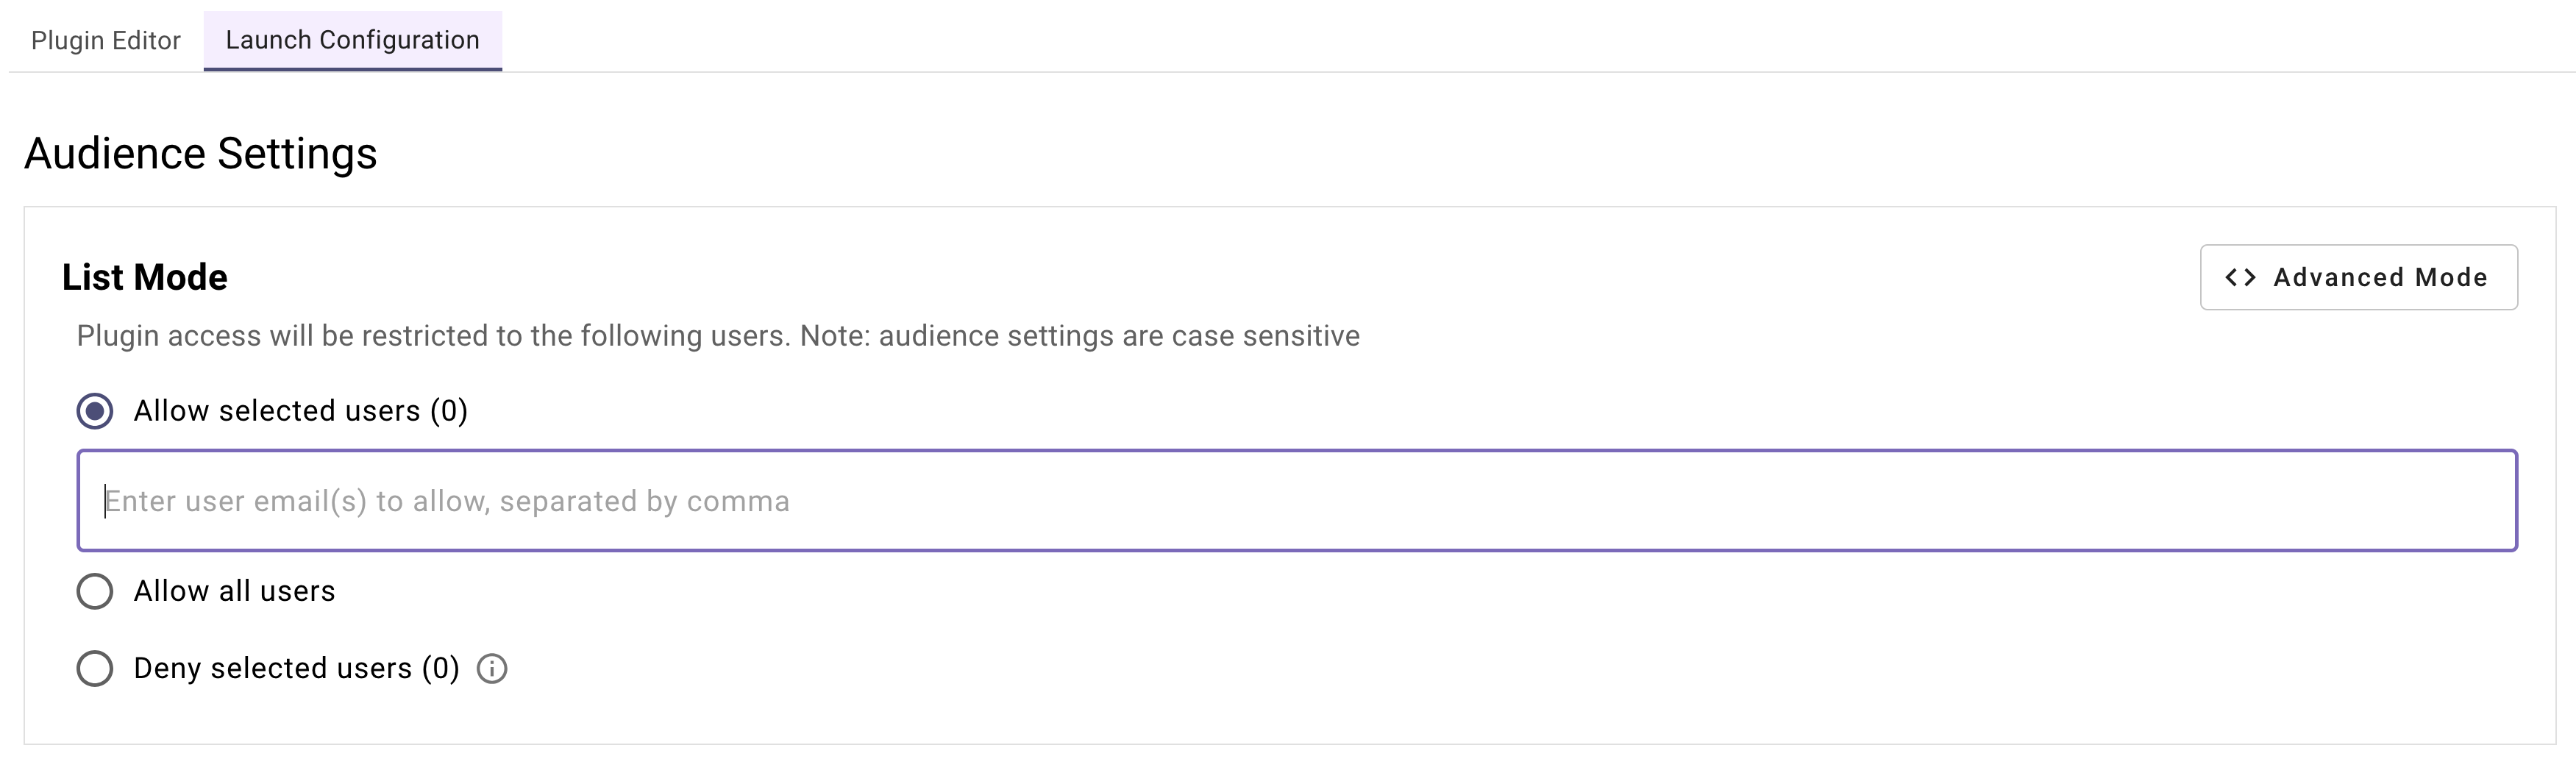
Define your Launch Configuration.
-
Navigate to the "Launch Configuration" tab.
-
In the Input field under "Allow selected users", enter your email (or multiple emails using commas to separate the email addresses).
-
-
Click "Publish". Review details, and click "Publish" once again to launch your Plugin.
Don't forget to press "enter" when adding user emailsAfter entering emails under "allow selected users" press "enter" or the email will not save when publishing.
And that's all! You've built your Plugin, and now it's ready for you to use.Use one of your triggering examples (e.g. "check PTO balance") to access the Plugin in conversation.
Reflecting on Your First Plugin
Congratulations, you’ve successfully completed the entire quick-start guide! You’ve built a fully functional PTO balance Plugin from the ground up, and that’s no small feat.
Through this guide, you’ve created a Plugin that:
- Retrieves PTO balance information from an external system with a well-crafted Action.
- Prompts users for details using Slots to make it interactive and user-friendly.
- Activates effortlessly with Conversational Triggers you’ve set up.
- Controls access perfectly with Launch Configurations you’ve just finalized.
From start to finish, you’ve mastered every step of the process — amazing work! Your Plugin is now ready to help users check their PTO balances with ease.
Updated about 1 month ago