
Sharepoint Online Access Requirements [OLD]
Note 1: Content Search with Permissions enabled requires User Ingestion through the MSGraph API to map Sharepoint user profiles to Moveworks user profiles, in order mirroring your Sharepoint Access Controls (ACLs). If User Ingestion has not been set up previously, or if this is your first time integrating Sharepoint for Search, please contact the Customer Success team for assistance with configuration.
Note 2: For Sharepoint Access requirements, Steps 1 and 2 describe separate sets of access that you have to provide to BOTH the Sharepoint Online REST API and the MSGraph API, due to the availability of Sharepoint Online Groups only via the Sharepoint Online REST API.
1. Grant Access to Sharepoint REST API via Azure AD App-Only Authentication Method
In this step, you will grant access for Moveworks to use the Sharepoint REST API to read content permissions (Sharepoint Groups) from your Sharepoint Sites. The Azure AD App-Only authentication method is the Microsoft-recommended method of granting access to the Sharepoint REST API.
Follow all instructions per Microsoft’s Azure AD App-Only Access Requirements
-
Follow the access steps from the Setting Up an Azure AD App for App-Only Access section from the Microsoft Azure AD App-Only Authentication guide. Use the New-SelfSignedCertificate cmdlet to generate the certificates. In this step, you will:
-
First generate the .pfx and .cer files using the Powershell script outlined above.
- Save the .pfx and .cer files for the following step.
-
Register an Application for Moveworks in your Azure AD App Directory.
-
Connect your certificate to the Application.
-
[Important] Grant specifically the Sites.Read.All access, as Sites.FullControl.All is not necessary. Note, this must be done for the Sharepoint API during this step.

-
-
Note: For each Sharepoint Group, it must have the following setting in order for members of those Sharepoint groups to access the Pages/Files (unless they have access via another Sharepoint Group, or Azure AD Group):
- Within "Group Settings", the settle "who can view the membership of this group" must be set to "Everyone", in order for Moveworks to read the group members
- If it's not set, please change the setting, or rely on Azure AD Groups or other Sharepoint Groups to manage permissions for those Pages/Files
Run Additional Powershell Commands to Generate X5t and Private Key values
-
There are two options for generating an X5t value. Either using SHA256 (modern, more secure) or SHA1. Either option below is sufficient.
-
For SHA256, run the following Powershell command to generate the X5t value using SHA256 needed for Moveworks’ Sharepoint Connector.
$certPath = "path\to\your\certificate.cer" $cert = New-Object System.Security.Cryptography.X509Certificates.X509Certificate2($certPath) $sha256 = [System.Security.Cryptography.HashAlgorithm]::Create("SHA256") $hash = $sha256.ComputeHash($cert.RawData) $x5t = [Convert]::ToBase64String($hash) -replace '\+','-' -replace '/','_' -replace '=' Write-Output $x5t -
For SHA1, run the following Powershell command, to generate the X5t value using SHA1 needed for Moveworks’ Sharepoint Connector.
$certPath = "path\to\your\certificate.cer"
$cert = New-Object System.Security.Cryptography.X509Certificates.X509Certificate2($certPath)

$sha1 = [System.Security.Cryptography.HashAlgorithm]::Create("SHA1")
$hash = $sha1.ComputeHash($cert.RawData)

$x5t = [Convert]::ToBase64String($hash) -replace '\+','-' -replace '/','_' -replace '='

Write-Output $x5t
-
-
Save the X5t value generated for later Step 3 (Create Connectors in Moveworks Setup).
-
Run the following Powershell command, to generate the Private Key needed for the Moveworks’ Sharepoint Connector.
openssl pkcs12 -in "C:\path\to\your\file.pfx" -nocerts -nodes -out "C:\path\to\output\privateKey.pem" -
Save the Private Key value generated for Step 3 (Create Connectors in Moveworks Setup).
2. Grant Moveworks Access to MSGraph API
In this step, you will grant scopes for Moveworks to execute your content-level ACL permissions by ingesting your Sites, Pages, Files, Users, and Groups via the MSGraph API. This is used to enforce that users are only able to search for information from Pages/Files that they already have access to.
Granting Scopes for Access to Sharepoint Pages (Answers Plugin)
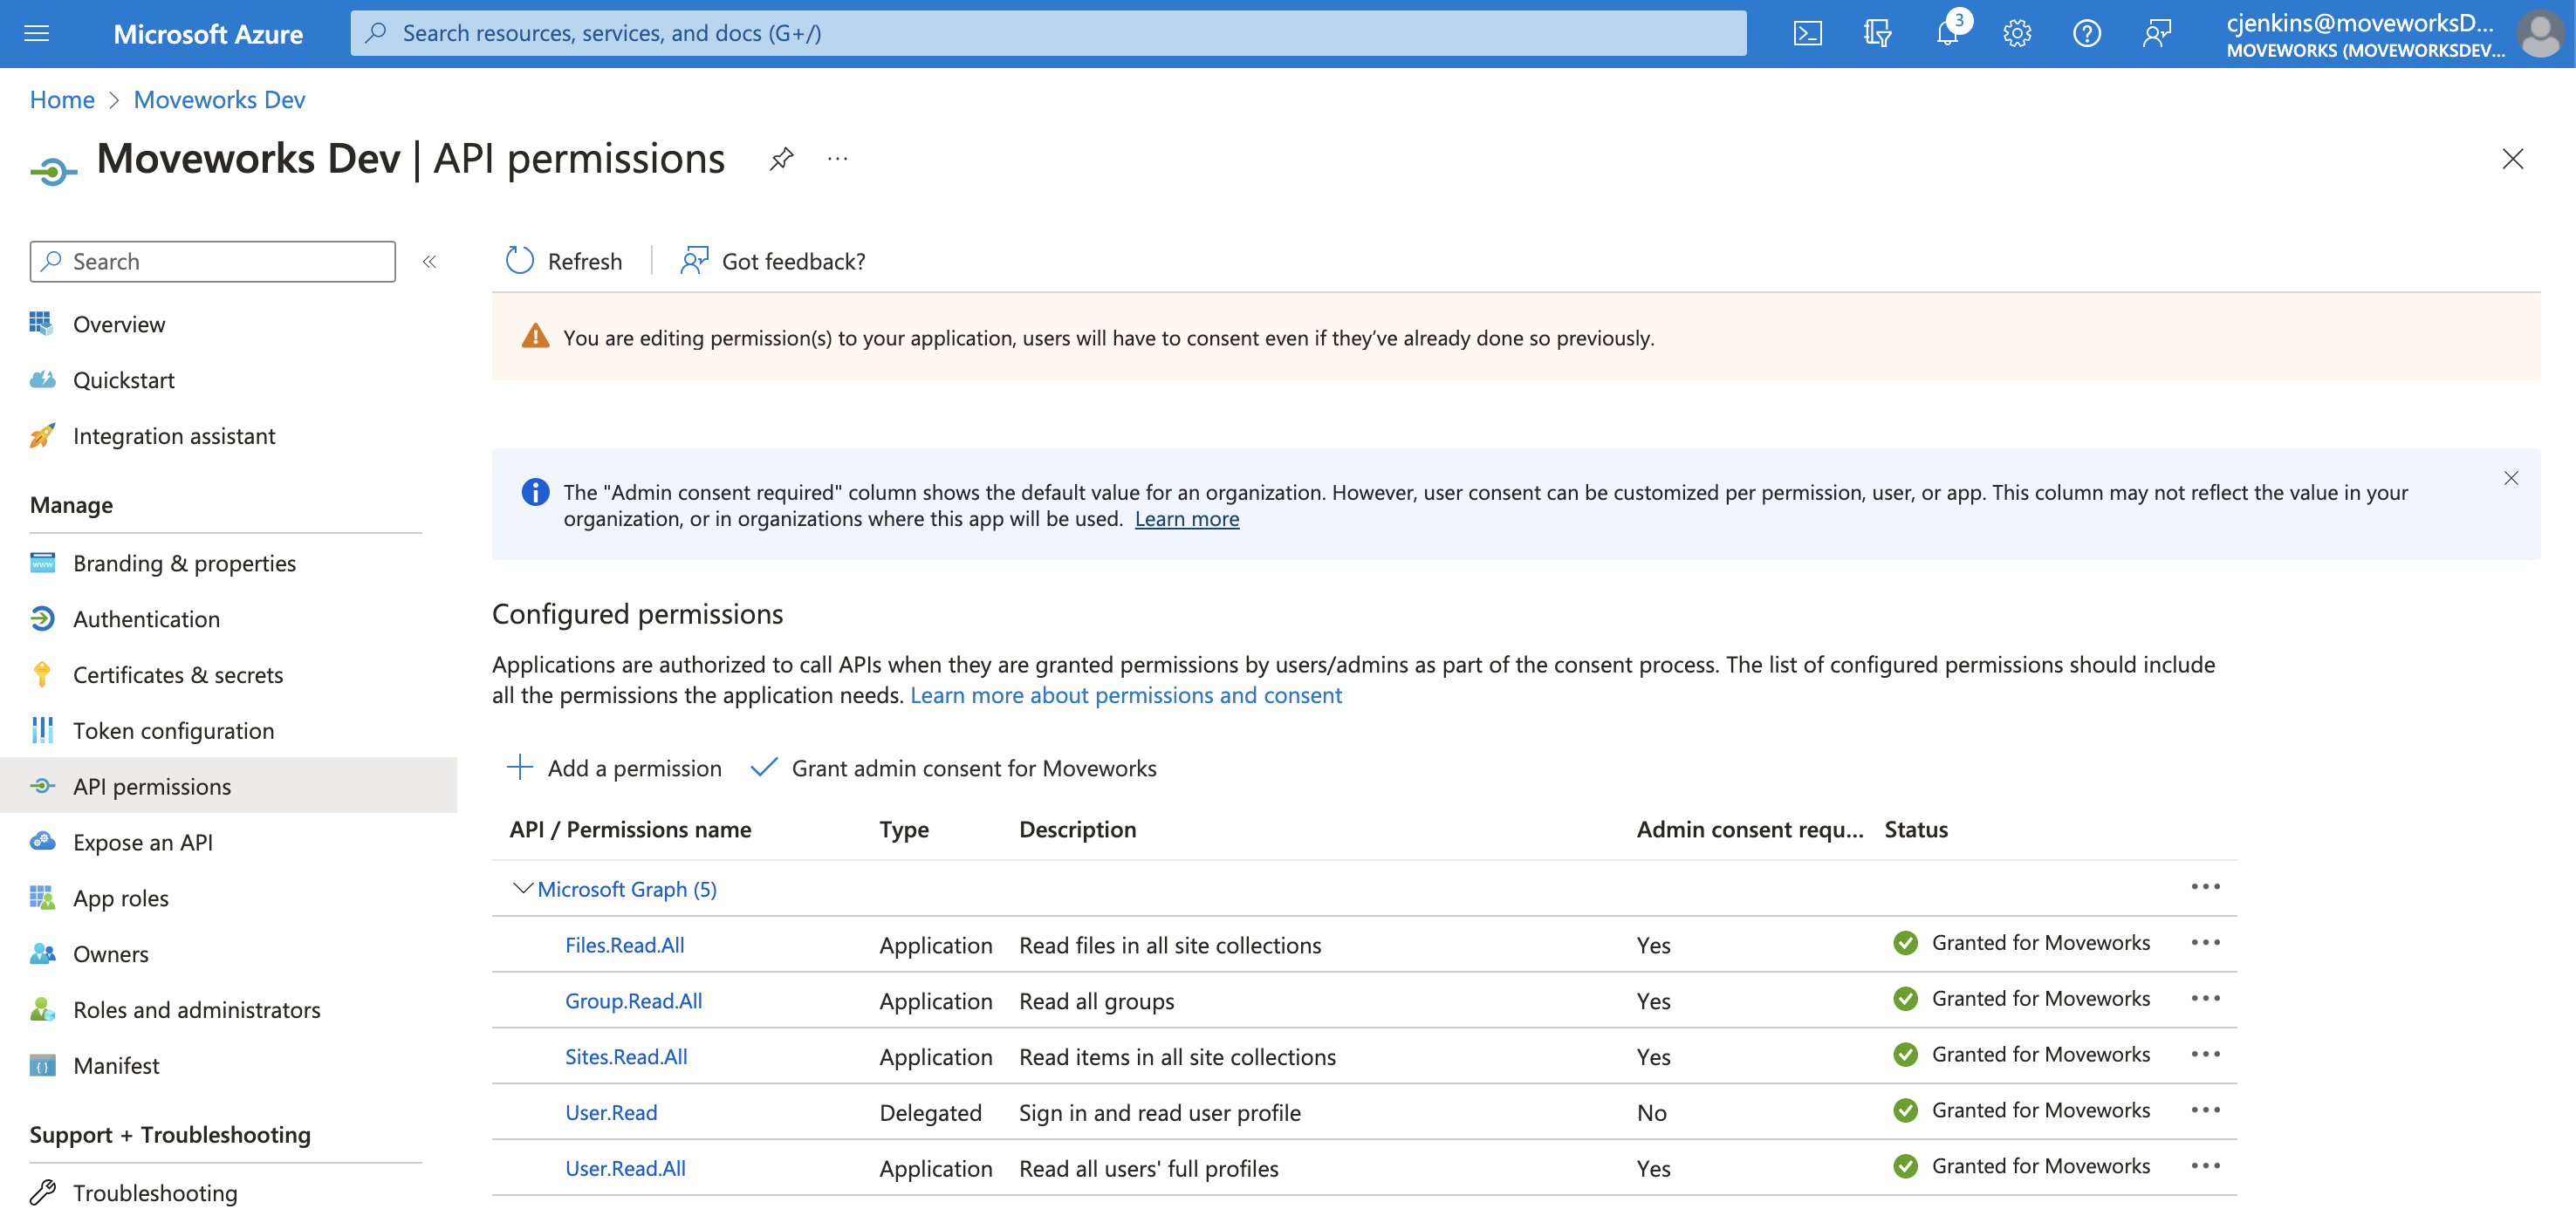
In order to ingest Knowledge articles which are present in Site pages for Sharepoint. You must grant your Moveworks AI Assistant Azure application the following scopes for it over the MSGraph API to support this :
- https://graph.microsoft.com/Sites.Read.All
- Alternate Option:https://graph.microsoft.com/Sites.Selected
This permission Allows Moveworks to read content from SPECIFIC sub sites in the tenant. This requires additional setup, instructions can be found here.
Note: With Sites.Selected, Files.Read.All is no longer required
- Alternate Option:https://graph.microsoft.com/Sites.Selected
- https://graph.microsoft.com/Group.Read.All
- https://graph.microsoft.com/User.Read.All
Please note, only Site Pages in the Published state are ingested into the AI Assistant. See Microsoft documentation for more details on Sharepoint page lifecycle.
Granting Scopes for Access to Sharepoint File (Answers & File Search Plugin)
In order to ingest files and their permissions from Sharepoint, you will need to grant the below scopes for Moveworks to execute your content-level ACL permissions by ingesting your Sites, Pages, Files, Users, and Groups via the MSGraph API. This is used to enforce that users are only able to search for information from Pages/Files that they already have access to.
Follow this guide on how to sett up File Search from Sharepoint .For more on the reasons for the scopes, see File Search - Respecting File Permissions.
There are three different ways to do this depending on how your Moveworks AI Assistant is deployed:
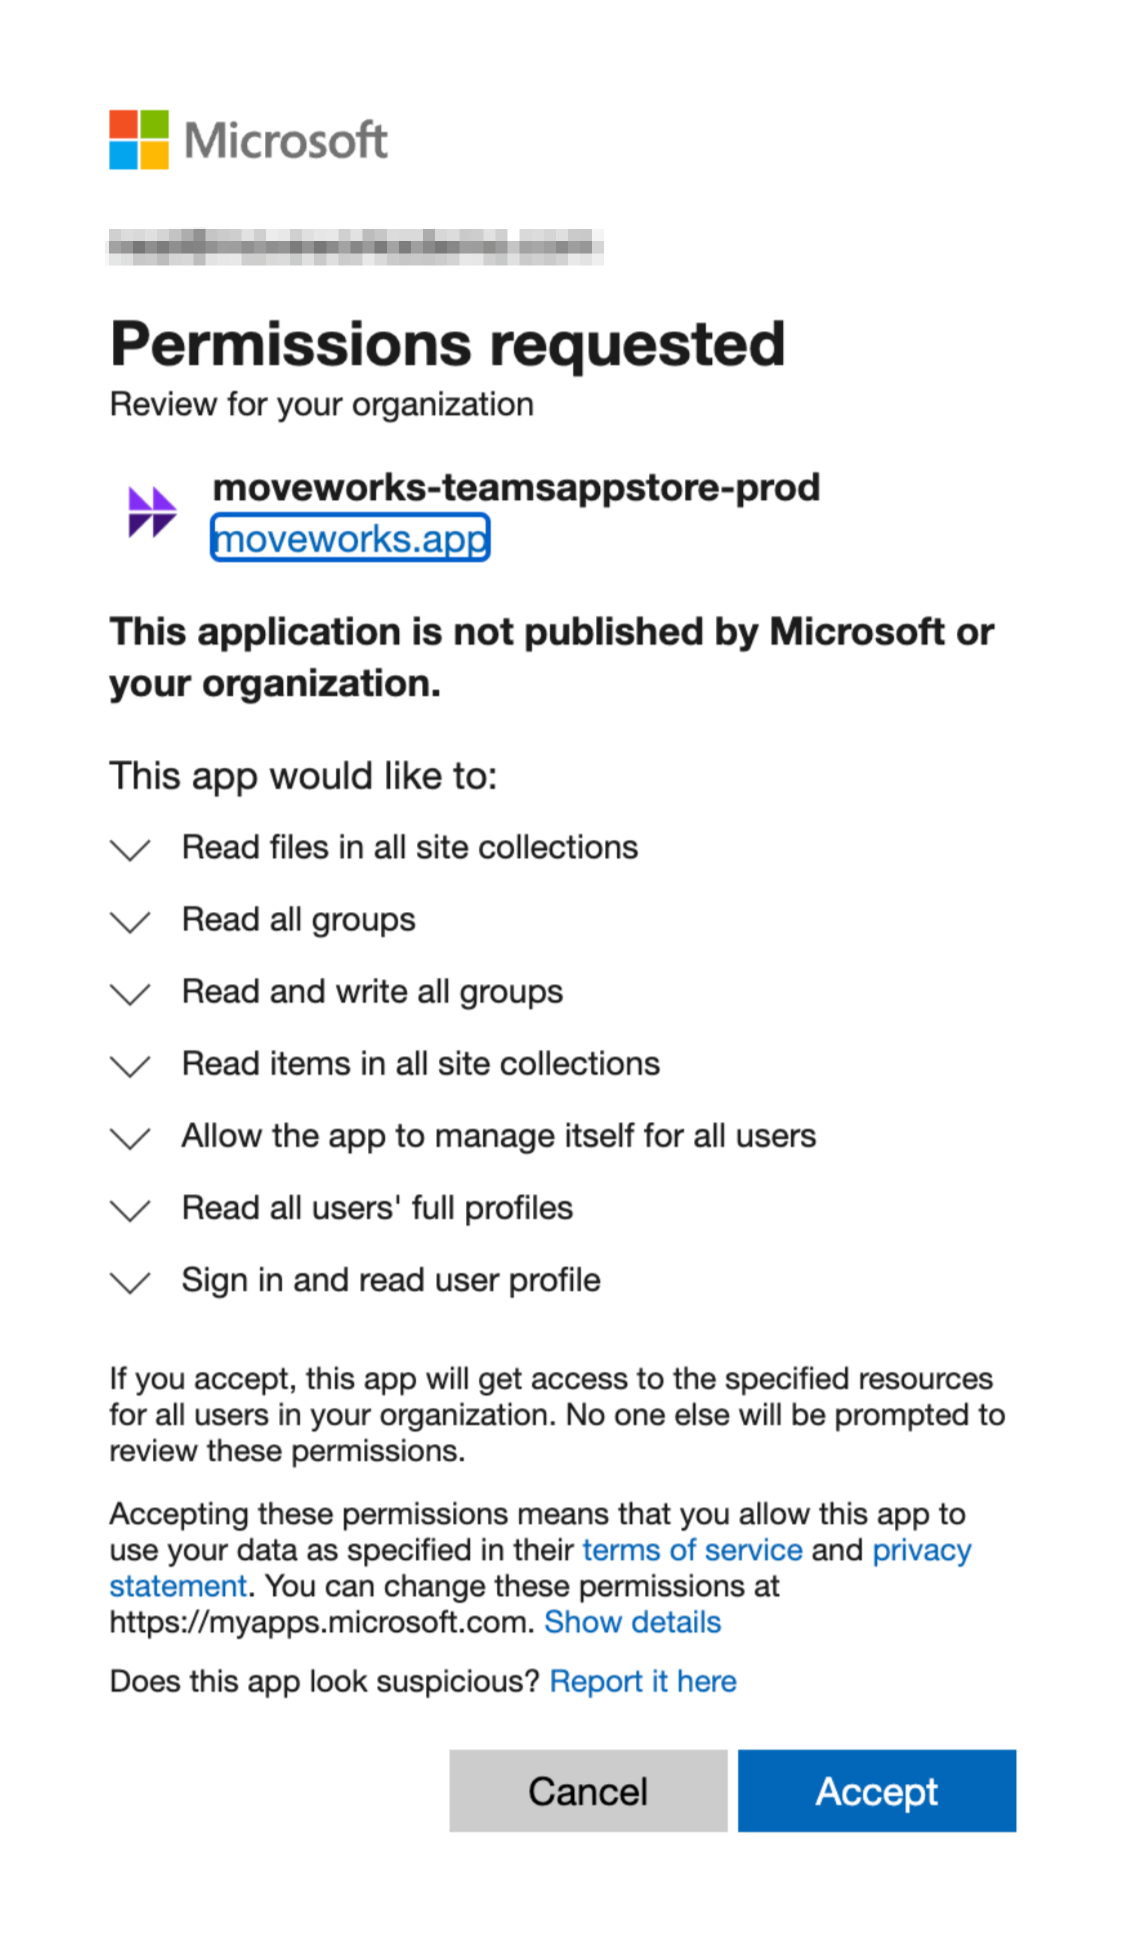
If you are using the Microsoft AppSource Moveworks Teams Bot
We have updated the app with the requested scopes necessary for us to read your permissions data. One of your Azure admins simply needs to consent to these additional requested scopes.
-
Simply navigate to the following URL, replacing <CUSTOMER_TENANT_ID> with the ID of the tenant to which you have installed the app, and click Accept:
If you are NOT using the Microsoft AppSource Moveworks Teams Bot and you ALREADY have a Moveworks Azure application
You will grant these permissions via the Azure admin portal by modifying your existing app.
-
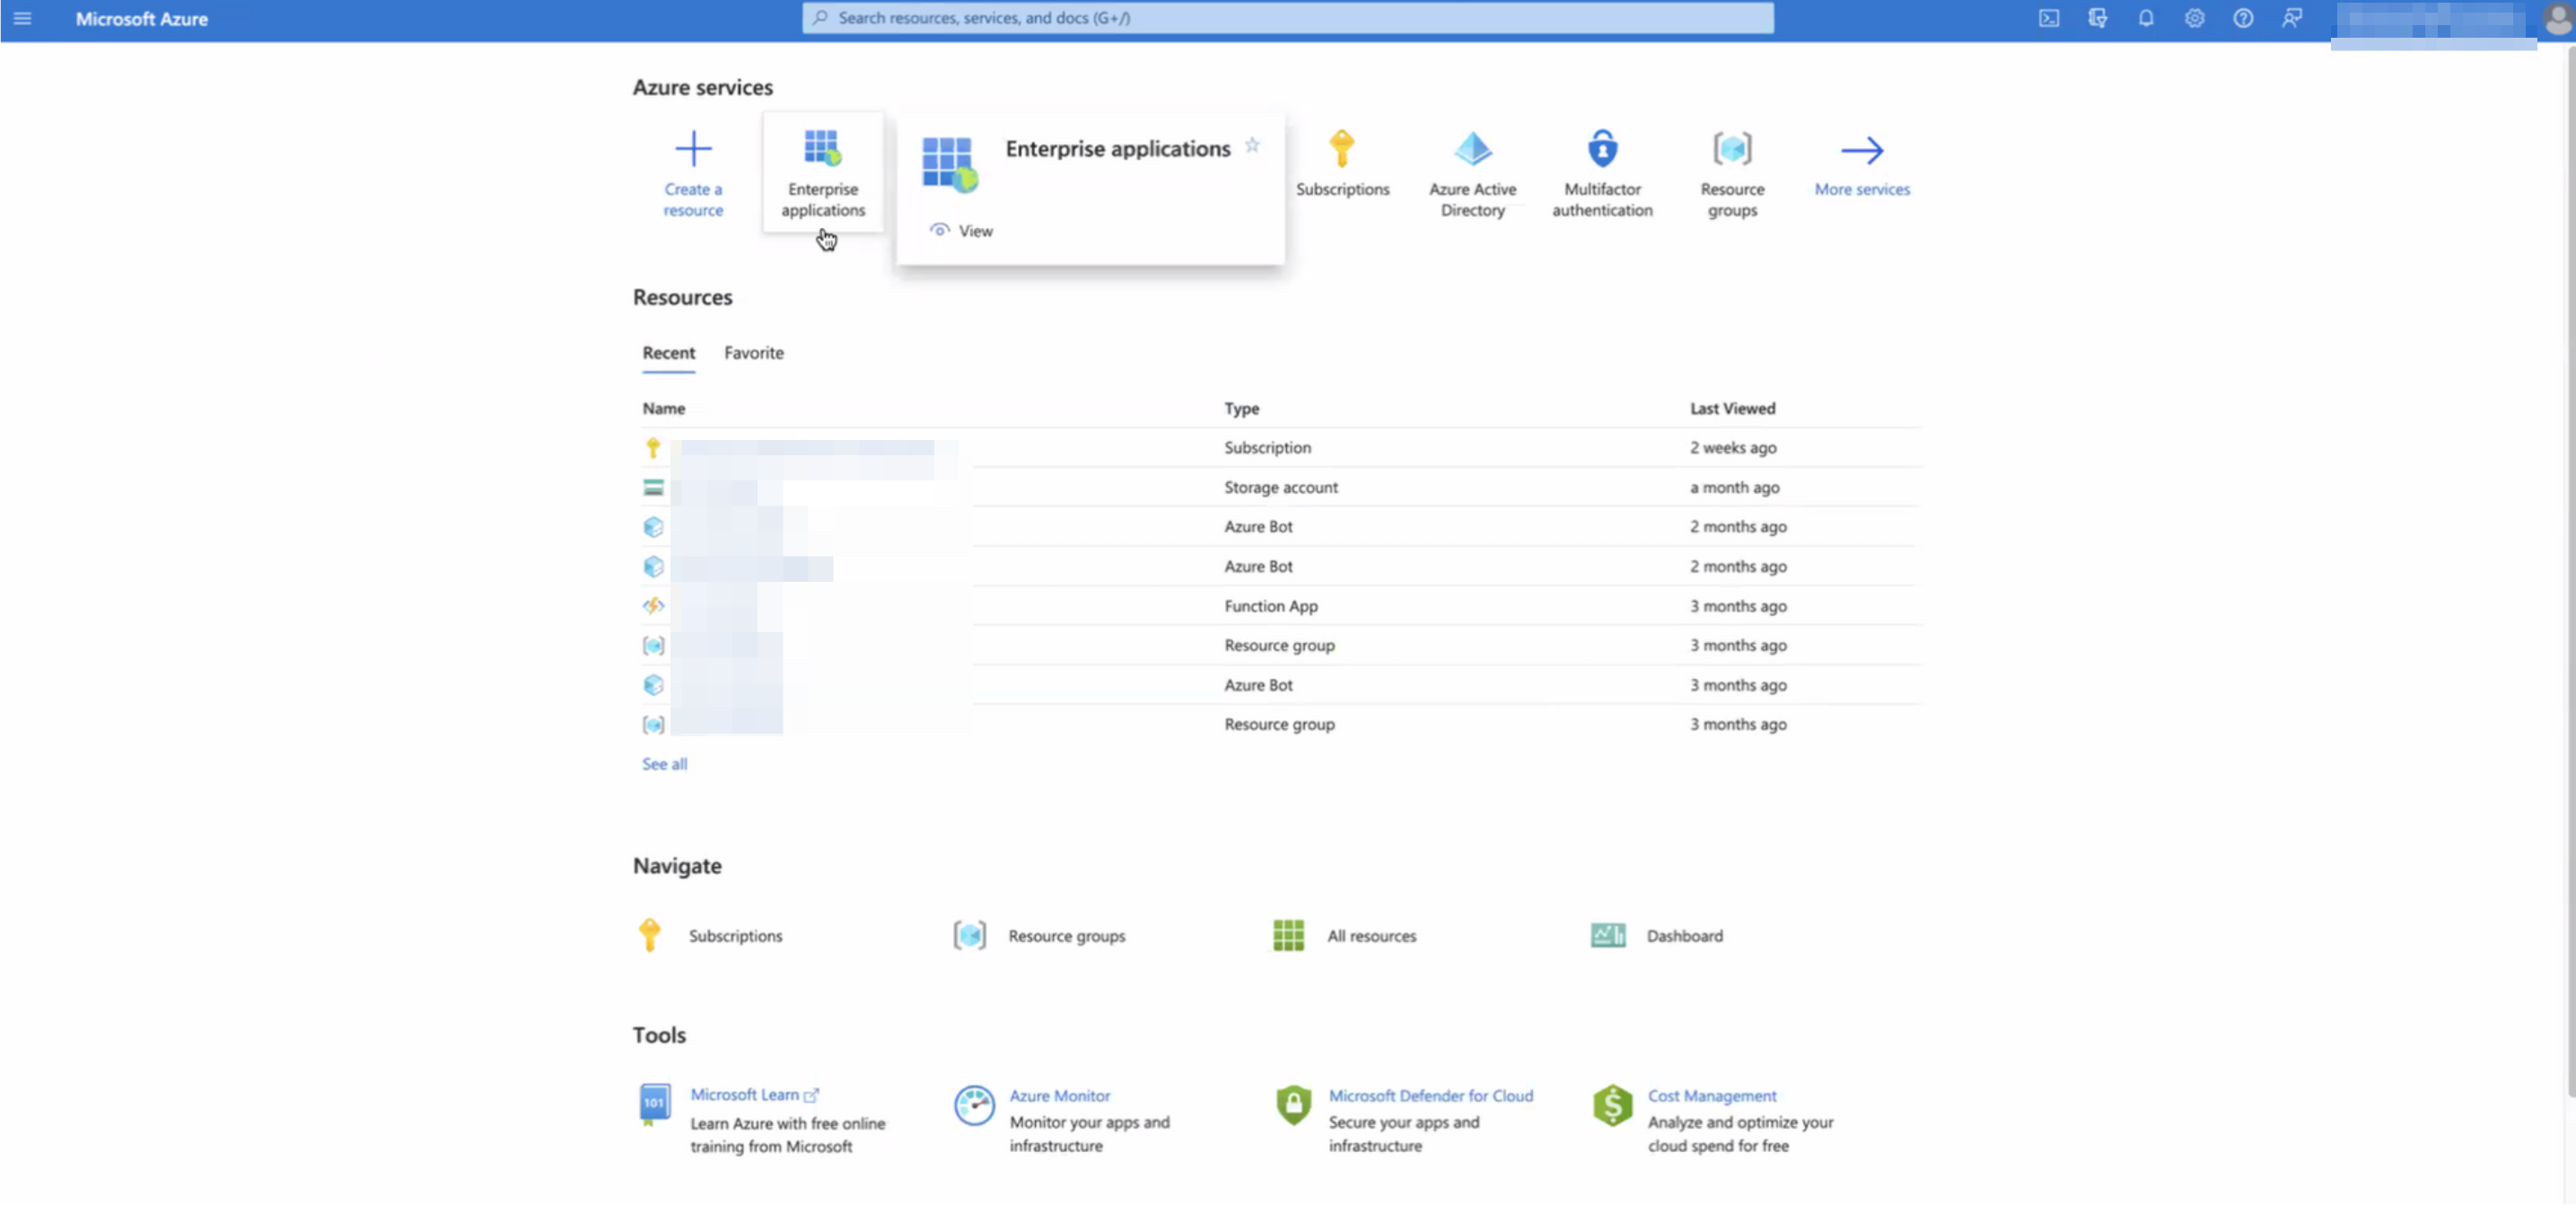
Go to your Microsoft Azure portal, and select Enterprise applications.
-
Search for the application to which you’ll be granting the new permissions. Note down its Application ID (aka App Id).

-
Navigate to this URL, replacing the end of the URL with your App Id:
https://portal.azure.com/#view/Microsoft_AAD_RegisteredApps/ApplicationMenuBlade/~/CallAnAPI/appId/{Application ID} -
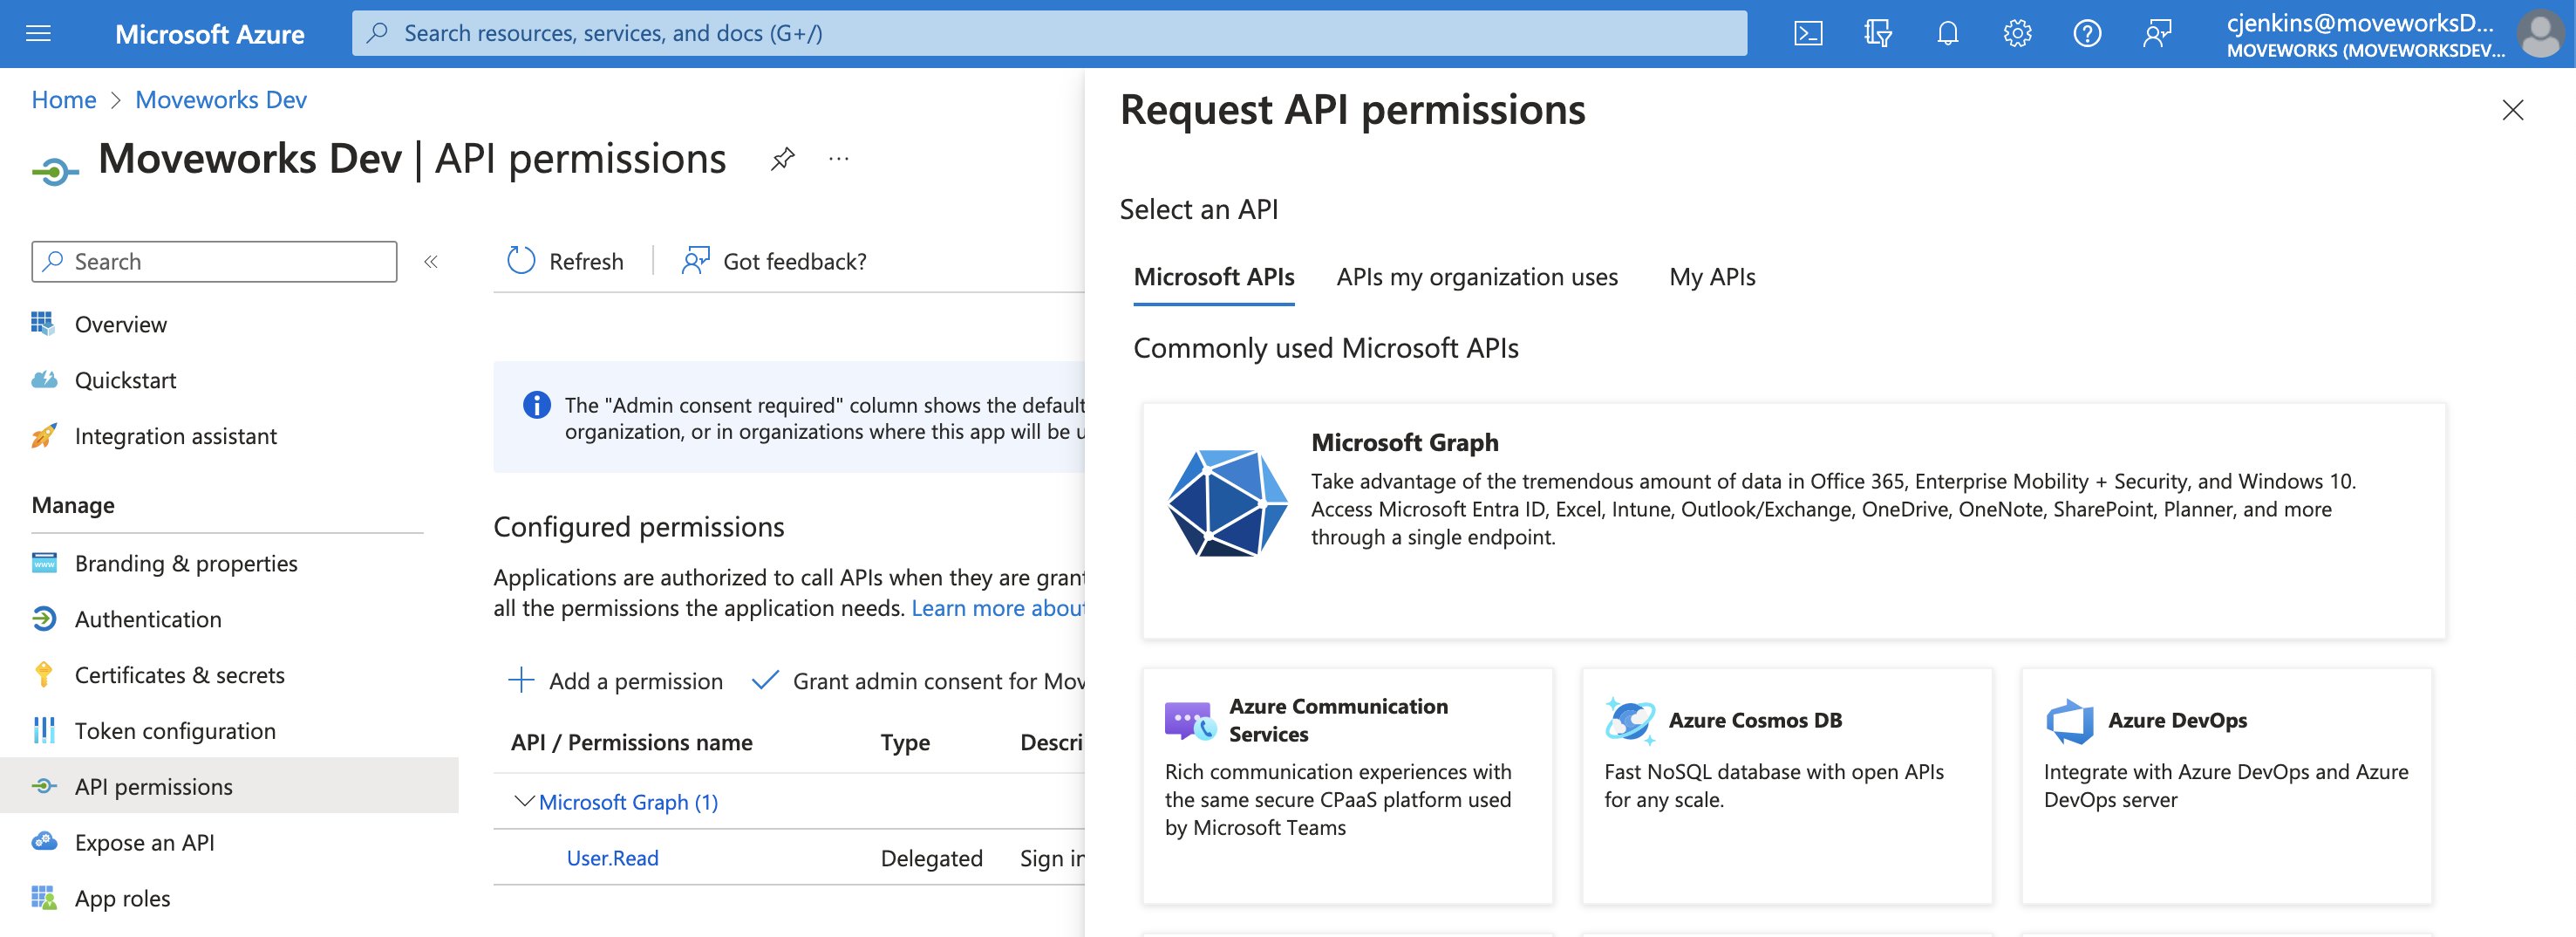
This will bring you to the API Permissions page for that application. You may already see some permissions configured for this application, some of which may already be ones we need. In the image below, however, you’ll see this app only has User.Read, and that is not one of the four permissions we need, so we need to add all four.

-
Click Add Permission.

-
This will open a panel on the right side:
-
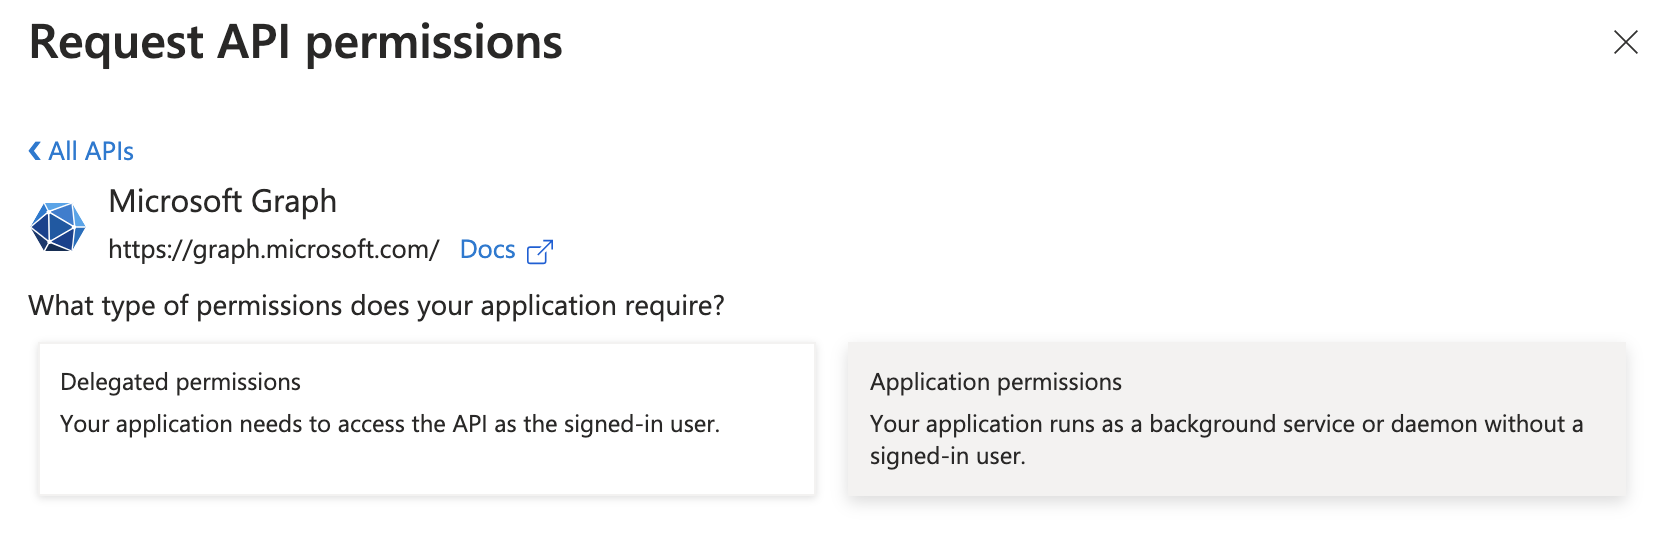
Click on Microsoft Graph.

-
Click on Application permissions.
-
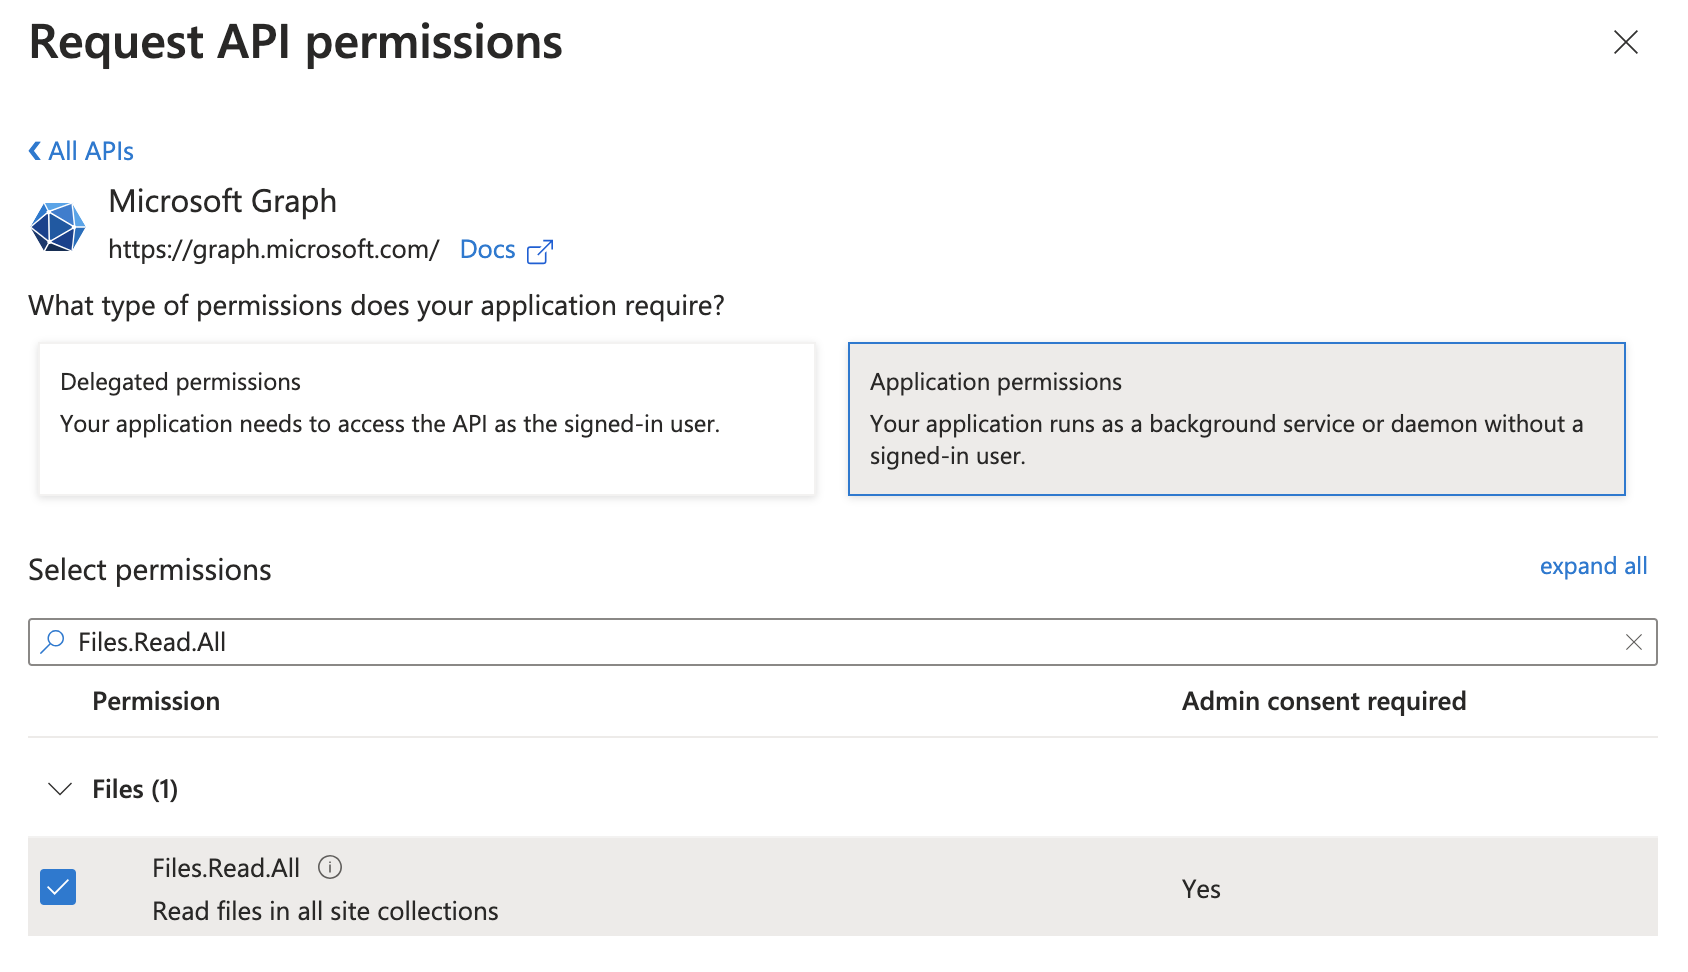
A search bar will appear.
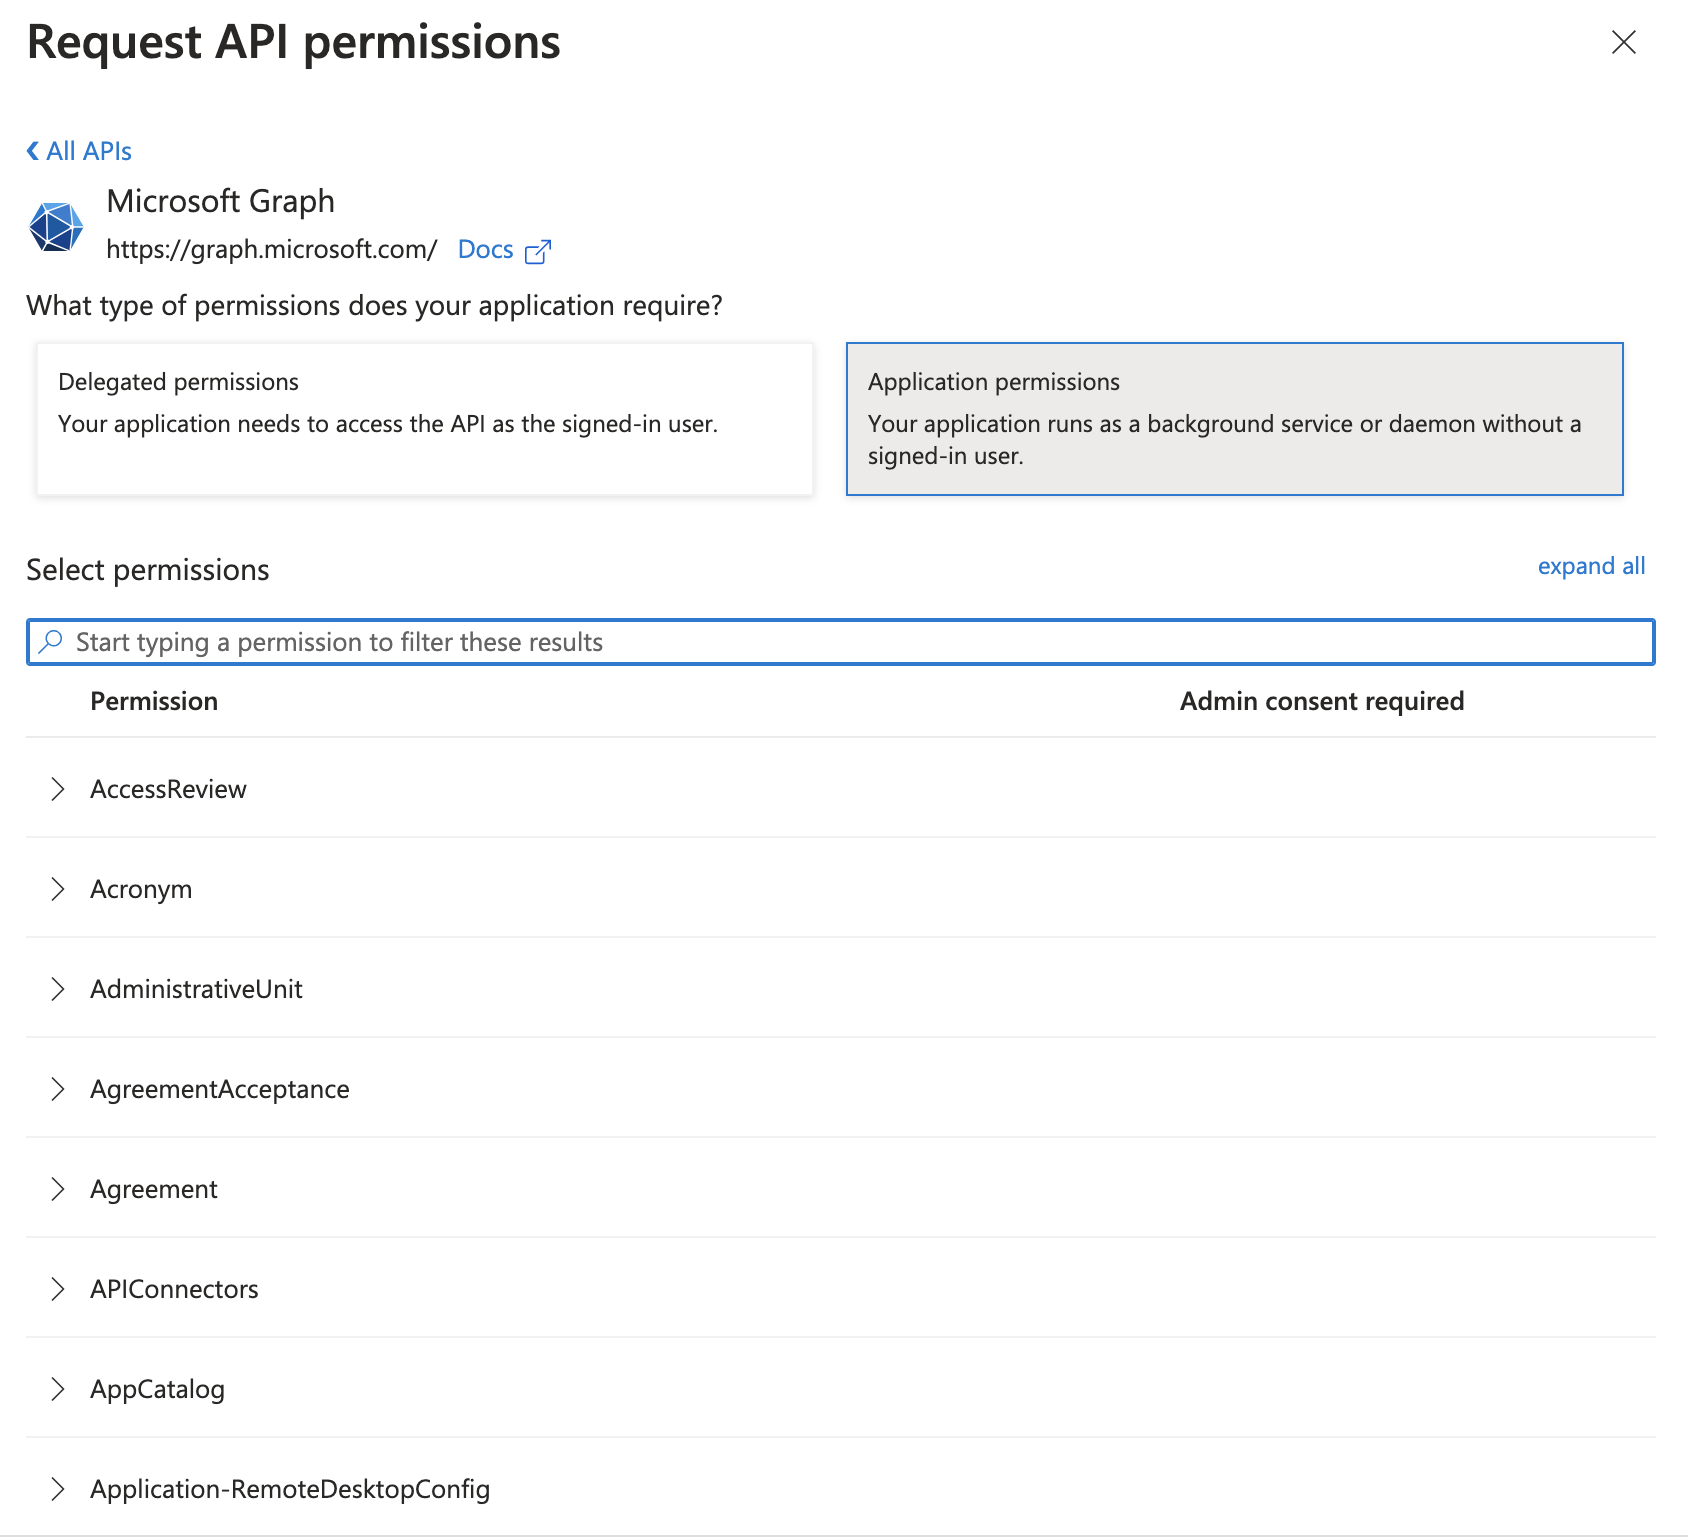
-
Search for the permissions you need to grant (noted above) and check the box for each.
-
Once they’ve all been checked, click Add permissions.

-
You’ll now see all the newly added permissions alongside any you previously had granted the app, however, the new ones will have a status of “Not granted for” your organization.
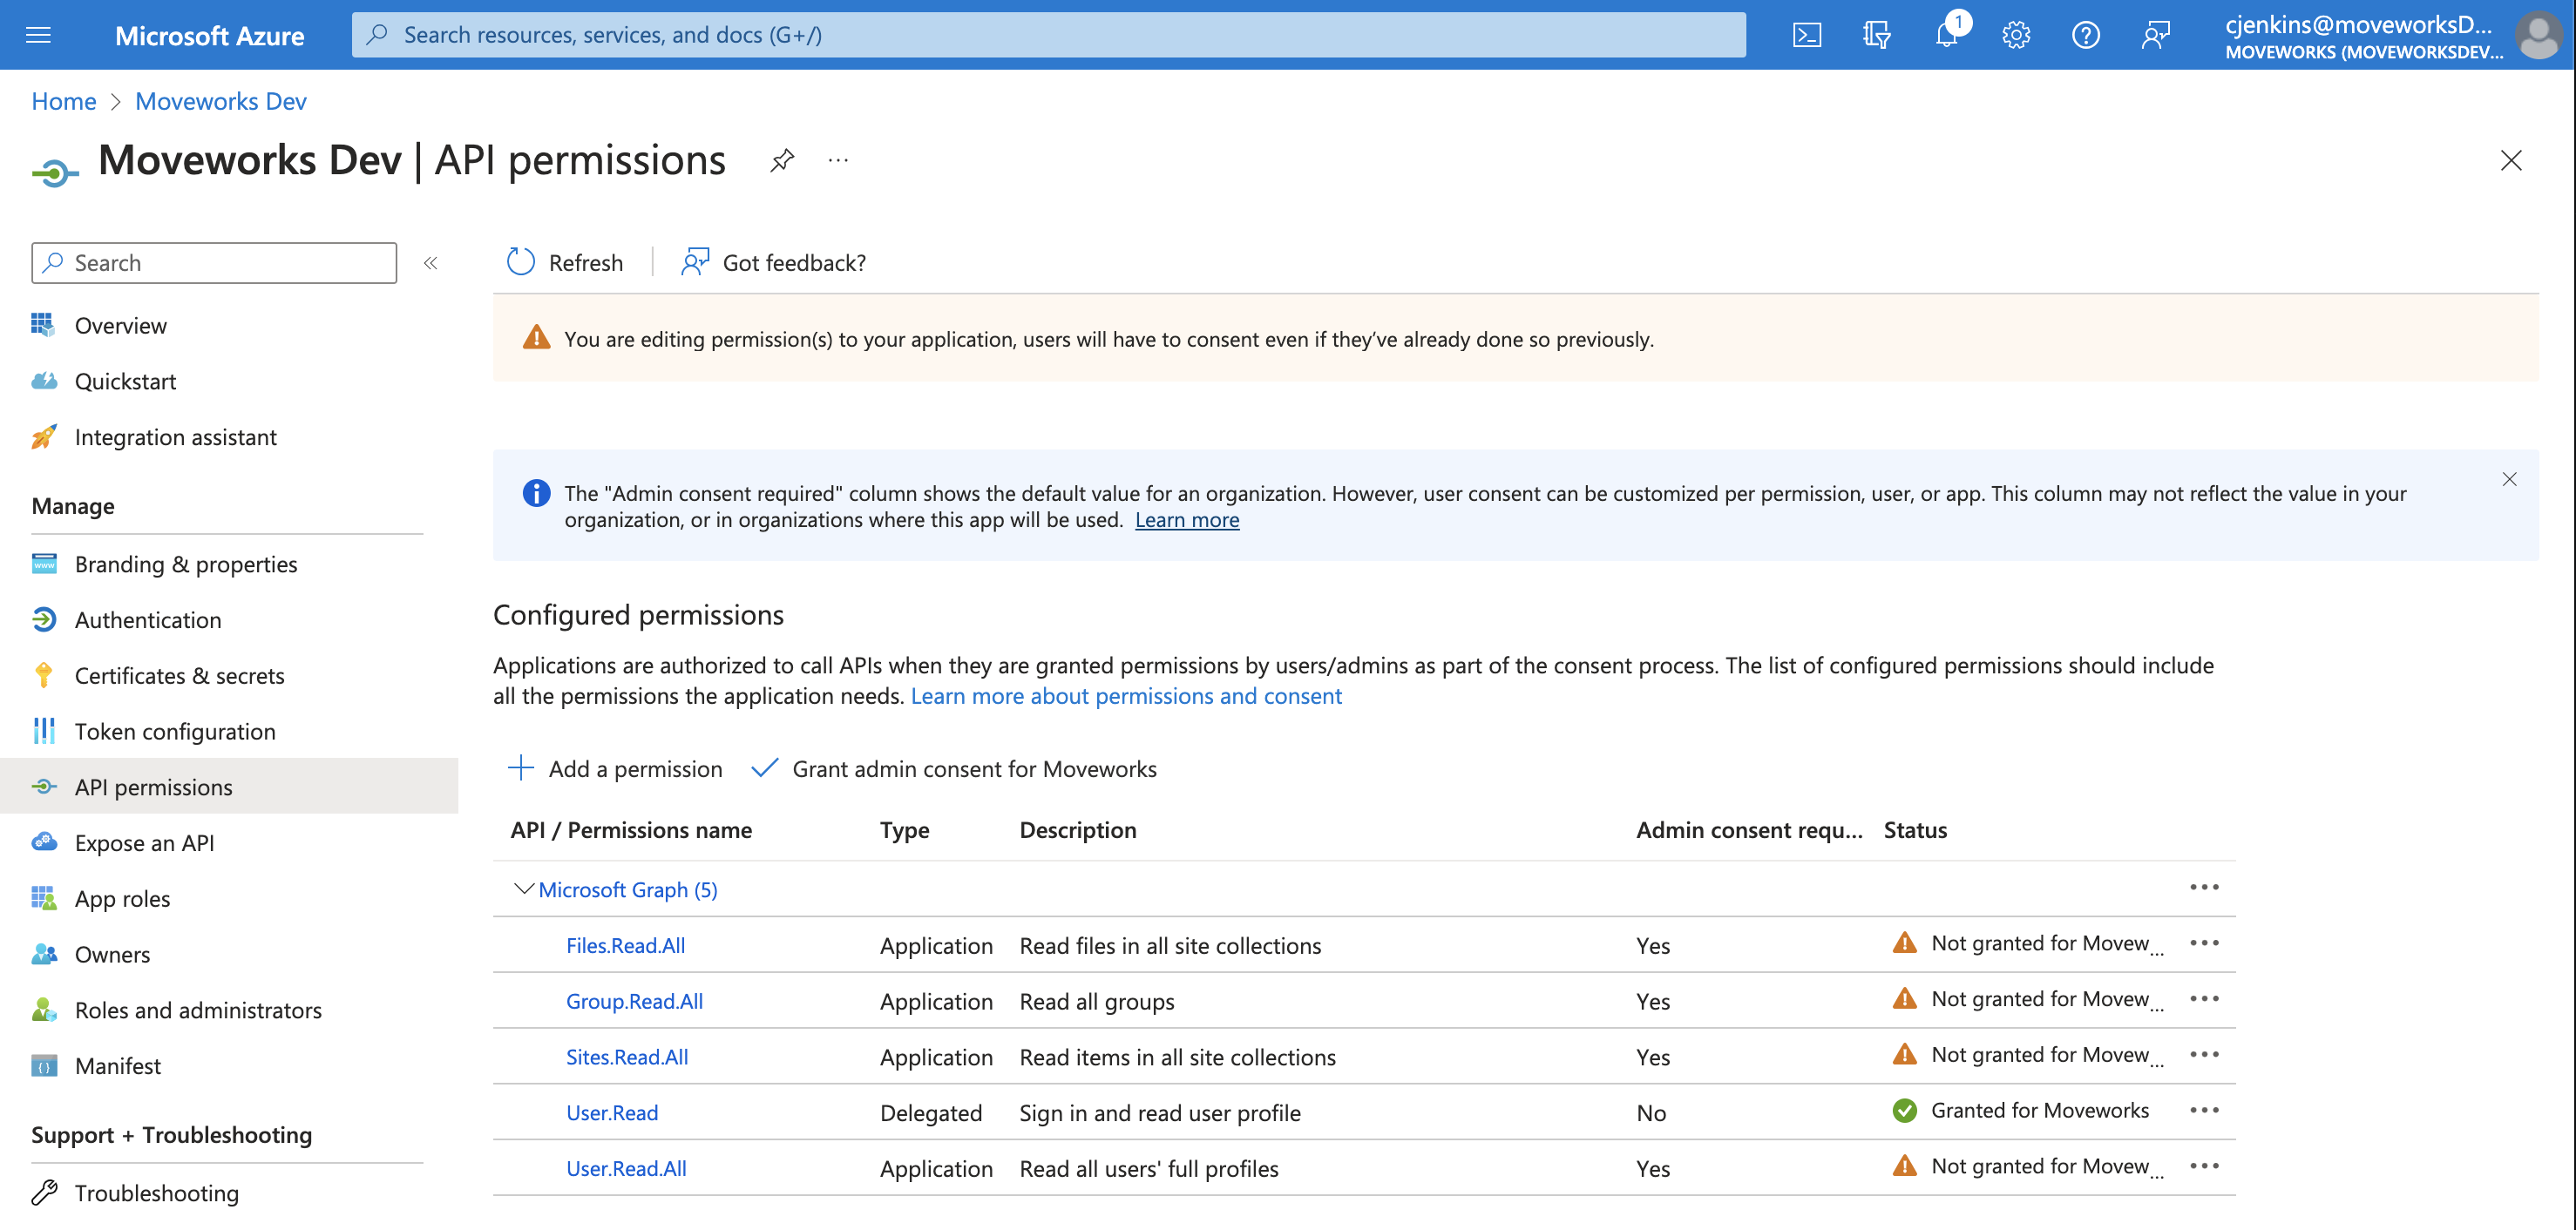
-
To complete the process, click Grant admin consent for your organization.

-
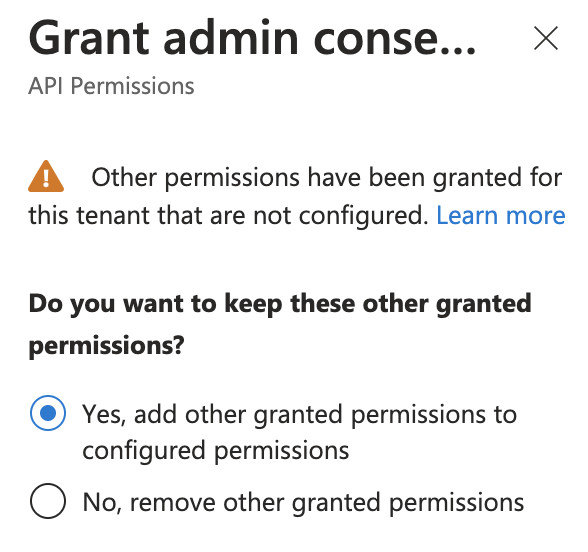
If this panel appears, click Yes, add other granted permissions to configured permissions then Save and continue, then Grant admin consent, and then Yes.
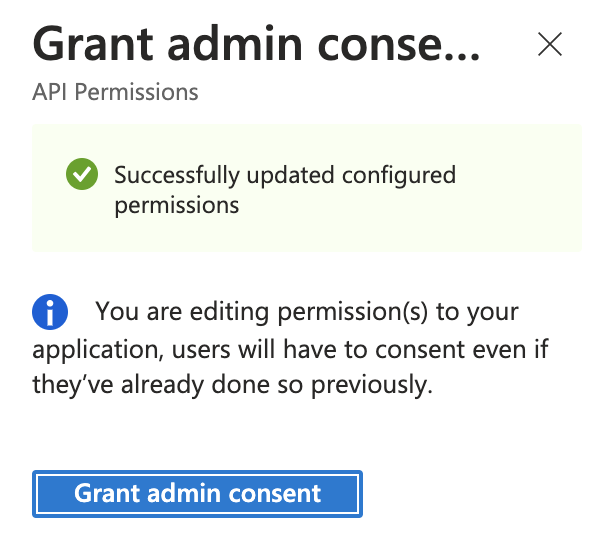
-
You will see green checkmarks on the newly added permissions if this was successful.
If you are NOT using the Microsoft AppSource Moveworks Teams Bot and you DO NOT ALREADY have a Moveworks Azure application
You will be creating a new app in the Azure admin portal with these permissions.
- Follow this guide, completing all the steps up through and including “Provide the Credentials to the Moveworks Customer Success team” (but skipping the “Verify Azure Manifest” step).
- As you do this, when you reach the step titled “Add API Permissions” also add and grant consent for the permissions noted above (Files.Read.All, Sites.Read.All, Group.Read.All, User.Read.All).
- You will not need to worry about connecting this to Teams, so please disregard references to doing so.
3. Create Connectors in Moveworks Setup
In this step, you will create the Connectors in your Moveworks Setup portal, using the credentials that you have configured above. If you have not been granted access to Moveworks Setup, please provide your credentials to your Customer Success team, who will help you create your Connectors and configure your Content Ingestions, akin to the following steps.
Get App ID
If you have a Microsoft Teams App Store Bot, use the App ID for Microsoft Team App Store Chatbot for Moveworks: b8ec4e1a-e05a-49d0-ba3a-05119b8b62c0 and proceed to the next step in this guide, to create the MSGraph and Sharepoint Online Connectors in Moveworks Setup using this AppID.
If you don’t have a Moveworks Teams App Store Chatbot, but do have a Teams Bot with an AzureBot/Bot Channel Registration in your own tenant, then go to portal.azure.com to find the App ID, save those credentials, and proceed to the next step in this guide, to create the MSGraph and Sharepoint Online Connectors in Moveworks Setup using this AppID.
If you use Slack, or another Chat platform, and have never set up a Microsoft Teams Chatbot for Moveworks, then follow these steps to set up a Microsoft App Registration first here: Creating a Microsoft App Registration for Moveworks, before proceeding to the next step in this guide.
Create Two Connectors in Moveworks Setup: One MSGraph Connector and One Sharepoint Online Connector
See Creating a Microsoft App Registration for Moveworks.
-
Configure one of each of the following connectors, as both will be required for Content Ingestion.
-
Start by navigating to the Connector > System Connectors module in your Moveworks Setup portal.
-
If you have not already, create the Microsoft Graph connector.
-
📘Set up the Microsoft Graph connector, DO NOT use the Sharepoint Online (via Microsoft Graph)
- Use OAuth2, select Client Credentials, and enter your Client ID, Client Secret, and Tenant ID
-
-
If you have not already, create the Sharepoint Online Connector (Classic method)
📘Set up the Sharepoint Online Connector using the Classic method
When setting up the Sharepoint Online Connector for File Search, select the Sharepoint Online (Classic method).
DO NOT use the Sharepoint Online (via Microsoft Graph)
-
If working with Moveworks’ Customer Success teams, send over via secure email the following credentials
- Client ID
- Tenant
- X5t value from Step 1
- To use X5t with SHA256, check the Use SHA-256 Algorithm first, and then upload your X5t value from Step 1.
- To use X5t with SHA1, directly input the X5t value from Step 1.
- privateKey from Step 1
-
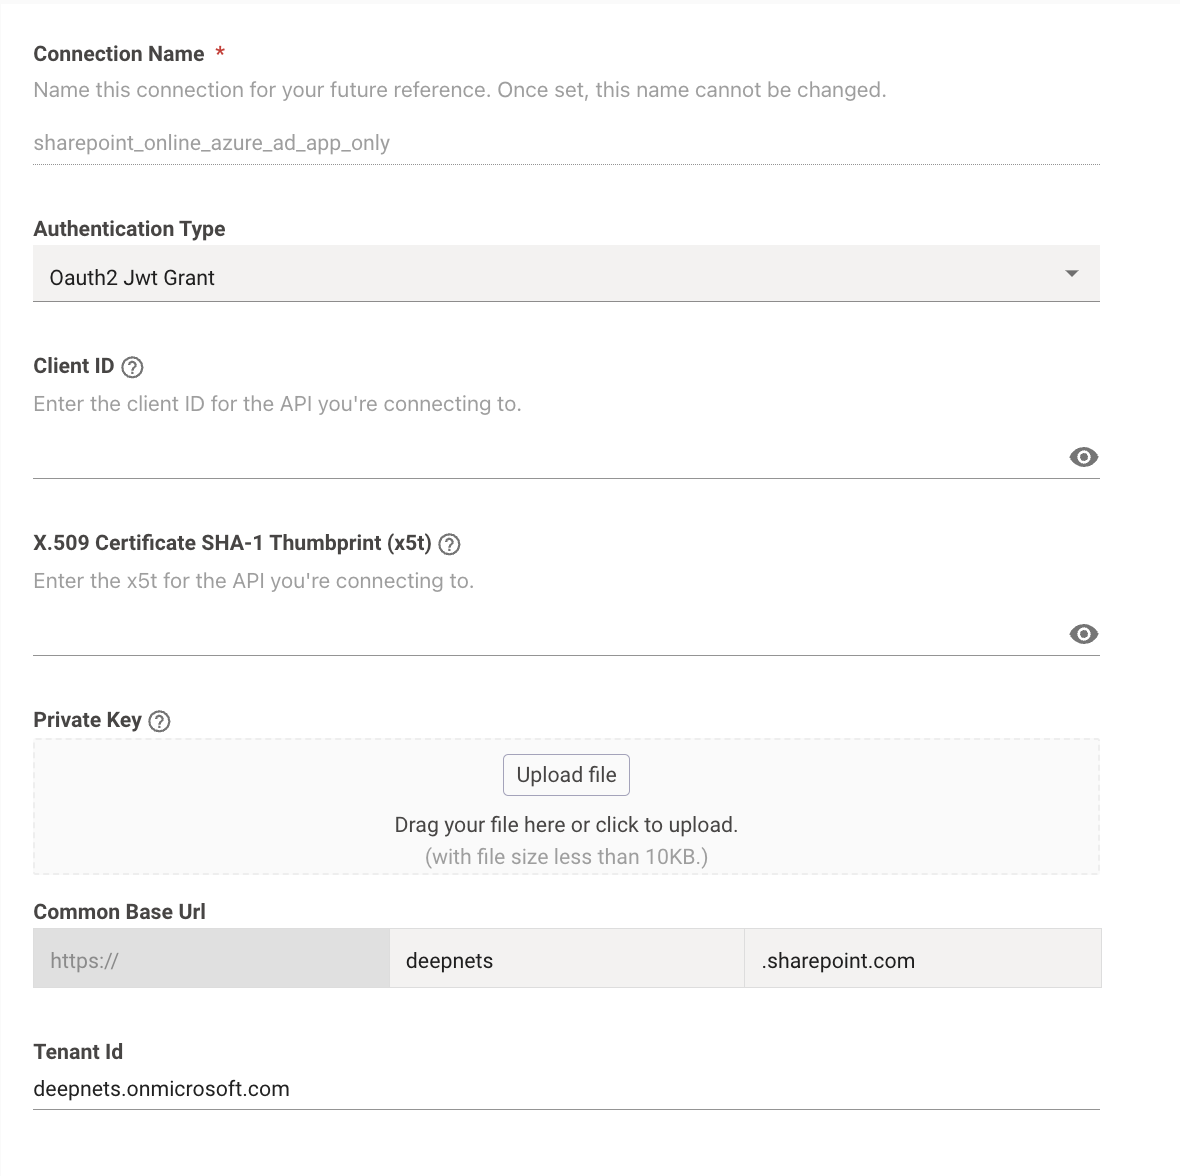
If self-serving configurations via Moveworks Setup, create a Sharepoint Online (Classic Method) connector
-
Select the following authentication method Oauth2 Jwt Grant
-
-
Input the following credentials
- Base URL
- Client ID
- Tenant ID
- X5t Value
- Private Key
-
4. Share your Content Ingestion plan.
Now that you have created your connectors, please get in touch with your Customer Success team and share the details of what content you want to ingest with them - the name of the Sites from where you want to ingest content(Pages, Files) from, and (optionally) the name of any specific Library or Folder from your Sharepoint Sites if you want to restrict the ingestion to them.
Your Customer Success team will then configure the ingestion based on your plan.
Updated 8 days ago