Configuring Sharepoint Online Files Ingestion [Classic]
This Document outlines how Moveworks Integrates with Sharepoint Online to ingest and serve up Files.
This page is for the Microsoft Graph and SharePoint Online classic connectors.
To utilize the new enterprise search configuration experience using the SharePoint and OneDrive (Next Gen) connector, please visit this documentation.
The following guide will walk you through the steps for configuring and setting up Sharepoint File Search via Moveworks Setup. Before we start the Configuration it is important to understand how Moveworks Integrates with Sharepoint to ingest the Files and Knowledge Content.
There are 2 connectors required to Integrate with Sharepoint to ingest the Files and Permissions :
- Microsoft Graph Connector
- This connector is responsible for the Ingestion of the Files from Sharepoint as it is the Graph API that gives us access to the Sites.
- This connector is also responsible for Ingestion of MS Graph Permissions assigned via Azure Portal.
- This connector is also used in Identity Configuration in order to ingest and map the permissions and content information since it is tied to the Graph APIs
- Sharepoint Online Connector
- This connector is responsible for ingestion of Sharepoint Permissions Groups assigned to the Sites.
Moveworks leverages both connectors to ingest the content and permissions and associate them in order to support Mirroring.
Pre-requisites
- Ensure you have read through the Sharepoint Access Requirements Document which walks you through the process of providing the required API permissions and creating the Azure Application.
1. Creating the Connectors
In order to Support the Ingestion of Files and Permissions, we need to create 2 Connectors which are the Sharepoint Online and MS_Graph Connector.
Microsoft Graph Connector Creation
-
Start by navigating to the Connector Page in Moveworks Setup under the Core Platform Module.
-
Click on Create New and search for the Microsoft Graph Connector and Add Credentials

-
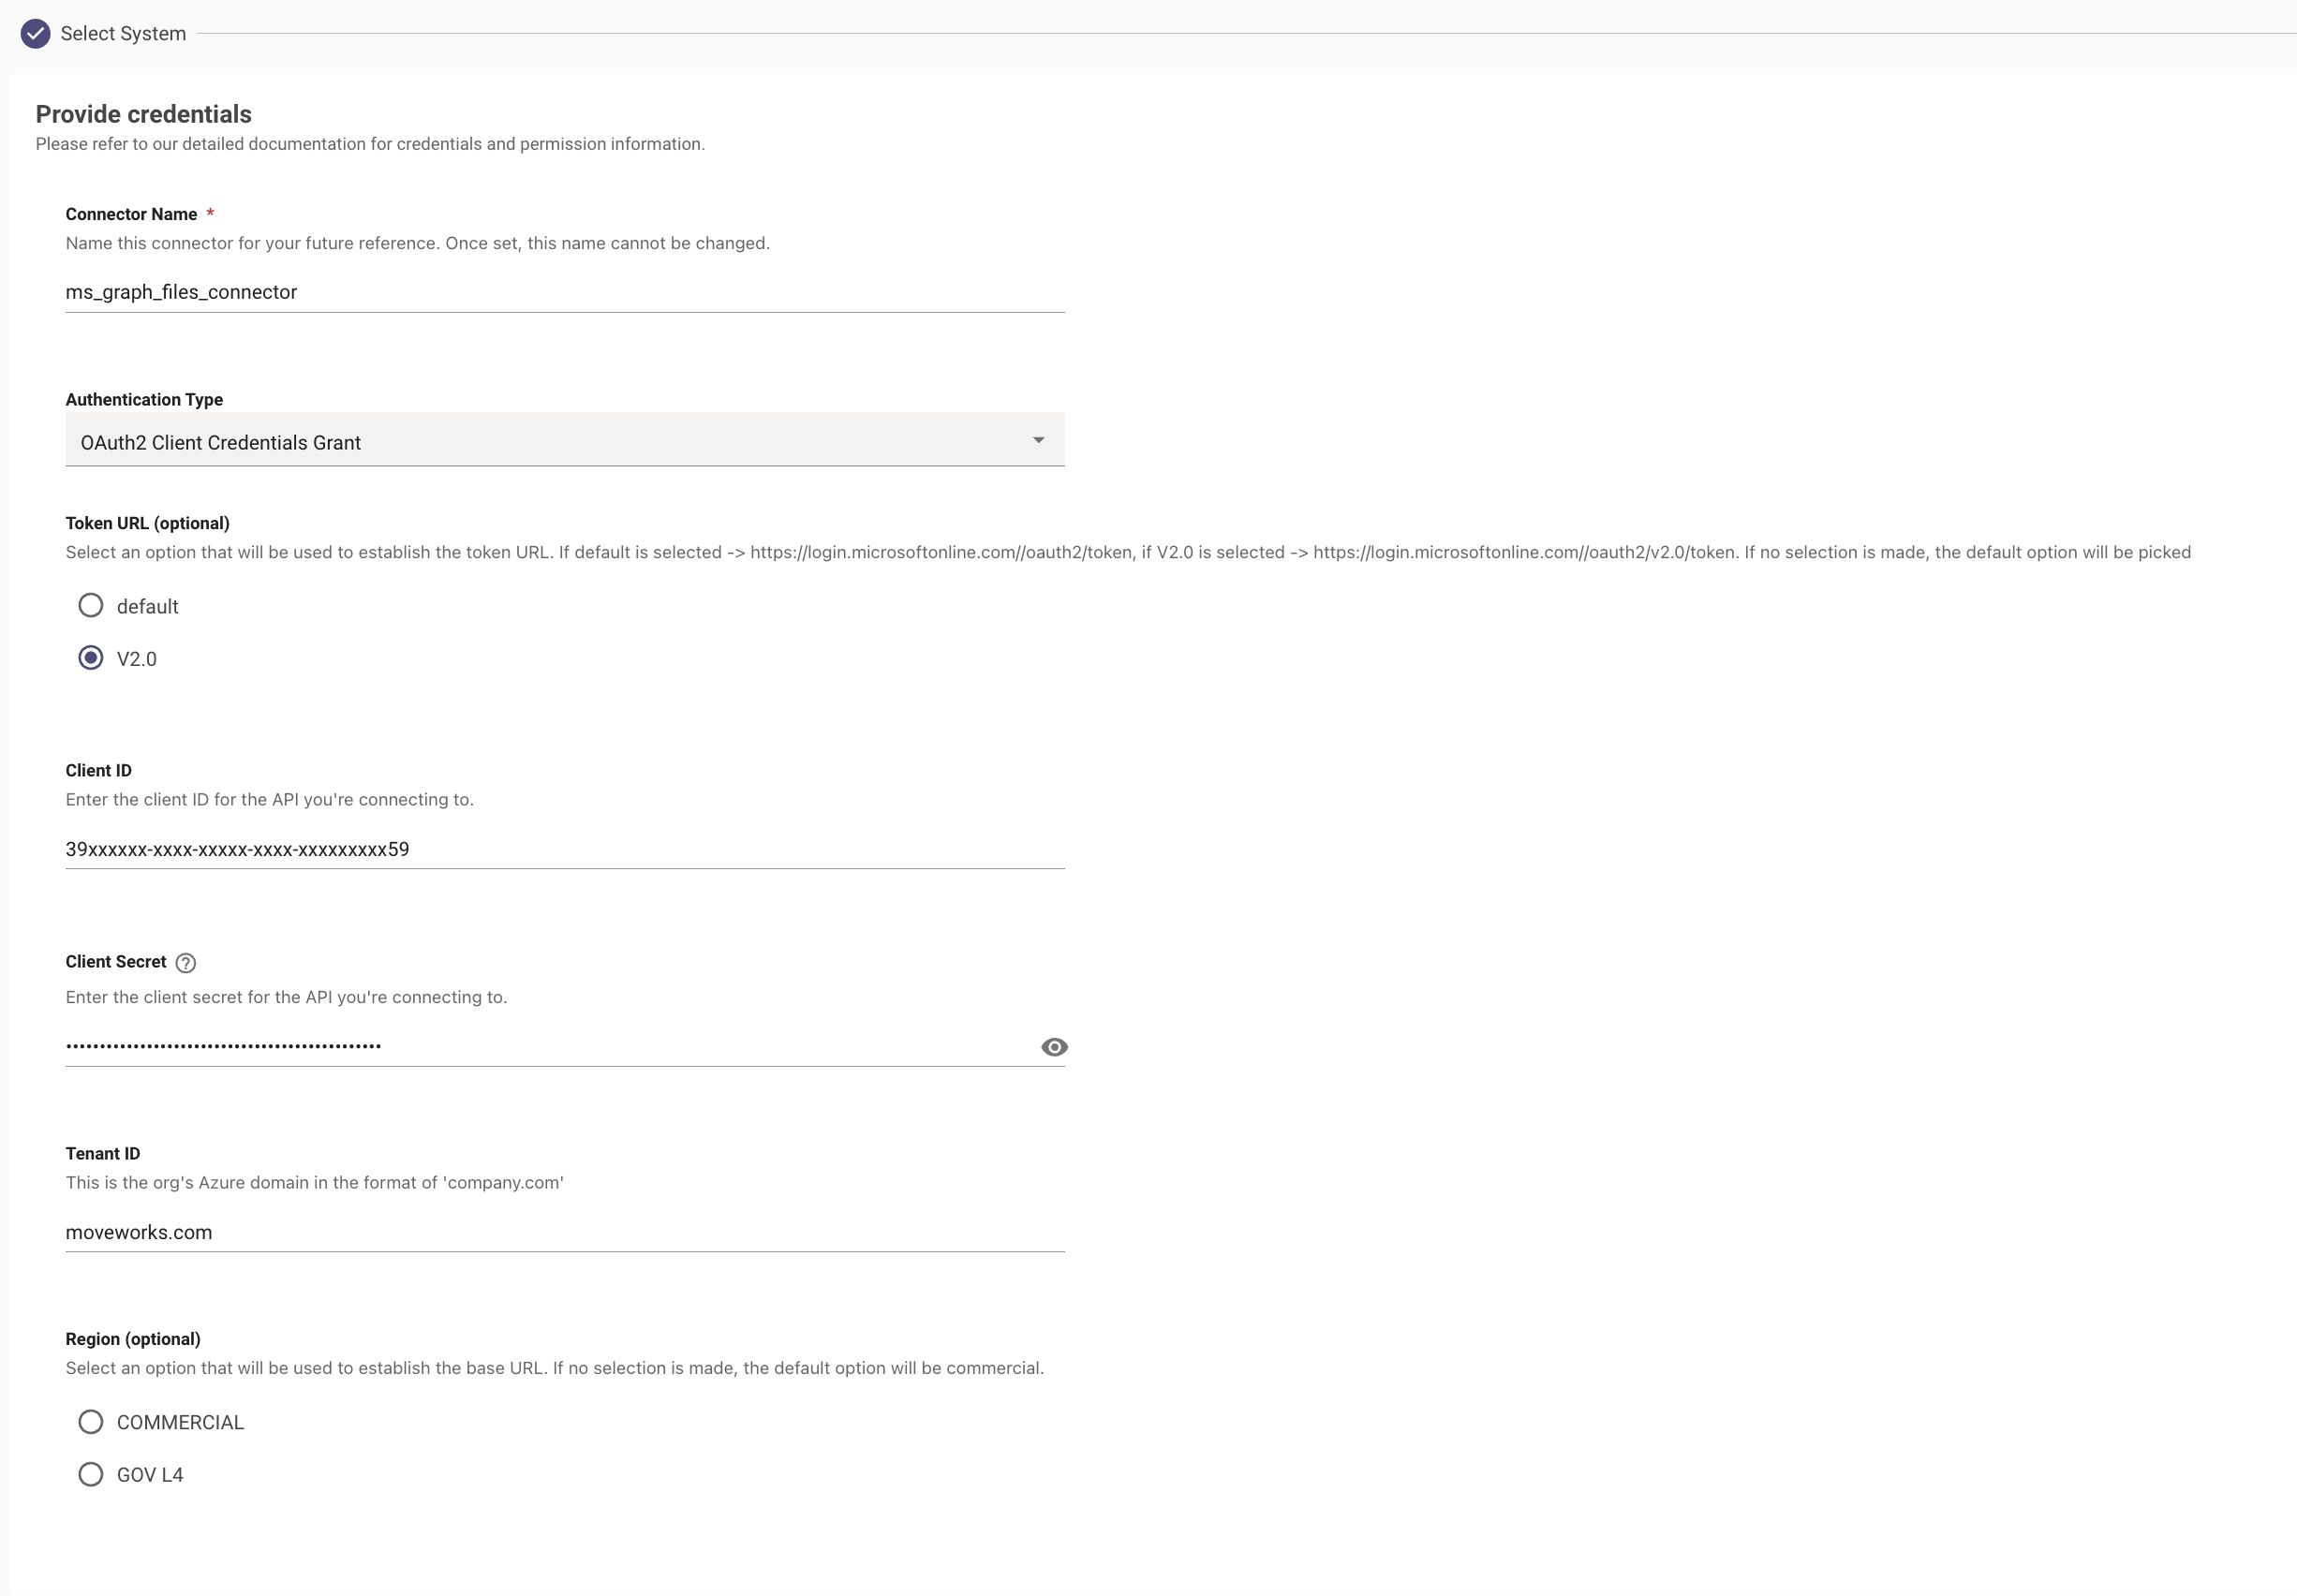
Start by providing a Name to the connector so it defines the function it supports. In this example we are labelling the connector ms_graph_files_connector Note: The same Connector name will be used for ingestion Identity Info at a later stage
-
For Authentication Type Use OAuth2, select Client Credentials, and enter your Client ID, Client Secret, and Tenant ID which was generated via the Azure Application here.
-
Input the following credentials which have all been generated by following the guide here.
- Client ID
- Client Secret
- Tenant ID
This completes the process of creating the Microsoft Graph Connector. Next we need to create the Sharepoint Connector.
Sharepoint Connector Creation
-
Start by navigating to the Connector Page in Moveworks Setup under the Core Platform Module.
-
Click on Create New and search for the Sharepoint Online(Classic Method) Connector and Add Credentials

-
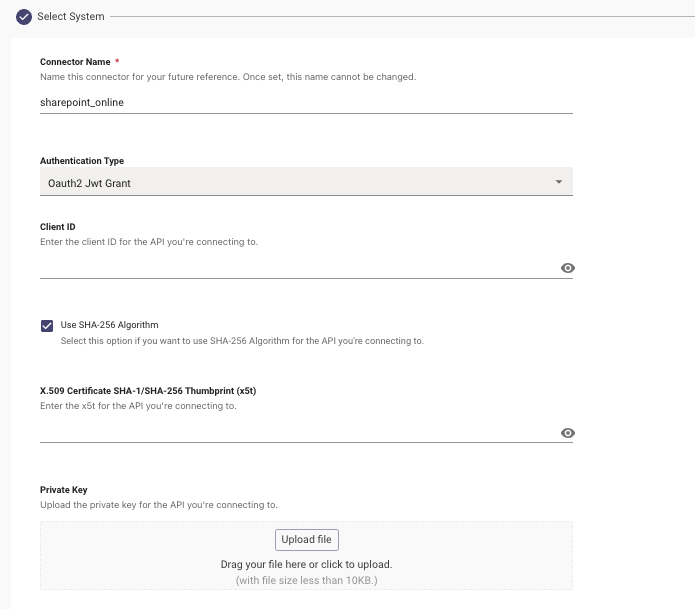
Start by providing a Name to the connector so it defines the function it supports. In this example we are labelling the connector sharepoint_online
-
Select the Authentication type to be Oauth2 JWT Grant
-
Provide the Client ID
-
Check the Box for Use SHA-256 Algorithm if this is how the X5t value was generated here
-
Provide the X.509 Certificate SHA-1/SHA-256 Thumbprint (x5t)
-
Upload the Private .pem key
-
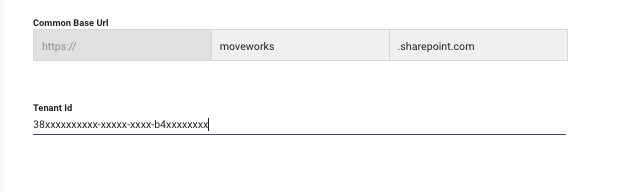
Provide the Common Base URL for the Sharepoint Root Site
-
Provide the Tenant ID
-
-
Save the Connector !
This completes the process of creating the Sharepoint Online Connector.
2. Ingesting Identity from Microsoft Graph
In order for Moveworks to Mirror permissions associated with Files, Identity information for the users associated with the Azure application needs to be ingested as this provides us access to the user tokens which will be checked against the content resource token to mirror permissions.
-
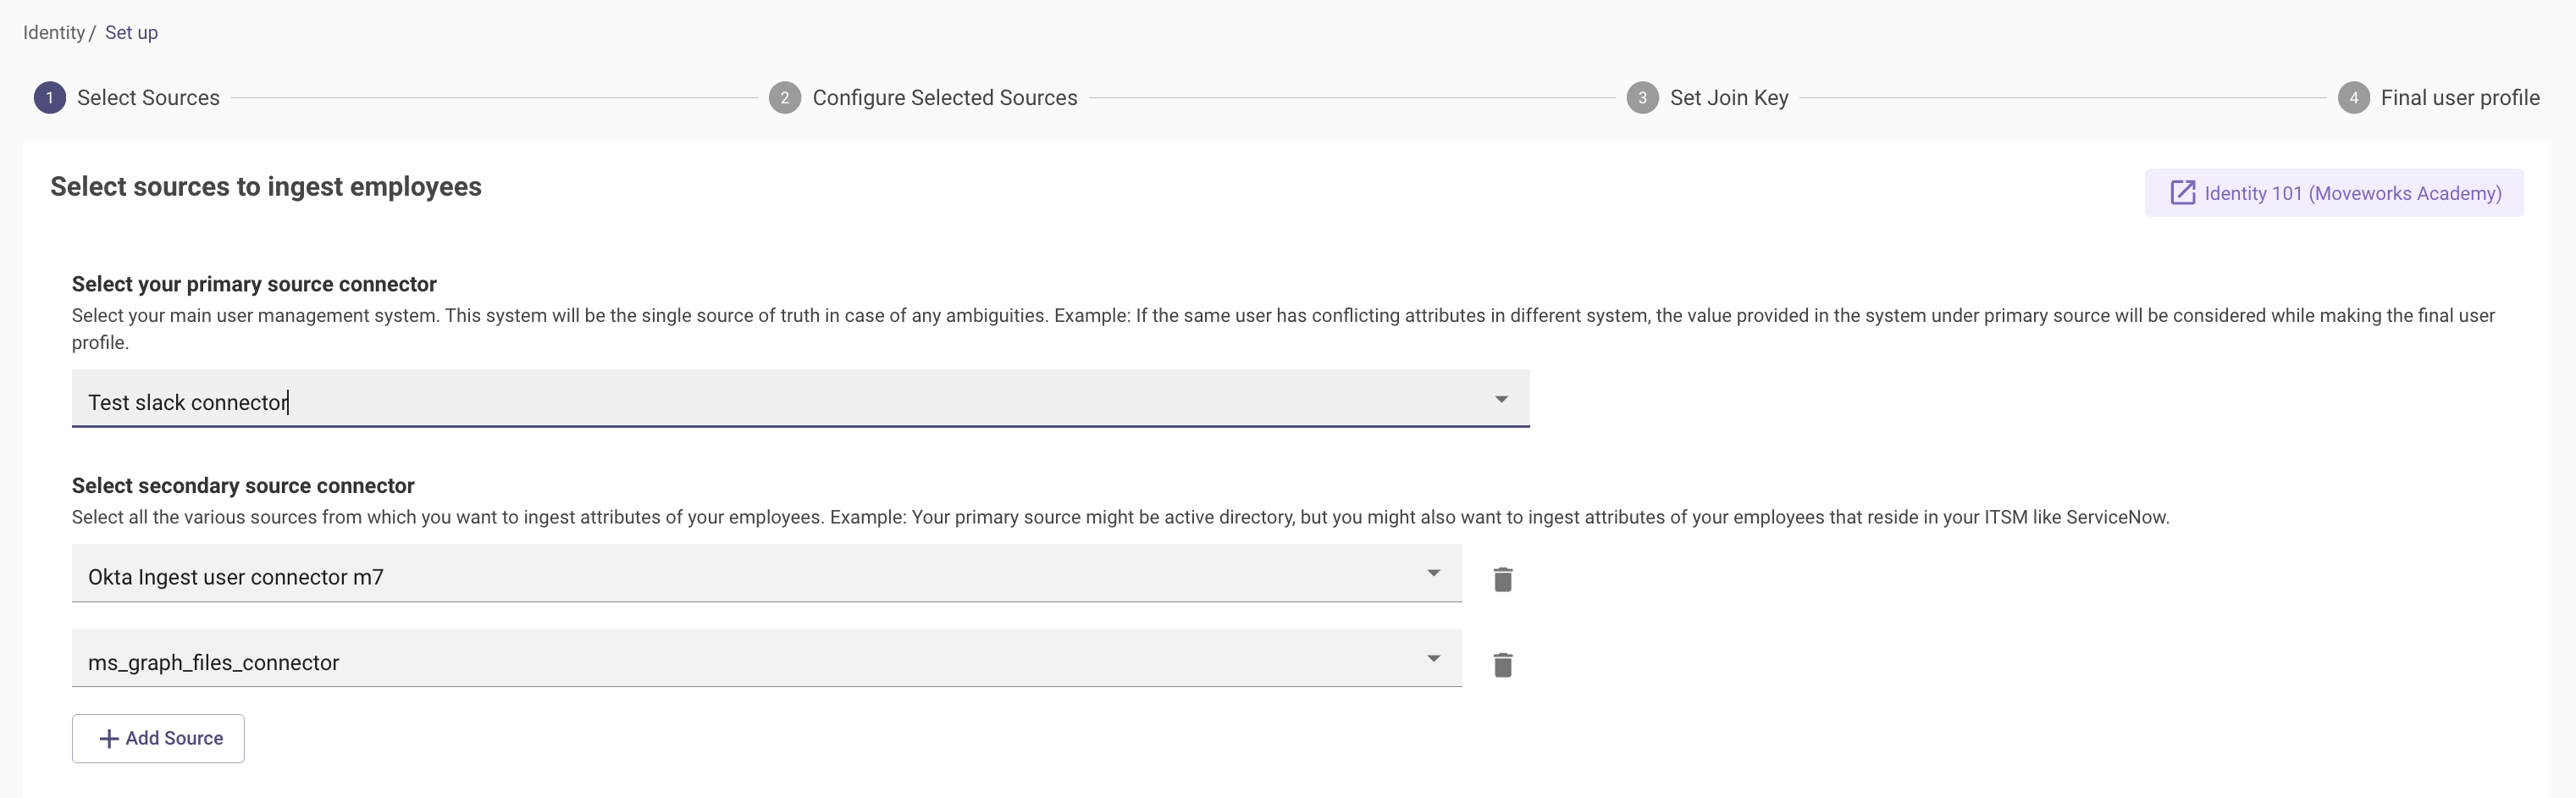
Navigate to User Identity > Import Users under the Core Platform Module. Click on Edit to start the process.

-
Add the new Microsoft Graph Connector we created under the Secondary Sources by clicking on Add Source. Here we have added the ms_graph_files_connector.
-
Move to the next Step to Configure the Selected Sources. Here we will click on the Advanced Mode Toggle in order to define the Source Attribute mapper which will be responsible for ingesting the data.

-
Add a new Integration on this Page, you will find the button above the Joining Key Field. Select the Graph connector created here.
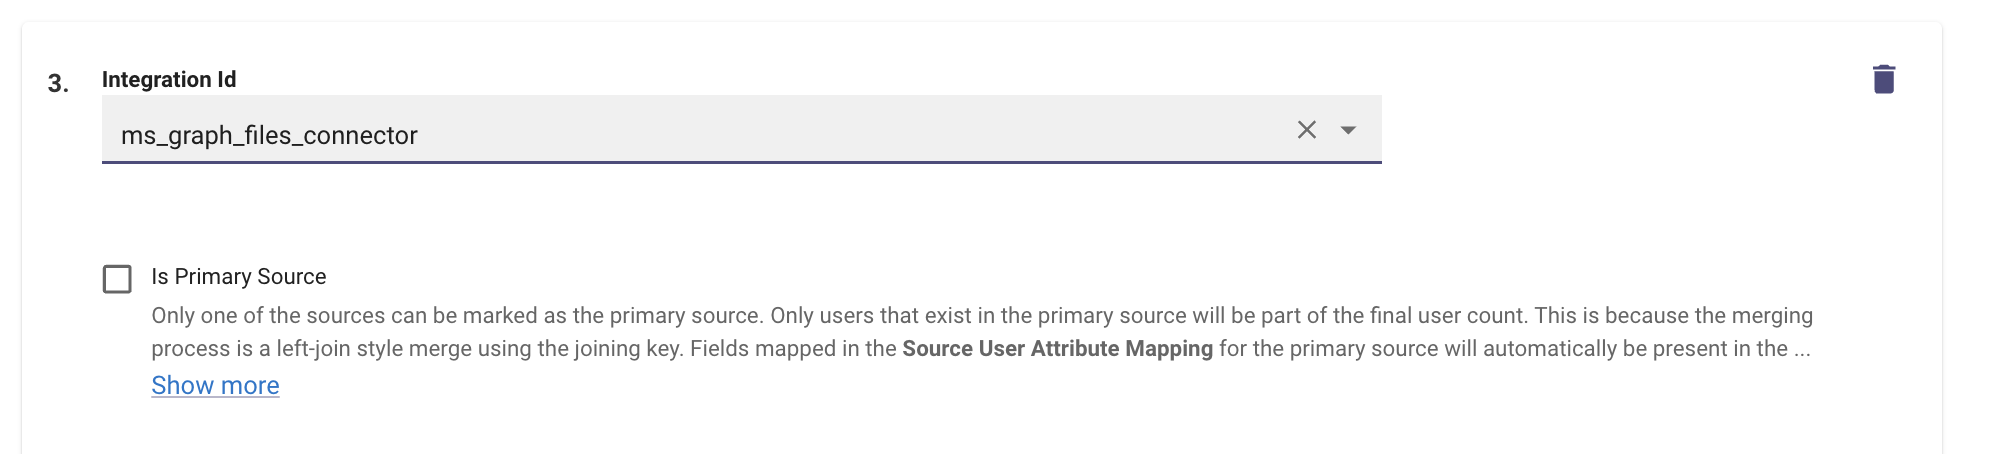
-
Next we need to define the Source Filter which will include the list of Attributes which will be ingested from the Azure Tenant.
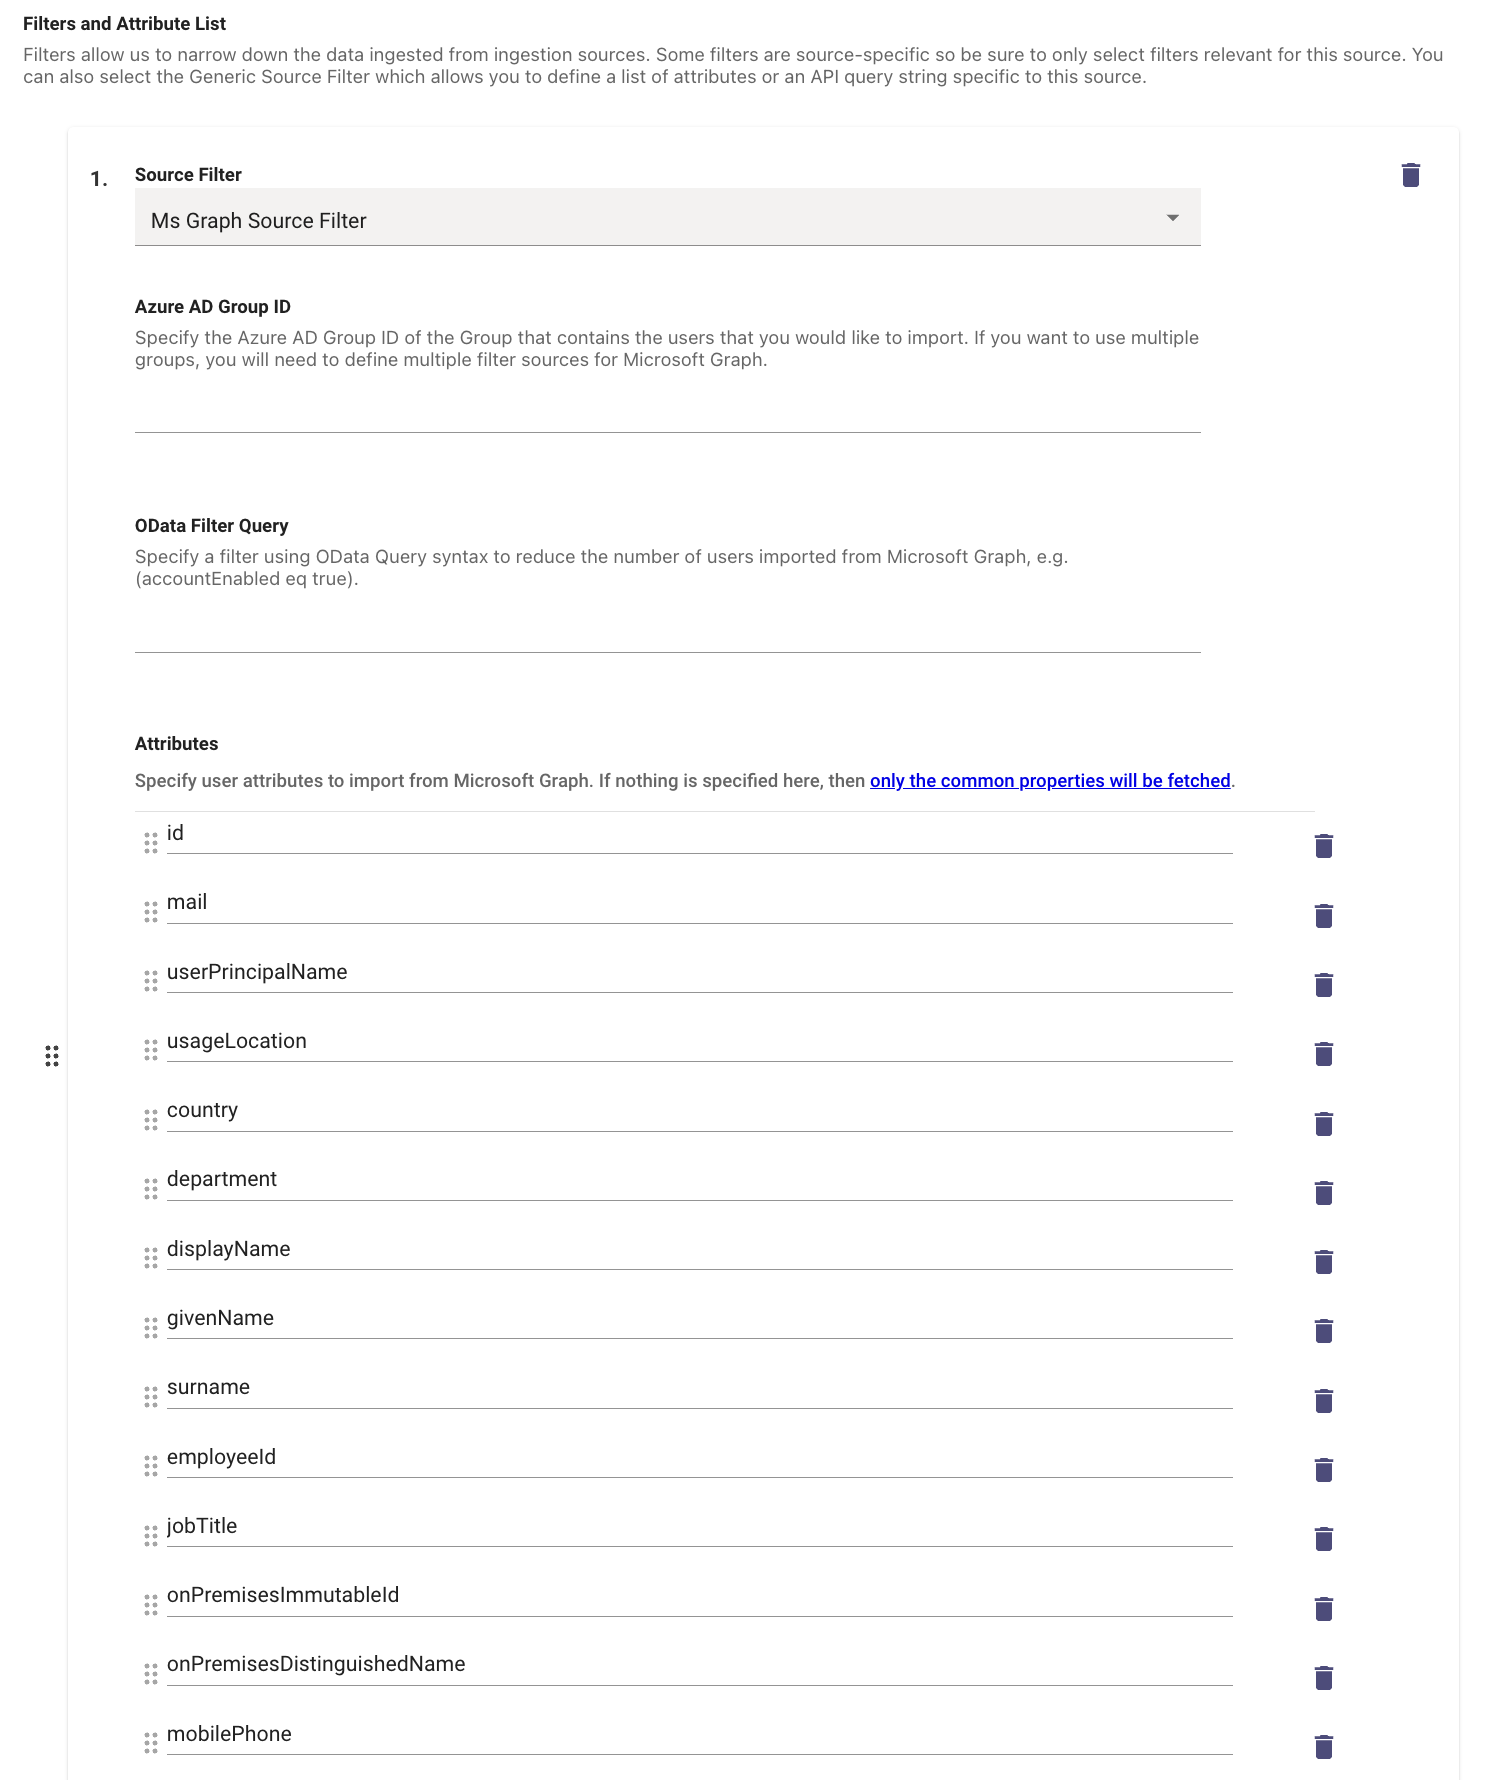
- Source Filter is MS Graph Source Filter
- In the list of Attributes you can define the expected ones which will be received in the API response.
-
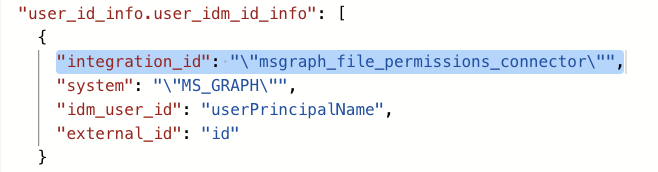
We now need to provide the JSON mapping under the Source-Specific User Attribute Mapping which describes the Moveworks Attributes which will store the Graph Data per user record.
"internal_fields": { "universal_id": "mail" }, "federated_id": "onPremisesImmutableId", "phone_number": "mobilePhone", "employee_id": "employeeId", "department": "department", "full_name": "displayName", "city": "city", "country_code": "country", "user_id_info.user_idm_id_info": [ { "integration_id": "\"msgraph_file_permissions_connector\"", "system": "\"MS_GRAPH\"", "idm_user_id": "userPrincipalName", "external_id": "id" } ], "email_addr": "mail", "first_name": "givenName", "role": "jobTitle", "preferred_language": "usageLocation", "last_name": "surname" } -
Note - Ensure the integration_id attribute value in the mapper is the exact Microsoft Graph Connector Name
-
Submit the Changes to save the Configuration !
Please ensure the Source Attribute mapper for the new integration includes the field which is being used as the Joining key in order to generate the Moveworks User Profile.
Once you have submitted the Identity ingestion configuration, it will kick off the Ingestion pipeline in the background, the details of the Ingestion times is present in the Moveworks Ingestion Schedule. It is recommended to wait a day before testing this out.
3. Configure File Ingestions in Moveworks Setup
In this step, you will configure the File Ingestion for the Shareponit Sites in Moveworks Setup, using the Connectors you have created above.
- Start by Navigating to Answers > Ingestion > File Settings under the Enterprise Search module. Click on create to start Configuration.
- Start by Selecting the Sharepoint Connector. This connector is only responsible for ingesting the Permissions for the Files on the Sites, defined in the configuration.

-
You must also select a second connector, the Microsoft Graph Connector, for ingesting file and permissions from Graph AD. This can be done in the Setup Ingestion Page.

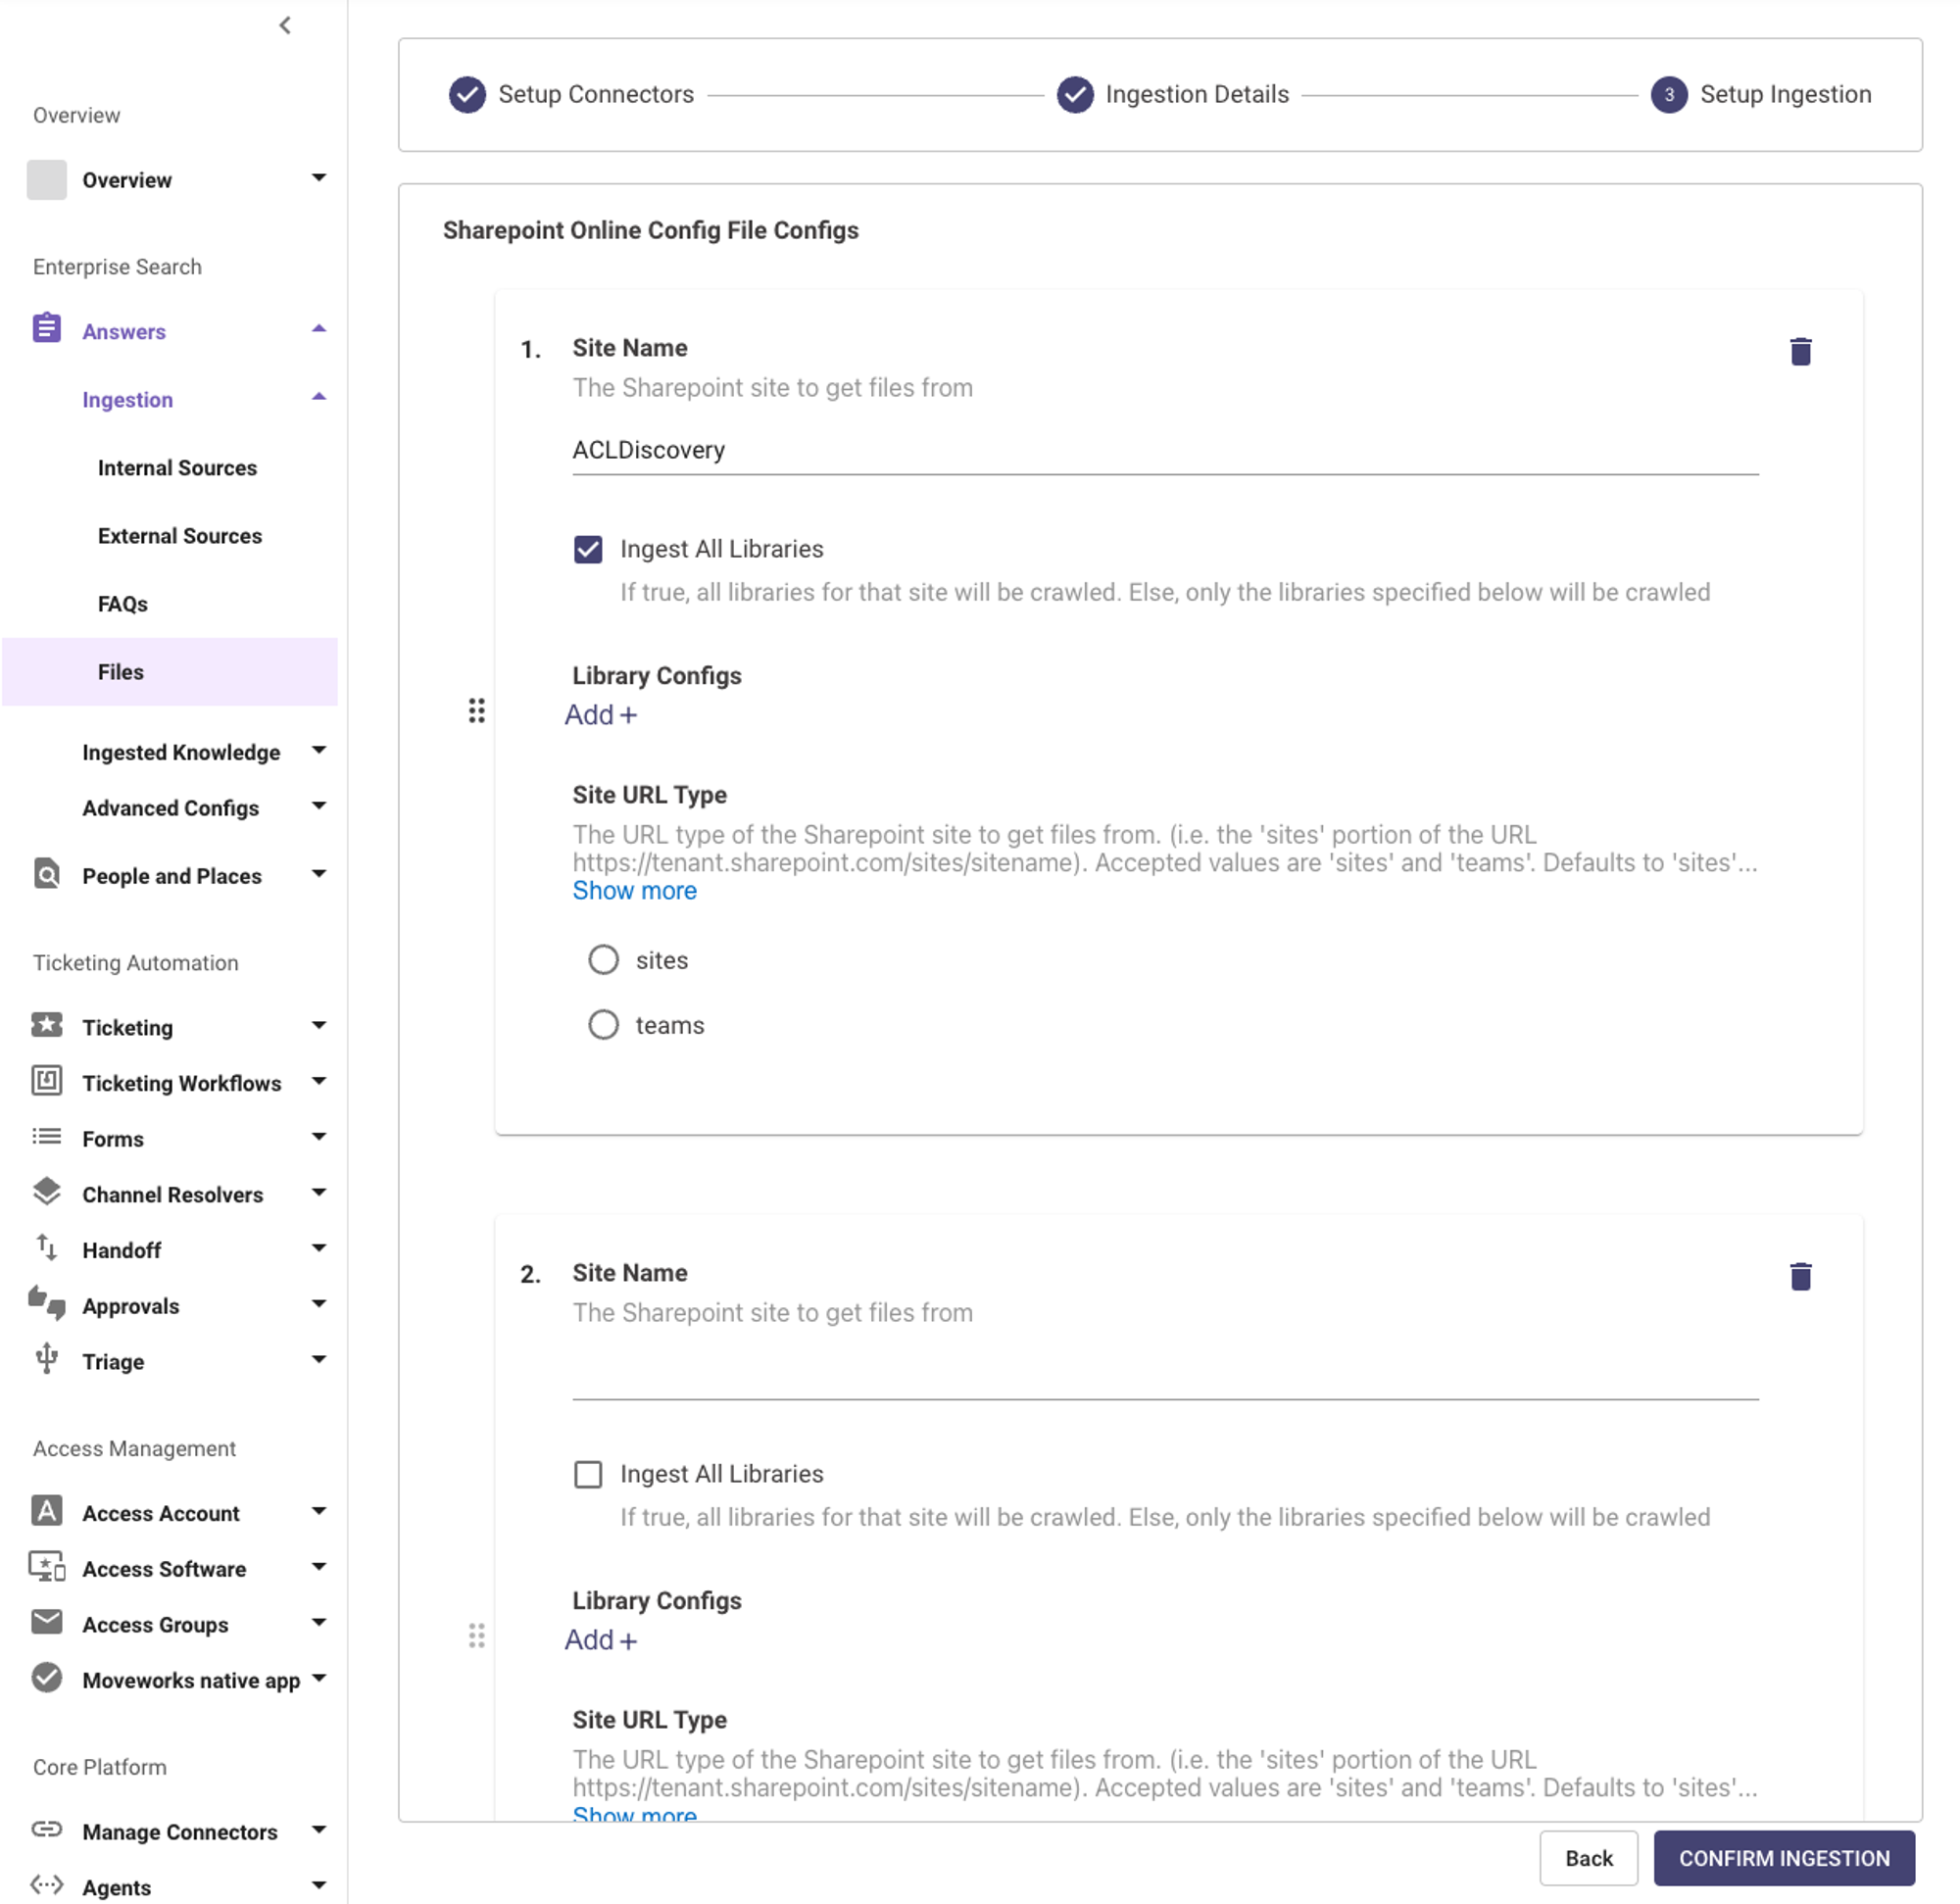
Continue to the Ingestion Details page and Specify each Site.
-
Choose a Domain under which these Files would be present, in this Scenario we are setting it to the HR Domain
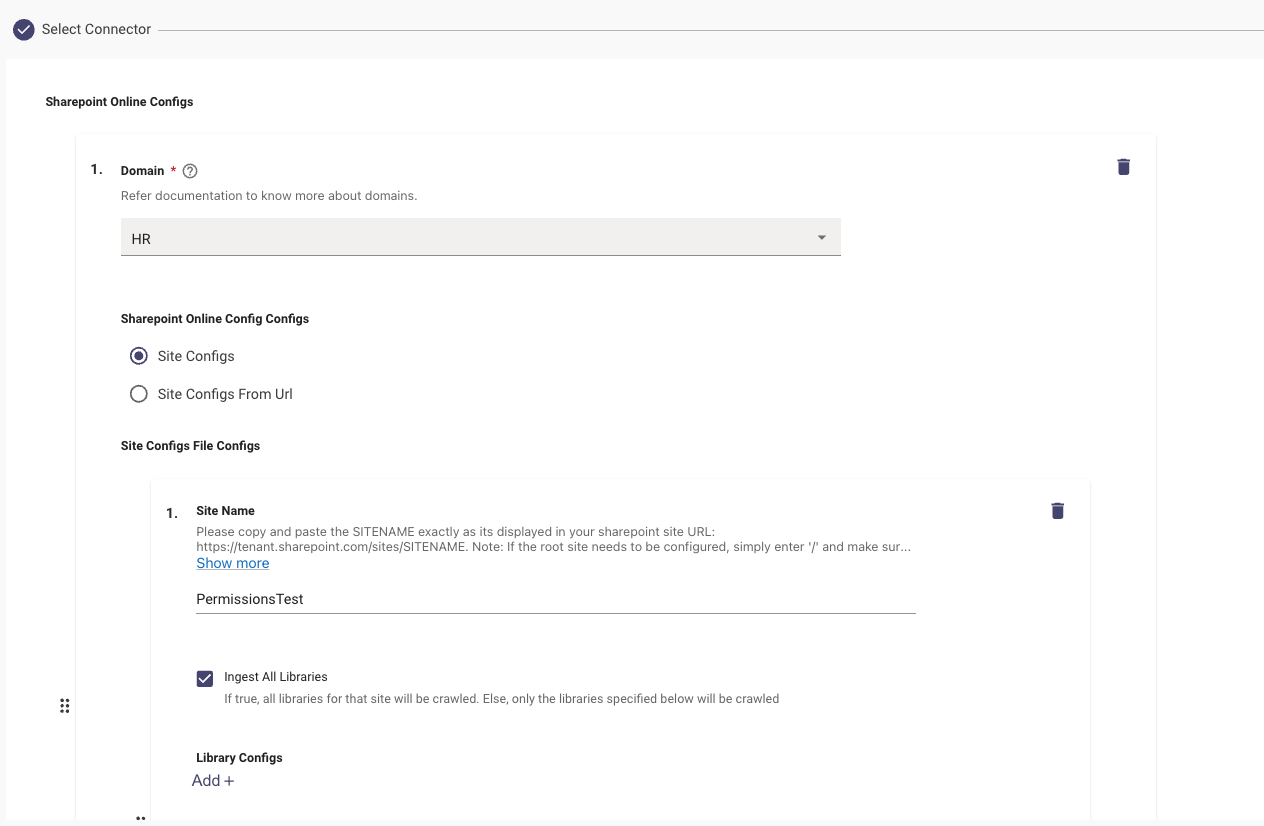
-
From the list of sites that you have granted us access to , specify each Site. under the Site Configs.
-
Please double check that each Site has been granted the access following Step 4.13 here.
- If you are using Sites.Selected, please double check that you have properly granted MSGraph access for the Site.
-
Please double check that you have entered each SiteName correctly.
-
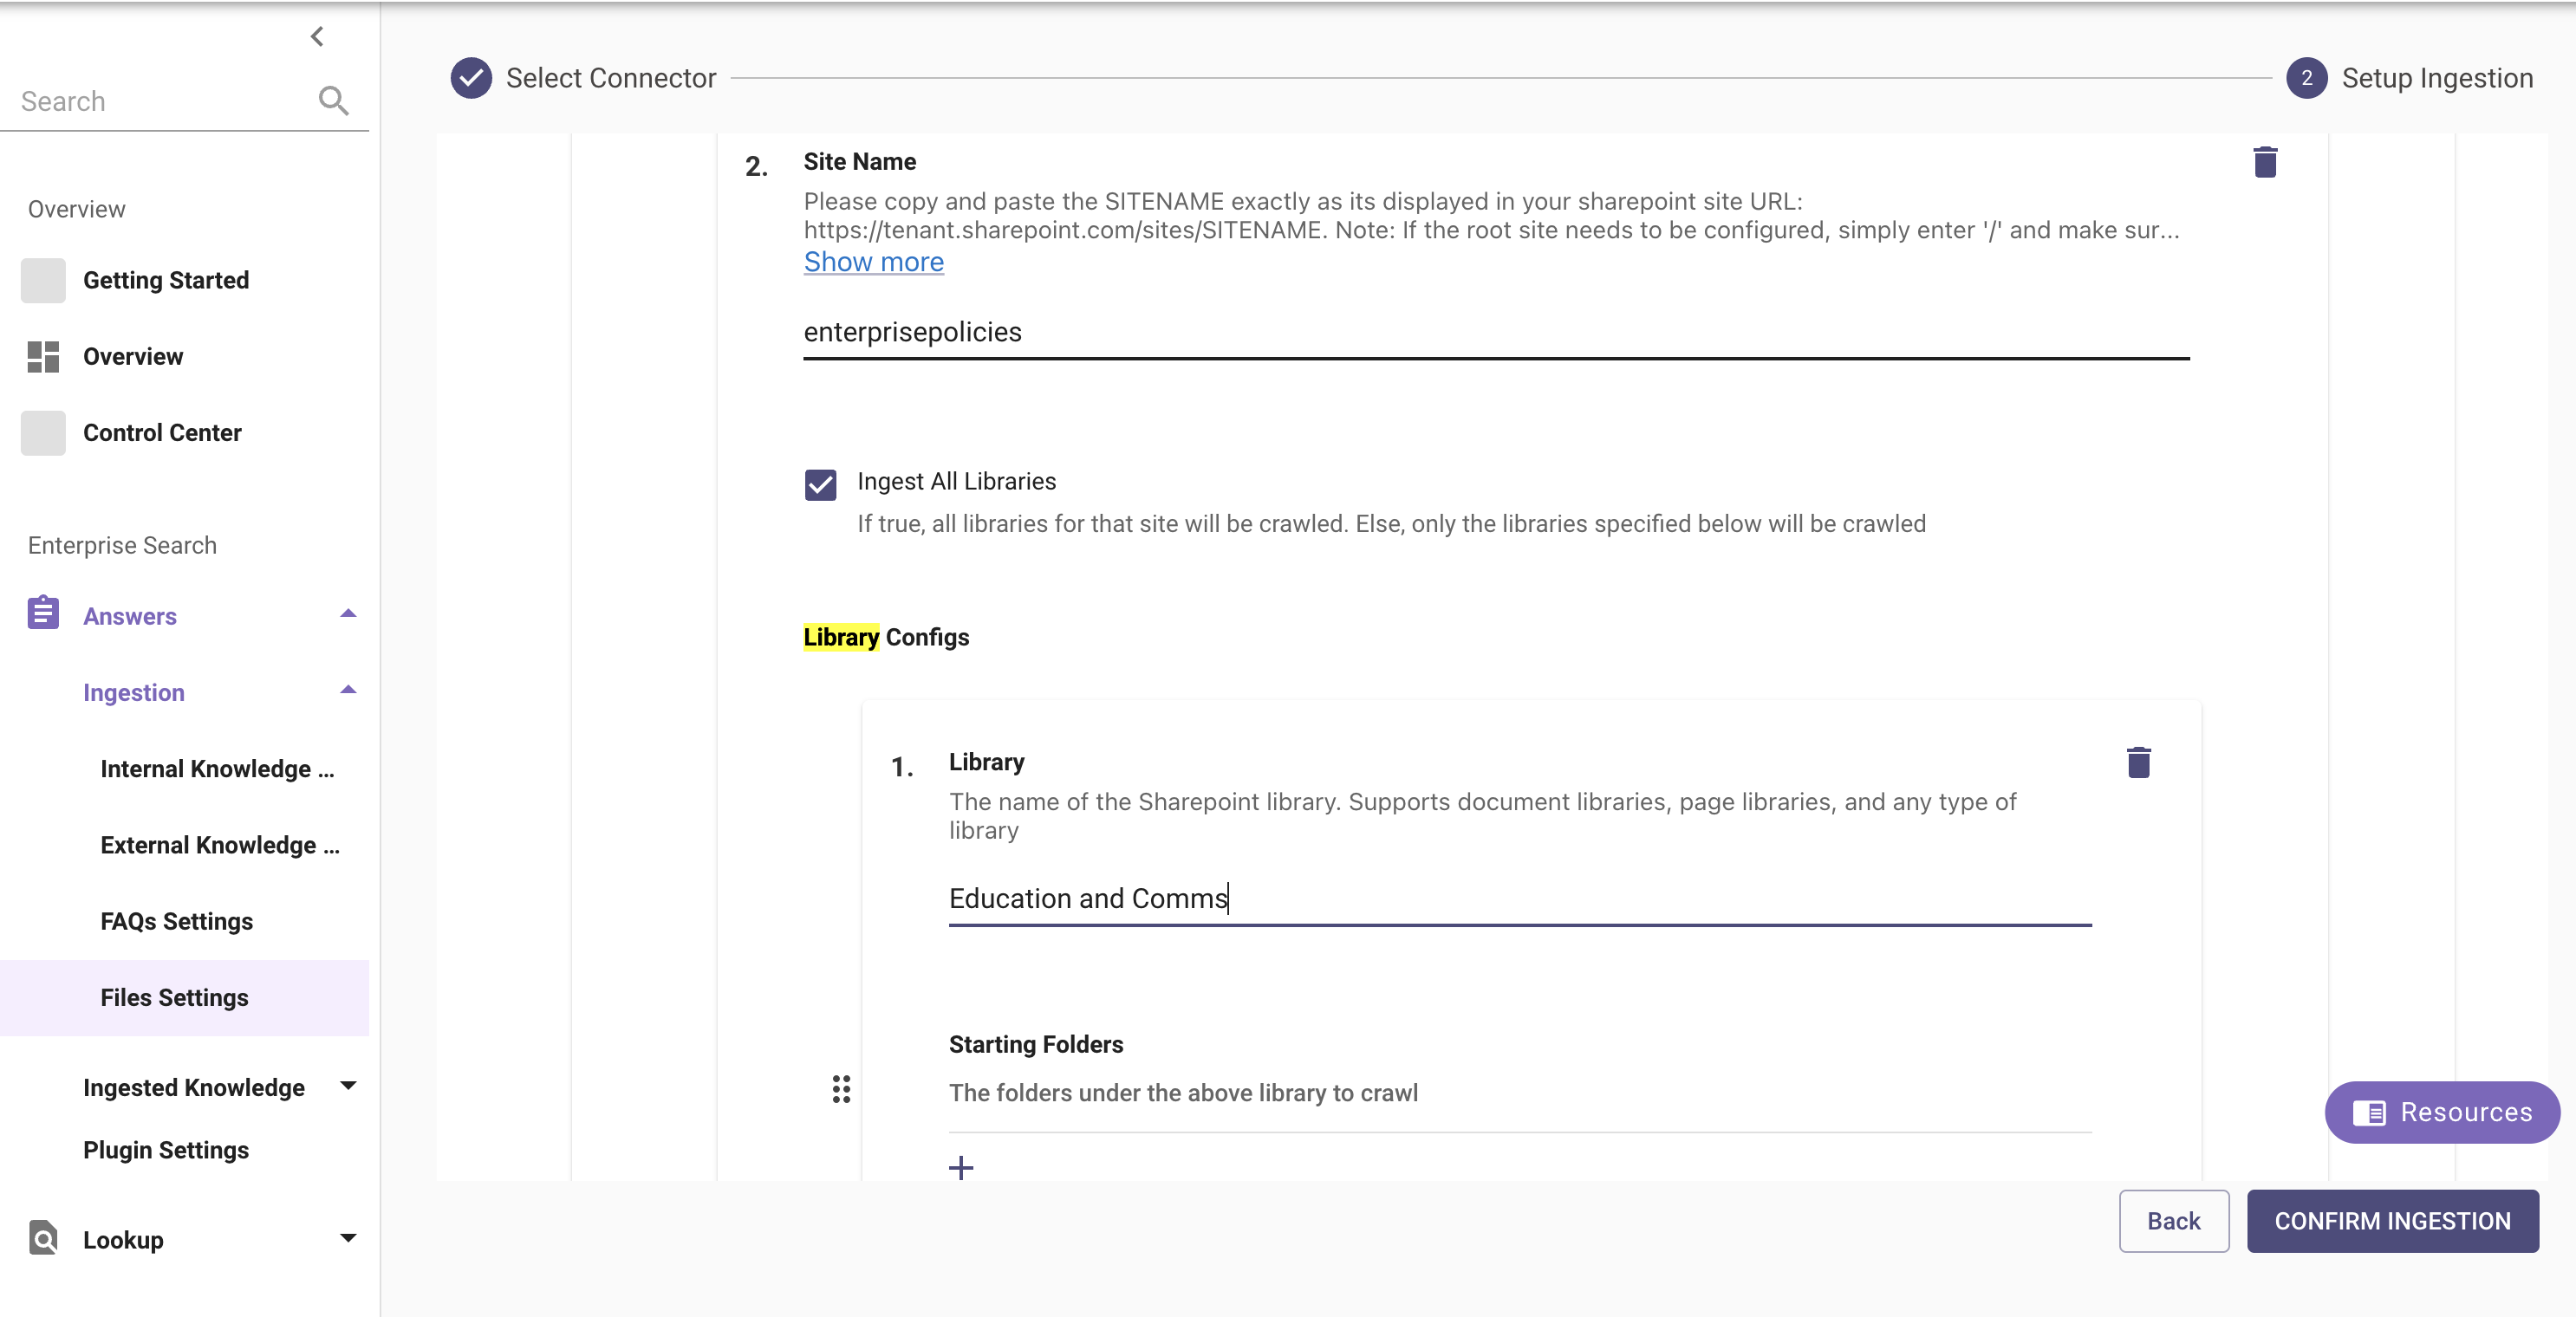
Files in a Sharepoint Site are stored inside Libraries, Files can be ingested in two ways :
- Ingesting an entire Site -
e.g. https://<tenant_name>.sharepoint.com/sites/<site_name> - Ingesting a document library -
e.g. https://<tenant_name>.sharepoint.com/sites/<site_name>/<name_of_document_library>
- Ingesting an entire Site -
-
For example, if the URL of your site is https://tenant.sharepoint.com/sites/sitename), enter the verbatim into your File Ingestion.
-
You can select the option to crawl through all nested resources within the Site you inputted.
-
You can also specify specific paths within the Sites, by using the Library Configs action. Please specify the path of the file, separating nested Site names in the following format.
-
-
-
-
Save the File Ingestions and continue on next steps.
4. Setting up Resource Permissions Configuration
-
Navigate to Resource Permissions > Permissions Rules under Core Platform. Click on Create.
-
Select the Strategy Config to be ReBac- Mirroring External System Permissions - This strategy mirrors the permission rules on the External Knowledge source by ingesting them on the Moveworks end.
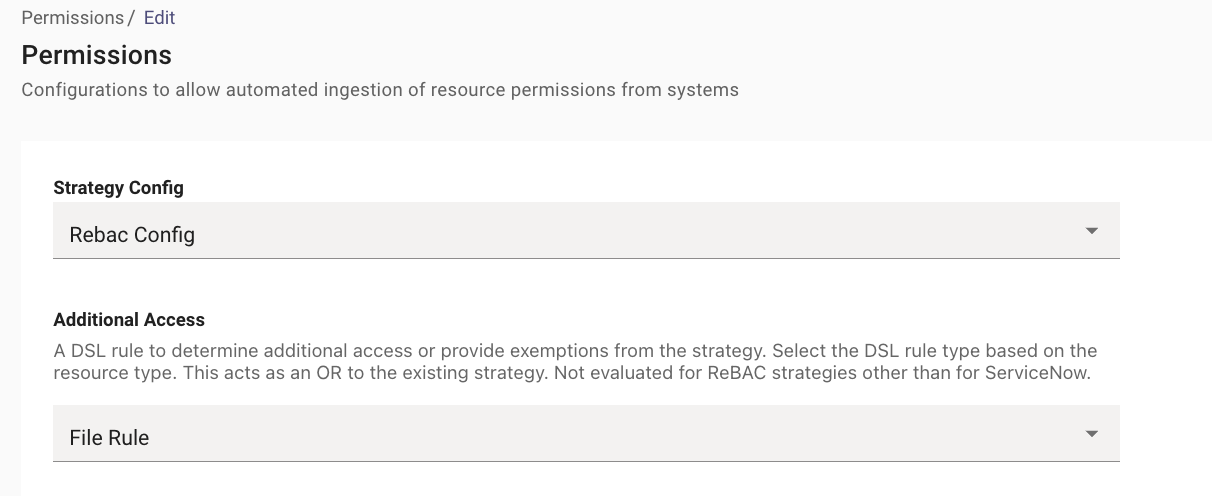
-
The Fields Additional Access and Additional Restrictions can be left empty as we will Mirroring Permissions.
-
Select the Microsoft Graph Connector under the Integration ID as this connector Ingests the Content.
-
Set the Resource Type to File.
-
Action - ACTION_VIEW
5. Check Ingestion Status
In this step, you will check Control Center to see the up-to-date view on the status of your ingestions, before you turn on File Search for your employees.
-
In Files Control Center, you can see when your most recent ingestion is finished running and the status of all your ingested files.
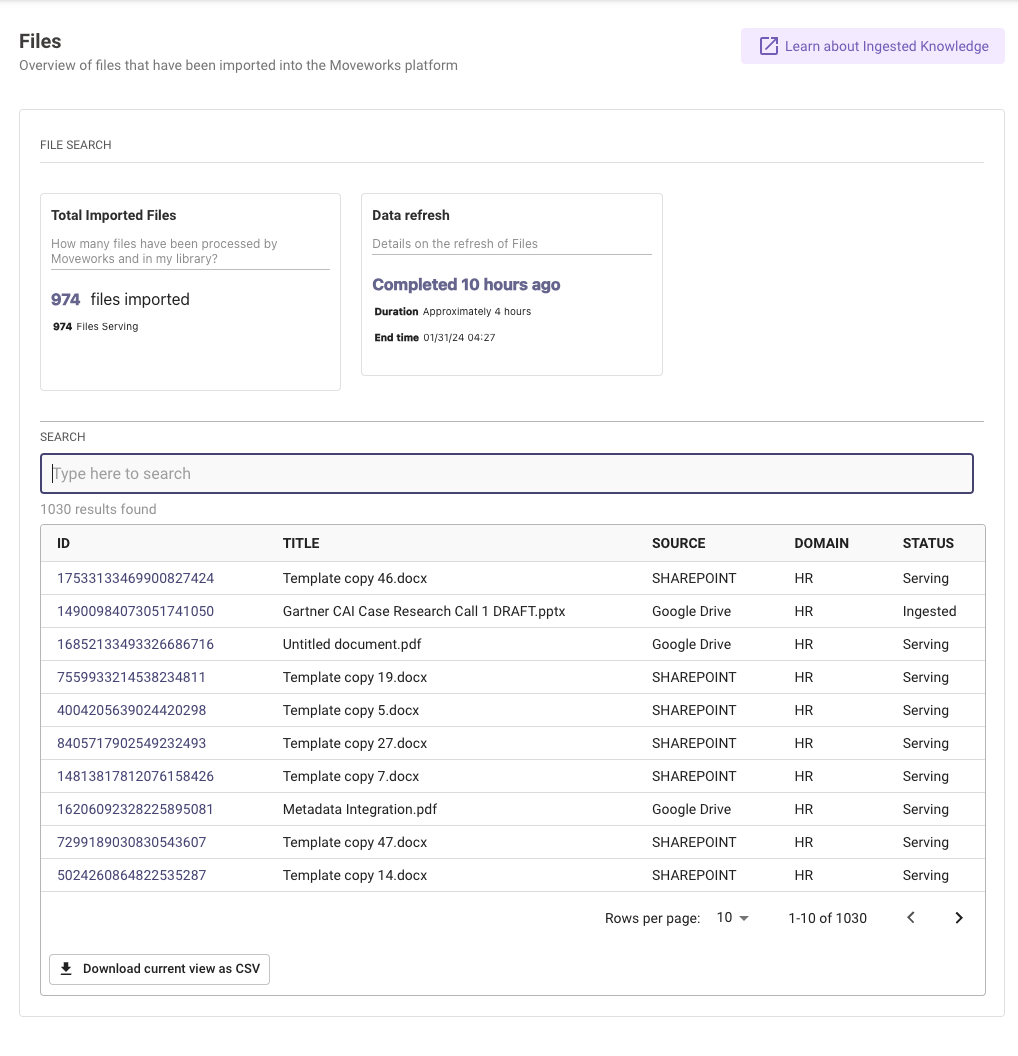
Status Definitions
| Status | Definition | Action Item |
|---|---|---|
| Serving | When the File has been ingested and indexed, and is now ready to serve in bot (or actively serving | Your files are ready to serve! Continue to Step 3 to |
| Ingested | When the File has been ingested, but not indexed and ready to serve in bot yet | Your files are actively indexing and almost ready to serve – check back later |
| Dropped | When the File has been dropped, due to various error reasons | Your files were dropped due to exceeding file limit |
6. Launch File Search to a test group of employees, validate permissions
In this step, you will turn on File Search to a whitelist set of test users, as well as validate that permissions are working as expected.
- Navigate to Advanced Configuration in Answers.
- Go to the File Search section.
- Specify a test group of users to launch the skill to:
- Input specified emails of your allowlist users:
- Input must be a Moveworks DSL Rule in the following format:
user.email_addr.$LOWERCASE() in ["[email protected]".$LOWERCASE(), "[email protected]".$LOWERCASE(), “[email protected]".$LOWERCASE()]
- Input must be a Moveworks DSL Rule in the following format:
- Input specified emails of your allowlist users:
- Check the Launch Skill button.
To validate permissions are working
- Access your Moveworks bot with one of the users in the allowlist
- Attempt to search for a file for which you do not have access in your source Sharepoint/Drive/Box, i.e. “restricted_inaccessible_file.pdf”
- You should not receive the contents of that restricted file in your search
- Note: We are building Permissions Analytics soon, to allow you to validate all file permission tokens and audit history of interactions and permissions filtering
7) Launch File Search to Your Employees
In this step, you will turn on File Search to make all your ingested files available to Search.
-
Navigate to Advanced Configuration under Answers.
-
Go to the Skill Settings tab.
-
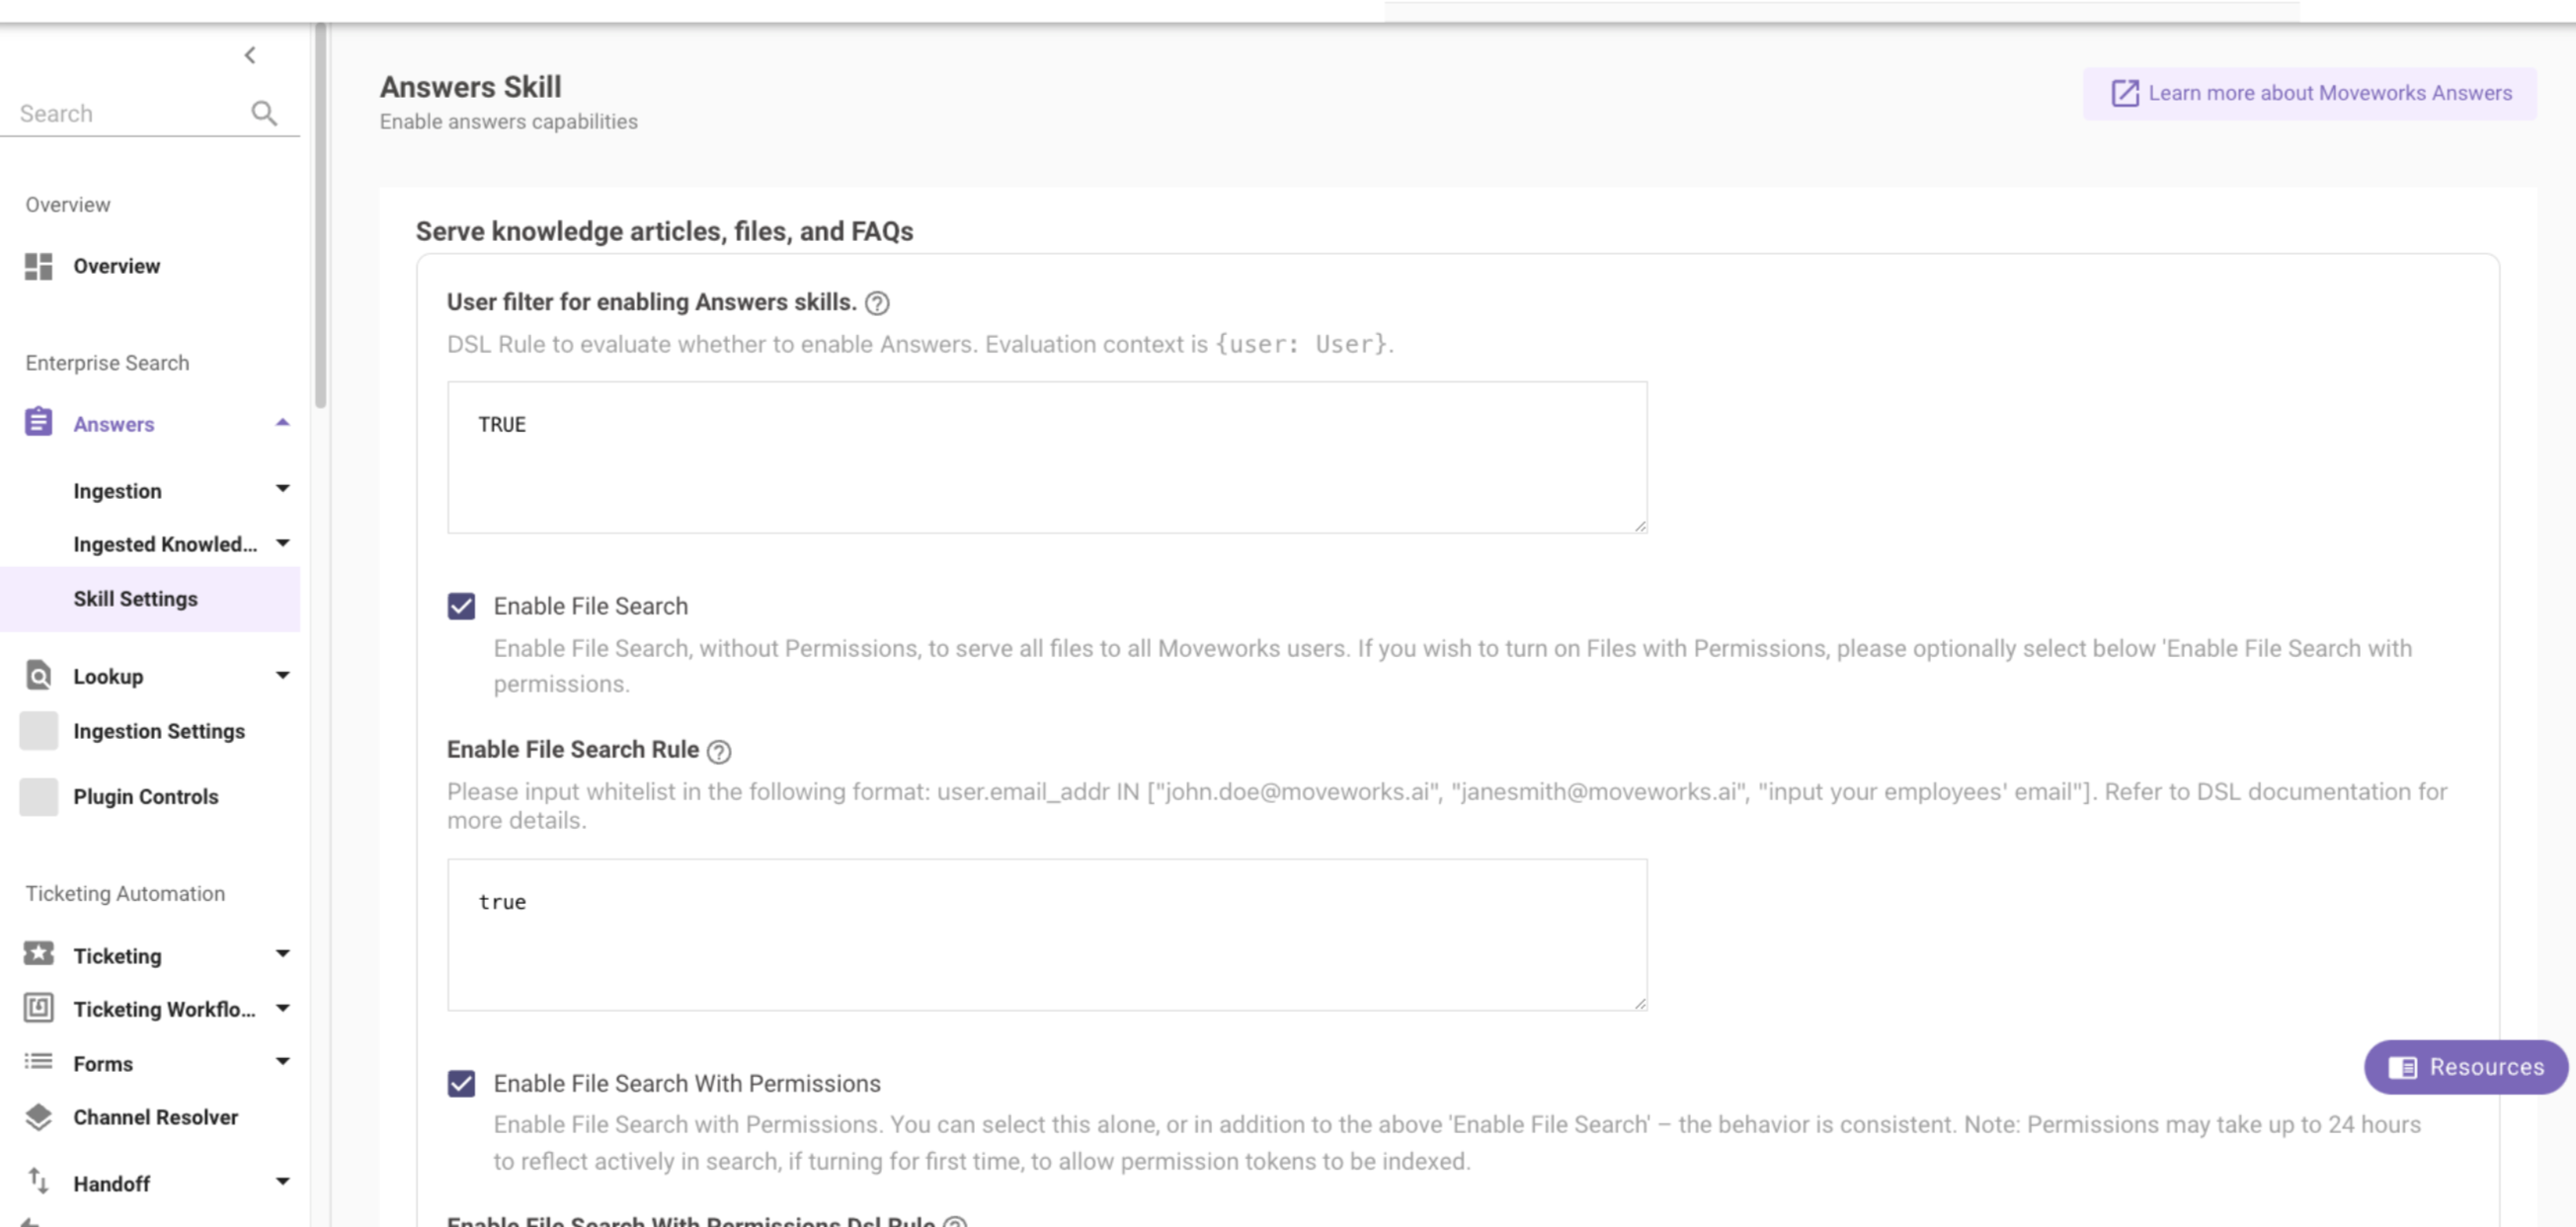
Remove the allowlist of users, check the Enable File Search with Permissions button, and click on Save.
-
At this point, File Search will now be live for all your users.
8) Maintenance: Adding and Removing Files from Search
During the maintenance phase, you are able to add and remove files from being searchable.
Adding Files
- Option 1: Add new files to your Source system
- Once you set up an ingestion for a specific resource, i.e Sharepoint Site, Drive or Box folder, Moveworks will automatically ingest the new files and their file permissions.
- Moveworks will crawl through the resources for new files, and upon completion of the next ingestion, those files will be searchable in-bot.
- Option 2: Add new Resources for ingestion
- Navigate to File Ingestion in Answers.
- Select the Ingestion for the system where you wish to add new files.
- Click through to the Ingestion Setup step.
- Add new Sites/URLs/Folders.
- Double check that you have properly defined your URLs/Sites/Folders
- Note, you will need to grant access to Moveworks to the new folders that you wish to ingest files from – please refer to the integration guides:
- Click on Run Ingestion.
- Upon completion of the next ingestion, all new files added to your source Sites/URLs/Folders will be available for Search.
- Check Ingestion Status in Control Center to validate that the ingestion has completed.
- Click on Download as CSV to review the status of all your files offline.
Removing Files
- Option 1: Delete files from your Sites/URLs/Folders, in your Source system
- Upon completion of the next ingestion, all files deleted from your source Sites/URLs/Folders will no longer available for Search.
- Option 2: Delete Sites/URLs/Folders from ingestion
- Navigate to File Ingestion in Answers.
- Select the Ingestion for the system where you wish to add new files.
- Click through to the Ingestion Setup step.
- Delete existing Sites/URLs/Folders that contain the files you no longer want available for Search.
- Click on Run Ingestion.
- Upon completion of the next ingestion, all files from deleted Sites/URLs/Folders will no longer be available for Search.
- Check Ingestion Status in Control Center to validate that the ingestion has completed.
- Click on Download as CSV to search for your new files.
Changing File-Level Permissions and Access
- Moveworks will always respect the permissions from your source system, when determining who can view the content of any given file.
- As you make changes to the permissions for a file, i.e. remove User A & add User B, those permissions will be updated and enforced in bot within 1 hour.
Failure Resolutions
This step describes how to resolve issues that you are encountering.
Failed Permission Ingestions
- Files where we were unable to ingest the ACL permissions are unsuccessful, will be labelled with Status = Ineligible (No ACL Permissions).
- Since first-class ACL permissions will always be respected, no files where we are unable to enforce ACL permissions will ever be searchable.
- Double check your connector guide that you have granted the proper set of permissions for Moveworks.
- One you have granted permissions, the files should be Status = Serving within 24 hours
Failed File Ingestions
- When any of your files are unable to be ingested, you will receive a notification in Alert Central.
- If a file failed because we were not granted the necessary permissions to ingest the file or its permissions, you may see its status as **Not Serving (**No ACL Permissions).
- To resolve, please validate that you have granted the necessary set of access per the access requirements.
- File Search Sharepoint Online Configuration -Grant Moveworks Access to MSGraph API
- If you are running into this issue with Sharepoint and granting MSGraph access via Sites.Selected, to identify the Sites for which ACL permissions are not being ingested, select Download as CSV, which will reveal the paths for the files where permissions are not being ingested.
- File Search Sharepoint Online Configuration -Grant Moveworks Access to MSGraph API
- To resolve, please validate that you have granted the necessary set of access per the access requirements.
- If files from certain Resources you are expecting to see are missing, you may have defined the Resource or Folder or URL incorrectly.
- To identify the Resources that are not part of the recent ingestion, please select Download as CSV.
- In your CSV, group or filter for the resources that you had configured for ingestion, but are now missing from the recent ingestion – these are the resources that were improperly ingested.
- To resolve:
- Double check that you have granted the necessary set of access to those resources:
- Navigate back to File Knowledge, select the integration where you are missing resources from ingestion, click through to Ingestion Setup, and double check that you have named the Site correctly.
File Ingestion Exceeded File Limit
- Your Ingestion failed because the total number of Files that you are attempting to serve exceeds your file limit – all files that were previously ingested and live are still available for your employees, but no new files or updates have been made searchable as part of this recent failed ingestion.
- Until you resolve this issue, no new files will be ingested.
- To resolve this issue, you have several options:
- Go to File Knowledge → Ingestion Setup and remove certain Resources from your
- To identify the new Configs that were not ingested, navigate to Control Center
- Files that caused you to exceed the limit will have Status as “Dropped”
- Remove files from your Source folders that are being ingested from
- To identify the new files that were not ingested, navigate to Control Center
- See the specific files that caused you to exceed the limit will have Status as “Dropped”
- The “Path” column can point you to remove the Configs for those “Dropped” files
- Go to File Knowledge → Ingestion Setup and remove certain Resources from your
Updated about 2 months ago