File Search Sharepoint Online Configuration (Legacy)
This guide details steps for our legacy File Search configuration, and will be deprecated by 4/6. Please refer to the updated guide here.
Note 1: File Search requires User Ingestion through the MSGraph API to map SharePoint user profiles to Moveworks user profiles, in order mirroring your SharePoint Access Controls (ACLs). If User Ingestion has not been set up previously, or if this is your first time integrating SharePoint for Search, please contact the Customer Success team for assistance with configuration."
Note 2: For Sharepoint Access requirements, Steps 1 and 2 describe separate sets of access that you have to provide to BOTH the Sharepoint Online REST API and the MSGraph API, due to our current implementation of the product.
1. Grant Per-Site Access to Sharepoint REST API
In this step, you will grant per-site access for each of the Sites that you wish to ingest, as our current implementation today requires us to use Sharepoint REST API to read the files from your Sites.
Provide Sharepoint per-Site Access
You will need Azure app (Microsoft App ID) to assign the access. If you are also deploying Moveworks to Microsoft Teams, the same app can be used.
Note: In order to add this permission appropriately, you must be an administrator of both the Azure App and the SharePoint Site.
-
Follow the powershell commands below to set
SiteOwnerManageLegacyServicePrincipalEnabledto true.Install-Module -Name Microsoft.Online.SharePoint.PowerShell -Scope CurrentUser Update-Module -Name Microsoft.Online.SharePoint.PowerShell # Make sure the module is on version 16.0.23710.12000 or later Connect-SPOService -Url https://<domain>-admin.sharepoint.com # Replace domain with your Sharepoint domain Set-SPOTenant -DisableCustomAppAuthentication $false Set-SPOTenant -SiteOwnerManageLegacyServicePrincipalEnabled $true -
For each sub-site the bot should have access to, navigate to:
https://**<tenant_name>**.sharepoint.com/sites/**<sub_site_name>**/_layouts/15/appinv.aspx. -
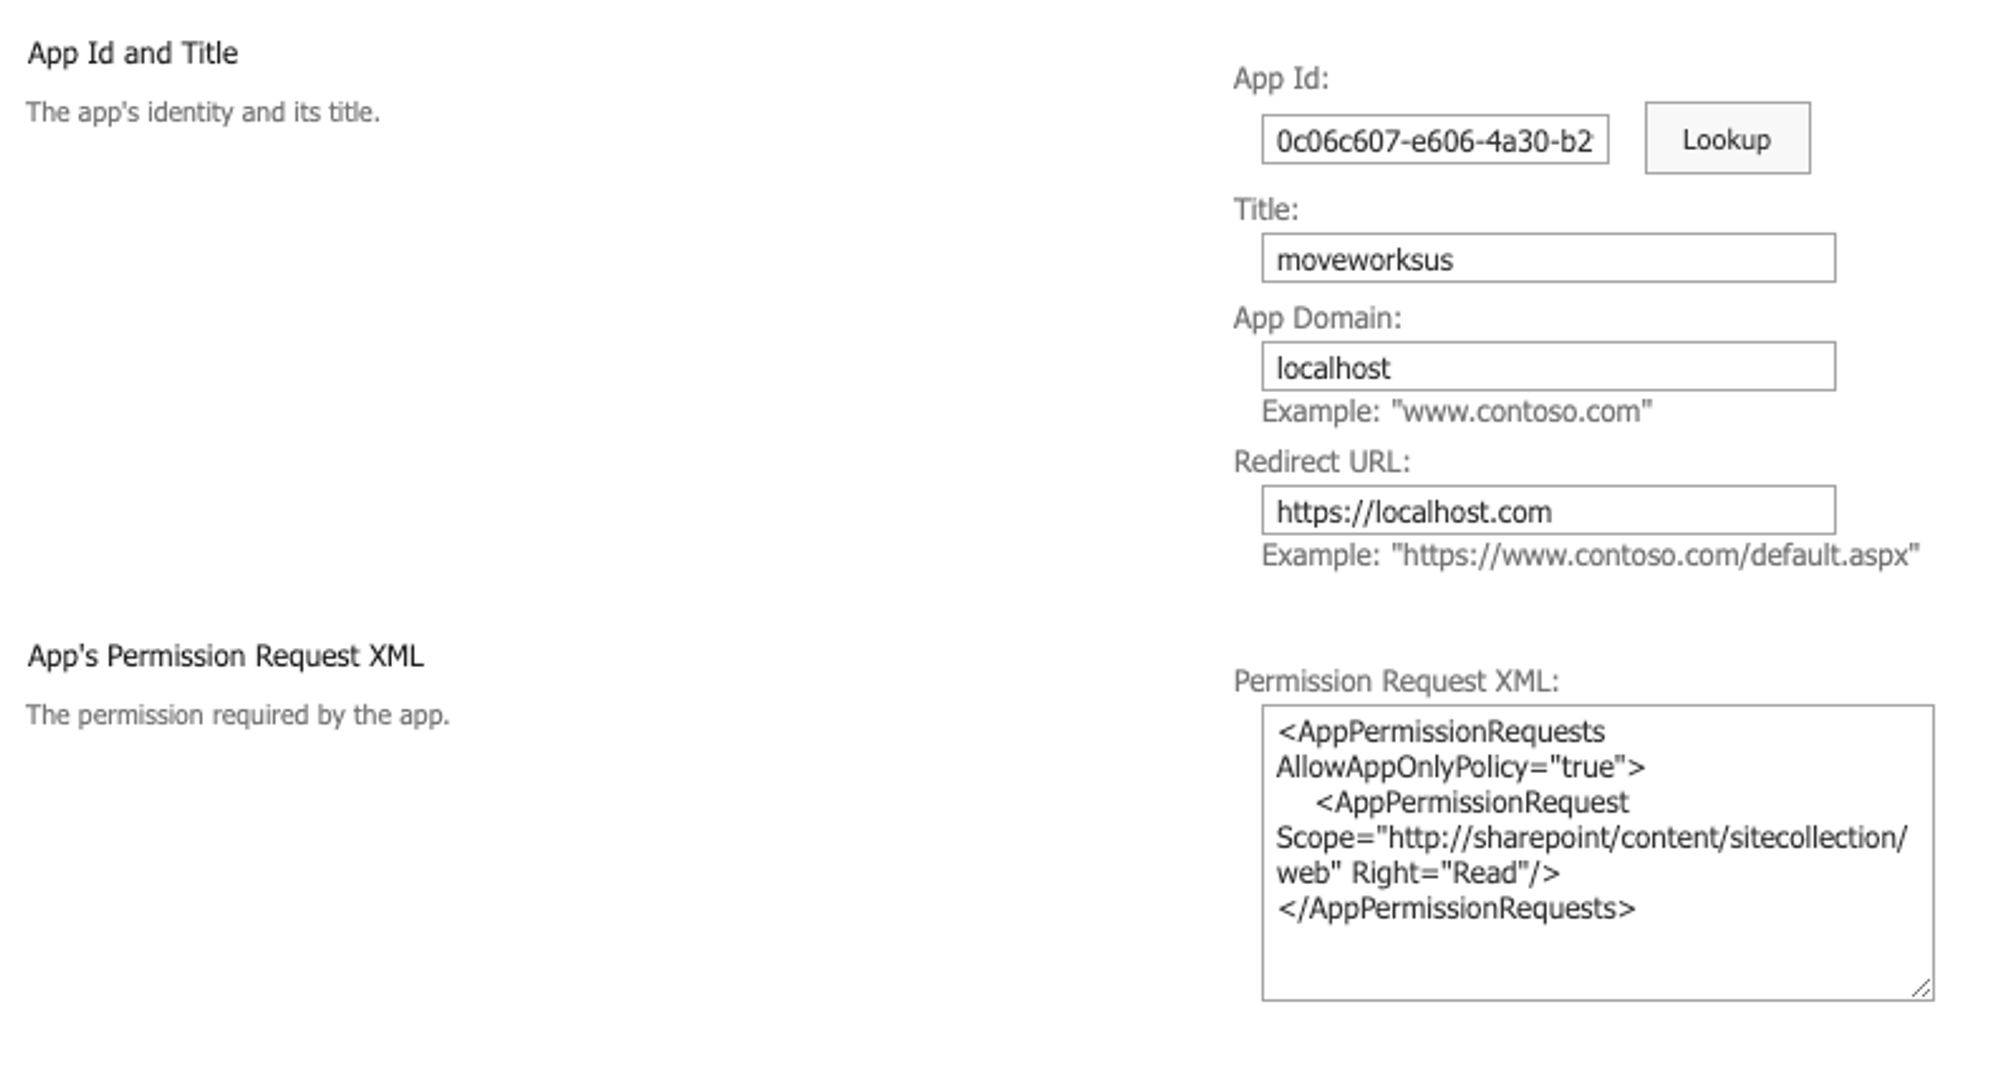
Put in the App Id of your App created in Azure and then click the Lookup button -- the Title field should auto populate.
-
For App Domain, and RedirectURL, enter "localhost" as shown in the screenshot below.
-
Enter the following XML as Permission Requests -- this grants Read Only access to the specific sub site.
<AppPermissionRequests AllowAppOnlyPolicy="true"> <AppPermissionRequest Scope="http://sharepoint/content/sitecollection/web" Right="Read"/> </AppPermissionRequests> -
After clicking Create, you will be prompted to authenticate and confirm the install. Select Trust.
-
You will need to do this for each sub site the bot should have access to and provide the list of sites you have authorized to your Moveworks Customer Success team.
Validating Moveworks access to the site
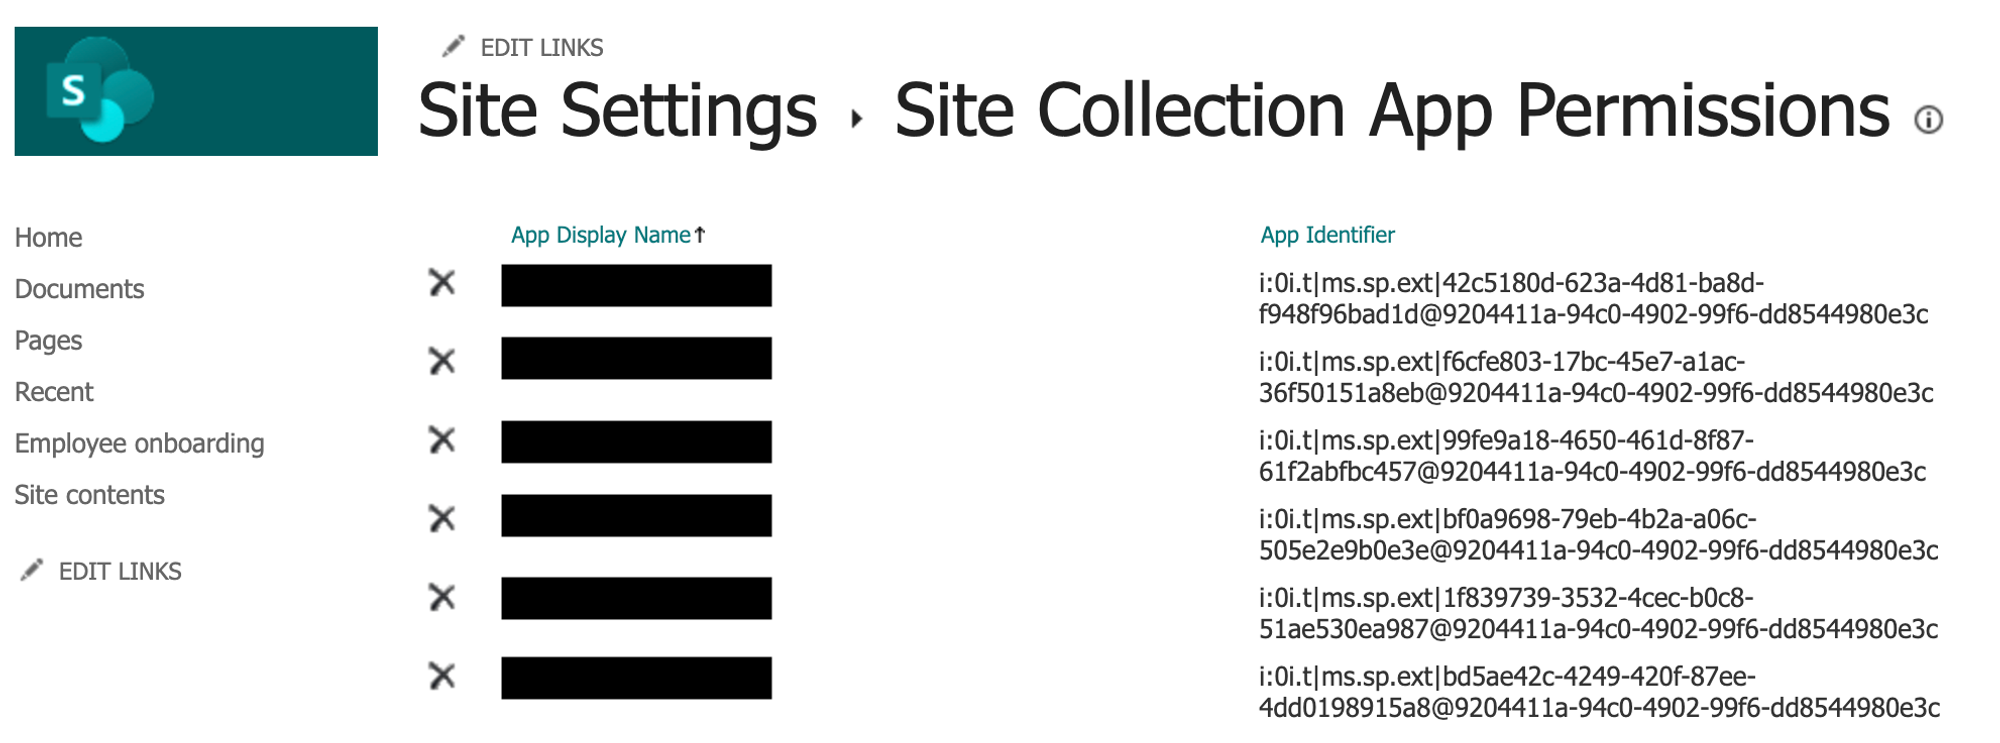
Note: At any point in the future, a SharePoint Site Admin can visit https://<tenant_name>.sharepoint.com/sites/<sub_site_name>/_layouts/15/appprincipals.aspx to validate if Moveworks has access to the site.
If the permissions were granted correctly, you should see the Azure app listed like this.
2. Grant Moveworks Access to MSGraph API
In this step, you will grant scopes for Moveworks to execute your file-level ACL permissions by ingesting your Sites, Files, Users, and Groups via the MSGraph API. This is used to enforce that users are only able to search for information from files that they already have access to. For more on the reasons for the scopes, see File Search - Respecting File Permissions.
You must grant your Moveworks bot Azure application the following scopes for it over the MSGraph API to support this:
- https://graph.microsoft.com/Files.Read.All
- https://graph.microsoft.com/Sites.Read.All
- Alternate Option:https://graph.microsoft.com/Sites.Selected
This permission Allows Moveworks to read content from SPECIFIC sub sites in the tenant. This, requires additional setup, instructions can be found here. Note, if using sites.selected, files.read.all is not necessary.- Note: With Sites.Selected, Files.Read.All is no longer required
- Alternate Option:https://graph.microsoft.com/Sites.Selected
- https://graph.microsoft.com/Group.Read.All
- https://graph.microsoft.com/User.Read.All
There are three different ways to do this depending on how your Moveworks bot is deployed:
If you are using the Microsoft AppSource Moveworks Teams Bot
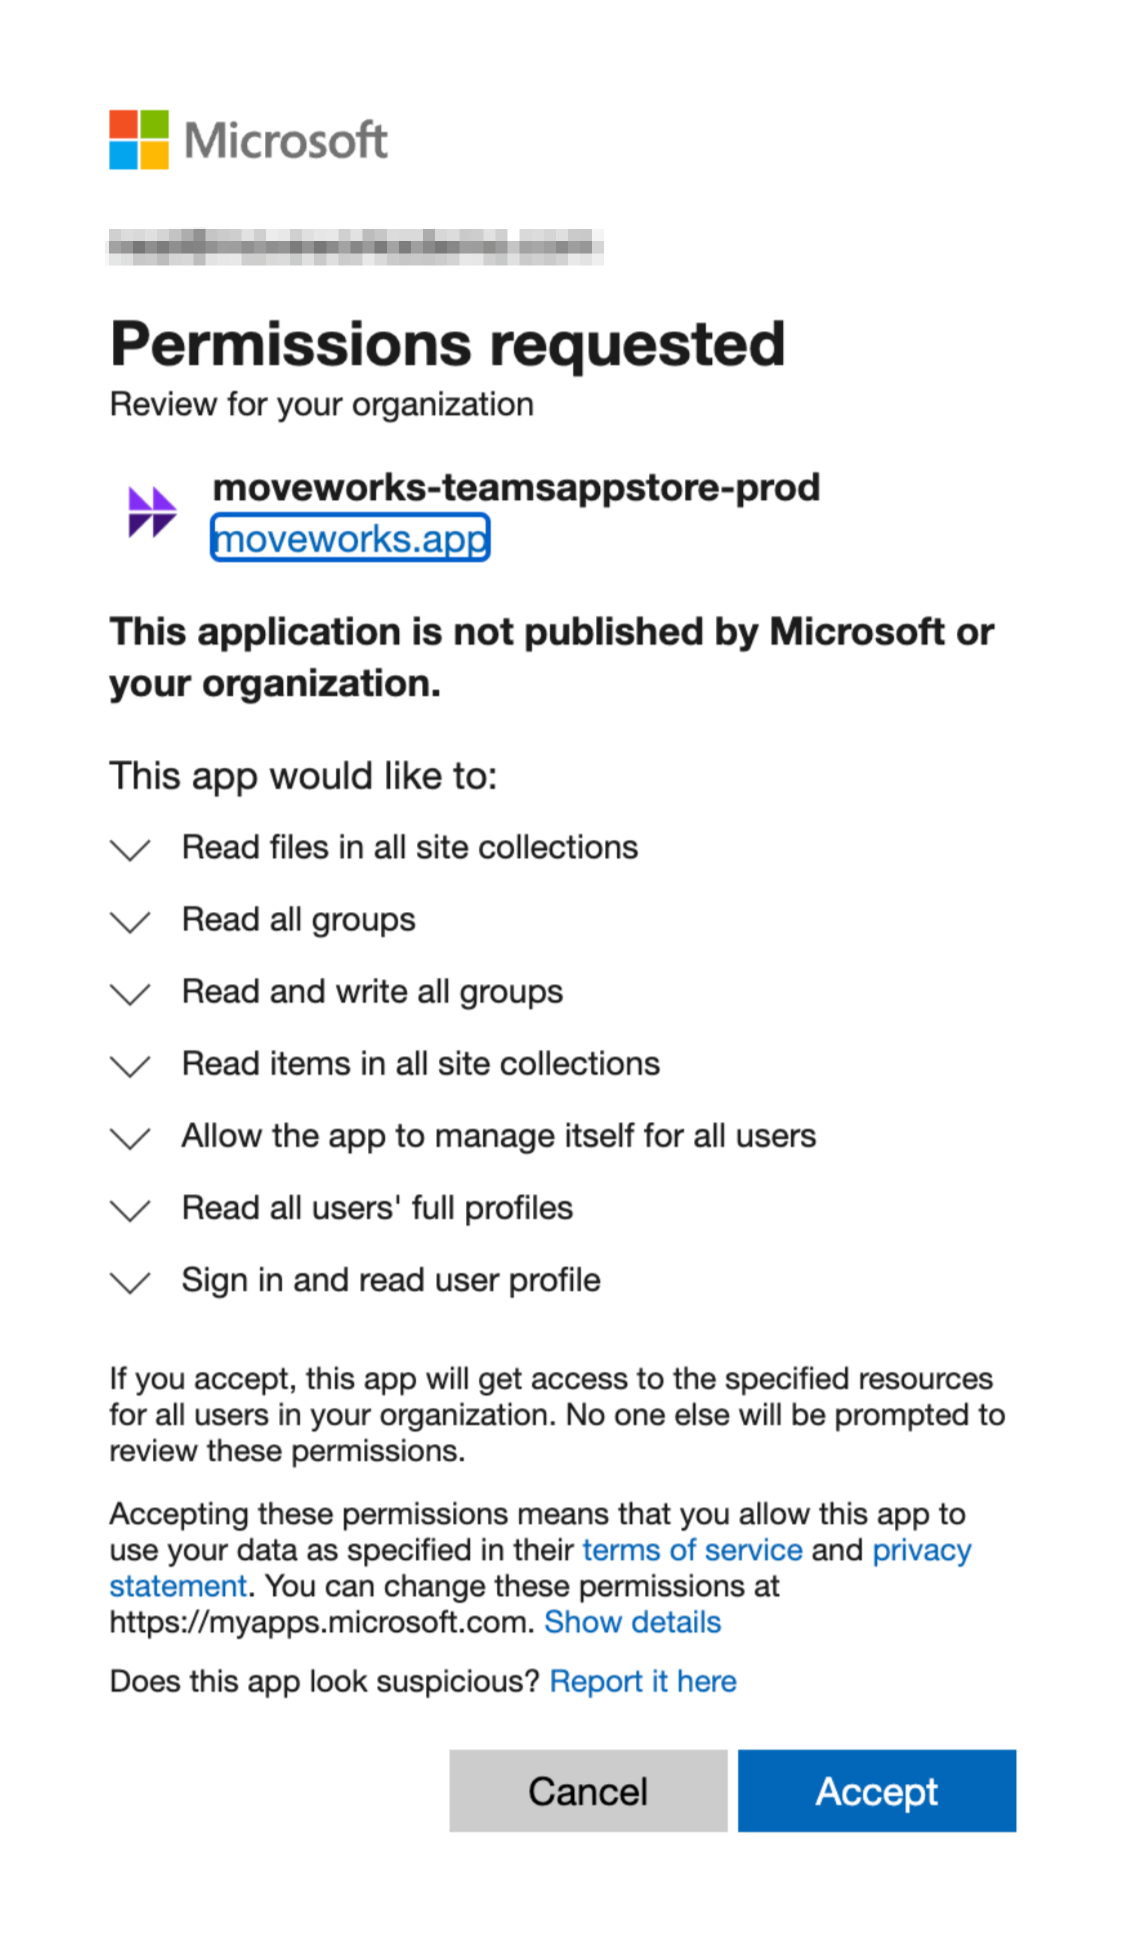
We have updated the app with the requested scopes necessary for us to read your permissions data. One of your Azure admins simply needs to consent to these additional requested scopes.
-
Simply navigate to the following URL, replacing <CUSTOMER_TENANT_ID> with the ID of the tenant to which you have installed the app, and click Accept:
If you are NOT using the Microsoft AppSource Moveworks Teams Bot and you ALREADY have a Moveworks Azure application
You will grant these permissions via the Azure admin portal by modifying your existing app.
-
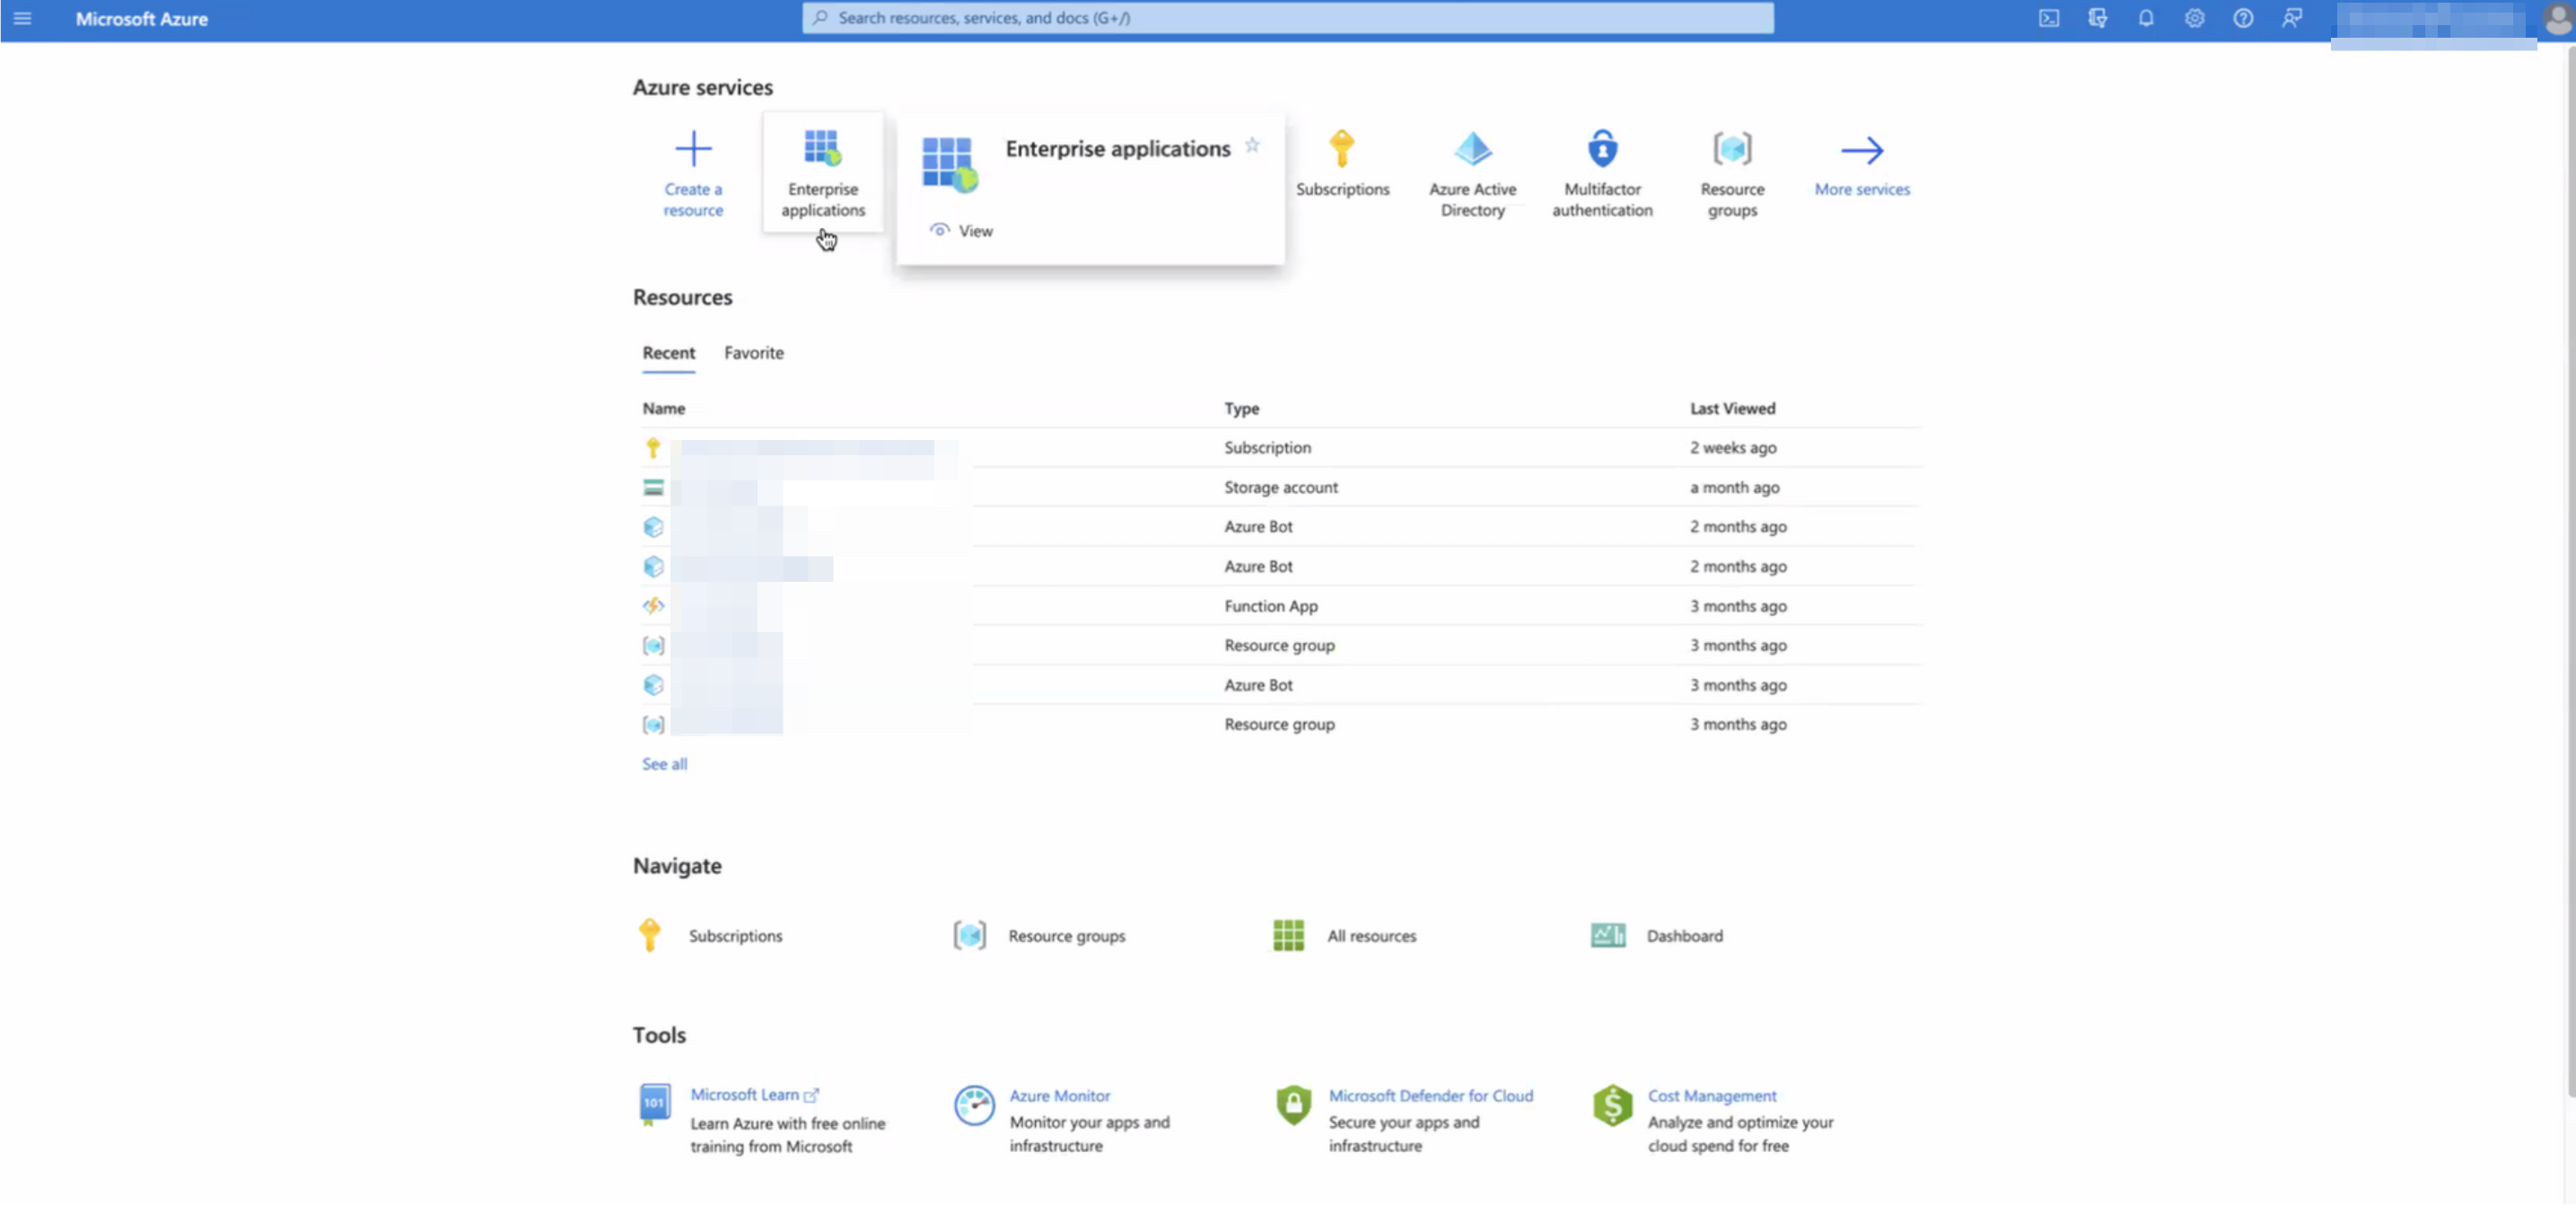
Go to your Microsoft Azure portal, and select Enterprise applications.
-
Search for the application to which you’ll be granting the new permissions. Note down its Application ID (aka App Id).

-
Navigate to this URL, replacing the end of the URL with your App Id:
https://portal.azure.com/#view/Microsoft_AAD_RegisteredApps/ApplicationMenuBlade/~/CallAnAPI/appId/{Application ID} -
This will bring you to the API Permissions page for that application. You may already see some permissions configured for this application, some of which may already be ones we need. In the image below, however, you’ll see this app only has User.Read, and that is not one of the four permissions we need, so we need to add all four.
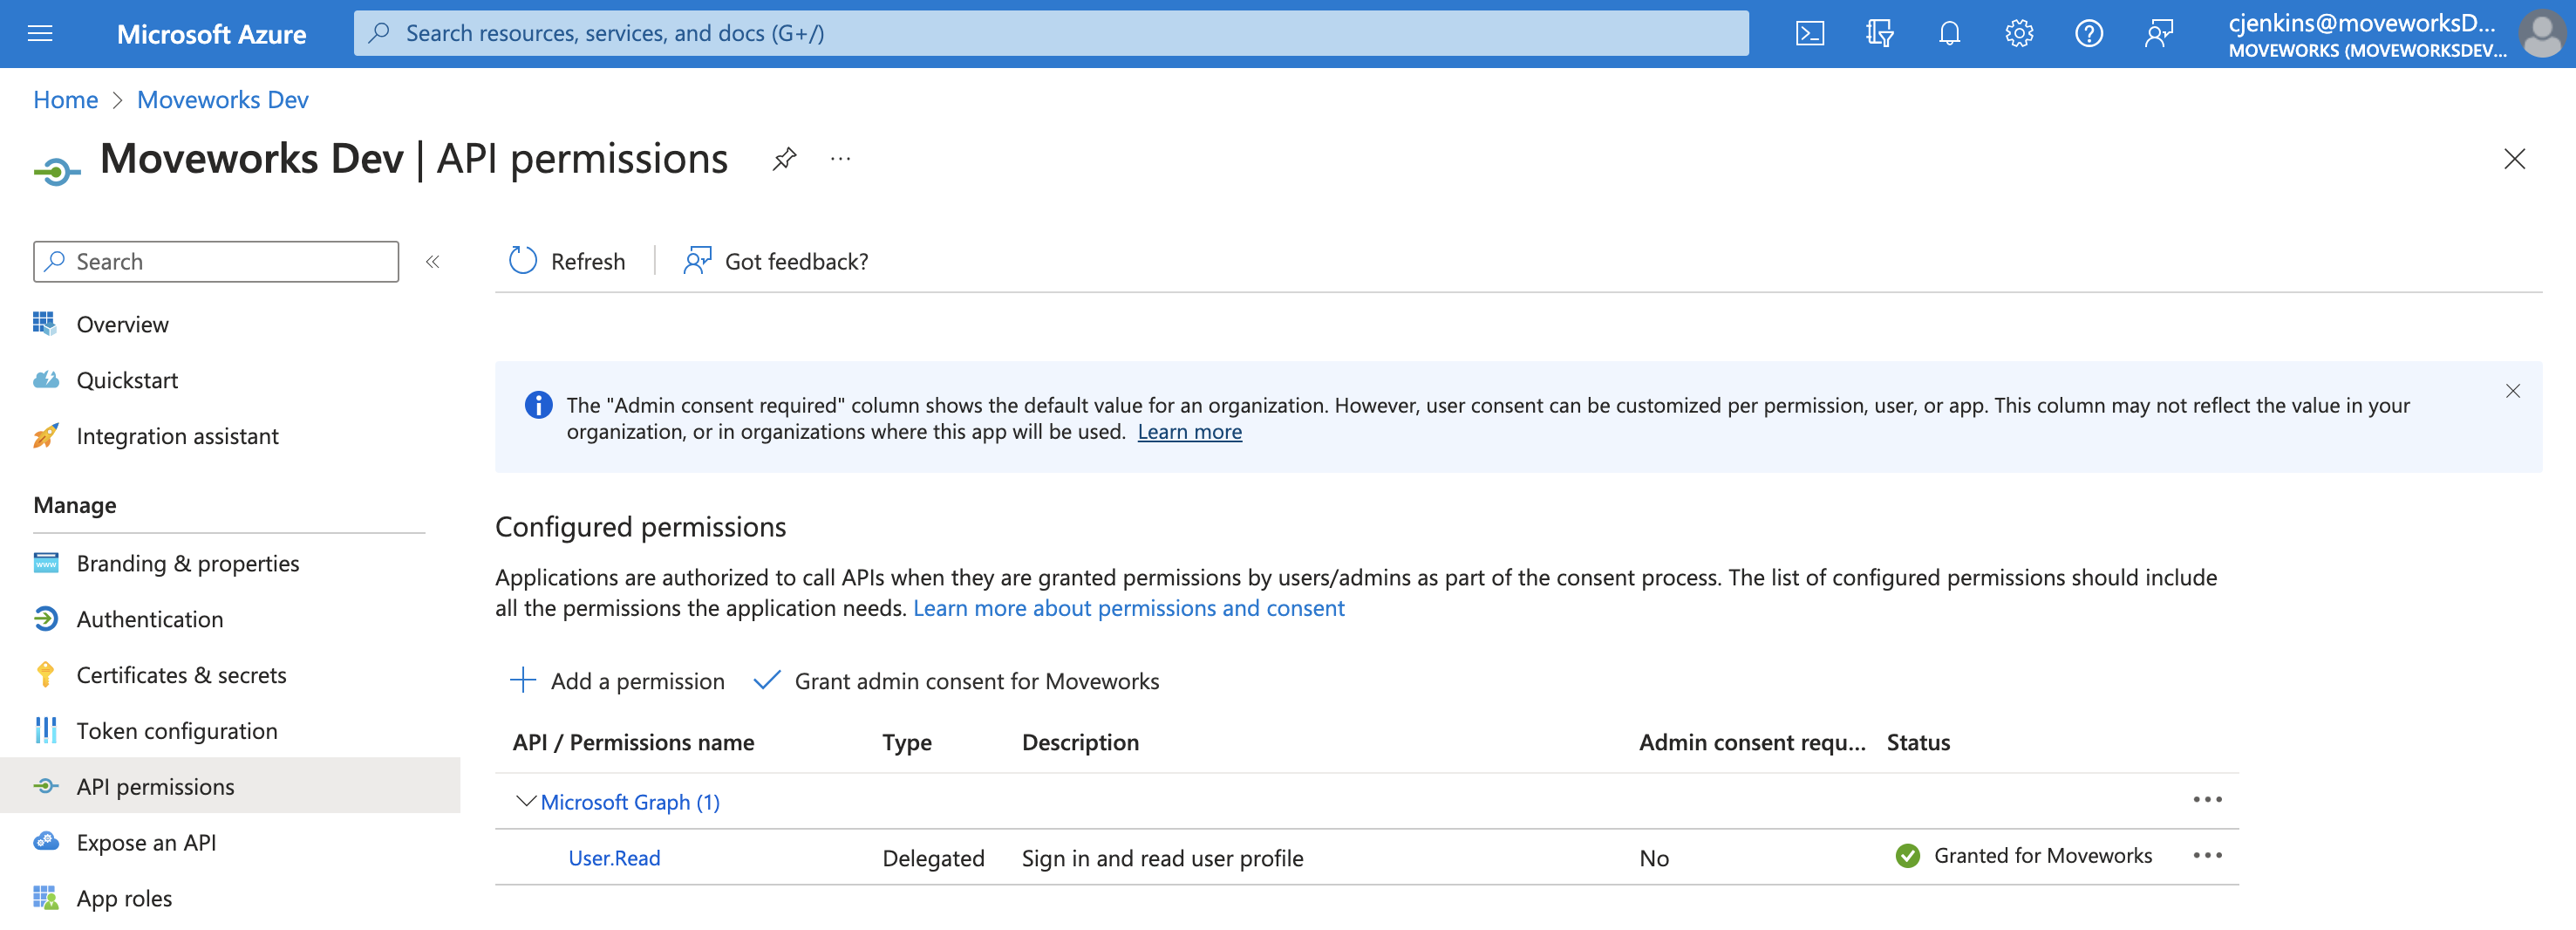
-
Click Add Permission.

-
This will open a panel on the right side:
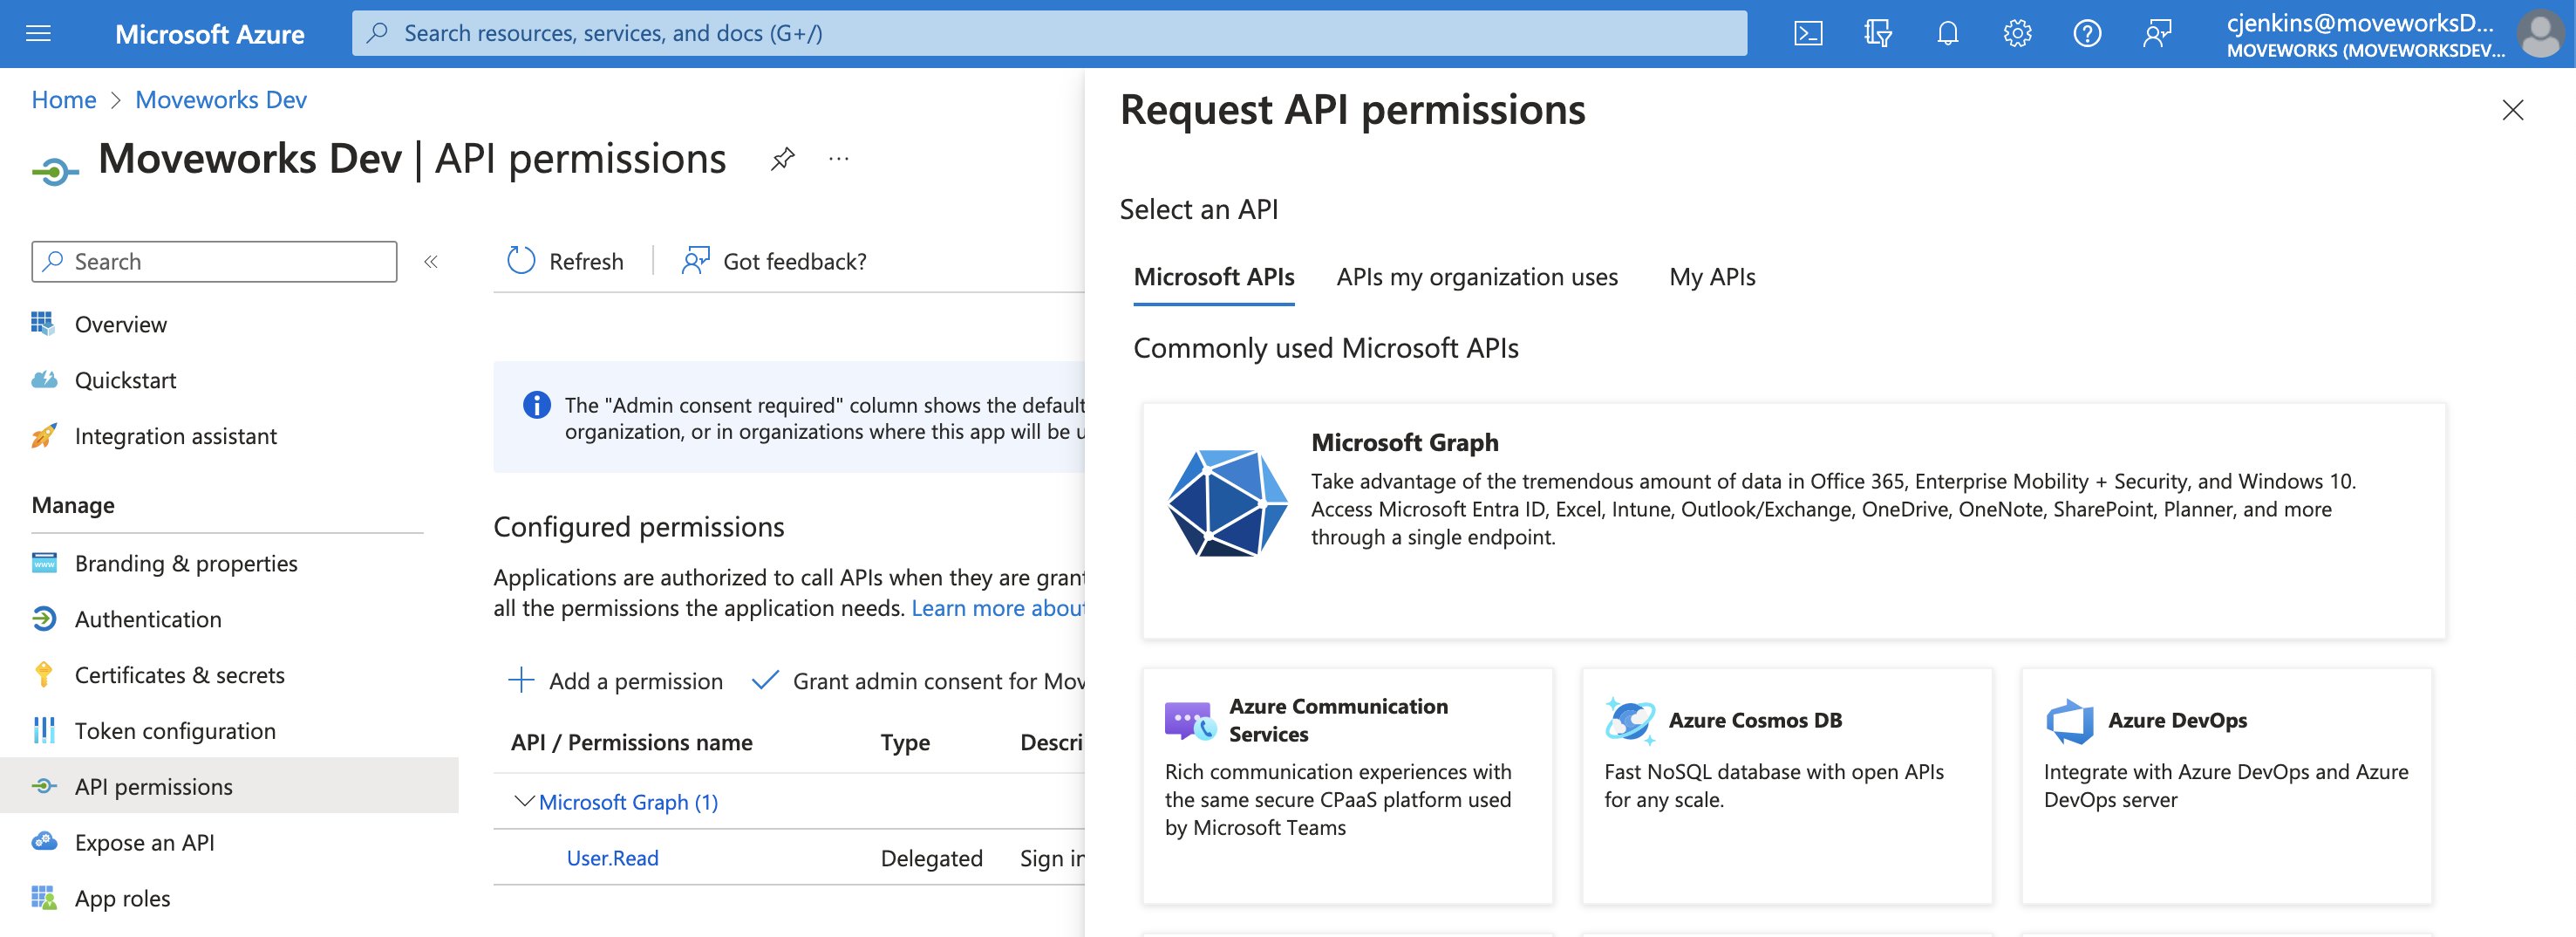
-
Click on Microsoft Graph.

-
Click on Application permissions.

-
A search bar will appear.
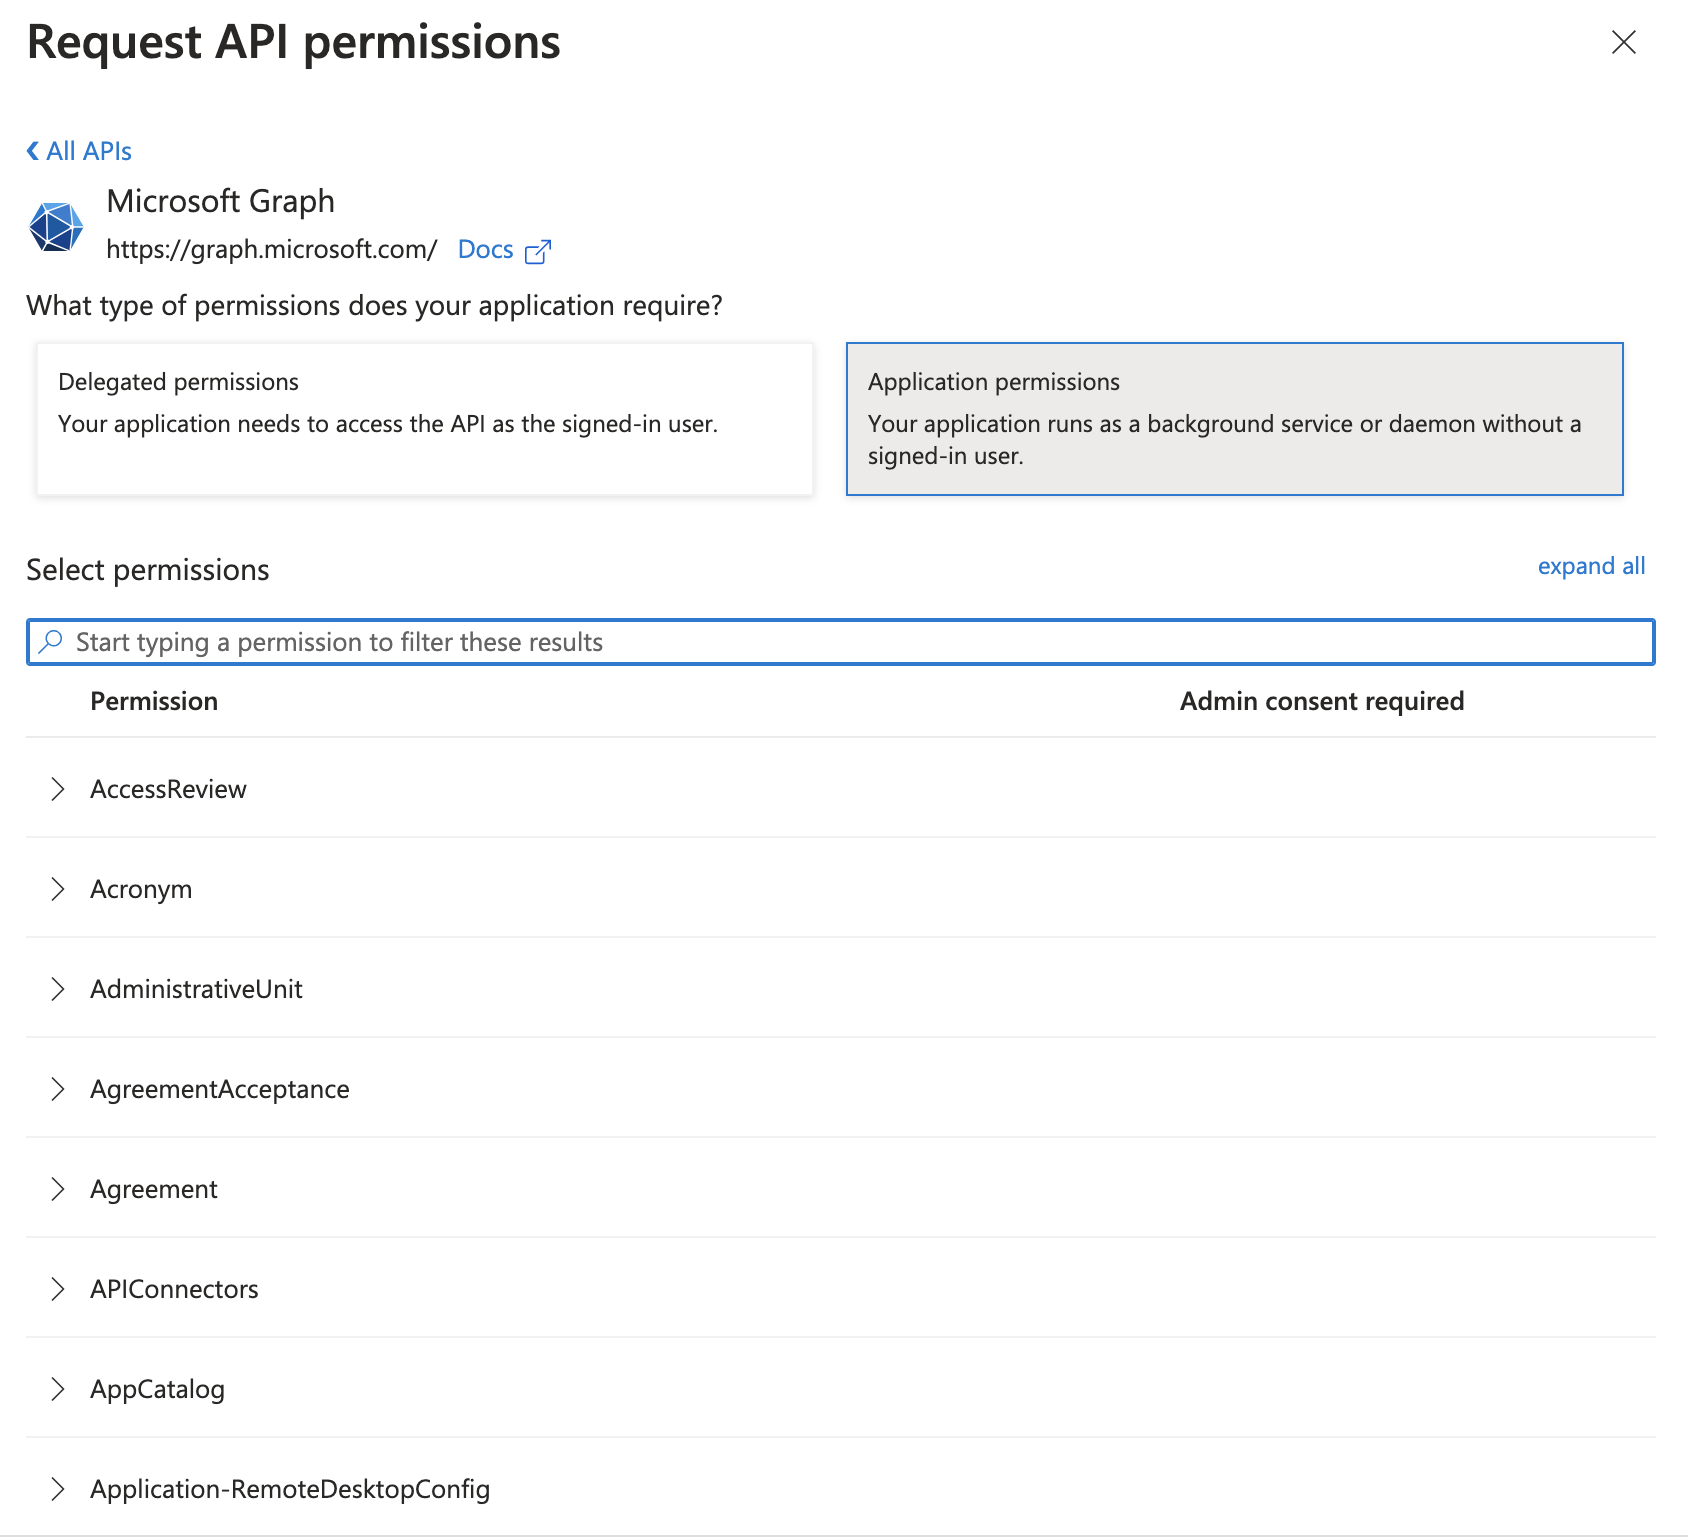
-
Search for the permissions you need to grant (noted above) and check the box for each.
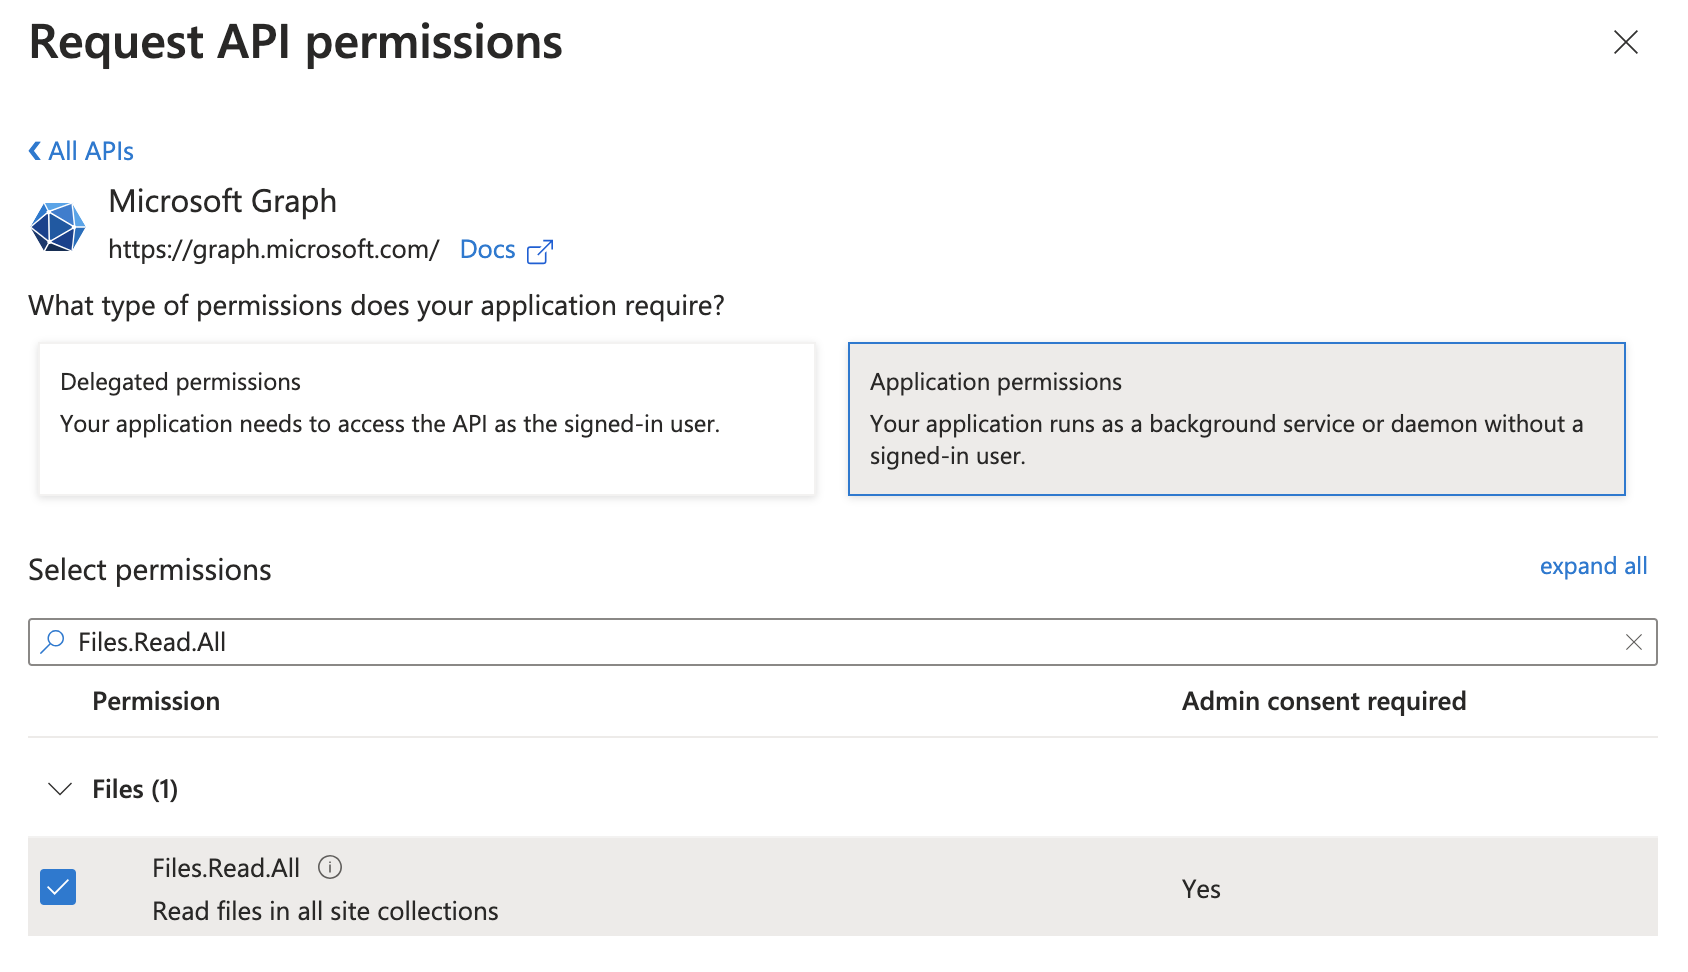
-
Once they’ve all been checked, click Add permissions.

-
You’ll now see all the newly added permissions alongside any you previously had granted the app, however, the new ones will have a status of “Not granted for” your organization.
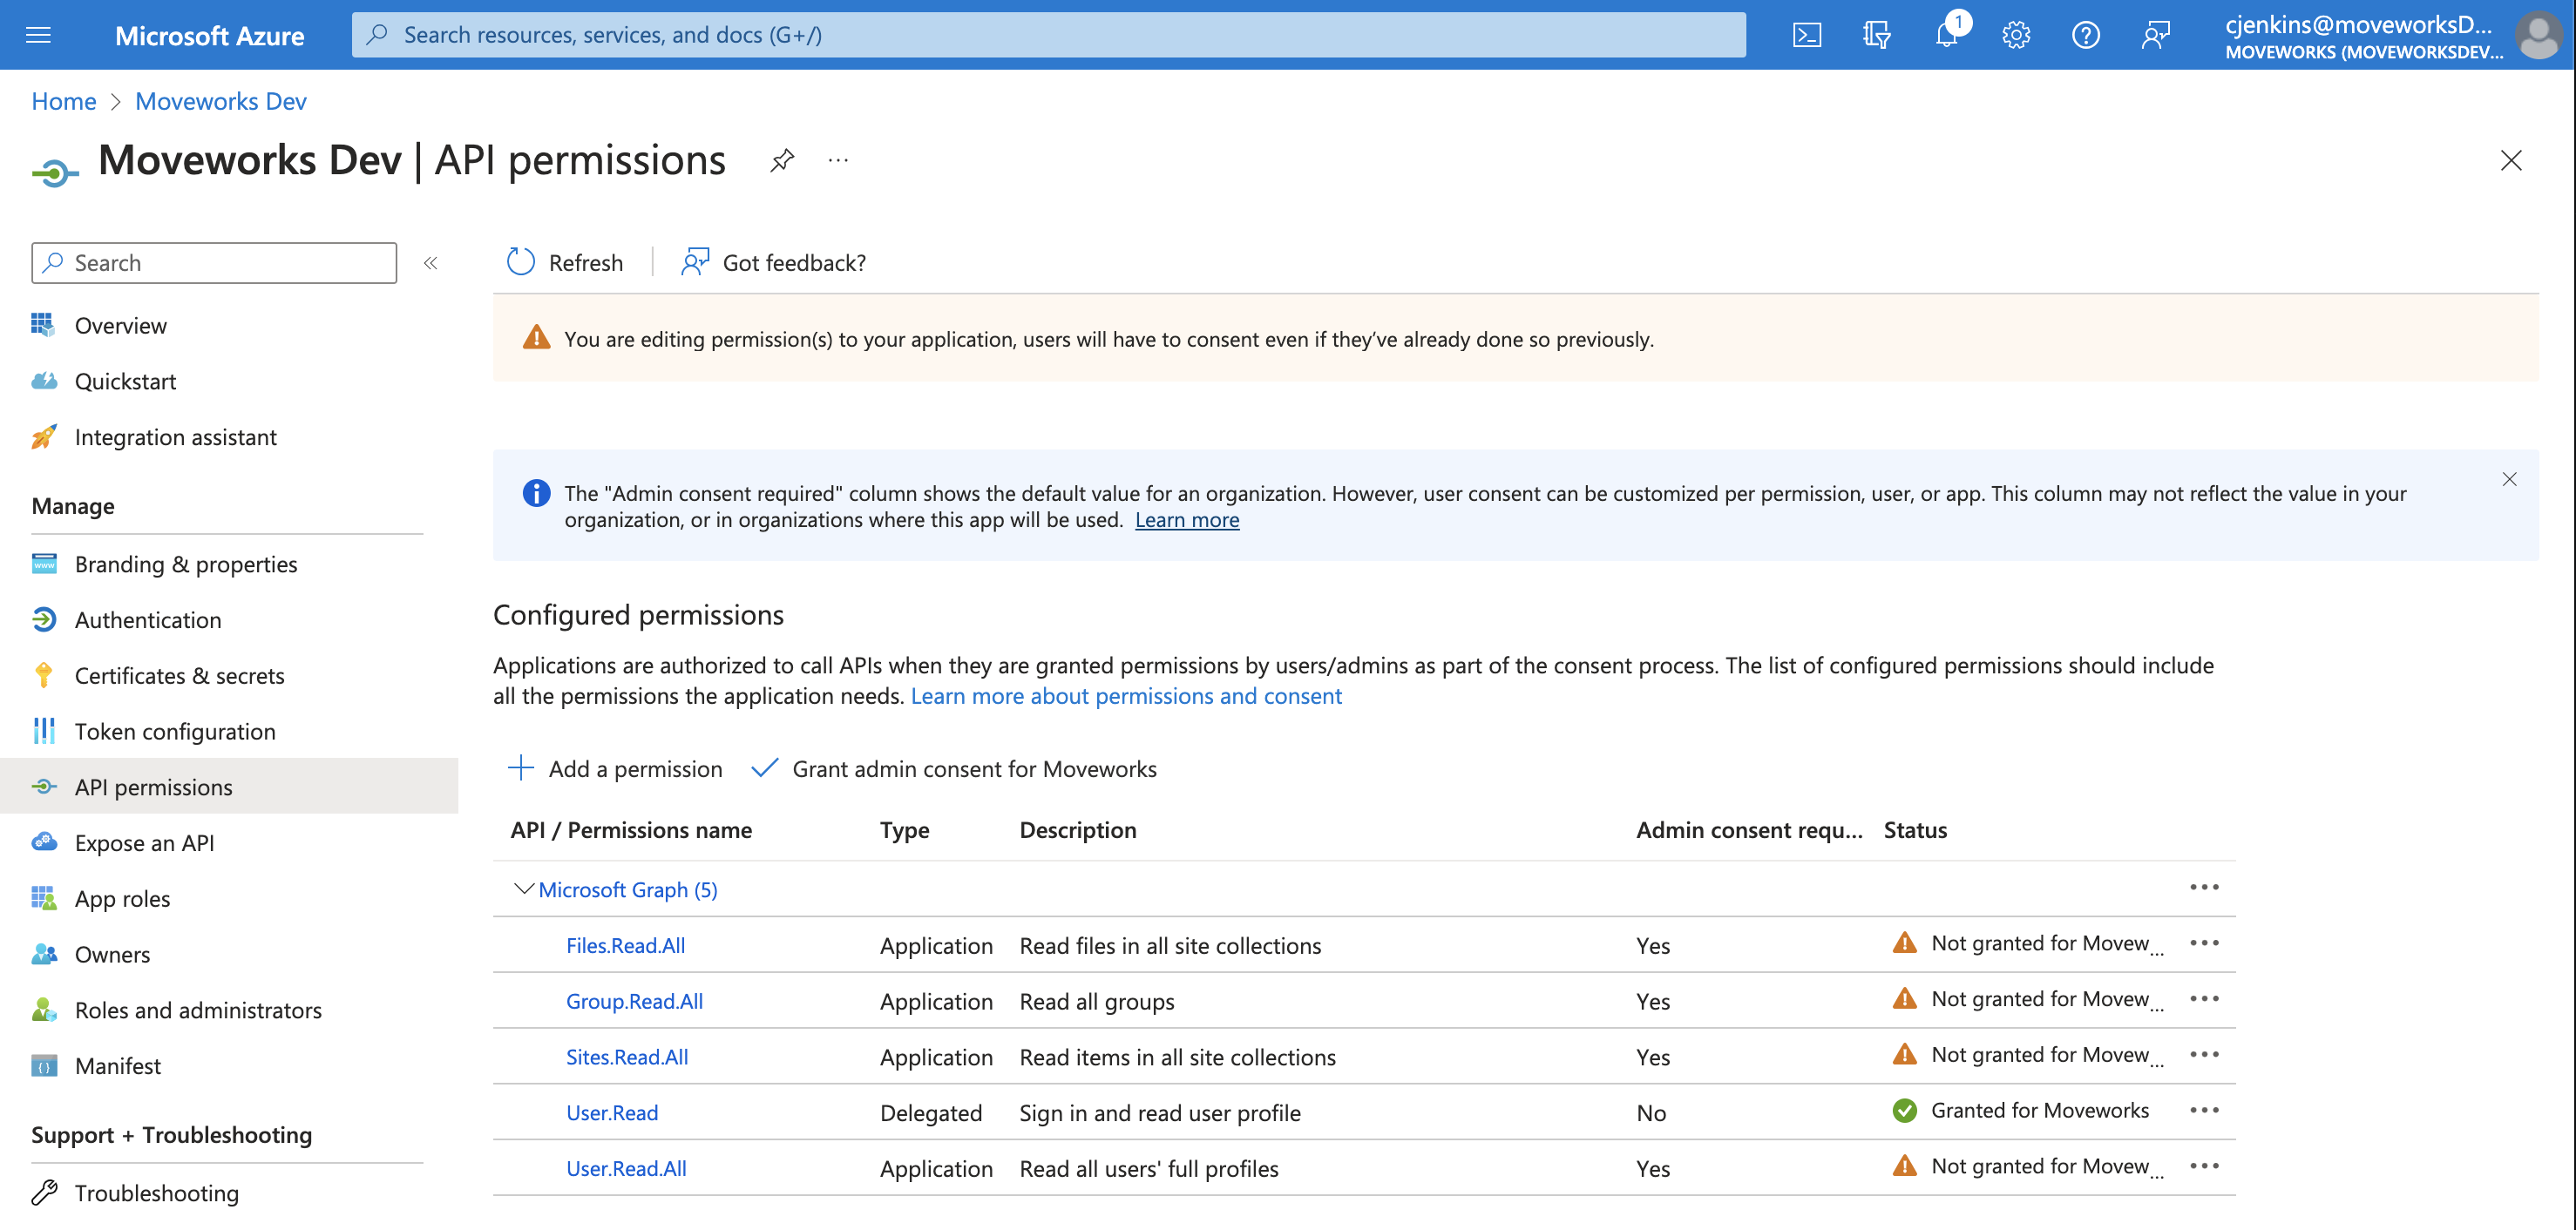
-
To complete the process, click Grant admin consent for your organization.

-
If this panel appears, click Yes, add other granted permissions to configured permissions then Save and continue, then Grant admin consent, and then Yes.
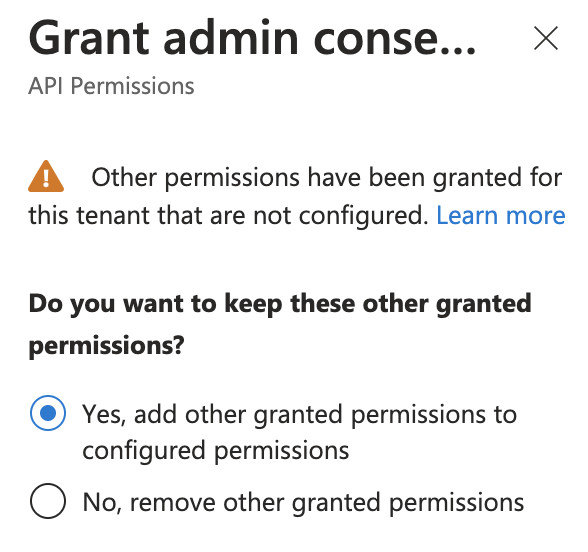
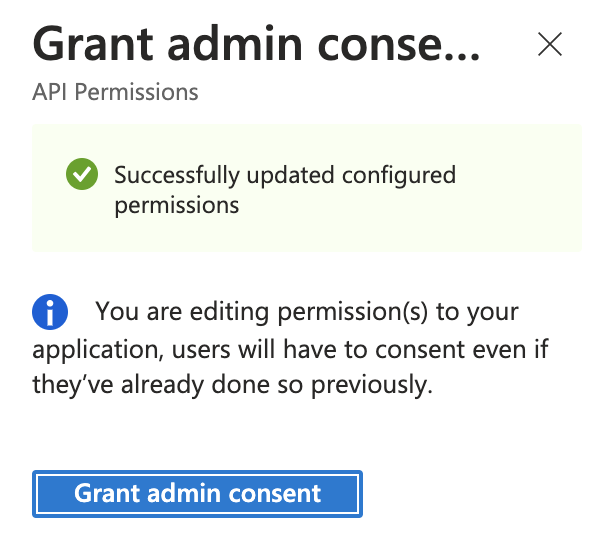
-
You will see green checkmarks on the newly added permissions if this was successful.
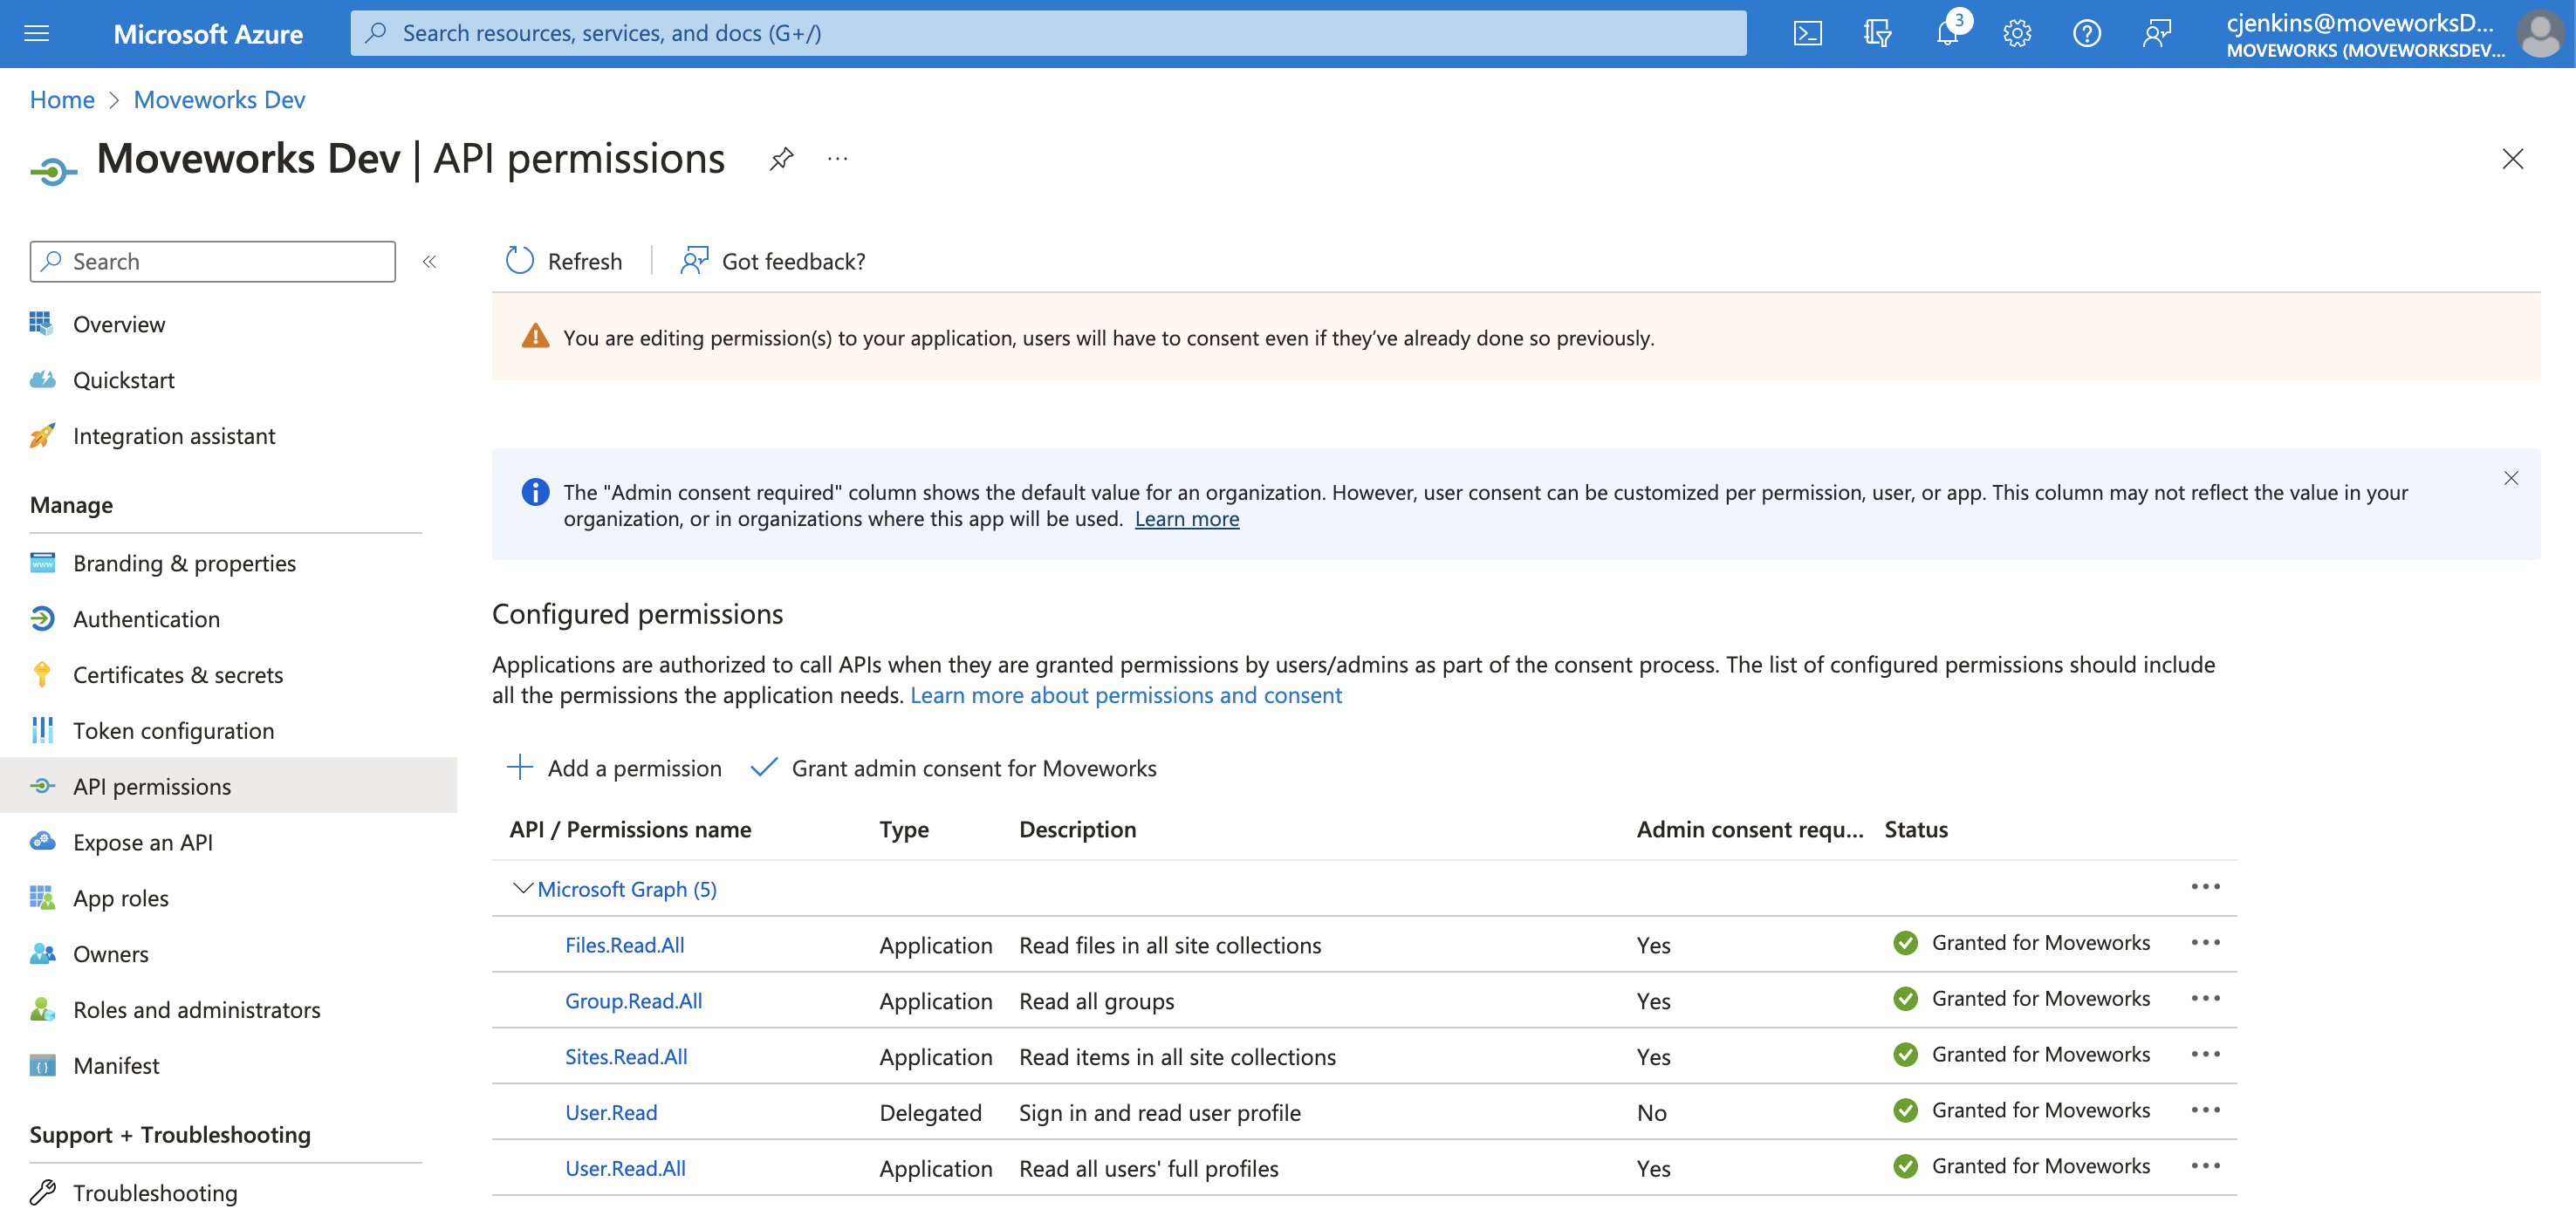
If you are NOT using the Microsoft AppSource Moveworks Teams Bot and you DO NOT ALREADY have a Moveworks Azure application
You will be creating a new app in the Azure admin portal with these permissions.
- Follow this guide, completing all the steps up through and including “Provide the Credentials to the Moveworks Customer Success team” (but skipping the “Verify Azure Manifest” step).
- As you do this, when you reach the step titled “Add API Permissions” also add and grant consent for the permissions noted above (Files.Read.All, Sites.Read.All, Group.Read.All, User.Read.All).
- You will not need to worry about connecting this to Teams, so please disregard references to doing so.
3. Get App ID and Create Connectors in MW Setup
In this step, you will create a Connector in your Moveworks Self-Serve portal, using the credentials that you have configured above. If you have not been granted access to Moveworks Setup, please provide your credentials to your Customer Success team, who will help you create your Connectors and configure your File Ingestions, akin to the following steps.
Get App ID
If you have a Microsoft Teams App Store Bot, use the App ID for Microsoft Team App Store Chatbot for Moveworks: b8ec4e1a-e05a-49d0-ba3a-05119b8b62c0 and proceed with the Sharepoint Online Access Requirements below.
If you don’t have a Moveworks Teams App Store Chatbot, but do have a Teams Bot with an AzureBot/Bot Channel Registration in your own tenant, then go to portal.azure.com to find the App ID, and then proceed with the Sharepoint Online Access Requirements below.
If you use Slack, or another Chat platform, and have never set up a Microsoft Teams Chatbot for Moveworks, then follow these steps to set up a Microsoft App Registration first: https://help.moveworks.com/docs/creating-a-microsoft-app-registration-for-moveworks.
Create Two Connectors: One MSGraph Connector and One Sharepoint Online Connector
https://help.moveworks.com/docs/creating-a-microsoft-app-registration-for-moveworks
- Configure one of each of the following connectors, as both will be required for File Search
- Start by navigating to the Connector module in your Self Serve portal.
- If you have not already, create the Microsoft Graph Connector. Note, use the "Microsoft Graph" connector, rather than the "Sharepoint Online (via Microsoft Graph)" connector.
- Use OAuth2, select Client Credentials, and enter your Client ID, Client Secret, and Tenant ID
- If you have not already, find the Sharepoint Online Connector
Set up the Sharepoint Online Connector using the Classic method
When setting up the Sharepoint Online Connector for File Search, select the Sharepoint Online (Classic method).
DO NOT use the Sharepoint Online (via Microsoft Graph)
- If you are using App Store Auth, enter your Tenant ID
- If you are using OAuth2, select Client Credentials, and enter your Client ID, Client Secret, and Tenant ID
4. Configure File Ingestions in Moveworks Setup
In this step, you will be able to configure the File Ingestions in Moveworks Self-Serve, using the Connector you have created above.
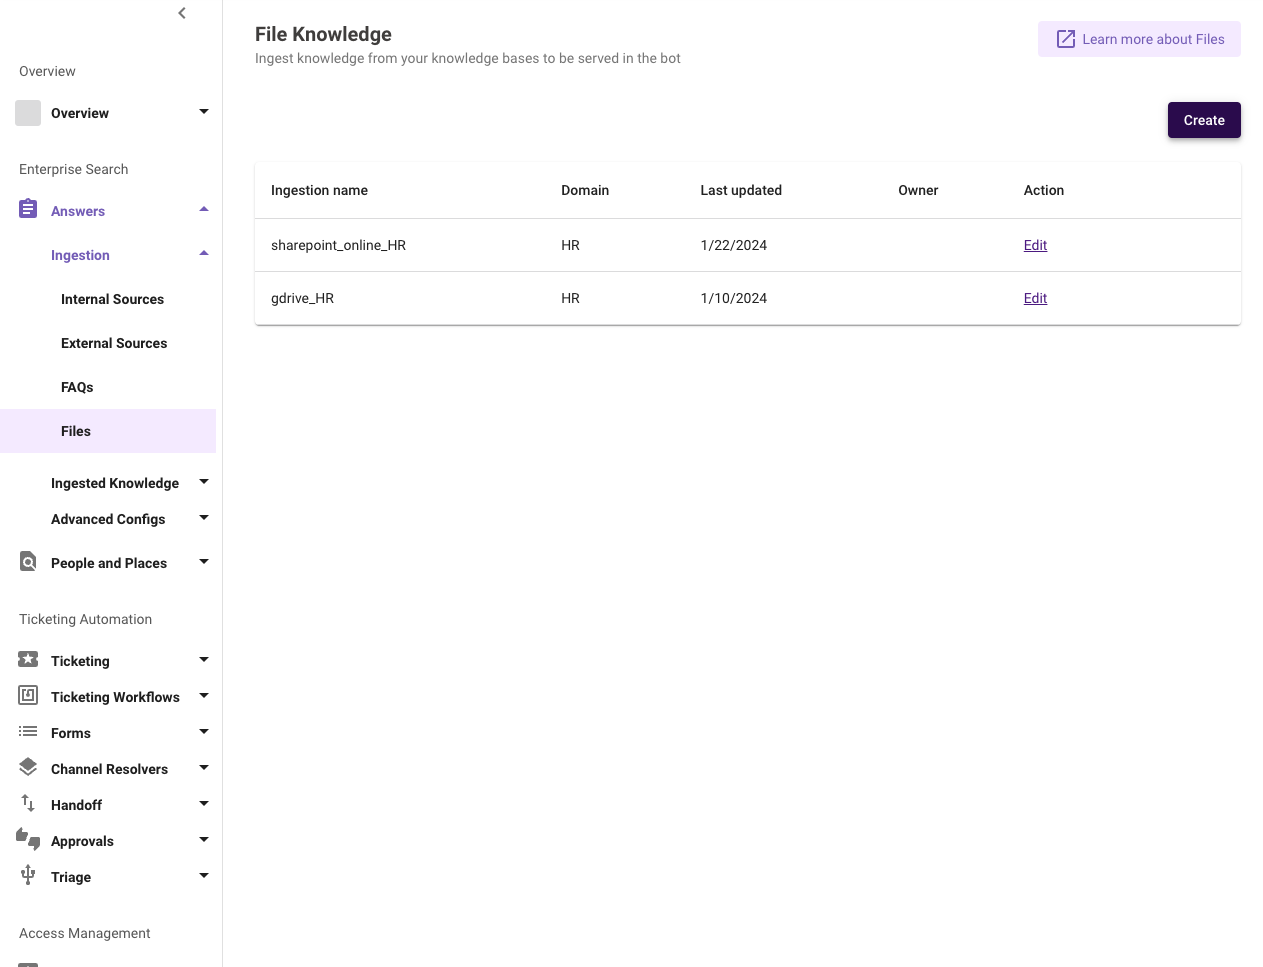
-
Navigate to the Enterprise Search → Answers → Ingestion → Files module.
-
Select the Sharepoint_Online Connector and Name your File ingestion config.
-
You must also select the second connector, the Microsoft Graph Connector, which is required for ingesting file permissions.
-
Continue to the Ingestion Details page and Specify each Site.
-
From the list of sites that you have granted us access to in Step 2 above , specify each Site.
-
Please double check that each Site has been granted the access in Step 2.
- If you are using Sites.Selected in Step 3, please double check that you have properly granted MSGraph access for the Site.
-
Please double check that you have entered each SiteName correctly.
-
For example, if the URL of your site is https://tenant.sharepoint.com/sites/sitename), enter the verbatim into your File Ingestion.
-
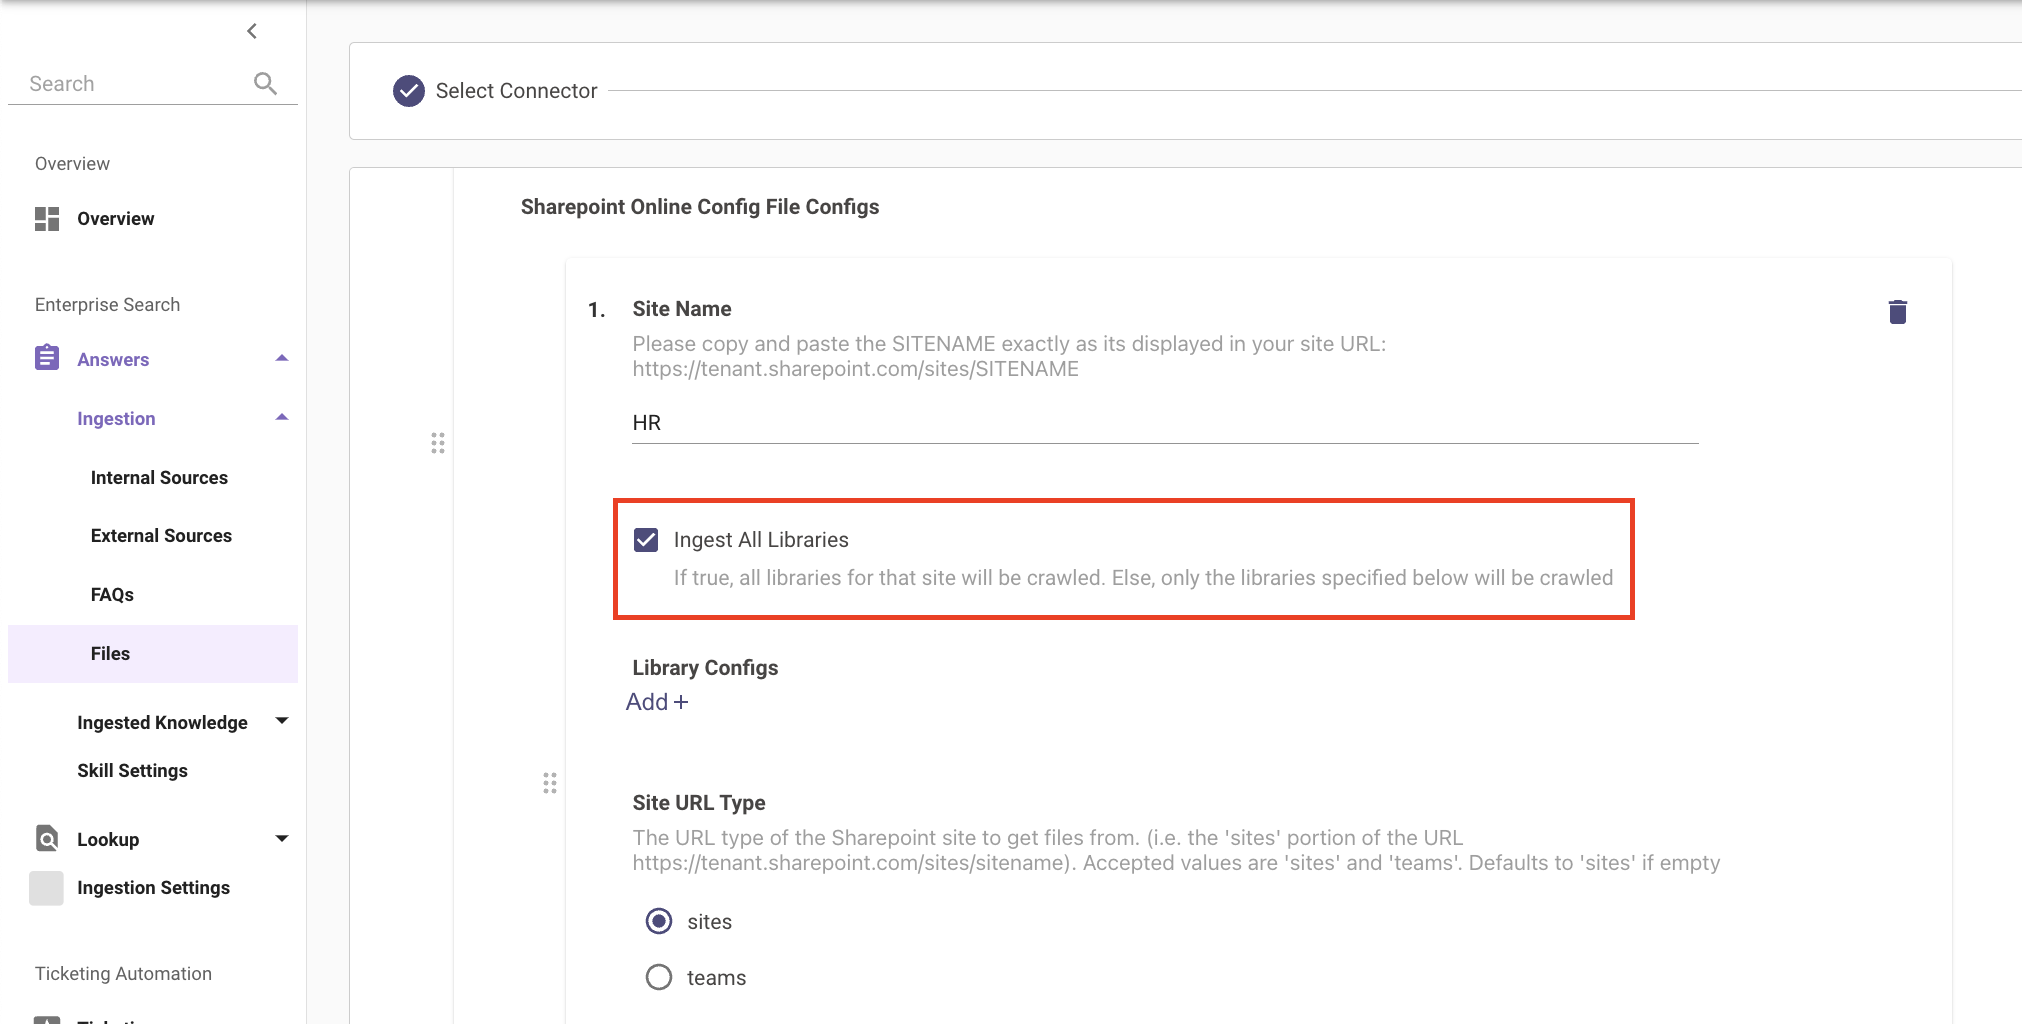
You can select the option Ingest All Libraries to crawl through all nested resources within the Site you inputted.
-
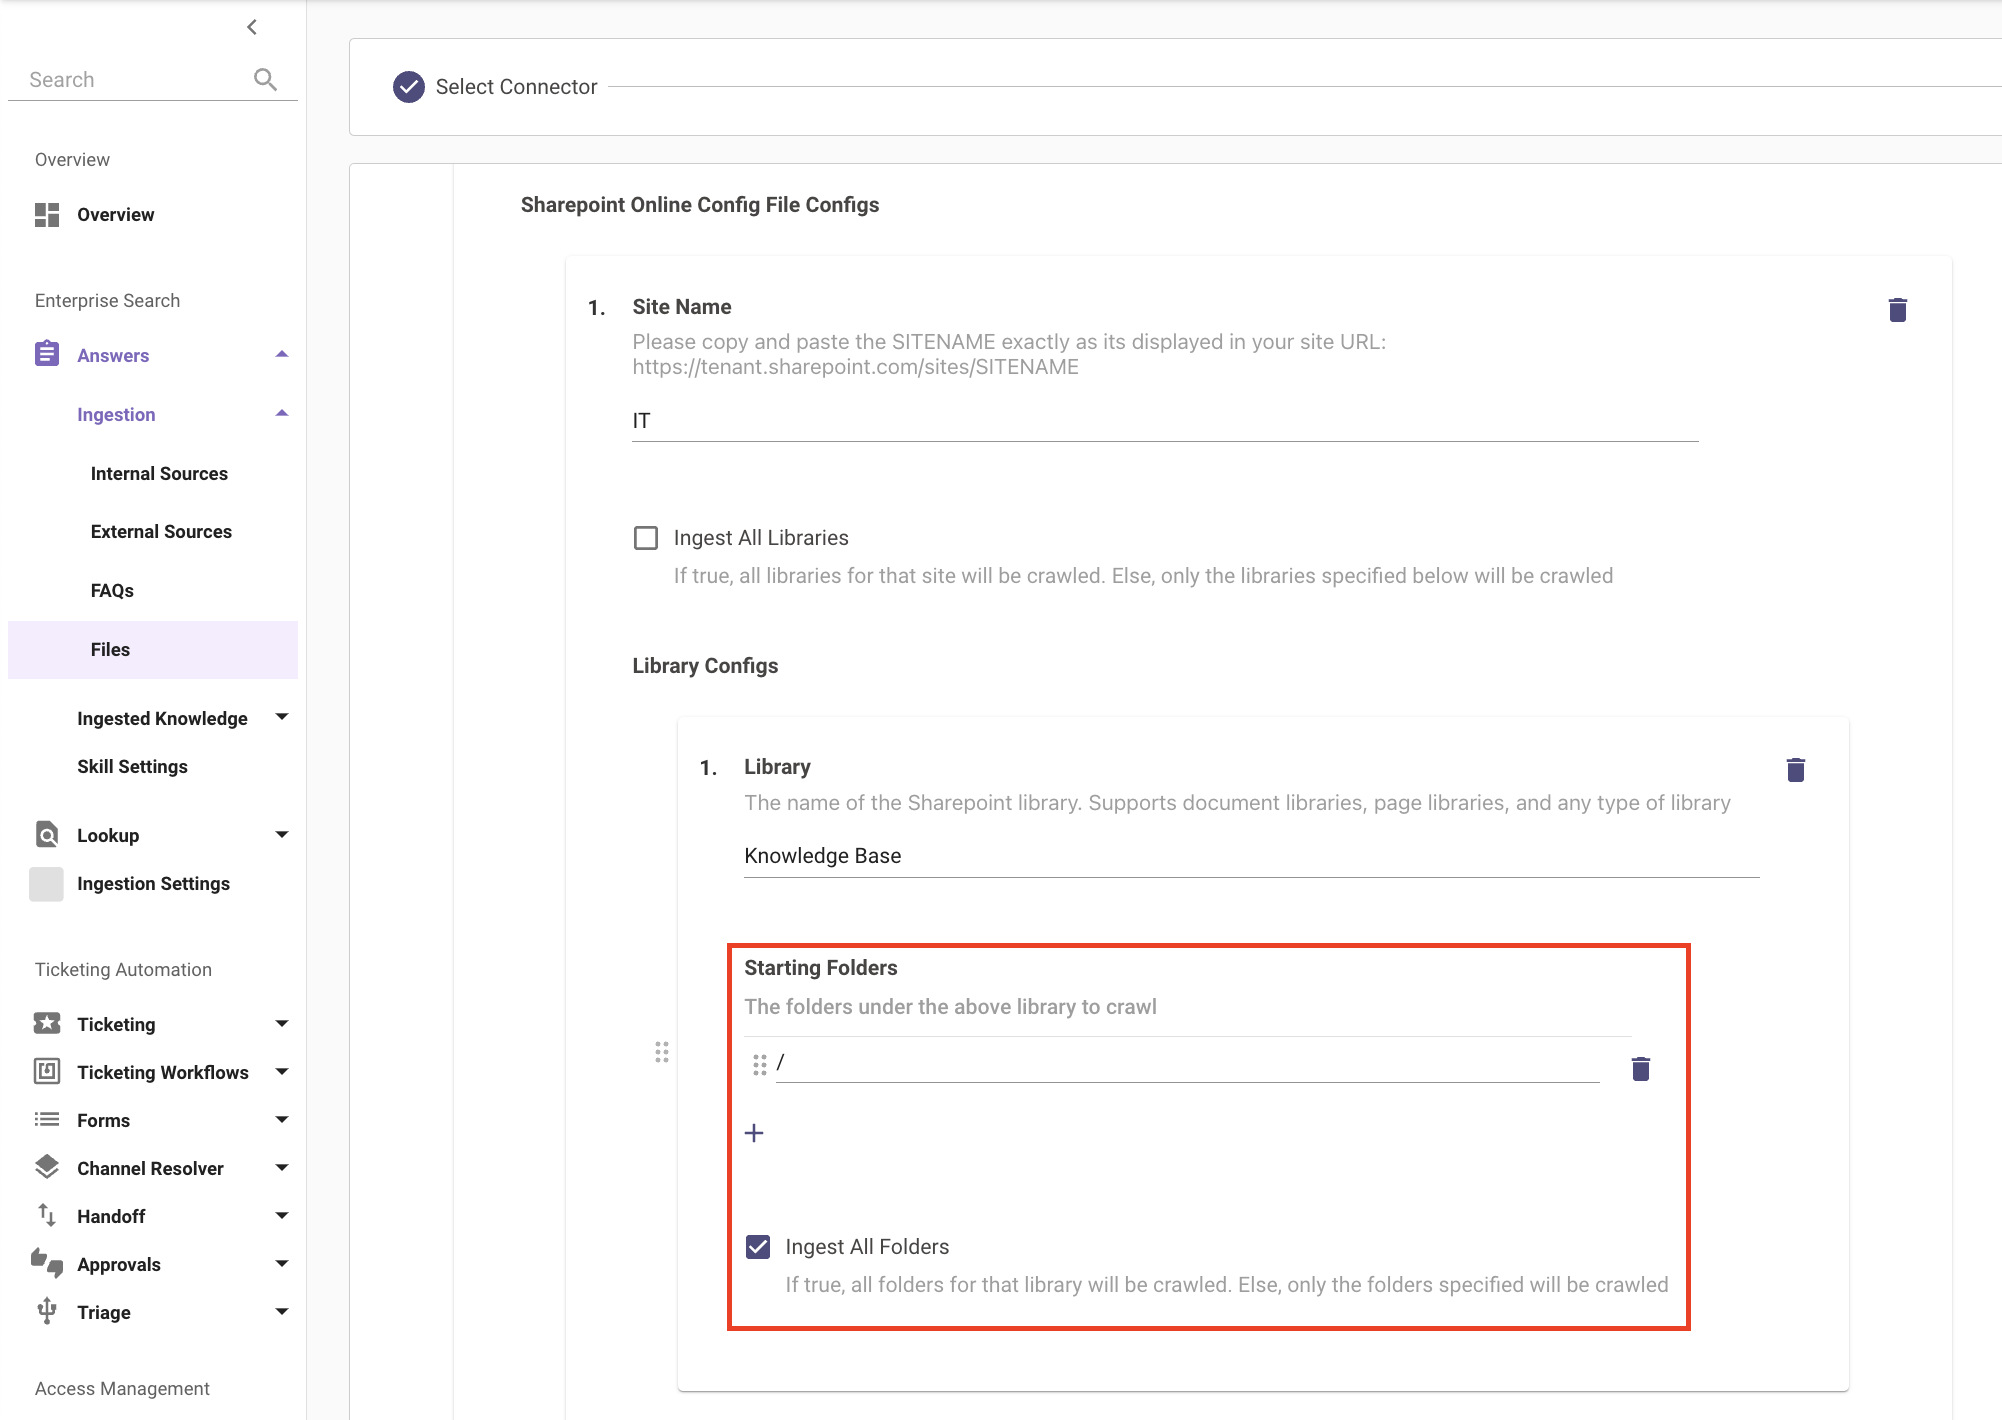
You can also specify specific paths within the Sites, by using the Library Configs action. Please add your Library name under Library.
- To ingest all nested folders within the Library, please add your Library name under Library and add an item with / under Starting Folders and check Ingest All Folders.
-
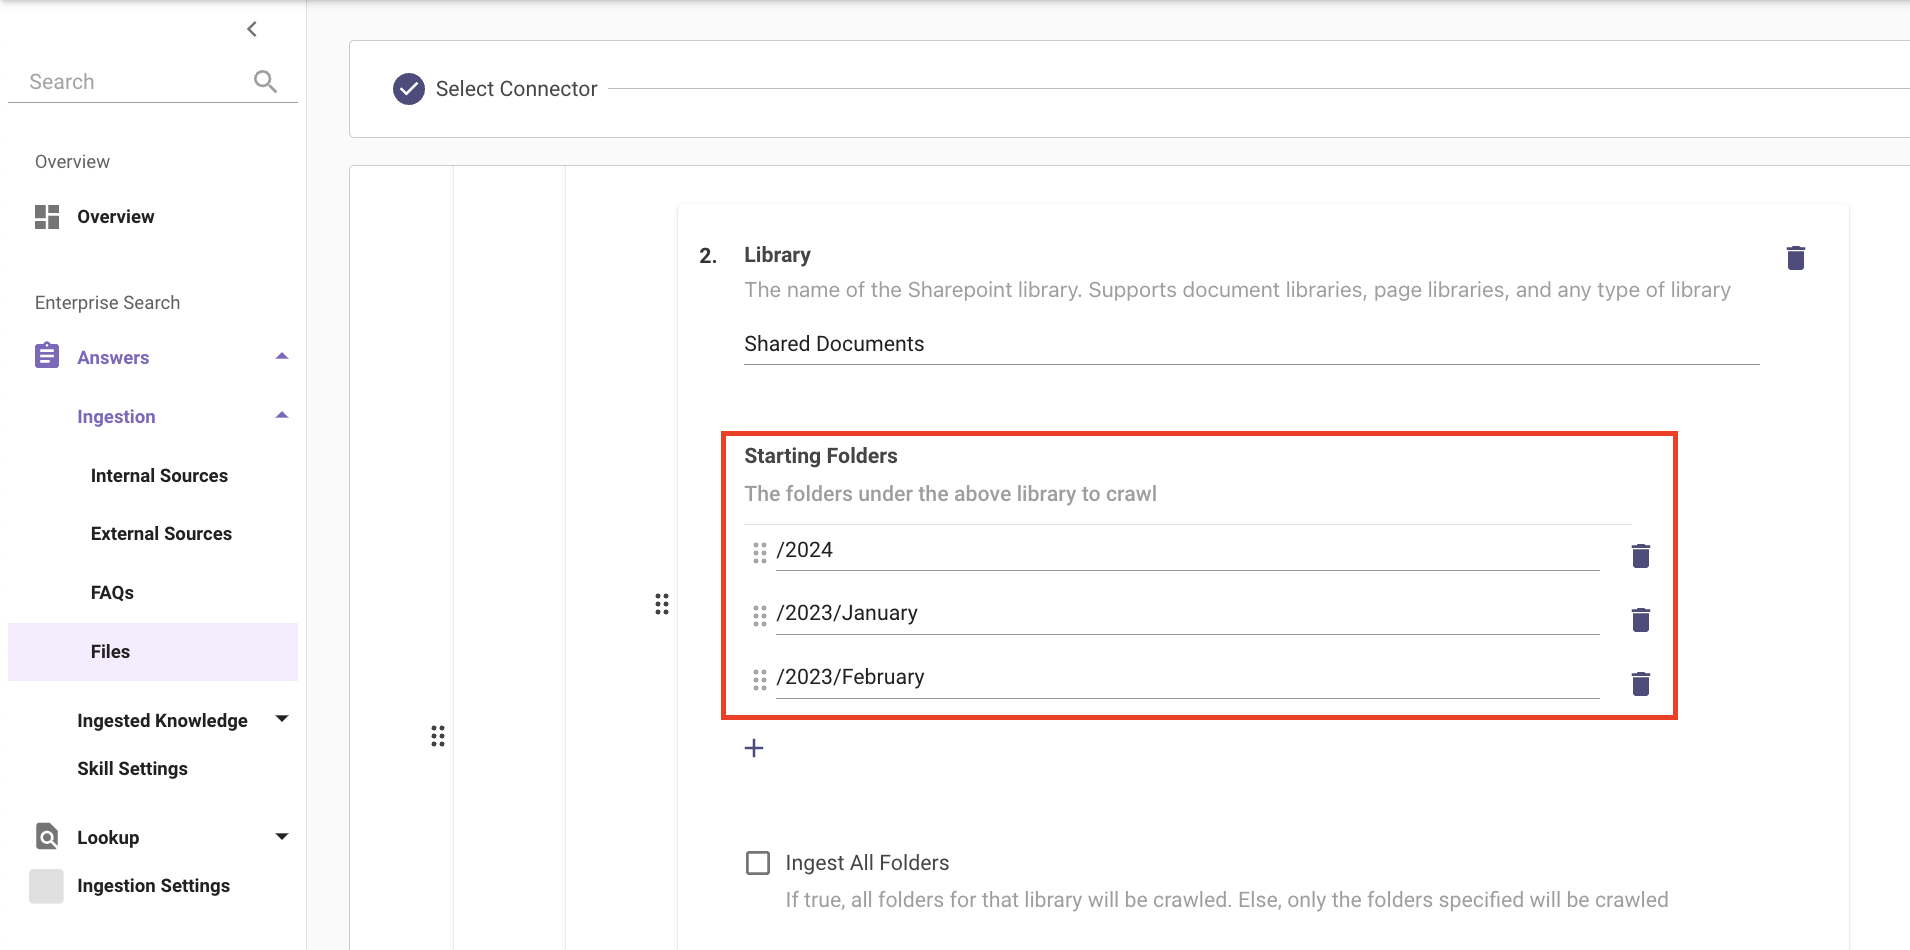
To ingest specific folders within your Library, please add the Library name under Library and specify the path of the file, separating nested Folder names in the following format, /\<Site1Name>/\<Site2Name>/<Site3Name>.
-
-
-
-
-
[Moveworks Customer success]Save the File Ingestions.
5. Continue to launch File Search to your employees (if not already)
- Refer back to the main File Search Self-Serve guide: File Search Self-Serve Configuration.
Updated 25 days ago
