
Quickstart #6: Expense Approval Ambient Agent
Limited Preview: Webhook Triggers & Listener
Webhook Triggers and the Webhook Listener are currently in Limited Preview and may change without notice. Access is invite-only. Self-nomination form is here. Production use is approved but may be subject to interruptions or breaking changes.
Learning Objectives
This guide will walk you through creating an Ambient Agent that intelligently handles expense approval requests. By listening to a webhook from your expense management system, this agent can differentiate between low-value and high-value expenses. It will automatically approve smaller expenses and route larger ones to the appropriate manager for manual review. By the end of this guide, you will be able to:
- Configure a Listener.
- Build a Compound Action that uses conditional logic based on the expense amount.
- Implement an automated approval branch for expenses under a set threshold.
- Create a manual approval branch that identifies the correct approver and sends them an interactive approval request.
- Update the source system to reflect the final "approved" or "rejected" status.
Prerequisites
- Access to the "Agent Studio" App
- Completed Quickstart #5: Notification Ambient Agent
What You'll Build
In this guide, you'll build an Expense Approval Ambient Agent that acts as a smart filter for your company's expense workflow. This agent will differentiate between low- and high-value expenses, automatically approving any report under $500 while routing larger sums to the appropriate manager for manual review. This automates routine tasks and ensures high-value expenses get the necessary oversight.
The result is a streamlined process for everyone. For expenses over $500, managers receive a simple, direct approval request right in their chat client, allowing them to take action in seconds.
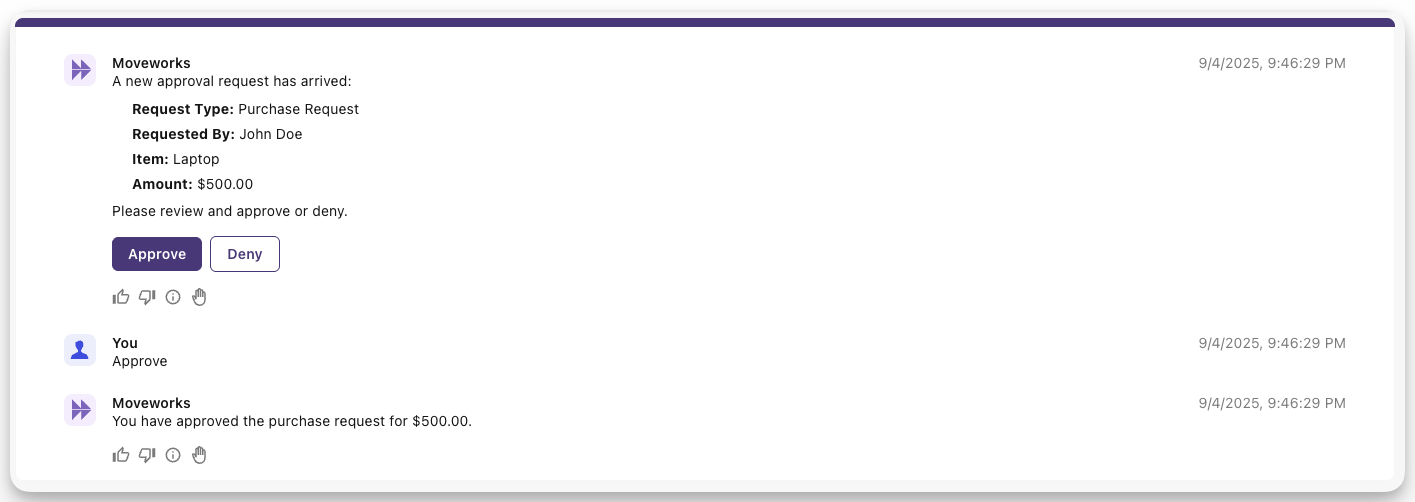
While the user-facing interaction is intentionally simple, the real power is the automation happening behind the scenes. The agent processes every request from your expense system, and for the majority of expenses (those under $500), no manual action is needed at all, they are approved instantly.
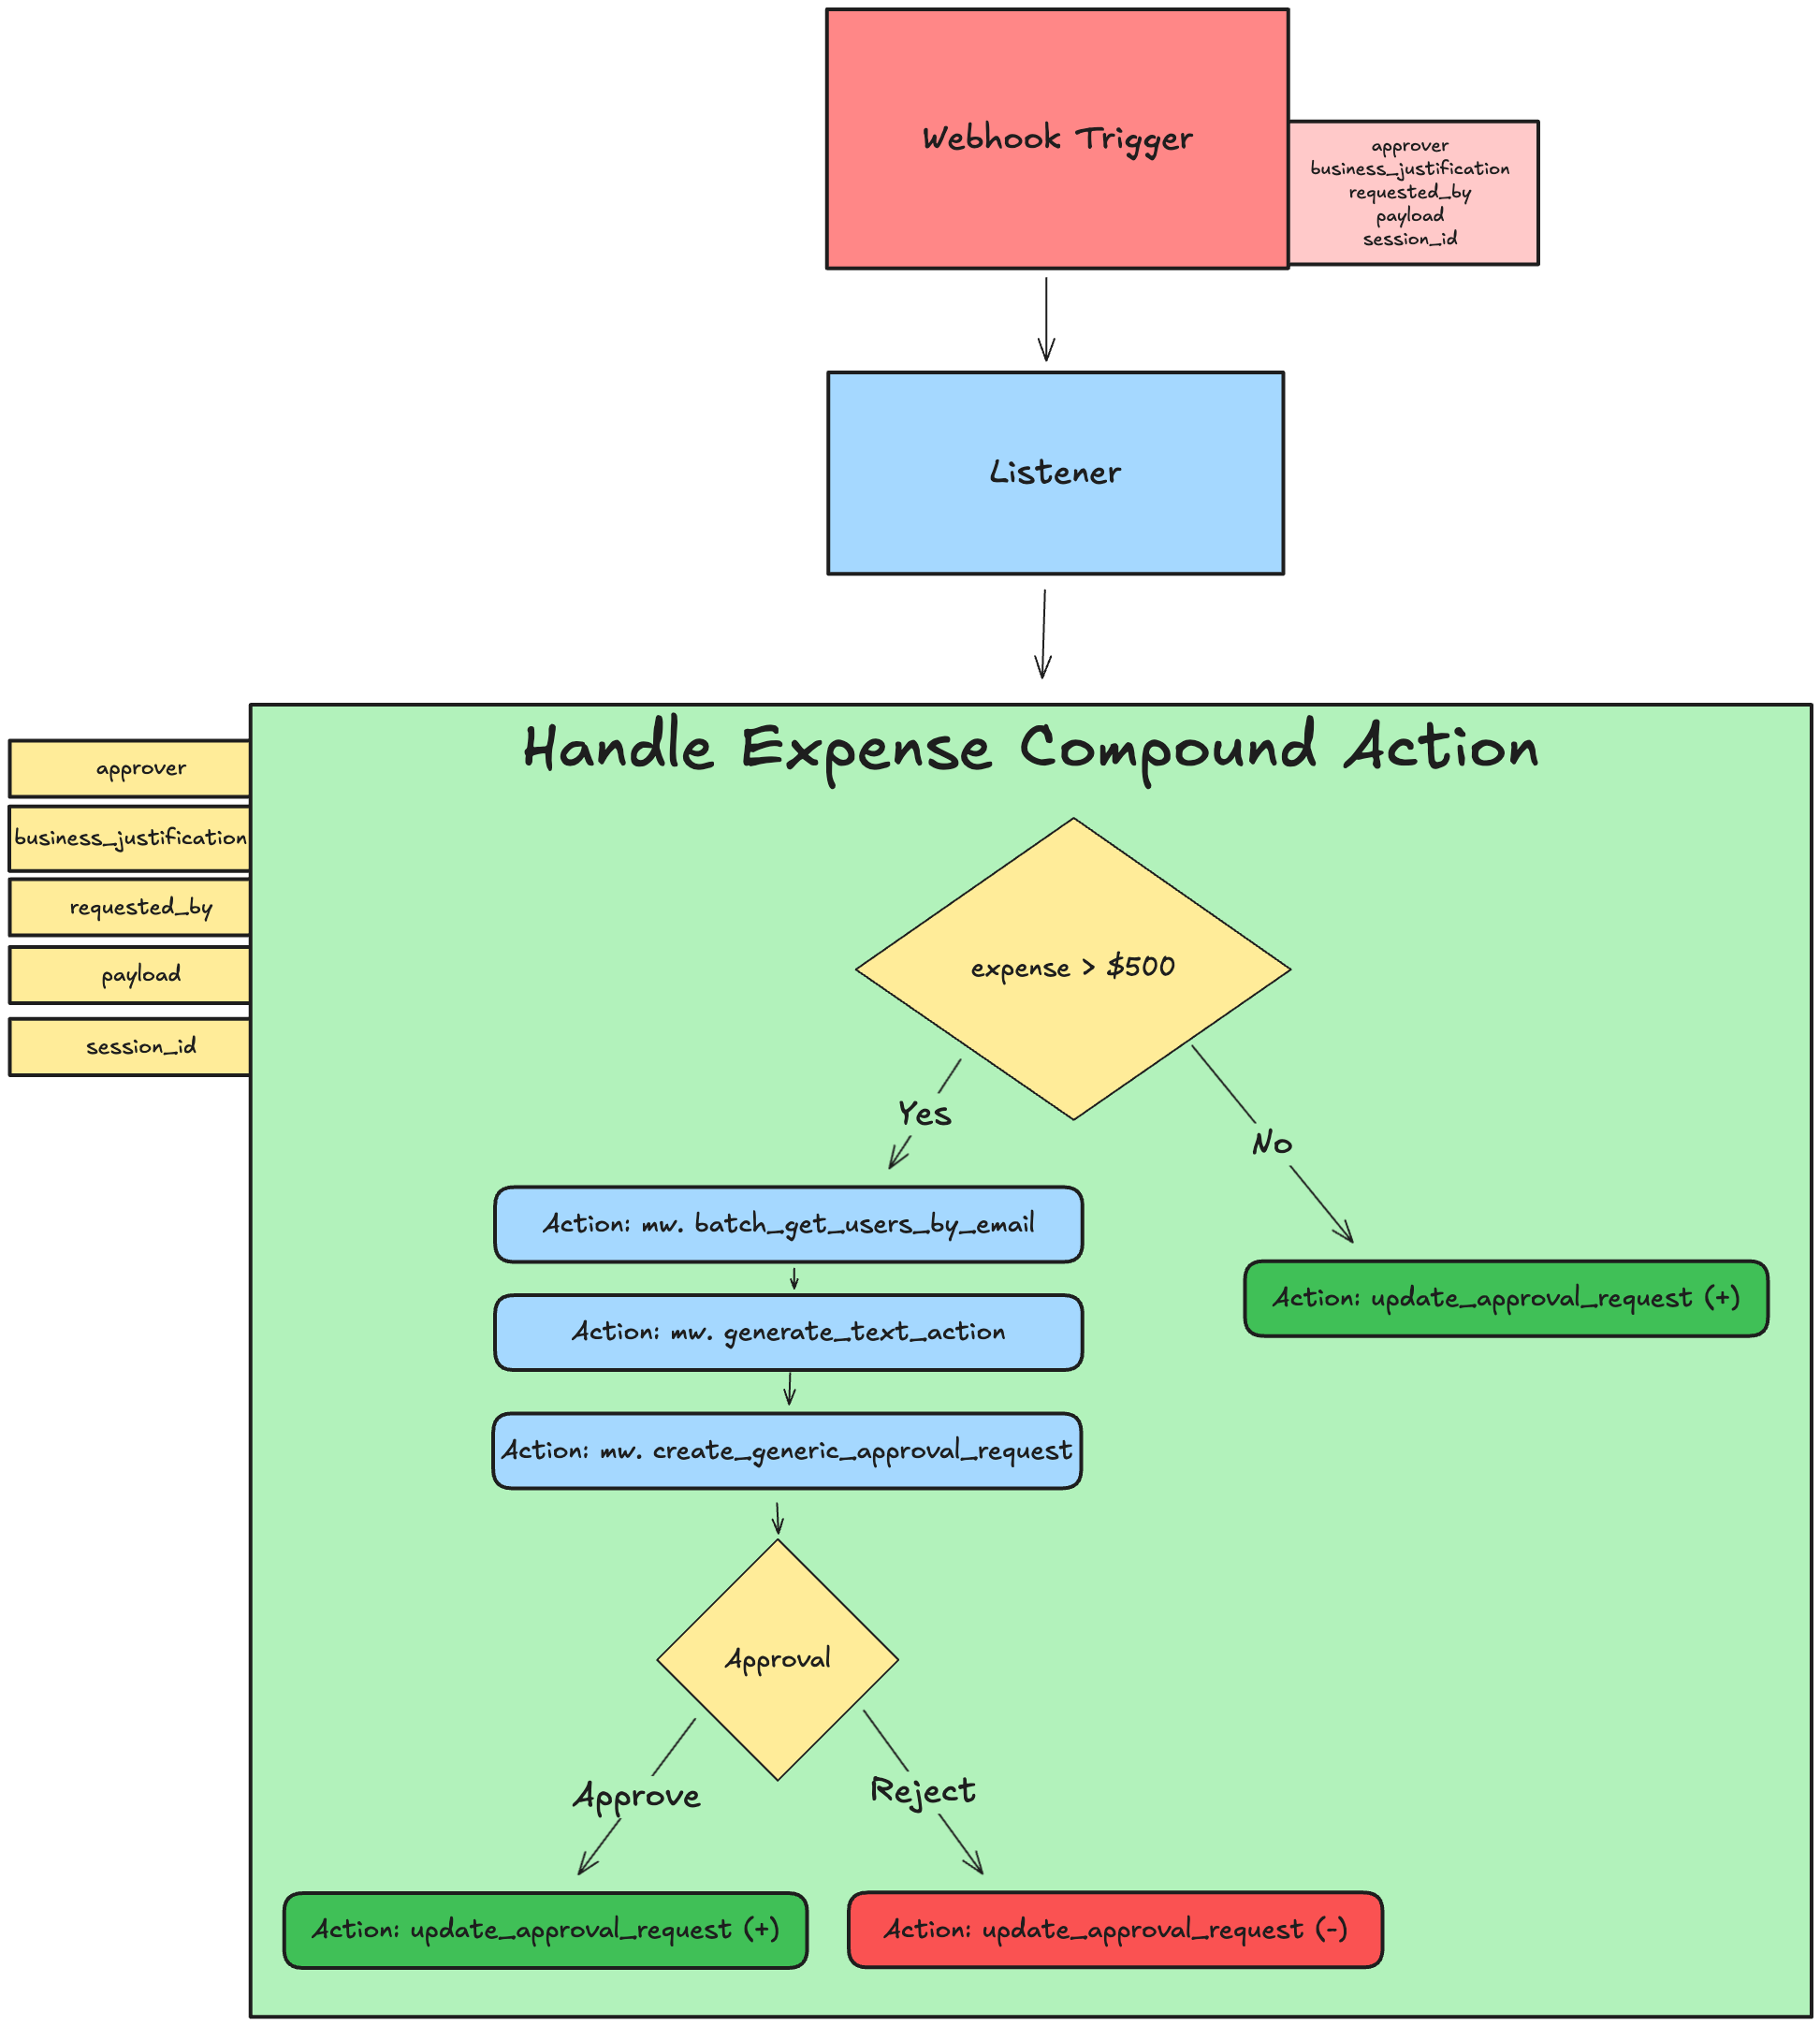
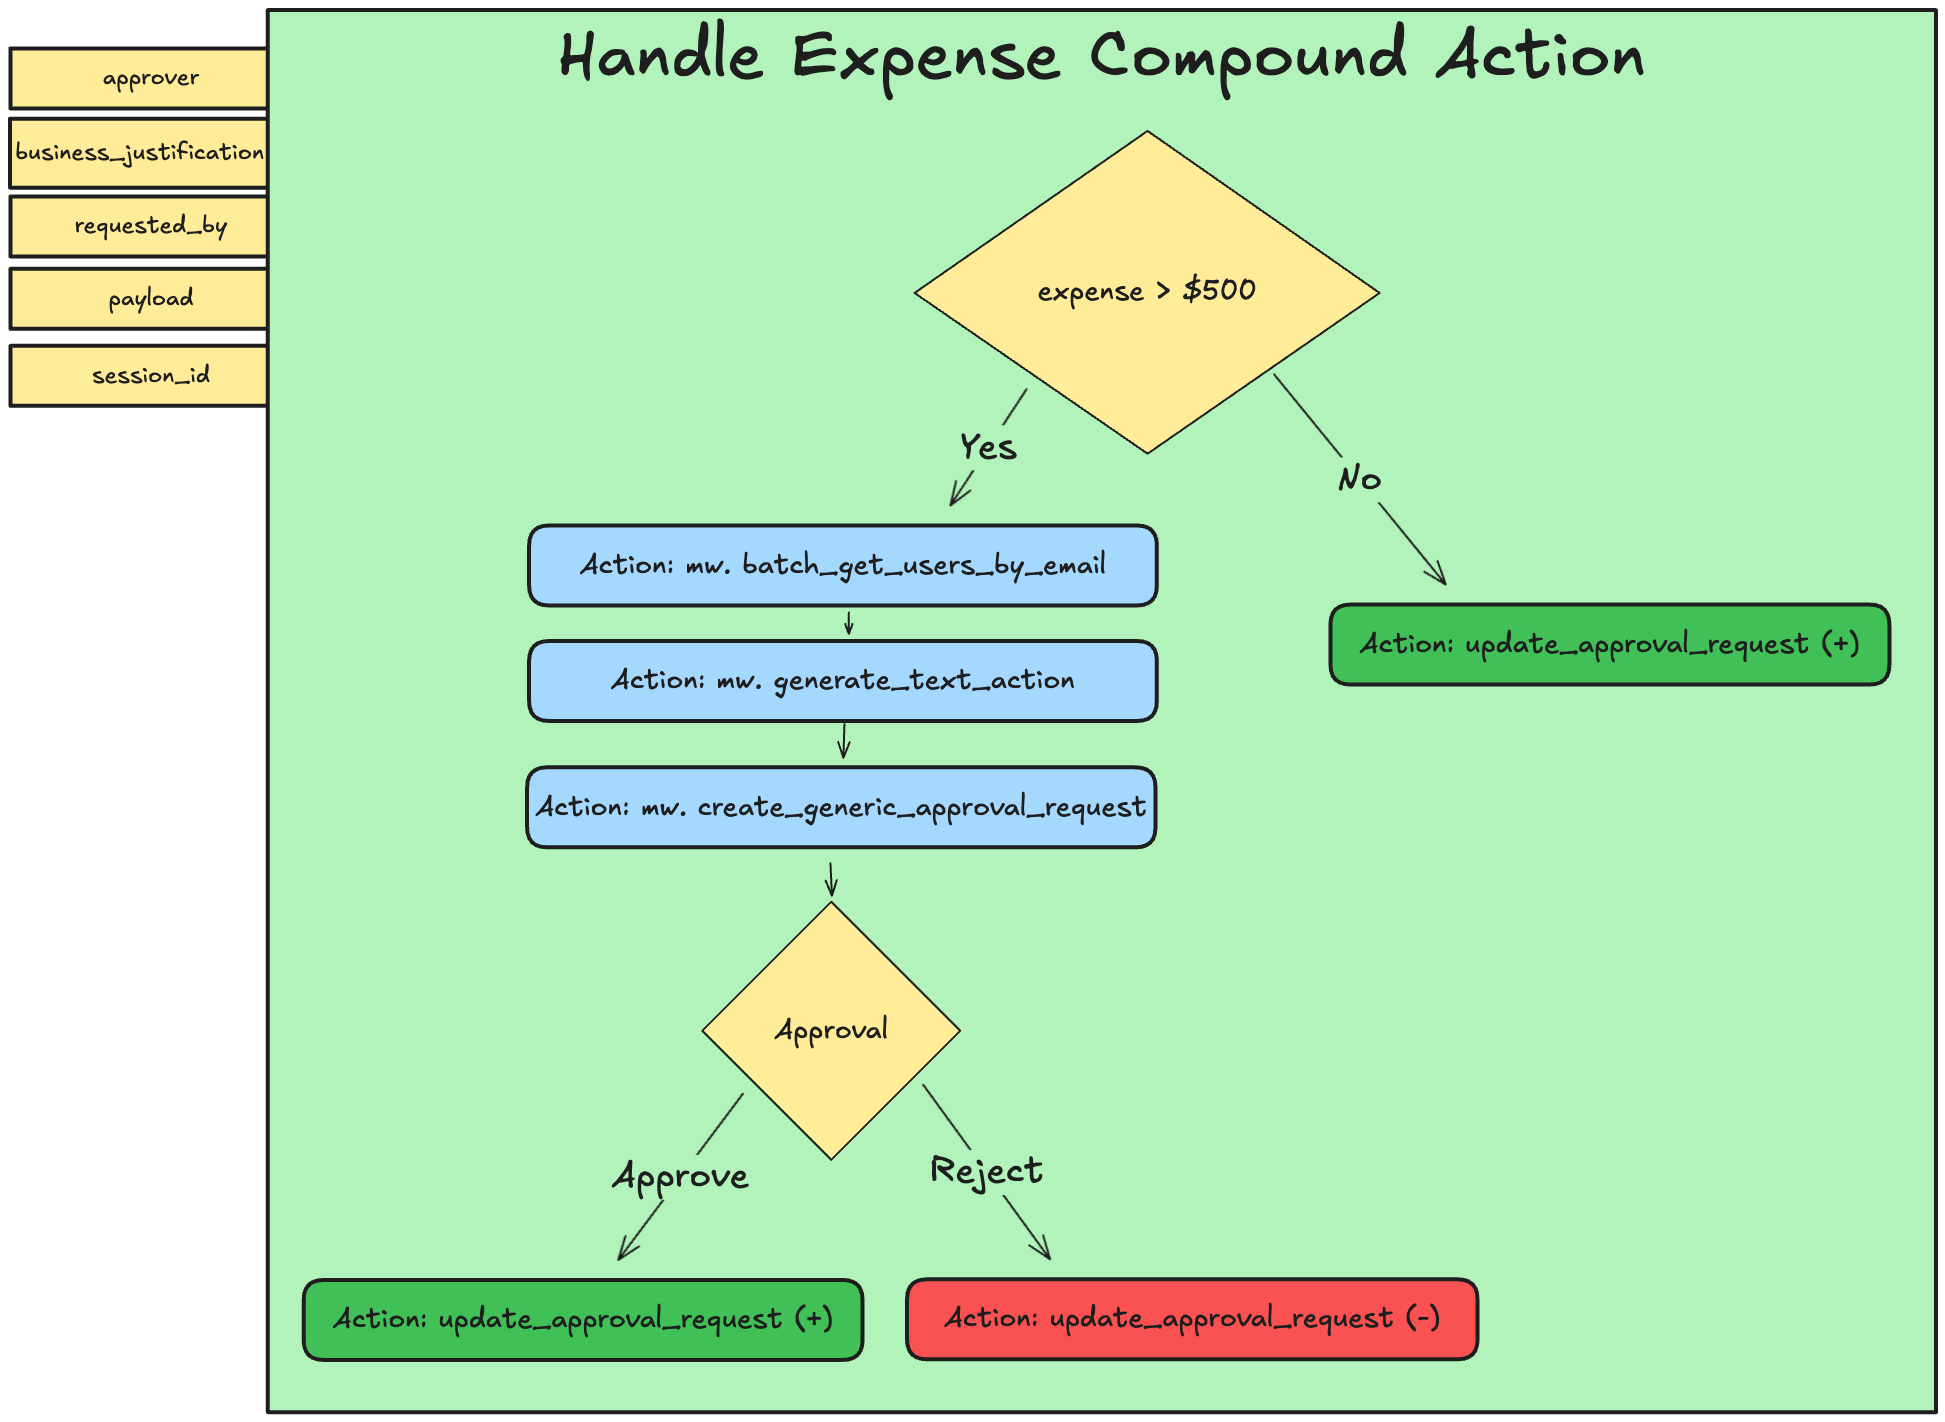
To achieve this, you will construct the workflow shown below. The agent's logic is built around a central Compound Action that is triggered by a Listener. This Compound Action ingests data from the expense system, such as the approver, the requester, and the expense details, and then follows a conditional path based on the expense amount.
You'll build an end-to-end working Ambient Agent Plugin via these phases:
- Set up a Listener
- Build the Compound Action
- Add the Listener and Compound Action to your AI Agent by launching a Plugin
- Test the approval workflow using the Purple Suite testing tool.
Let's get started!
Phase 0: Generate a unique Session ID & Set up your Connector
You may be able to skip this phase if you've completed another Agent Studio Quickstart guide.You can skip Phase 0 and move onto Phase 1 if:
- You have already created a
first_last_moveworks_purpleconnector, AND- You already have your unique "Session ID" on hand.
This section will walk you through how to set up your own connector to the Moveworks Purple API (which powers the Actions used in the Quickstart guides), so no need to repeat this step if you've done it before.
In this guide, you'll build a Plugin that will actually fetch from and take action on a store of feature requests that's set up just for you. In preparation for this, follow these steps
- Go to the Moveworks Purple API Tool.
- Click "Create New Session ID". You should see sample feature requests populate below.
- Do not close the Purple API Tool
Now, you just need to set up a (reusable) connector that will allow you to seamlessly hit the necessary Actions that your Plugin will use.
-
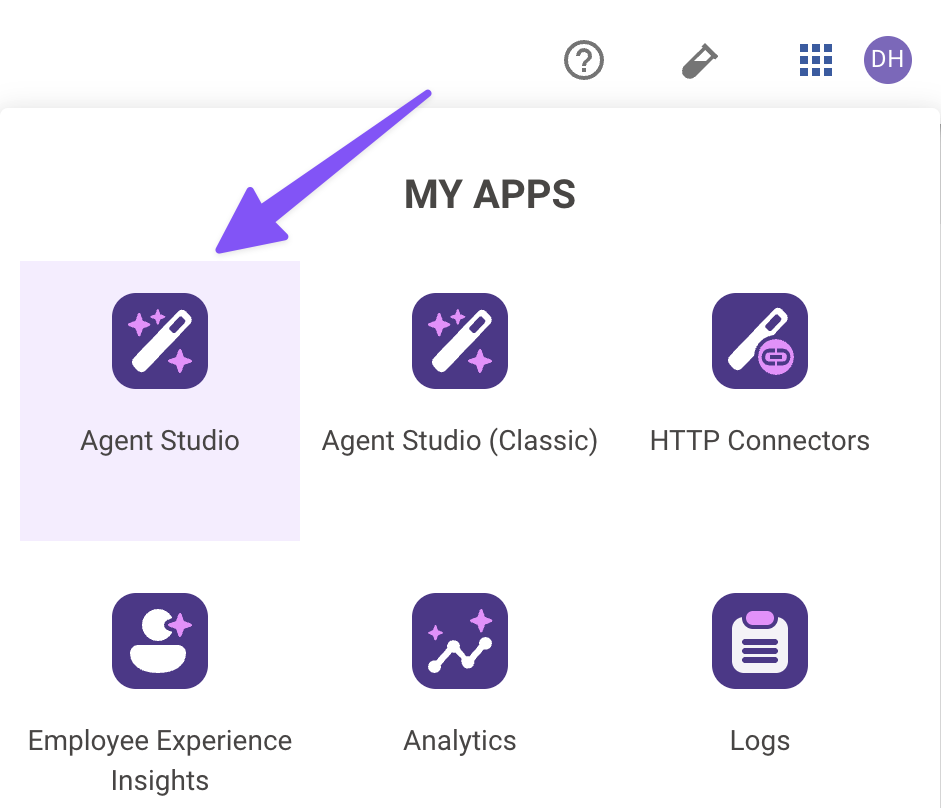
Navigate to the App Picker in the top right corner of Agent Studio.
-
Click on "HTTP Connectors", which will take you to another browser tab.
-
Click "Create" in the top right corner.
-
Fill out the following information for your Connector (be sure to replace "first" and "last" with your corresponding information).
Field Value to enter (replace "firstname" & "lastname" with your info) Connection Name first_last_moveworks_purpleDescription Moveworks Purple APIs ConnectorBase Url https://marketplace.moveworks.comAuth Config No Auth -
Click "Save" on the bottom right corner.
You're now fully ready to start building. On to Phase 1 to set up your Actions!
Phase 1: Set Up Your Webhook Listener
-
Navigate to the App Picker in the top right corner. Click on "Agent Studio".
-
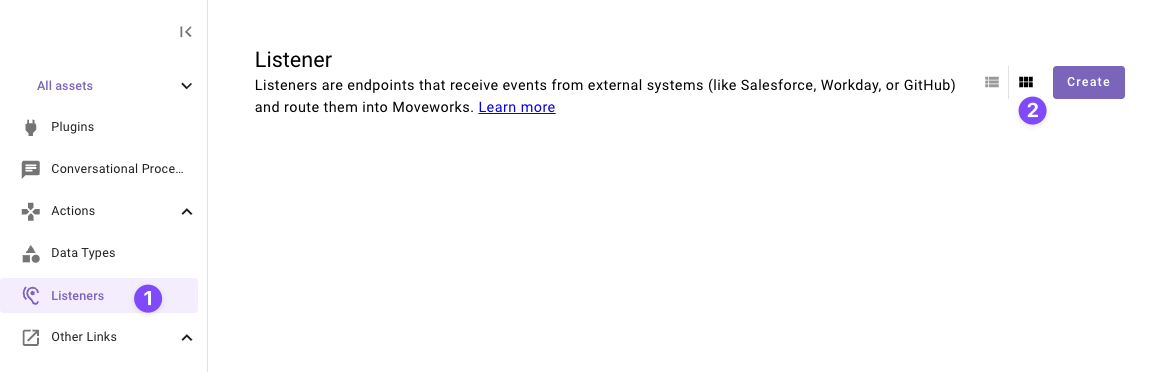
Navigate to a new Listener.
-
Click "Create".
-
Set the following Title and Description for your listener (be sure to replace firstnameand lastname with your corresponding information).

Field Value to enter (replace "first" & "last" with your info) Title quickstart_first_last_expense_approval_listenerDescription Listens for expense approvals -
Click "Copy URL" and paste the webhook URL somewhere you can get back to it quick, we will need it in future steps.
-
Click "Publish" to save your listener.
Phase 2: Set up your "Update Approval Status" Action
Let's set up an Action to update the status of the approval that is being provided by the source system. This action will require three dynamic inputs: approval_id, status, and session_id.
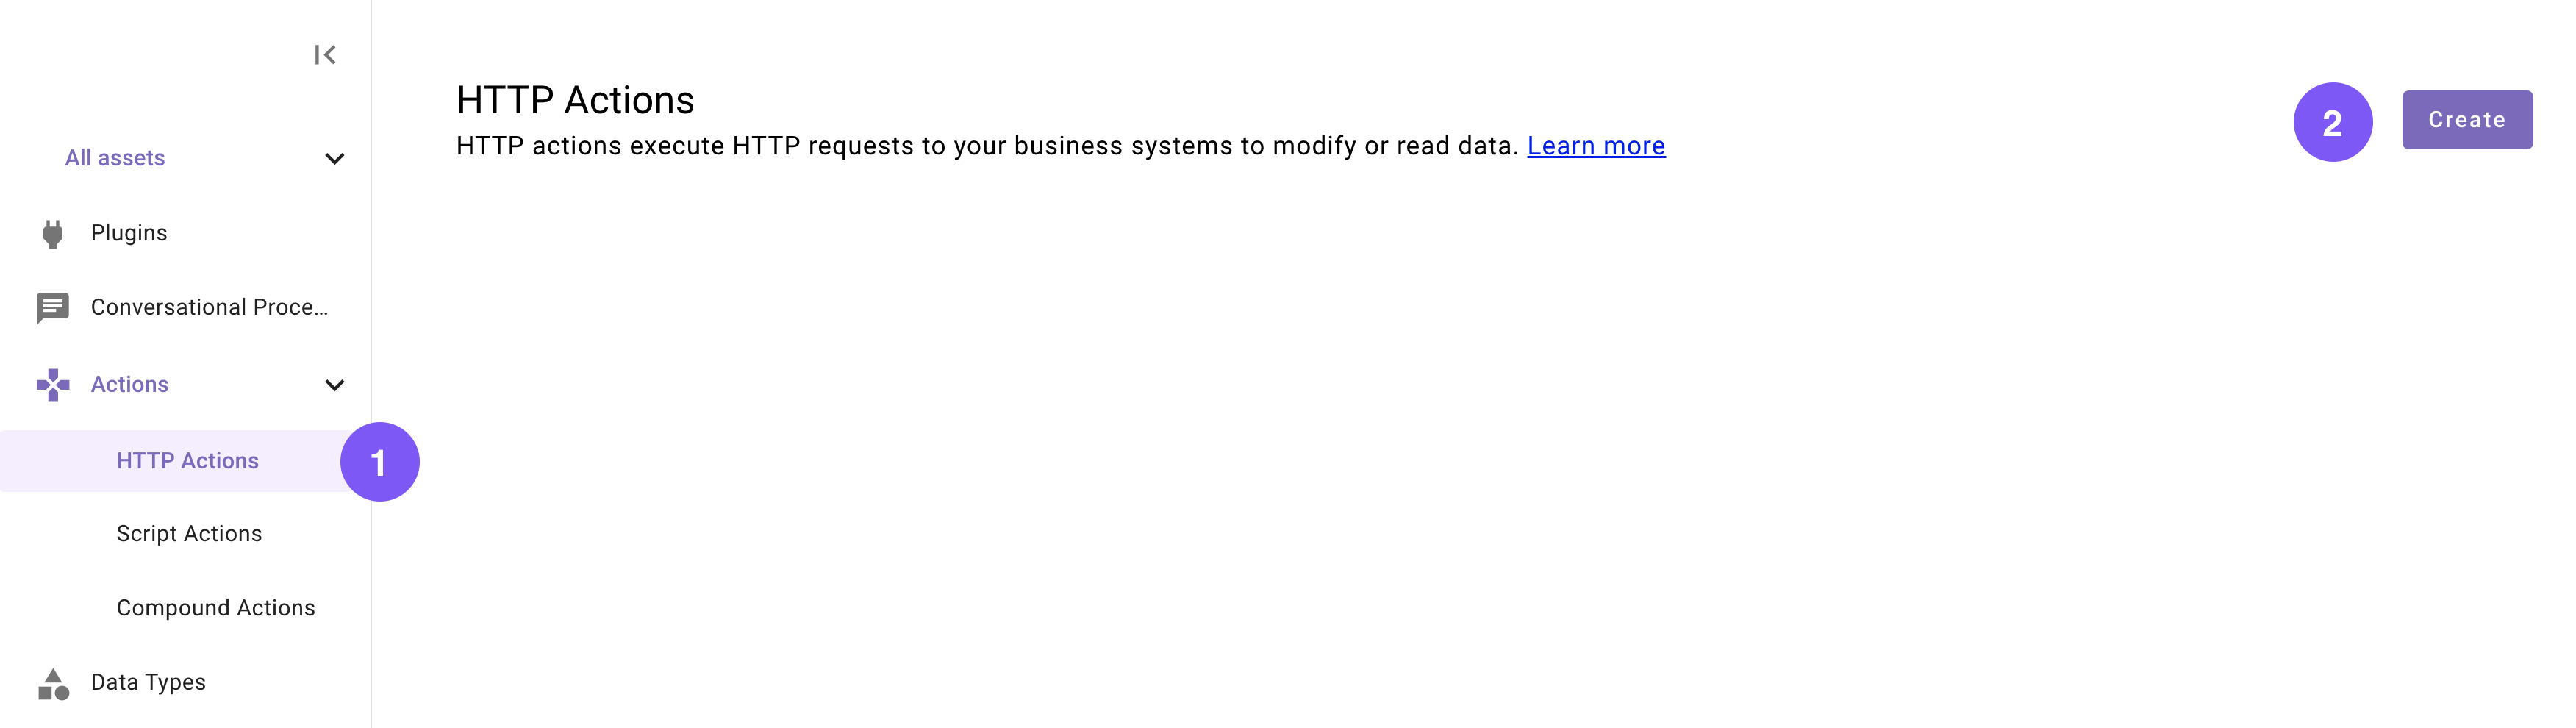
-
Navigate to a new HTTP Action.
-
-
Set the following title and description for your Action (be sure to replace "first" and "last" with your corresponding information).
Field Value to enter (replace "first" & "last" with your info) Title quickstart_first_last_update_approval_requestDescription Updates an approval request's status -
Enter the details of your API:
-
Click on the "Import" icon to the right of the "TEST" button.
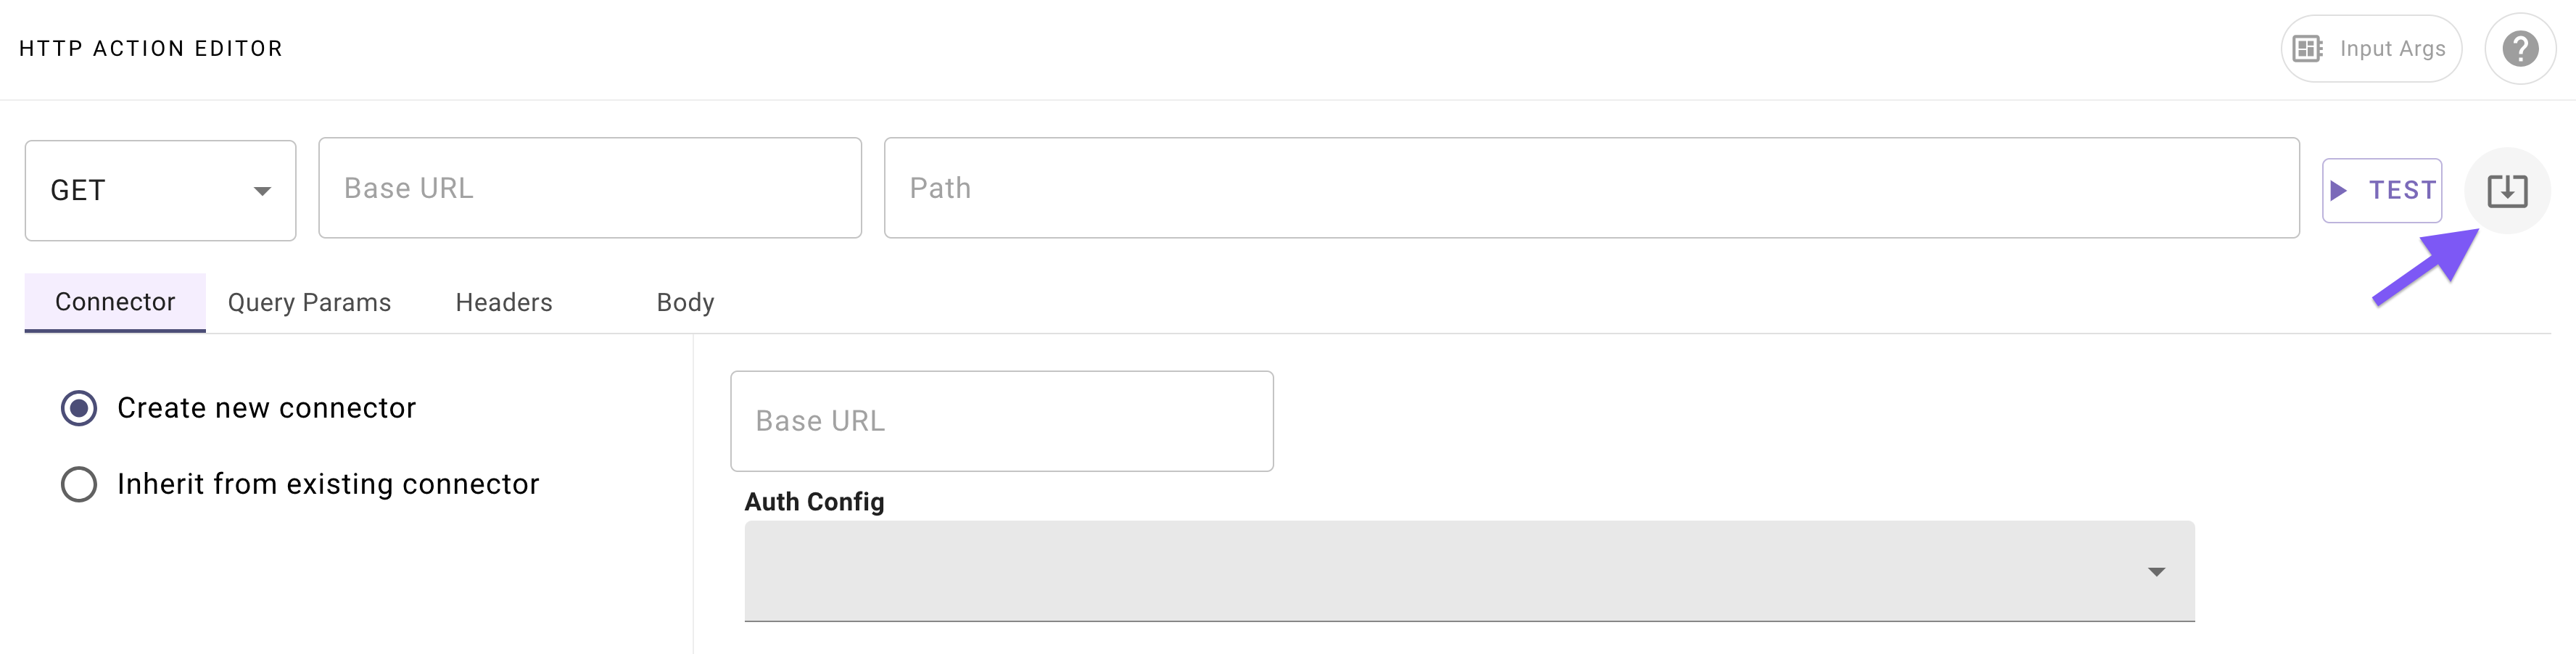
-
Paste the following cURL command:
curl -X PATCH \ -H "Content-Type: application/json" \ -d '{"status": "{{status}}"}' \ "https://marketplace.moveworks.com/api/purple-suite/erp/approvals/{{approval_id}}?sessionId={{session_id}}" -
Click "Import" (your Action should now be auto-populated with details).
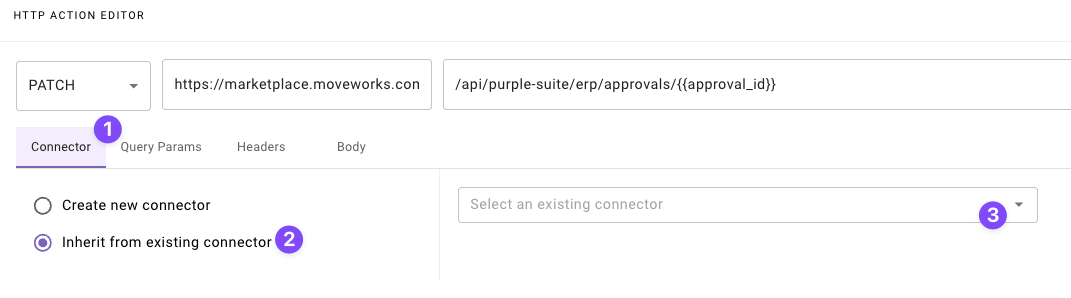
-
-
Navigate to the "Connector" tab, and select your existing Moveworks Purple Connector (set up in Phase 0)
-
Define 3 formal input arguments to represent the "approval ID", and "status", and "session ID" inputs that this Action requires:
-
Click on the "Input Args" button near the top right corner.
-
Click "Create New" in the "Input Arguments" pop up.
-
Fill out the following details for your
approval_idargument:Field label Value to enter/select Argument Name approval_idData Type Select "string" Example Value APV-965Description The ID of the approval request being updatedRequired Check the box -
Hit "Save".
-
Click "Create New" again in the "Input Arguments" pop up.
-
Fill out the following details for your
statusargument:Field label Value to enter/select Argument Name statusData Type Select "string" Example Value approvedDescription The status the approval request is being updated toRequired Check the box -
Hit "Save".
-
Click "Create New" again in the "Input Arguments" pop up.
-
Fill out the following details for your
session_idargument:Field label Value to enter/select Argument Name session_idData Type Select "string" Example Value Enter your own(Enter the session ID you created earlier)Description The session of the user that keeps track of their approval requestsRequired Check the box -
Hit "Save" and hit the "X" icon to close this "Input Arguments" pop up.
-
-
Hit "Publish"
Nice, your Action is all set up and ready to update approval requests!Time to construct your Compound Action.
Phase 3: Create Your Compound Action
You will now create a compound action to handle the incoming webhook routed by the listener.
In this phase you will build a compound action with 1) approver, business_justification, requested_by, payload, session_id as input arguments, 2) three actions to resolve the users by email, create a Moveworks approval request, and update the approval in the source system, and 3) switch expressions to conditionally route the expense approval requests. Here's a reminder of the bird's-eye view for our Compound Action:
-
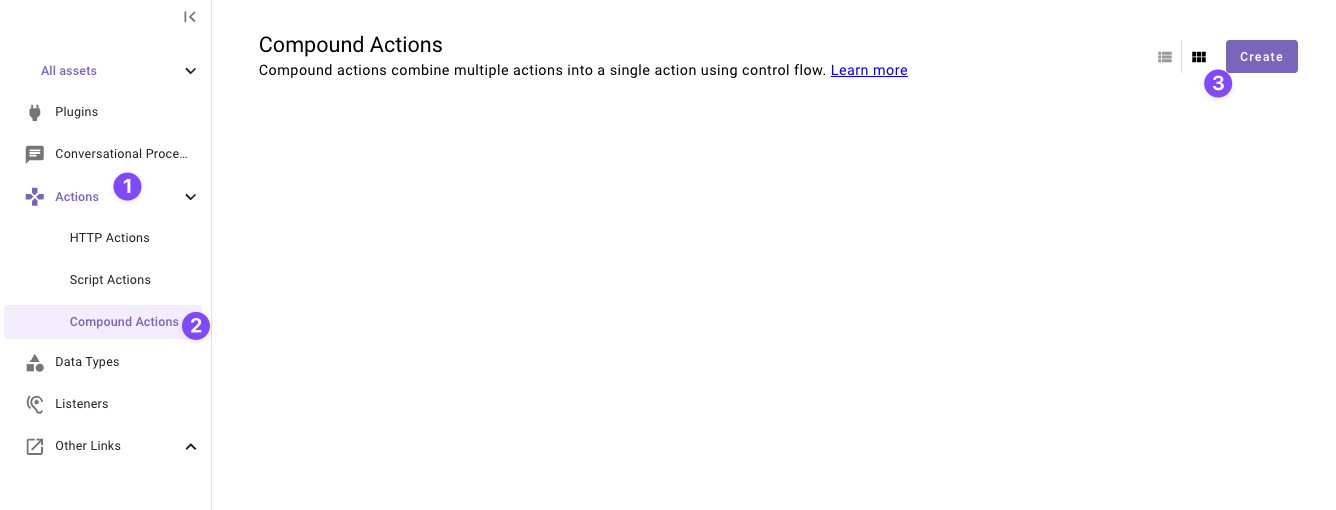
Navigate to a new “Compound Action” in the left nav and then click “Create”.
-
Set the following title and description for your Compound Action (be sure to replace "firstname" and "lastname" with your corresponding information).
Field Value Title quickstart_first_last_expense_approval_caDescription Handles an incoming expense approval request -
Copy the following expression into the Compound Action Editor
Make sure to replace the action name's with your action name!
steps: - switch: cases: - steps: - action: output_key: early_approval_result action_name: quickstart_first_last_update_approval_request # MAKE SURE TO CHANGE THIS input_args: approval_id: data.payload.approval_id status: '''approved''' session_id: data.session_id - return: output_mapper: early_return_message: '''Approval request approved. Terminating process''' condition: data.payload.amount < 500 default: steps: [] - action: output_key: target_users action_name: mw.batch_get_users_by_email input_args: user_emails: [data.approver, data.requested_by] - action: output_key: llm_summary_result action_name: mw.generate_text_action input_args: system_prompt: '''Based on the provided business justification and payload from an approval expense request. Write a brief summary for the approver of the request with the important details that an approver must see. Do not format with *.''' user_input: RENDER(): template: "business justification: {{business_justification}}\n payload: {{webhook_data}}" args: webhook_data: $STRINGIFY_JSON(data.payload) business_justification: data.business_justification - action: output_key: approval_request_result action_name: mw.create_generic_approval_request input_args: approvers: - data.target_users.user_records[0].user users_requested_for: - data.target_users.user_records[1].user approval_details: data.llm_summary_result.generated_output - switch: cases: - steps: - action: output_key: reject_approval_result action_name: quickstart_first_last_update_approval_request # MAKE SURE TO CHANGE THIS input_args: approval_id: data.payload.approval_id status: '''denied''' session_id: data.session_id condition: data.approval_request_result.status == "DENIED" default: steps: - action: output_key: approve_approval_result action_name: quickstart_first_last_update_approval_request # MAKE SURE TO CHANGE THIS input_args: approval_id: data.payload.approval_id status: '''approved''' session_id: data.session_idUnderstanding the Compound Action
-
Define 5 formal input arguments to represent the
approver,requested_by,payload,business_justification, andsession_idinputs that this Compound Action requires.-
Click on the "Input Args" button near the top right corner

-
Click "Create New" in the "Input Arguments" pop up.
-
Fill out the following details for your
approverargument:Field label Value to enter/select Argument Name approverData Type Select "string" Description The expense approval request's approver emailRequired Check the box -
Hit "Save"
-
Click "Create New" again to the "Input Arguments" pop up.
-
Fill out the following details for your
requested_byargument:Field label Value to enter/select Argument Name requested_byData Type Select "string" Description The user who requested the expense approvalRequired Check the box -
Click "Create New" again to the "Input Arguments" pop up.
-
Fill out the following details for your
payloadargument:Field label Value to enter/select Argument Name payloadData Type Select "object" Description The payload data in the expense requestRequired Check the box -
Click "Create New" again to the "Input Arguments" pop up.
-
Fill out the following details for your
business_justificationargument:Field label Value to enter/select Argument Name business_justificationData Type Select "string" Description The expense request's business justificationRequired Check the box -
Click "Create New" again to the "Input Arguments" pop up.
-
Fill out the following details for your
session_idargument:Field label Value to enter/select Argument Name session_idData Type Select "string" Description The session were the approval request is being tracked atRequired Check the box -
Hit "Save" and hit the "X" icon to close this "Input Arguments" pop up.
-
-
Click "Publish"
All done with Actions!You're ready to move on — time to create your Plugin and put everything you've built together.
Phase 3: Configure and Launch Your Plugin
This section guides you through adding your Listener and Compound Action to a Plugin. A key step will be configuring the data flow, where you'll specify exactly which fields from the webhook you want to forward to your action.
-
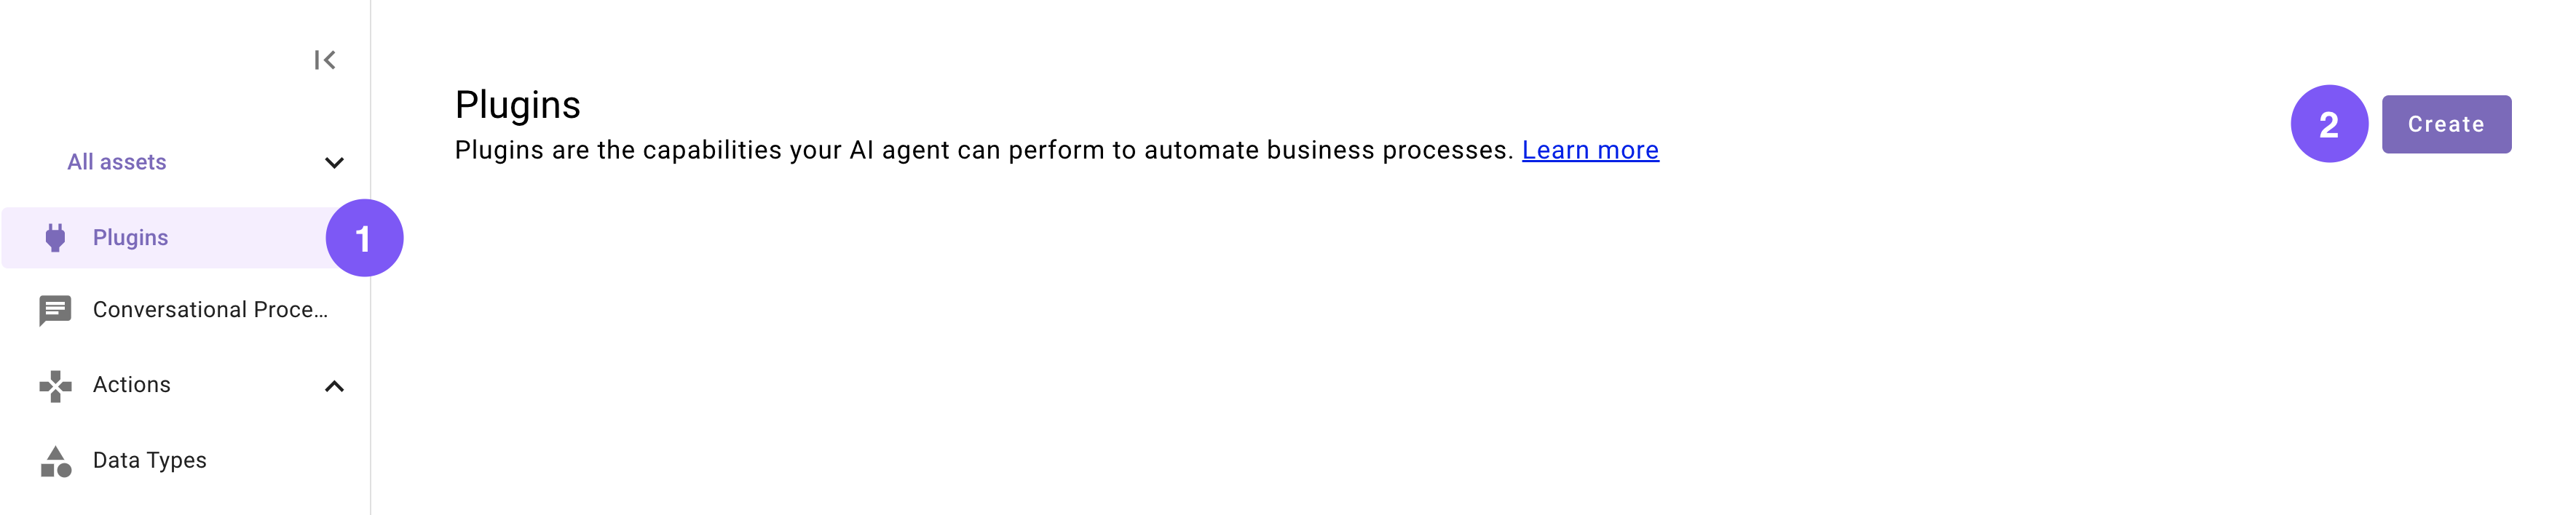
Navigate to a new Plugin (navigate to the library and click "Create").
-
Set the following title and description for your Plugin (be sure to replace "first" and "last" with your corresponding information).
Field Value to enter Title quickstart_first_last_expense_approvalDescription Handles an incoming expense approval request. -
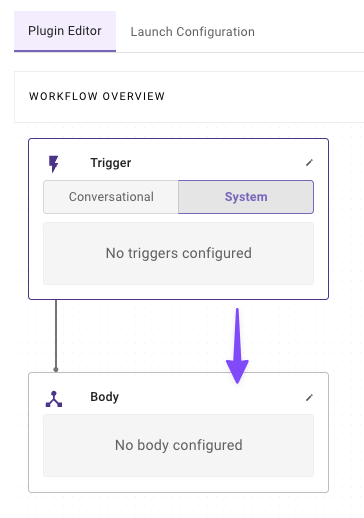
In the “Workflow Overview” section click “System” in the Trigger box.

-
Configure your system trigger to connect your Listener in the slide-out pop up with:
Field Label Value to enter/select Select Trigger Type WebhookSelect Listener quickstart_first_last_expense_approval_listener(Select yours)Event Filter Leave this field empty -
Click on the "Body" in the "Workflow Overview
-
Configure your system body to connect your compound action to the plugin
- Select Type - System body
- Select an Action - quickstart_first_last_expense_approval_ca (Select your Action)
- Input Mapping - Copy the below values
- approver: parsed_body.approver
- payload: parsed_body.data
- requested_by: parsed_body.requested_by
- session_id: parsed_body.session_id
- business_justification: parsed_body.details
Understanding the Input Mapping
When the listener receives a webhook, we expect a JSON payload structured like this:
{
  "approver": "[email protected]",
  "data": {
    "amount": 300,
    "approval_id": "APV-965",
    "category": "Meals & Entertainment",
    "currency": "USD",
    "description": "Lunch meeting with a client",
    "merchant": "The Corner Bistro",
    "payment_method": "Corporate Credit Card",
    "transaction_date": "2025-09-05T10:26:00Z"
  },
  "details": "Requirement to advance to the next sales pipeline with client",
  "requested_by": "[email protected]",
  "session_id": "OW3hEkZwgLCfI2gipNAJ" # this session_id will be based on your session
}
The listener automatically parses this JSON payload into a
parsed_bodyobject. To access the data you need, you simply use dot notation to reference the keys:parsed_body.emailparsed_body.data
This method gives you the flexibility to extract only the specific data your compound action requires, even if the webhook sends a much larger payload.
Note: While this mapping is currently a manual process, we are developing an "Auto Configure" feature to streamline this setup in the future.
-
-
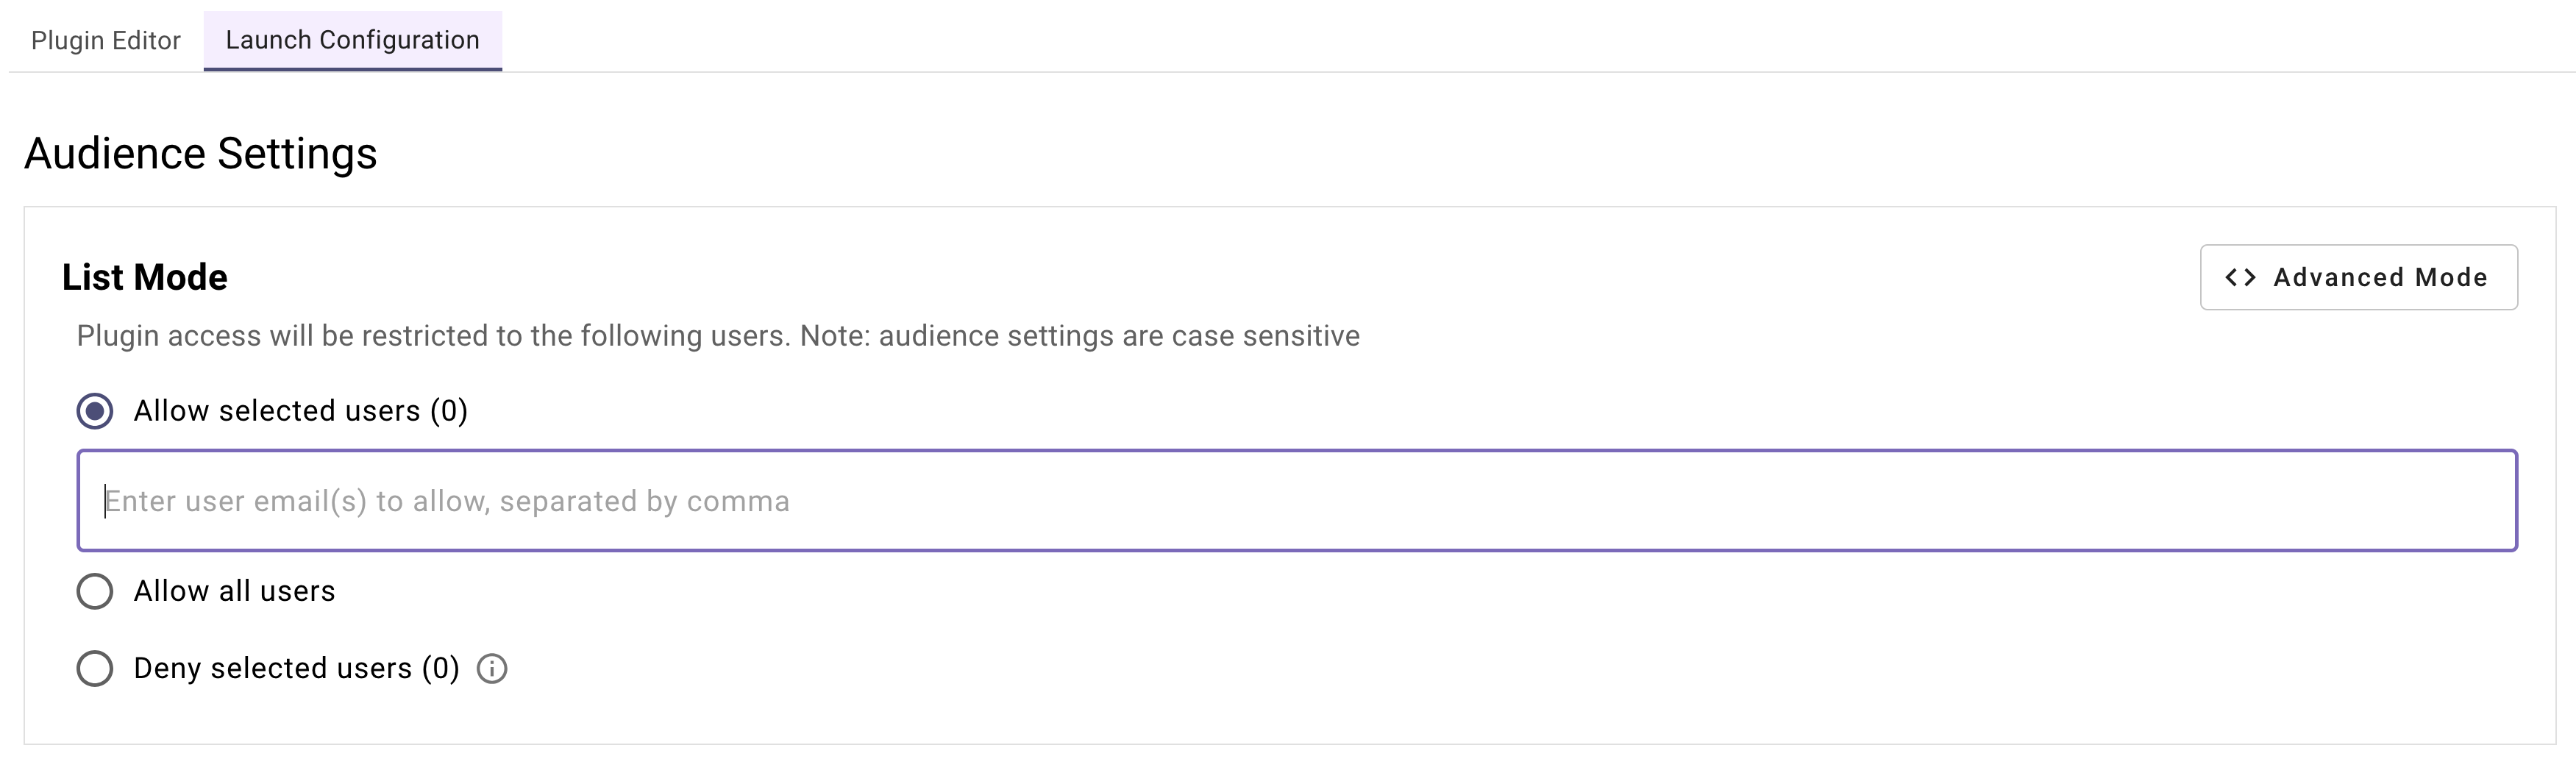
Define your Launch Configuration
-
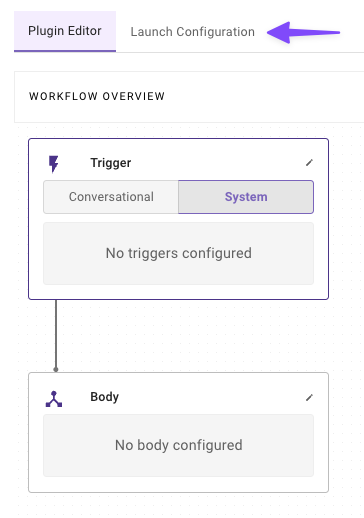
Navigate to the "Launch Configuration" tab
-
In the Input field under "Allow selected users", enter your email (or multiple emails using commas to separate the email addresses).
-
-
Click "Publish" to launch your Plugin.
And just like that — you've finished building your Plugin, and now it's ready to use!Congrats! You are now ready to test your plugin. In the next section, you will provided with required tools to help you test it.
Phase 4: Testing
This section guides you through the Moveworks Purple API tool to help you test your plugin by sending webhooks to your listener.
-
Go back to the tab where your Moveworks Purple API Tool is open
-
Click on the Webhooks Tab

-
Configure the field values with your listener information
Field Value to enter Webhook URL Enter the Webhook URL you created in Phase 1 API Key Leave empty -
Click on the Approvals Tab
-
Fill out the Approval Form with your information (Make sure to edit the approver and requested by fields)
Field label Value to enter/select Business Justification Requirement to advance to the next sales pipeline with clientApprover Email [email protected](Type approver email)Requested By Email [email protected](Type requested by email)Data Template Expense Approval -
Click on Generate Approval
- You will see an approval being generated in the system for your session ID with the details you entered
-
Click on Generate Webhook Payload
- A payload will be generated for your upcoming webhook
{ "approver": "[email protected]", // this will your approver make sure to edit "data": { "amount": 300, "approval_id": "APV-965", "category": "Meals & Entertainment", "currency": "USD", "description": "Lunch meeting with a client", "merchant": "The Corner Bistro", "payment_method": "Corporate Credit Card", "transaction_date": "2025-09-05T10:26:00Z" }, "details": "Requirement to advance to the next sales pipeline with client", "requested_by": "[email protected]", // this will be your requested by user "session_id": "OW3hEkZwgLCPf2gipNAJ" // this will be based on the session ID you created } - Make sure to tinker with the
amountfield to test different flows of your plugin.
- A payload will be generated for your upcoming webhook
-
Click on Trigger Webhook
Success! Check the ApprovalsExcellent work! You have successfully tested your plugin. Depending on the amount you set, your approval request may have gotten automatically approved or you may have gotten an approval request! You can click on the Refresh Approvals button in the Purple API Tool to see the status updates on the approvals!
Updated 1 day ago