How To Guide for Access Software Plugin
How To Configure Active Directory Group Based Software Provisioning
Pre-Requisites
- Please ensure the required Active Directory Connector has been created with the necessary permissions. Please refer the Active Directory / LDAP Access Requirements Doc for details.
- Please ensure the required Grant Software Access Plugin is set to TRUE within the Copilot Plugin Management settings. There should be no Deflection Message listed.
- The distinguishedName of the Active Directory group that controls access to this software is needed. The full OU path to this group will be required.
Configuration
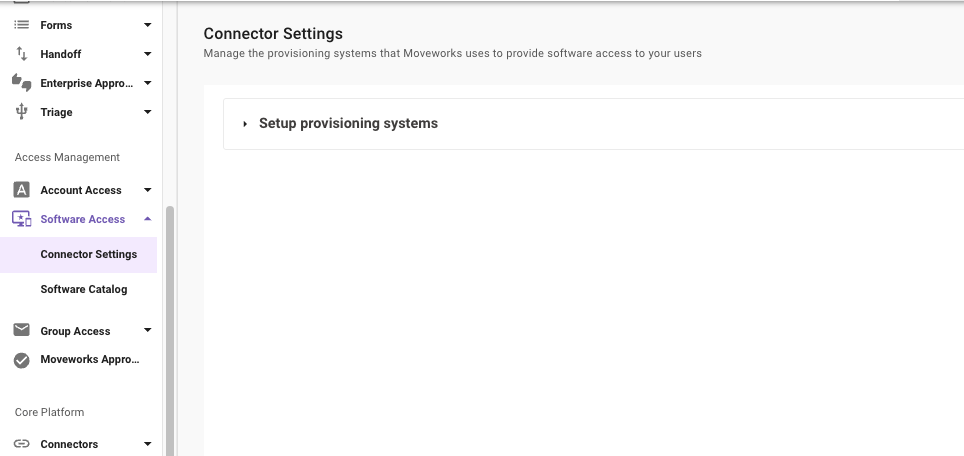
Start by navigating to Software Access > Connector Settings
- Click on the Setup provisioning systems toggle to expand the settings.
- Under the Provisioners settings, click on Add + to add in a new software provisioning system.
- Select your Active Directory connector within the Select connector dropdown.
- Optionally, you can provide a Post Provisioning URL to your software portal which will be served to the user once the workflow is completed.
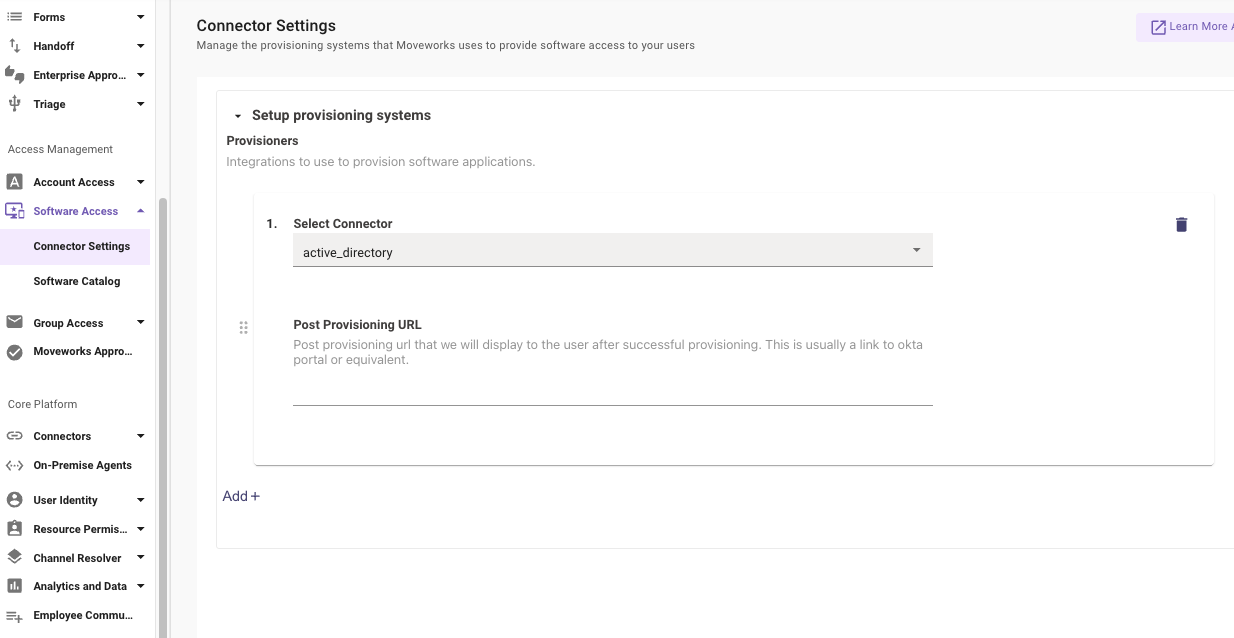
- Click Submit at the bottom of the page
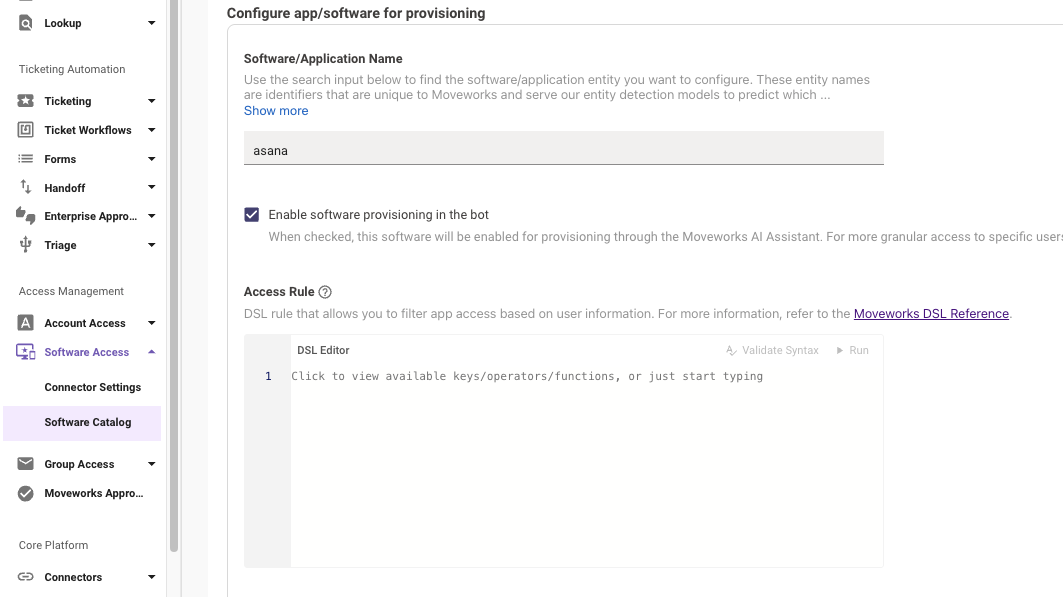
Next, navigate to Software Access > Software Catalog
- Type in your software name within the Software/Application Name text box to search across all of the Moveworks software entities. When your software is shown, click on it from the dropdown to select it.

- Toggle on the Enable software provisioning in the bot checkbox to enable this software to be provisioned by the AI Assistant.
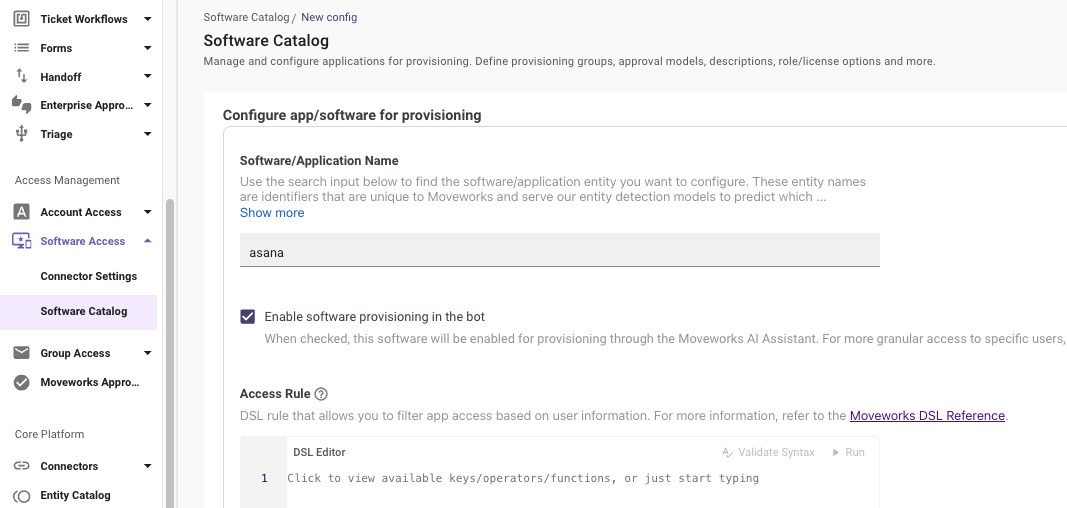
- Optionally, enter a DSL rule within the Access Rule DSL box. To activate this skill for all users, set the DSL value to TRUE. To only have this skill be available to certain users, leverage the Moveworks DSL Syntax in the Guide here . By default, the DSL rule is set to TRUE.
- Set the Provisioning Strategy to Group Based Provisioning
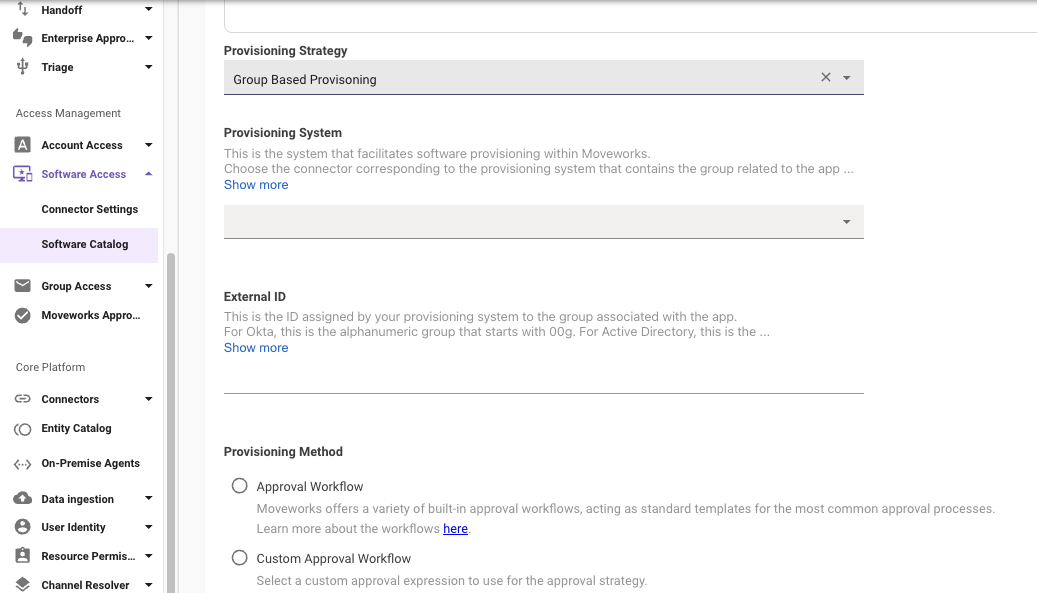
- Choose your Active Directory connector within Provisioning System.
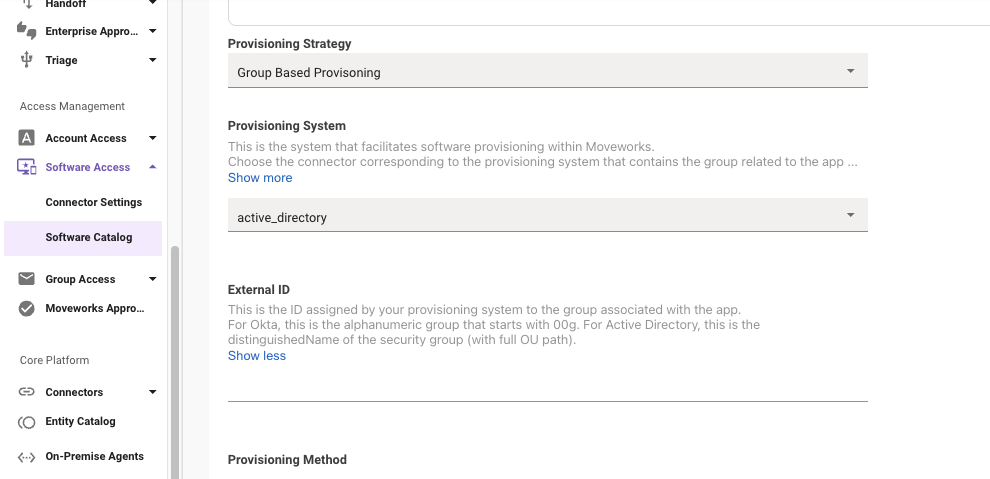
- Set the External ID to the distinguishedName of the group that controls access to this software.
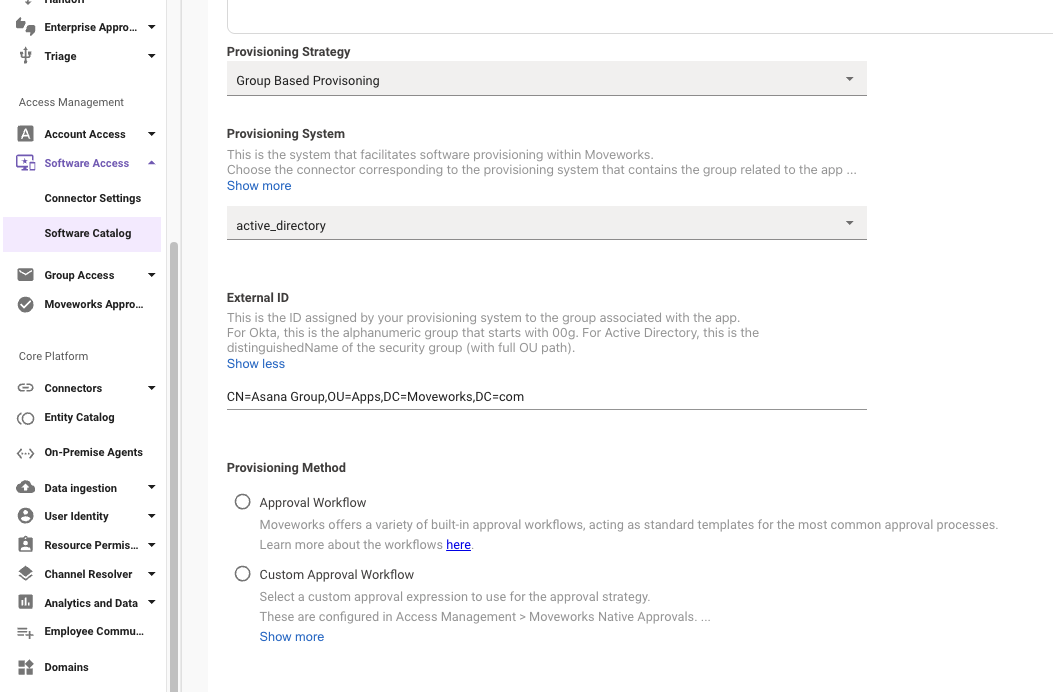
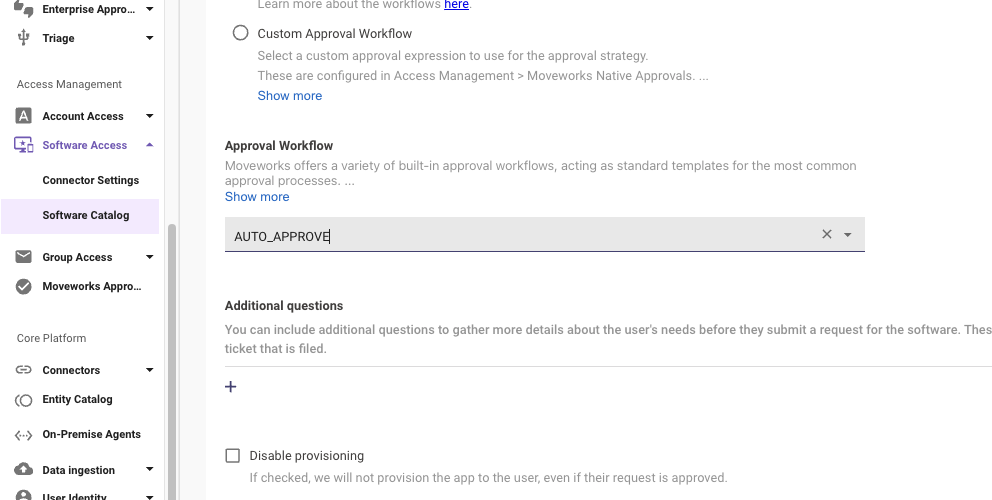
- Choose an Approval Workflow which will define the approval needed before provisioning the application to the the user. There are pre-defined approval workflows or custom approval workflows.
- Below are the most common pre-defined approval workflows. You can learn more about all possible pre-defined approval workflows and custom approval workflows within the Configure Approvals Engine doc.
- AUTO_APPROVE: Here, asks or requests are automatically approved, bypassing the need for an approving authority.
- APP_ADMIN: The Application Administrator's approval is necessary to carry out certain functions.
- MANAGER: This type of approval requires the consent of the individual's Manager.
- APP_ADMIN_THEN_MANAGER: A two-step approval process. First, the App Admin needs to approve. If approved, the workflow moves to require the Manager's approval.
- Custom Approval Method: This is more suited, if pre-defined approval method workflows do not suffice your org’s requirements for software provisioning. Customer Approval workflows are created separately in Moveworks Native Approvals module.
- Below are the most common pre-defined approval workflows. You can learn more about all possible pre-defined approval workflows and custom approval workflows within the Configure Approvals Engine doc.
- Click Submit at the bottom of the page.
Validation
The defined software is now available within the AI Assistant. This can be verified by requesting the software within the AI Assistant. The AI Assistant should do the following if fully configured:
- Confirm that you want to provision the certain software.
- Create a ticket within the ITSM system to track the provisioning request.
- Add you to the Active Directory group.
- Confirm with you that the process is completed.
How To Configure Active Directory Role Based Software Provisioning
Pre-Requisites
- Please ensure the required Active Directory Connector has been created with the necessary permissions. Please refer the Active Directory / LDAP Access Requirements Doc for details.
- Please ensure the required Grant Software Access Plugin is set to TRUE within the Copilot Plugin Management settings. There should be no Deflection Message listed.
- The distinguishedName of the Active Directory groups that controls access to the software roles is needed. The full OU path to these groups will be required for each role.
Configuration
Start by navigating to Software Access > Connector Settings
- Click on the Setup provisioning systems toggle to expand the settings.
- Under the Provisioners settings, click on Add + to add in a new software provisioning system.
- Select your Active Directory connector within the Select connector dropdown.
- Optionally, you can provide a Post Provisioning URL to your software portal which will be served to the user once the workflow is completed.
- Click Submit at the bottom of the page
Next, navigate to Software Access > Software Catalog
- Type in your software name within the Software/Application Name text box to search across all of the Moveworks software entities. When your software is shown, click on it from the dropdown to select it.
- Toggle on the Enable software provisioning in the bot checkbox to enable this software to be provisoned by the AI Assistant.
- Optionally, enter a DSL rule within the Access Rule DSL box. To activate this skill for all users, set the DSL value to TRUE. To only have this skill be available to certain users, leverage the Moveworks DSL Syntax in the Guide here . By default, the DSL rule is set to TRUE.
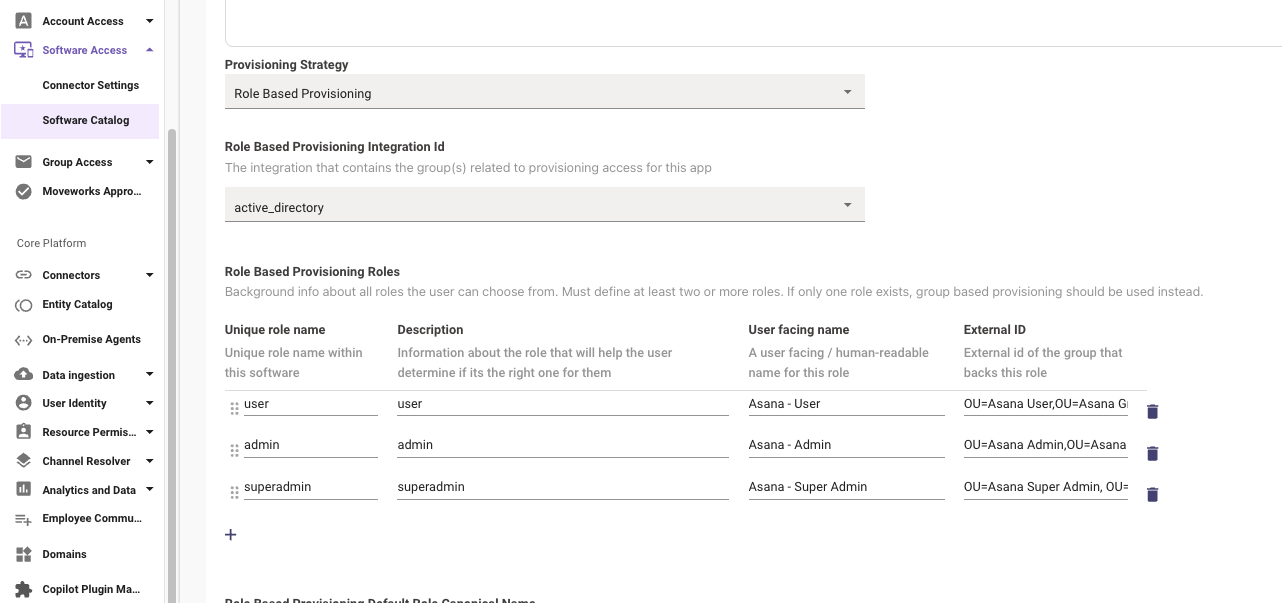
- Set the Provisioning Strategy to Role Based Provisioning

- Choose your Active Directory connector within Role Based Provisioning Integration Id.
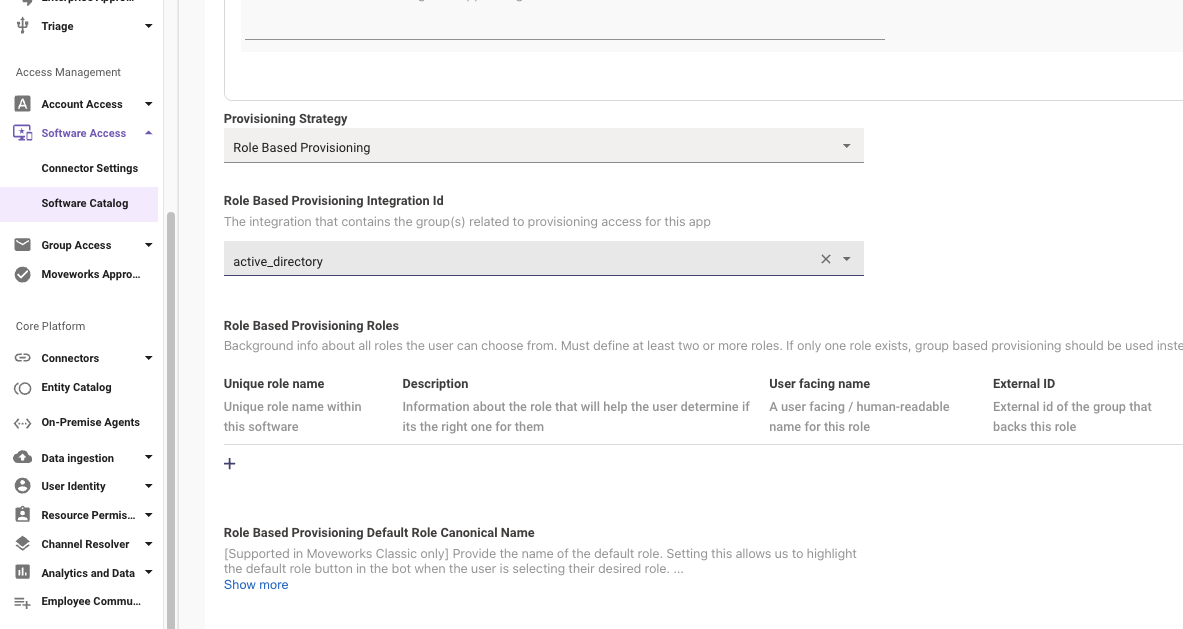
- Define the Unique role name, Description, User facing name, and External ID of the roles within the software app.
- Choose an Approval Workflow which will define the approval needed before provisioning the application to the the user. There are pre-defined approval workflows or custom approval workflows.
- Below are the most common pre-defined approval workflows. You can learn more about all possible pre-defined approval workflows and custom approval workflows within the Configure Approvals Engine doc.
- AUTO_APPROVE: Here, asks or requests are automatically approved, bypassing the need for an approving authority.
- APP_ADMIN: The Application Administrator's approval is necessary to carry out certain functions.
- MANAGER: This type of approval requires the consent of the individual's Manager.
- APP_ADMIN_THEN_MANAGER: A two-step approval process. First, the App Admin needs to approve. If approved, the workflow moves to require the Manager's approval.
- Custom Approval Method: This is more suited, if pre-defined approval method workflows do not suffice your org’s requirements for software provisioning. Customer Approval workflows are created separately in Moveworks Native Approvals module.
- Below are the most common pre-defined approval workflows. You can learn more about all possible pre-defined approval workflows and custom approval workflows within the Configure Approvals Engine doc.
- Click Submit at the bottom of the page.
Validation
The defined software is now available within the AI Assistant. This can be verified by requesting the software within the AI Assistant. The AI Assistant should do the following if fully configured:
- Confirm that you want to provision the certain software and ask to distinguish which role is desired.
- Create a ticket within the ITSM system to track the provisioning request.
- Add you to the Active Directory group.
- Confirm with you that the process is completed.
How To Configure Okta Group Based Software Provisioning
Pre-Requisites
- Please ensure the required Okta Connector has been created with the necessary permissions. Please refer the Okta Access Requirements Doc for details.
- Please ensure the required Grant Software Access Plugin is set to TRUE within the Copilot Plugin Management settings. There should be no Deflection Message listed.
- The Okta group that controls access to this software is needed. This group name will begin with 00g.
Configuration
Start by navigating to Software Access > Connector Settings
- Click on the Setup provisioning systems toggle to expand the settings.
- Under the Provisioners settings, click on Add + to add in a new software provisioning system.
- Select your Okta connector within the Select connector dropdown.
- Optionally, you can provide a Post Provisioning URL to your software portal which will be served to the user once the workflow is completed.
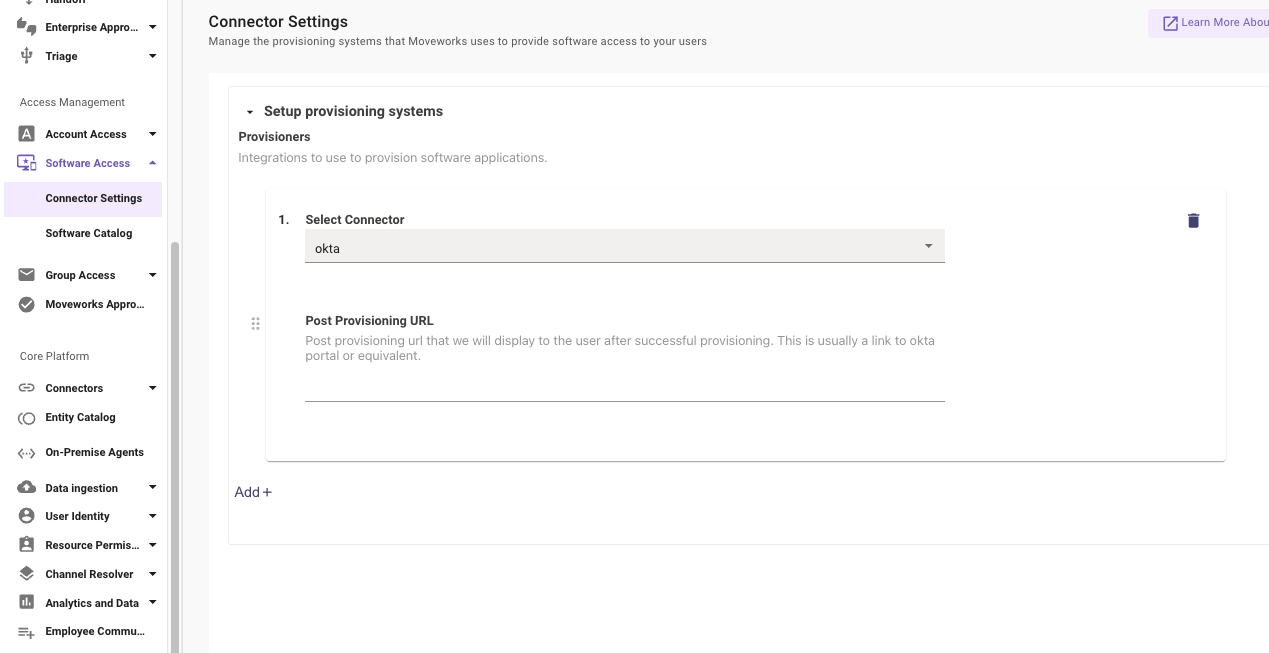
- Click Submit at the bottom of the page
Next, navigate to Software Access > Software Catalog
- Type in your software name within the Software/Application Name text box to search across all of the Moveworks software entities. When your software is shown, click on it from the dropdown to select it.
- Toggle on the Enable software provisioning in the bot checkbox to enable this software to be provisioned by the AI Assistant.
- Optionally, enter a DSL rule within the Access Rule DSL box. To activate this skill for all users, set the DSL value to TRUE. To only have this skill be available to certain users, leverage the Moveworks DSL Syntax in the Guide here . By default, the DSL rule is set to TRUE.
- Set the Provisioning Strategy to Group Based Provisioning
- Choose your Okta connector within Provisioning System.
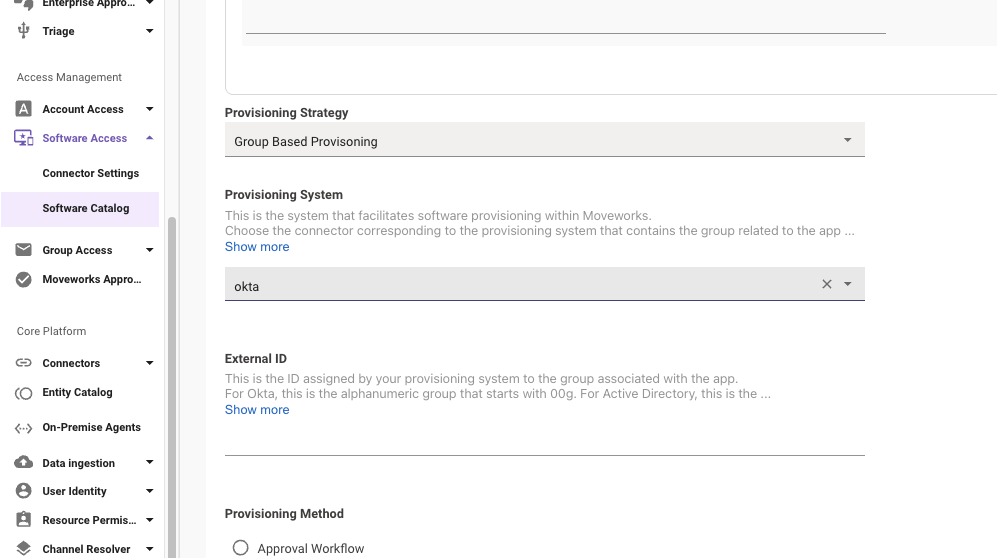
- Set the External ID to the Okta group that controls access to this software.
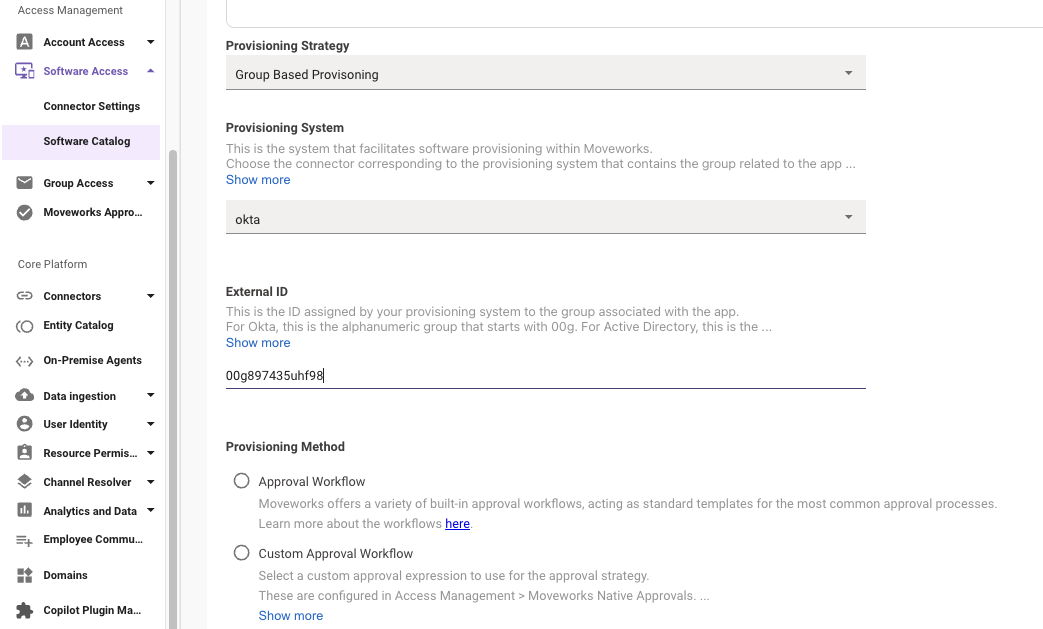
- Choose an Approval Workflow which will define the approval needed before provisioning the application to the the user. There are pre-defined approval workflows or custom approval workflows.
- Below are the most common pre-defined approval workflows. You can learn more about all possible pre-defined approval workflows and custom approval workflows within the Configure Approvals Engine doc.
- AUTO_APPROVE: Here, asks or requests are automatically approved, bypassing the need for an approving authority.
- APP_ADMIN: The Application Administrator's approval is necessary to carry out certain functions.
- MANAGER: This type of approval requires the consent of the individual's Manager.
- APP_ADMIN_THEN_MANAGER: A two-step approval process. First, the App Admin needs to approve. If approved, the workflow moves to require the Manager's approval.
- Custom Approval Method: This is more suited, if pre-defined approval method workflows do not suffice your org’s requirements for software provisioning. Customer Approval workflows are created separately in Moveworks Native Approvals module.
- Below are the most common pre-defined approval workflows. You can learn more about all possible pre-defined approval workflows and custom approval workflows within the Configure Approvals Engine doc.
- Click Submit at the bottom of the page.
Validation
The defined software is now available within the AI Assistant. This can be verified by requesting the software within the AI Assistant. The AI Assistant should do the following if fully configured:
- Confirm that you want to provision the certain software.
- Create a ticket within the ITSM system to track the provisioning request.
- Add you to the Okta group.
- Confirm with you that the process is completed.
How to Configure Okta Role Based Software Provisioning
Pre-Requisites
- Please ensure the required Okta Connector has been created with the necessary permissions. Please refer the Okta Access Requirements Doc for details.
- Please ensure the required Grant Software Access Plugin is set to TRUE within the Copilot Plugin Management settings. There should be no Deflection Message listed.
- The Okta groups that controls access to the software roles is needed. This group names will begin with 00g.
Configuration
Start by navigating to Software Access > Connector Settings
- Click on the Setup provisioning systems toggle to expand the settings.
- Under the Provisioners settings, click on Add + to add in a new software provisioning system.
- Select your Okta connector within the Select connector dropdown.
- Optionally, you can provide a Post Provisioning URL to your software portal which will be served to the user once the workflow is completed.

- Click Submit at the bottom of the page
Next, navigate to Software Access > Software Catalog
- Type in your software name within the Software/Application Name text box to search across all of the Moveworks software entities. When your software is shown, click on it from the dropdown to select it.
- Toggle on the Enable software provisioning in the bot checkbox to enable this software to be provisoned by the AI Assistant.
- Optionally, enter a DSL rule within the Access Rule DSL box. To activate this skill for all users, set the DSL value to TRUE. To only have this skill be available to certain users, leverage the Moveworks DSL Syntax in the Guide here . By default, the DSL rule is set to TRUE.
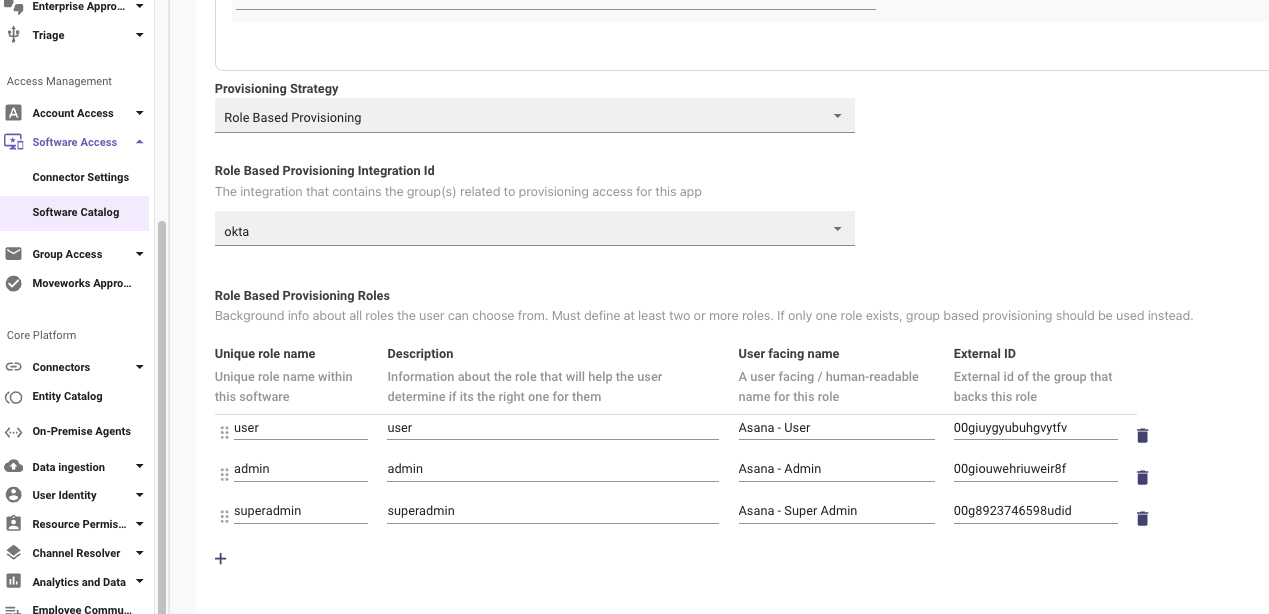
- Set the Provisioning Strategy to Role Based Provisioning
- Choose your Okta connector within Role Based Provisioning Integration Id.
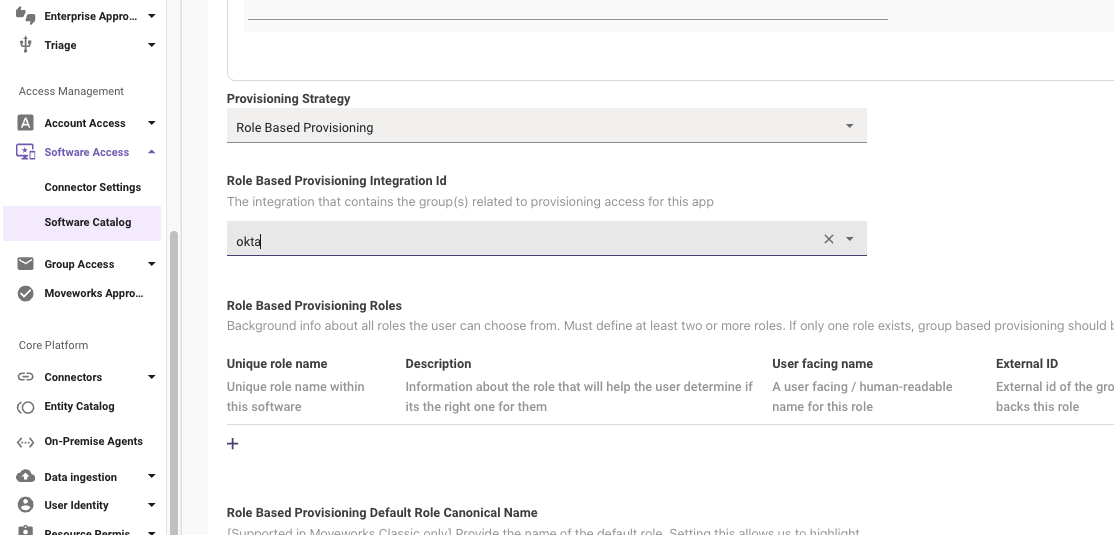
- Define the Unique role name, Description, User facing name, and External ID of the roles within the software app.
- Choose an Approval Workflow which will define the approval needed before provisioning the application to the the user. There are pre-defined approval workflows or custom approval workflows.
- Below are the most common pre-defined approval workflows. You can learn more about all possible pre-defined approval workflows and custom approval workflows within the Configure Approvals Engine doc.
- AUTO_APPROVE: Here, asks or requests are automatically approved, bypassing the need for an approving authority.
- APP_ADMIN: The Application Administrator's approval is necessary to carry out certain functions.
- MANAGER: This type of approval requires the consent of the individual's Manager.
- APP_ADMIN_THEN_MANAGER: A two-step approval process. First, the App Admin needs to approve. If approved, the workflow moves to require the Manager's approval.
- Custom Approval Method: This is more suited, if pre-defined approval method workflows do not suffice your org’s requirements for software provisioning. Customer Approval workflows are created separately in Moveworks Native Approvals module.
- Below are the most common pre-defined approval workflows. You can learn more about all possible pre-defined approval workflows and custom approval workflows within the Configure Approvals Engine doc.
- Click Submit at the bottom of the page.
Validation
The defined software is now available within the AI Assistant. This can be verified by requesting the software within the AI Assistant. The AI Assistant should do the following if fully configured:
- Confirm that you want to provision the certain software and ask to distinguish which role is desired.
- Create a ticket within the ITSM system to track the provisioning request.
- Add you to the Okta group.
- Confirm with you that the process is completed.
Updated 8 months ago