
[Plugin Workspace 1.0] Agentic Automation Engine
Use Case Overview
This guide provides a comprehensive walkthrough on how to leverage GET APIs to query an external system for a user’s PTO (Paid Time Off) balance using the Agentic Automation Engine.
Objectives
- Learn how to leverage GET APIs to query an external system for a user’s PTO balance.
Prerequisites
- Basic understanding of APIs.
Step-by-Step Guide
-
Create an HTTP Action:
To get started, you need to create an HTTP Action. This action will allow us to communicate with an external system. Navigate to your Agent Studio (Classic) portal.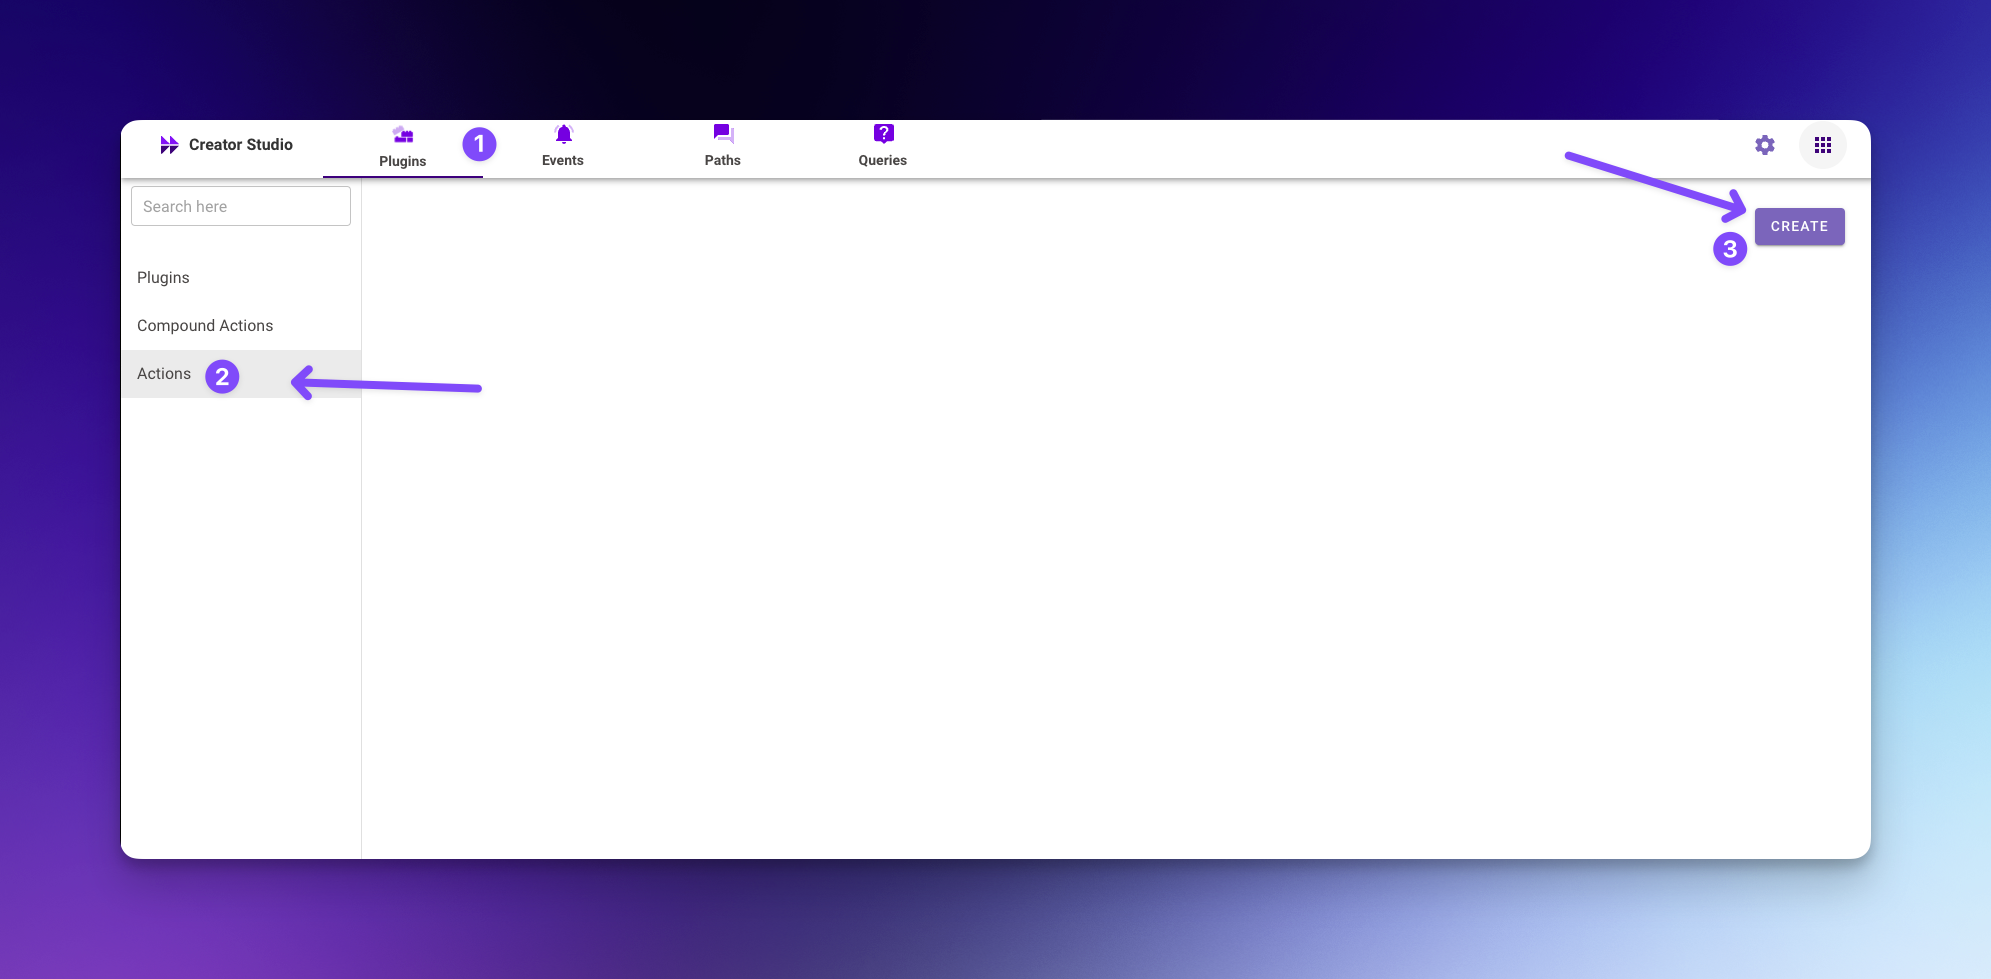
- Click on Plugins
- Select Actions on the left sidebar
- Click on Create to initiate your first action
-
Enter API Information
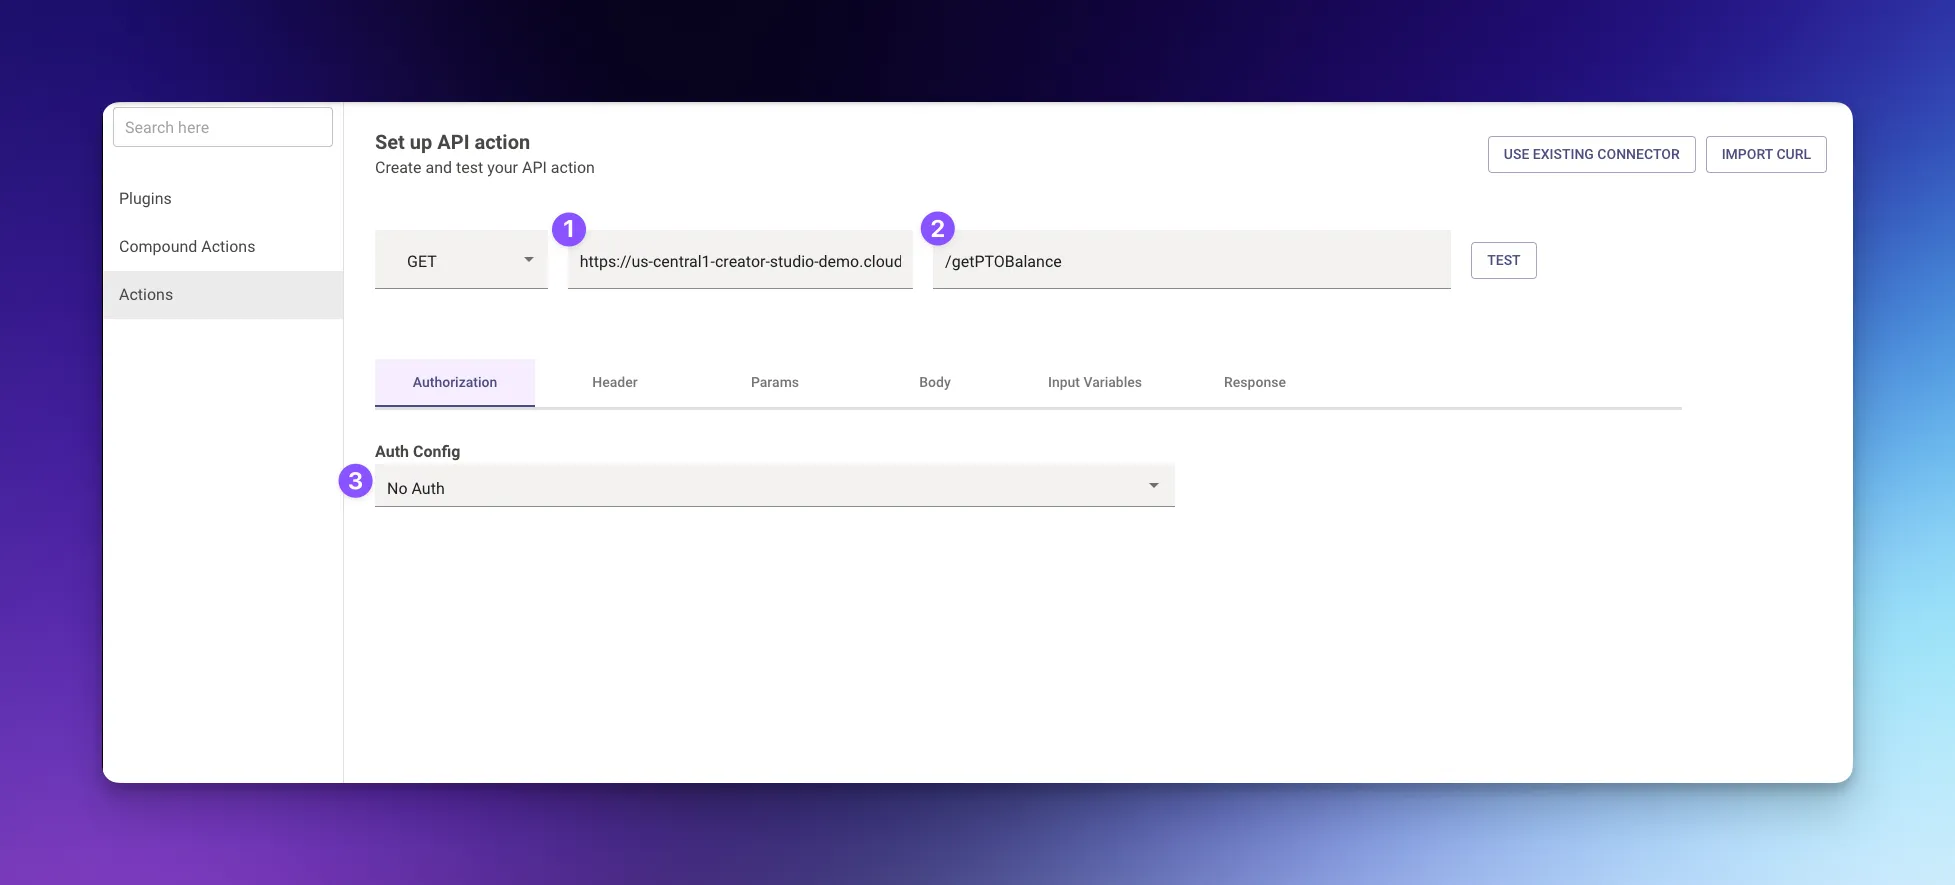
- Provide the base URL of the API
https://us-central1-creator-studio-workflows.cloudfunctions.net - Enter the endpoint
/getPTOBalance - Set the Authorization configuration to
No Auth - OPTIONAL: import this cURL using the IMPORT CURL button
curl -X GET "https://us-central1-creator-studio-workflows.cloudfunctions.net/getPTOBalance"
- Provide the base URL of the API
-
Add an Email Parameter:
You will need to filter for the user who is making this request, so let's add anemailparameter to the endpoint. For this, click on the Params tab.
- Click on +ADD to add a new parameter
- In the Key field, type
email - In the Value field type
{{user_email}}this{{}}mustache syntax will come into play whenever the bot has to enter dynamic values (different email addresses for different requestors)
-
Define Input Variables:
Head to the Input Variables tab, here you will need to define the input variables you previously designated asuser_emailin the Params. You will notice that the input variable gets added automatically. In this case you only need to add an example value to test the Action.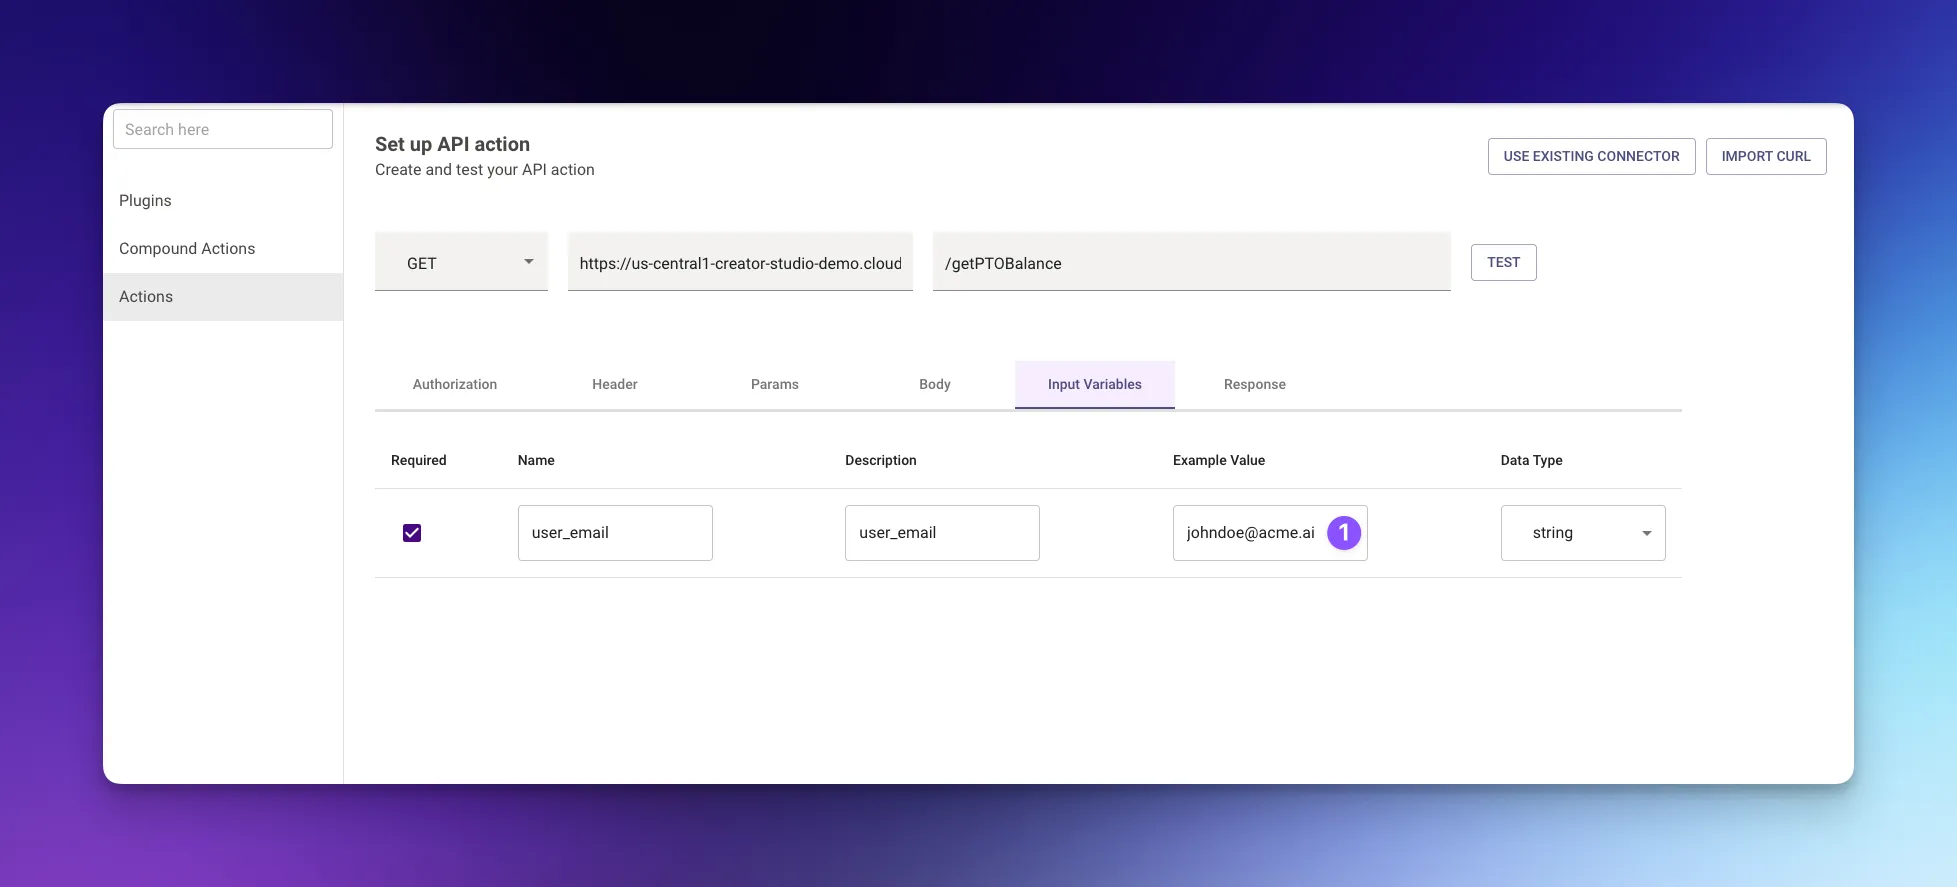
- Enter an email in the Example value field
- Click on the TEST button next to the endpoint
-
Review API Response:
Once you press the TEST button you will be redirected to the Response tab where you will be able to get a response for the API you just defined.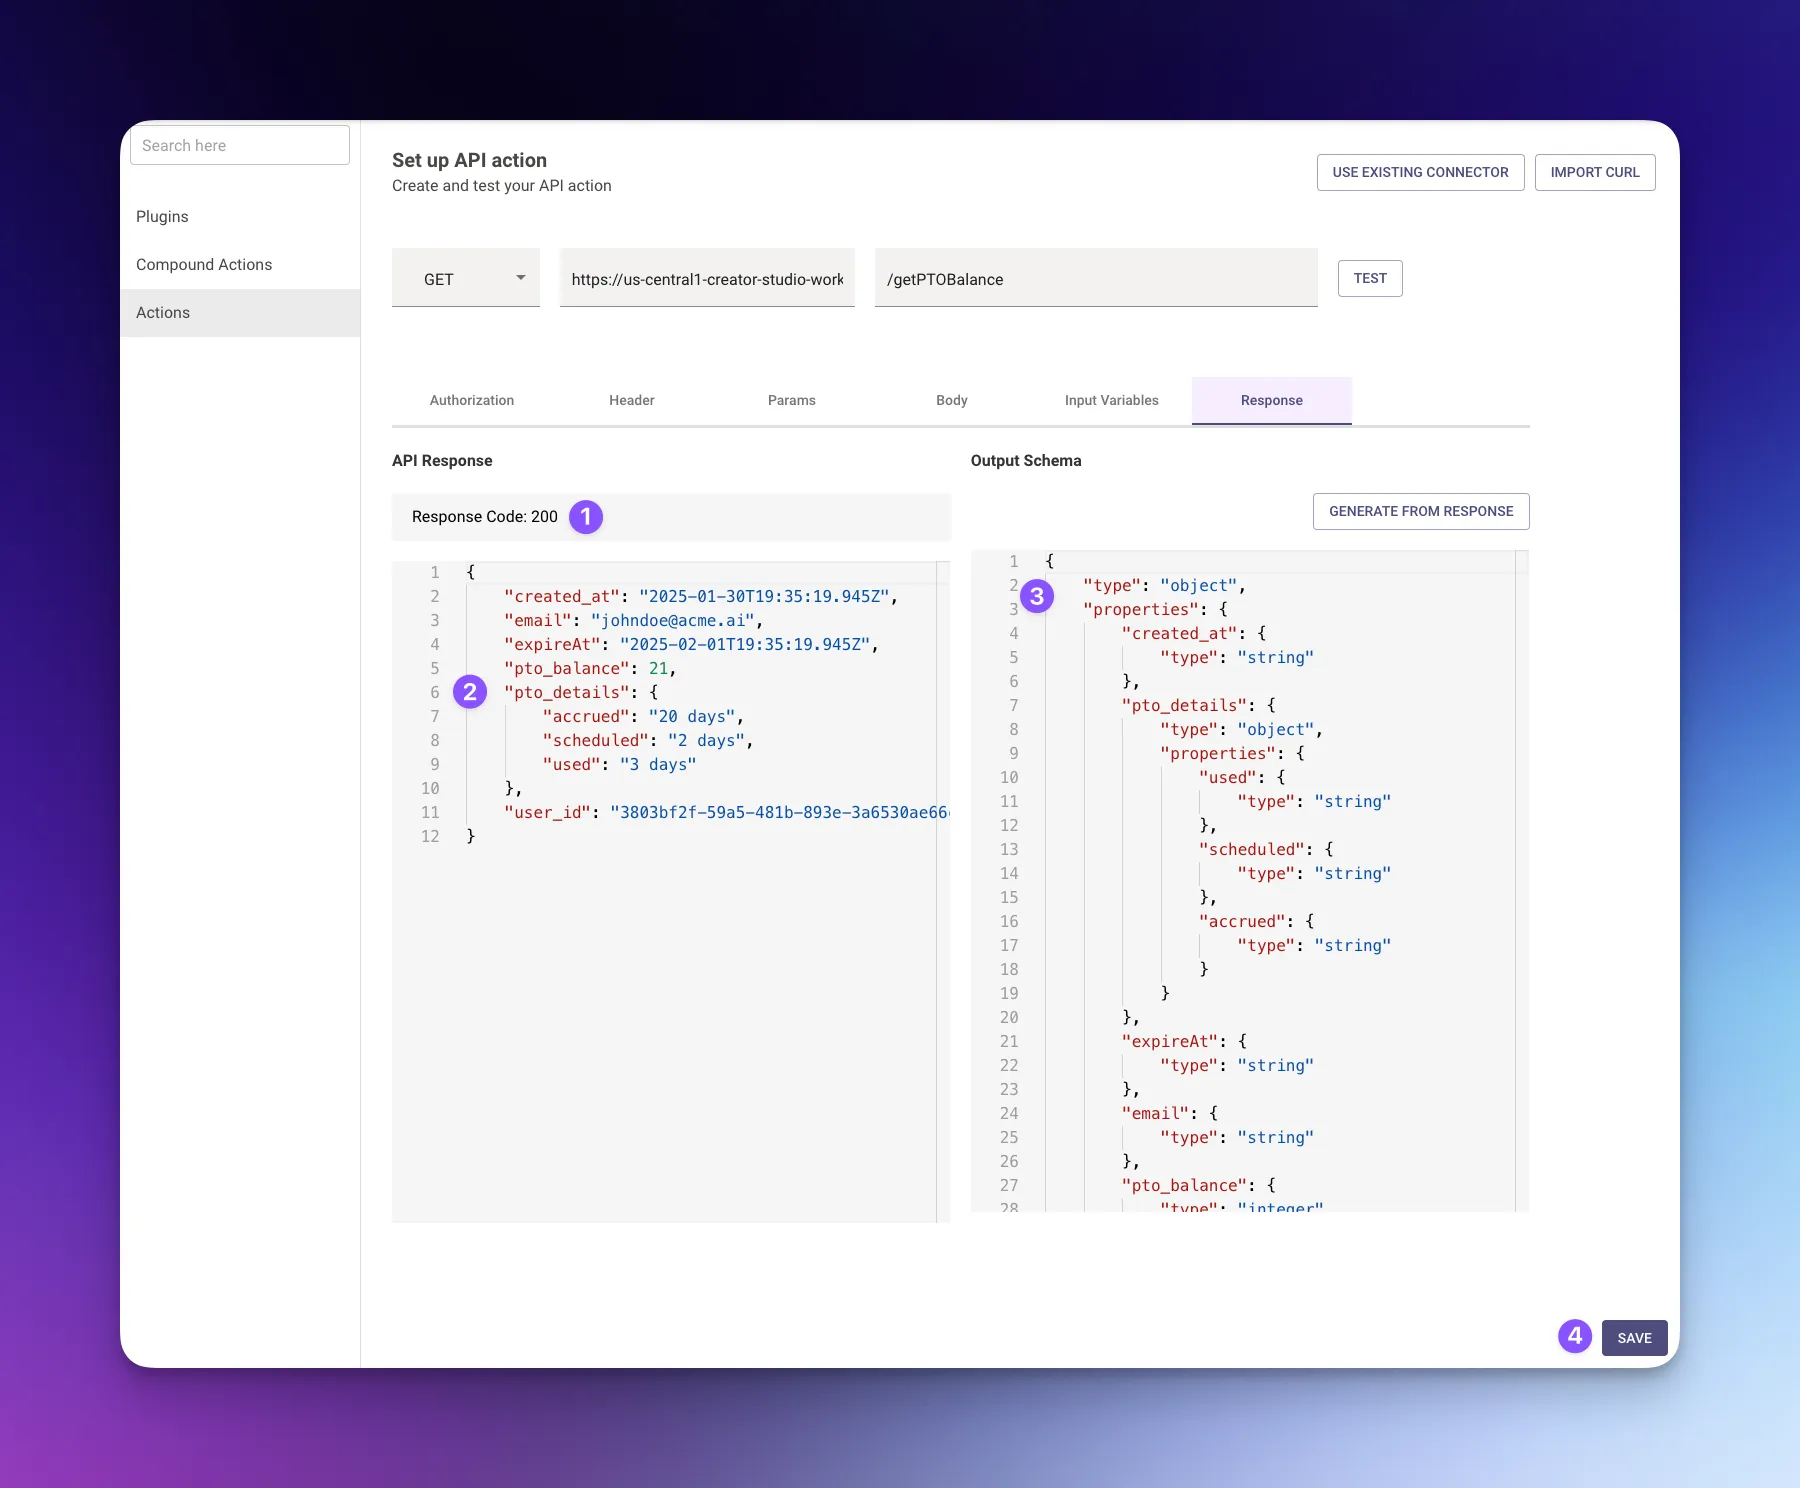
- You can see the Response Code
- On the left side box you can see the response for the user that was queried, in this case,
[email protected] - On the right box you will see an Output Schema box, this output schema will come into play when you create a Compound Action, which will be discussed later!
- Click on SAVE
-
Save Action Details:
After clicking SAVE, a modal titled Review Connector and API will appear. Here you will enter information about the Action you just created.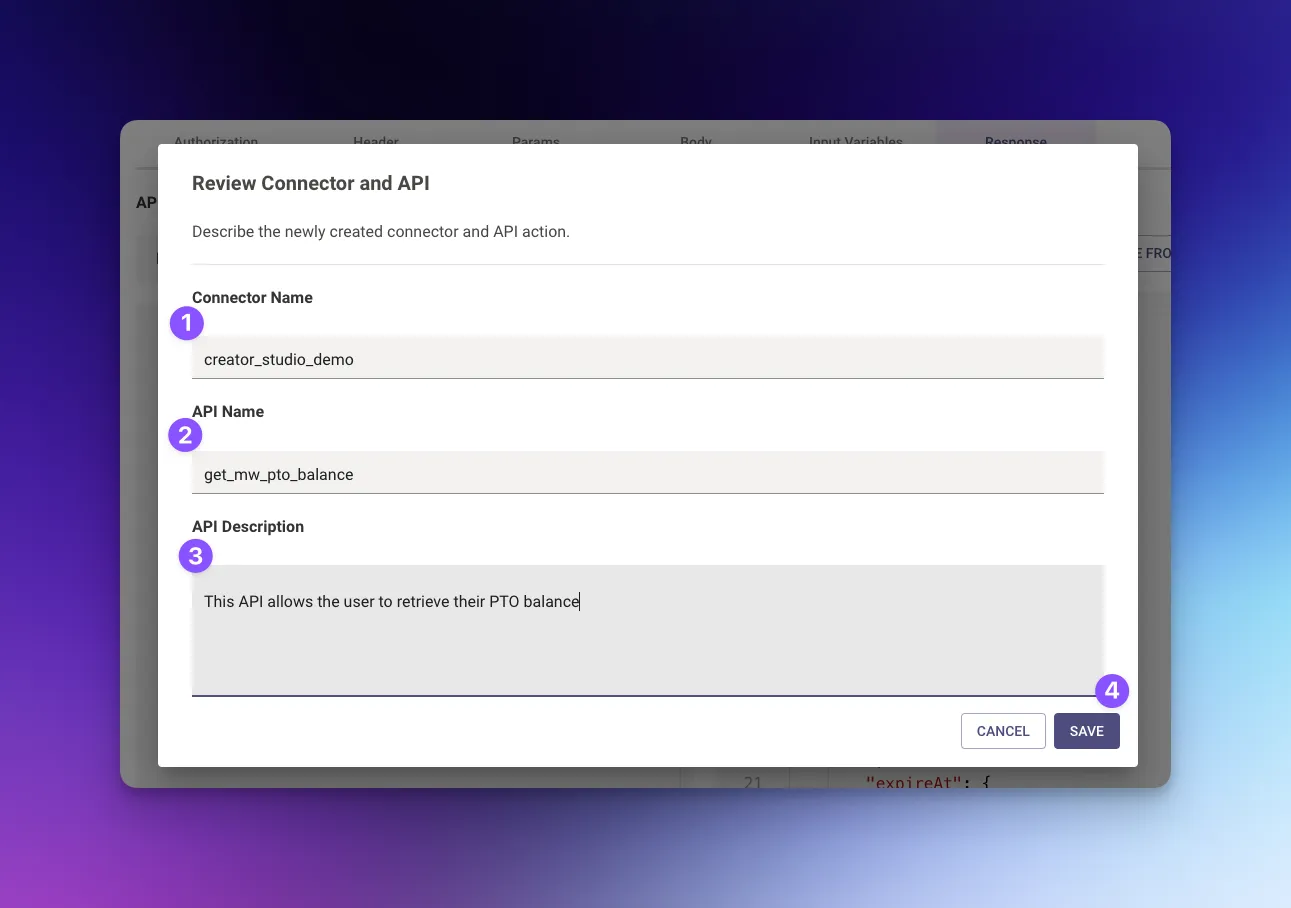
- Since this is your first time creating an Action with this external system, you are prompted to set a name for the connector. Name it
agent_studio_demoso it can be reused in the future. - The API Name is the name of the HTTP Action. Name it
get_mw_pto_balance. - You can also add a description for this API. Adding a description is recommended if your API has nuances or requires further interpretation from the Moveworks AI Assistant.
- Click SAVE
- Since this is your first time creating an Action with this external system, you are prompted to set a name for the connector. Name it
-
Create a Compound Action
After saving your action, you will be sent back to the Plugins workspace. Now you are ready to create a Compound Action, which will allow us to put our Action into play.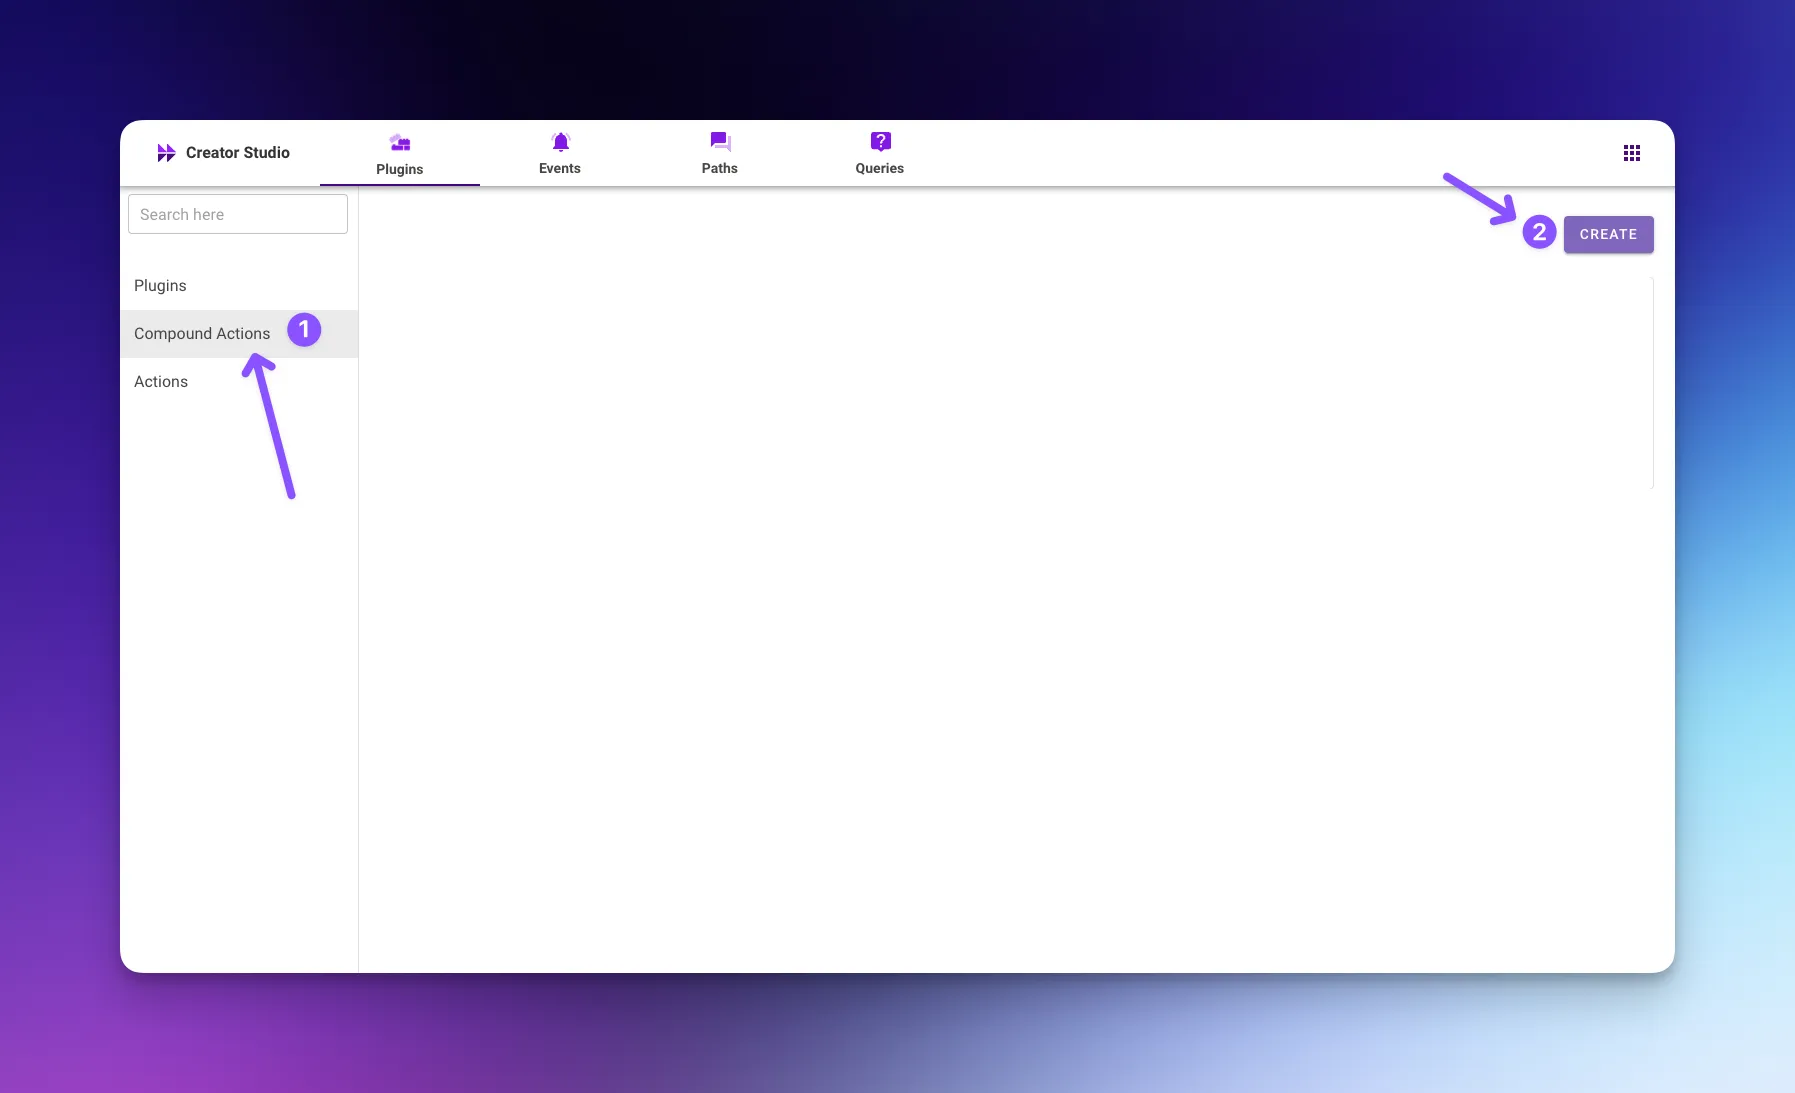
- Click on Compound Actions on the sidebar
- Click on Create to initiate a new Compound Action
-
Enter Compound Action Details
Now you need to enter the Compound Action’s information.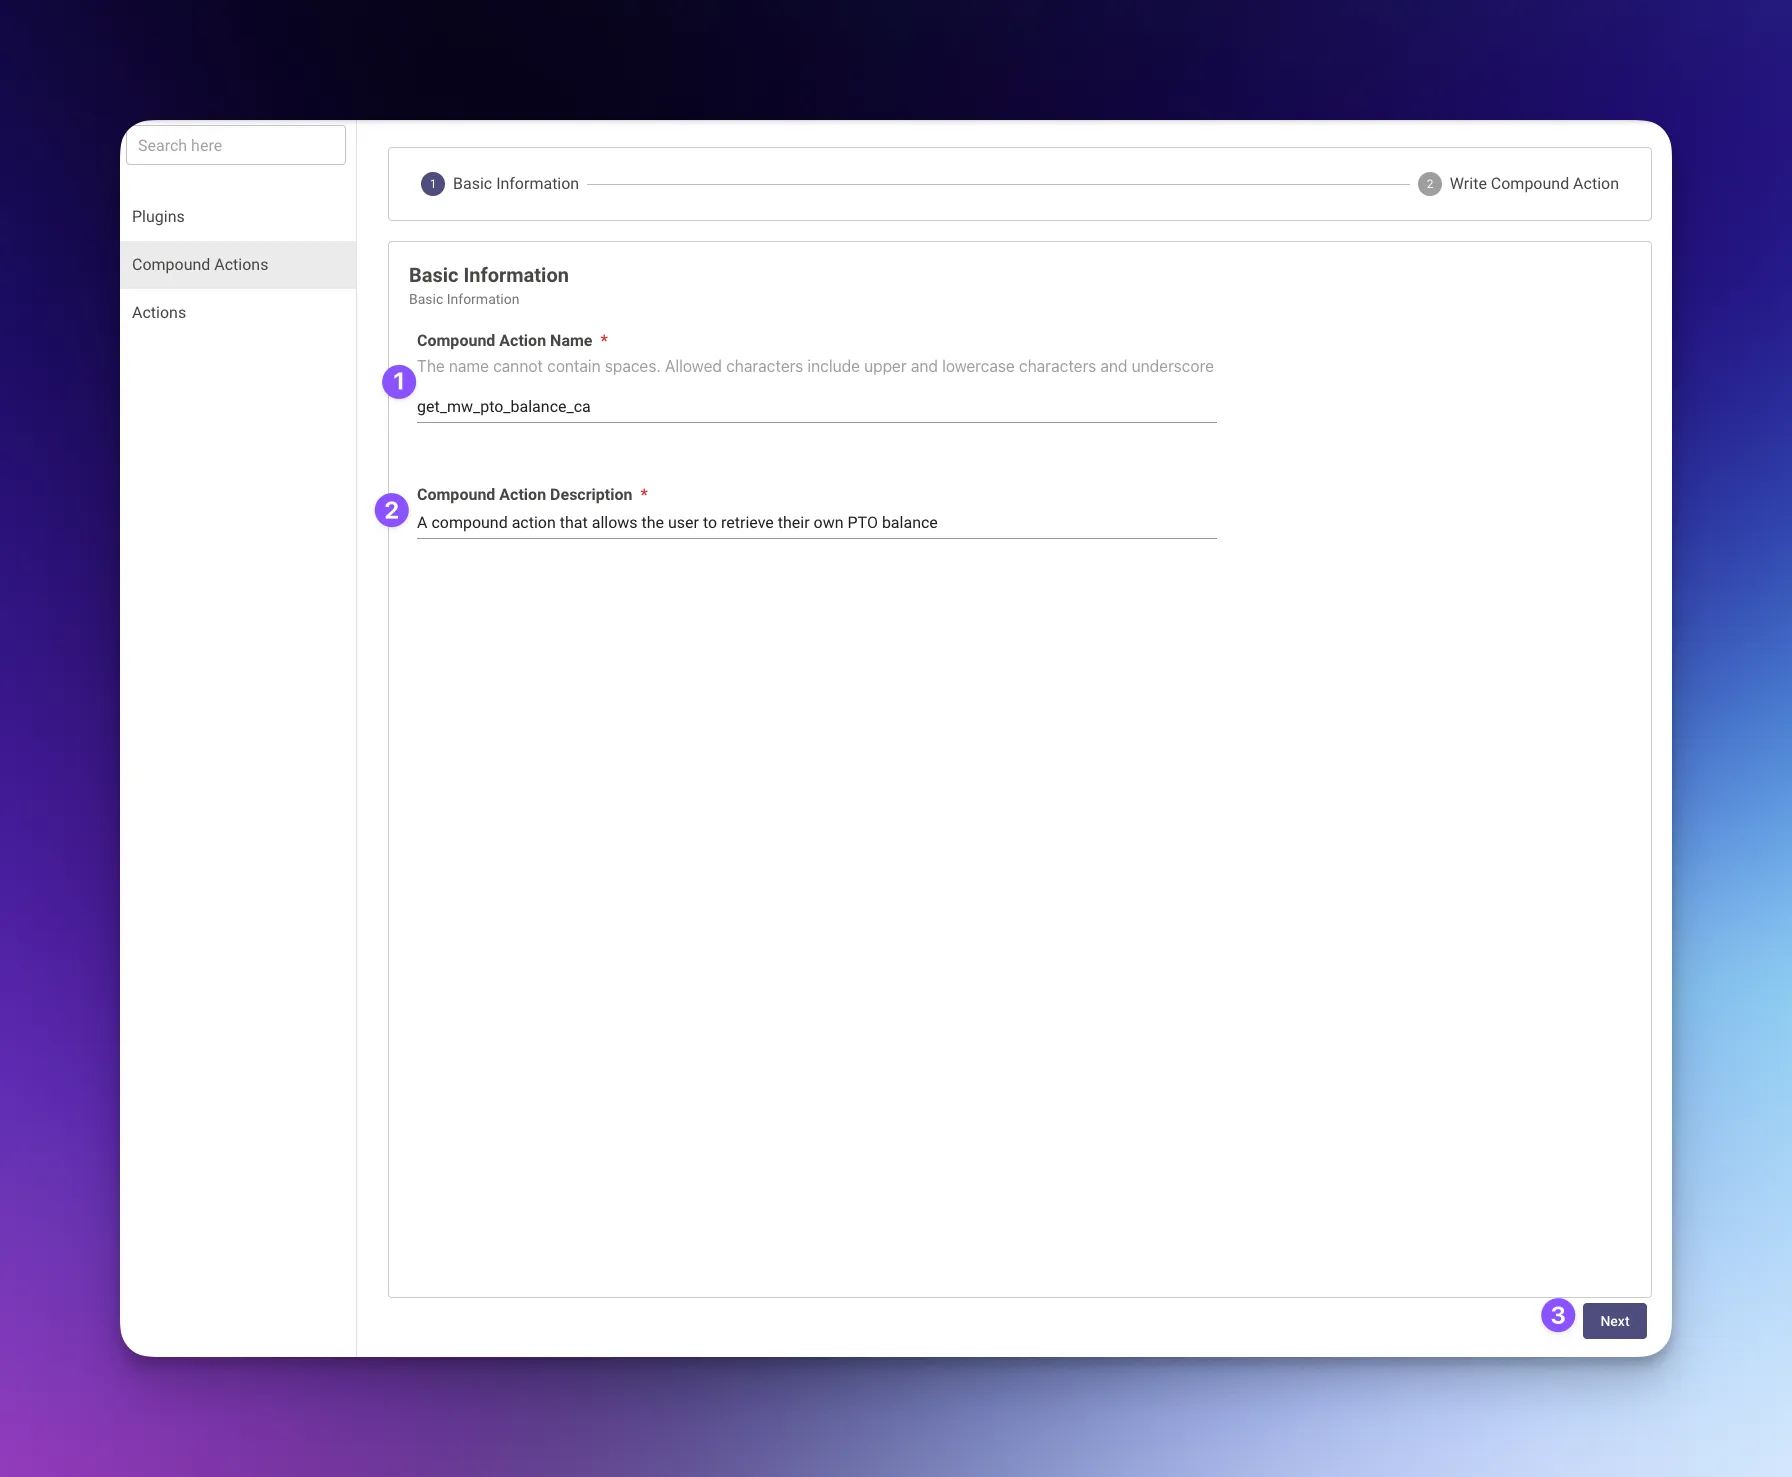
Description: A compound action that allows the user to retrieve their own PTO balance
- Provide a name that’s easy to remember and understand, for example,
get_mw_pto_balance_ca. Note: Action and Compound Action names must be unique. - Add a description explaining what your Compound Action does. The Moveworks AI Assistant takes these descriptions seriously, so be as thorough as possible!
- Click on Next to proceed
- Provide a name that’s easy to remember and understand, for example,
-
Write Compound Action Script:
You will be greeted by a Write Compound Action window that contains two tabs: Script Editor and Input Fields. In this exercise, you will only need to focus on the Script Editor.-
Click on the Script Editor tab
-
Now you need to write your Compound Action script. Think of a Compound Action as a way to write several Actions and Expressions in harmony, similar to writing a workflow. You combine multiple actions step-by-step and chain them together to get an outcome. For this use case, you only need to fetch the user’s PTO balance and present it to them. To accomplish this, call the action and use a Return expression to present the data from the action’s response to the user. Write the following script:
steps: - action: output_key: get_mw_pto_balance_result action_name: get_mw_pto_balance progress_updates: on_complete: ON_COMPLETE_MESSAGE on_pending: ON_PENDING_MESSAGE input_args: user_email: meta_info.user.email_addr - return: output_mapper: pto_balance: data.get_mw_pto_balance_result.pto_balance pto_accrued: data.get_mw_pto_balance_result.pto_details.accrued pto_used: data.get_mw_pto_balance_result.pto_details.used pto_scheduled: data.get_mw_pto_balance_result.pto_details.scheduled -
One thing you will notice when writing the results of the actions in the script editor is that you receive suggestions for the fields of the API response. This is possible because the Moveworks platform generates a Response Schema for you when you tested the action earlier!

-
Press Submit at the bottom right!
-
-
Publish Compound Action to a Plugin:
Again, you will be brought back to the Compound Actions page. Here, you will promote your compound action to a plugin so you and your users can use the use case you have been developing.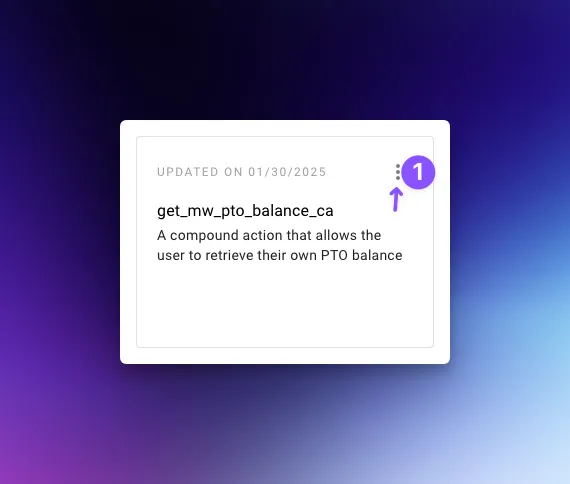
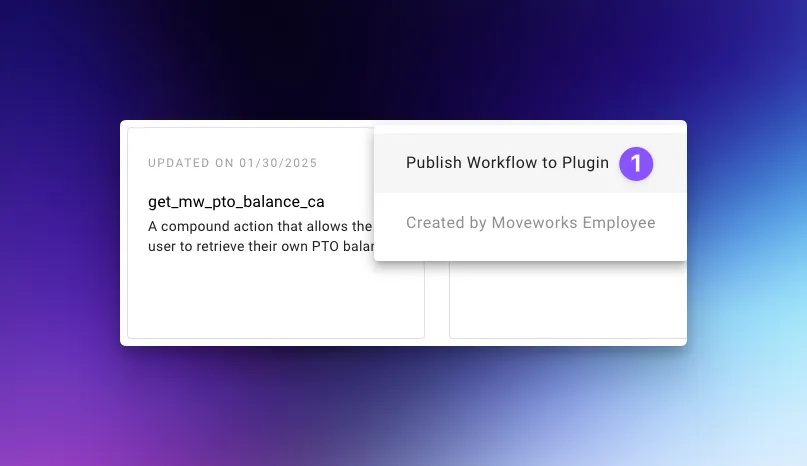
- Click the three dots on your Compound Action
- Click on Publish workflow to Plugin
-
Set Up Plugin Information:
You will now be redirected to a screen to set up the information about your Plugin, similar to your Compound Action.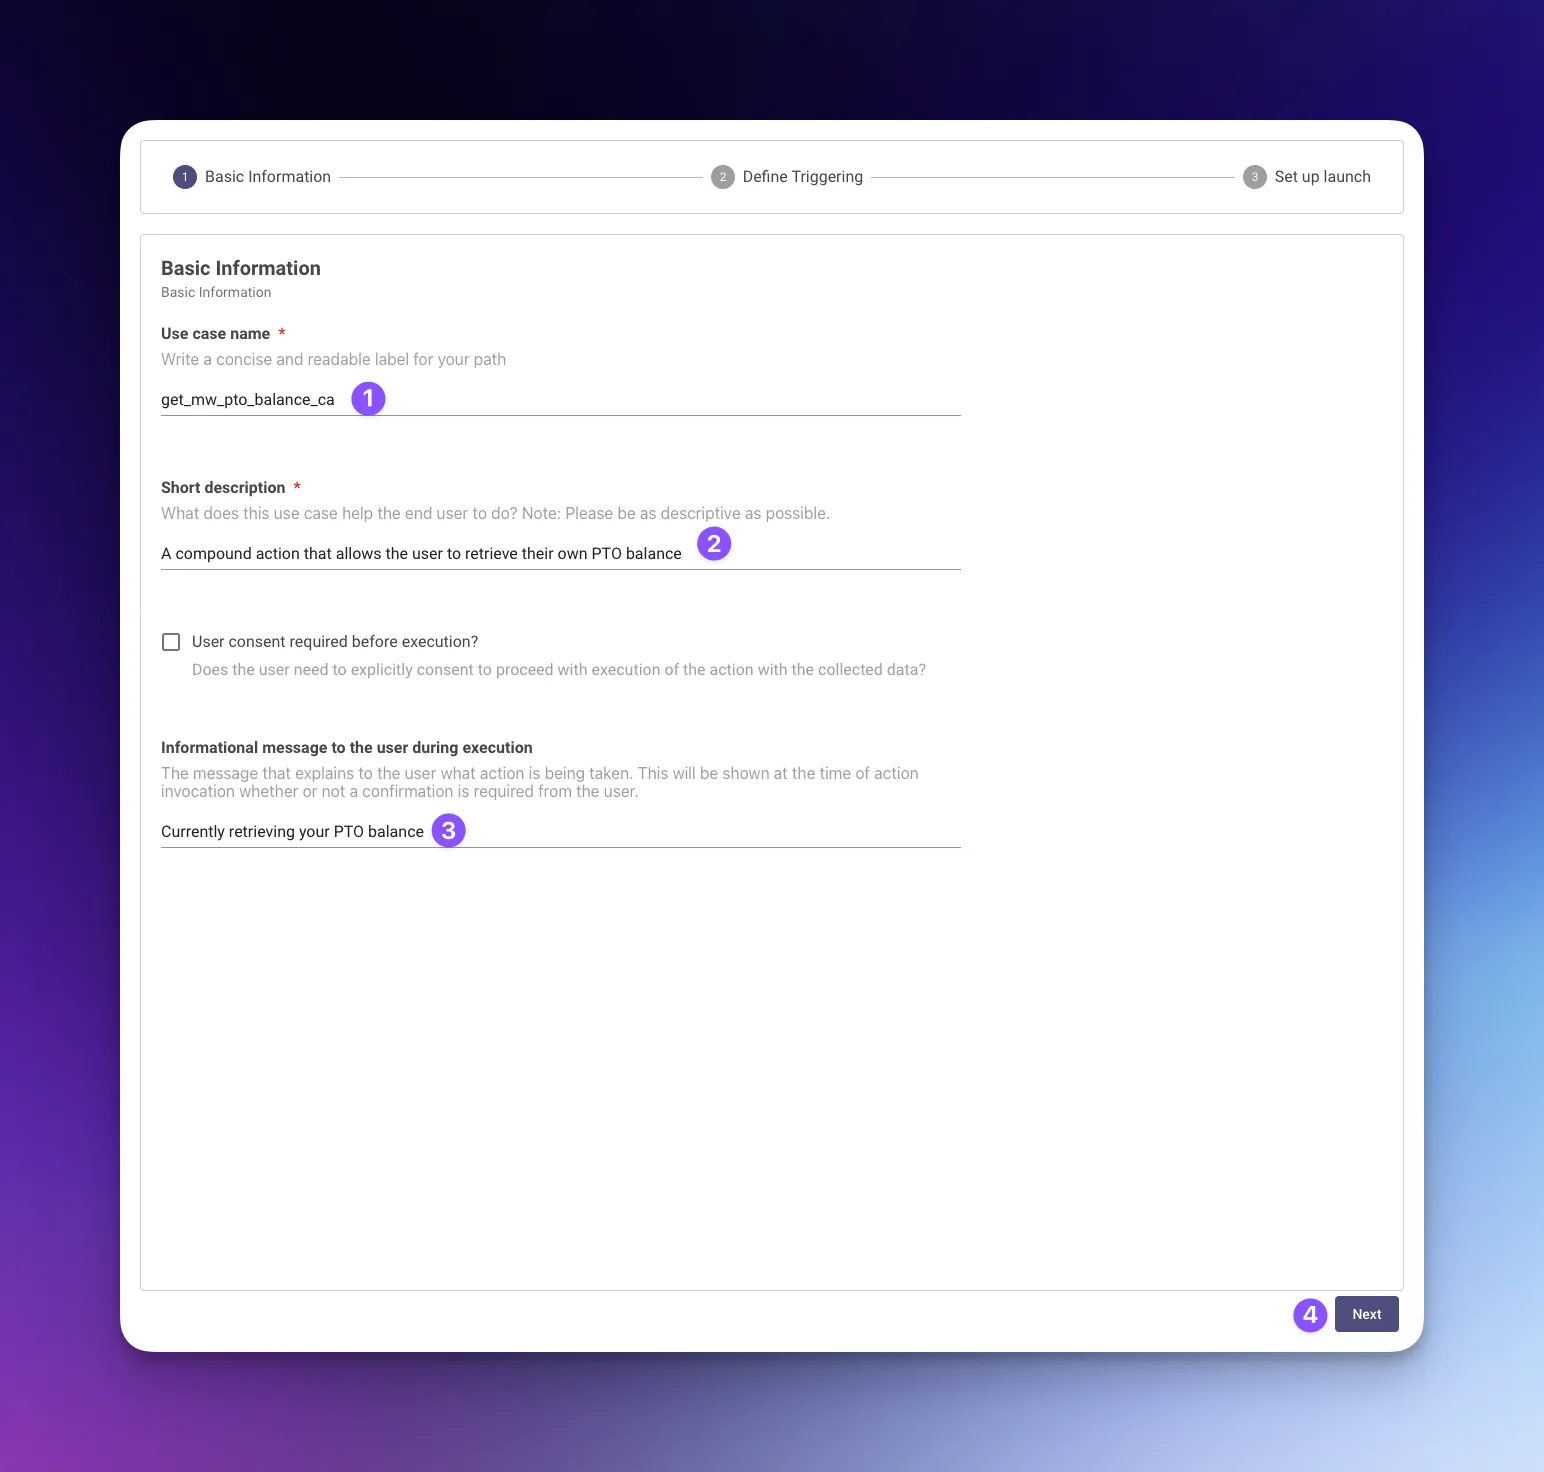
Description: A plugin that allows the user to retrieve their own PTO balance
- Enter the use case name. You can name it however you like. In this case, name it
get_mw_pto_balance_ca. - Add a description explaining what the Plugin does, similar to the compound action, be as descriptive as possible
- You can also provide an informational message to users when the plugin is executing.
- Click on Next
- Enter the use case name. You can name it however you like. In this case, name it
-
Definite Triggering Utterances:
Now you will encounter the Define Triggering step. Here you will be asked to enter positive and/or negative utterances that will help the Moveworks AI Assistant understand when to trigger the plugin. Based on the descriptions you set up earlier, suggestions are generated for you.
You need to enter at least 5 positives utterances to proceed to the next step.

- Click on Should Trigger if the suggestion is appropriate
- Click on Should Not Trigger if the suggestion is not something you want the plugin to trigger from
- You can also enter your own positive utterances and click on +ADD to include them
- Similarly, you can enter negative utterances.
- Once you have five positive utterances click NEXT
-
Set Up Launch:
In the Set up launch page, you can select who gets to trigger this plugin. In the example below, we will allow a few users to try it out.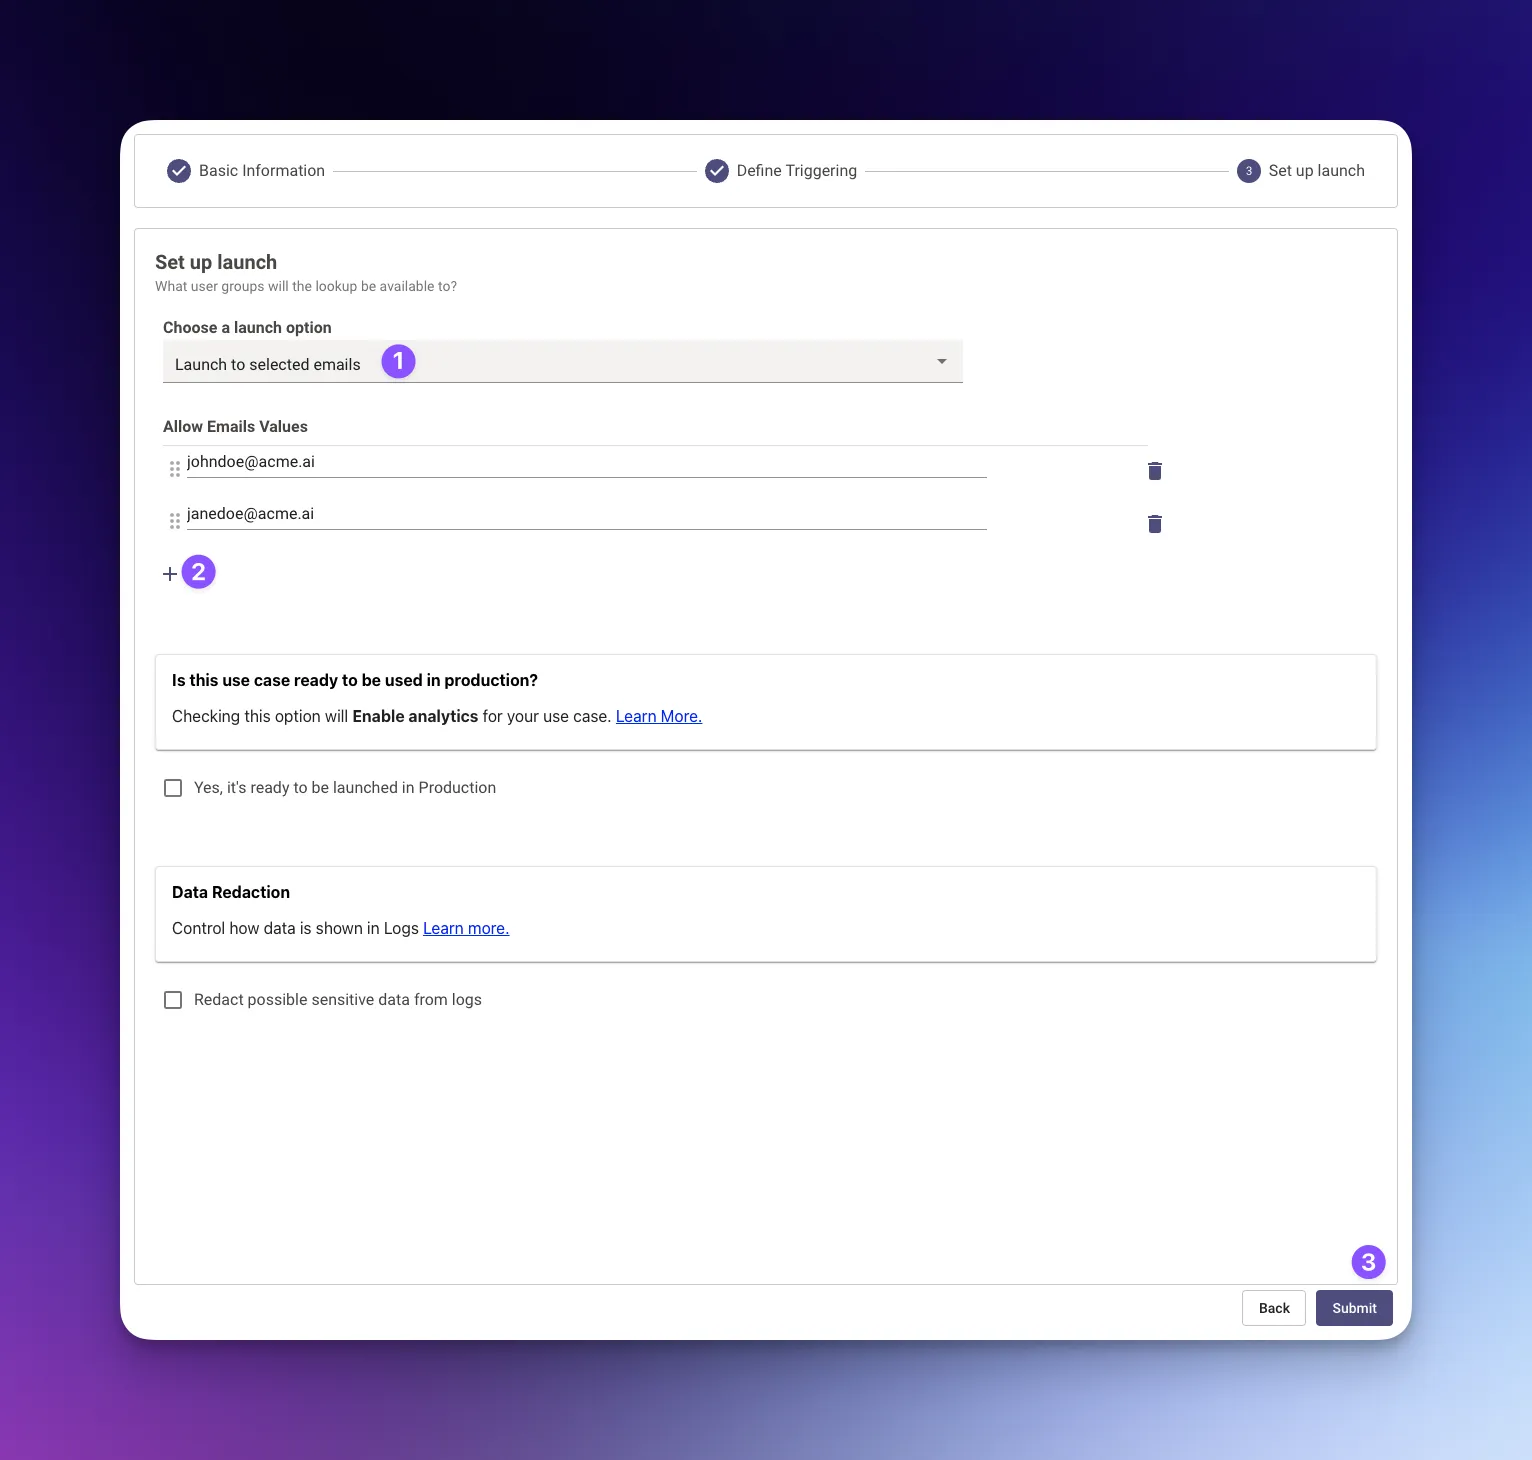
- In the dropdown menu, select
Launch to selected emails - Click on the
+sign and add as many user emails as you’d like - Click Submit to launch your plugin!
- In the dropdown menu, select
-
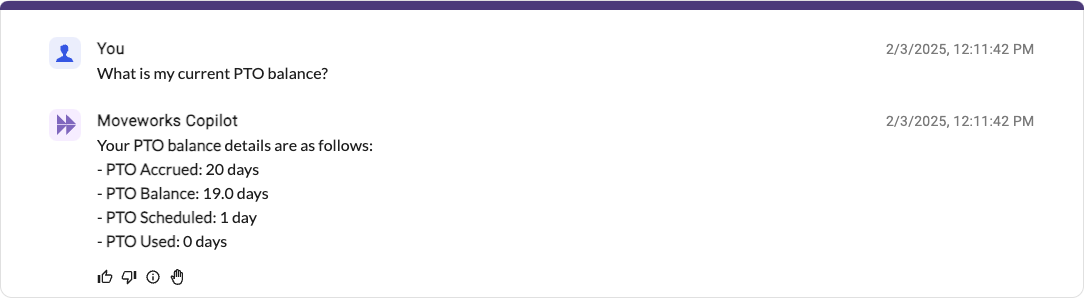
Test the Plugin:
To ensure everything is working correctly, test the plugin by asking the Moveworks AI Assistant:Can you show me my current PTO Balance?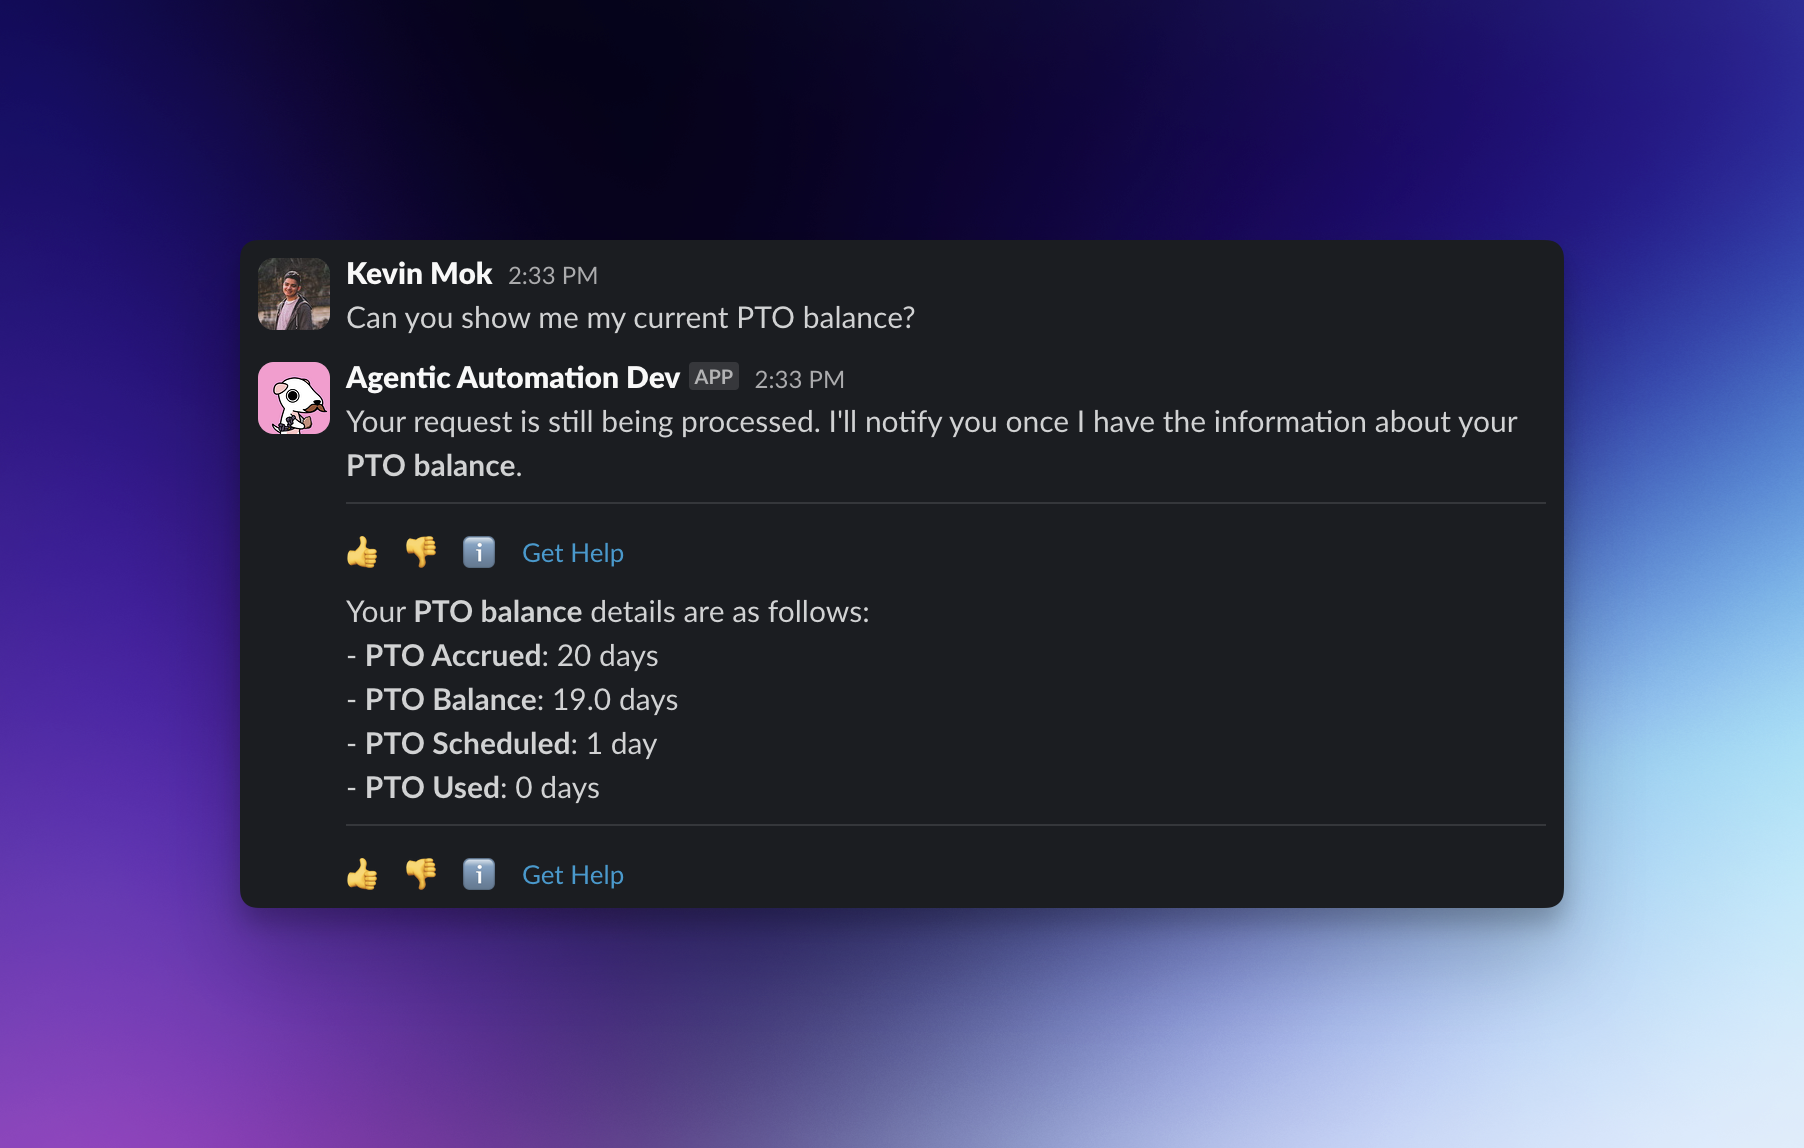
Updated 3 months ago