
Adding Embedded AI Assistant to ServiceNow
Installing Moveworks for Employee Center
The Moveworks Assistant can now be embedded on your ServiceNow Employee Center by simply installing a plugin! Learn more about the plugin on the ServiceNow documentation site.
Follow the instructions below to ensure that you have the necessary Moveworks configuration and information to install the plugin.
Installation Steps
The instructions below provide a walk through of how to install Moveworks for Employee Center via the ServiceNow App Store.
- Navigate to Chat Platforms > Manage Chatbots and then select Create on the top right to create a Bot Configuration for the Embedded AI Assistant. Set the following configuration.
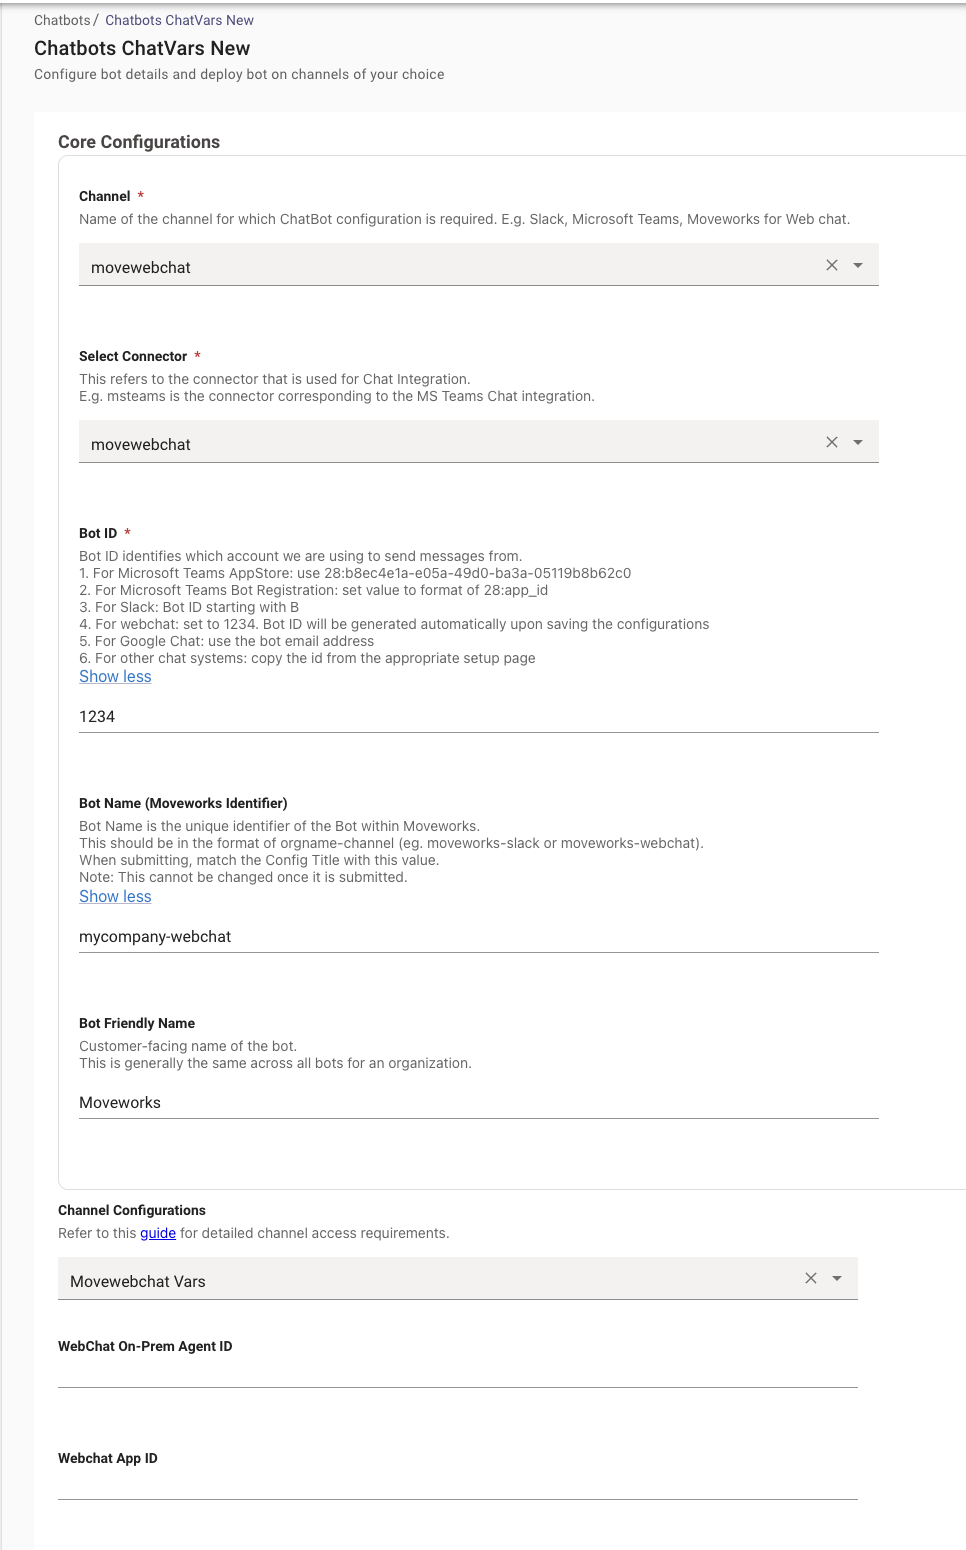
- After you select Submit on the bottom right, navigate back to the page, and you should see the Bot ID was generated. Take note of this Bot ID as you will need to update this value in ServiceNow.
- Follow the steps below under JWT Certificate Generation Guide (Mac & Windows) to generate the certificates used for authentication. After completing those steps, you should have 2 certificates a
.jksfile and a.crtfile. - Navigate to Chat Platforms > Web Chatbot > Authentication and select Create on the top right, and set the following configuration (For ServiceNow Webchat Authentication config, it is recommended to use
ITSM_USER_IDas the User Identifier Type as that is guaranteed to be unique for all users):
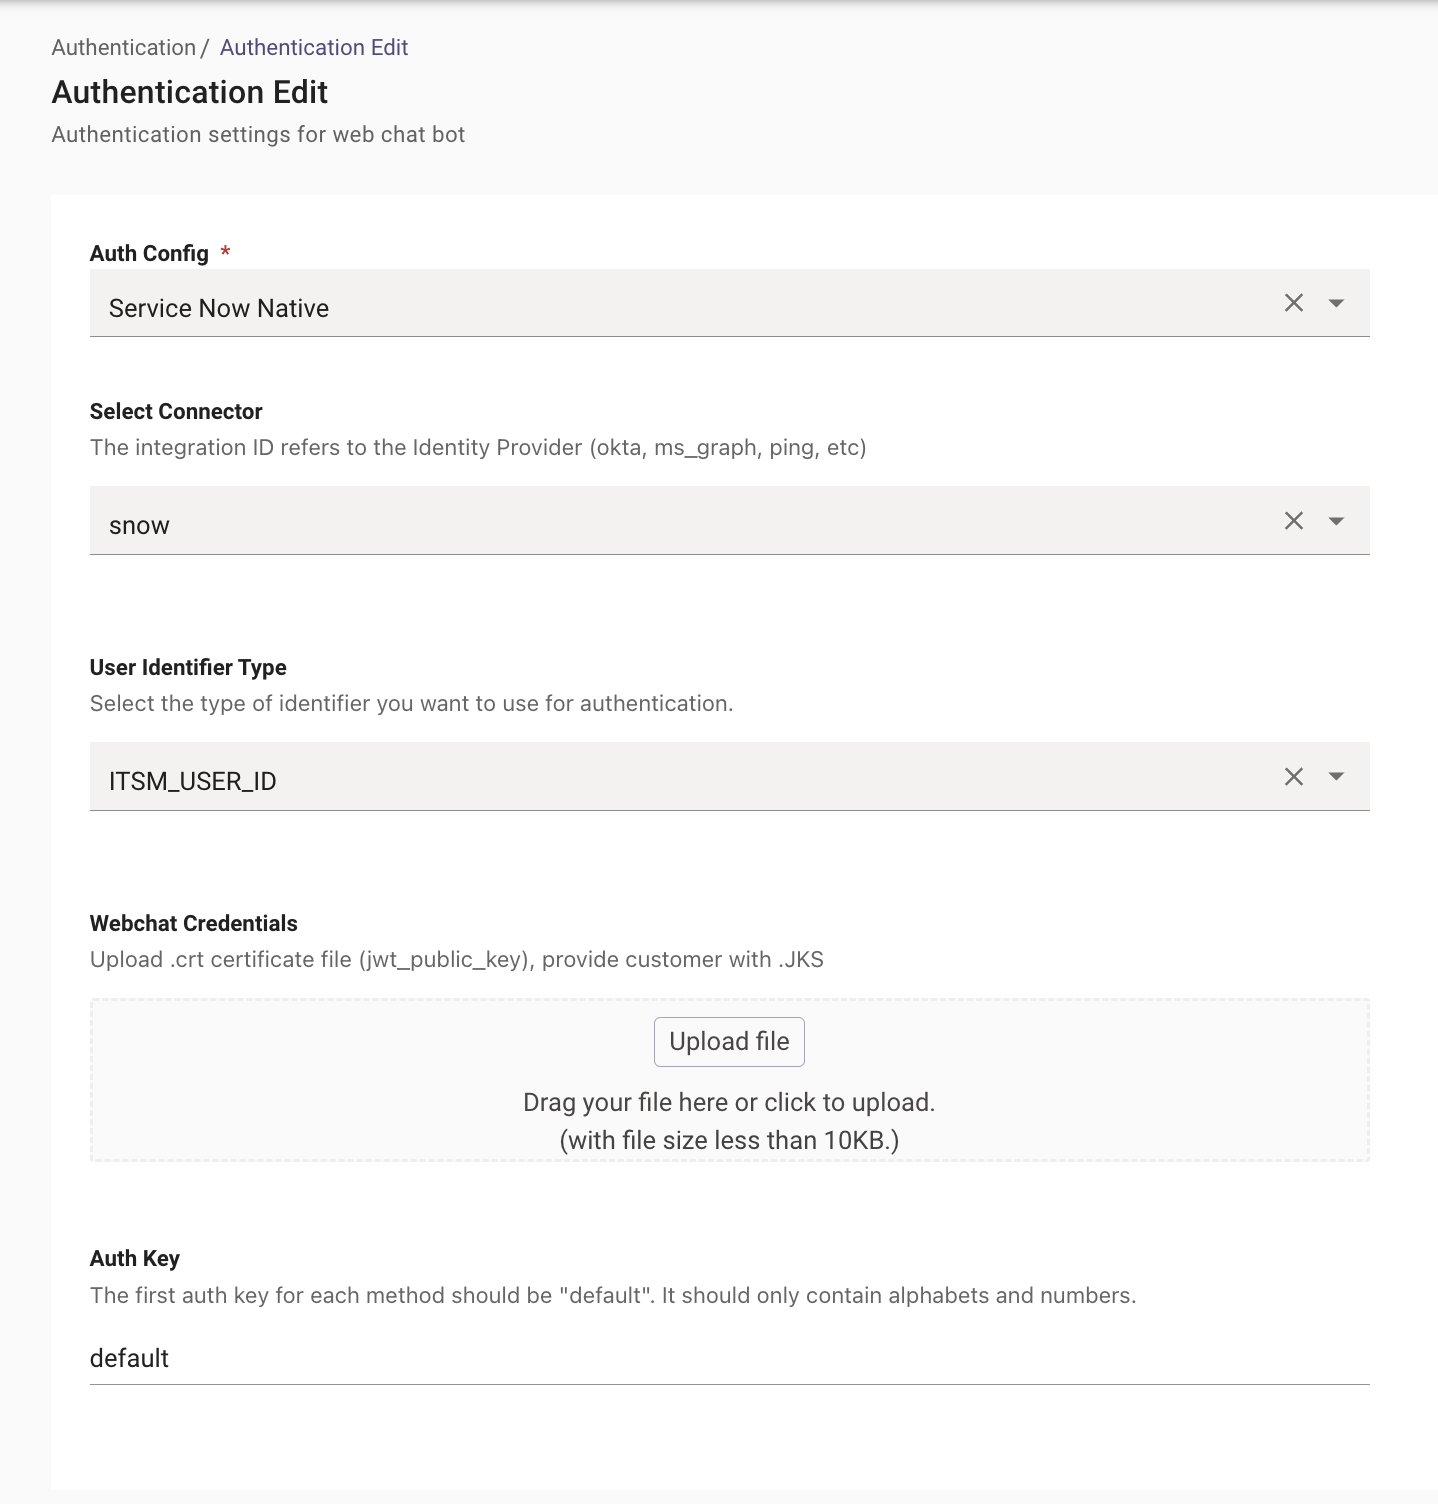
Your .crt certificate file should be uploaded on the screen above in the file upload section labeled Webchat Credentials.
- Once you have completed the steps above, follow the instructions here (https://www.servicenow.com/docs/r/employee-service-management/employee-experience-foundation/moveworks-ec-getting-started.html) to complete the Configurations in ServiceNow.
JWT Certificate Generation Guide (Mac & Windows)
Overview
This guide walks you through generating a self-signed JWT certificate (valid for 2 years) for use with Moveworks for Web.
The files you upload are moveworks.jks for ServiceNow and the public certificate liveOUT.crt for Moveworks. The script also creates private-key and intermediate files. Keep those files secure; do not upload private keys to Moveworks.
Choose your Key Store Password
Before you run the script, create the password that the script will set on the key store. Use a new, unique password for YOURPASSWORD in the script below. This becomes the Key Store Password you enter when you upload moveworks.jks to ServiceNow.
Generate a unique password instead of inventing one by hand:
Store the generated value in your password manager or secrets store before continuing. You need it again to upload the key store to ServiceNow and to check the certificate’s expiry later.
Mac
Prerequisites: openssl (pre-installed) and keytool (comes with Java/JDK)
Using Terminal on your Mac, run this script, replacing YOURORG with your organization name and YOURPASSWORD with the password you generated above:
Files to upload: find these files in the directory where you ran the script:
Windows
Option A: WSL (Recommended)
Install WSL (wsl --install in PowerShell as admin), then run the Mac script above inside the WSL terminal.
Option B: Native Windows
Install OpenSSL for Windows and ensure Java/JDK is installed for keytool. Then run this script in PowerShell, replacing YOURORG with your organization name and YOURPASSWORD with the password you generated above:
Files to upload: find these files in the directory where you ran the script:
Installing Embedded AI Assistant using OIDC-Based SSO (Alternative)
First, follow the steps to configure an SSO application for authentication to the Embedded AI assistant in the guide related to the SSO system you are using (e.g. Azure, Okta, etc.).
Okta OIDC: /ai-assistant/ai-assistant-web-surfaces/moveworks-for-web/moveworks-for-web-installation-okta-oidc
Azure OIDC: /ai-assistant/ai-assistant-web-surfaces/moveworks-for-web/moveworks-for-web-installation-azure-oidc
For additional SSO system guides, check the navigation menu on the left side of the page.
Once steps are complete and you have your code snippet, you can add it to your ServiceNow service portal.
Navigate to the sp_portal table. Find the portal(s) on which you’d like to include the widget, and click into its Theme record.
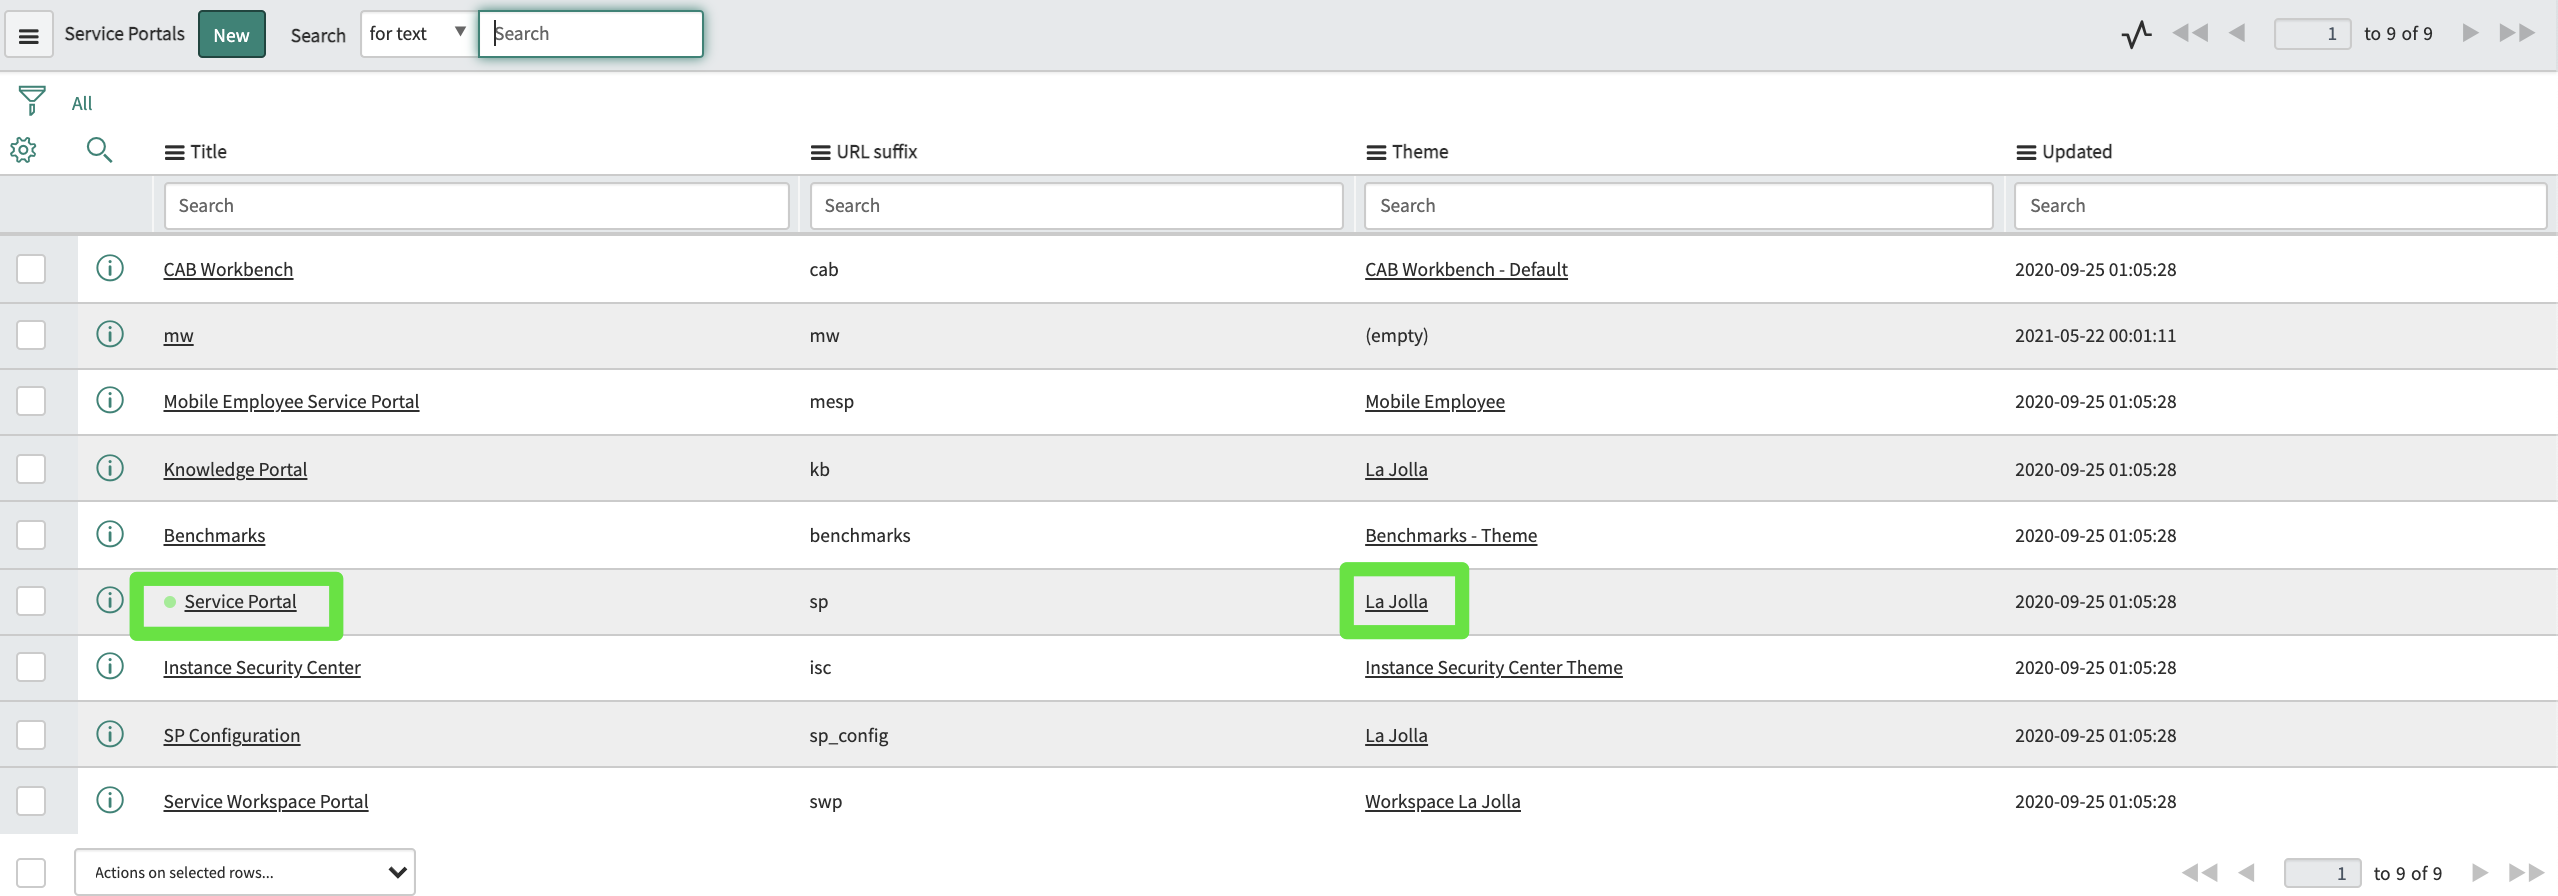
Find the footer field:

If there is nothing there, use the magnifying glass to create a new footer record and navigate to it. If there is already a footer there, navigate to that record.
In the footer record, add the snippet for your environment to the Body HTML template field:
Ensure the footer is applied to your theme:

Now the widget is set to appear on any page using that theme, including your Service Portal.
Once Moveworks configuration is complete, and you have access to the web bot, navigate to your Service Portal to see the Moveworks web AI Assistant widget.
FAQ
Q: How do I check the expiry of my cert?
A: You can use one of the following commands to check the expiry of a cert:
Check the .crt file directly: openssl x509 -in liveOUT.crt -noout -enddate OR openssl x509 -in liveOUT.crt -noout -dates
Check the .p12 (PKCS12) file: openssl pkcs12 -in liveOUT.p12 -passin pass:$PW -nodes | openssl x509 -noout -enddate
Check the .jks (Java KeyStore): keytool -list -v -keystore moveworks.jks -storepass $PW | grep "Valid from"