Configure Productivity Boost (QuickGPT + Brief Me)
Configure Productivity Boost (QuickGPT + Brief Me)
This guide covers configuration for Productivity Boost features. The Moveworks Productivity Boost SKU includes two plugins (features):
- Quick GPT
- Brief Me
Prerequisites
Before configuring, gather the user lists to enable the plugins. This list determines who can access both features.
Warning: Productivity Boost is a Paid Feature
Please ensure that you do not activate this feature for more users than your current subscription covers. Exceeding your purchased limit may result in additional charges or service interruptions.
Need more licenses? Contact your Moveworks Account Executive for assistance.
How to configure Quick GPT
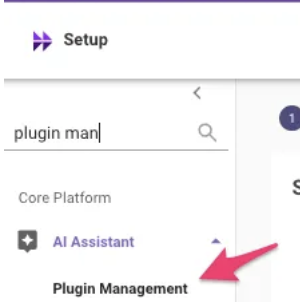
Step 1: Navigate to Core Platform > AI Assistant > Plugin Management
Step 2: Update the QuickGPT Plugin Settings.
- Find the “QuickGPT Plugin” section and expand it.

- Add the users you want to give access to. In most cases only a specific set of users will have access. So you’ll need to create a DSL rule which could look like this
Note: the DSL Rules are case sensitive so ensure the emails in your rule are lowercase.
- Save your configuration.
You have successfully configured Quick GPT. ✅
How to configure Brief Me
To configure Brief Me you’ll also make this update on the Plugin Management Page. To access this page, navigate to Moveworks Setup and then search for “Plugin management”.
You’ll need to make updates to 2 configurations:
- Plugin Management
- Manage Chatbots
Step 1: Navigate to Core Platform > AI Assistant > Plugin Management
Step 2: Turn on Brief Me (Interactions) & the Brief Me (Start/ End) Plugin
For each section, add the SAME USER LIST in both sections. The user list contains the list of users you want to give access to:
Step 3: Navigate to Chat Platforms > Manage Chatbots
- Select the AI Assistant (bot) you wish to modify, click Edit.
- Note: You will need to make this change for all AI Assistants (bots) you want to activate Brief Me in.
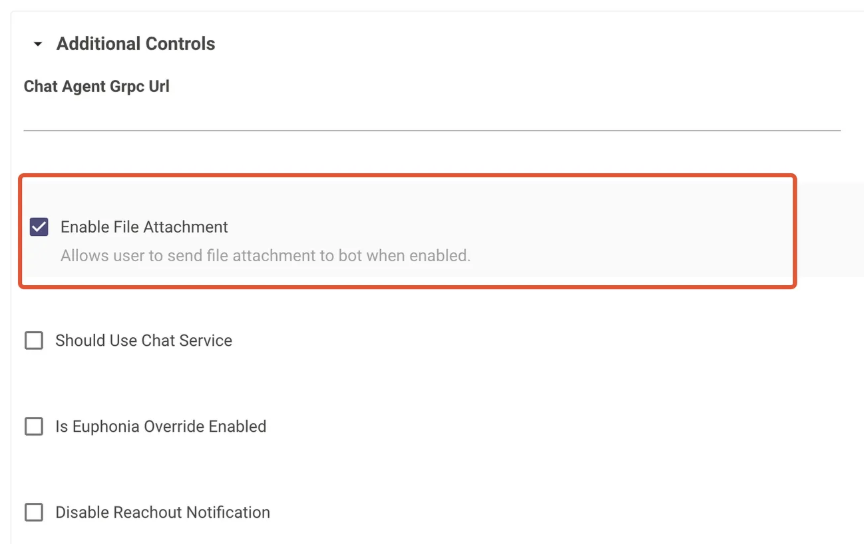
The goal of this step is to enable the AI Assistant to support attachments.
- Under Additional Controls, checkbox the
enable file attachmentfunctionality.
You have successfully configured Brief Me. ✅