Embedded AI Assistant SSO Configuration (General SAML) + ADFS Configuration
Embedded AI Assistant SSO Configuration (General SAML) + ADFS Configuration
This guide walks you through the general SSO SAML setup for Embedded AI Assistant using Active Directory Federation Services (ADFS). This will allow you to copy a code snippet of the AI Assistant and paste it onto any page governed by your SSO provider, and Embedded AI Assistant will just work, automatic authentication and all.
Prerequisites:
- ADFS Server: Ensure the stakeholder has an ADFS server set up and configured & has the highest level of admin access in it.
- SSL Certificate: Obtain and install an SSL certificate for your ADFS server.
ADFS Setup Instructions
Configure Relying Party Trust
-
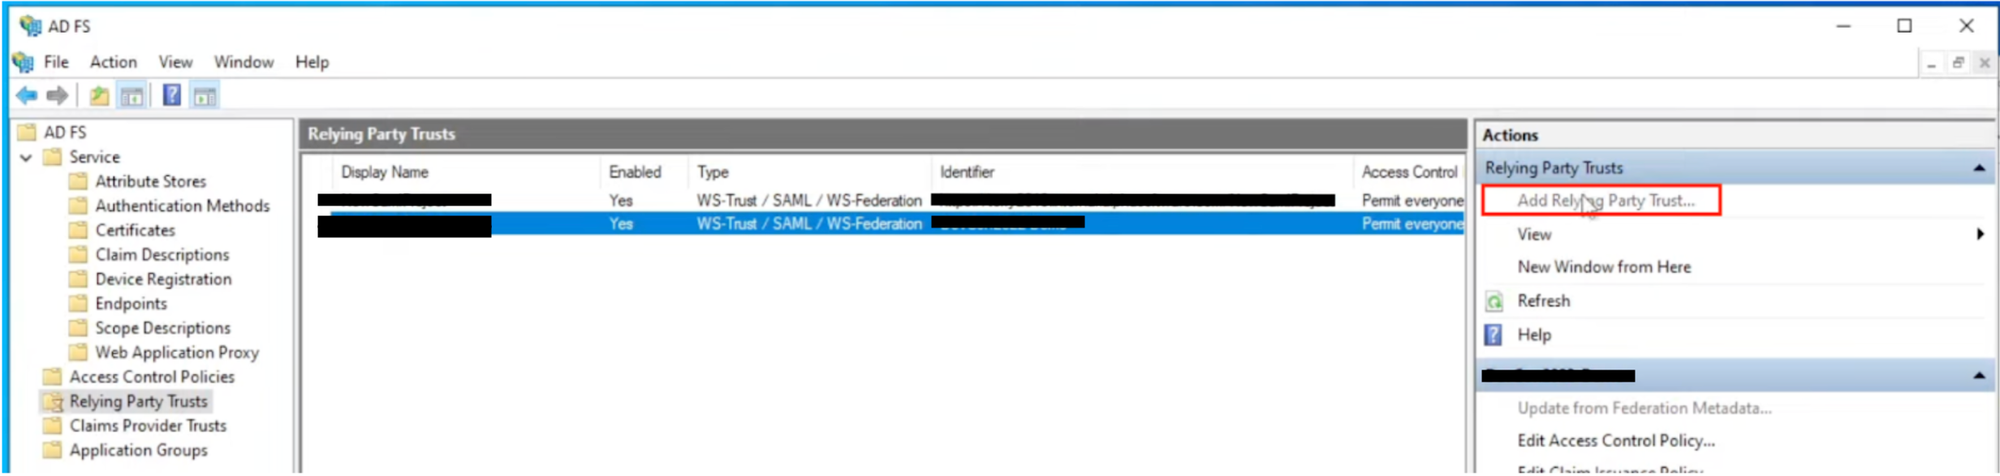
Open the ADFS Management Console on your ADFS server.
-
In the left pane, select “Relying Party Trusts” and then click Add Relying Party Trust to start the wizard.
-
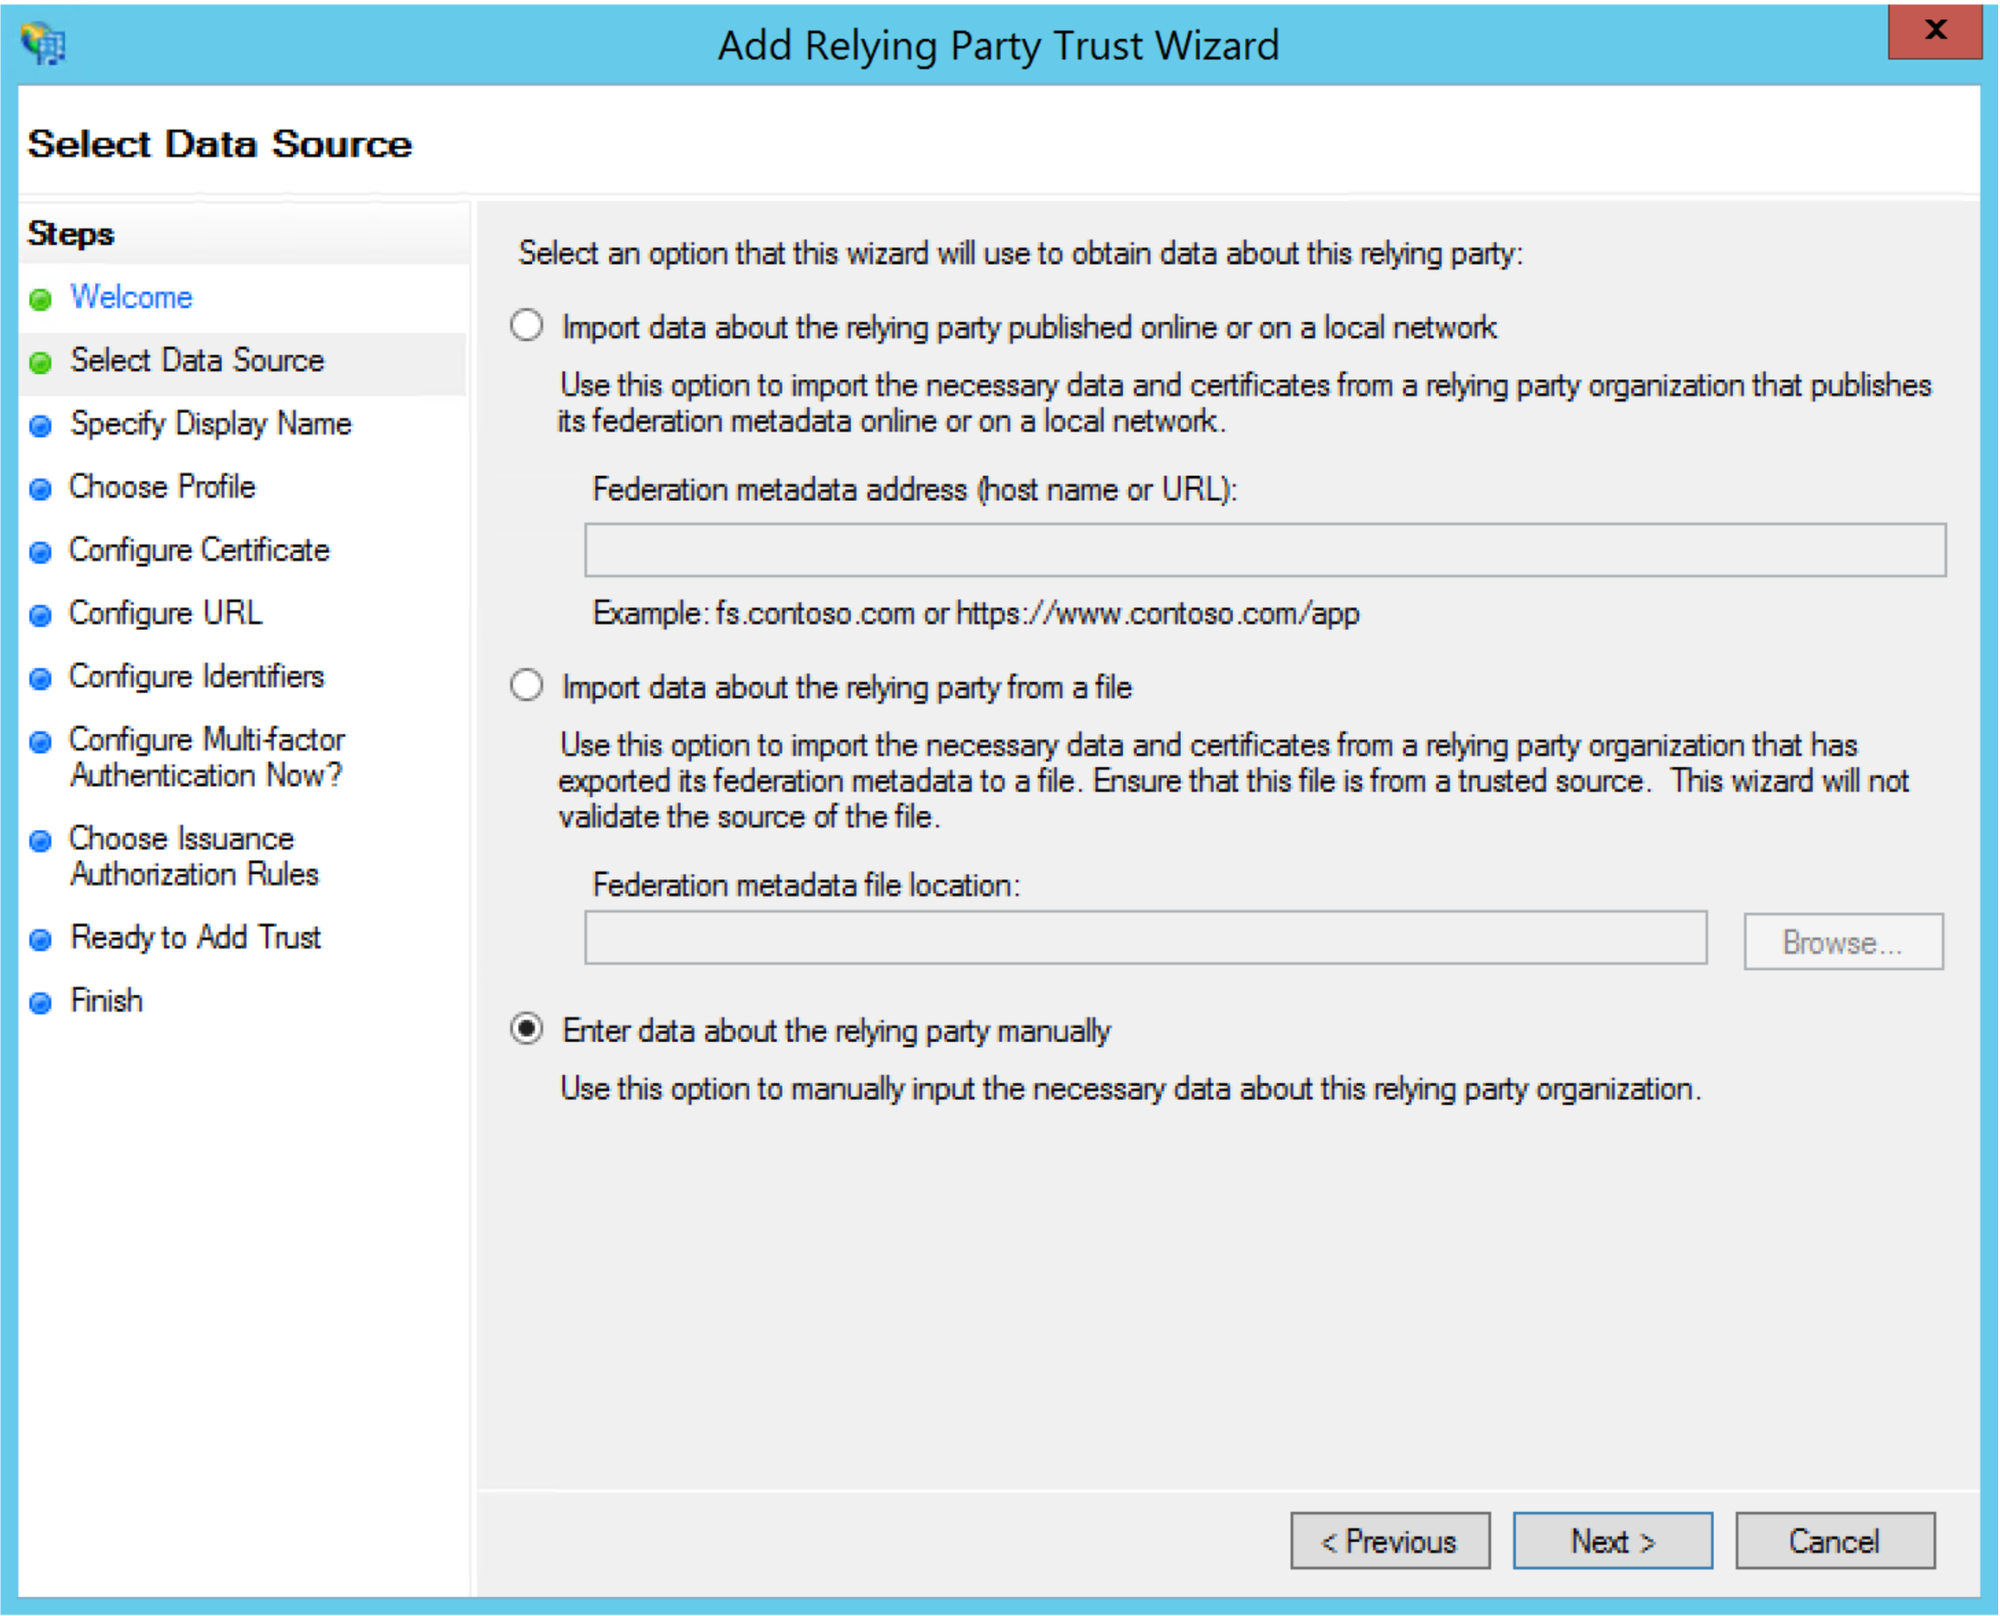
Follow the wizard to configure the Relying Party Trust. You’ll need to provide the metadata or SAML configuration details provided by the service or application you want to integrate with.
-
In the Select data source step, toggle the option Enter data about the relying party manually.
-
Specify Display Name: Enter a display name for the Relying Party Trust (e.g., “Moveworks Embedded AI Assistant”) and an optional description. Click “Next.”
-
Configure Certificate: In most cases, you’ll use the token-signing certificate already configured in your ADFS. You can choose to use an existing certificate or create a new one. Click “Next.”
-
Configure URL: For the “Relying party trust identifier,” based on the info below
Region SAML ACS URL (also called single sign-on URL, Destination URL, Recipient URL)
United States (default) https://CUSTOMER_ID.moveworks.com/login/sso/saml Canada https://CUSTOMER_ID.am-ca-central.moveworks.com/login/sso/saml EU https://CUSTOMER_ID.am-eu-central.moveworks.com/login/sso/saml Australia / Asia Pacific https://CUSTOMER_ID.am-ap-southeast.moveworks.com/login/sso/saml Government Secure Cloud https://CUSTOMER_ID.moveworksgov.com/login/sso/saml Japan https://CUSTOMER_ID.jp.moveworks.com/login/sso/saml UK https://CUSTOMER_ID.uk.moveworks.com/login/sso/saml US Prod 4 https://CUSTOMER_ID.prod4.us.moveworks.com/login/sso/saml US Prod 3 https://CUSTOMER_ID.prod3.us.moveworks.com/login/sso/saml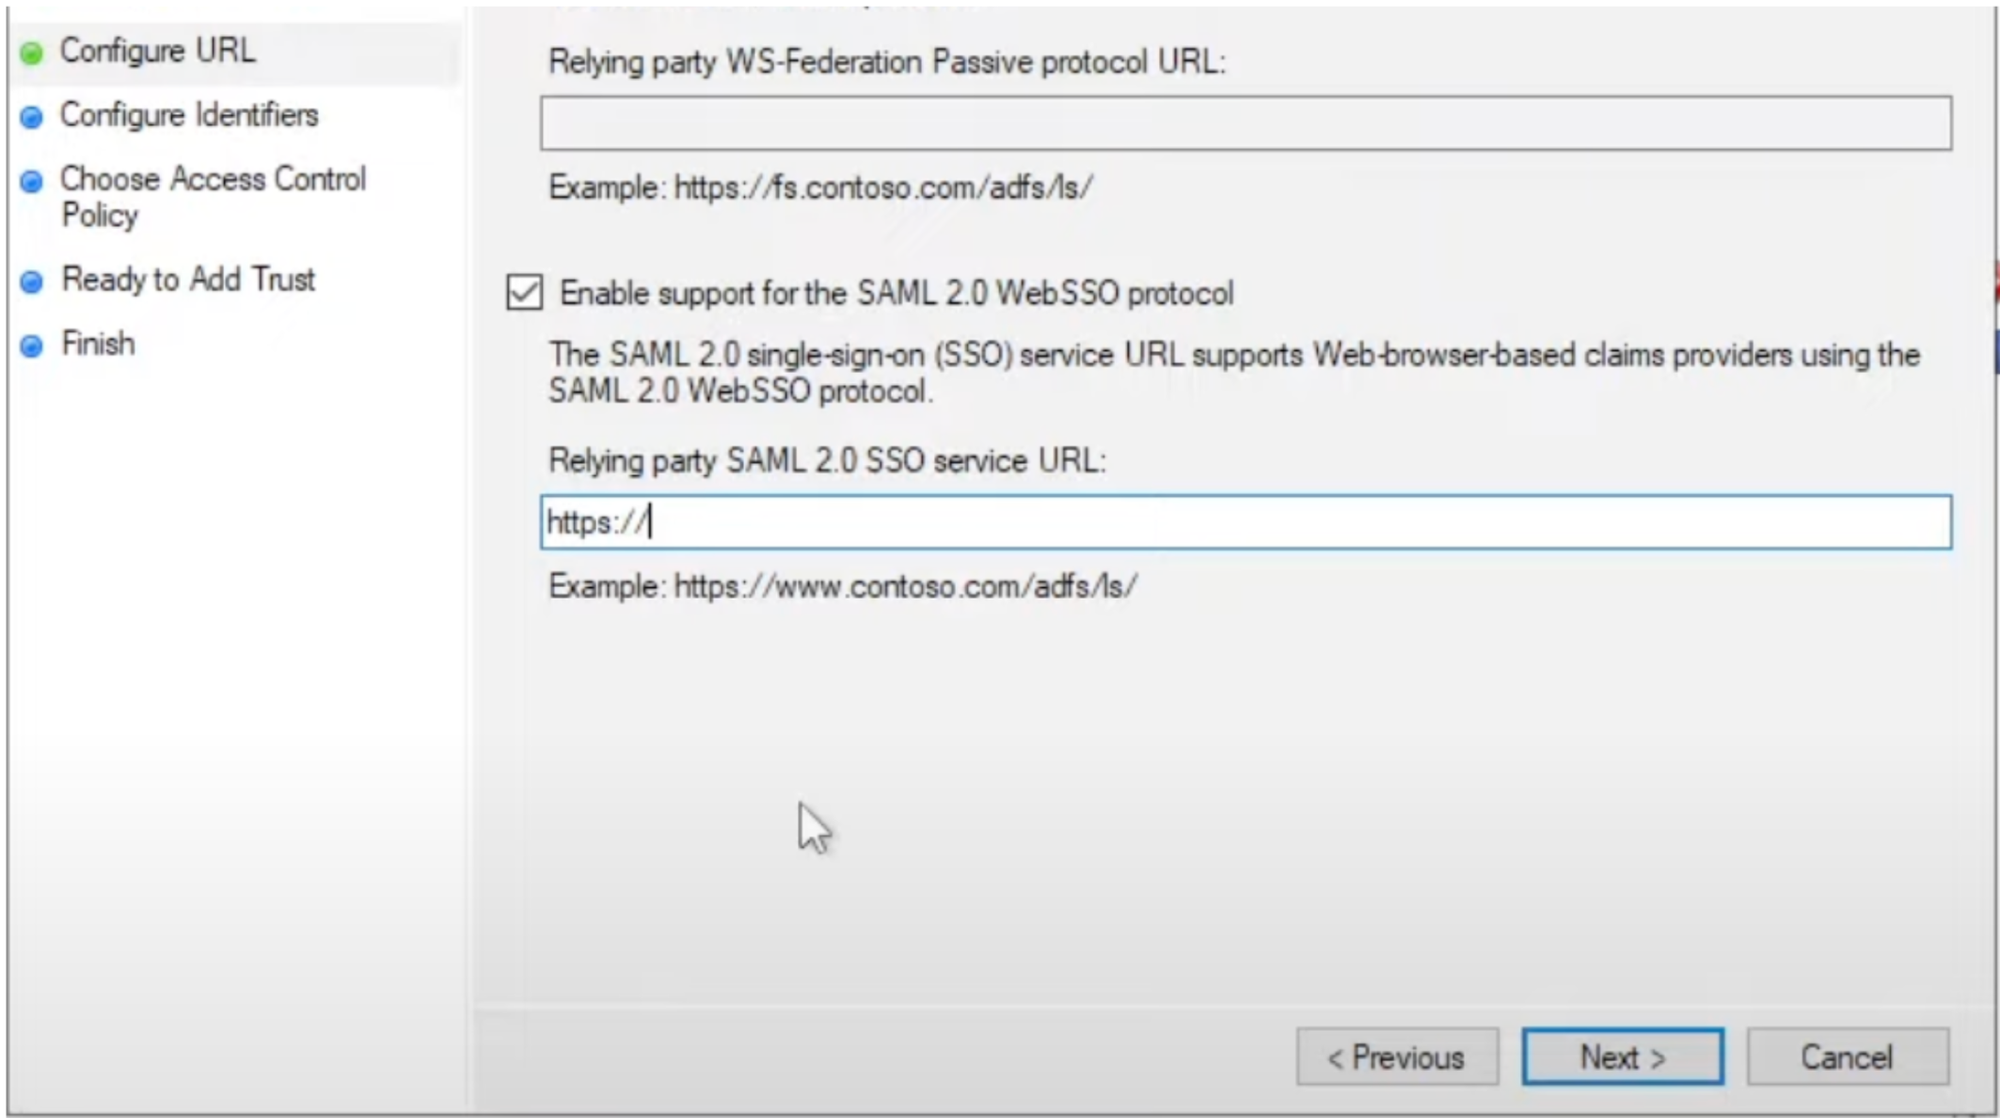
-
-
Relying Party Trust Identifier: Enter the identifier or entity ID provided by the service provider (SP). This identifier should match the SP’s expectations and is used to uniquely identify the relying party trust. Click Add to add it to the list.
- Idenitifier : www.moveworks.ai
If this is the second Relying Party Trust you are setting up in ADFS for the customer. You might see an issue for Identifier Duplications.
In this case you should change the Identifier to be www.moveworks.com
- Idenitifier : www.moveworks.ai
-
Choose Access Control Policy: In most cases, you can leave this at the default setting. These rules control which users are allowed to authenticate to this RPT.
- Select Permit all users to access this relying party, then click Next and review your settings
-
Ready to Add Trust: Review your settings. If everything looks correct, click “Next” to create the RPT. This completes the steps for creating a Relying Party Trust.
Setting up Claim Rule
Next, you’ll create rules, or assertion claims, for your relying party trust – in this case, Moveworks only receives the outgoing claim type attributes and values, so the list of attributes might look different
-
With the RPT now created, you need to configure claim rules. In the “Relying Party Trusts” section of the ADFS Management Console, right-click on your new RPT and select Edit Claim Rules….
-
The Edit Claim Rules for the RPT window will appear. Here, you can add, edit, or remove claim rules as needed. These rules determine how attributes from your Active Directory are transformed into SAML assertions for the service provider.
-
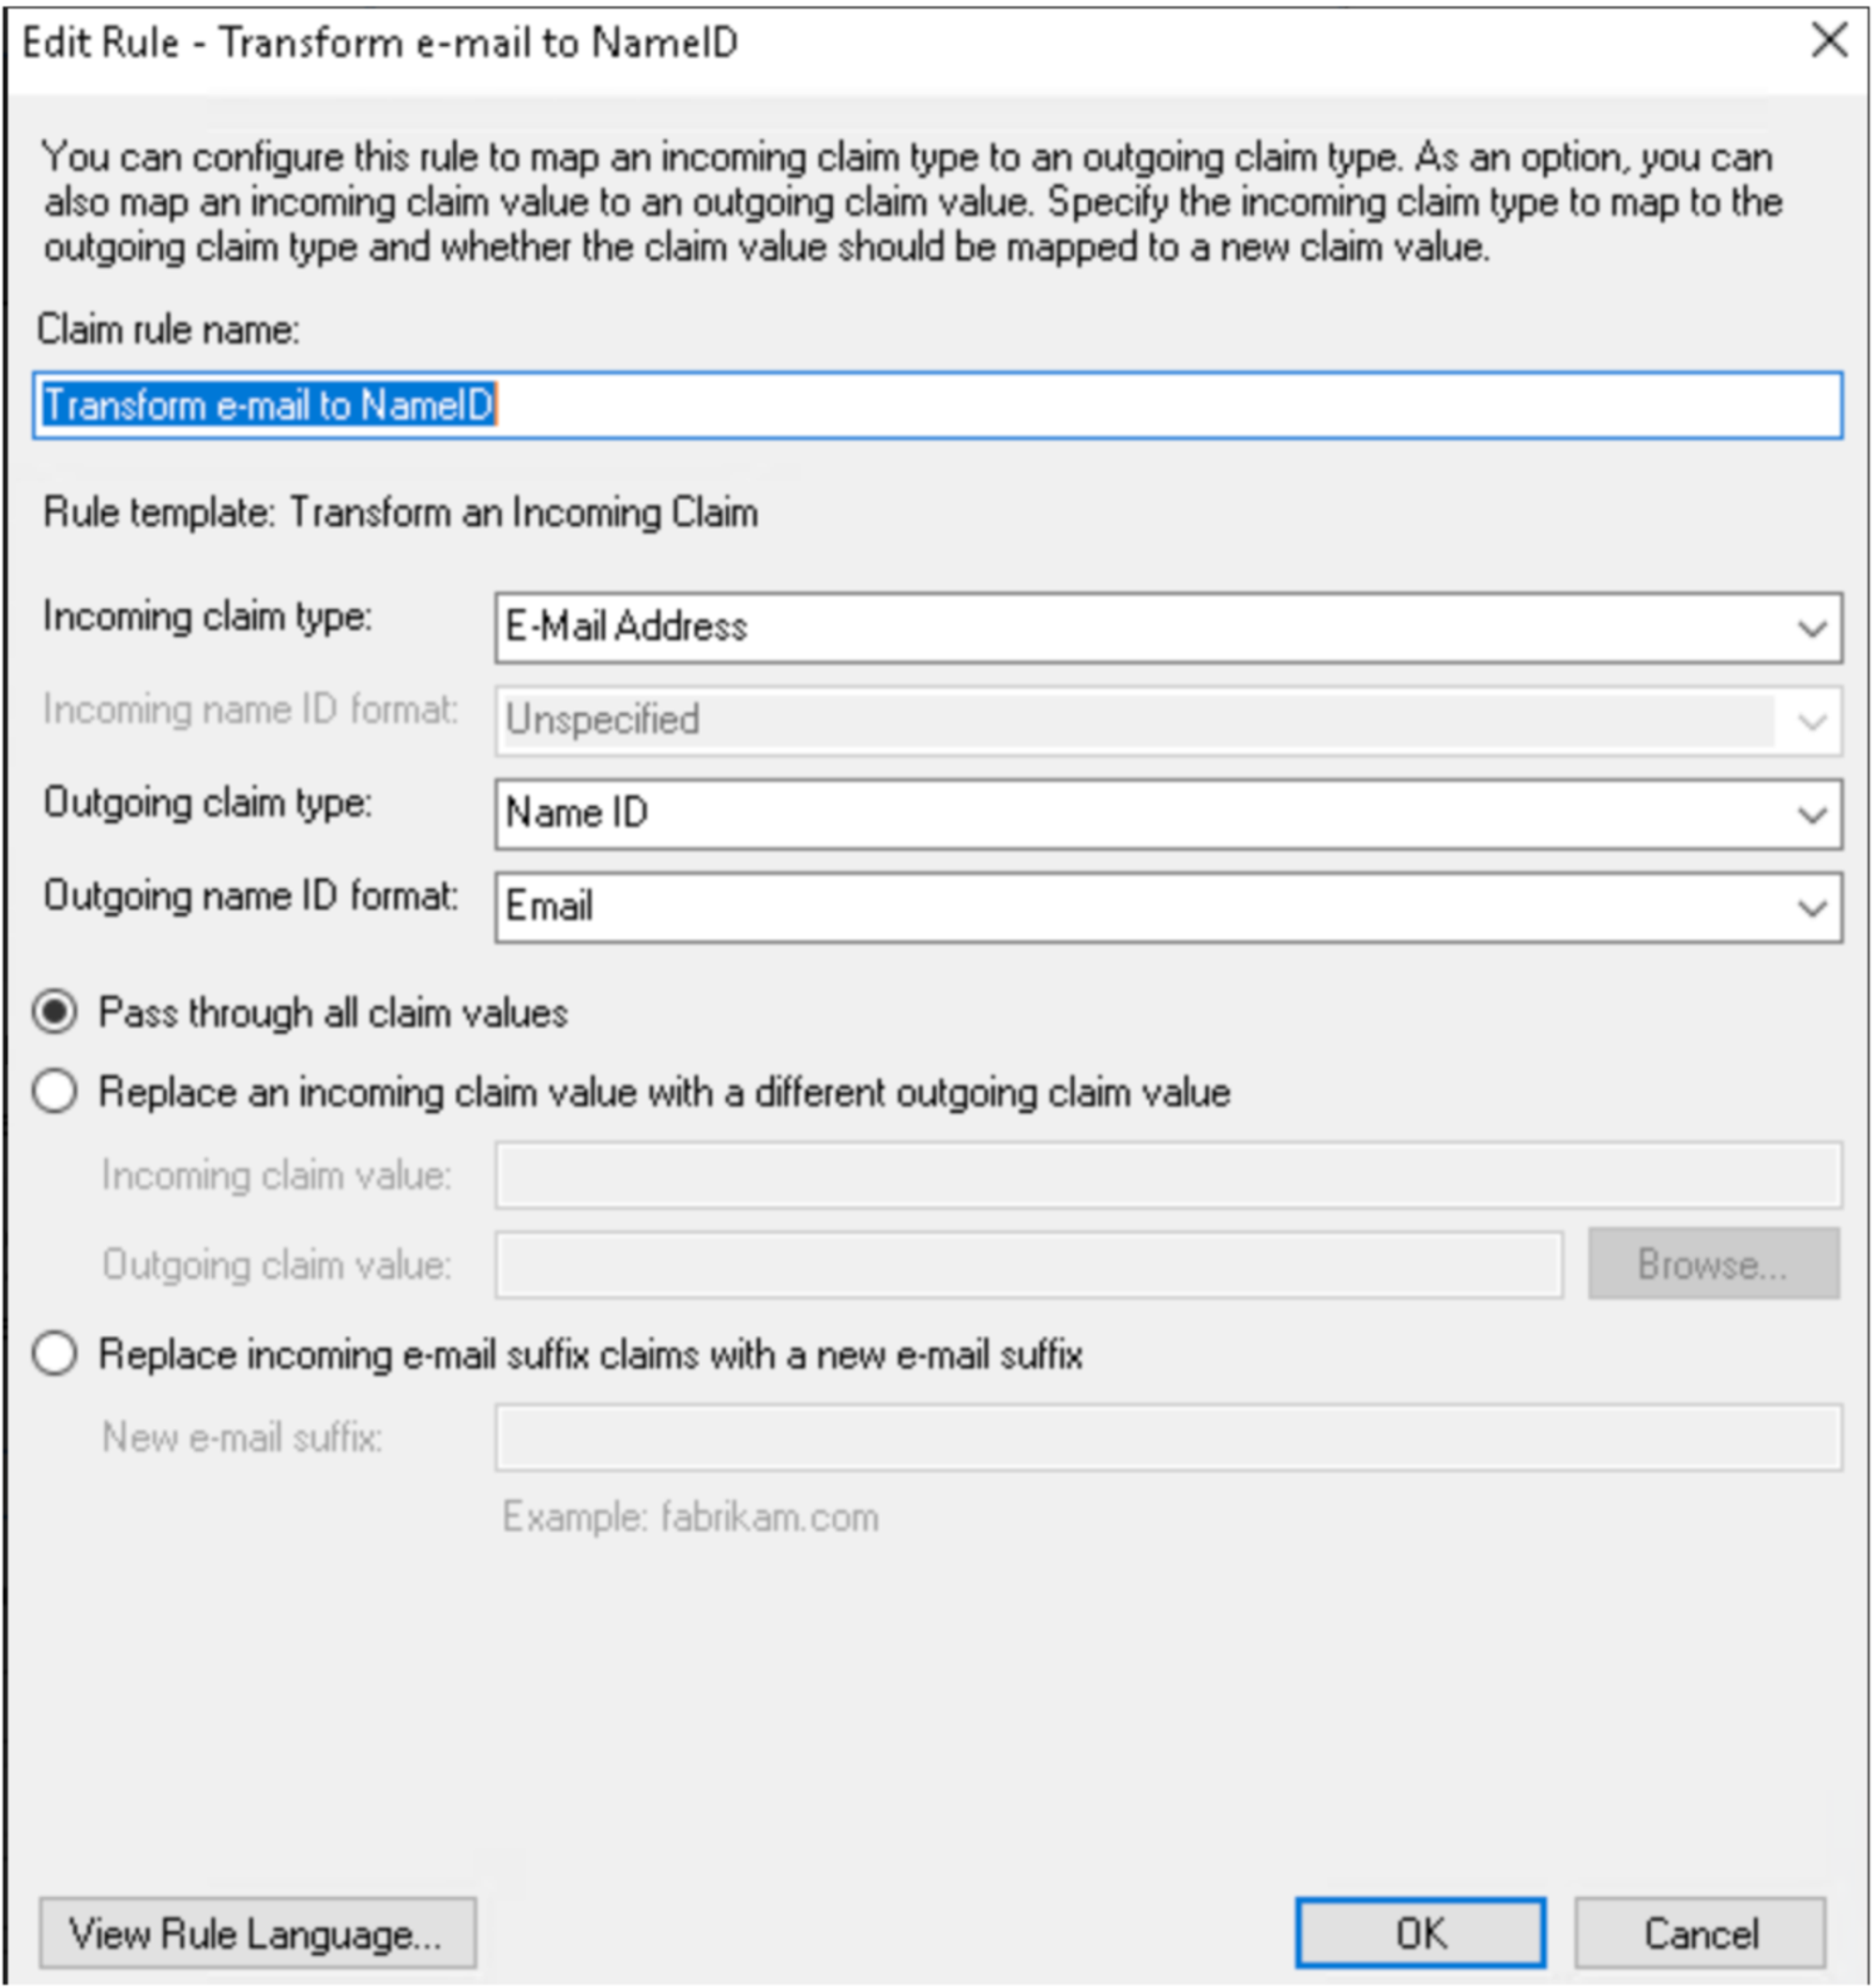
Add Rule: To add a new rule, click “Add Rule…” and follow the wizard. You might create rules like “LDAP Claims” or “Transform Email Address.”

-
Create Rule: Transform email to NameID.
-
-
In the “Add Transform Claim Rule Wizard,” select “Send Claims Using a Custom Rule” and click Next.
-
Enter a name for the claim rule (e.g., “RelayState” which is the org_name in this case) and configure the custom rule.
ADFS Certificate Generation
-
From ADFS’s Encryption tab, copy your entire token-signing x.509 certificate and paste it in the Public certificate field.
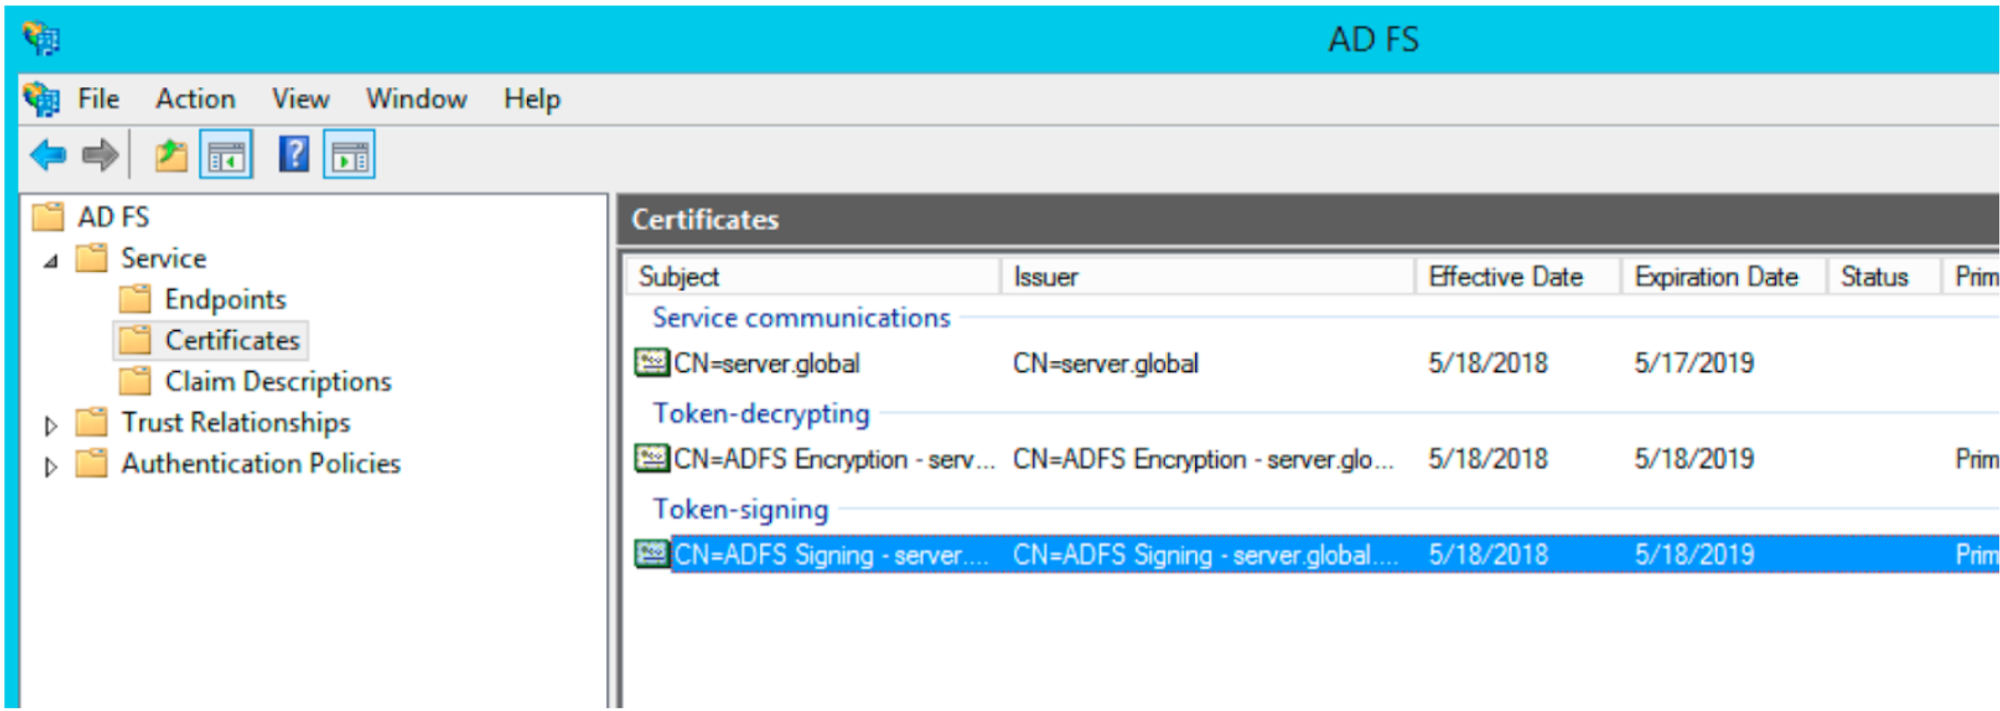
This Certificate will be used when setting up the SSO Config on the Moveworks end.
Setting up the Embedded AI Assistant script on the ADFS Server
Enabling the IDP SignOn Permissions
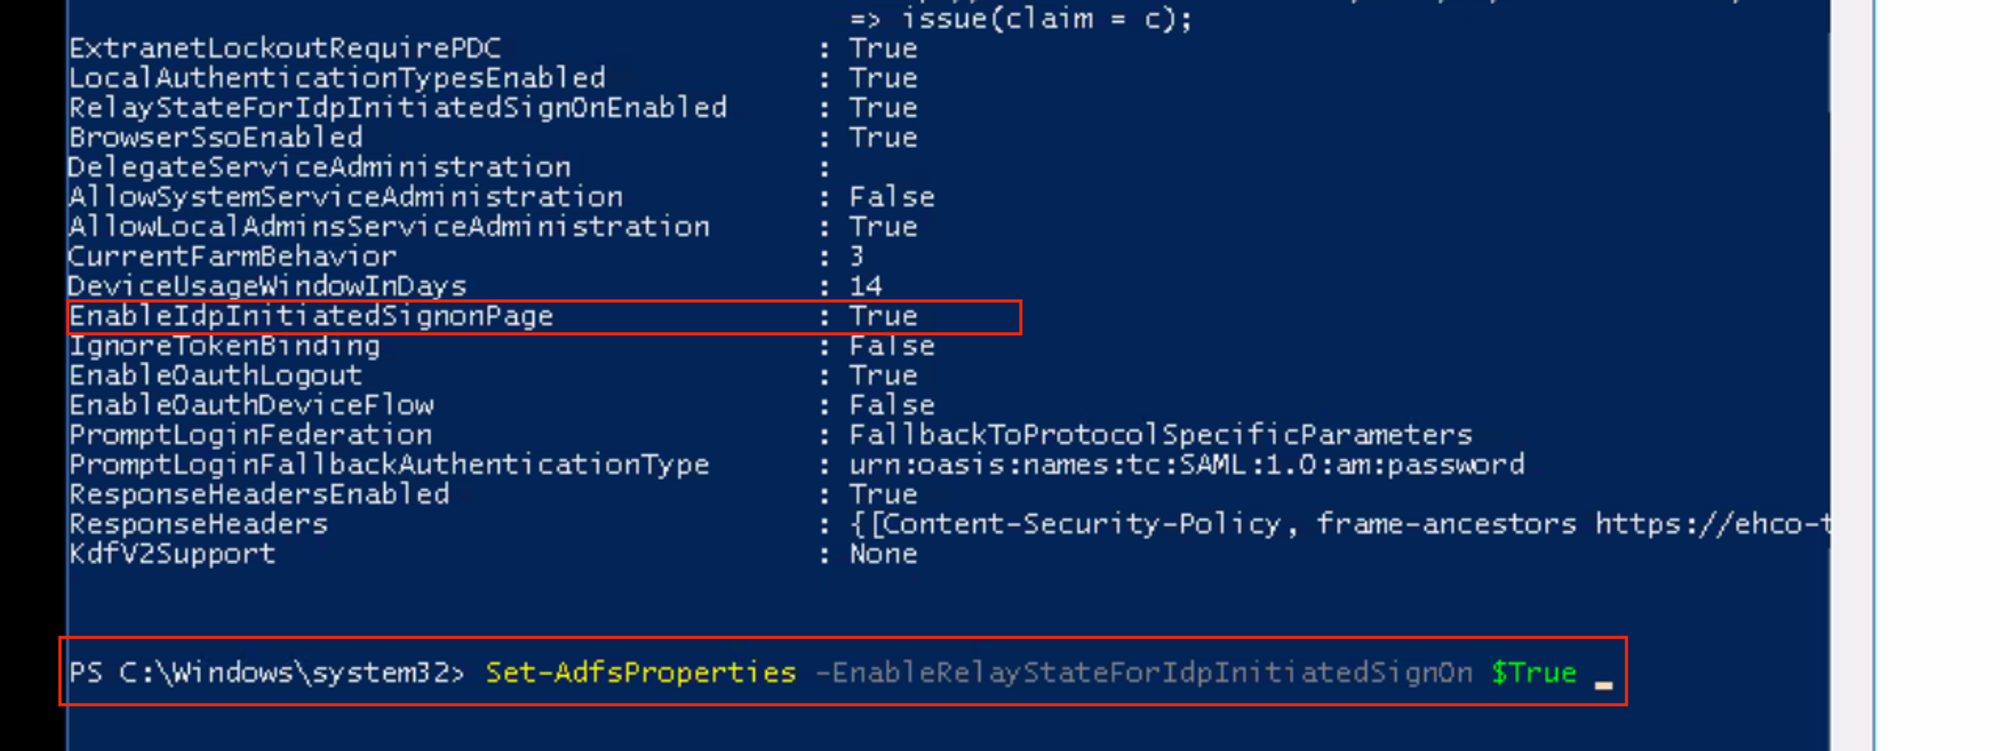
- We need to ensure that a Relay state is setup and it has the permission from the ADFS end to allow IDP initiated Sign On for Moveworks to receive the SAML call.
- The configuration on the ADFS end is controlled by 2 permissions which we will need to set up.
- Start by having the ADFS stakeholder (on the customer end) log into the ADFS Server and run the below command, this will allow the relayState parameter to pass the data from the Script to the IDP. Reference Doc
- We also need to ensure in the config of the ADFS Server we have set the IDP Initiated Sign on as True.
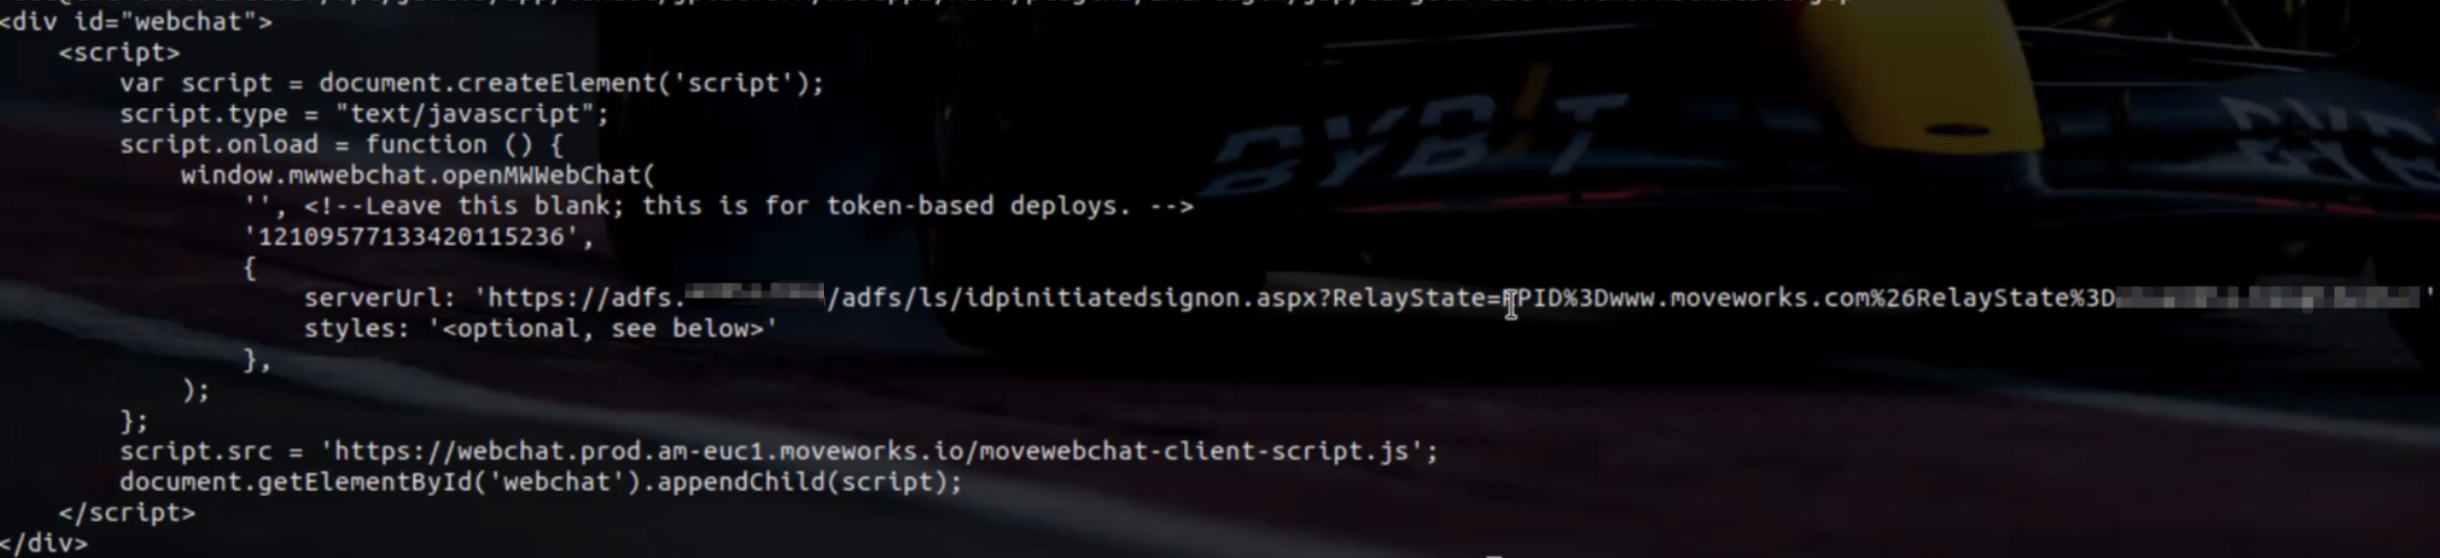
Setting the Script in ADFS Server
The Script content in the case of ADFS differs because here we need to add the RelayState and the RPID as part of the Server URL. Here is the Documentation Link for reference on how these are structured.
Generating the right link can be a bit challenging at time. You can use the following ADFS Relay state Generator to help with that https://jackstromberg.com/adfs-relay-state-generator/
Essentially the Structure of the Server URL will be as follows (Example):
- IDP Sign on URL : This will be your ADFS instance e.g:
https://adfs.company-vd.com/adfs/ls - Identifier in RP:
moveworks.com - Org Name: Your Moveworks Org Canonical Name
Example of how this will look on the Server:
Create SSO configuration in Moveworks Setup
- Within Moveworks Setup, navigate to Single Sign-on (SSO)
- Click create to create a new SSO configuration
- Input the following details:
- Moveworks Product: Movewebchat
- Select Connector: Moveworks
- Authentication Protocol: SAML
- IDP Sign On/ SSO URL
- IDP Issuer/Identifier ID
- IDP Public Certificate
- Click Submit
Create Moveworks Setup Authentication Configuration
- Within Moveworks Setup, Navigate to Web Chatbot > Authentication and click create to create a new authentication record
- Set Auth Config to Generic SSO
- Set SSO Config to the SSO configuration record you created in the previous section of this guide.
- Set Auth Key to defaultfor single SSO authentication setups. For setups where you have multiple SSO systems users use to authenticate, follow the Multi SSO Configuration Guide
Configure the Embedded AI Assistant
You will need to follow the Embedded AI Assistant Configuration Guide to complete the remaining setup steps if you have not done so already.