
SharePoint Online and OneDrive Setup for Enterprise Search
This page is for the SharePoint & OneDrive (Next Gen) connector for SharePoint Online and OneDrive and it can only be configured within the new enterprise search configuration experience explained below.
Currently, the new experience is only available for SharePoint Online. For SharePoint Server(On-Prem), please reach out to your customer success team.
Please visit this documentation to learn more about Max Capacity and Classic connectors.
System Overview
Microsoft 365’s SharePoint Online is your organization’s hub for sites, pages, and document libraries. From an enterprise-search perspective, it’s a primary repository of institutional knowledge and files that can be indexed to make content easily discoverable across the organization with permissions intact.
OneDrive for Business is each user’s personal file store connected to their organization account, where they can store, access, and sync their individual work files across multiple devices. It is private by default, and files are only accessible to others if the user explicitly chooses to share them.
Moveworks supports both — indexing content from SharePoint sites, so users can search the pages and documents they are authorized to view, as well as live search over the SharePoint Online sites a user has access to, serving content beyond ingestion limits.
OneDrive is currently only supported via live search (with user consent); Moveworks does not index OneDrive data.
Authentication
Authentication is accomplished by creating and registering an Azure App Registration for each of the following approaches.
- Indexing (SharePoint Online only)
- Uses app-only access with certificate-based OAuth (JWT bearer) through an Azure App Registration.
- You upload the cert’s public half to the app, compute the x5t (SHA-256) thumbprint, and provide the private key (PEM) to Moveworks.
- Recommended permission model:
Sites.Read.All- Enables full discovery and the All Sites/All except selected options in Content Selection.
- Lesser-privilege alternative:
Sites.Selected. Choose only if your security policy strictly requires it.- Extra admin steps required: you must grant site-specific access to the app for every site to be indexed and ensure the app can resolve site group visibility for all groups within each permissioned site (so ACLs can be read).
- Content Selection UI impact:
All SitesandAll except selectedare not available; you can only chooseOnly selected sites. Files.Read.Allis still required: webhook registration for near-real-time incremental ingestion depends on it. WithoutFiles.Read.All, webhooks cannot register and ingestions run on a daily schedule (not the typical ~15-minute incremental SLA).
- Live Search (SharePoint Online & OneDrive)
- Uses delegated OAuth with a separate Azure App Registration and client secret.
- End users sign in and consent the first time; Moveworks then searches only the files they can access in SharePoint and OneDrive.
- No enterprise-wide indexing of OneDrive content occurs.
A single unified connector in Moveworks collects both sets of credentials—one block for Indexing (certificate/JWT) and another for Live Search (delegated).
Permissions Enforcement
Moveworks honors native Microsoft 365 ACLs at all times.
- Indexing: Item- and site-level permissions (including group membership) are captured and enforced at query time—users only see results they’re allowed to view.
- Live Search: Results are retrieved on behalf of the signed-in user using their delegated token, so source-system permissions are inherently enforced.
API Usage
- Moveworks uses the standard Graph API v1.0 and SharePoint REST API to fetch data from SharePoint Online and OneDrive. We use application permissions with admin-granted access for indexing content and delegated permissions for live search.
Content Types
Indexing (SharePoint Online)
- Pages (modern site pages, classic wiki pages and classic publishing pages).
- Documents stored in SharePoint document libraries (including common attachments).
- Supported file formats: doc, docx, pdf, ppt, pptx, txt, html, aspx(pages)
Indexed pages and documents with no extractable text content are excluded from ingestion and will not appear in Moveworks search results. This includes image-only PDFs, scanned documents without an OCR text layer, and pages or documents with no written body content.
Ensure that content you want to be searchable contains readable text rather than purely image-based or blank content.
Live Search (SharePoint Online & OneDrive)
- On-demand results from the signed-in user’s accessible SharePoint sites/libraries and their OneDrive files/folders. It includes Pages, Documents, Lists etc.
- Not indexed into the enterprise corpus; fetched at query time after user consent.
Coverage & Freshness
Moveworks delivers comprehensive coverage—content, metadata, identity, and permissions—and uses incremental updates for indexed content.
- Webhooks allow near-real-time incremental updates; registering them requires
Files.Read.All. - Without
Files.Read.All, webhooks cannot register and updates are performed on a daily schedule.
Max Capacity always auto-generates this system’s permission configuration. It also auto-generates the user identity configuration, but only when your organization already has an identity configuration and its joining key resolves to an email address (the joining key is the email itself, or a non-email key such as an employee ID is mapped to the email field of your primary identity source). If either condition is not met, only the user identity configuration is skipped — your Max Capacity setup is not blocked. User identity is a separate, independent configuration you can complete before or after connecting this system. See Configure User Identity.
Permission Requirements
Moveworks requires the following permissions to index SharePoint content and enforce access controls. All permissions are read-only — Moveworks never modifies content in your SharePoint environment.
These permissions are registered in an Azure App within your own tenant. Moveworks accesses only what the app is authorized to read, and only content each user is permitted to view is surfaced in search results.
SharePoint Indexing
Alternative: Sites.Selected — If your security policy does not permit Sites.Read.All, you can grant Sites.Selected on both API groups instead. This restricts Moveworks to specific sites you authorize. Trade-off: the All Sites and All except selected content scope options are unavailable. Files.Read.All is still required — webhook registration for incremental sync depends on it.
Files.Read.All is required for incremental sync. Webhook registration depends on Files.Read.All, whether you grant Sites.Read.All or Sites.Selected. Without it, webhooks cannot register, incremental ingestion does not work, and content is refreshed only on a daily schedule.
Group membership visibility is required for indexed permissions. For each SharePoint group used to grant access to indexed sites, the group’s “who can view the membership of this group” setting must be set to Everyone. Otherwise Moveworks cannot read the group’s members, and files permissioned only through that group are not returned for anyone — even though connector validation may still pass. If you cannot set this, manage access to those files through Azure AD groups or other SharePoint groups instead. This applies to the Add Sites (indexing) method only; Live Search runs on each employee’s own delegated access and does not need it.
SharePoint and OneDrive Live Search
Live Search uses delegated permissions — content is fetched on behalf of the signed-in user at query time, so users only see files they already have access to.
Access Requirements
Pre-requisites
Before you get started, make sure you have everything you need:
- Admin roles
- Global Admin permissions to create App registrations, upload certificates, and grant admin consent.
- SharePoint Admin permissions to identify your tenant domain(s) and (if using Sites.Selected) grant per-site permissions.
- Environment details
- Your SharePoint tenant domain(s), e.g., contoso (and contoso-eu, contoso-apc if applicable).
- Cloud environment: Commercial or GOV L4.
- Tools (recommended)
- PowerShell (Windows) with certificate cmdlets, or OpenSSL (macOS/Linux/Windows).
- OpenSSL is installed by default on macOS terminals
- PnP PowerShell if you’ll grant
Sites.Selectedper-site access via cmdlets.
- PowerShell (Windows) with certificate cmdlets, or OpenSSL (macOS/Linux/Windows).
Understanding Permissions Scopes required for Enterprise Search
SharePoint Indexing
Microsoft Graph API Group
- Sites.Read.All - Application Permission which provides access to read all SharePoint Site Content across all Sites. Moveworks requires this access to ingest Files from all Sites.
Note : If your organization does not want to provide access to All sites, you can instead provide Sites.Selected- Sites.Selected - Application Permission which is an alternate option allows you to narrow down Moveworks search to content from only SPECIFIC sub sites in the tenant.
This requires additional setup, Please ensure these instructions are followed if Sites.Selected Permission is being provided. Note: Even with Sites.Selected, Files.Read.All is still required — without it, Moveworks cannot register webhooks and incremental ingestion will not work.
- Sites.Selected - Application Permission which is an alternate option allows you to narrow down Moveworks search to content from only SPECIFIC sub sites in the tenant.
- Files.Read.All - Application Permission which provides access to read File content inside a SharePoint Site. Moveworks requires this access to ingest the Files as well as register webhooks to conduct incremental sync of data.
- Group.Read.All - Application Permission which provides access to read Microsoft AD group details for the files in the SharePoint Site. Moveworks requires this access to ingest Microsoft AD groups in order to respect permissions.
- User.Read.All - Application Permission which allows access to read all user information in the tenant. Moveworks requires this access to ingest user details from the Azure tenant which will be used to respect permissions
SharePoint API Group
- Sites.Read.All - Application Permission which provides access to read all SharePoint Site Content across all Sites. Moveworks requires this access to ingest Files from all Sites. As with the Microsoft Graph API group above, you can instead provide Sites.Selected to narrow ingestion to specific sites — see the note there for the additional setup required.
The Sites.Read.All or Sites.Selected Permission needs to be provided to Both API Groups.
In this approach we will maintain a single Azure Application which will provide access to both SharePoint and Microsoft Graph APIs listed above.
SharePoint and OneDrive Live Search
Microsoft Graph API Group
- Files.Read.All: lets Moveworks read files the user already has access to in OneDrive and SharePoint document libraries, so it can surface relevant results.
- Sites.Read.All: lets Moveworks read site pages and list items the user can access in SharePoint Online.
- User.Read: identifies the signed-in user.
- offline_access: allows Moveworks to store a refresh token so the user doesn’t have to re-consent every time they search.
In this approach we will again maintain a single Azure Application which will provide access to Microsoft Graph APIs listed above but will be a different application than the Indexed one.
Instructions for SharePoint Indexing — App-only with certificate/JWT
1. Register a new App
- Sign in to the Azure portal.
- Select Microsoft Entra ID > Manage > App registrations > New registration.
- On the Register an application page, register an app with the following details
Field Value Name MoveworksSupported account types Accounts in this organizational directory only (Single tenant) Redirect URI Leave this field empty 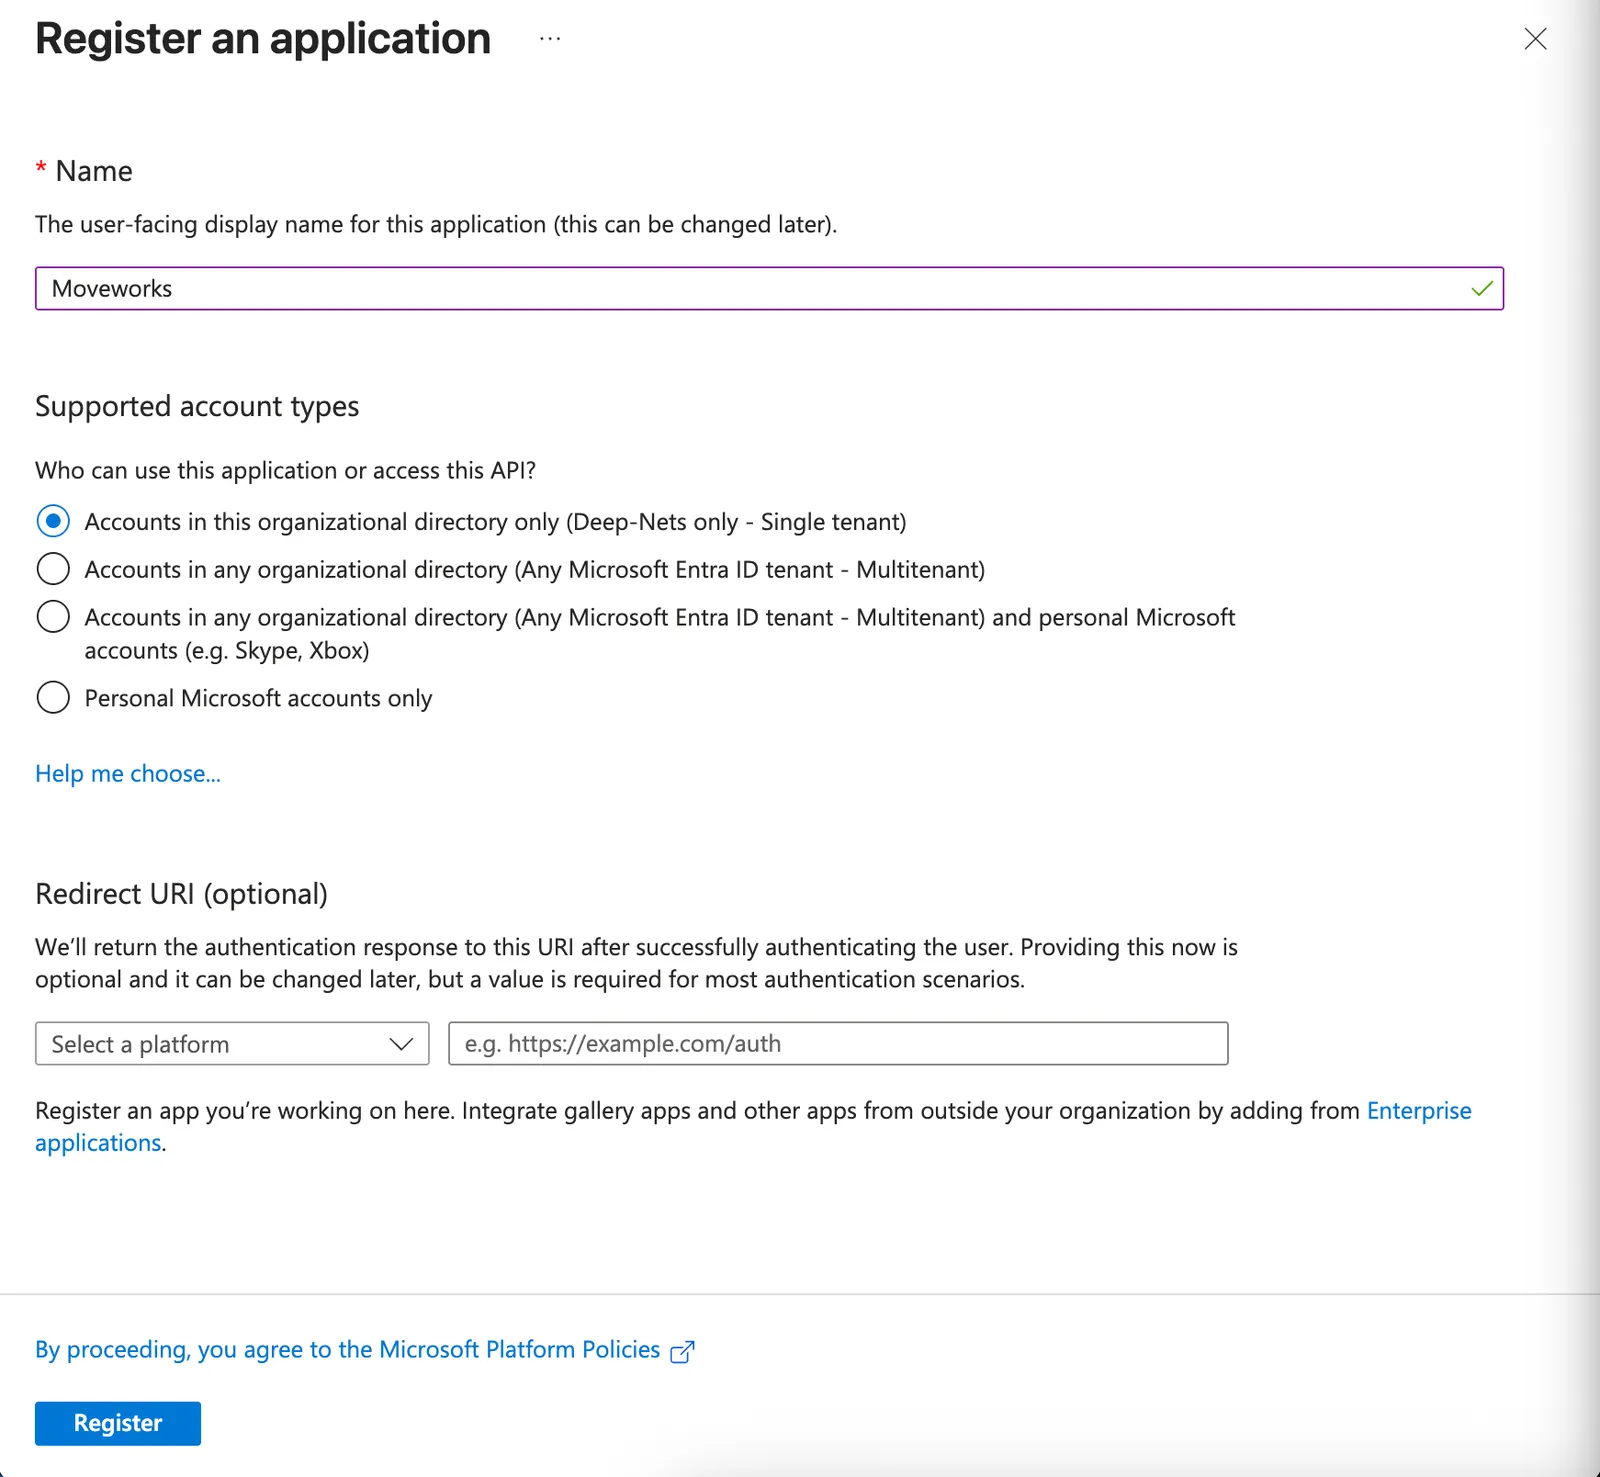
- From the overview page, note down the following values:
- Directory (tenant) ID
- Application (client) ID
2. Add Application API permissions & grant Admin consent
- Open the App Registration you created above and click on Manage > API Permissions.
- Click Add a permission.
- This will open a panel on the right side:
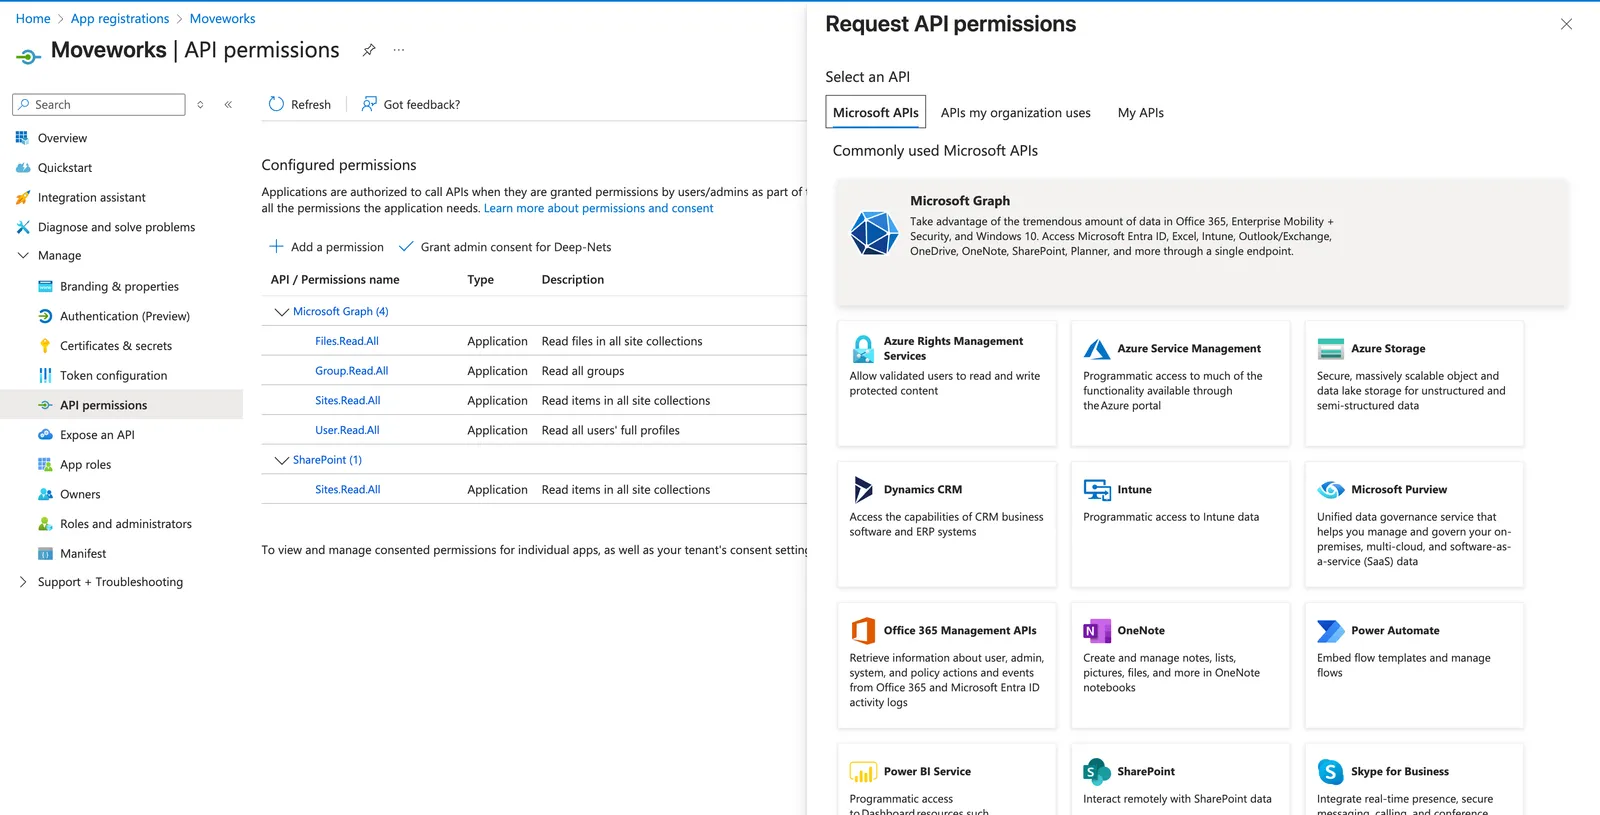
- Select Microsoft Graph.
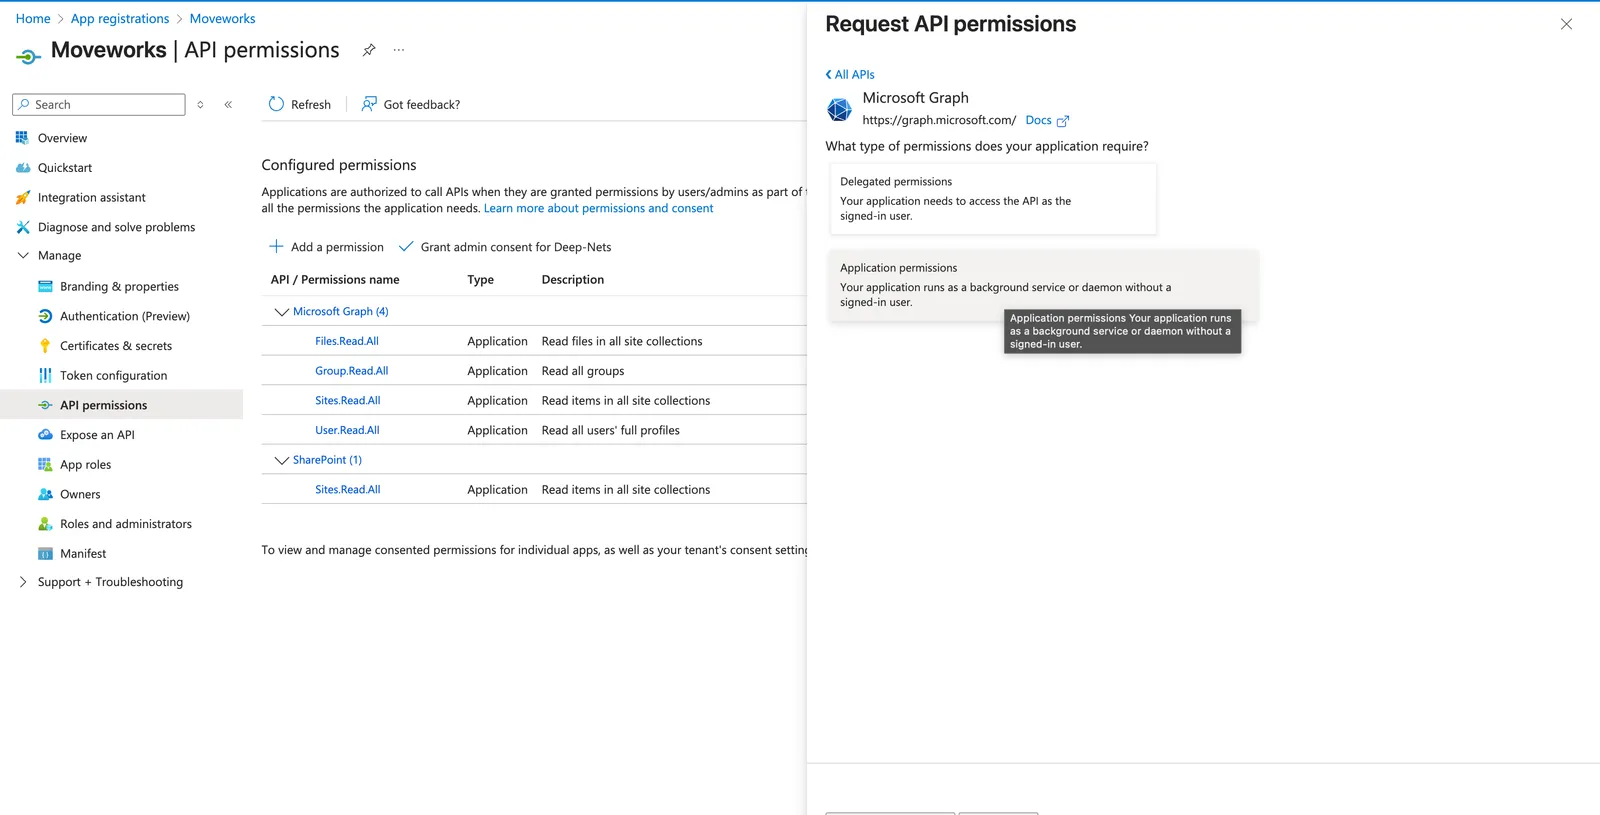
- Choose Application permissions :
- A search bar will appear:
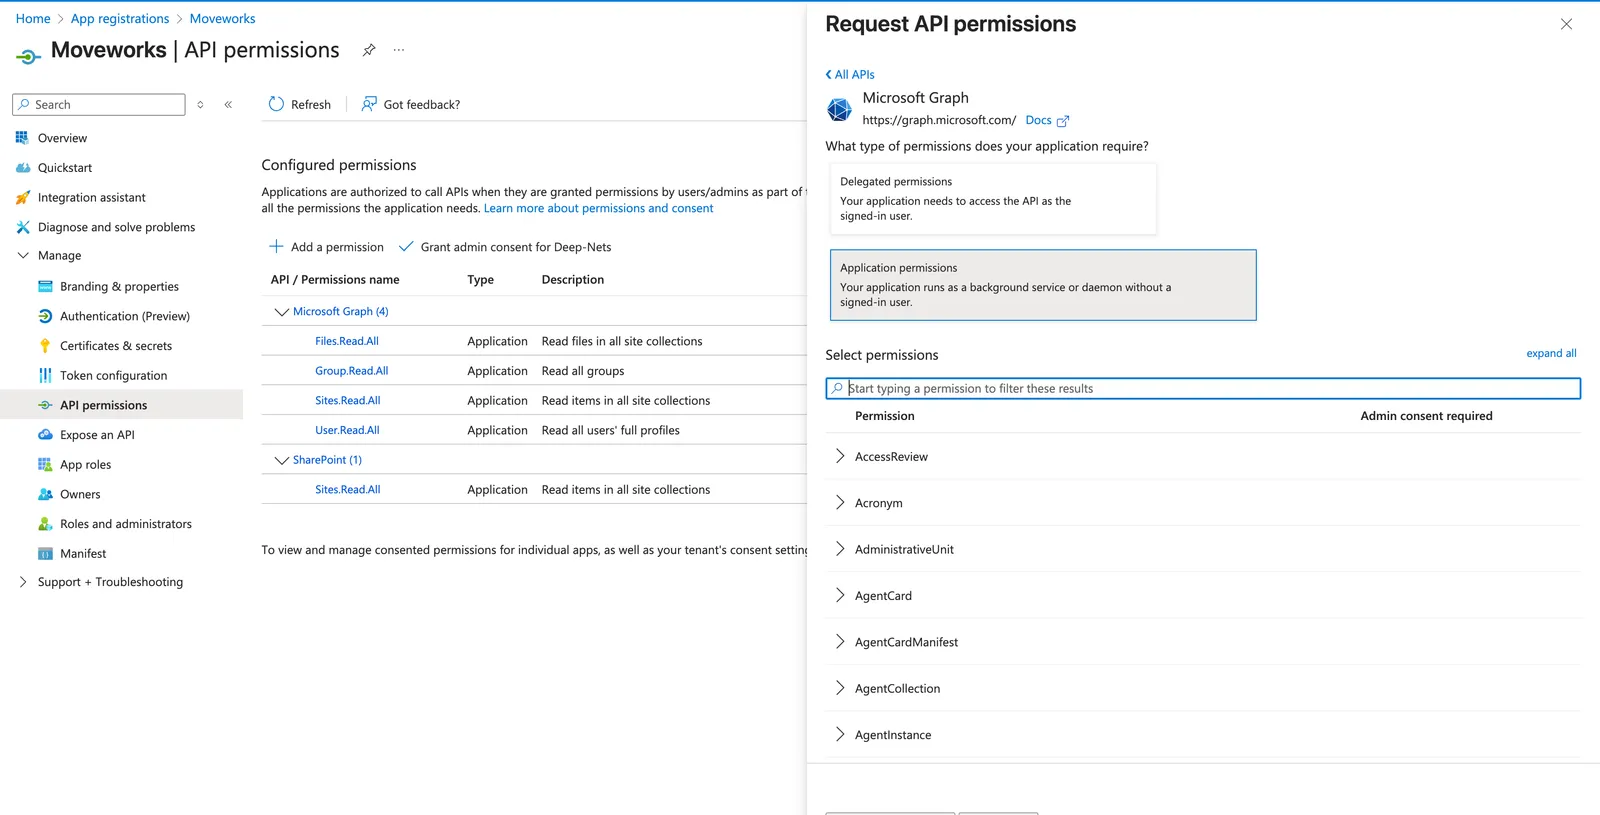
- Search for the permissions you need to grant(noted above) and check the box for each:
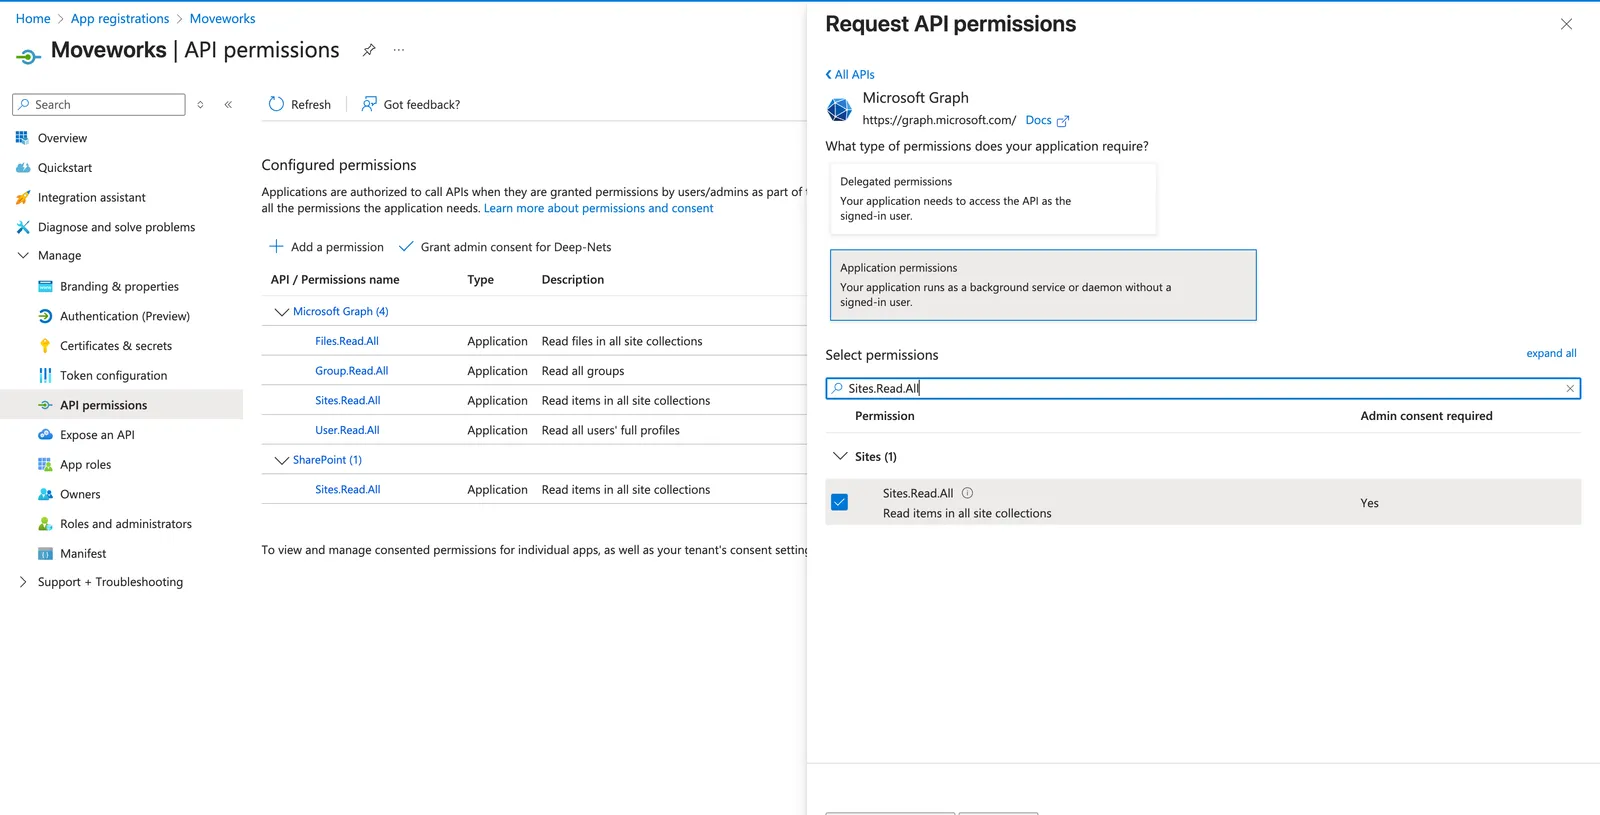
- Once they’ve all been checked, click Add permissions
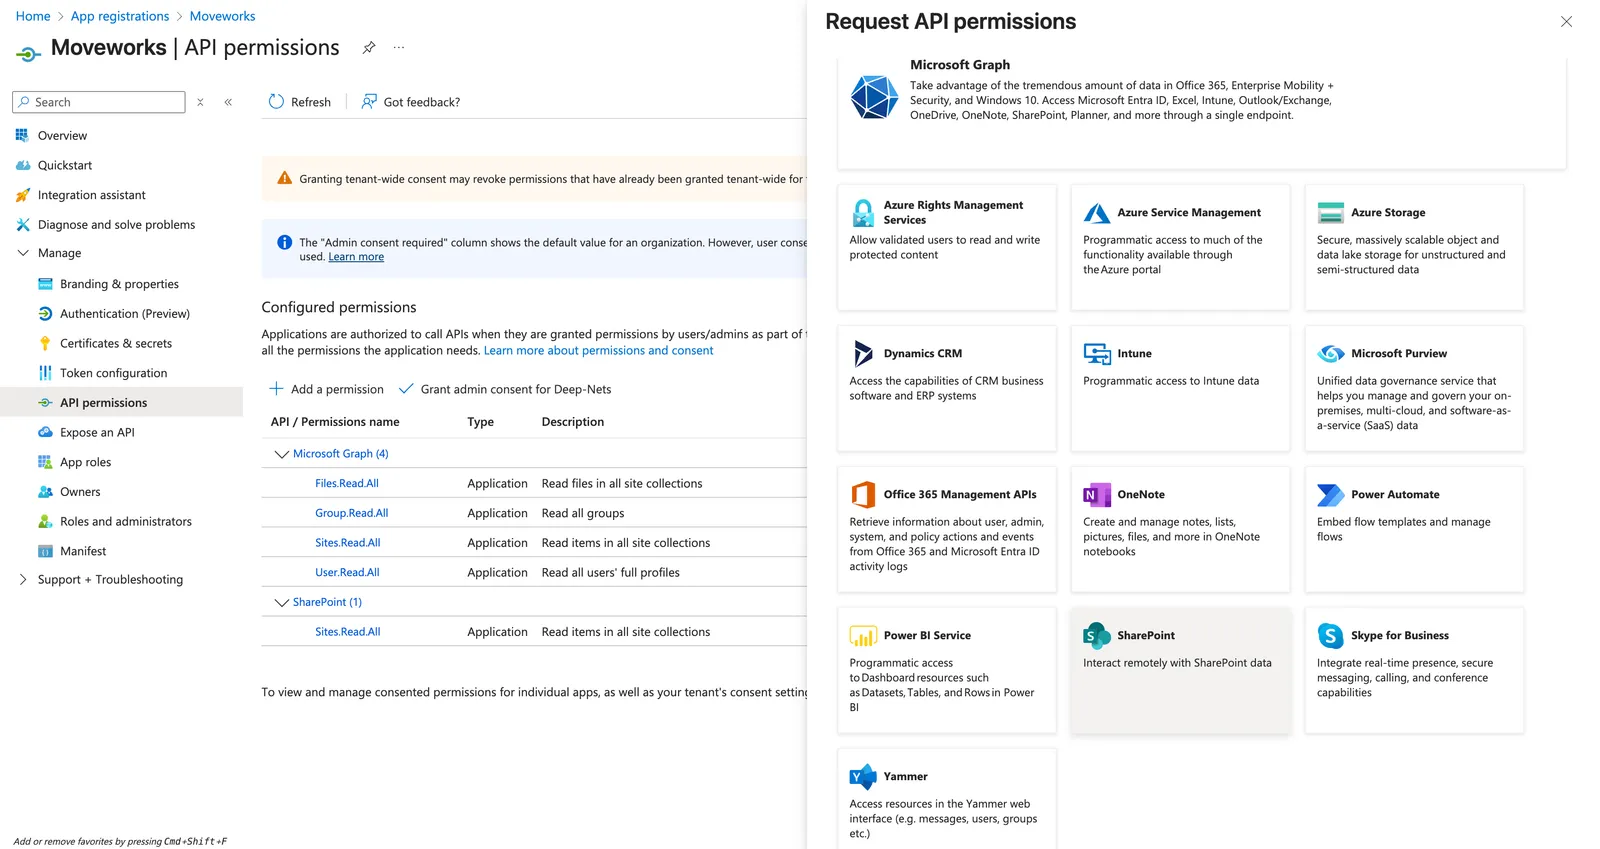
- Repeat the steps again by clicking on Add a permission button and selecting SharePoint.
- Similar to the previous steps, select Application permissions.
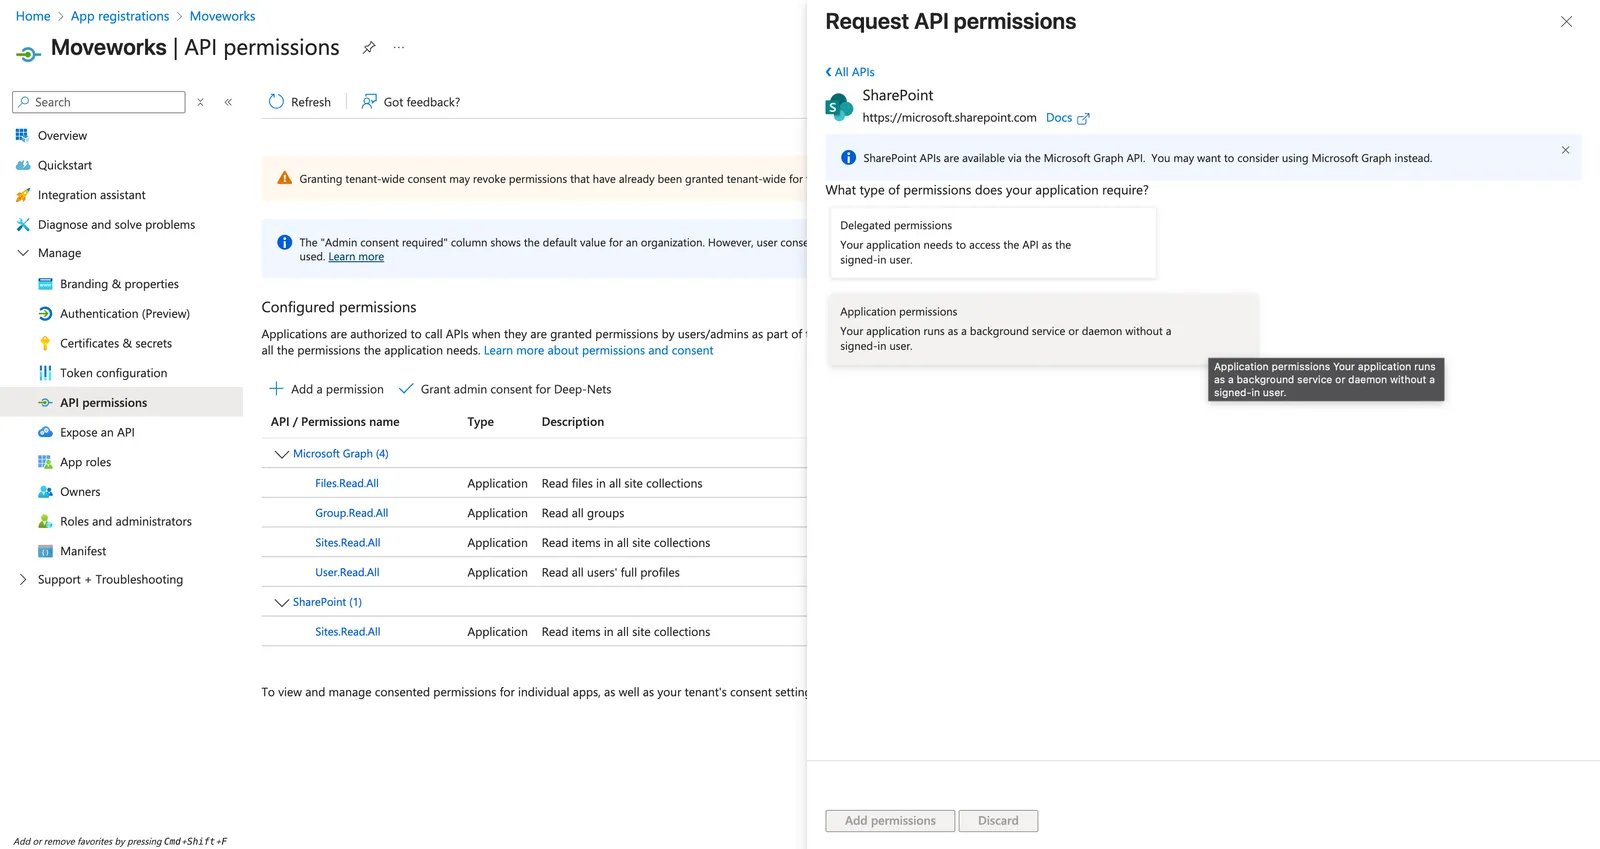
- Select either Sites.Read.All or Sites.Selected based on your requirements (noted above) and click on Add permissions after selecting all scopes.
- You’ll now see all the newly added permissions will have a status of “Not granted for” your organization.
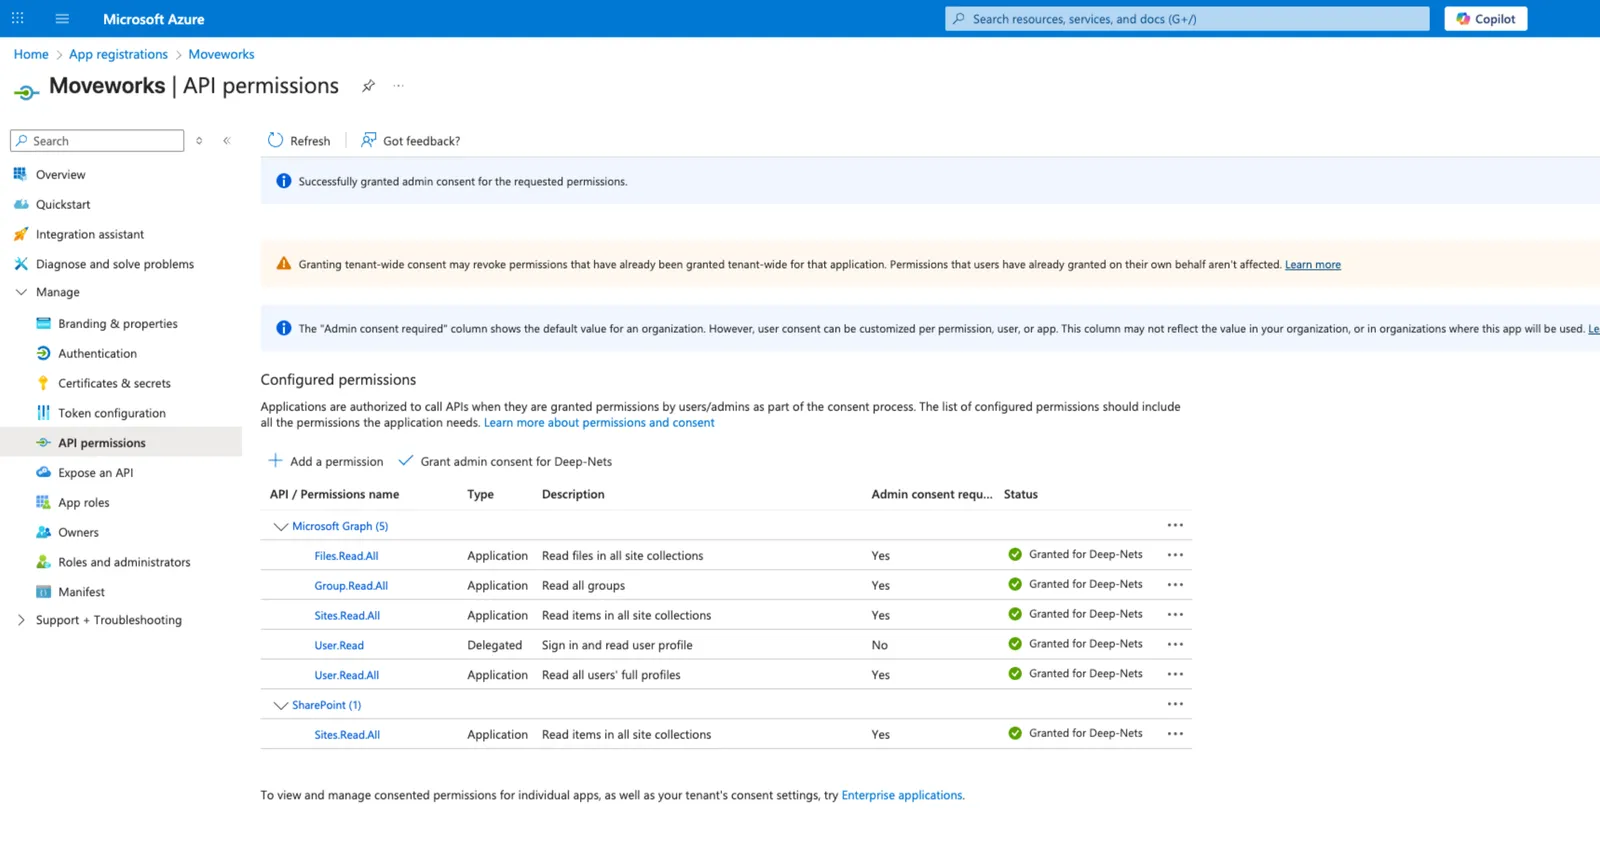
- To complete the process, click Grant admin consent for your organization

- If this panel appears, click Yes, add other granted permissions to configured permissions then Save and continue, then Grant admin consent, and then Yes.
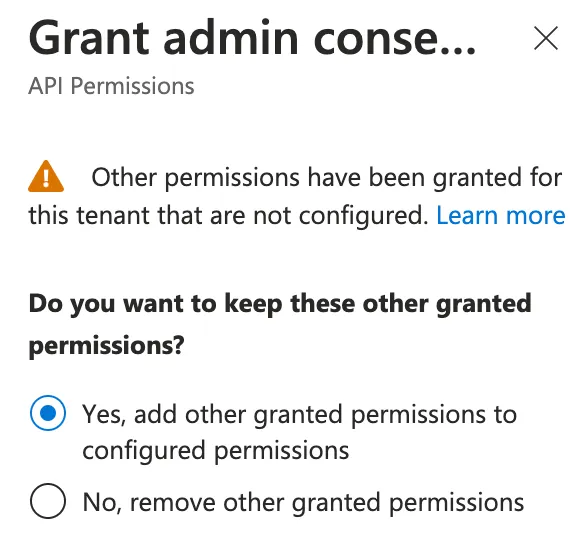
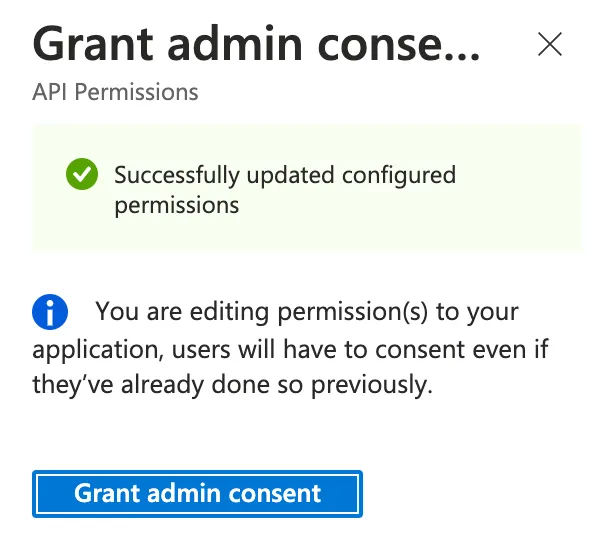
- You will see green checkmarks on the newly added permissions if this was successful.
- Note for all Sites you are trying to configure within Moveworks:
For each SharePoint Group, it must have the following setting in order for members of those SharePoint groups to access the files (unless they have access via another SharePoint Group, or Azure AD Group):- Within “Group Settings”, the setting “who can view the membership of this group” must be set to “Everyone”, in order for Moveworks to read the group members
- If it’s not set, please change the setting, or rely on Azure AD Groups or other SharePoint Groups to manage permissions for those files
3. Generate a self-signed certificate and private key
You need:
- Public certificate (.cer) — upload to the app.
- Private key (privateKey.pem) — uploaded later in Moveworks.
Windows (PowerShell)
- Create a 2048-bit RSA, SHA-256 self-signed cert (exportable) with 2-year validity (replace the CertStoreLocation with your desired location)
- Export the .pfx (choose a password) and .cer
- Export the private key (PEM) from Moveworks.pfx
macOS/Linux (OpenSSL)
- Generate Private key + self-signed cert with 2 years validity
Verify that both certificate.cer and privateKey.pem are generated successfully in the desired location. Open each file, and ensure the files conform to the following formats:
- The certificate file must start with
BEGIN CERTIFICATEand end withEND CERTIFICATE - The private key should begin with
BEGIN PRIVATE KEYand end withEND PRIVATE KEY.- It must not include
RSAin the headers, nor be encrypted.
- It must not include
Store the private key in a safe storage since this will be used later to create the connector in Moveworks
4. Bind the cert to the app
- Navigate to the App you created above -> Certificates & secrets -> Certificates -> Upload certificate -> upload the
certificate.cerfile.
5. Compute x5t (SHA-256)
Windows (PowerShell)
macOS/Linux (OpenSSL)
- Note down the x5t token value from the terminal output
Instructions for SharePoint and OneDrive Live Search — Delegated with client secret
1. Register a new App
- Sign in to the Azure portal.
- Select Microsoft Entra ID > Manage > App registrations > New registration.
- On the Register an application page, register an app with the following details
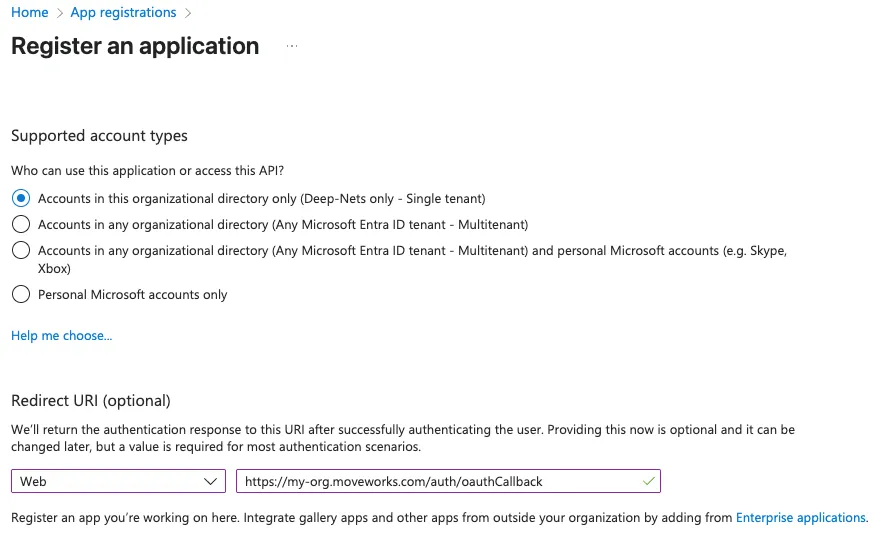
Note:
Ensure the Redirect URI is a Web application, and when specifying the Redirect URI, include your specific sub-domain for MyMoveworks.
https://{org}.moveworks.com/auth/oauthCallback— for US orgsMake sure to replace the
{org}with your specific sub-domain.
If you have a sandbox MyMoveworks environment, please configure an additional URL for that too:
- On the Home page of the Application you just created, click on the Redirect URIs link
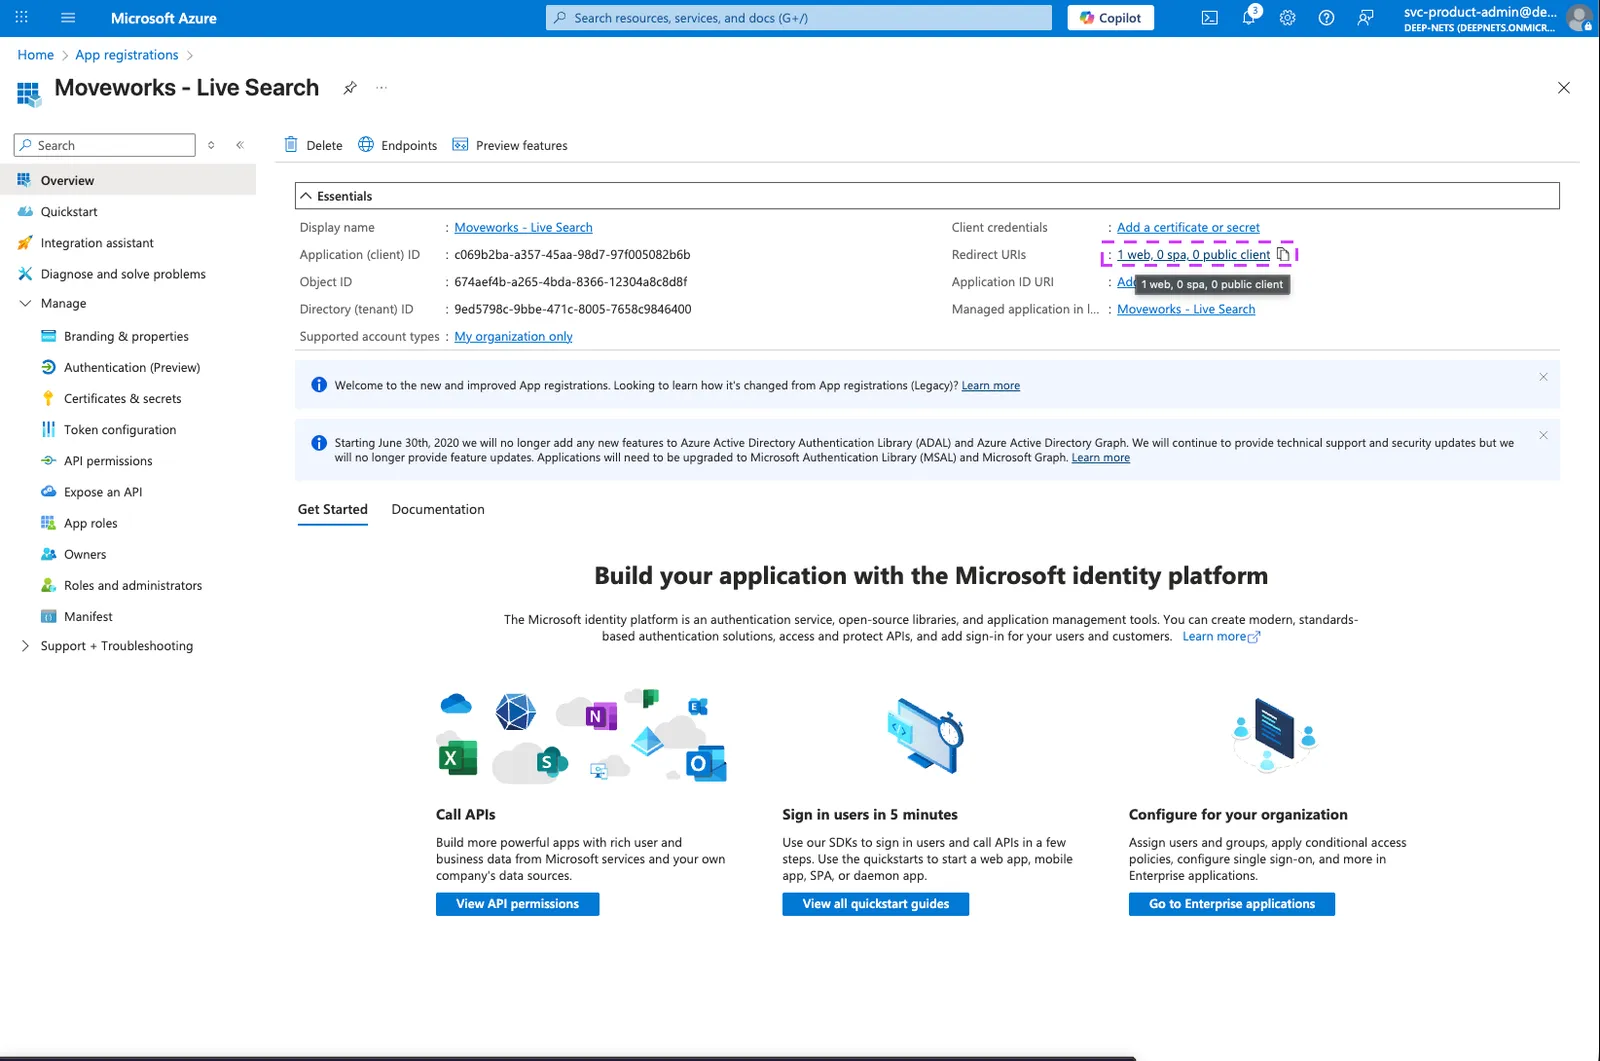
- On the page that opens, click on the Add Redirect URI button to add an additional URI
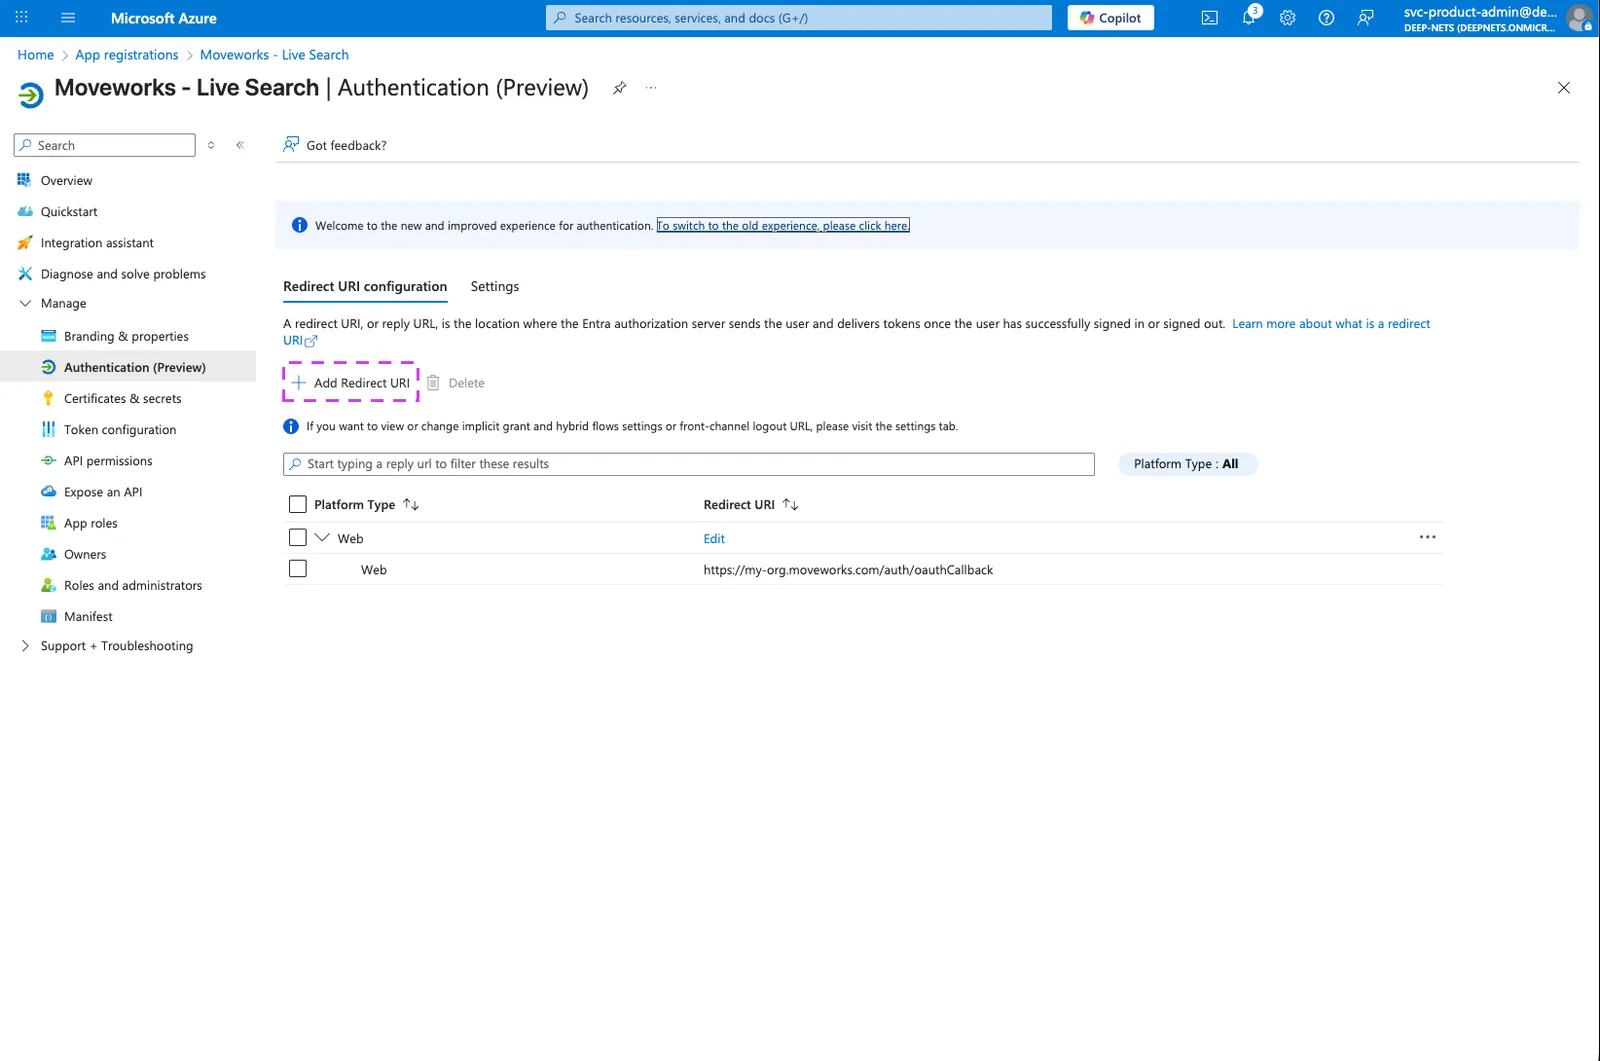
- Select Web
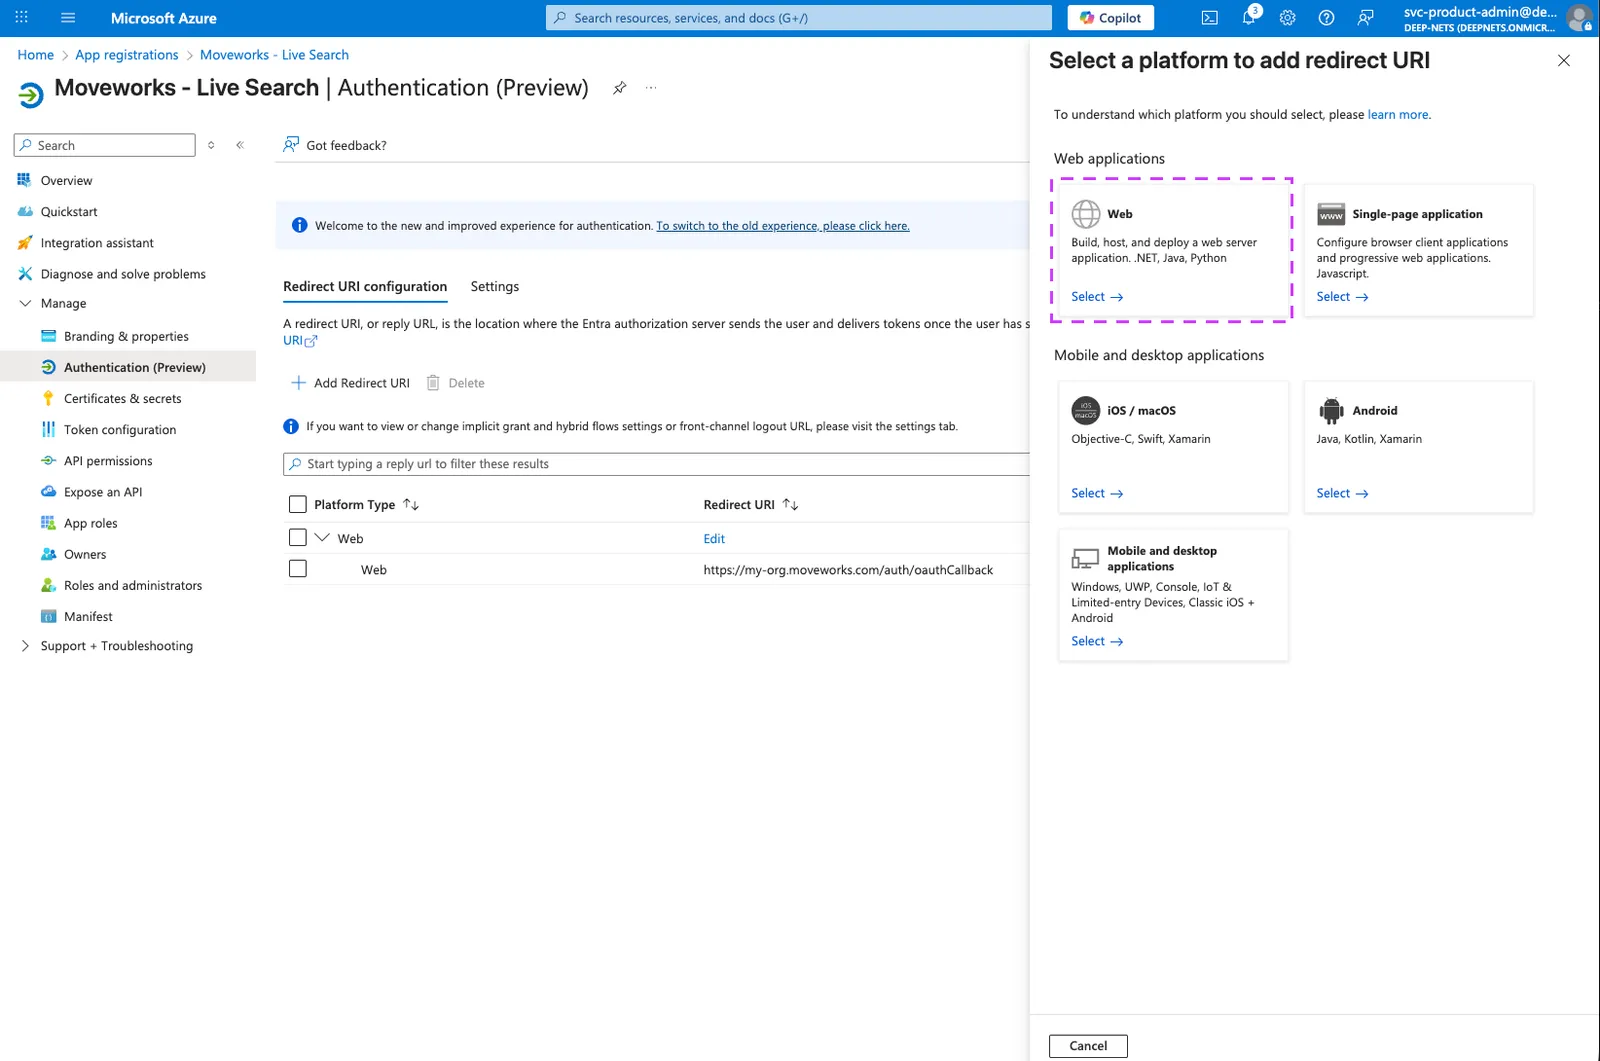
- Enter the URL for your sandbox MyMoveworks environment and click on Configure.
https://{org}-sandbox.moveworks.com/auth/oauthCallback— for US orgs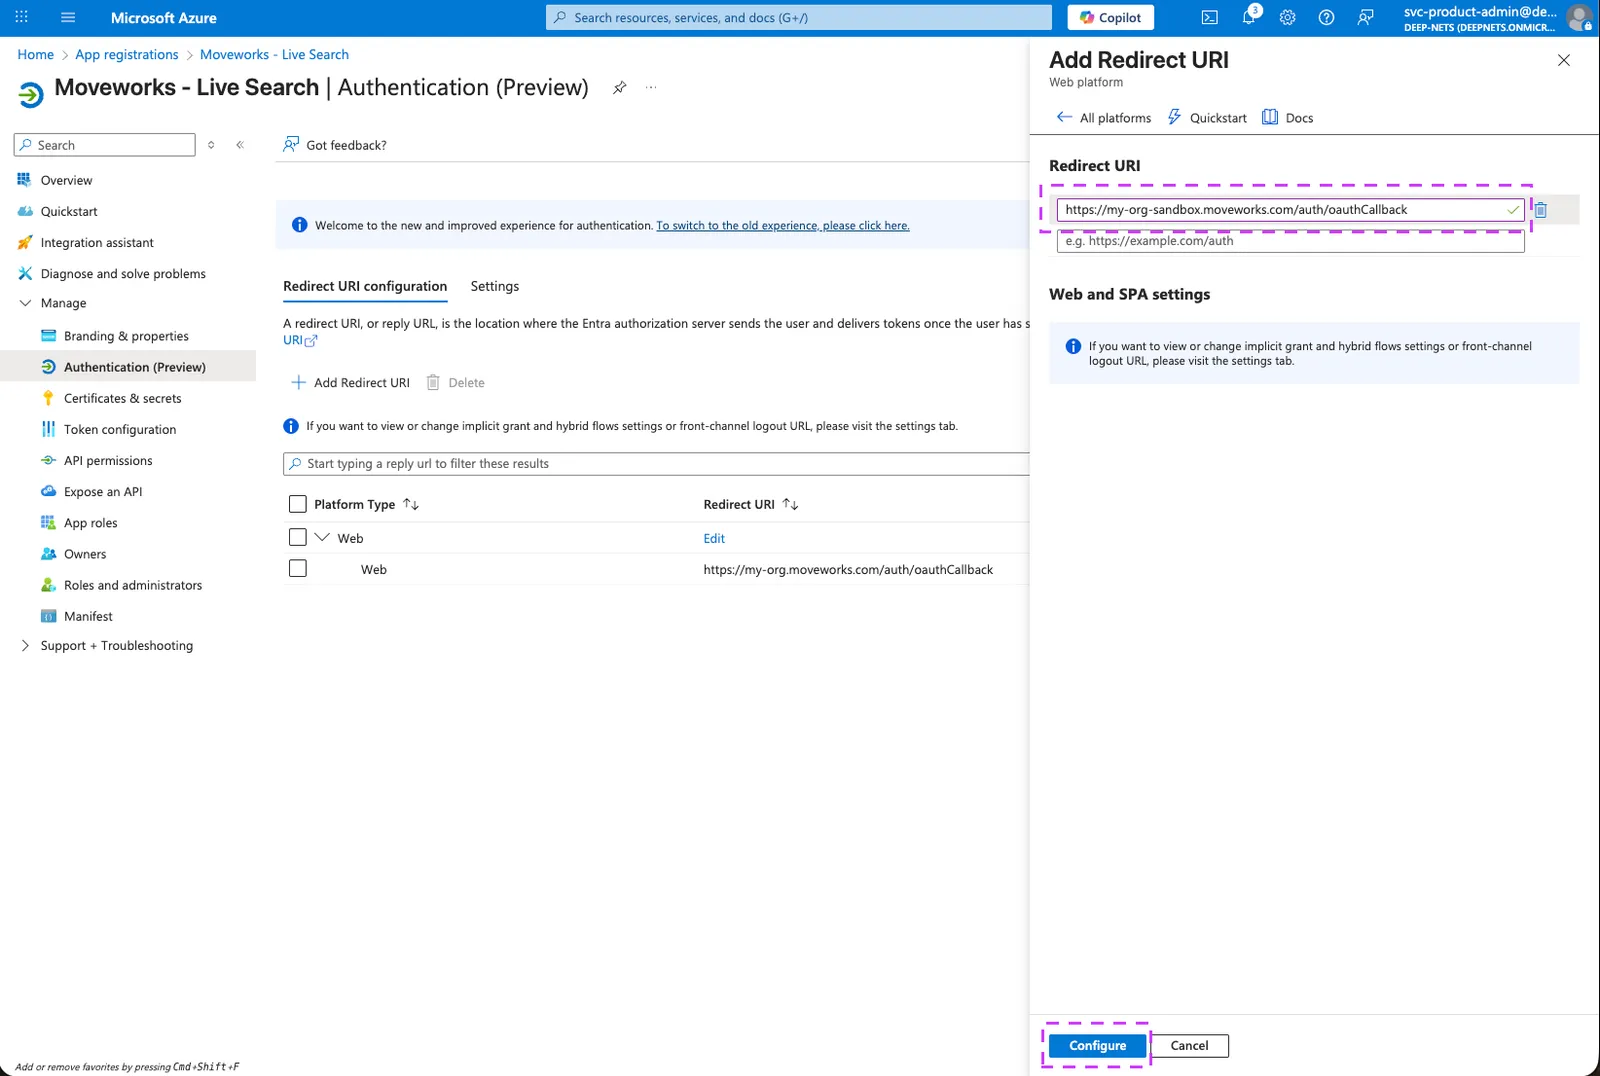
- You should now see both of your MyMoveworks URIs configured on this page.
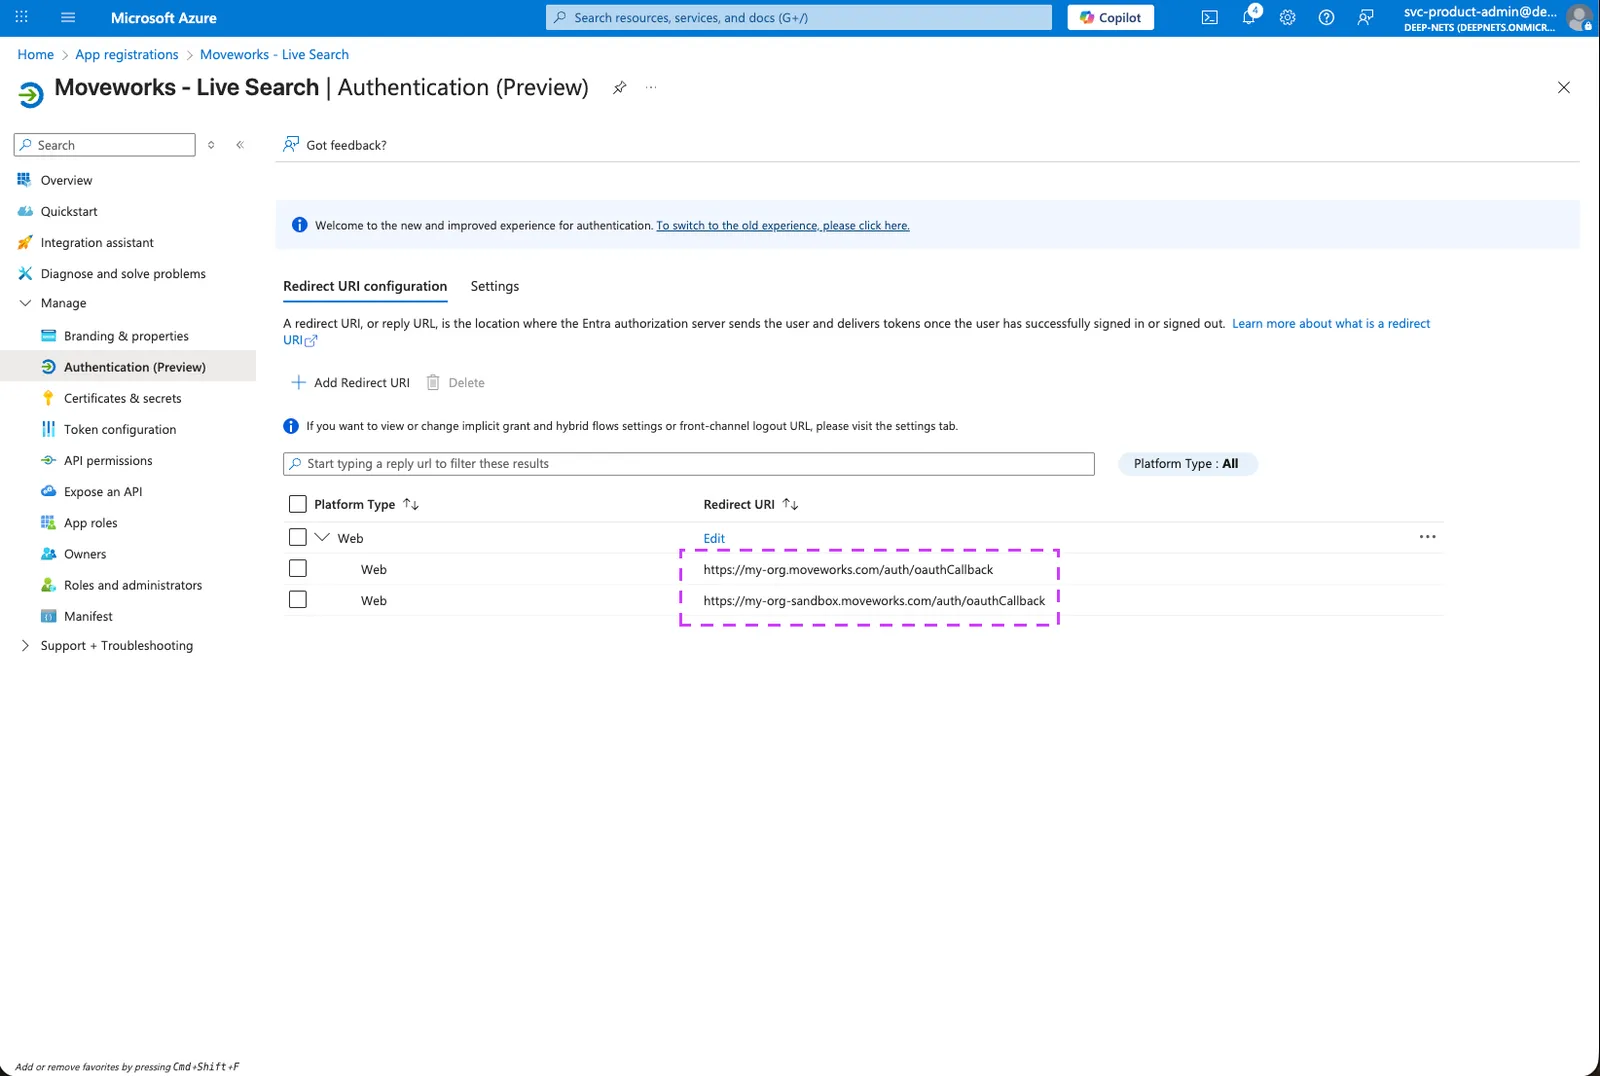
2. Setup API Permissions
- Go to API Permissions to add the required MS Graph Permissions:
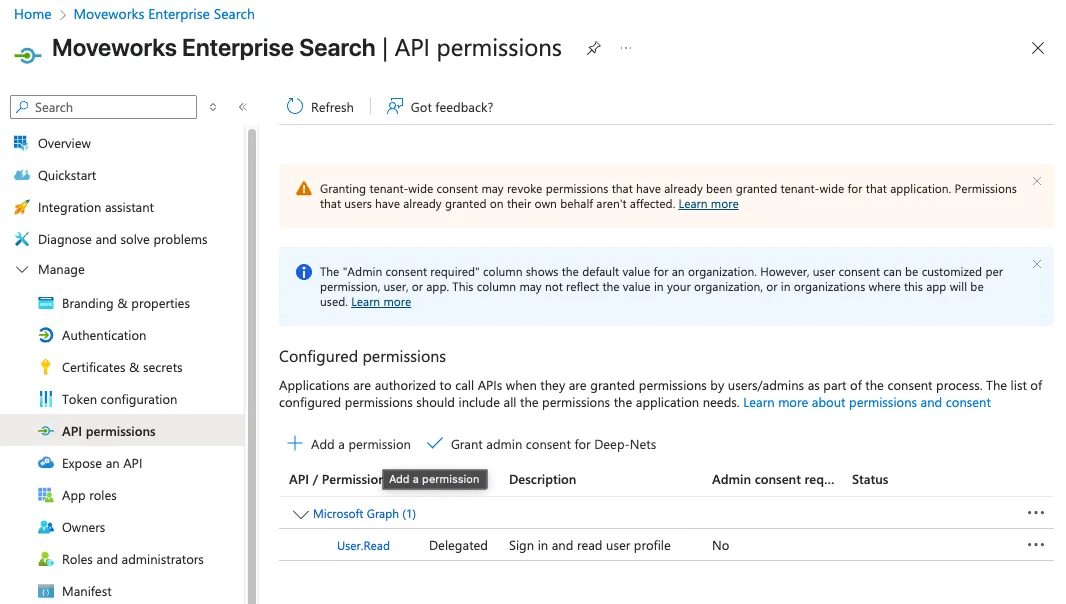
- Click on Add a permission button. This will open a panel on the right side
- Select Microsoft Graph.
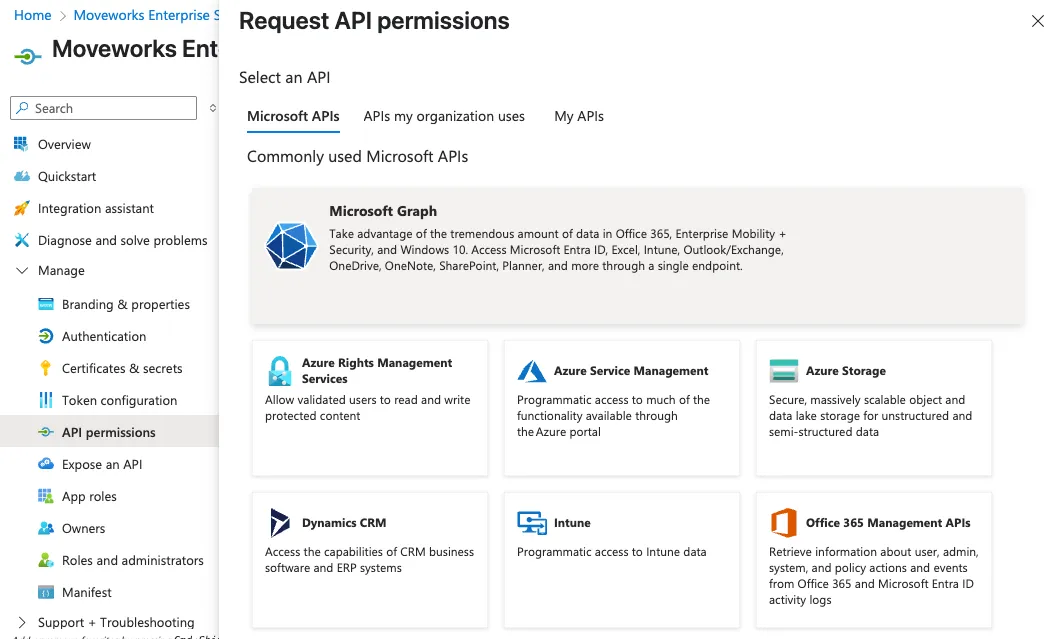
- Choose Delegated Permissions.
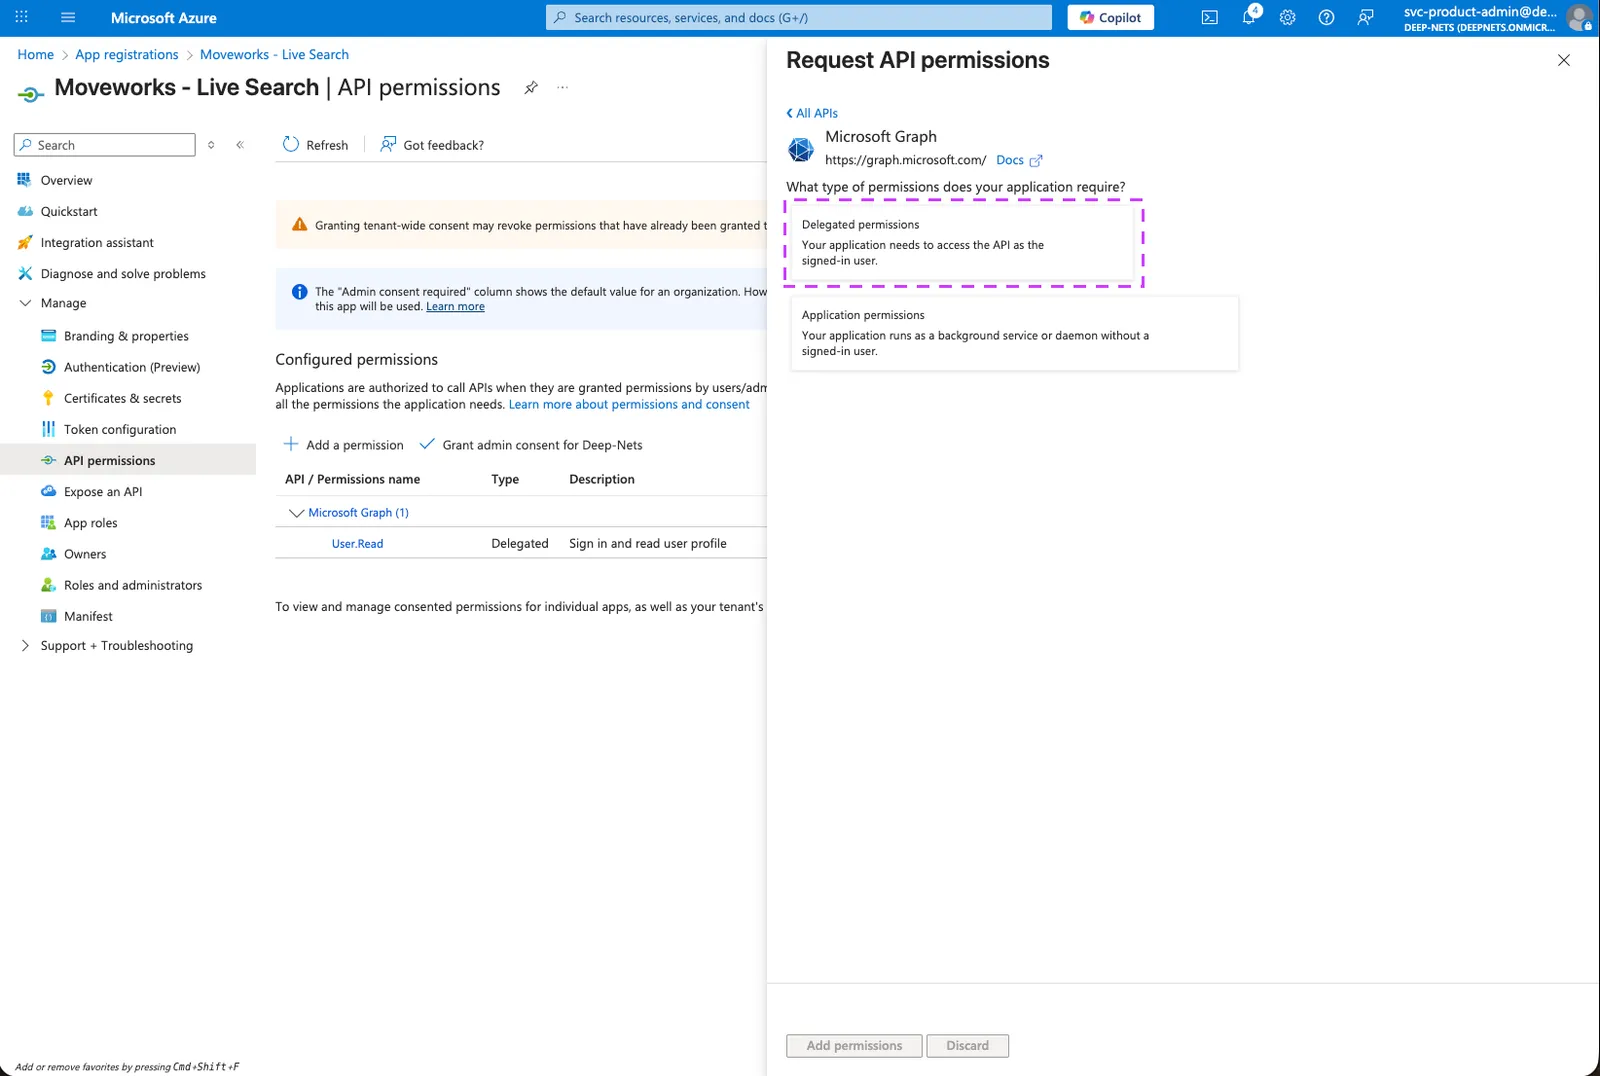
- Ensure the following Delegated Permissions are added to the application.
Files.Read.All: lets Moveworks read files the user already has access to in OneDrive and SharePoint document libraries, so it can surface relevant results.Sites.Read.All: lets Moveworks read site pages and list items the user can access in SharePoint Online.User.Read: identifies the signed-in user.offline_access: allows Moveworks to store a refresh token so the user doesn’t have to re-consent every time they search.
- Click on Add permissions after selecting all of the above permission scopes.
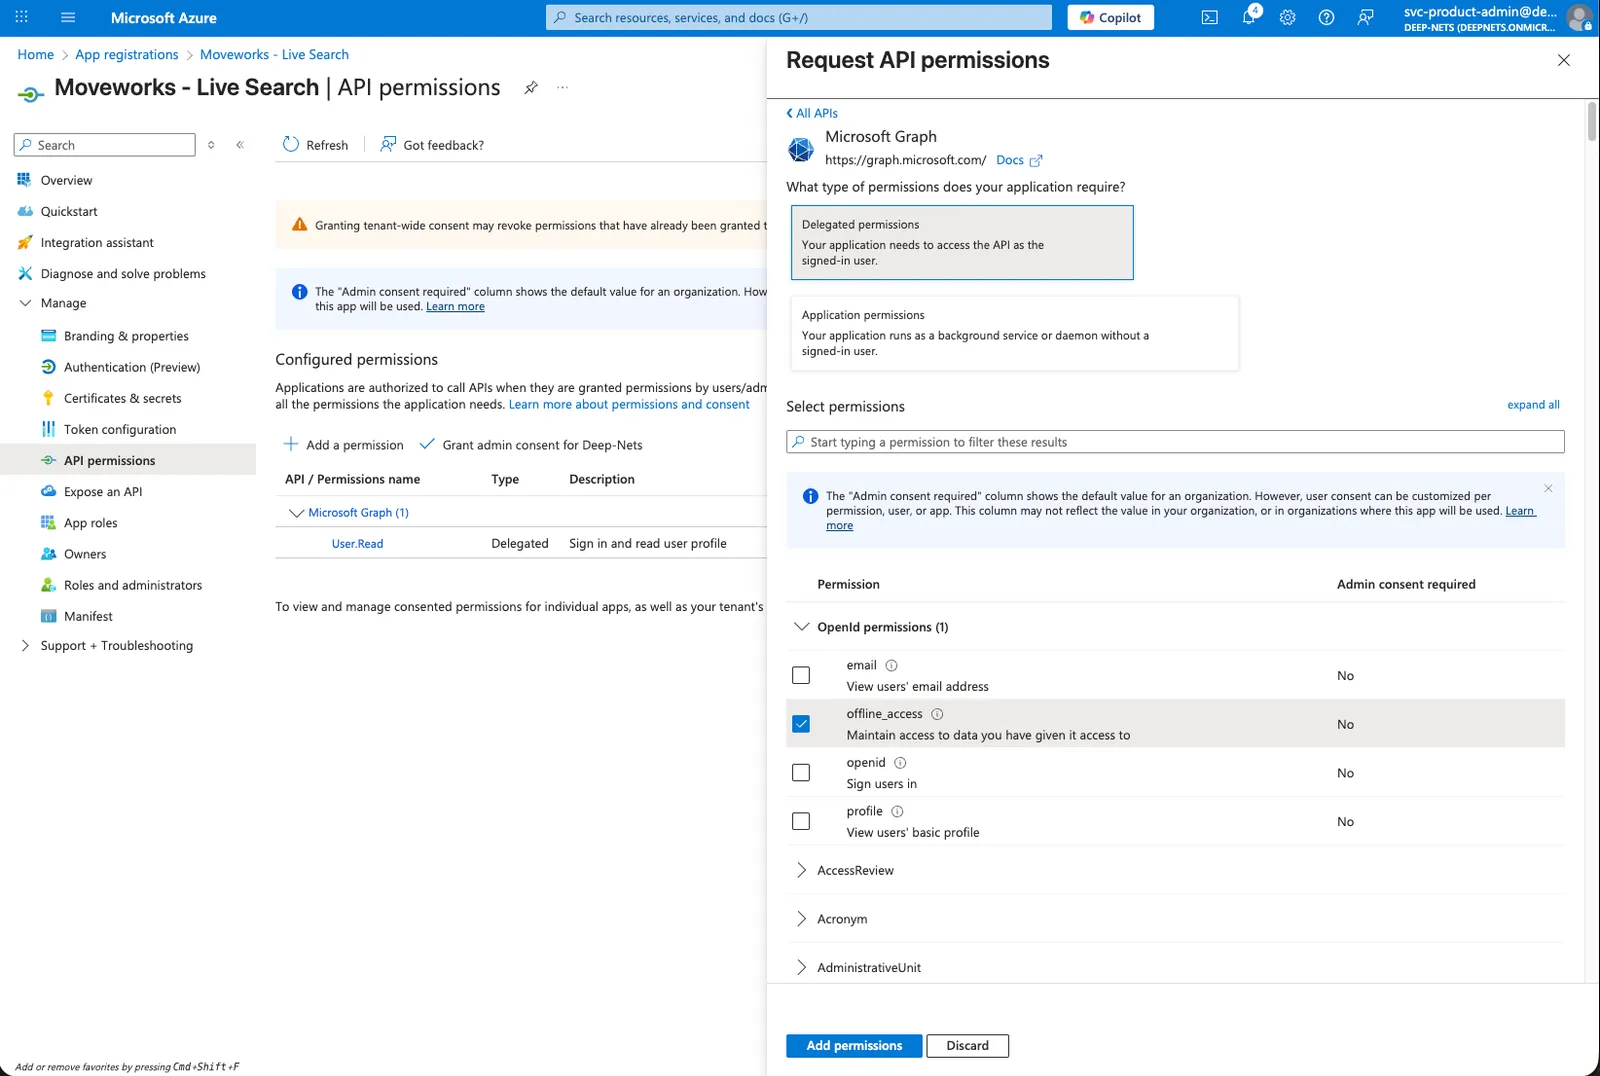
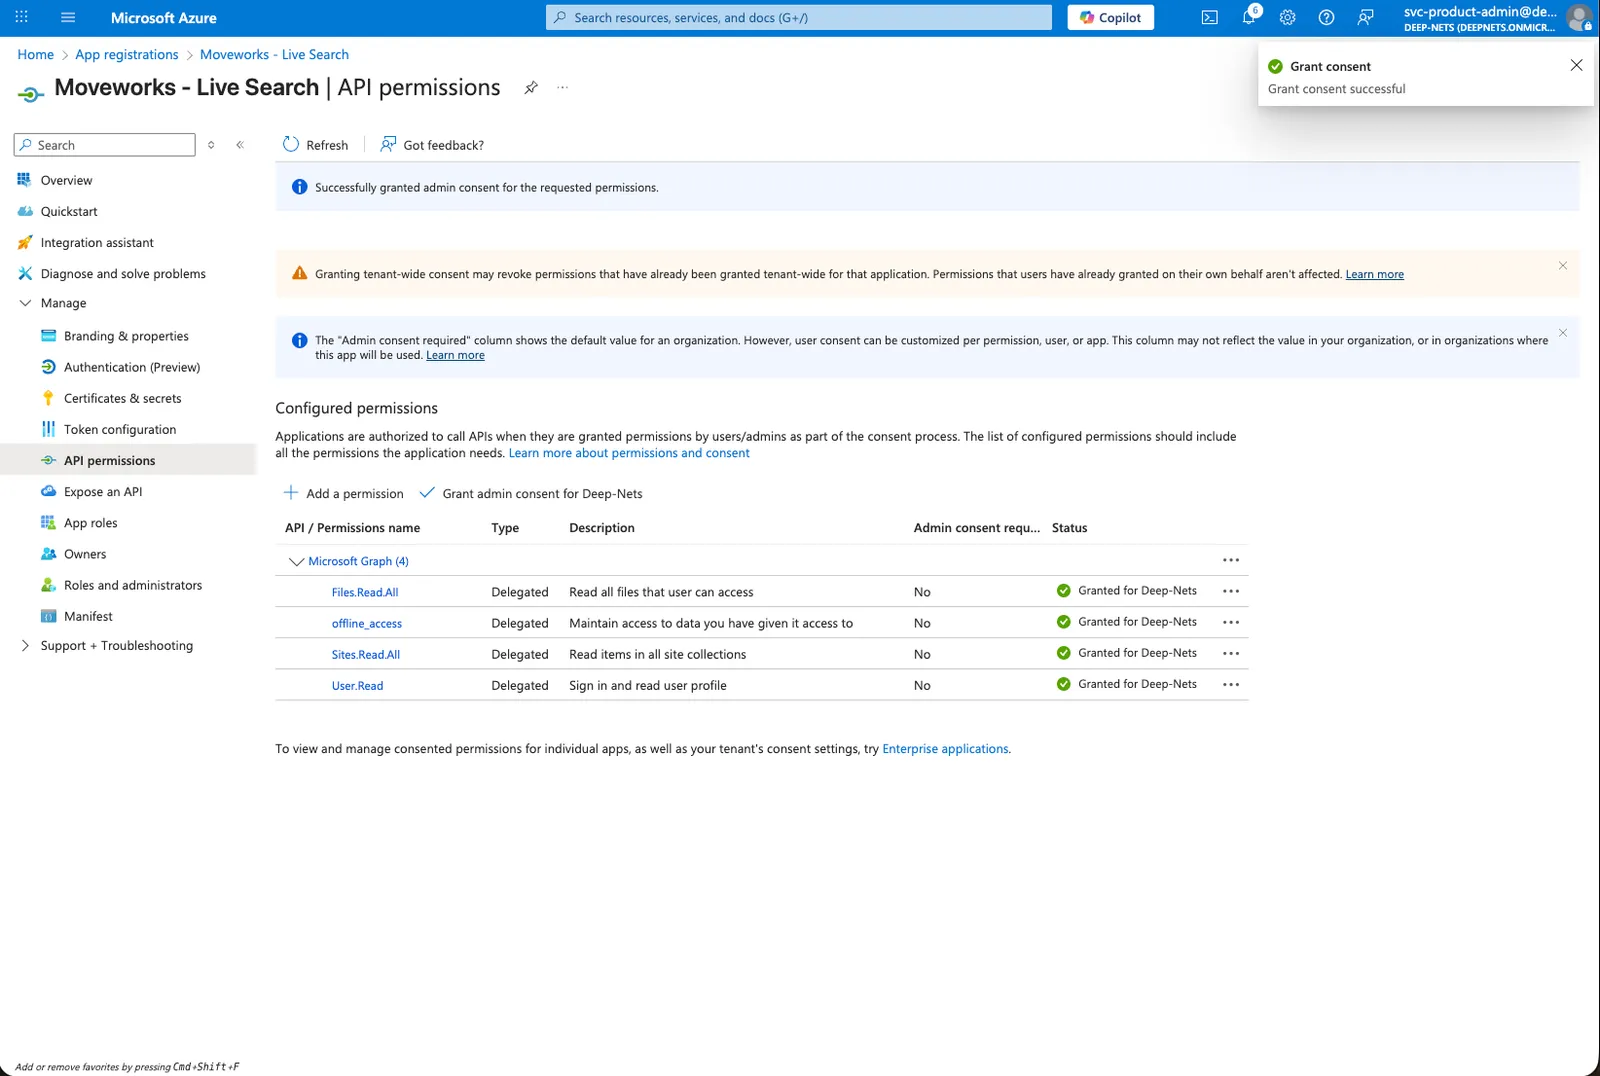
- Verify that all 4 permission scopes are present under Configured permissions.
- Click on the Grant admin consent for your-org button to make sure all permissions are available for all users to grant access.
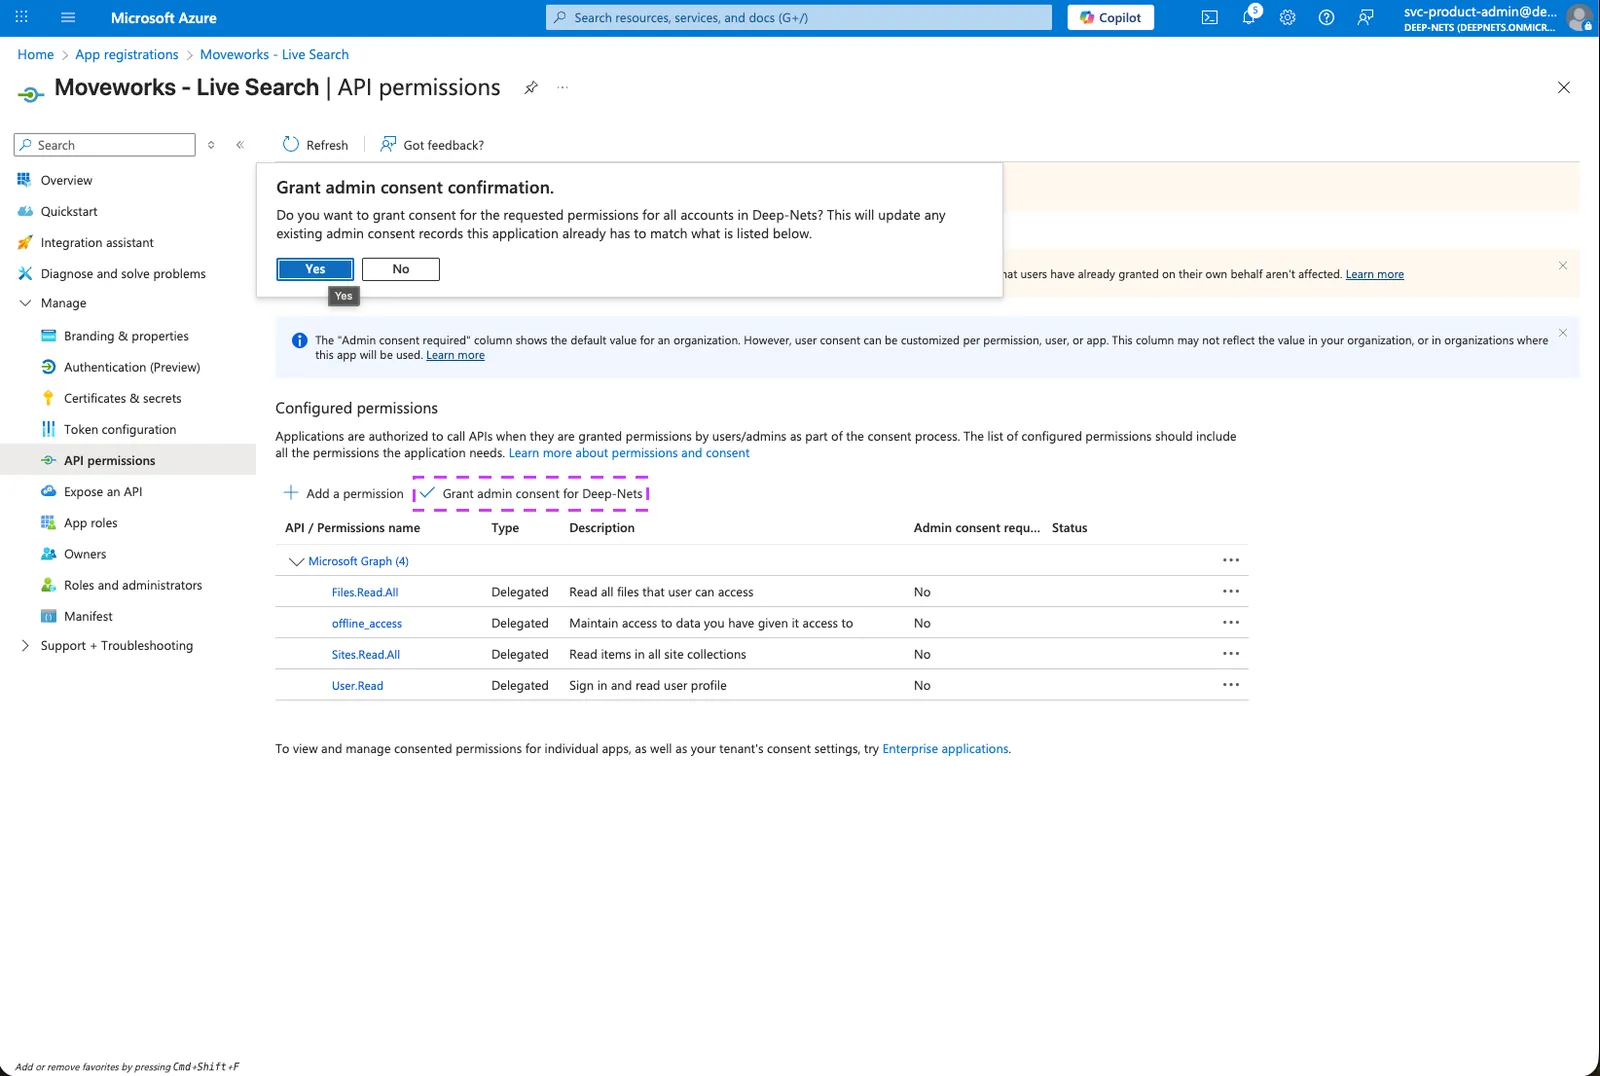
- If this panel appears, click Yes, add other granted permissions to configured permissions then Save and continue, then Grant admin consent, and then Yes.
- You will see green checkmarks on the newly added permissions if this was successful.
3. Generate Client Secret
Next, we will need to create a Client Secret for the Registration to connect it to Moveworks.
- Navigate to the App you created above -> Certificates & secrets
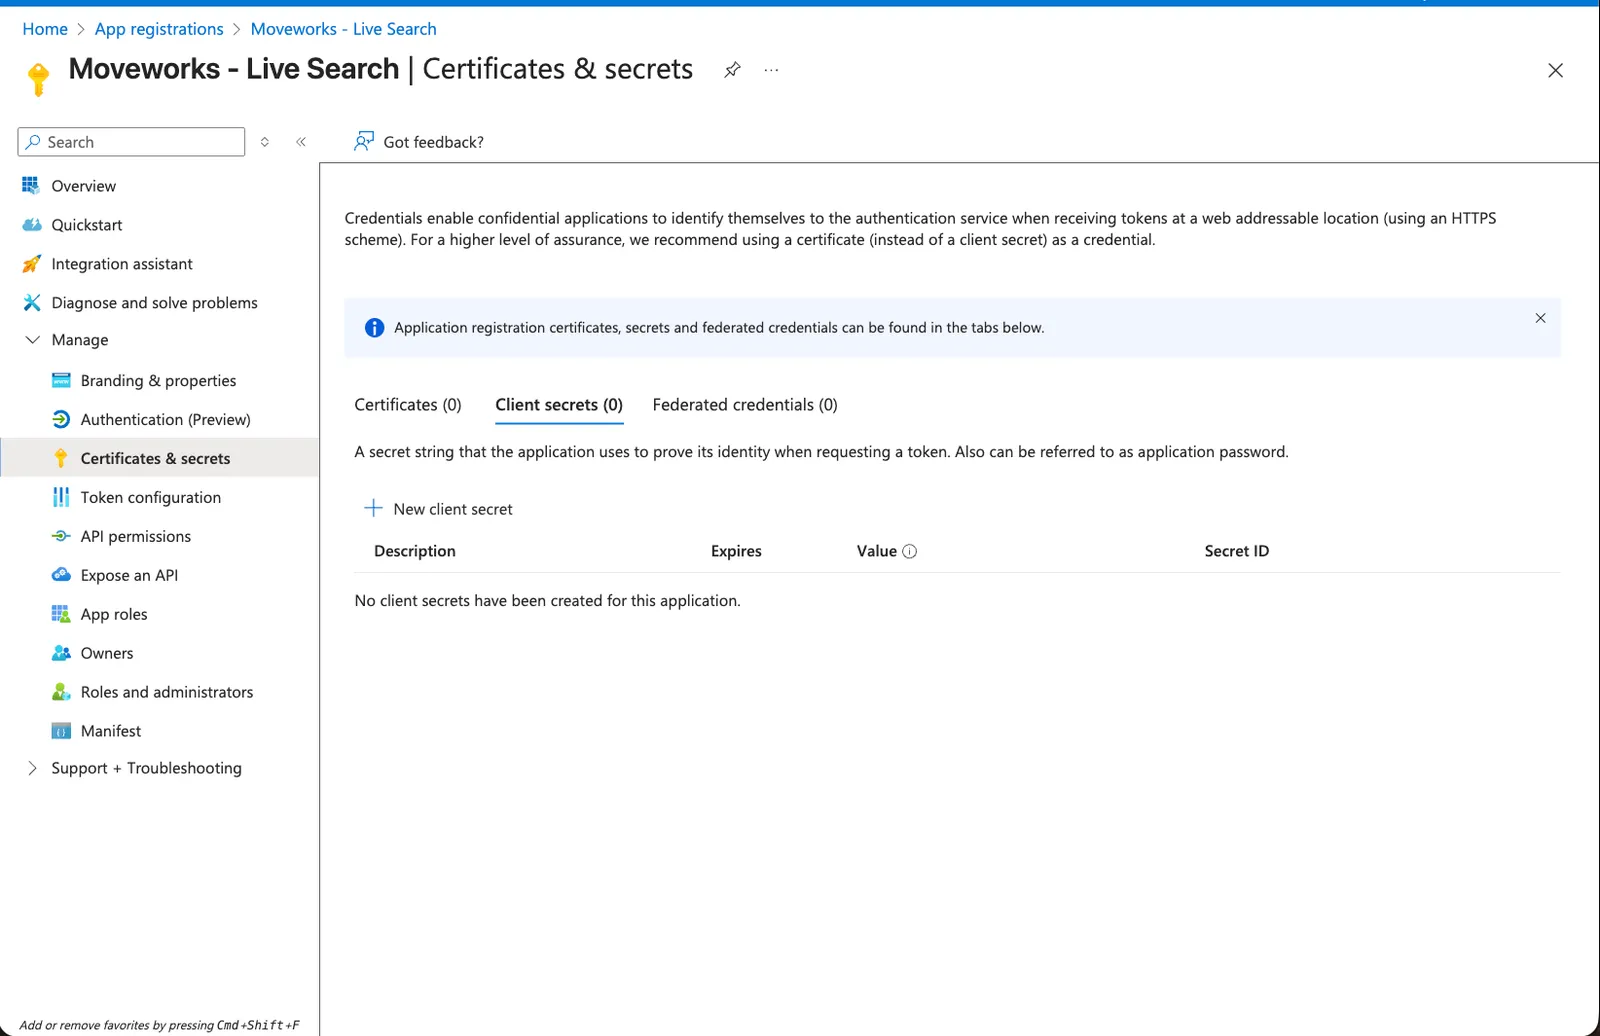
- Click on New client secret button. This will open a panel on the right side.
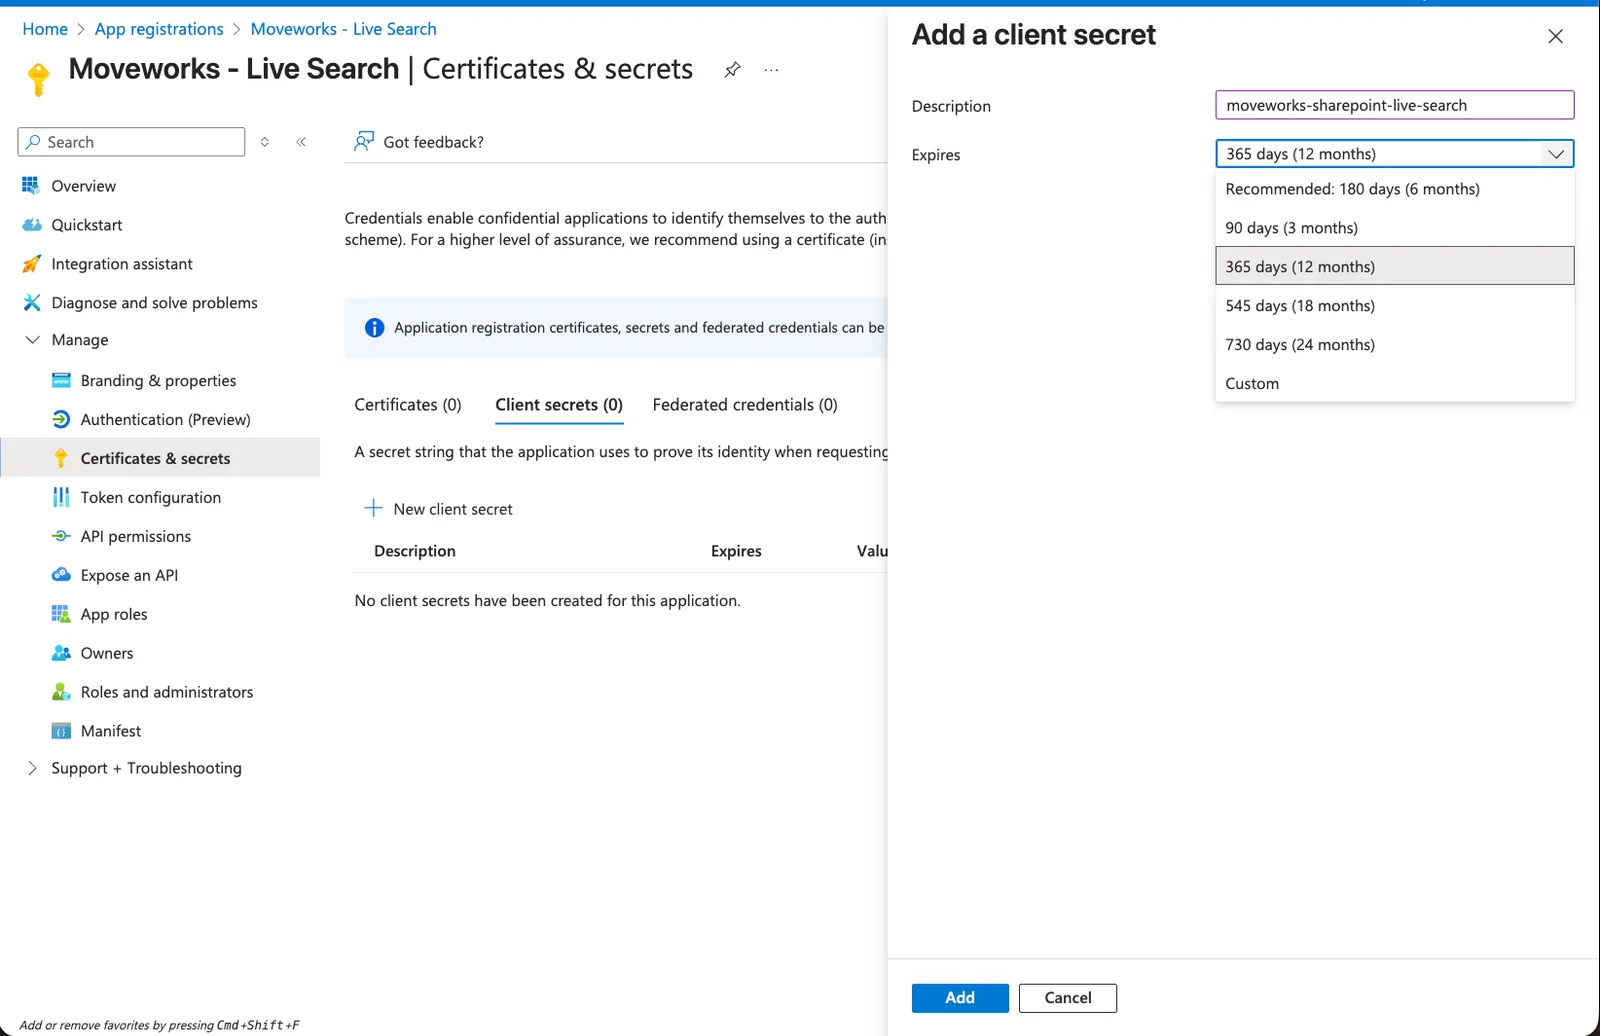
- Set the description and expiry of this credential based on your org’s policy and click on Add.
- This will create a new entry on the Client secrets table
- Make sure to copy the secret present in the Value column and store it in a secure location.
Note: Once you create the Secret, make sure to save it right now as it cannot be recovered later.
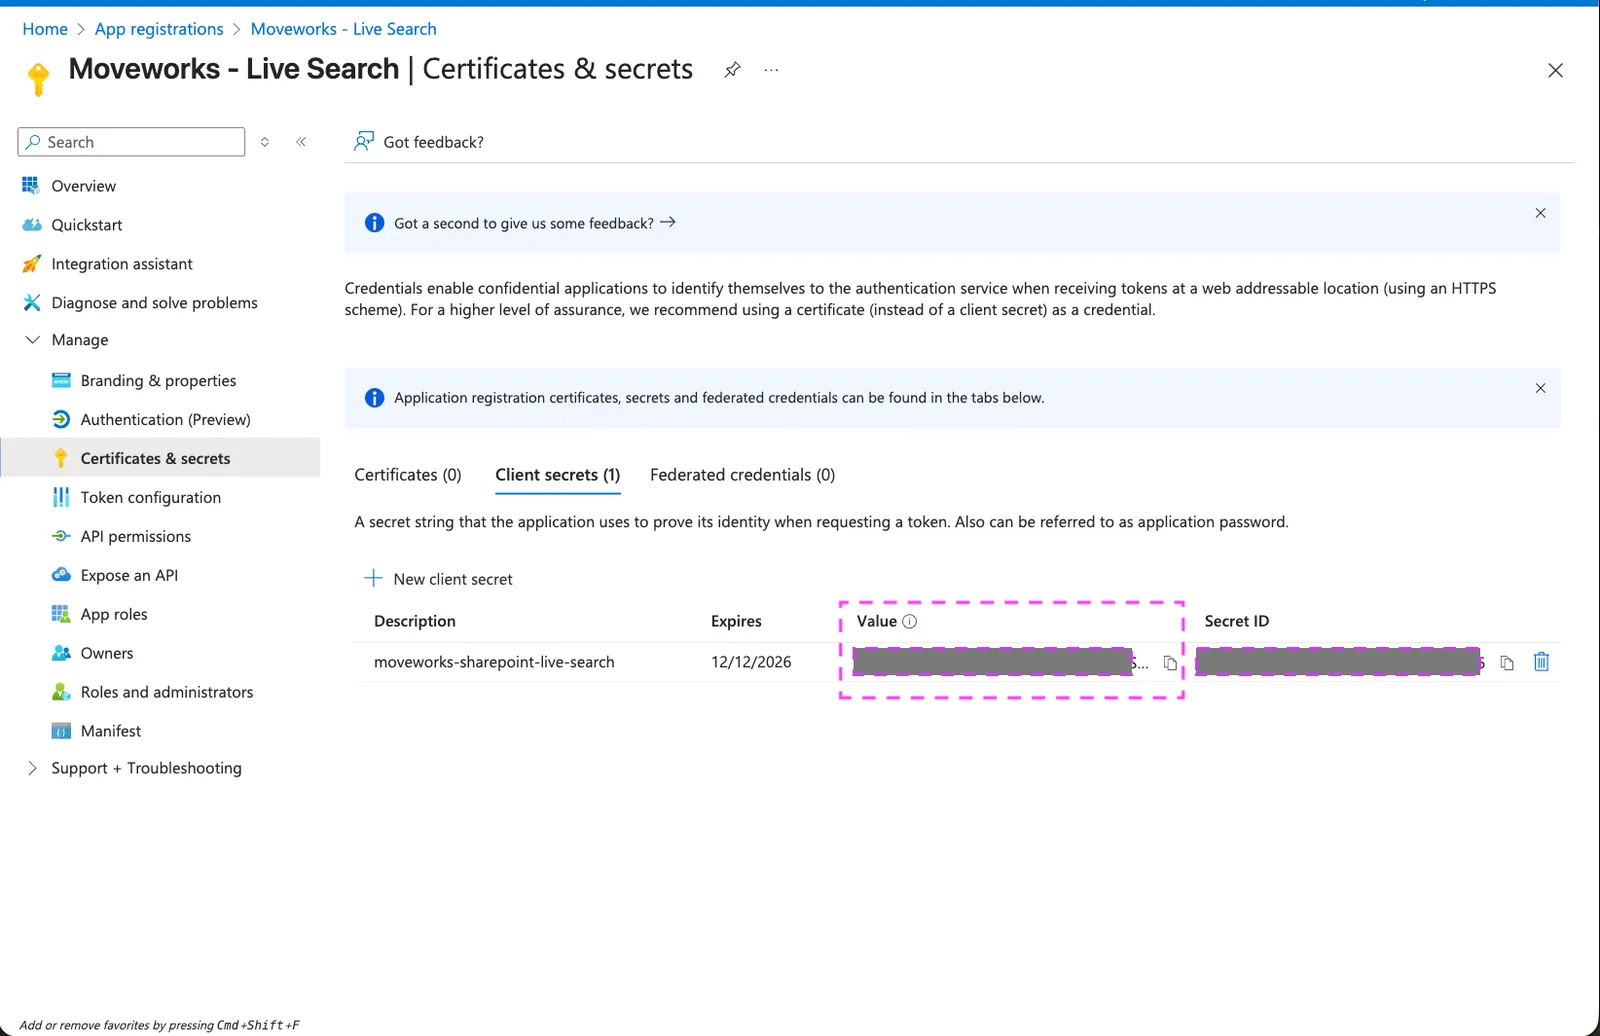
- Go back to the Overview page, to capture the following details:
Directory (tenant) IDApplication (client) ID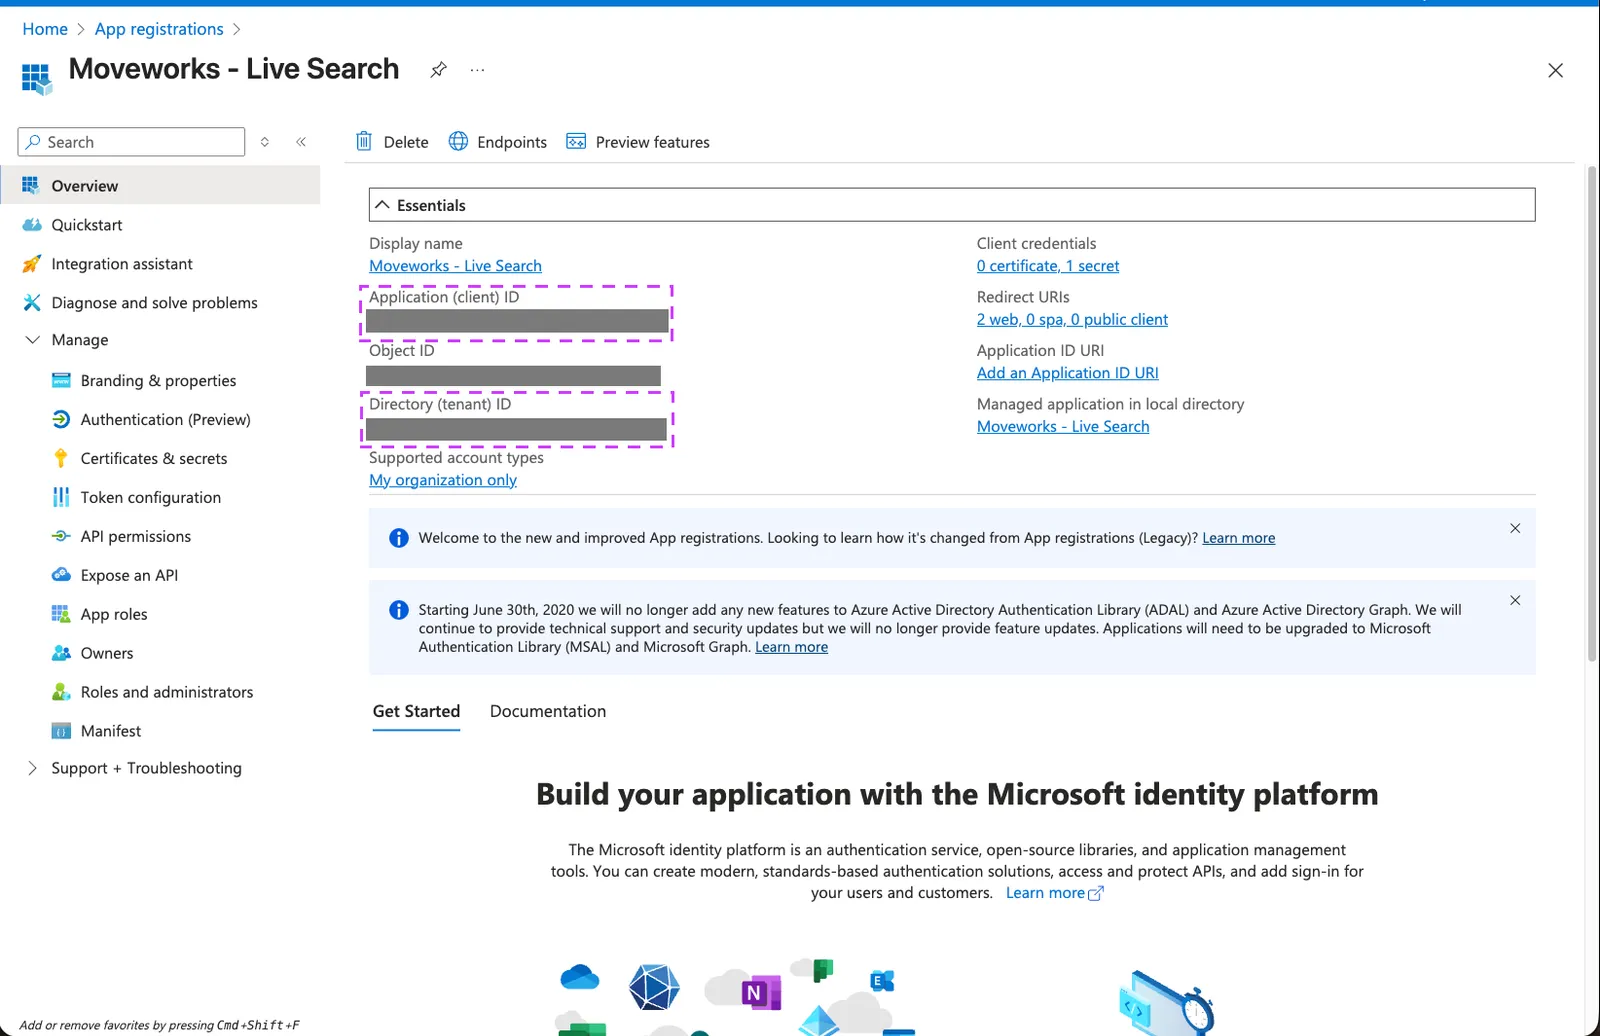
You have now completed all required steps to create a new Enterprise Application and generate the requisite credentials to setup a connector within Moveworks Setup for enabling Live Search. You should have the following details with you now:
Application (client) IDDirectory (tenant) IDClient Secret
Setup in Moveworks
Connector Creation
- Log in to your org’s MyMoveworks portal
- Navigate to Moveworks Setup > Connectors > Built-in Connectors
- Click Create New
- Search and Select SharePoint & OneDrive (Next Gen)
- Click on Next: Add Creds
- Input the following details
- Connector Name : Name this connector for your future reference. Once set, this name cannot be changed.
- Tenant (directory) ID: Enter your Microsoft Entra (Azure AD) tenant ID that uniquely identifies your organization.
- Tenant Domains: Enter all the SharePoint tenant domains to ingest data from across the organization, if you have multiple geo-locations configured. Eg: Enter org1 for domain_url org1.sharepoint.com and org2 for domain_url org2.sharepoint.com
- Region (optional): Select an option that will be used to establish the base URL. If no selection is made, the default option will be Commercial. If GOV L4 is selected, a .us token URL will be created.
- Application (client) ID: Enter the Application (client) ID from your Indexing Microsoft Entra app registration’s Overview page, used for certificate-based authentication.
- X.509 Certificate SHA-1/SHA-256 Thumbprint (x5t): Enter the SHA-256 thumbprint of your uploaded certificate from Microsoft Entra, used to verify certificate authenticity (format: hexadecimal string without colons or spaces).
- Private Key: Upload the private key as a PEM file that corresponds to the certificate uploaded to your Microsoft Entra app registration.
- Application (client) ID: Enter the Application (client) ID from your Live Search Microsoft Entra app registration for delegated/user-consent authentication.
- Application Client Secret: Enter the client secret value from your Live Search Microsoft Entra app registration for delegated/user-consent authentication.
- Click Save. This connector will now be used to configure content ingestion from SharePoint Online and enable live search from OneDrive. Refer to the steps mentioned below.
Configuring SharePoint Online and OneDrive for Enterprise Search
Initialising setup
- Log in to your org’s MyMoveworks portal
- Navigate to Moveworks Setup > Search > Configure Search > Max Capacity
- Click on Create New or Get Started
- Select SharePoint Online & OneDrive from the dropdown list and click on Get Started
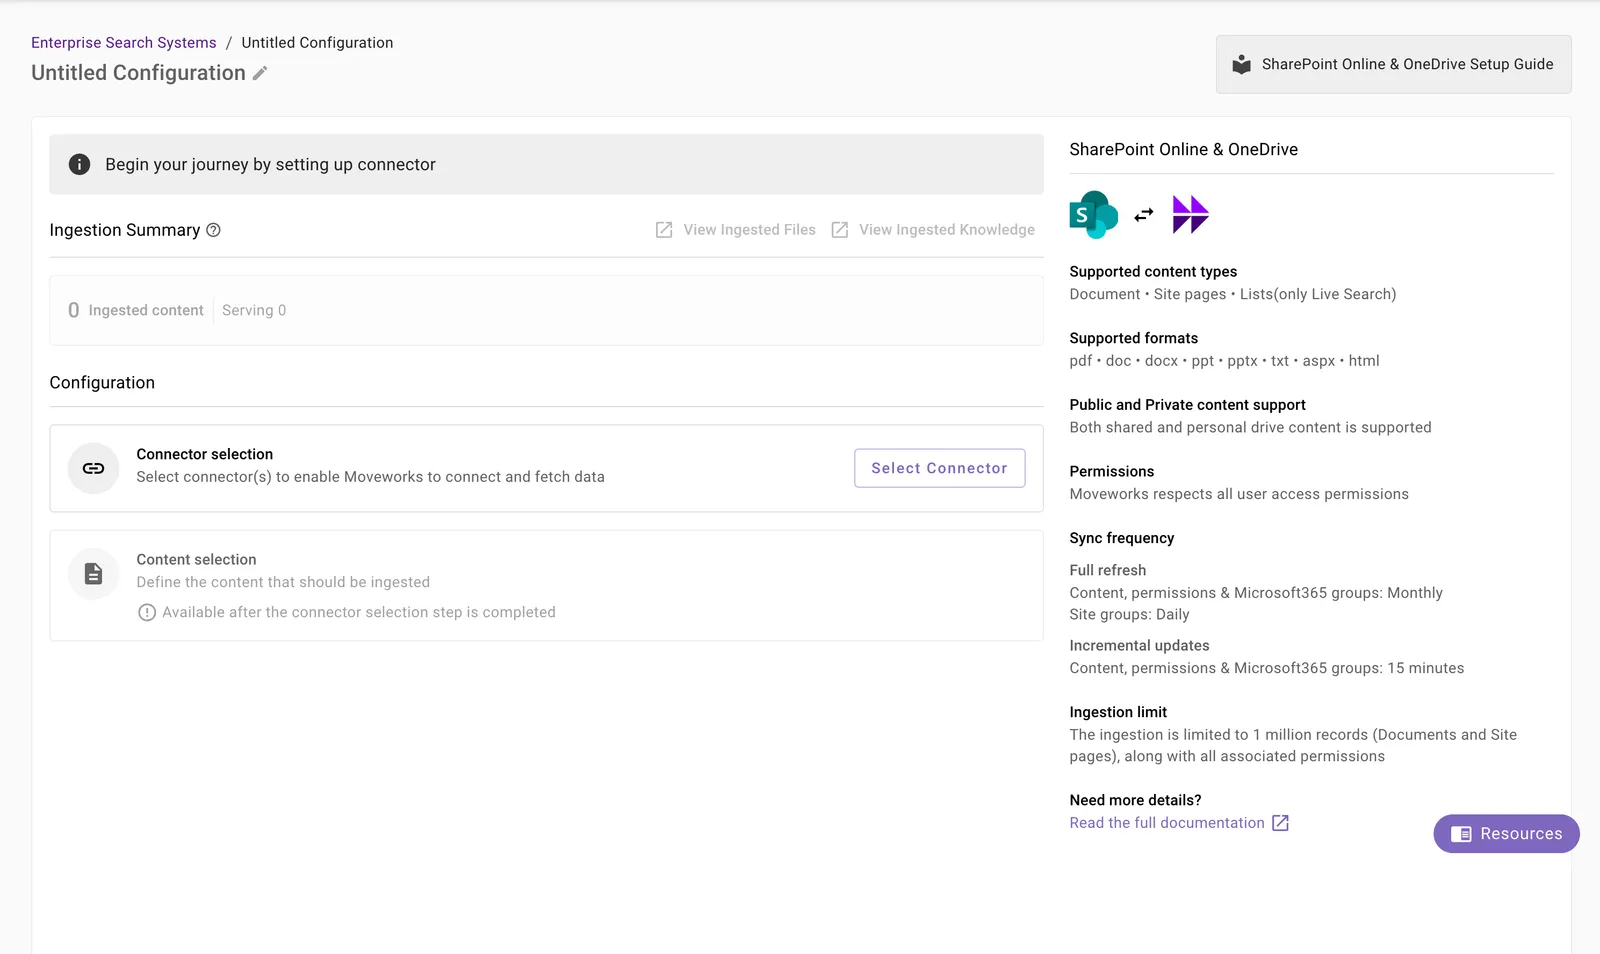
- You will be redirected to the SharePoint Online & OneDrive ingestion overview page. On the overview page, you will find a few info blocks and a few configuration blocks.
- System Overview: This presents an overview of SharePoint Online & OneDrive support from Moveworks
- Ingestion Summary: This provides information on the count of records that have been ingested and are being served. The values will appear after the first successful ingestion run.
- Connector Selection: In this configuration block, you select the connector and choose one or more retrieval methods: SharePoint Online: Enable Live Search (Instant), SharePoint Online: Add Sites, and/or OneDrive: Enable Live Search (Instant).
- Content Selection: In this configuration block, you are required to define the content that should be ingested within Moveworks
Connector selection and validation
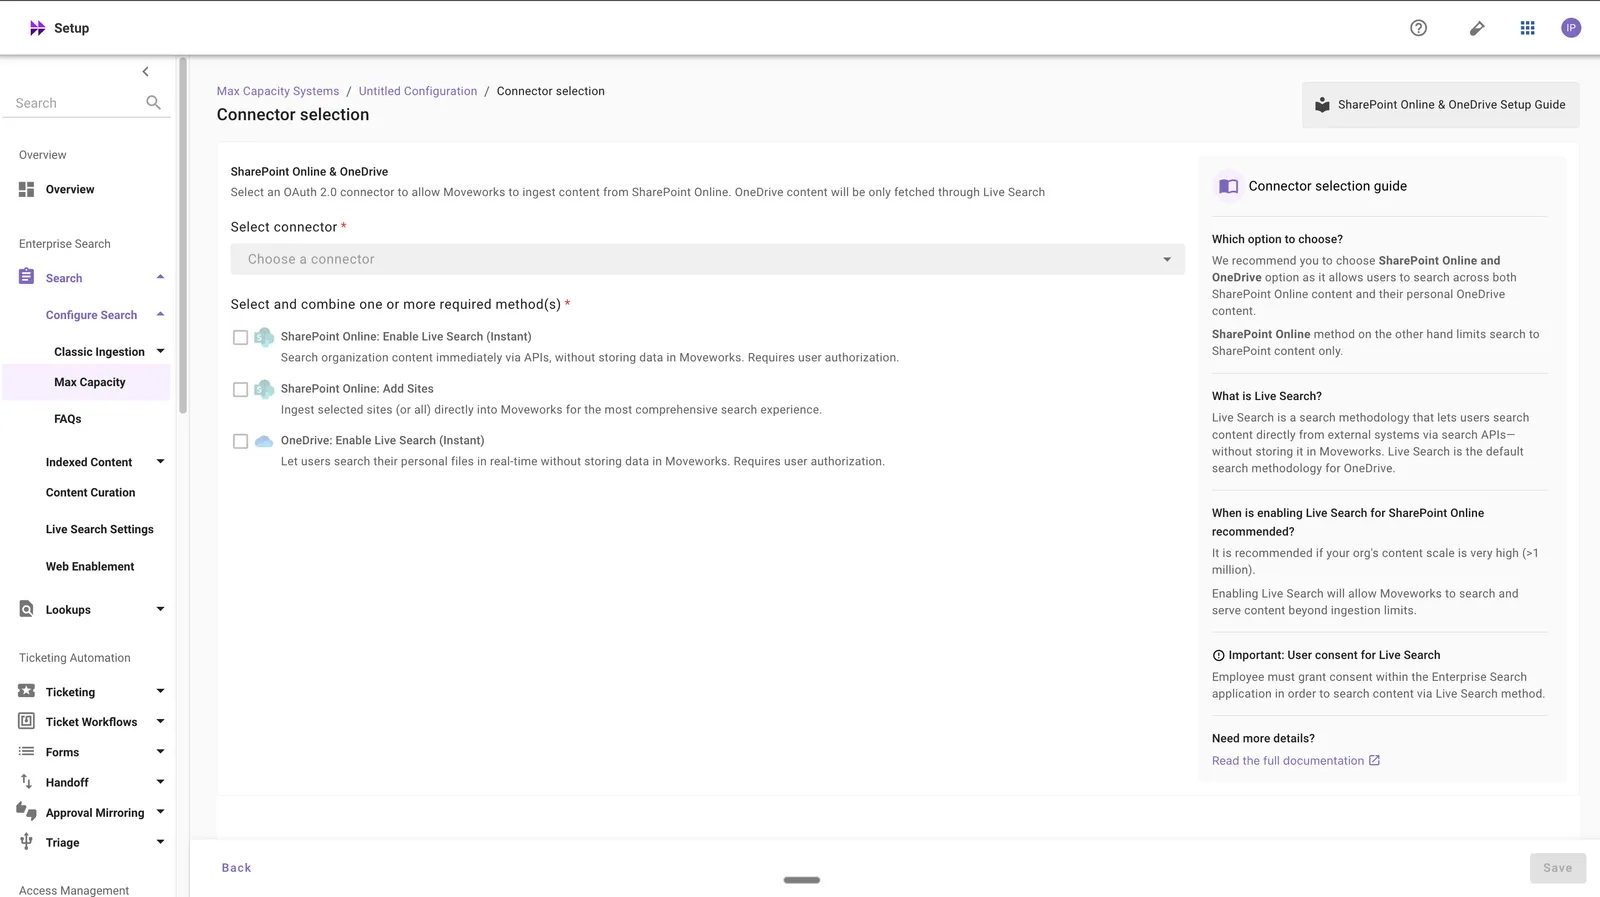
SharePoint Online and OneDrive are configured through a single connector, but on the connector-selection screen you choose one or more retrieval methods. Select the methods that match how you want employees to search, validate each one, and then save.
You cannot change the connector or the selected methods after you save. To use a different connector, or a different set of methods, create a new configuration.
The retrieval methods
Which methods to choose
SharePoint Online — do you need to control exactly what Moveworks makes searchable?
- Yes, control what is ingested: select Add Sites and choose the specific sites to ingest. Do not also enable SharePoint Live Search — Live Search queries across all SharePoint content the signed-in user can access, so it would return results beyond the sites you scoped.
- No, employees should be able to search broadly right away: select Enable Live Search so employees can search SharePoint immediately, with nothing stored in Moveworks. You can optionally also Add Sites for a selected set of sites to get higher-quality search over that content. Live Search and Add Sites can be used together.
OneDrive — do you want personal OneDrive files to be searchable?
- Yes: select Enable Live Search. This is the only method for OneDrive; Moveworks does not index OneDrive content.
Add Sites has an extra prerequisite. For indexed sites, each SharePoint group used to grant access must have its “who can view the membership of this group” setting set to Everyone, or Moveworks cannot read the group’s members and those files will not be returned for anyone. See Access Requirements. Live Search does not need this, because it runs on each employee’s own delegated access.
SharePoint Multi-Geo tenants need extra setup. If your tenant has sites on non-root geo domains (for example, contoso-eu.sharepoint.com), reach out to Moveworks before you add those sites. They require additional configuration to stay in sync, because Microsoft Graph does not support change-notification webhooks on non-root geo domains. This applies to the Add Sites (indexing) method; Live Search is unaffected.
Steps
-
Click Select Connector, then choose the connector you created in the Connector Creation step.
Please note: Only the SharePoint & OneDrive (Next Gen) connectors will appear in this list.
-
Under Select and combine one or more required method(s), choose any combination of SharePoint Online: Enable Live Search (Instant), SharePoint Online: Add Sites, and OneDrive: Enable Live Search (Instant). Each selected method must be validated before you can save.
-
For Add Sites (indexing): click Start Validation — Add Sites has no Authorize step. In the Connector validation dialog, enter a Site URL (for example,
https://{tenant}.sharepoint.com/sites/{sitename}) and click Validate.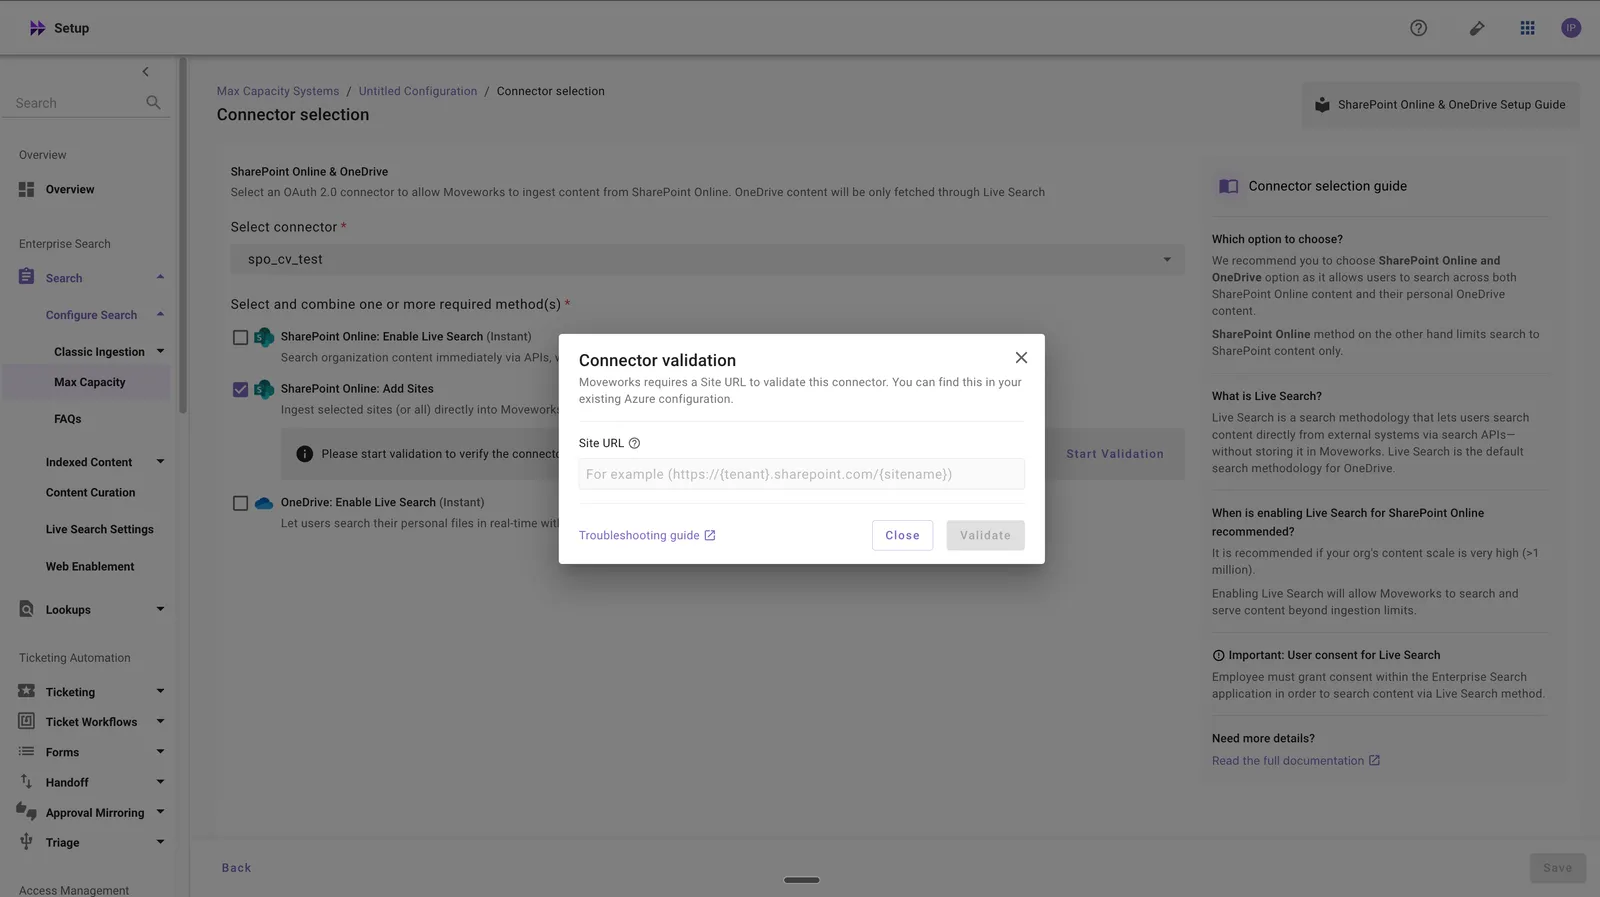
Connector Validation is mandatory before you can save. For Add Sites, Moveworks validates:
- Auth — the connector can authenticate
- Content — the connector has the scopes to fetch content
- Permissions — the connector has the scopes to fetch user permissions
- Users — the connector has the scopes to fetch user data
- Groups — the connector has the scopes to fetch Microsoft 365 groups data
- Site Groups — the connector has the scopes to fetch site-group data from the specified site
All checks must pass. If any fail, click View Details and see Troubleshooting Connector Validation Failures.
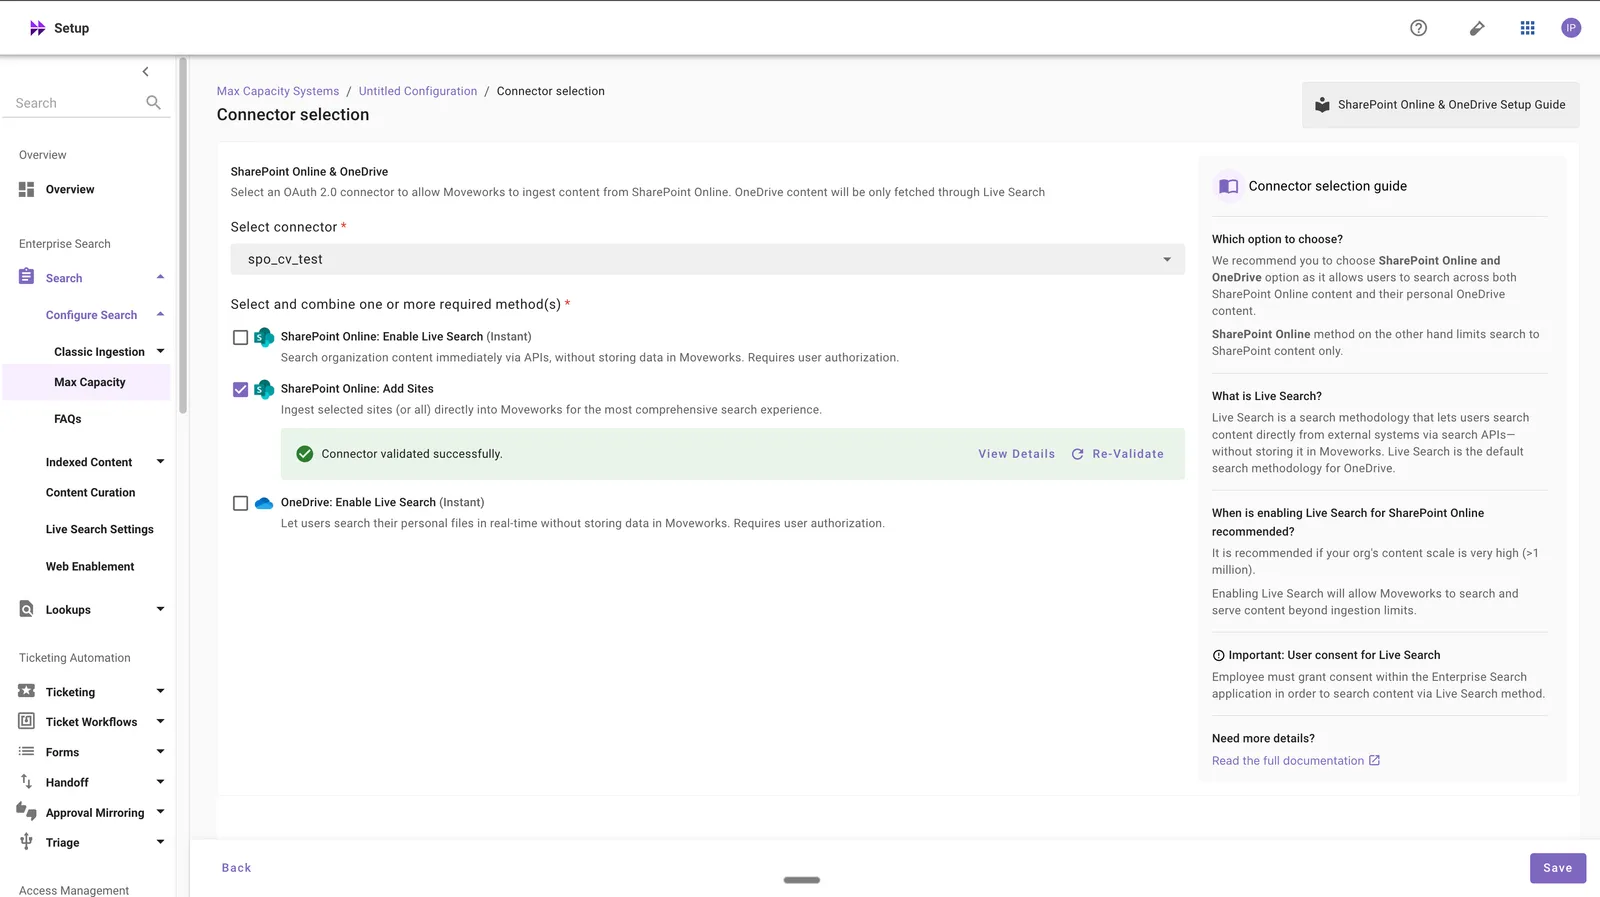
On success, the method shows Connector validated successfully, with View Details and Re-Validate available.
-
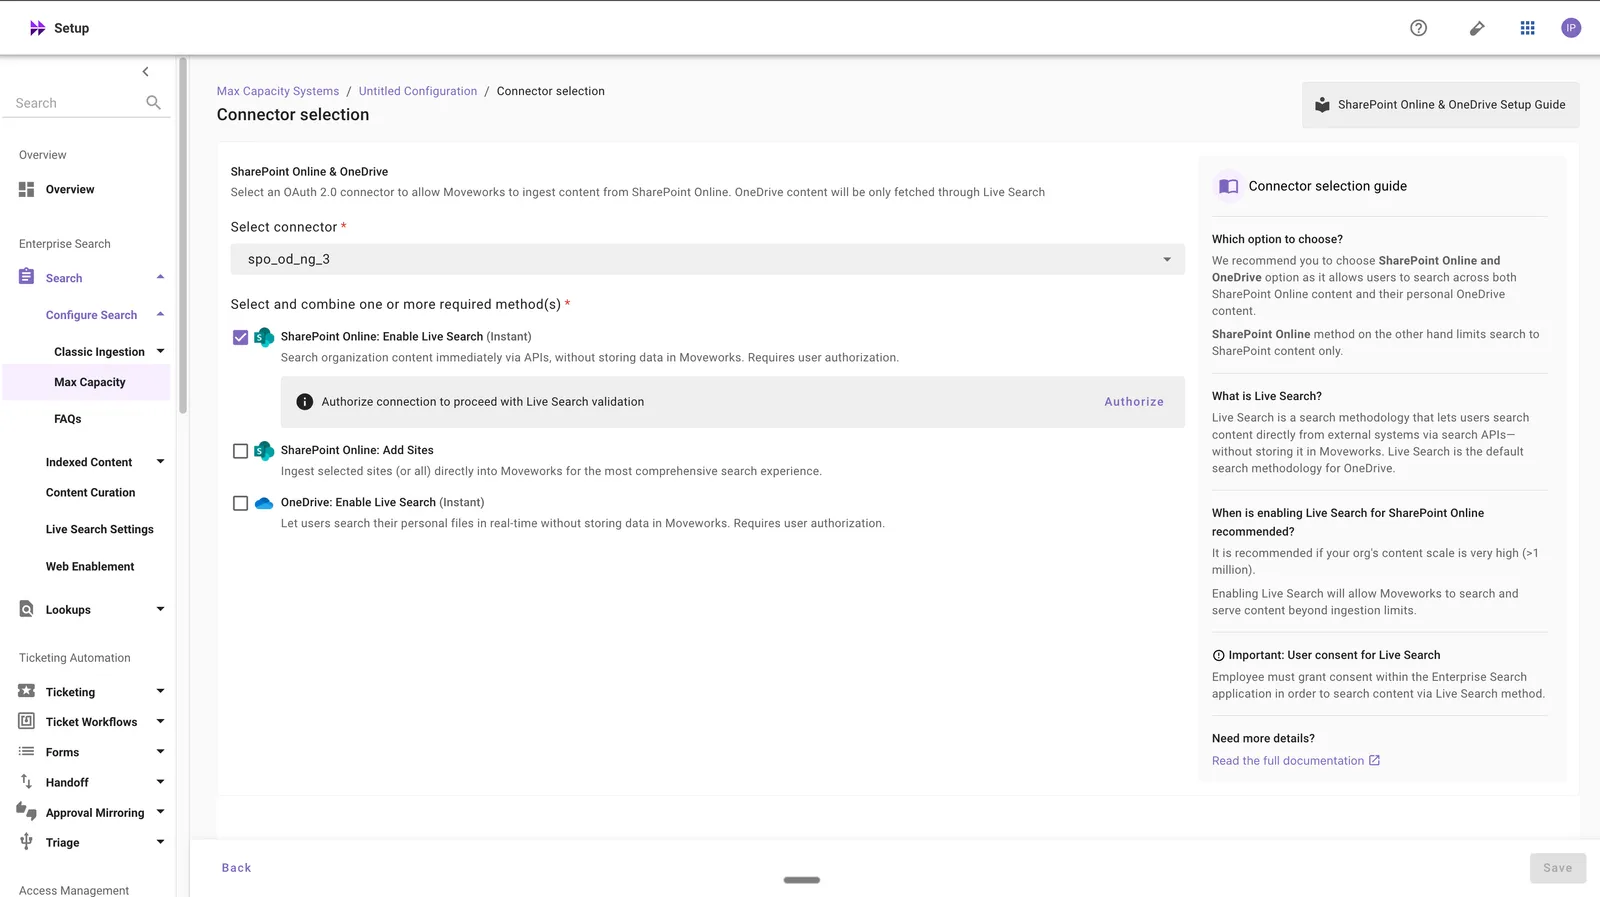
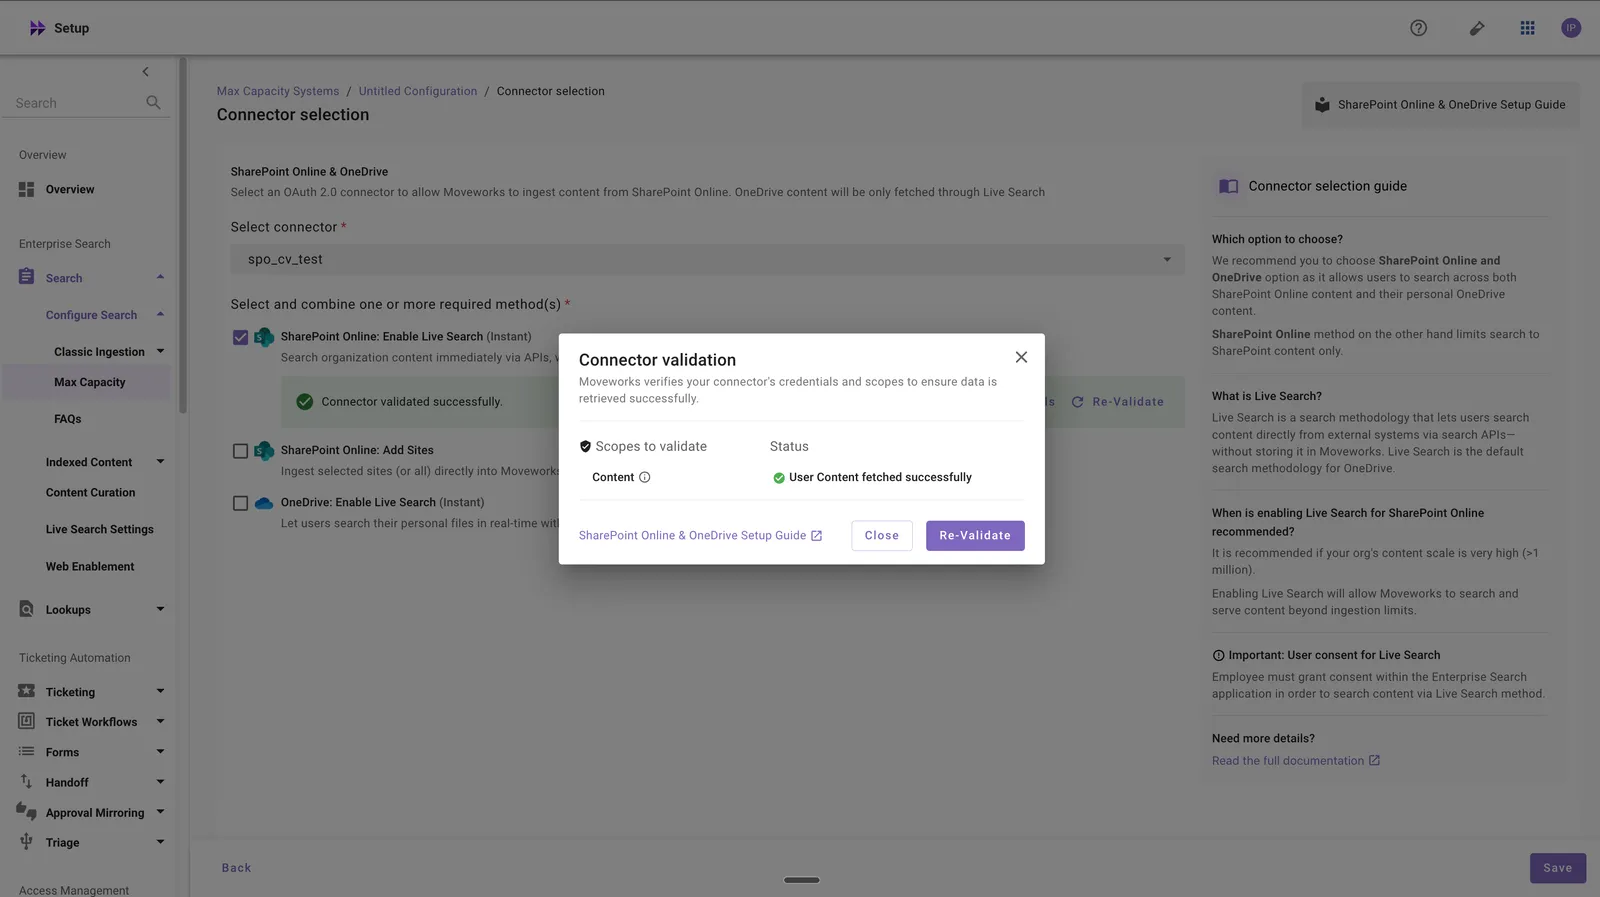
For Enable Live Search (SharePoint and/or OneDrive): click Authorize, sign in with your Microsoft user, and approve the app. You are redirected back to Moveworks Setup, where you click Start Validation. Live Search validation checks a single Content scope (the delegated read) rather than the six checks used by Add Sites.
-
Every selected method must validate successfully before Save is enabled.
-
Enter a unique configuration name (optionally add a change summary) and click Save.
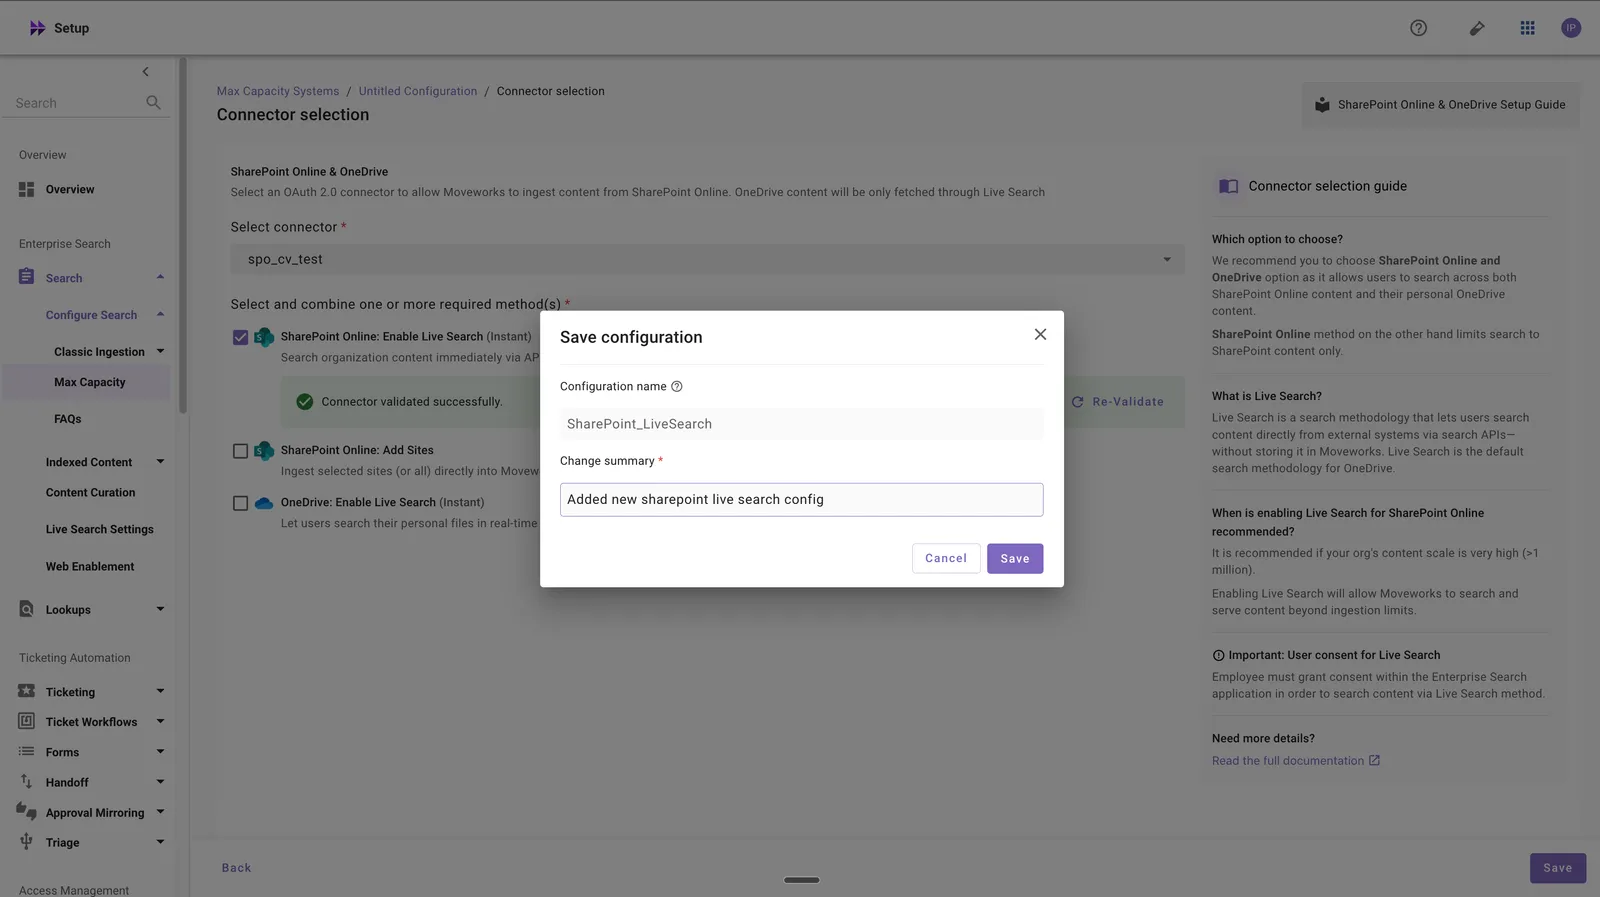
At this stage, only the configuration entry is created. Ingestion does not start until you configure the Content Selection step, and ingested content is not served in search until you configure the Audience step. Live Search does not use Content Selection — enable Live Search on the configuration’s home page and configure the Audience step so results are served.
-
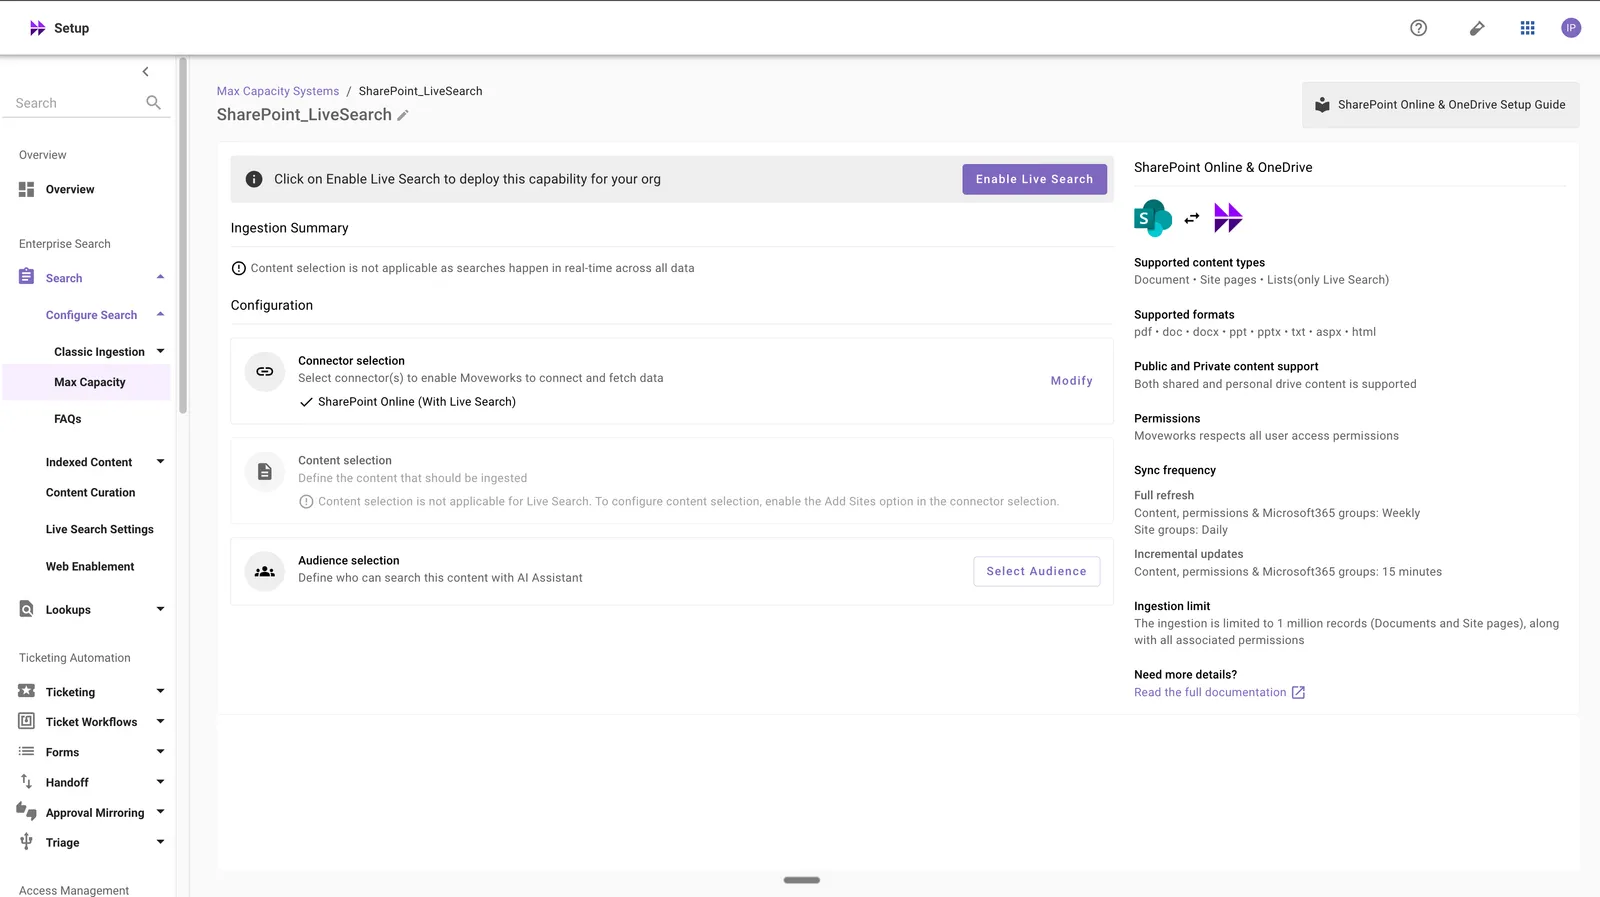
After saving, the configuration’s home page shows the saved method(s) — for example, SharePoint Online (With Live Search). For Live Search, click Enable Live Search to deploy it for your organization, and use Select Audience to choose who can search. You can rename the configuration with the pencil 🖊️ icon, or click Modify on a block to change it.
-
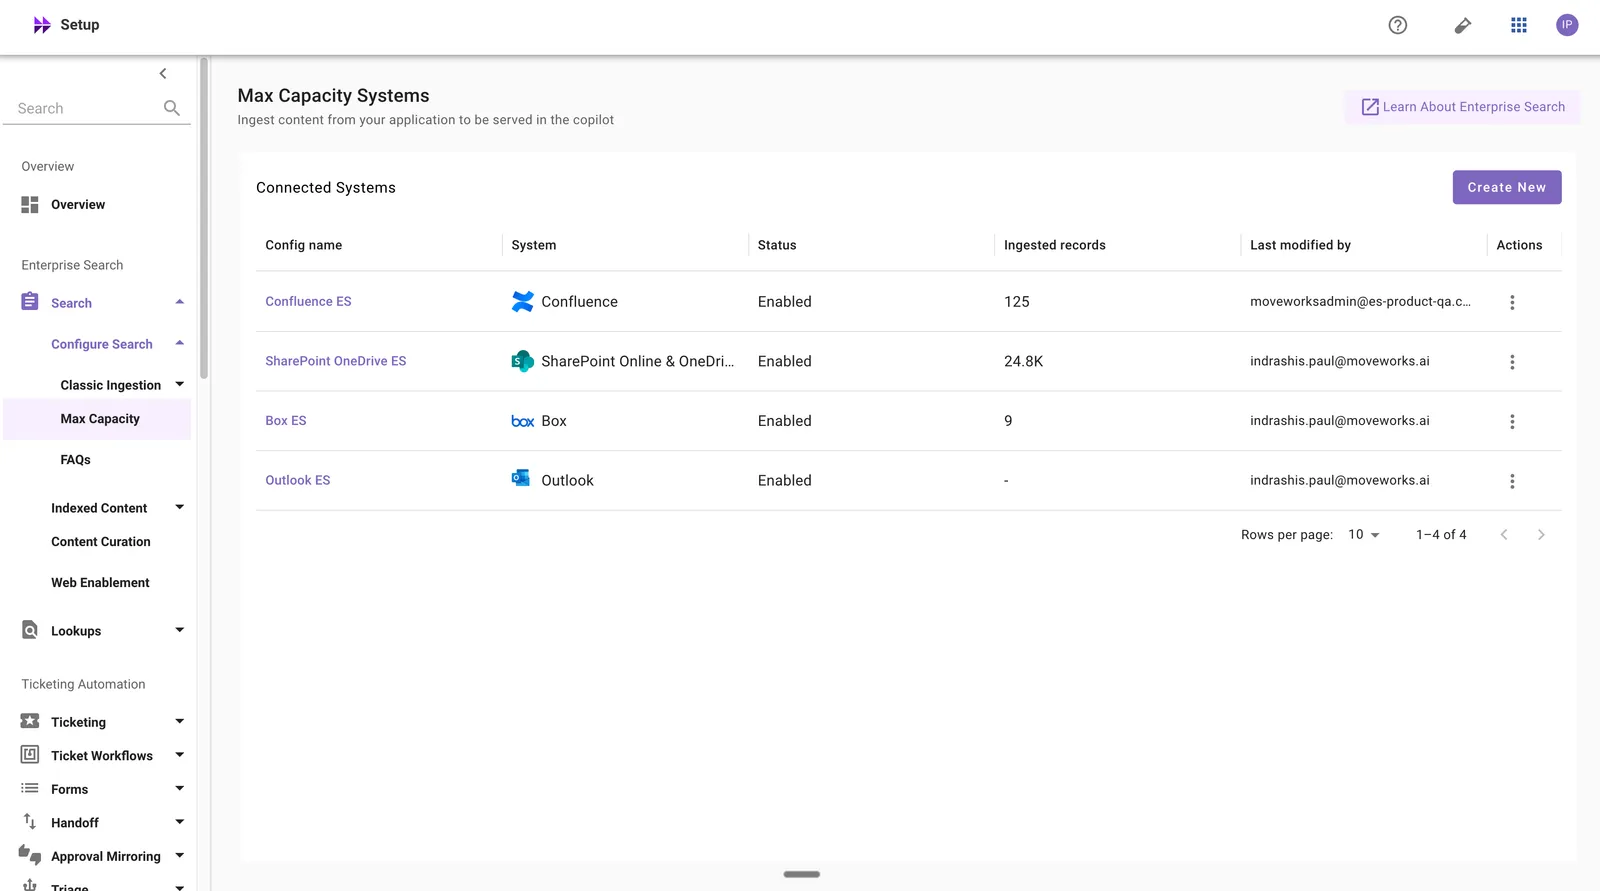
You will also see your configuration in the Connected Systems list on the Max Capacity page (Search → Configure Search → Max Capacity). Click it to edit or complete the configuration.
Content Selection
Once the connector selection step is complete and the configuration is saved, you will now be required to define the scope of content that will be ingested in Moveworks.
- Once you click on Select Content, a content selection screen will appear as follows.
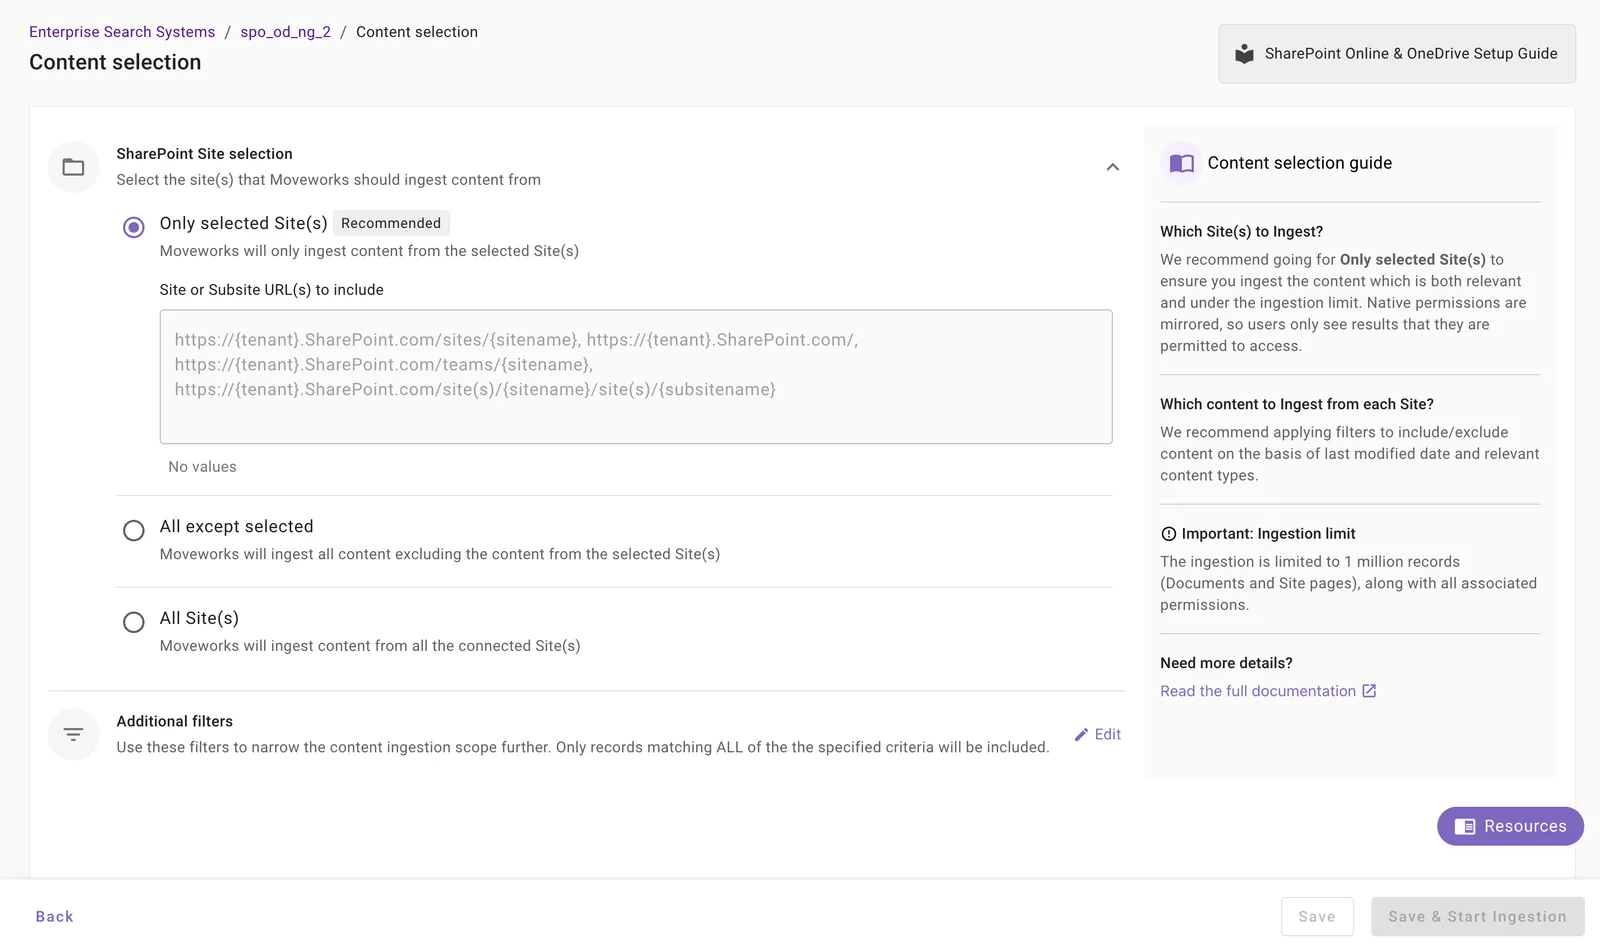
- In this screen, you are required to define the Site URLs from which Moveworks will ingest content and apply filters (optionally) to filter down the content further.
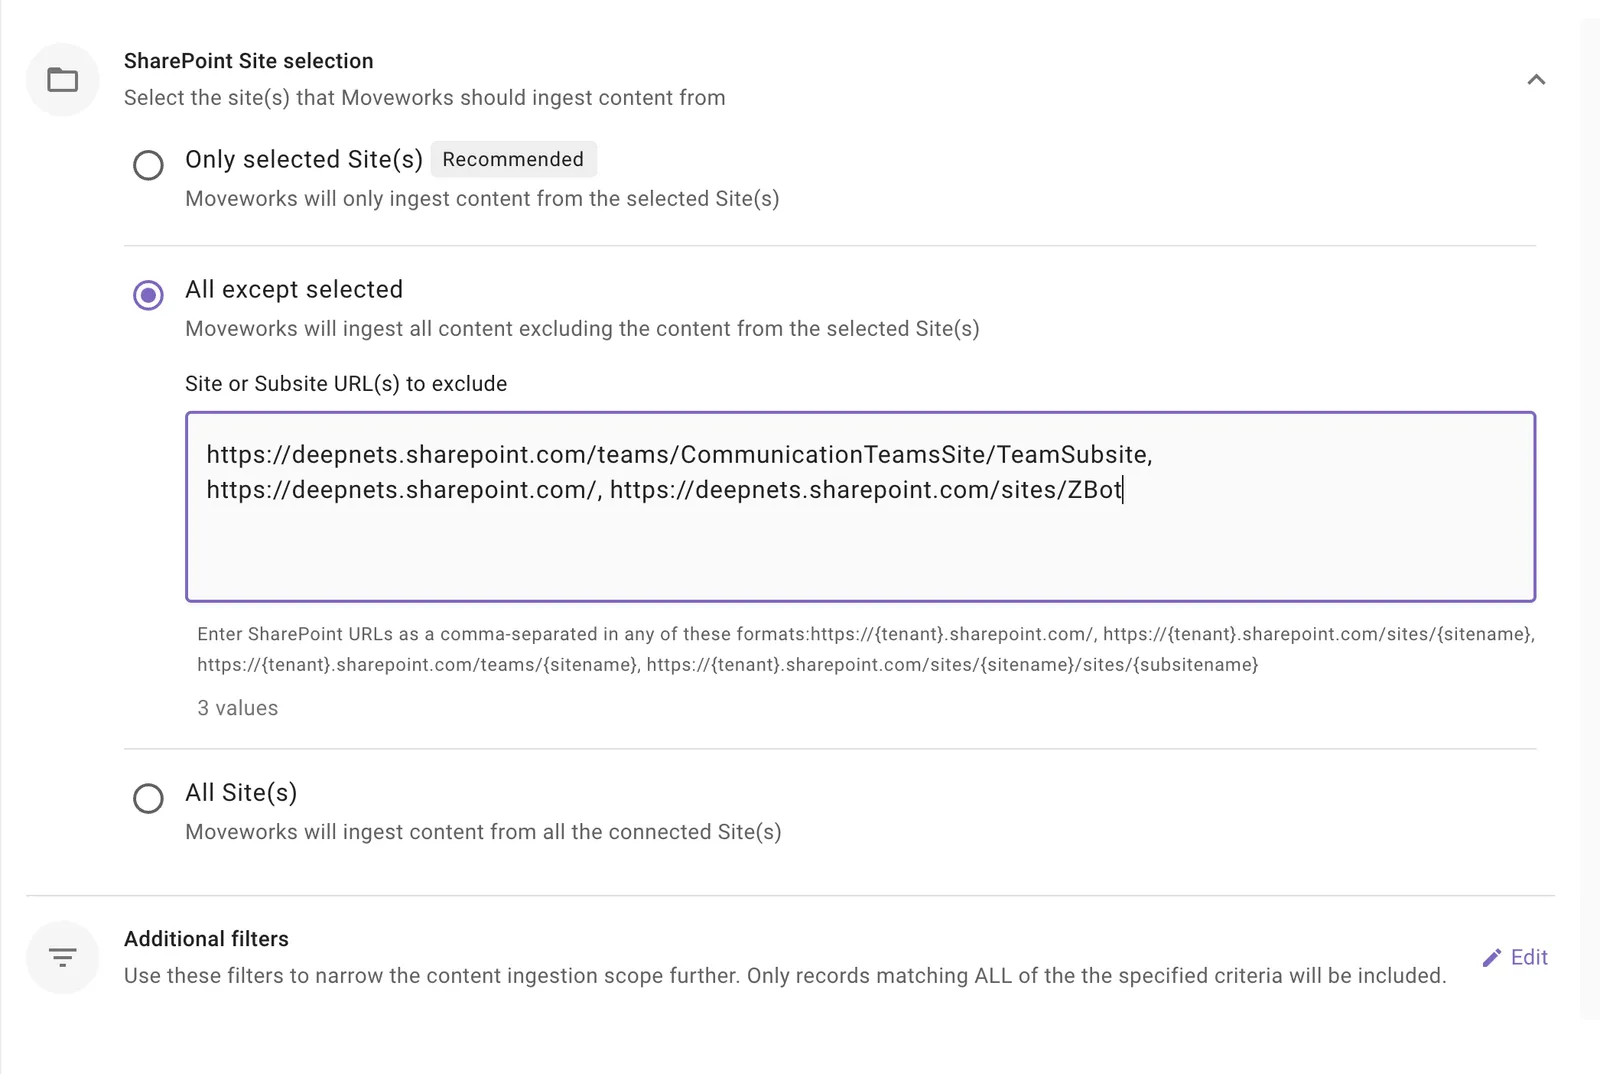
- SharePoint Site Selection: This is a mandatory configuration. This configuration defines which Sites Moveworks will crawl and ingest content from. As an admin, you get three options
-
Only selected Sites(s) (Recommended): Moveworks will only ingest content from specified Site URLs.
When to choose this option? Choose this option if you want content to be served only from a subset of Site URLs. For example - Let’s assume, the Azure App has access to 15 Sites or All Sites, but you want content to be served only from 5 Sites, then you choose this method.
How to configure? Enter comma separated Site URL(s).
-
All except selected: Moveworks will ingest content from all Sites except the specified ones.
When to choose this option?
Choose this option if you want content to be served from all except a few Sites. For example - Let’s assume, the Azure App has access to All 100 Sites, but you want content to be served from 96 Sites, then you choose this method and specify the 4 Site URLs from which Moveworks should not ingest.
Important Note: The Azure App must be configured with
Sites.Read.Allpermission scope to enable selecting this option.How to configure? Select this option and enter comma separated Site URL(s).
-
All Sites: Moveworks will ingest content from all applicable Sites
When to choose this option?
Choose this option if you want content to be served from All Sites within your SharePoint tenant. For example - Let’s assume, your SharePoint tenant contains 100 Sites, and you want content to be served from all 100 Sites, then you choose this method.
Important Note: The Azure App must be configured with
Sites.Read.Allpermission scope to enable selecting this option.How to configure? Select this option. You are not required to specify the Site URLs in this scenario.
-
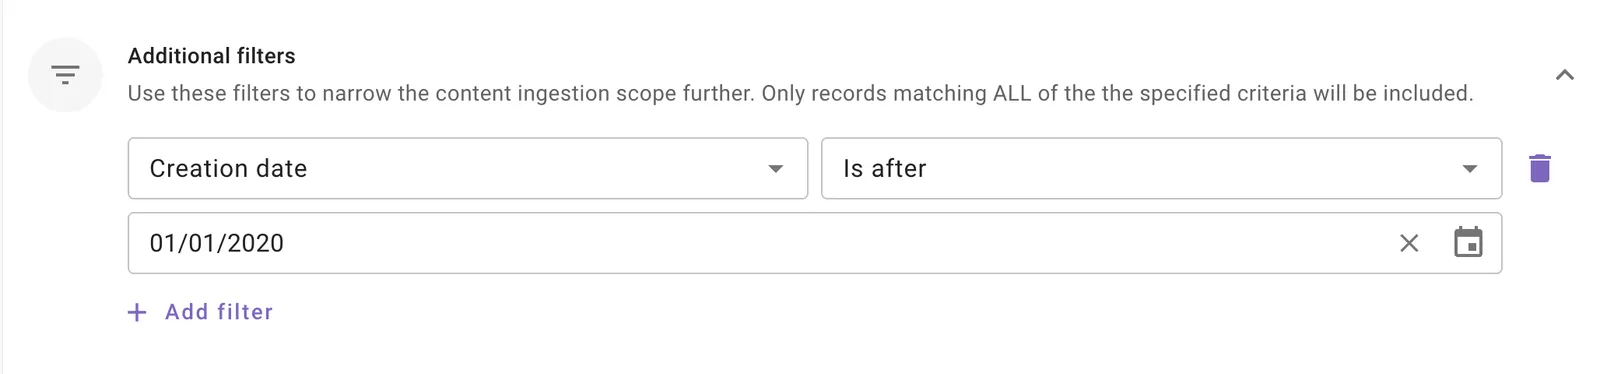
- Additional Filters: Use these filters to narrow the content ingestion scope further. Only records matching ALL of the specified criteria will be included.
Currently following filters are supported:
This is an optional configuration. Moveworks recommends using these filters only if your dataset is very large (i.e. >1million records) so that only relevant content is ingested and served to your employees.
- Modified date: Use this filter to include only those content records whose Modified date is after a specified date.
- Created date: Use this filter to include only those content records whose Created date is after a specified date.
Save and Start Ingestion
Once content selection is configured, you have two options:
-
Save: Clicking this will just save the configuration and not initiate the first ingestion crawl. Use this option, if you would want to complete your configuration in multiple sessions/ sittings.
- Once you click on Save, you will be redirected to the SharePoint Online & OneDrive overview screen
- You will notice a banner that prompts you to Start Ingestion
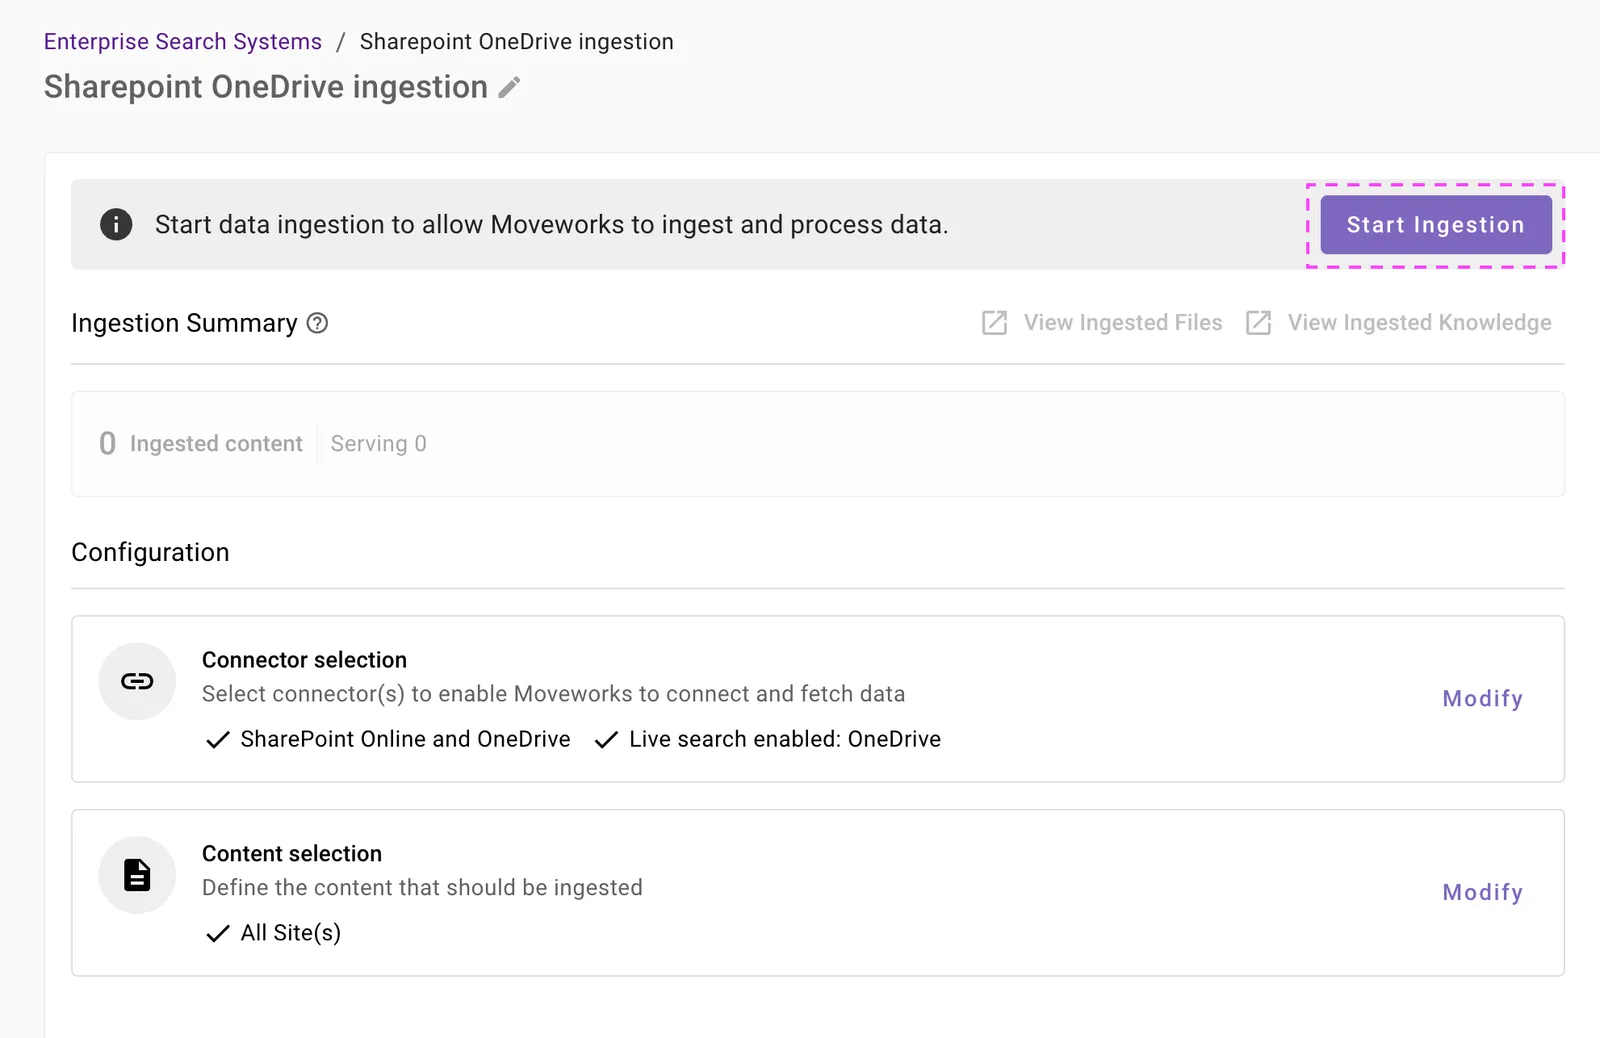
- Once you are satisfied with your configuration, you can click on Start Ingestion
- A confirmation popup will come that provides a summary of the configuration
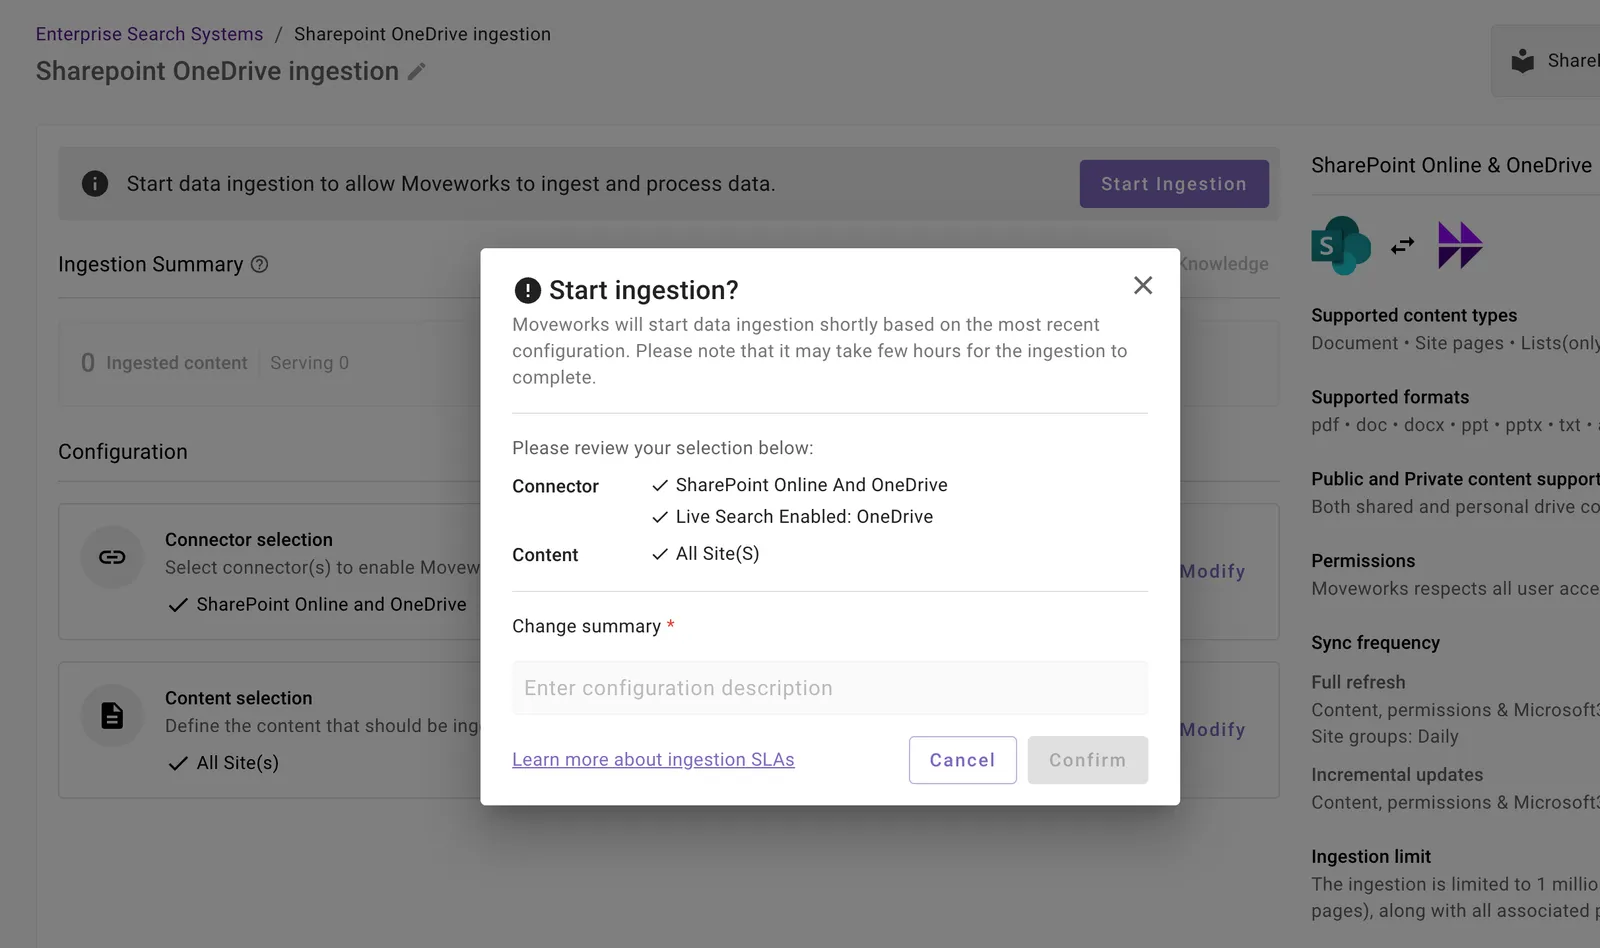
- Click on Confirm
- After you click on Confirm, ingestion will start shortly.
- For the first crawl to complete, this generally takes anywhere from few hours to 48 hours depending upon the size of the data.
-
Save and Start Ingestion: Click this option if you have completed and validated your content selection configuration and you are ready to initiate the first ingestion crawl.
- A confirmation popup will come that provides a summary of the configuration
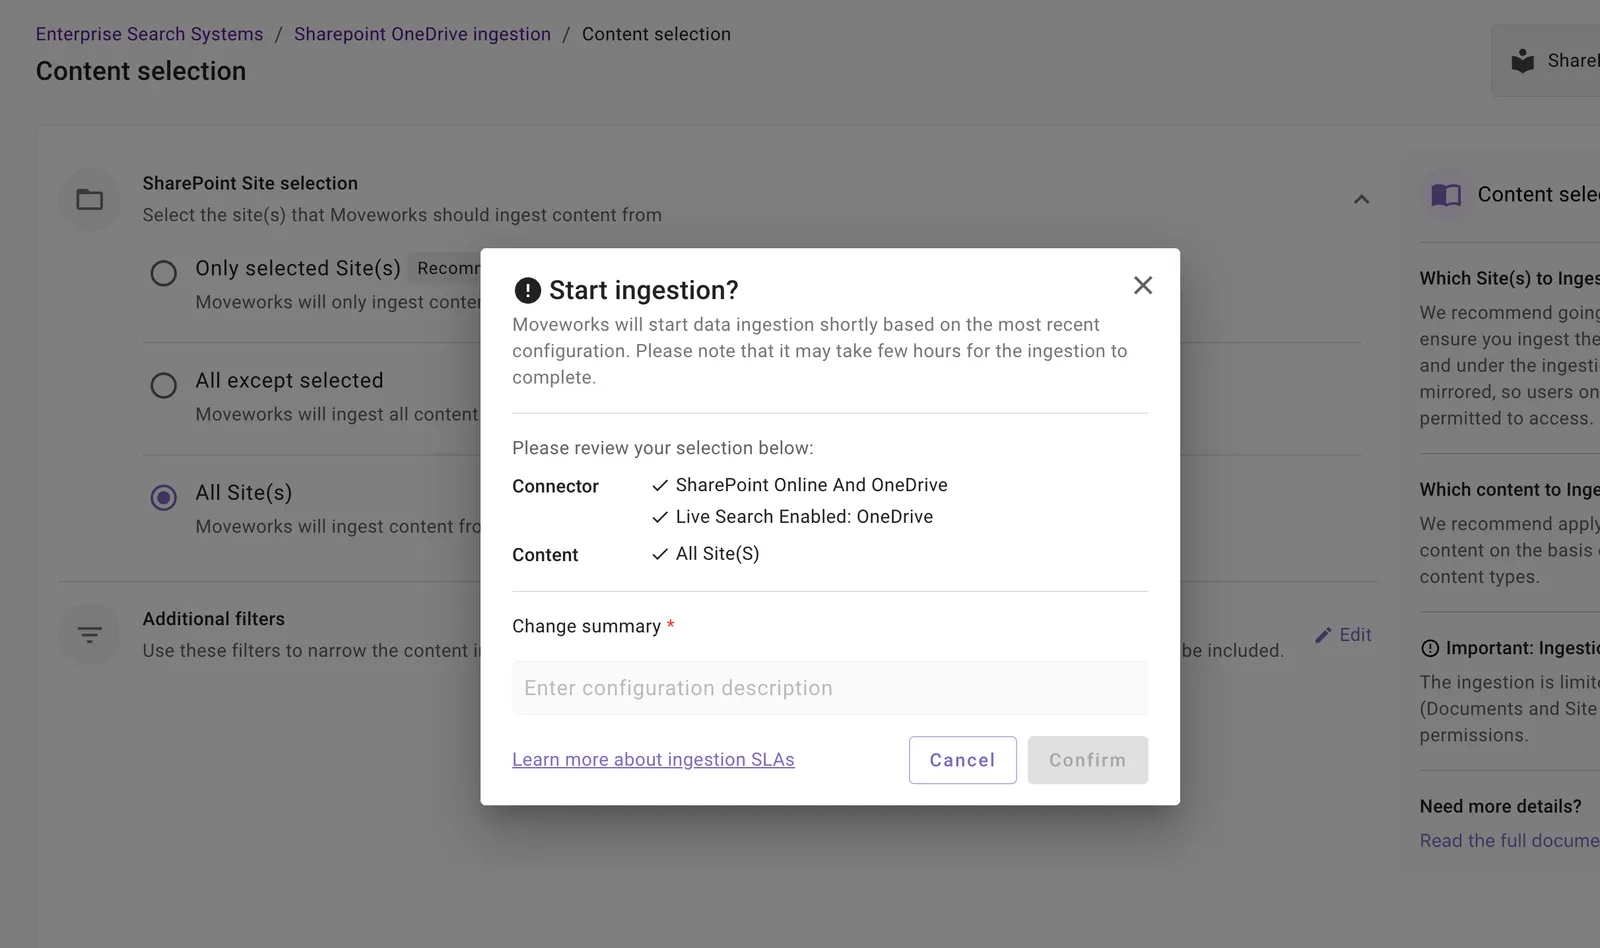
- Click on Confirm
- After you click on Confirm, ingestion will start shortly.
Important Note for Admins:
- It generally takes anywhere from few hours to 48 hours for the first crawl to complete depending upon the size of the data.
- You can review the status of ingestion via Data Ingestion Viewer and view ingested record in the Indexed Content > Files and Indexed Content > Internal Knowledge screens.
- A confirmation popup will come that provides a summary of the configuration
Audience configuration
A configuration does not serve content in search until you set its audience. From the configuration’s home page, open the Target audience tab, choose who can search this content, and save — source permissions are always enforced on top of your selection.
Audience configuration is the same for every Max Capacity connector. For the full steps and options, see Step 4: Define Target Audience in the Max Capacity Setup overview.
Known Limitations
The items below are known constraints we are actively working on. Each includes the current way forward.
- SharePoint Multi-Geo tenants. Microsoft Graph does not support change-notification webhooks for sites on non-root geo domains (for example,
contoso-eu.sharepoint.com). If your tenant uses SharePoint Multi-Geo, reach out to Moveworks for additional configuration so content on those domains stays in sync.
Troubleshooting Connector Validation Failures
Validation errors can occur when setting up a SharePoint Online or OneDrive connector. This guide helps you diagnose and resolve common issues.
Primary Validation Errors:
- “Validation failed: Invalid credentials or missing required permissions”
- “Invalid URL schema” - Base URL must use HTTPS protocol
- “Host name is not safe or valid” - The SharePoint domain cannot be resolved or is blocked
- “Failed to find connector action data” - Required configuration fields are missing or empty
Root Causes
The guide outlines potential causes by authentication method:
Server-to-Server Authentication Issues:
- Application not registered - The Azure AD application hasn’t been created or registered in Microsoft Entra
- Missing API permissions - Application lacks required SharePoint permissions (
Sites.Read.AllorSites.SelectedorFiles.Read.Alletc) - Certificate issues - Invalid certificate thumbprint, expired certificate, or private key format errors
- Tenant ID mismatch - The provided Tenant ID doesn’t match the SharePoint tenant
- Admin consent not granted - API permissions haven’t been approved by a Global Administrator
User-Consent Authentication Issues:
- Invalid Client Secret - The client secret has expired or is incorrect
- Missing delegated permissions - OAuth application lacks either
Sites.Read.AllorFiles.Read.Allor both the delegated permissions - Refresh token expired - User needs to re-authenticate
Configuration Issues:
- Invalid tenant domain - Domain doesn’t match the SharePoint site (e.g., “contoso” for contoso.sharepoint.com)
- Wrong region selected - Must choose “Commercial” for standard tenants or “GOV L4” for government clouds
- Private key format - Private key file must be in PEM format
- Empty required fields - Tenant domains list is empty or Client ID is missing
Resolution Approach
Follow these steps in sequence to diagnose and resolve validation failures:
Step 1: Verify Base Configuration
Check the fundamental connector settings:
- Confirm Tenant ID matches your Microsoft Entra tenant (found in Azure Portal → Azure Active Directory → Overview)
- Verify Tenant Domain is correct (e.g., “contoso” if your SharePoint URL is https://contoso.sharepoint.com)
- Confirm Region selection:
- “Commercial” for standard Microsoft 365 tenants
- “GOV L4” for US Government GCC High tenants
- Validate at least one tenant domain is provided
Step 2: Verify Azure AD Application Registration (Server-to-Server Auth)
For certificate-based authentication:
- Confirm application exists:
- Navigate to Azure Portal → Azure Active Directory → App registrations
- Search for your application by Client ID
- Verify the Application ID matches the Client ID in your connector configuration
- Check API permissions: Required Microsoft Graph permissions mentioned above - Understanding Permissions Scopes required for Enterprise Search
- Verify admin consent:
- In the application’s API permissions page, check the “Status” column
- Should show “Granted for [Your Organization]”
- If not granted, click “Grant admin consent” (requires Global Administrator role)
- Validate certificate configuration:
- Navigate to Certificates & secrets → Certificates
- Verify a certificate is uploaded and not expired
- Confirm the SHA-256 Thumbprint matches the
certificate_sha256_x5t_fingerprintin your connector config - Thumbprint format should be: uppercase hex string without colons (e.g., “A1B2C3D4E5…”)
Step 3: Verify Private Key Format
The private key must be in PEM format:
Common issues:
- Wrong format: Key must be PEM, not PFX, CER, or DER
- Missing headers: File must start with
-----BEGIN PRIVATE KEY----- - Line breaks: Ensure proper line breaks in the base64 content
- Encryption: Use unencrypted PEM files (not password-protected)
To convert from PFX to PEM:
Step 4: Test OAuth Credentials (User-Consent Auth)
For the Live Search (user-consent) OAuth application:
- Verify Client ID and Secret:
- Navigate to Azure Portal → App registrations → Your App
- Confirm the Application (client) ID matches your configuration
- Check Certificates & secrets → Client secrets
- If secret is expired, generate a new one
- Test token acquisition: Use Microsoft Graph Explorer or curl to test authentication:
Should return an access token if credentials are valid.
Step 5: Verify SharePoint Access Permissions
- Test application can access SharePoint sites:
- Use Microsoft Graph Explorer (https://developer.microsoft.com/graph/graph-explorer)
- Authenticate with your service principal or test user
- Try query:
GET https://graph.microsoft.com/v1.0/sites/{site-id}
- Check site permissions:
- Navigate to SharePoint Admin Center → Active sites
- Select a site and check site permissions
- For app-only access, verify the application has access to required sites
Step 6: Validate URL Accessibility
The connector validates that the SharePoint instance is accessible:
- HTTPS requirement:
- All URLs must use
https://(HTTP is rejected for security) - SharePoint Online always uses HTTPS
- All URLs must use
- Network accessibility:
- Ensure the SharePoint domain resolves to public IPs (not internal/private addresses)
- The connector blocks connections to private IP ranges for security
- Firewall rules:
- If using on-premise proxy, verify firewall allows outbound connections to SharePoint Online
- Check corporate proxy/firewall rules
Step 7: Advanced Troubleshooting
If issues persist after completing steps 1-6:
- Check Azure AD audit logs:
- Azure Portal → Azure Active Directory → Audit logs
- Filter by application ID to see authentication attempts
- Look for failed sign-in events or permission errors
- Review SharePoint audit logs:
- SharePoint Admin Center → Audit log search
- Search for activities by the service principal
- Check for access denied events
- Validate certificate-key pair:
- Ensure the private key matches the certificate uploaded to Azure AD
- Test by using the same certificate/key pair with Azure CLI:
- Test API directly: Use the Microsoft Graph API to test access with your credentials:
- Get access token using certificate-based auth
- Test endpoints:
GET https://graph.microsoft.com/v1.0/sites?search=*(list all sites)GET https://graph.microsoft.com/v1.0/sites/{site-id}/drive/root/children(list documents)