
ServiceNow Access Requirements
The Moveworks bot will directly perform actions in ServiceNow to create, update, and query information about tickets, catalog items, and knowledge base articles.
Prerequisites
- Make sure you have the admin access since it’s necessary for creating a Service Account and an OAuth client application
- Install Postman
Actions taken in your ServiceNow instance (ITIL and Workflow)
The Moveworks service interacts with your ServiceNow platform so that the bot can:
- monitor tickets for autonomous resolution;
- reach out to an employee when a ServiceNow ticket needs the employee’s attention;
- create tickets to log issues the bot has resolved autonomously;
- create tickets for issues that require an agent’s attention;
- triage incoming tickets;
- load ServiceNow Catalog Items and knowledge base articles so that the bot can serve them to employees; and
- read the ServiceNow user table so that the bot can log and assign issues appropriately.
Service account in Production Instance
To perform the actions listed above, Moveworks needs one account for the bot on your ServiceNow Production instance.
What is this account used for
A dedicated service account in ServiceNow allows the Moveworks service to read and update tickets, and read users, Catalog Items, and KB articles. Create a service account dedicated to Moveworks and share the credentials of this account with your Moveworks Implementation team. This account must have the following permissions and settings.
How to create a Service Account
Step 1: Create a Service Account
The steps below are for a local service account, but you may also use an account synced from your directory system.
- Go to your ServiceNow instance; the URL of the instance should look like
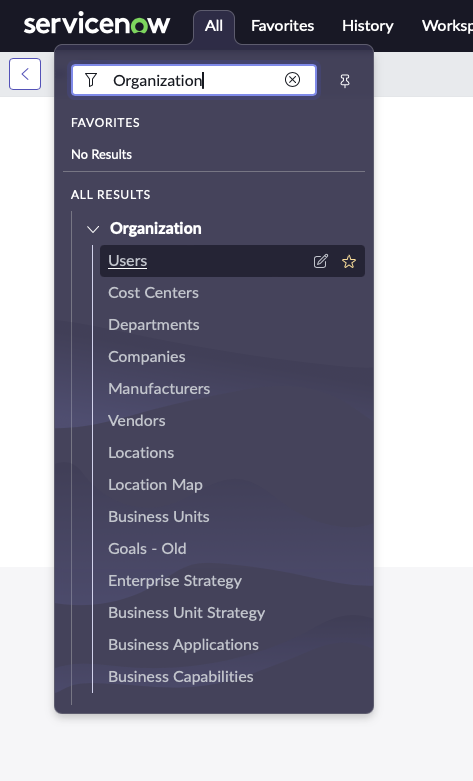
https://dev{{instance_name}}.service-now.com - Click on ‘All’, Search for ‘Organization’ in the search bar, and then Click on ‘Users’
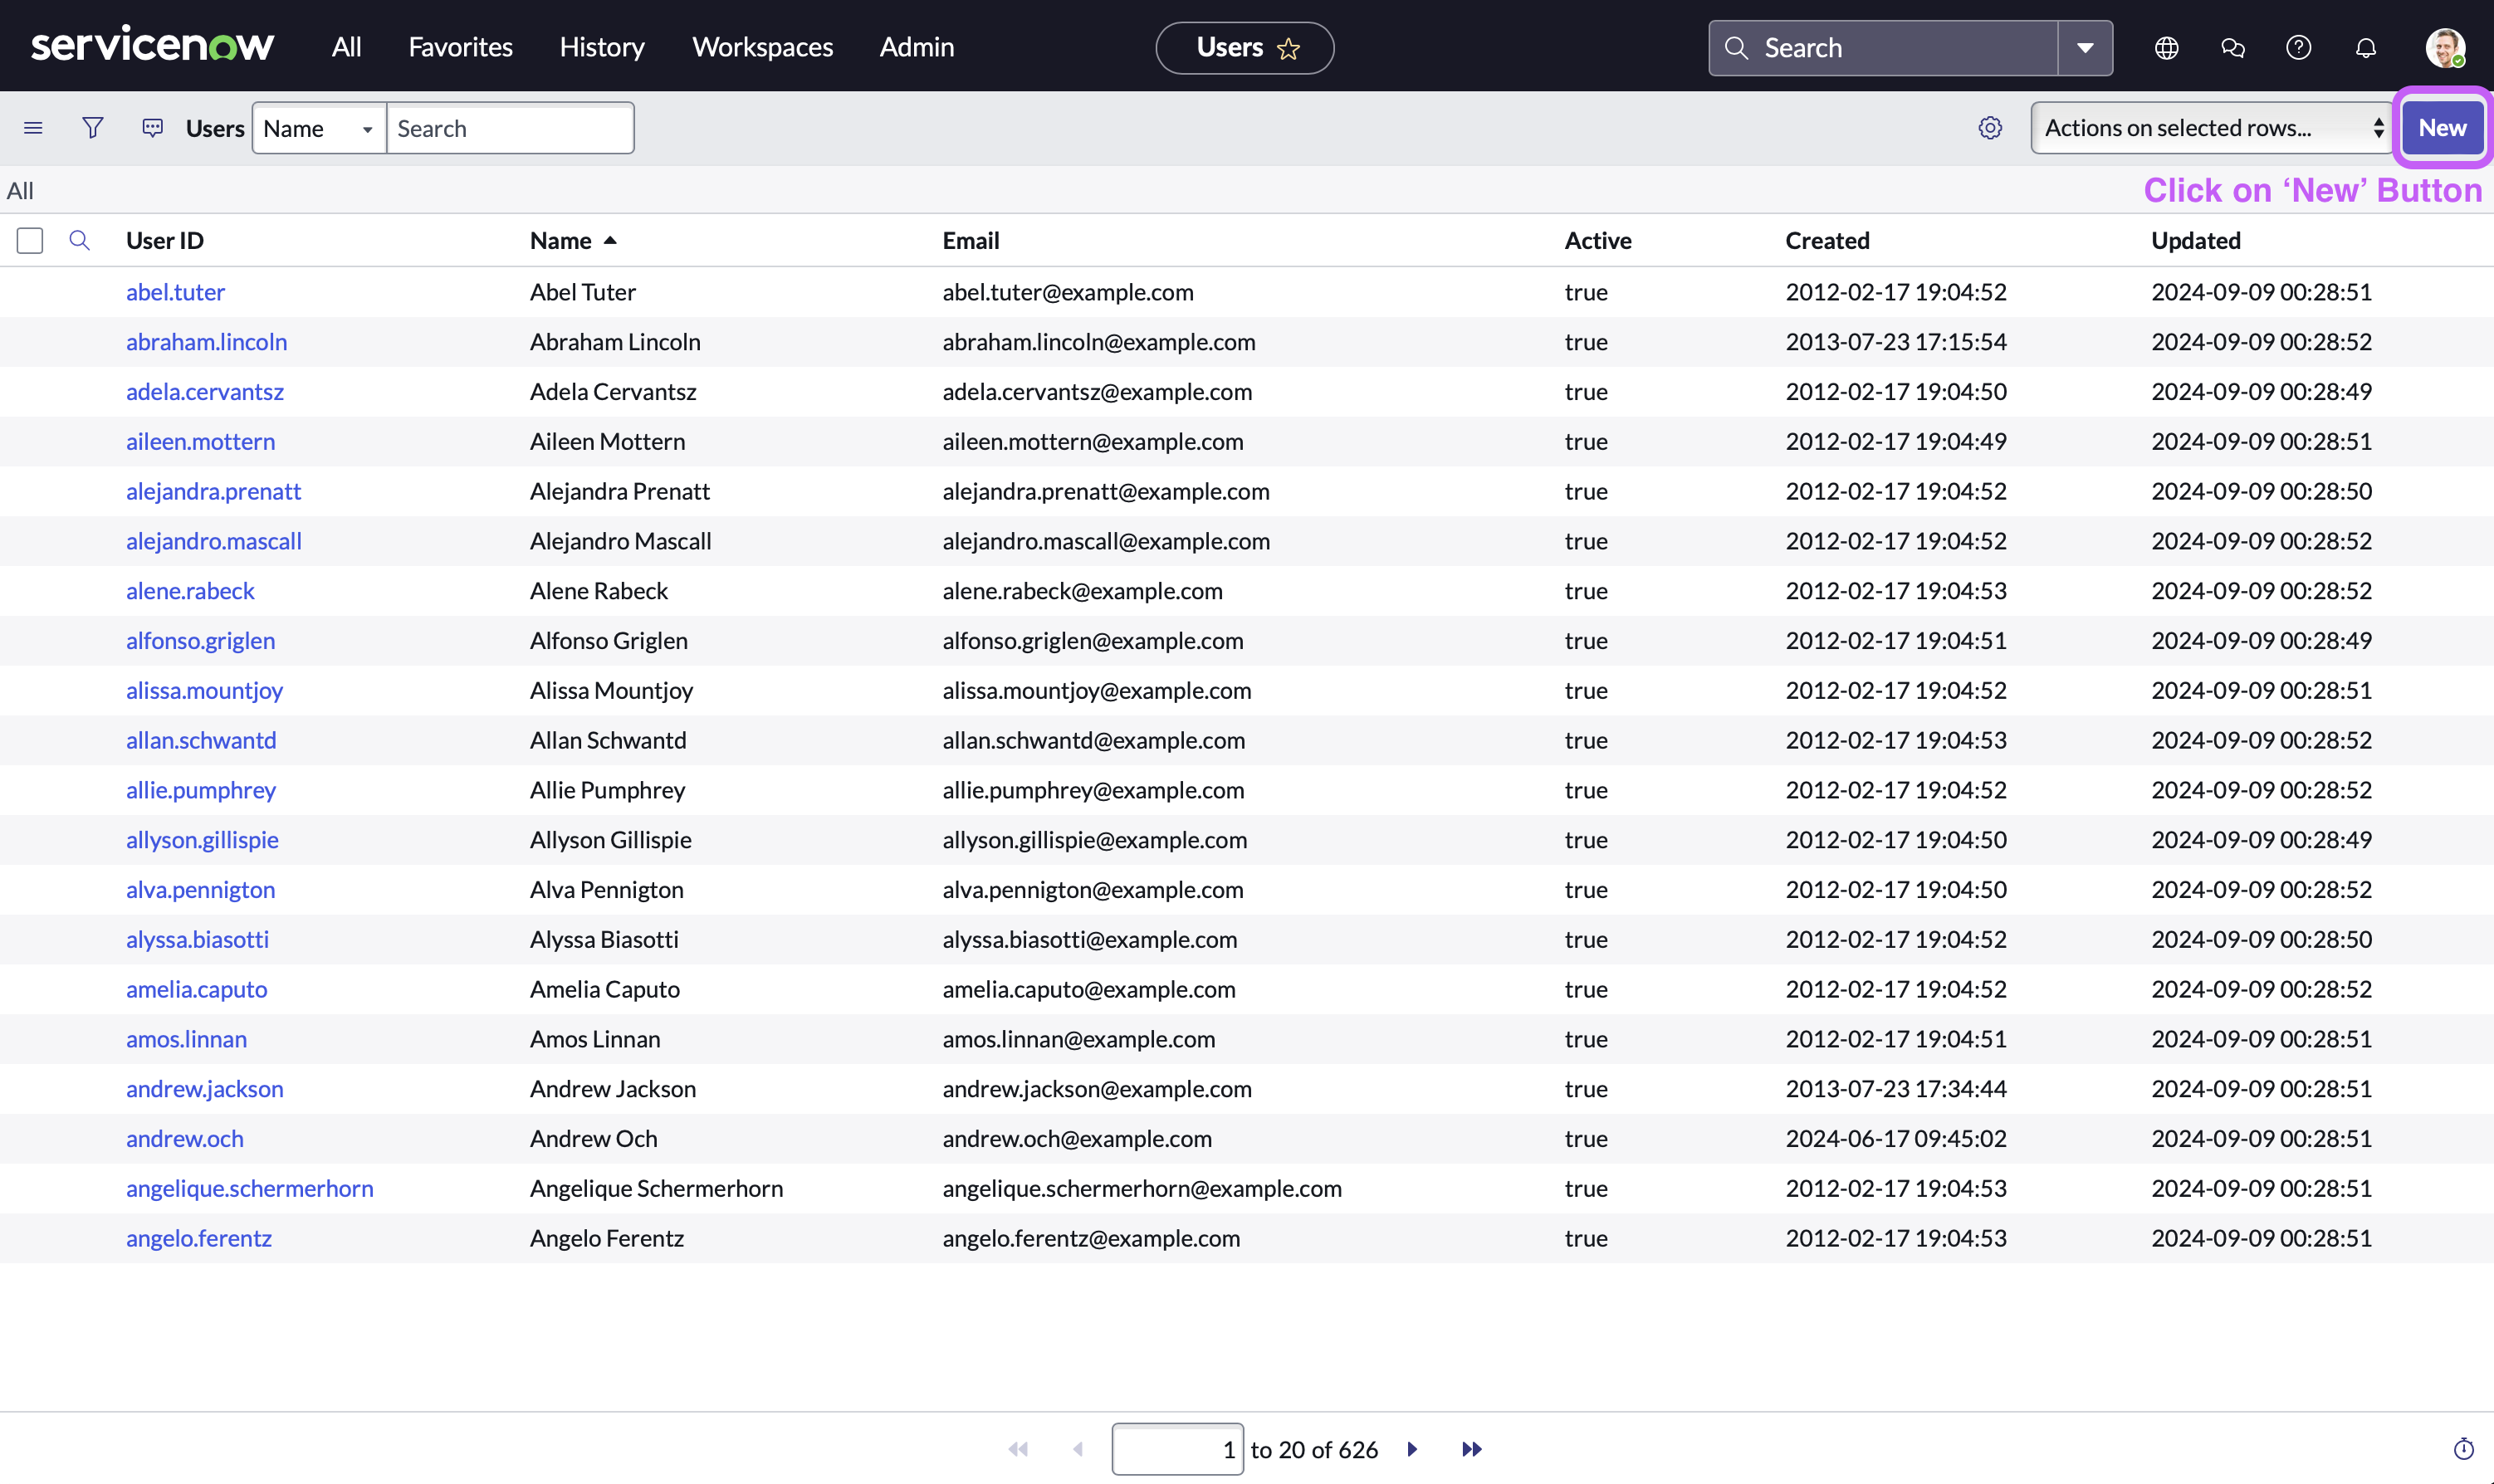
- Now, in the user table view, Click on the ‘New’ button located at the top right side of navigation bar
- Fill in the service account details. Make sure that ‘Web Service Access Only’ checkbox is enabled
- First Name/Last Name =
Your Moveworks bot name(otherwise use“Moveworks”) - Time zone =
GMTPlease ensure that both the Display Value and Value are set to GMT. If Display Value is set to GMT, but Value is set to Greenwich/Universal, then polling will fail. This can be verified on the sys_choice table
- Date format =
yyyy-MM-dd - Email (Optional - required for OAuth2.0 with JWT) =
Service account email ID of your choice(otherwise usesvc_snow_mw@your_org.com)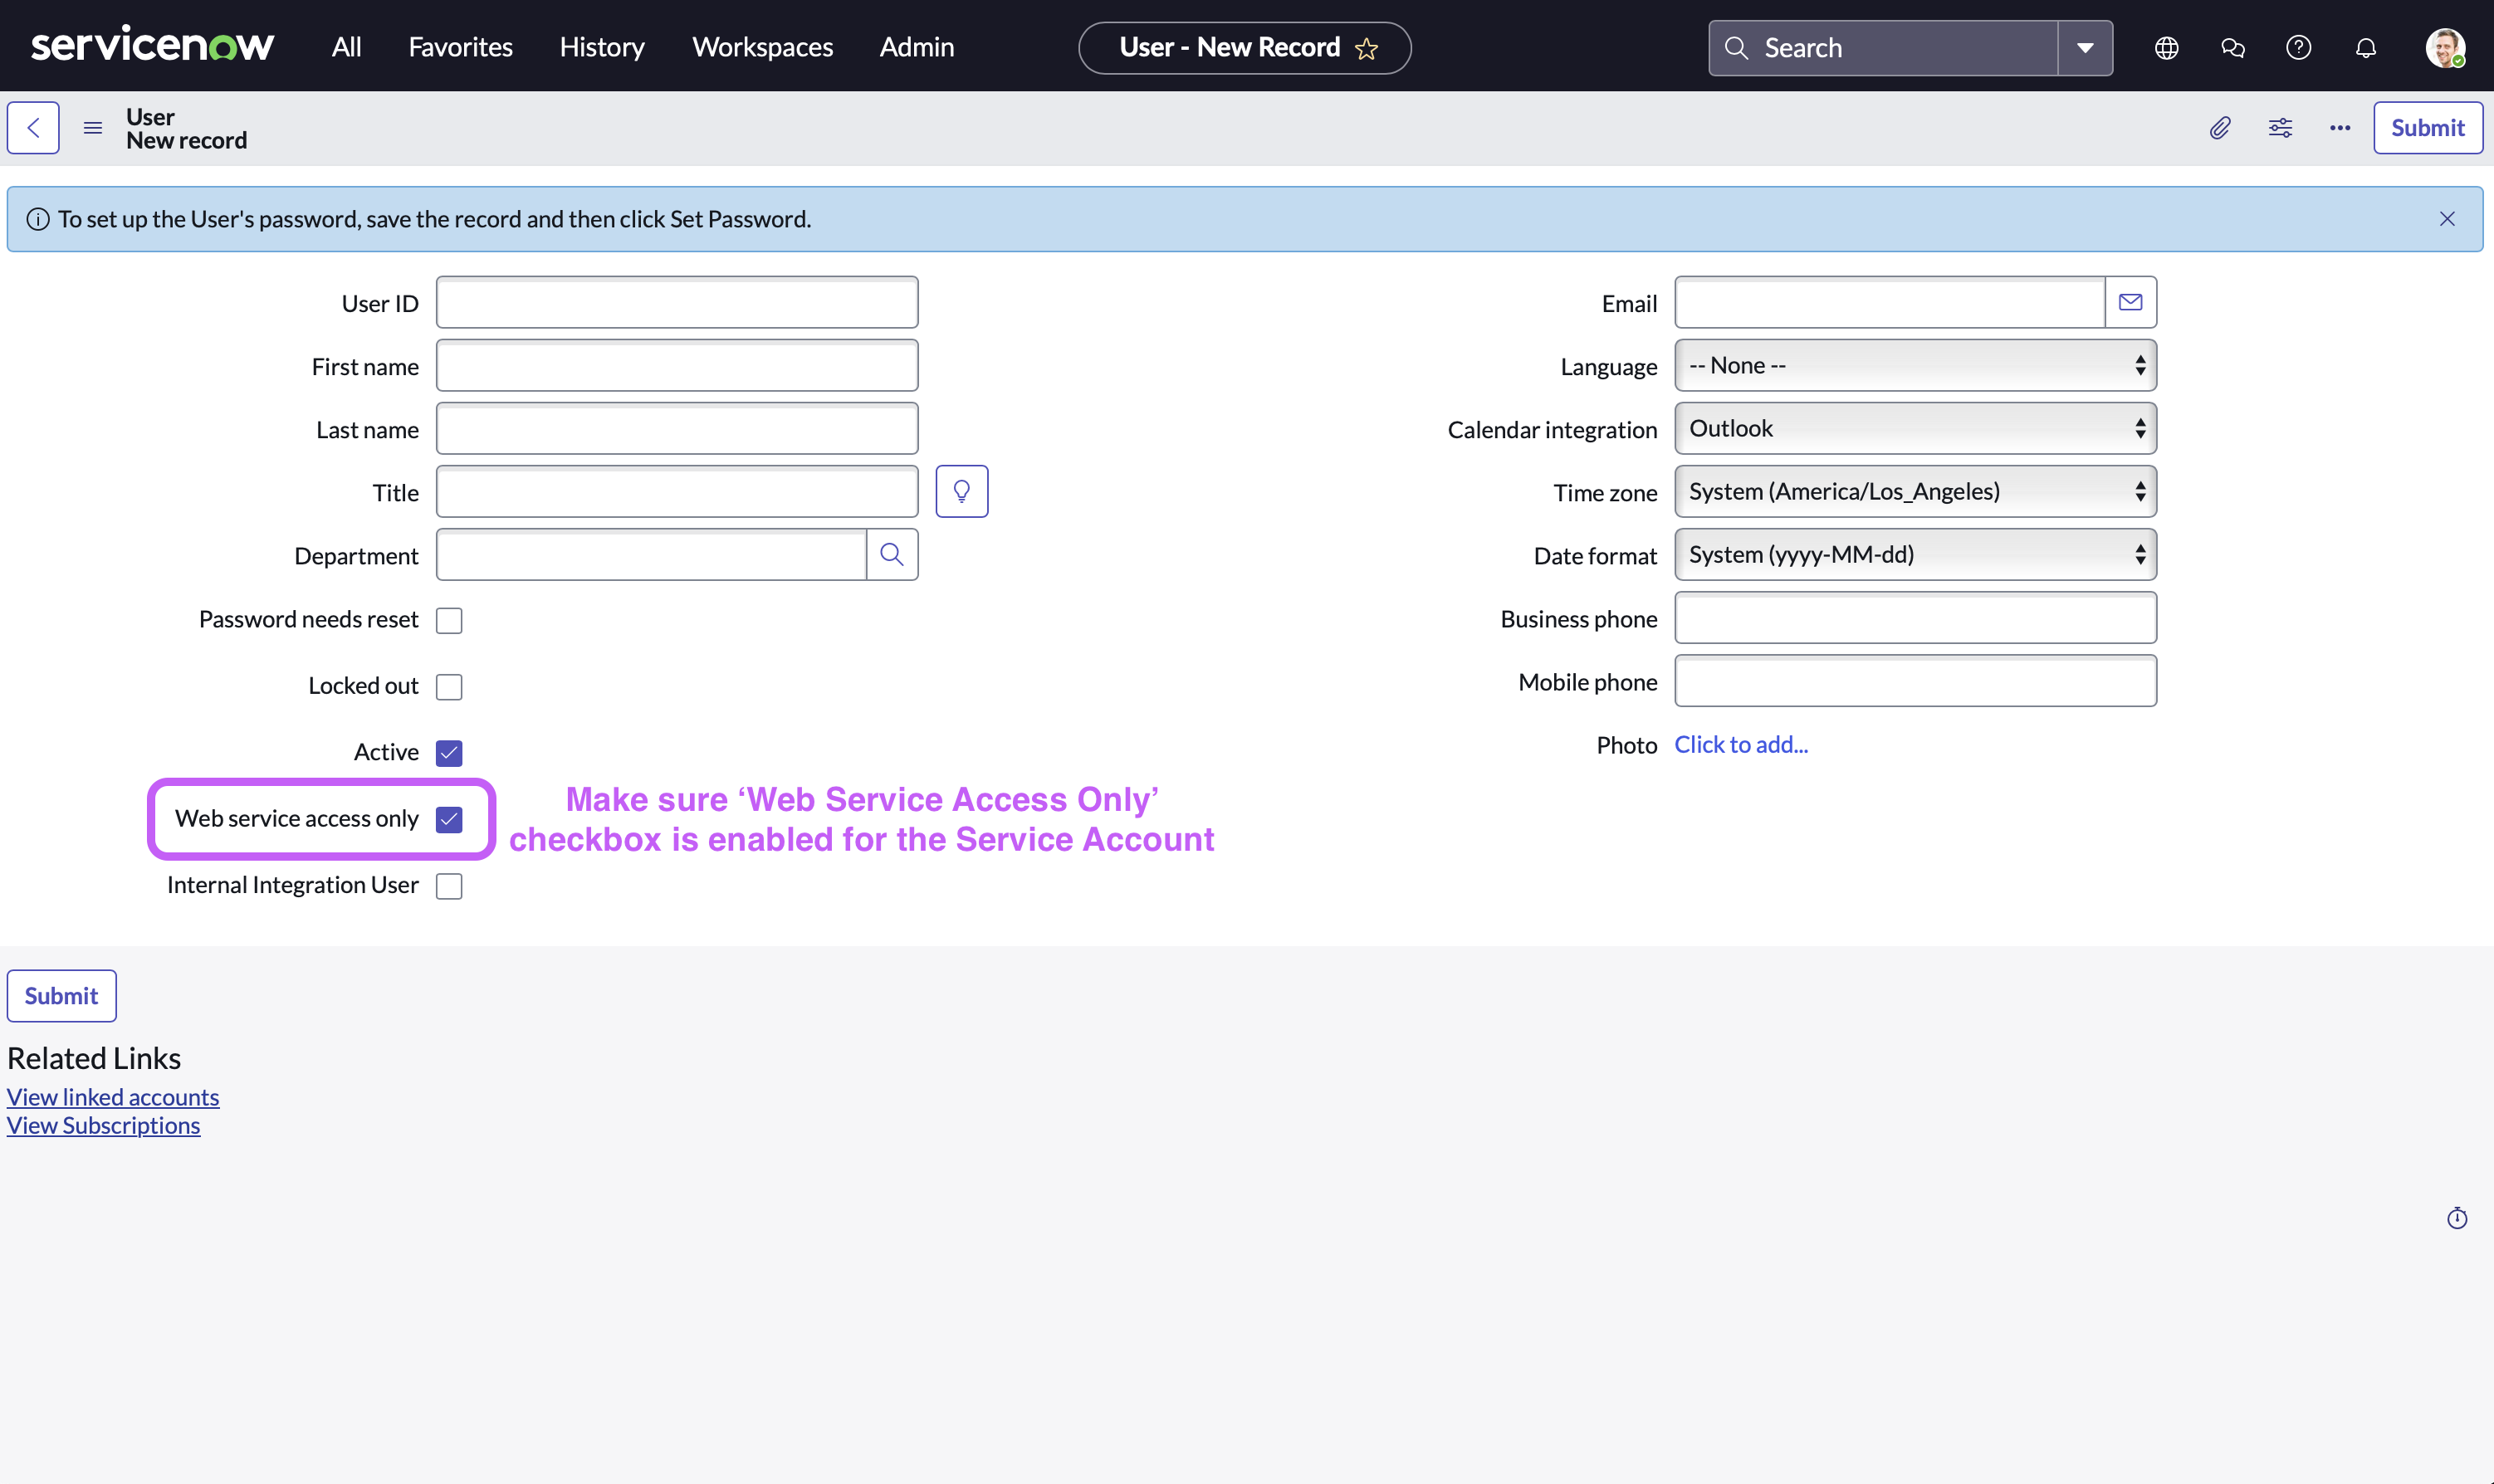
- First Name/Last Name =
- Click on ‘Submit’
Step 2: Grant Permissions to Service Account
- Click on ‘All’, Search for ‘Organization’ in the search bar, and then Click on ‘Users’ (As shown in the previous step)
- Now, in the user table view, Search for the Service Account you just created and then Click on it
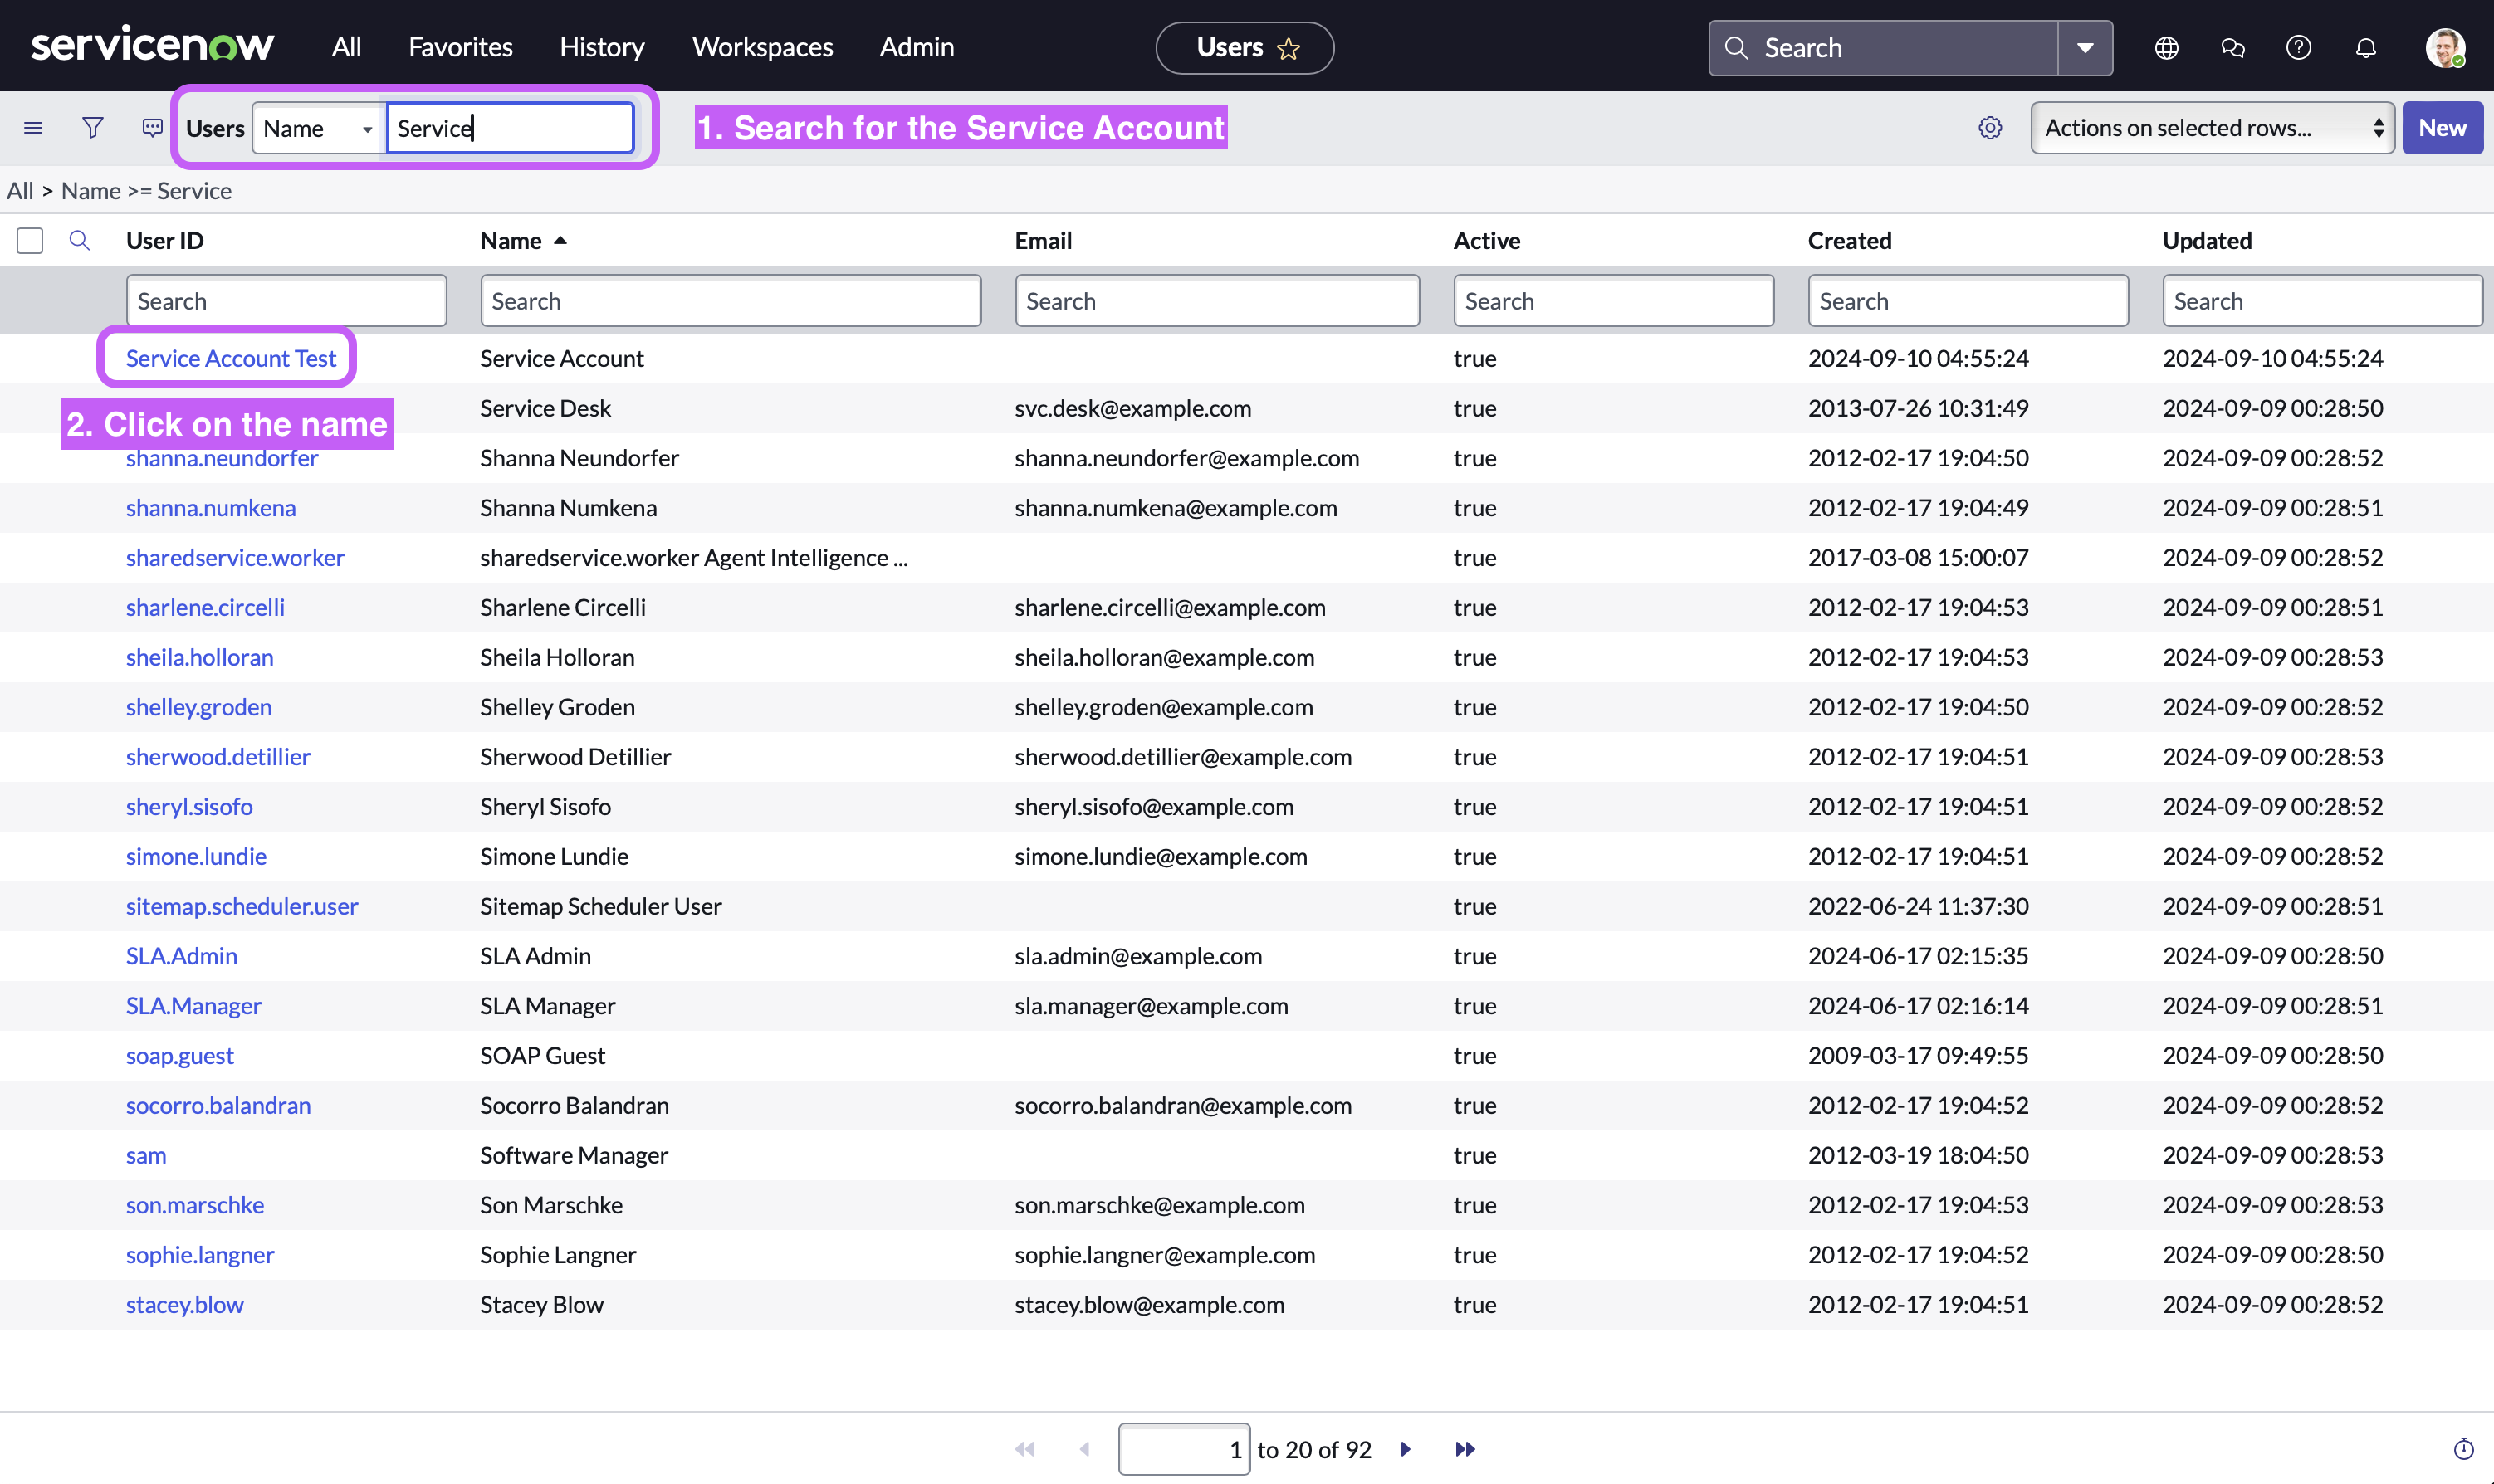
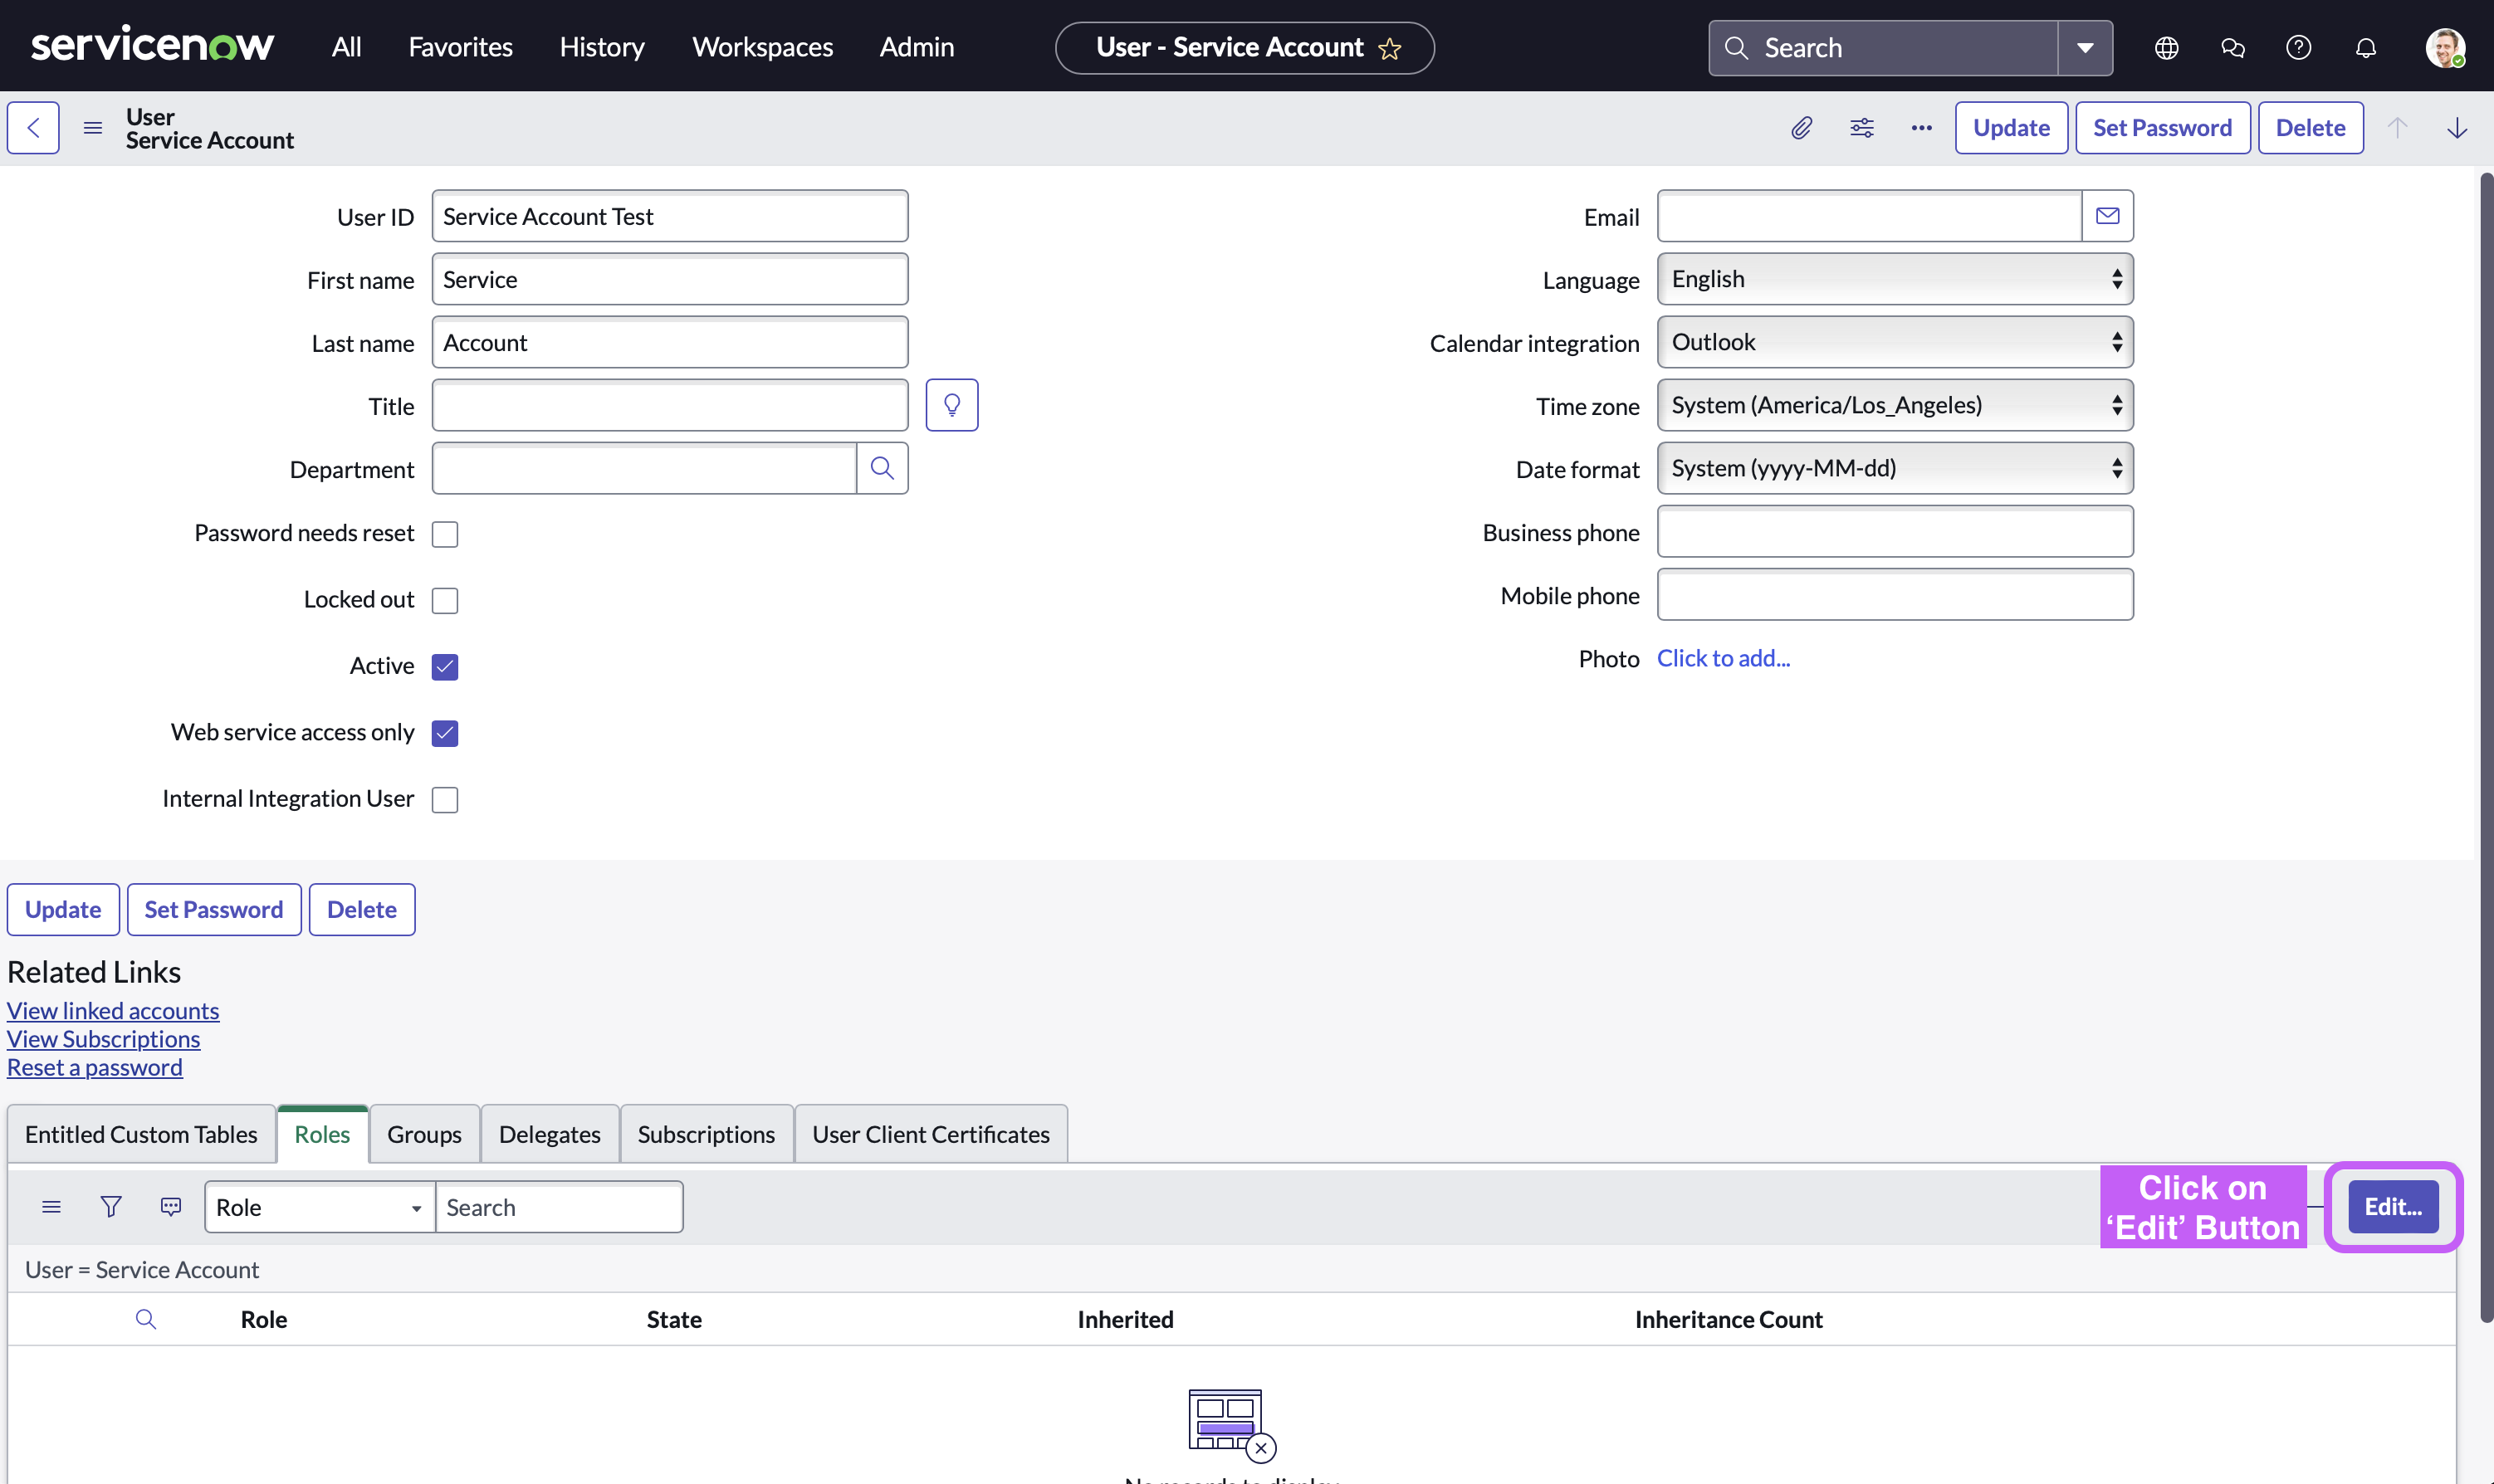
- Click on the ‘Edit’ button located at the bottom right side
- Click on the Permission, Click on the ‘Right Arrow’ button to assign (’Left Arrow’ button removes that permission), and then Click on ‘Save’ button.
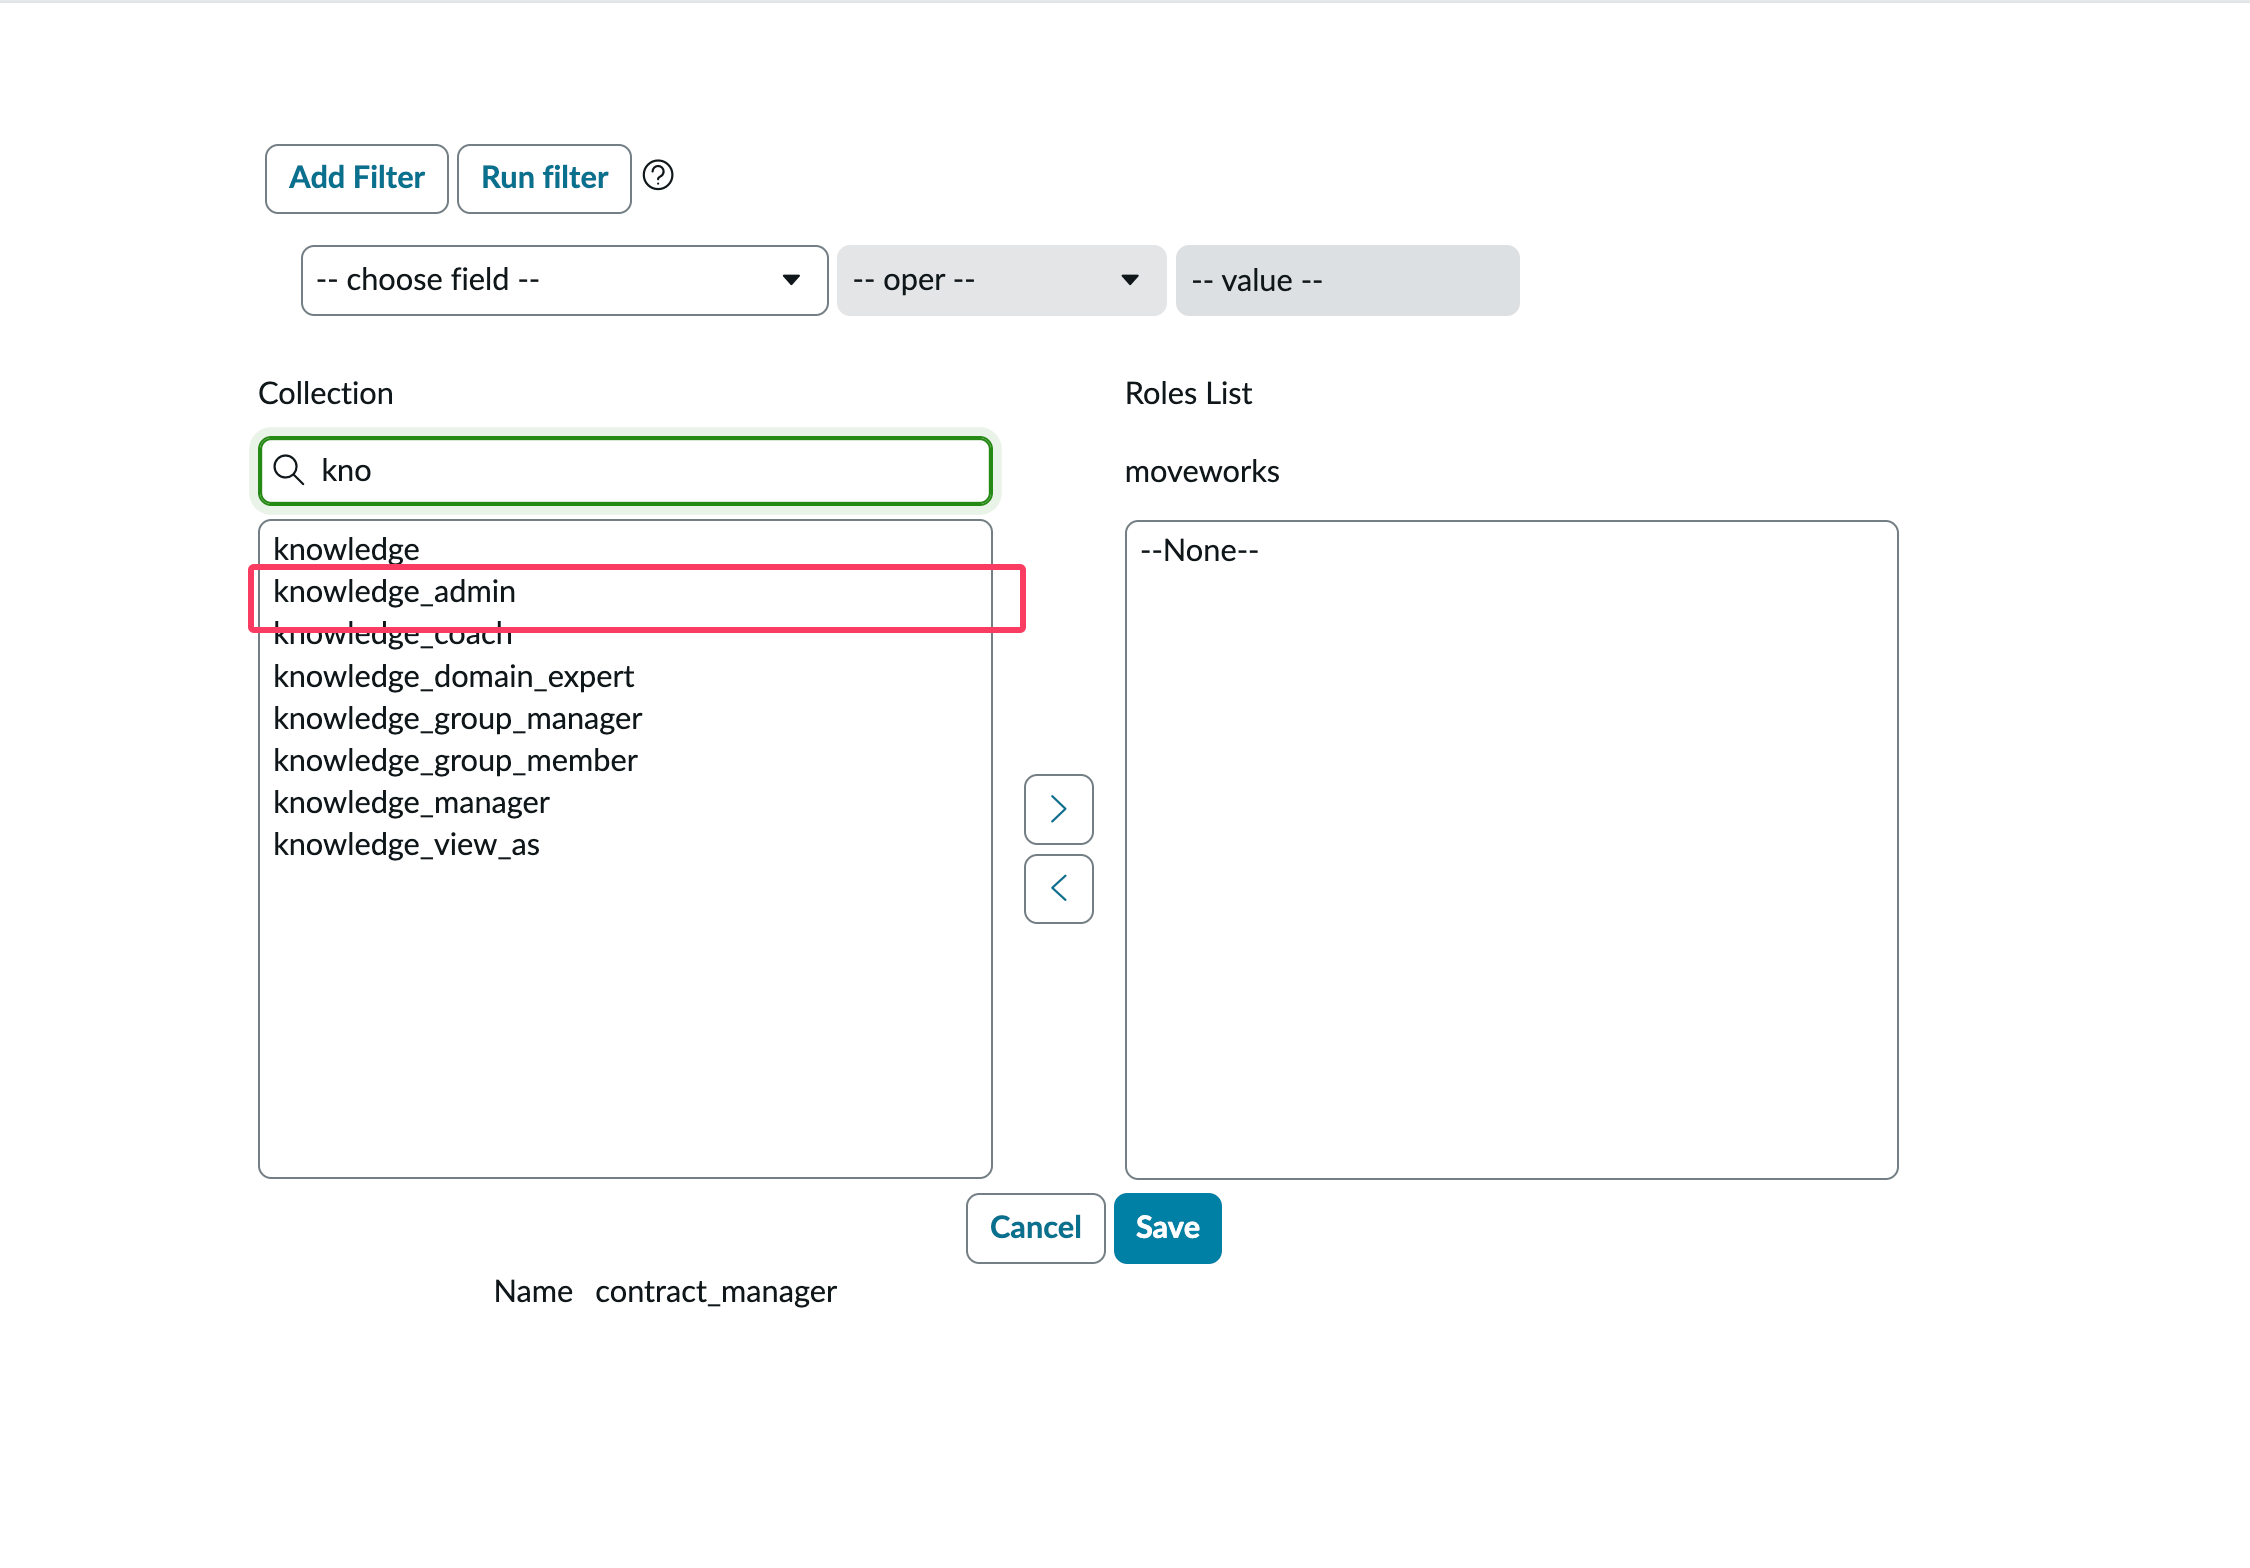
The next section provides recommendation on specific roles & permissions for the Moveworks Service Account.
Service Account Requirements & Permissions
- Account Timezone:
GMTtime zone (no offset) - Account Date Format:
YYYY-MM-DD - Account Time Format:
HH:mm:ssorhh:mm:ss a - Roles/Permissions:
- Option 1: Use ServiceNow Out of the Box/Standard roles
- ITIL - Used for ticket CRUD operations (file ticket, add comment, close ticket, etc.)
- Approval Admin - Used to read approvals, notify users on ServiceNow Approvals, and allow users to approve/deny approval
- Flow Operator - Used to view flows, flow contexts and its logs
- Catalog Admin - Used to read ServiceNow Catalog Items system definition and UI policies
- Ui Policy Admin - Used to read ServiceNow Catalog Items system definition and UI policies
- Personalize Dictionary - Used to read ServiceNow Catalog Items system definition and UI policies
- interaction_agent - Optional: Used only for Message Brokering Live Agent Chat functionality
- Option 2: Use a custom role & Approval Admin role
- Approval Admin Used to read approvals, notify users on ServiceNow Approvals, and allow users to approve/deny approval
- Custom Role with access to the following tables:
- Read/Write access:
- incident
- sc_request
- sc_req_item
- sc_task
- sys_journal_field - used for comments
- interaction (if interaction tickets are used)
- new_call (if call tickets are used)
- Read-Only access:
- sys_user - used to import user sys_id to take action on their behalf
- kb_knowledge - used to import knowledge
- kb_knowledge_block - used to import knowledge
- kb_template_how_to - used to import knowledge
- kb_template_kcs_article - used to import knowledge
- kb_template_faq - used to import knowledge
- kb_template_what_is - used to import knowledge
- kb_template_known_error_article - used to import knowledge
- sc_cat_item_content - used to import knowledge
- sys_user_group - used for the bot to understand assignment groups
- sys_choice - used to understand choice options
- sc_cat_item - used to understand options that appear in choice lists
- sc_cat_item_producer - used to import record producers
- sc_catalog - used to import catalog items for Form Finding & skilling
- sc_category - used to understand Service portal structure and properly filter catalog items
- sc_cat_item_category - used to understand Service portal structure and properly filter catalog items
- sc_cat_item_user_criteria_no_mtom - used to understand who cannot access a given catalog item
- catalog_ui_policy - used to replicate the behavior of catalog item forms when presented to your users in Moveworks
- catalog_ui_policy_action - used to replicate the behavior of catalog item forms when presented to your users in Moveworks for in-bot form filling
- catalog_script_client - used to understand forms that have scripts associated with them for in-bot form filling qualification.
- sys_ui_policy - used to replicate simple UI policies for in-bot form filling
- sys_dictionary- used to get display values for column drop downs for in-bot form filling
- question_choice- used to pull a question and its choices for in-bot form filling
- item_option_new- used to understand variable and variable set definition of a form for in-bot form filling
- item_option_new_set- used to understand variable and variable set definition of a form for in-bot form filling
- sc_item_produced_record - used to understand which tickets were submitted by a form.
- sys_script_include - used to understand script definition to recommend alternative approaches
- Read/Write access:
- Option 1: Use ServiceNow Out of the Box/Standard roles
Along with the core needs mentioned above, provide the Moveworks service account read access for all tables used in reference field types in catalog items (Reference, Lookup Select Box, List Collector, Lookup Multiple Choice, Select Box).
Note: It is recommended to create a user criteria for the service account that gets assigned to all catalog items. Moveworks will be able to respect user criteria for individuals using the bot, so they can only see resources that they have access to in the service portal. See below for more information.
Install Update Sets
The Moveworks Assistant can respect user criteria for knowledge articles and catalog items present on the ServiceNow end.
- In order to learn what these update sets do, you can read through the Document here.
- Click here to download and install the Moveworks ServiceNow update sets.
To set this up, please install the Moveworks update sets into your ServiceNow non-production and production instances.
After installing the update sets, a new role called moveworks_user is added to your instance. This role will need to be assigned to the Moveworks service account.
For more information on what the update sets contain, see this document.
Note: In order for the bot to respect user criteria across all catalog items and knowledge articles, it is recommended to create a user criteria for the service account that gets assigned to all resources.
Service account in Non-Production Instance
A dedicated service account in ServiceNow will need to be created with the same permissions as for the Production service account in the closest clone of the Production instance. Typically this is a non-production Staging or Test instance. This Service account should be a clone of the account in production and have the same sys_id and same name. Ideally, the service account name should resemble the bot name.
Please clone the following tables from your Production to the Non-Production instances to ensure accurate configuration and testing:
- sc_cat_item
- kb_knowledge
What is this account used for
This account is used when the bot is being configured during the IT Testing phase. After launch to all employees, this account is used for testing purposes. The Moveworks Team tests all changes in our platform using this account against the Test/Staging instance before they are deployed.
Setting Up OAuth Access
Setting up OAuth 2.0 with Password Grant
Step 1: Register OAuth 2.0 API Client
- Create a service account user (username & password), and note down the credentials. Your instance name is the prefix of your URL:
https://{{instance_name}}.service-now.com - Access your ServiceNow instance by navigating to the URL provided in the previous step
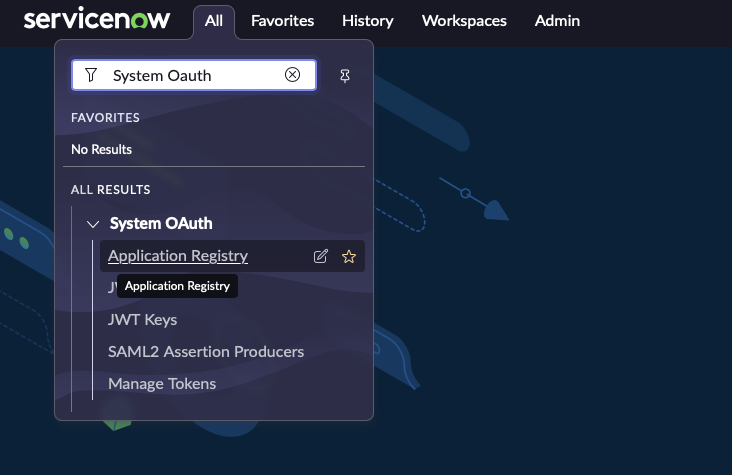
- In the top left side of navigation bar, Click on ‘All’, search for ‘System OAuth’ option in the search bar and then Click on ‘Application Registry’ under it
- Now, in the top right side of navigation bar, Click on the ‘New’ button

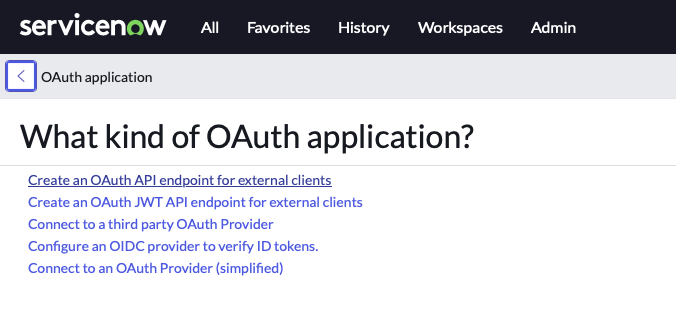
- Click on ‘Create an OAuth API endpoint for external clients’
- Fill in the necessary details and Click ‘Submit’
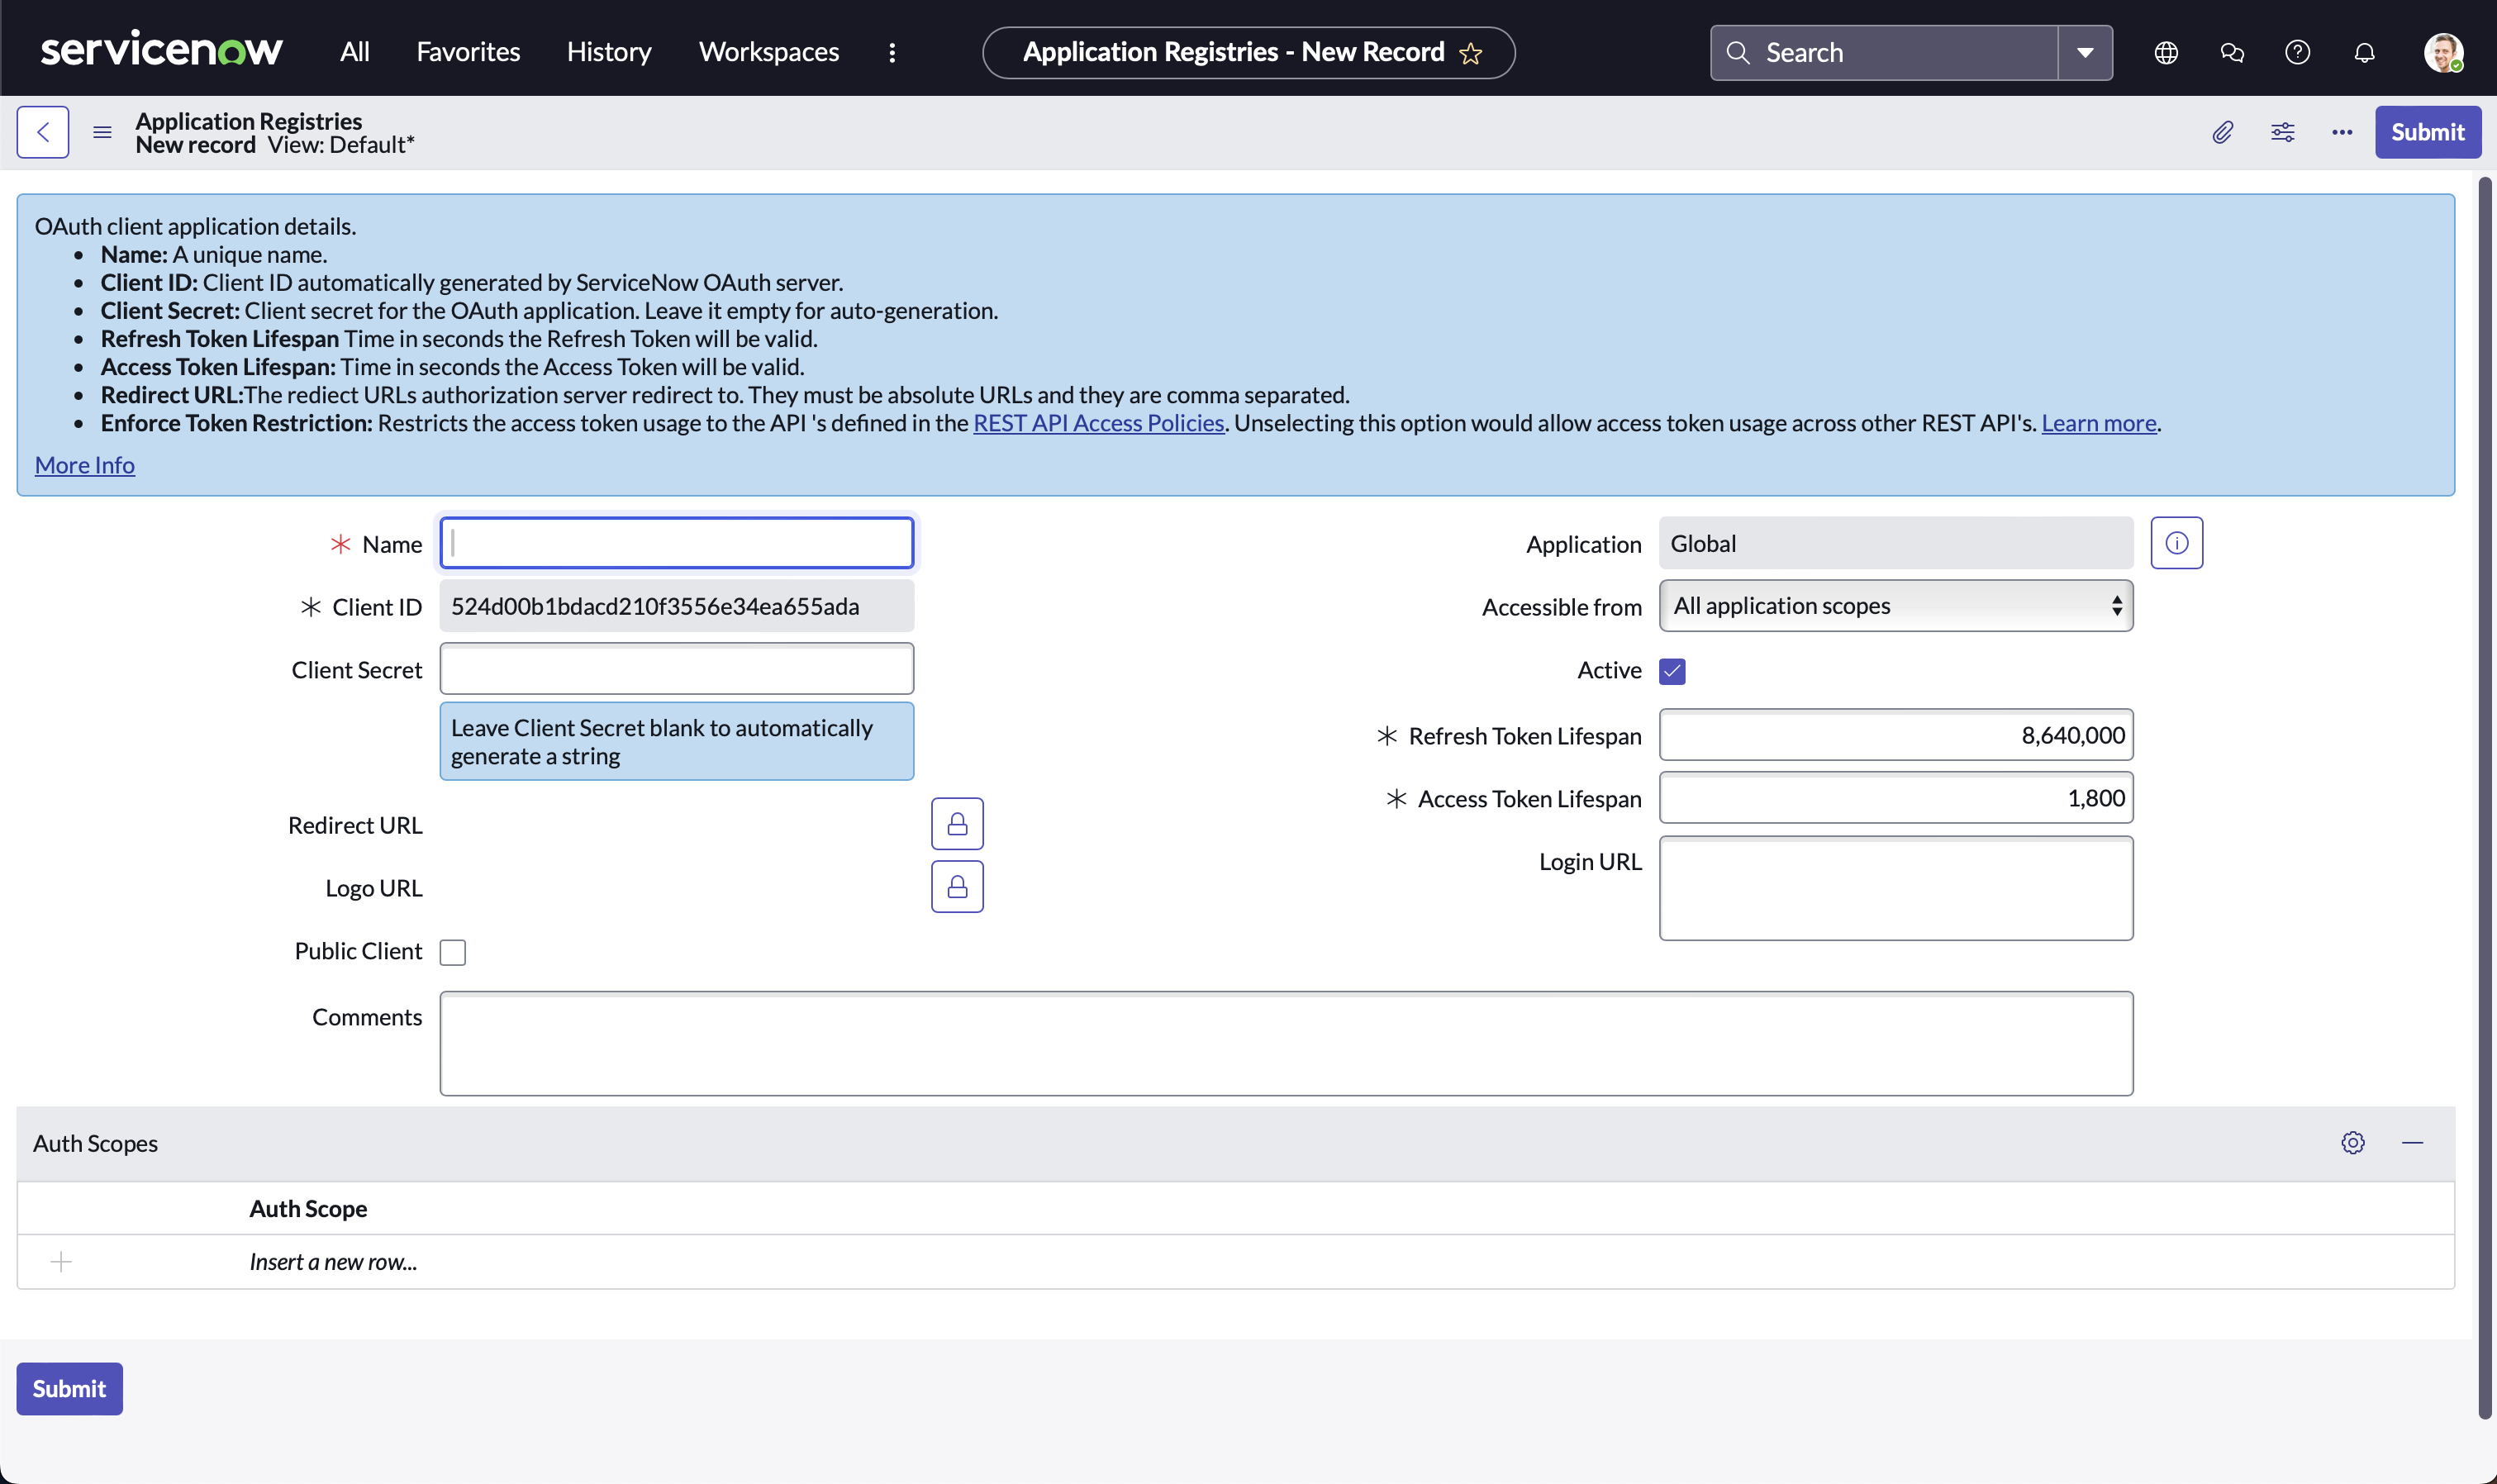
- Note down Client ID and Client Secret for later use in Step 3
Step 2: Test with Postman (or any other API client)
Choose one of the following options to configure a request in Postman
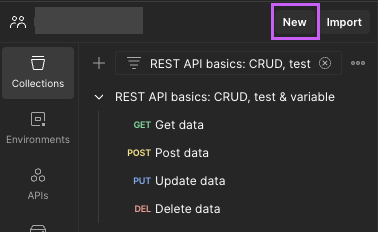
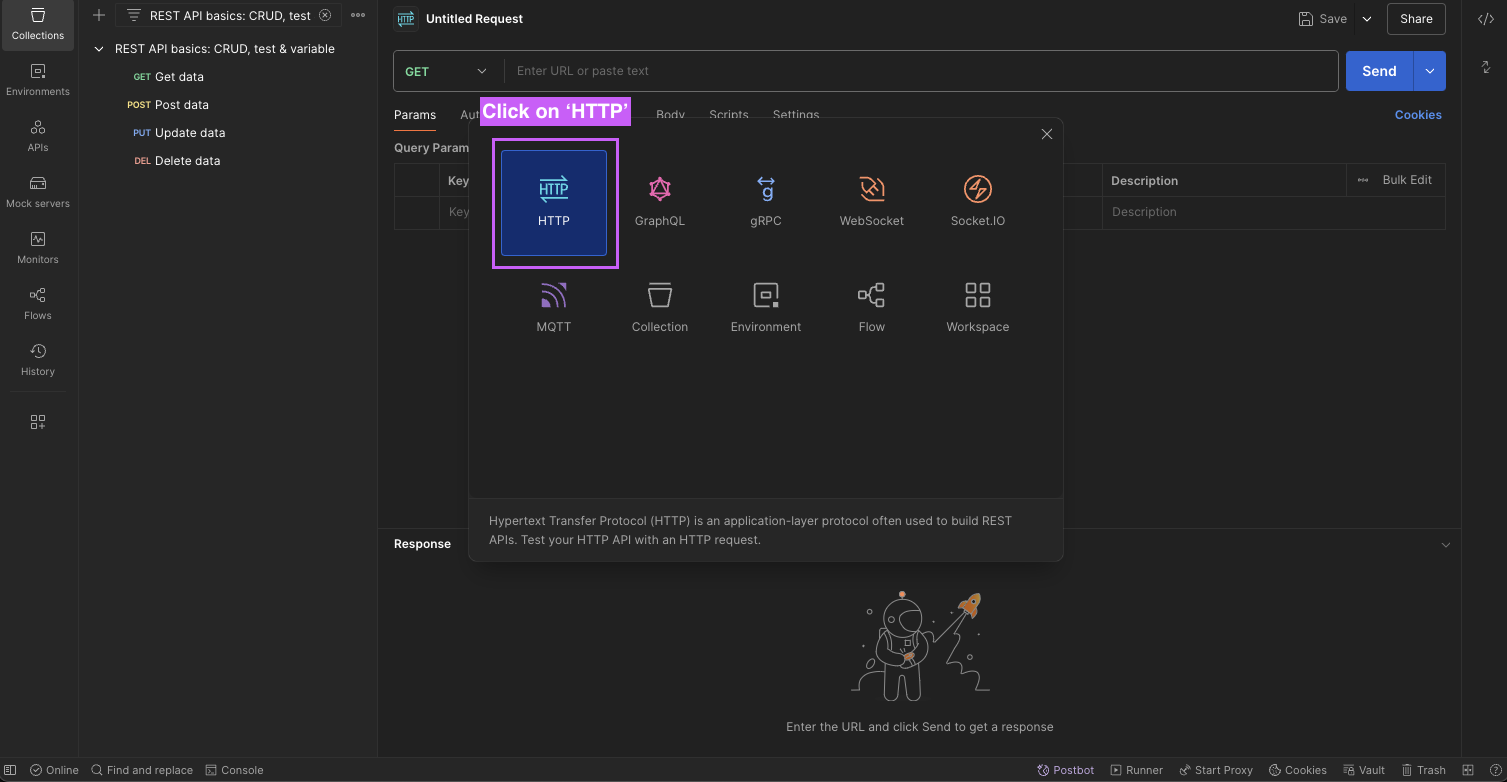
- Setup through a new HTTP request
- Open Postman, Click on ‘New’
- Click on ‘HTTP’
- Input your
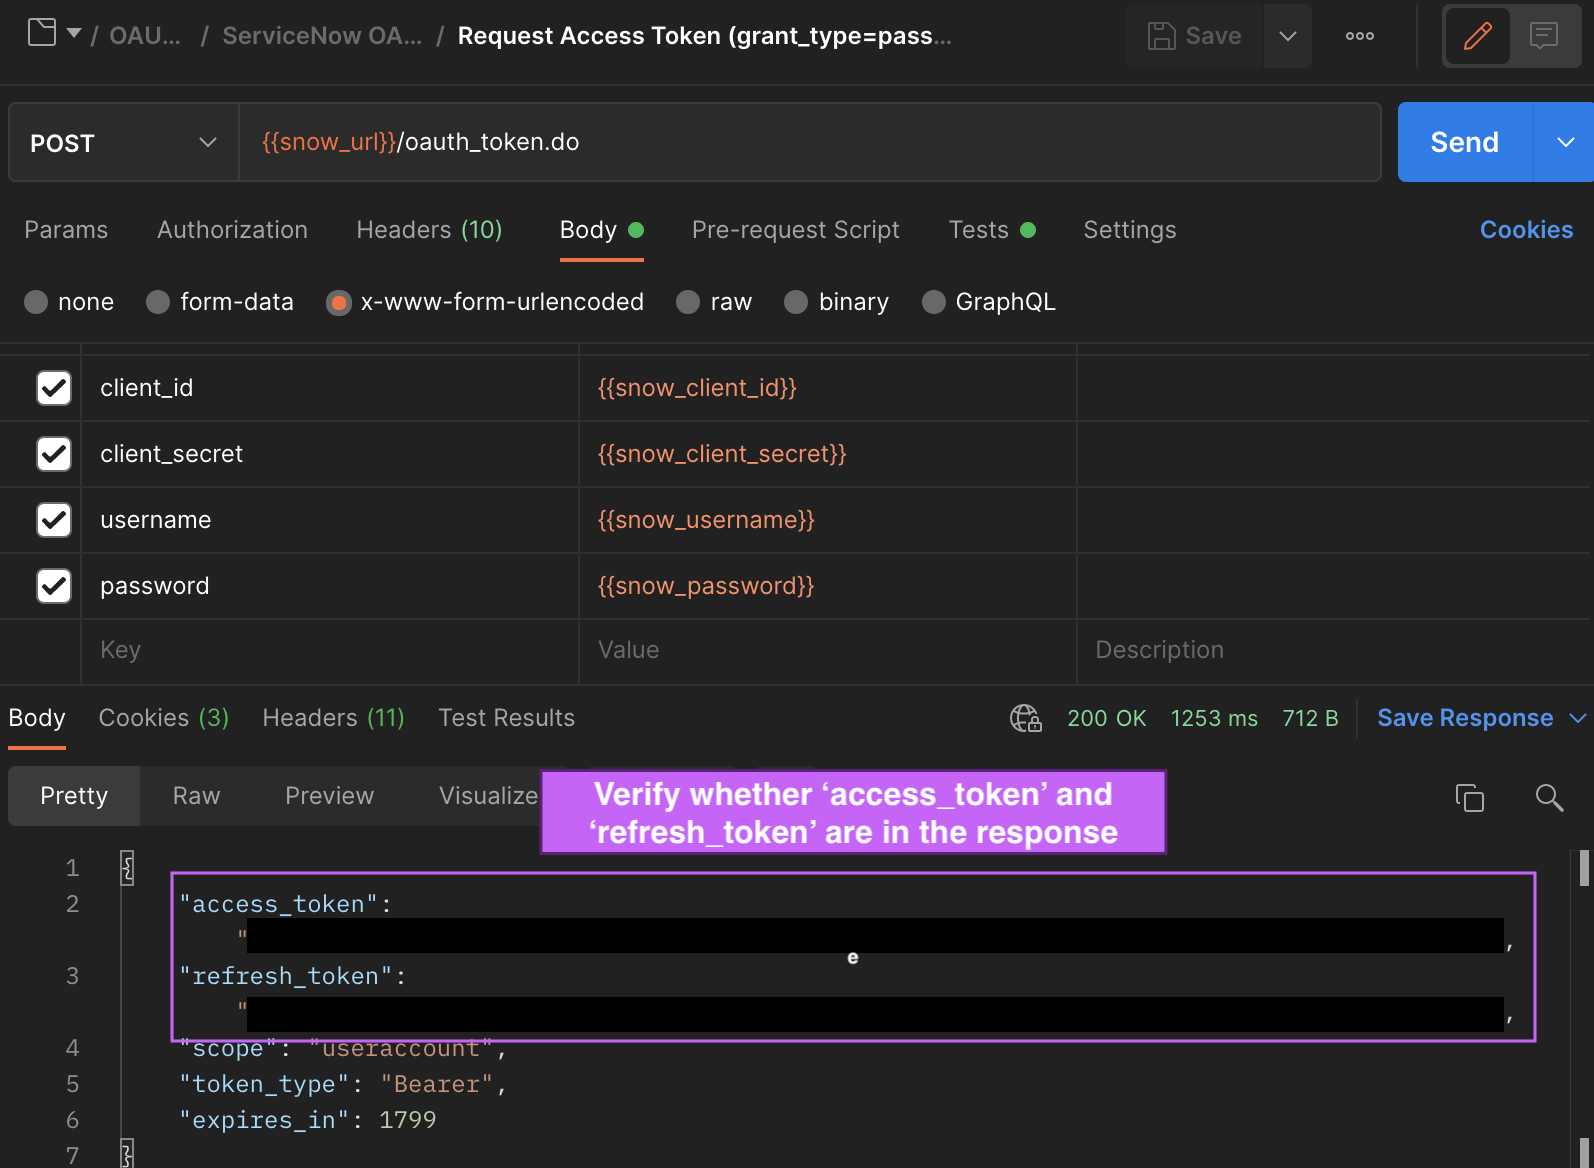
Instance Namein the URL bar andUsername,Password,Client_ID, andClient_Secretin the Body using x-www-form-urlencoded option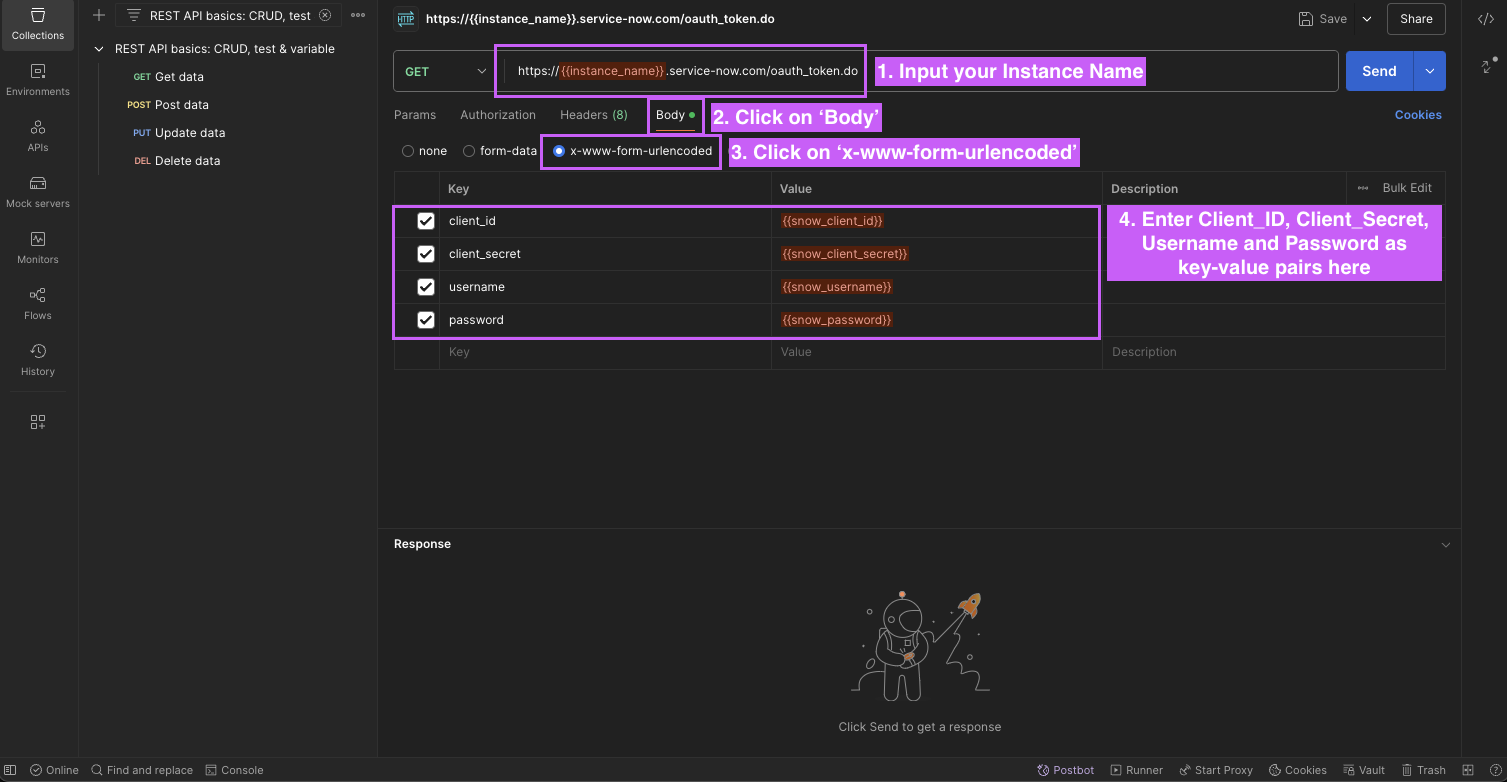
- Open Postman, Click on ‘New’
- Setup through cURL command method
- Copy the following cURL command
javascript
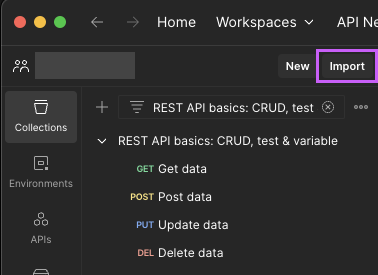
- Open Postman, Click on ‘Import’
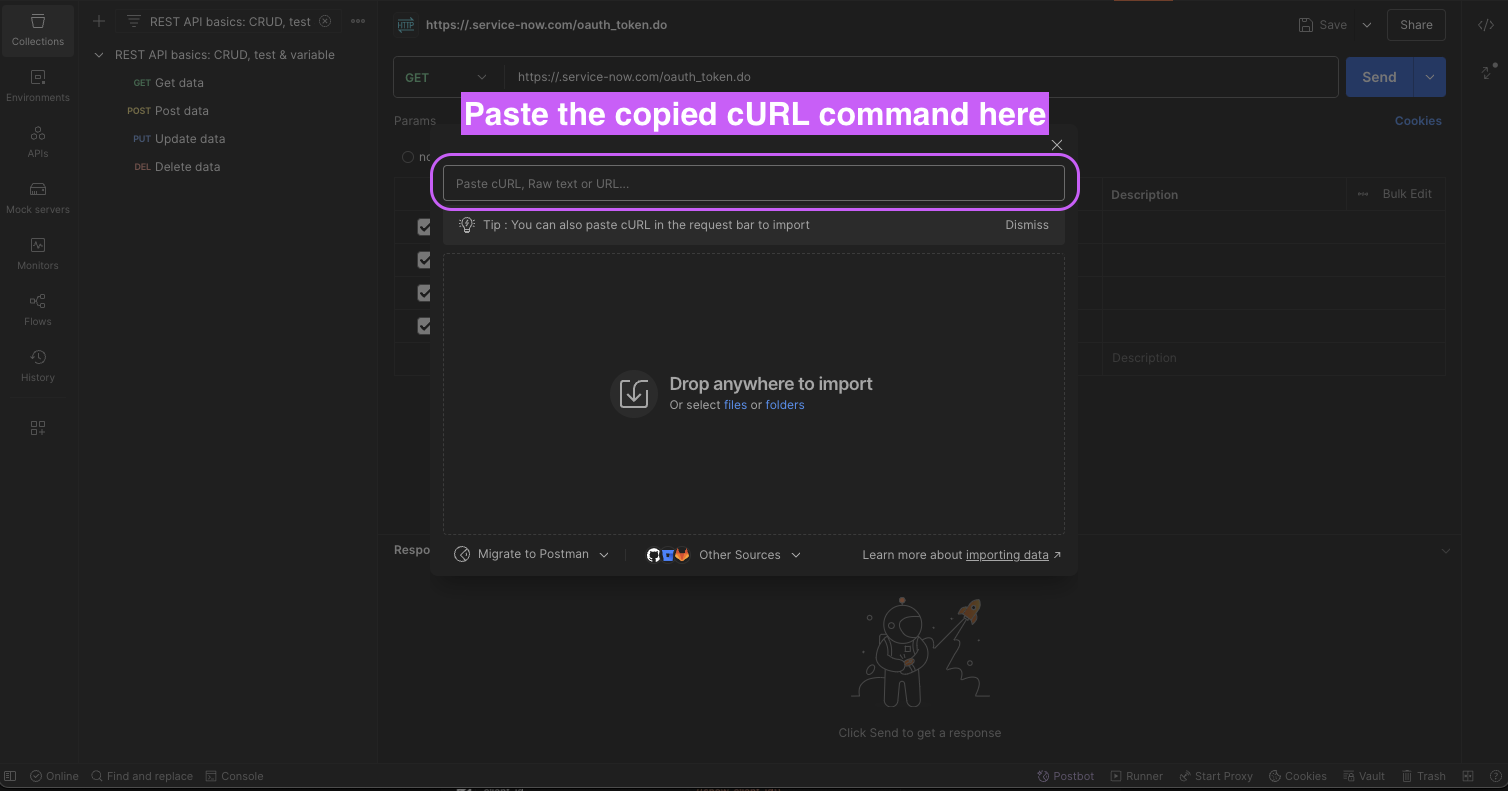
- Paste the cURL command
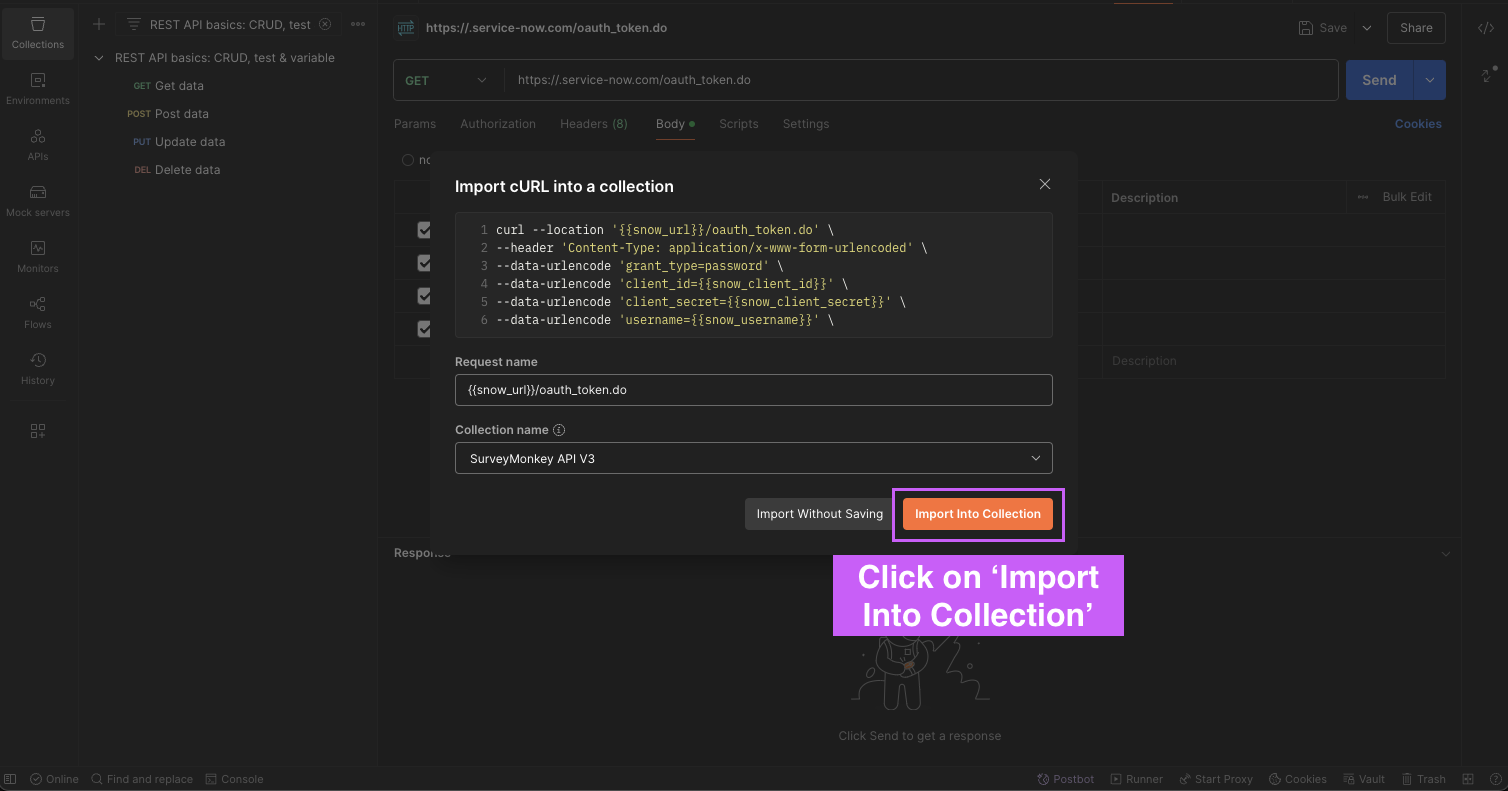
- Click on ‘Import Into Collection‘
- Substitute the saved values from previous steps and Click on ‘Send’
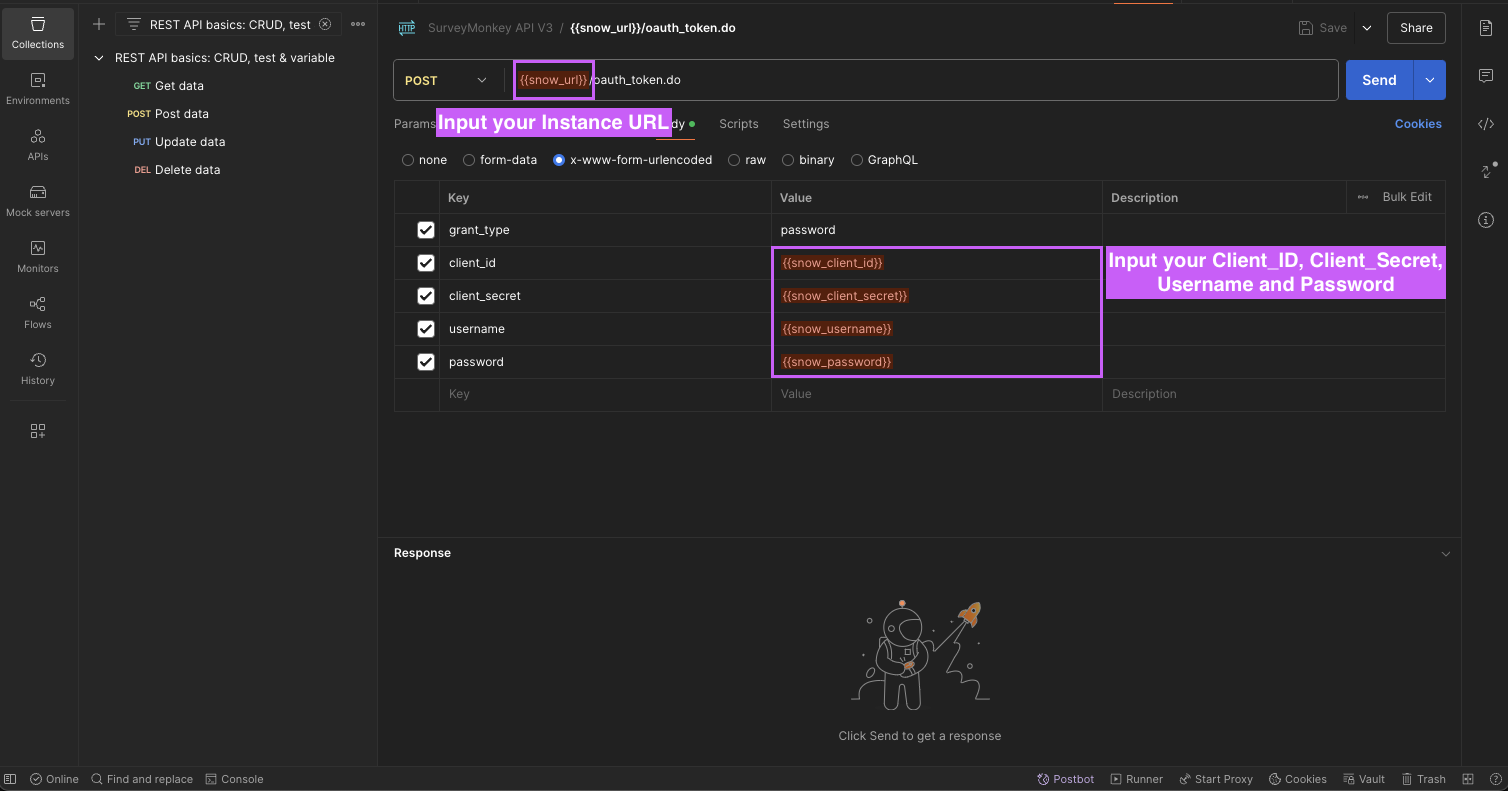 Verify whether the response includes access_token and refresh_token*(Applicable to both methods listed above)*
- Copy the following cURL command
Step 3: Configure in Moveworks Setup
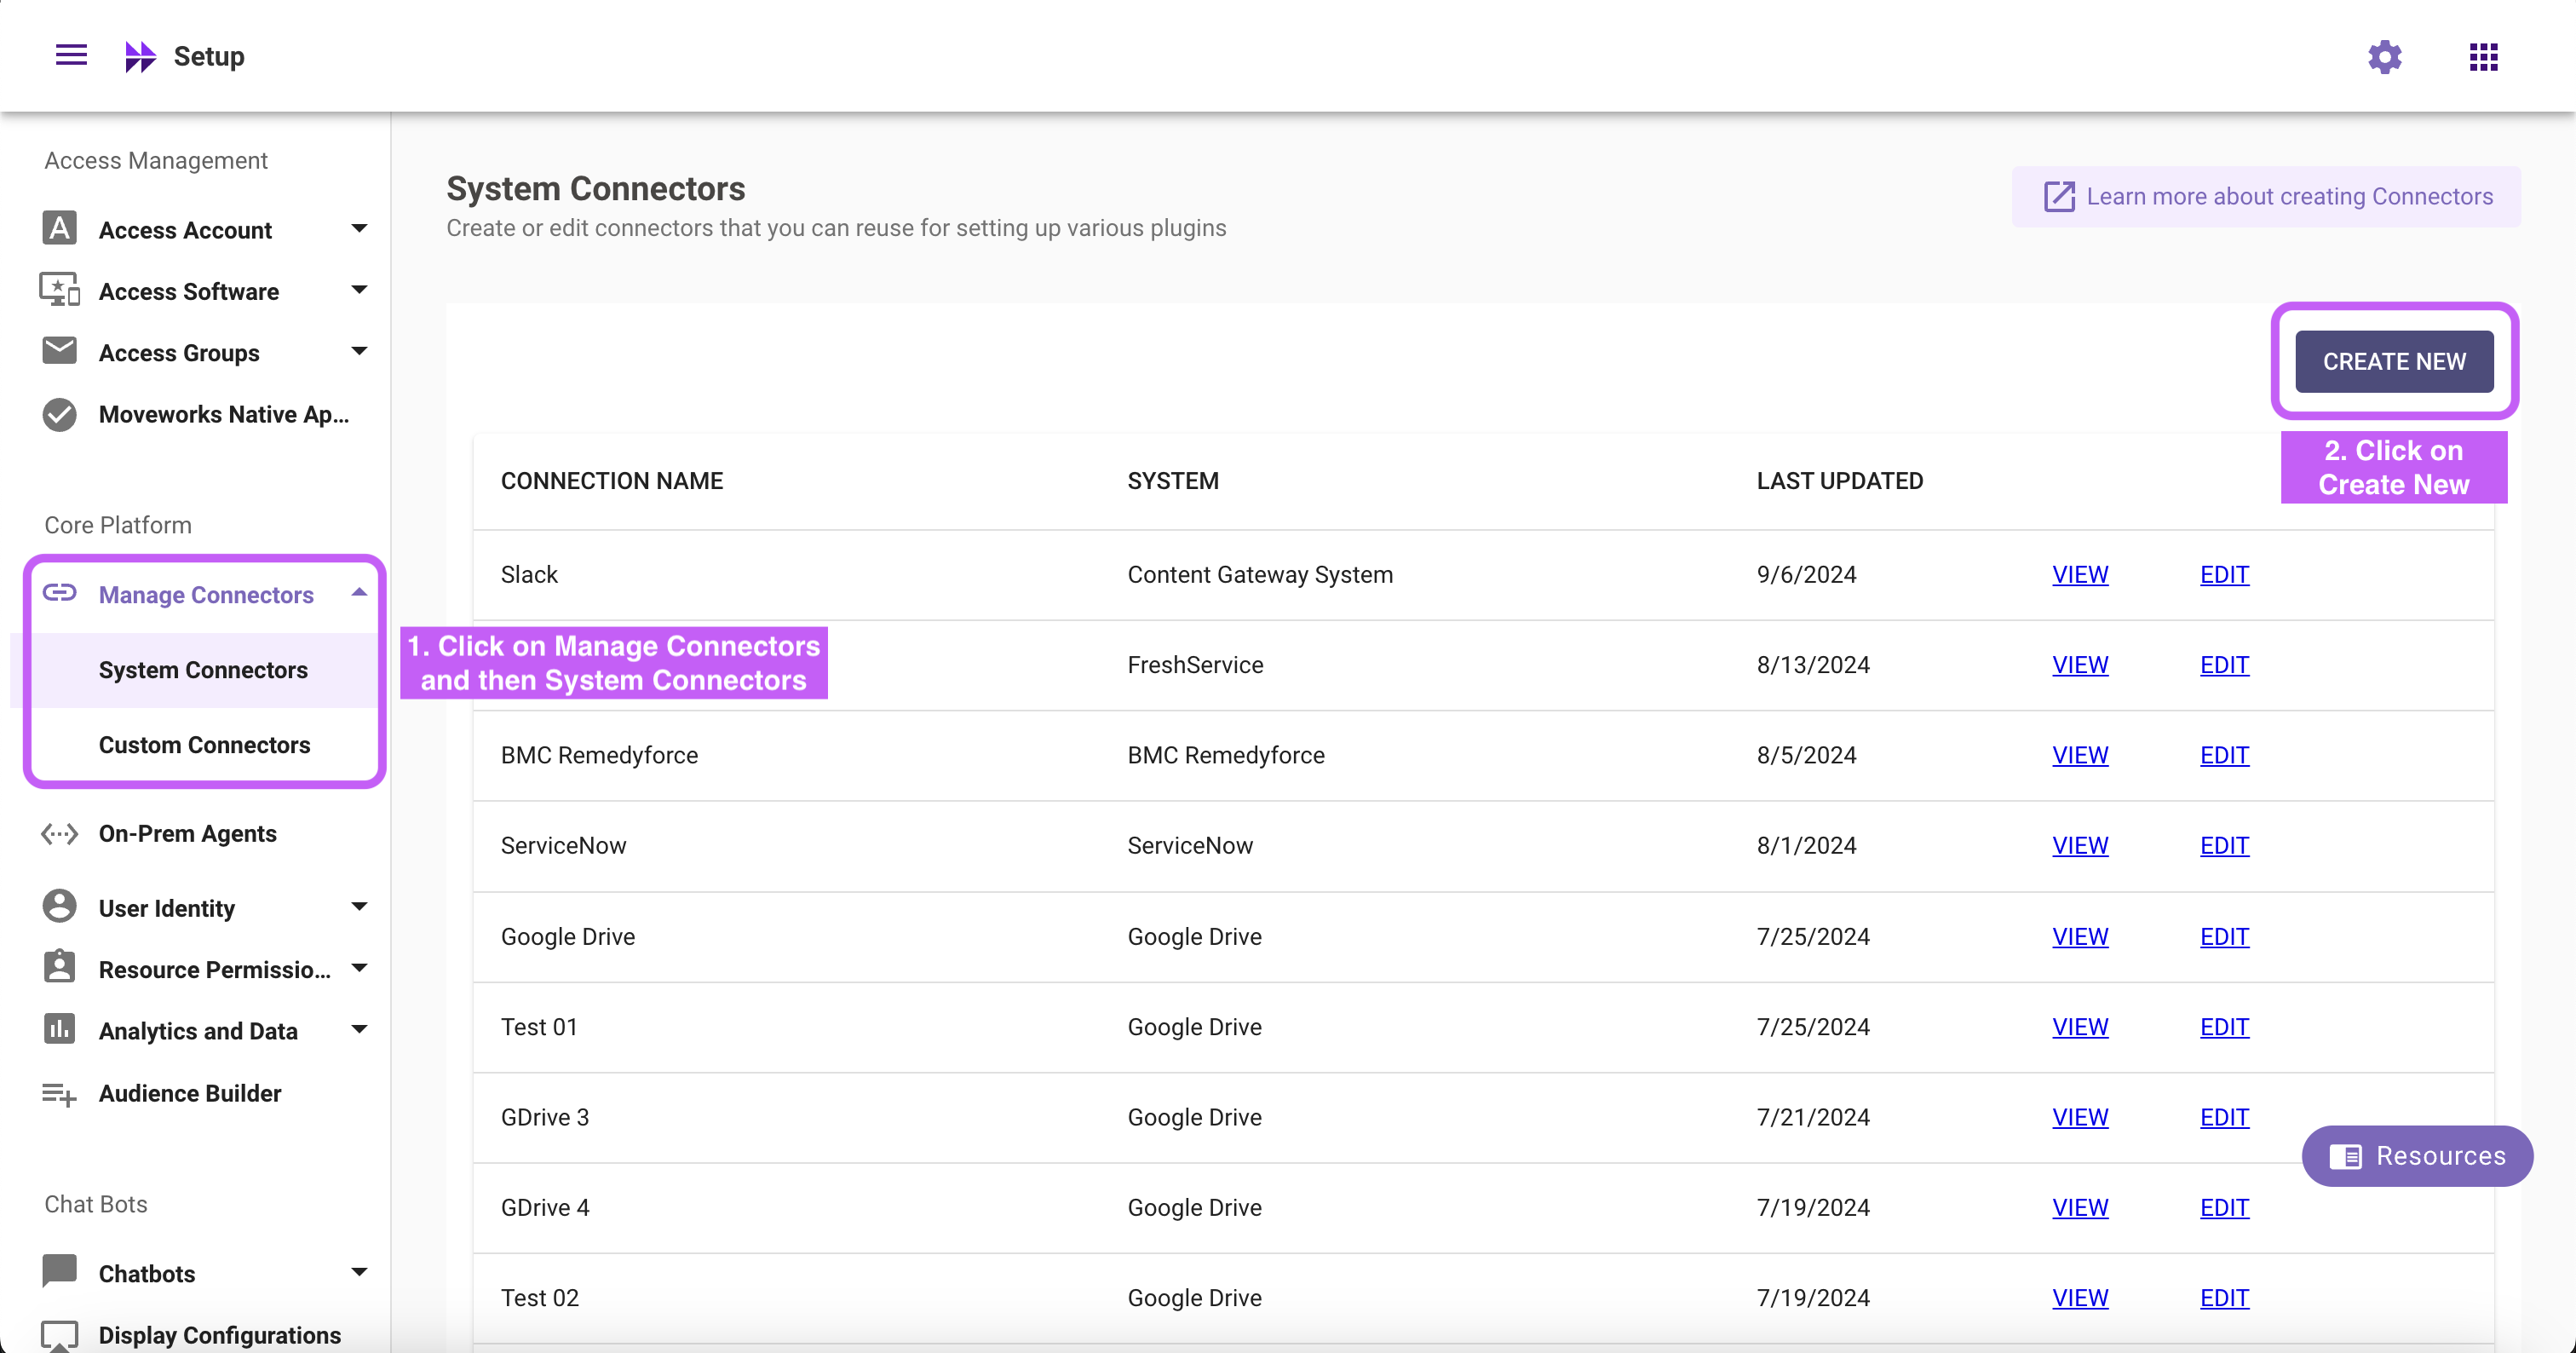
- Go to Manage Connectors > System Connectors, then click on ‘CREATE NEW’
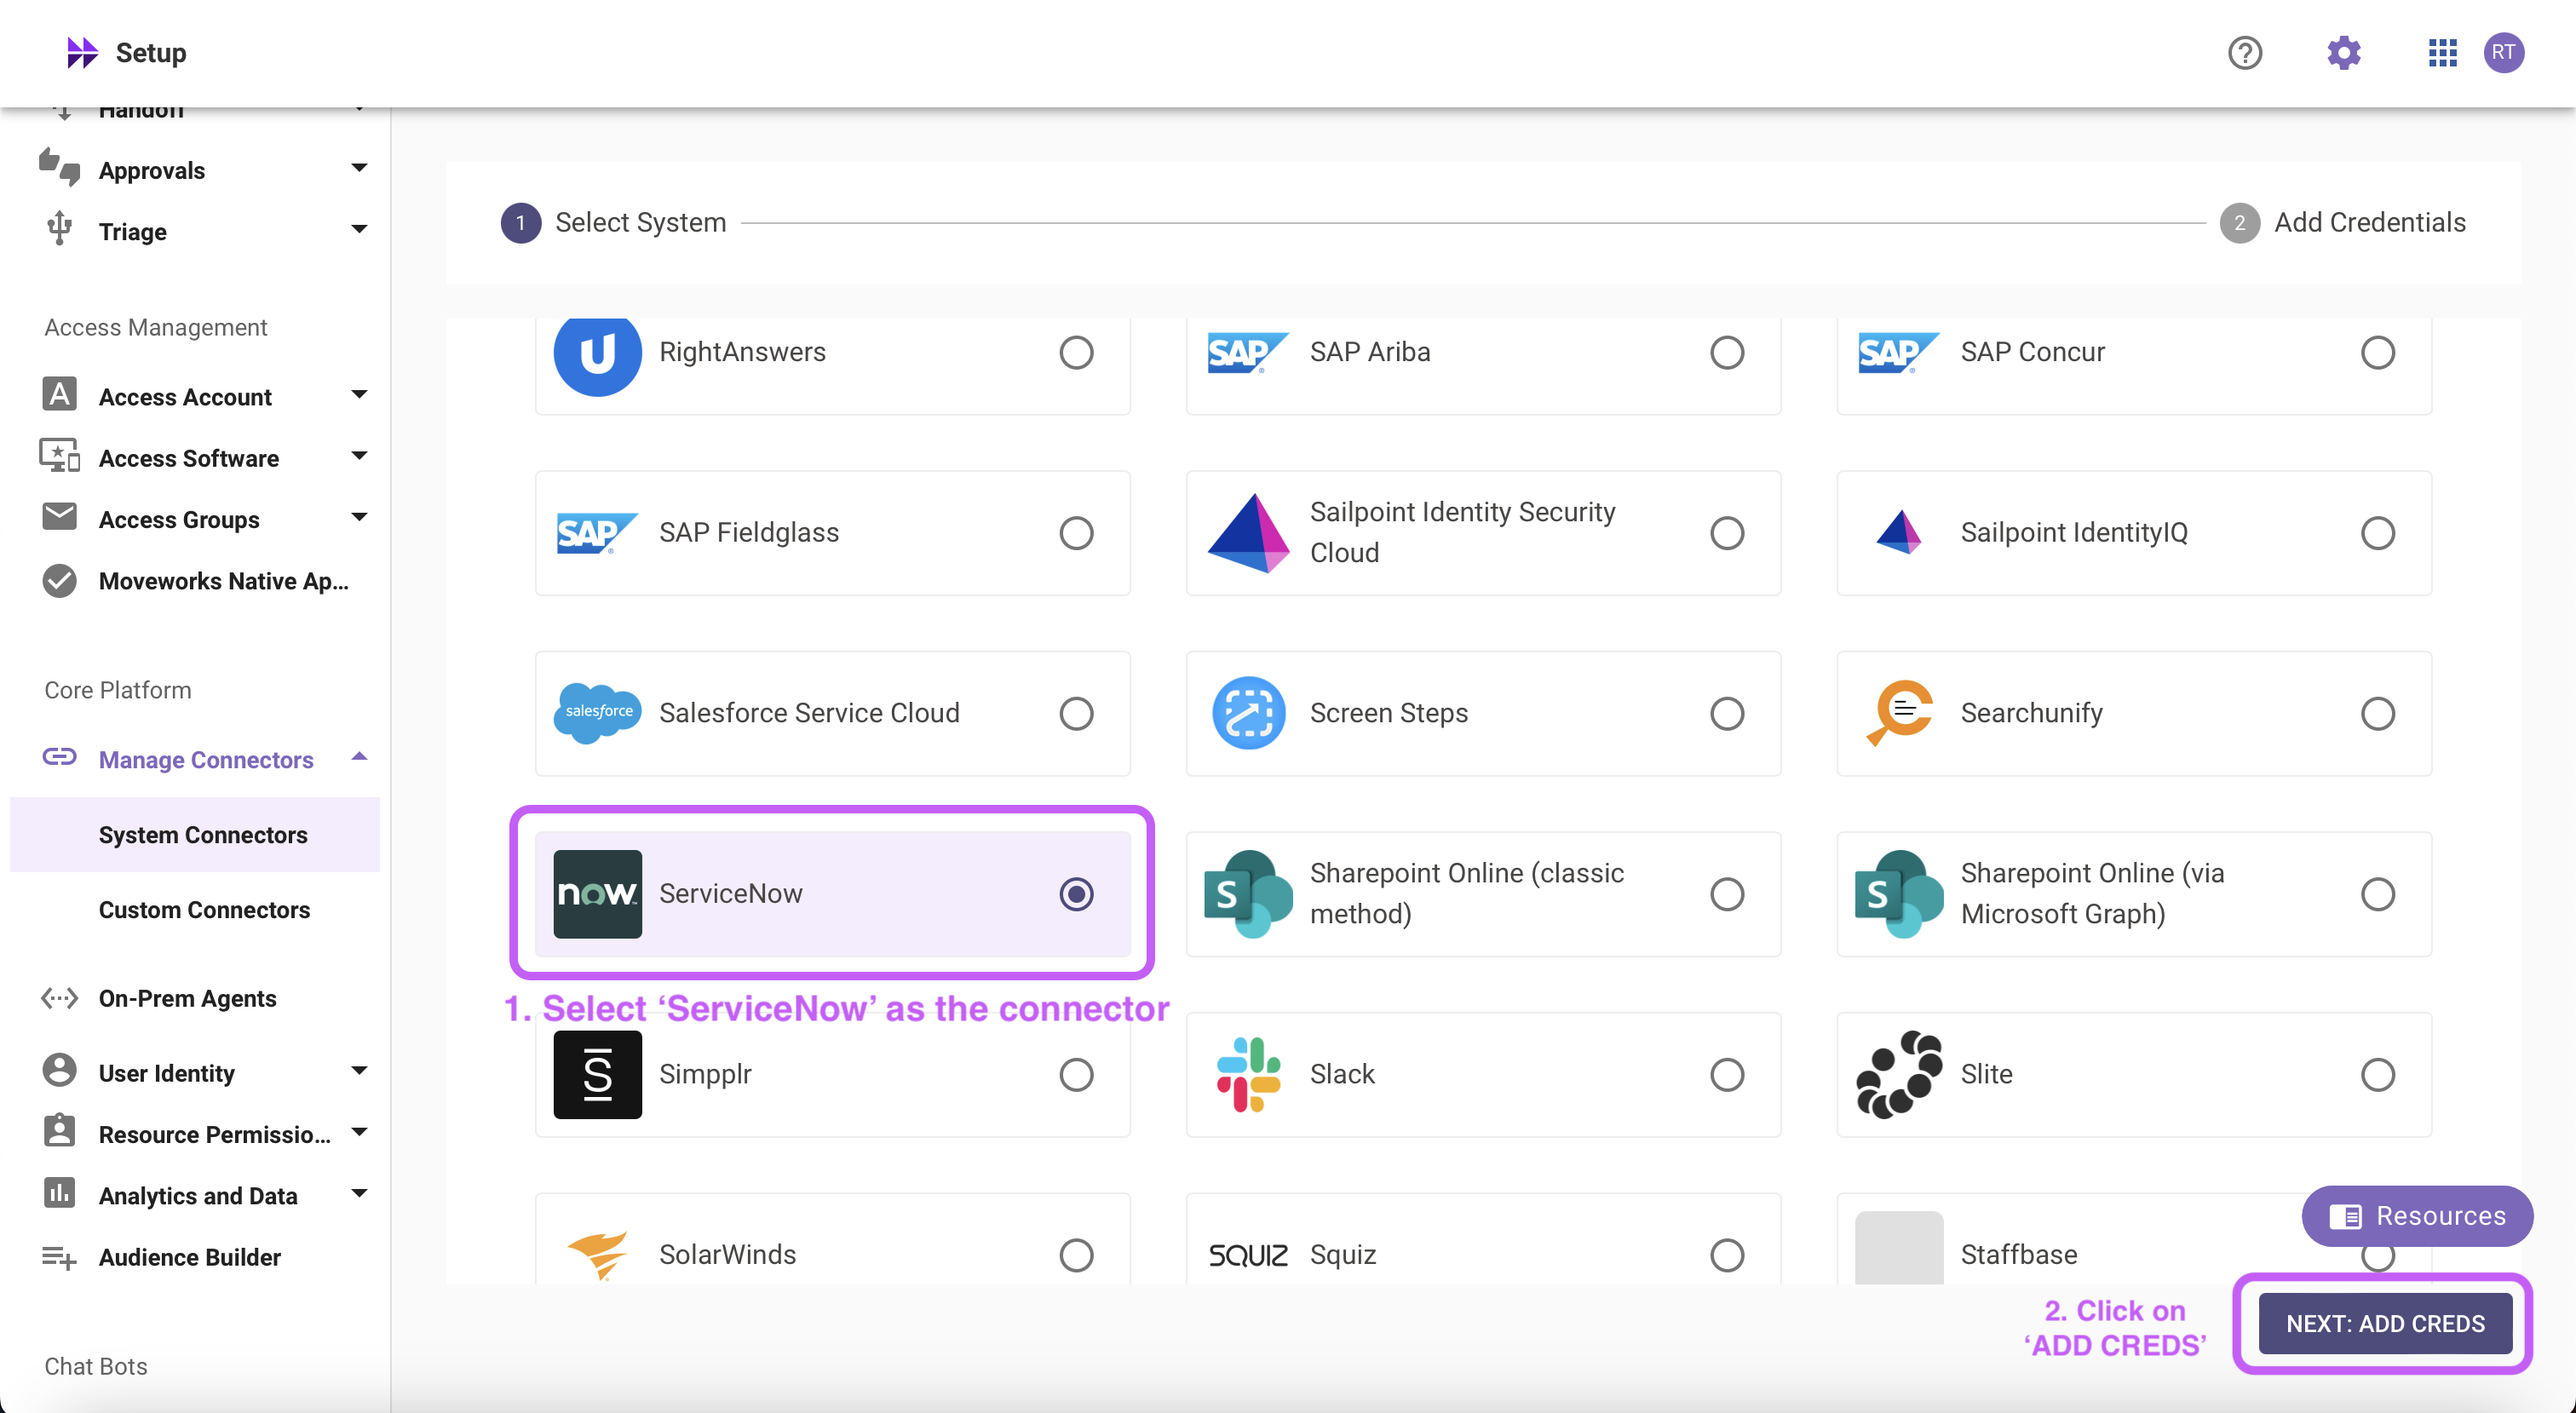
- Click on ‘ServiceNow’ Connector, then click on ‘Next ADD CREDS’
- Fill in the
Instance Name,Client ID,Client Secret,Username, andPasswordobtained in Step 1- Instance:
- If ‘Common Base URL’ option is selected, just enter
instance_namethat appears inhttps://{{instance_name}}.service-now.com - If ‘Custom Base URL’ option is selected, enter the Instance URL after ‘https://’
- If ‘Common Base URL’ option is selected, just enter
- Authentication Type: Select ‘Oauth2 with Password Grant’ from the dropdown
- Client ID:
Client ID - Client Secret:
Client Secret - Username:
Username - Password:
Password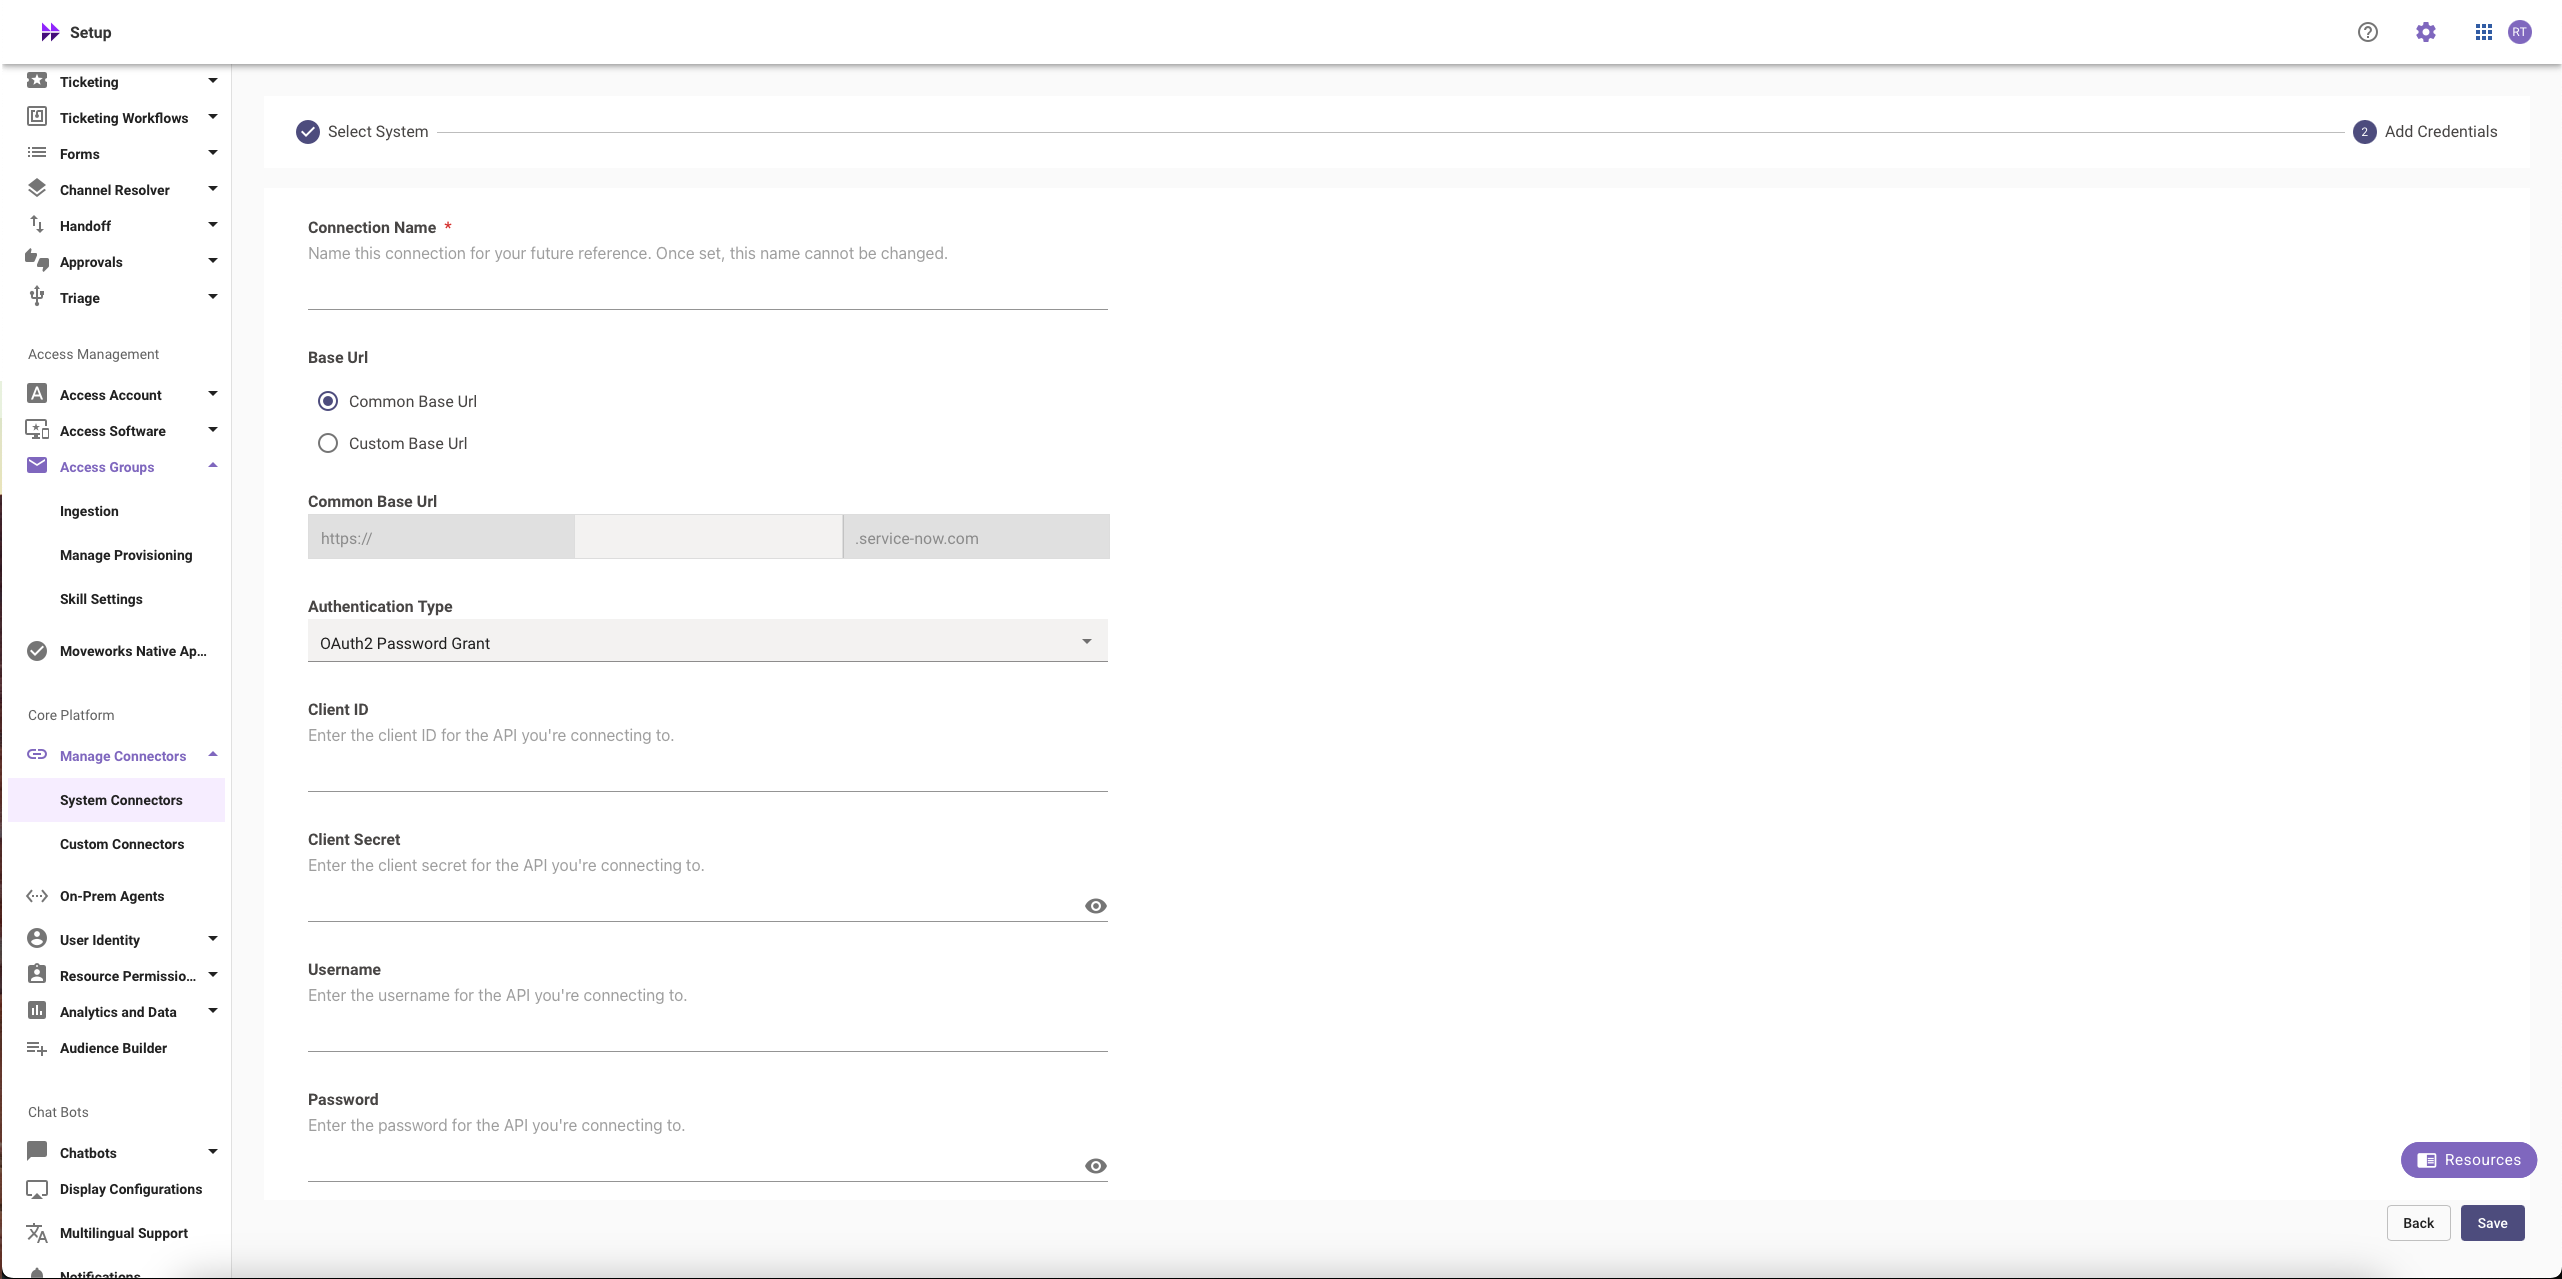
- Instance:
- Click on ‘Save’
Setting up OAuth 2.0 with Refresh Token Grant
Step 1: Register OAuth 2.0 API Client
- Create a service account user (
username&password), note them down. Your instance name is the prefix of your URL:https://{{instance_name}}.service-now.com - Access your ServiceNow instance by navigating to the URL provided in the previous step
- In the top left side of navigation bar, Click on ‘All’, search for ‘System OAuth’ option in the search bar and then Click on ‘Application Registry’ under it
- Now, in the top right side of navigation bar, Click on the ‘New’ button
- Click on ‘Create an OAuth API endpoint for external clients’
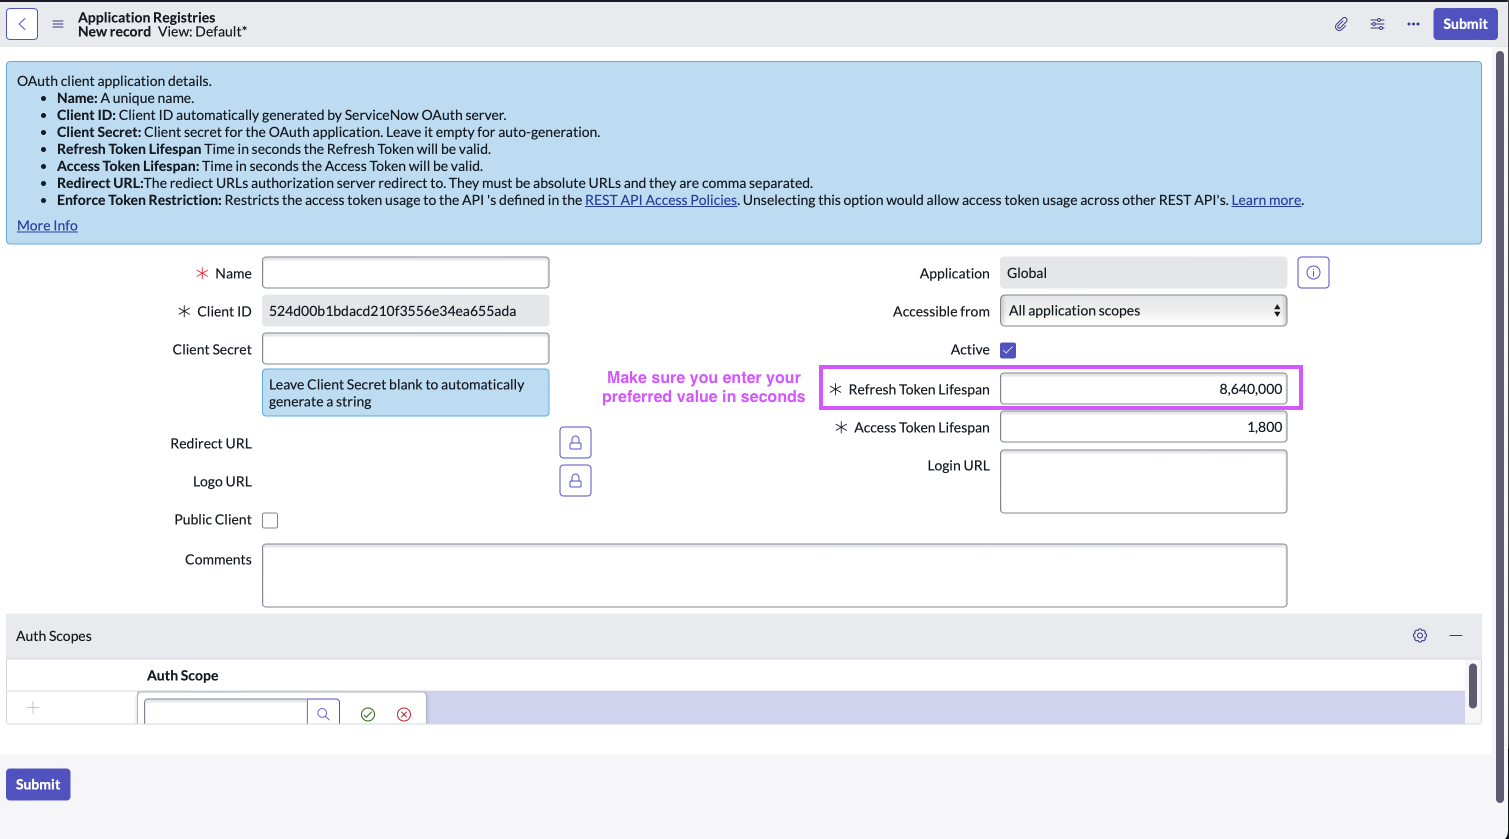
- Fill in the necessary details
🚧 Note
Refresh token is only provided if the “Refresh Token Lifespan” field is set to a value greater than 0
- Click ‘Submit’
Step 2: Generate Refresh Token
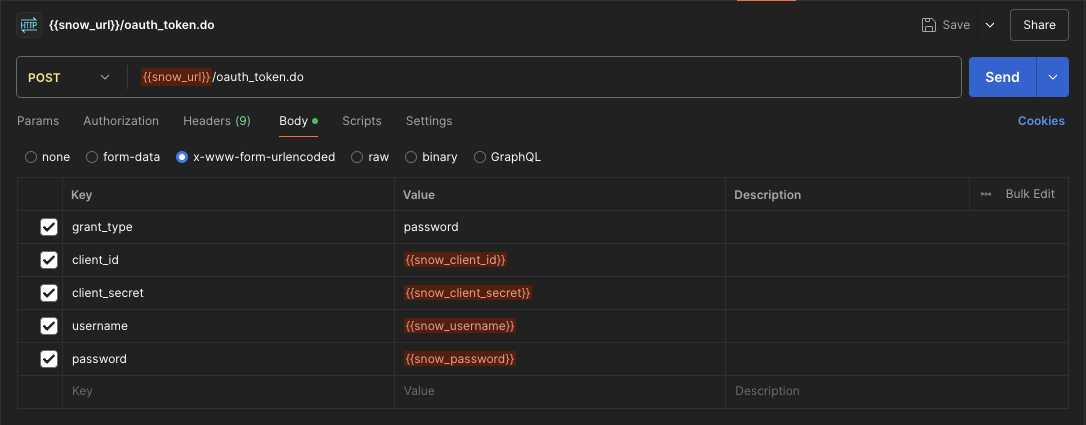
The steps to generate a Refresh Token are similar to the ones mentioned in Step 2 of Setting up OAuth 2.0 with Password Grant
- Setup through a new HTTP request
- Setup through cURL command method
Javascript
You can use the refresh token to get a new access token when the current one expires
Step 3: Configure in Moveworks Setup
- Go to Manage Connectors > System Connectors, then click on ‘CREATE NEW’ (As shown in Step 3 of Setting up OAuth 2.0 with Password Grant)
- Click on ‘ServiceNow’ Connector, then click on ‘Next ADD CREDS’ (As shown in Step 3 of Setting up OAuth 2.0 with Password Grant)
- Fill in the
Instance,Client ID,Client Secret, andRefresh Tokenobtained in the previous steps- Instance:
- If ‘Common Base URL’ option is selected, just enter
instance_namethat appears inhttps://{{instance_name}}.service-now.com - If ‘Custom Base URL’ option is selected, enter the Instance URL after ‘https://’
- If ‘Common Base URL’ option is selected, just enter
- Authentication Type: Select ‘Oauth2 with Refresh Token Grant’ from the dropdown
- Client ID:
Client ID - Client Secret:
Client Secret - Refresh Token:
Refresh Token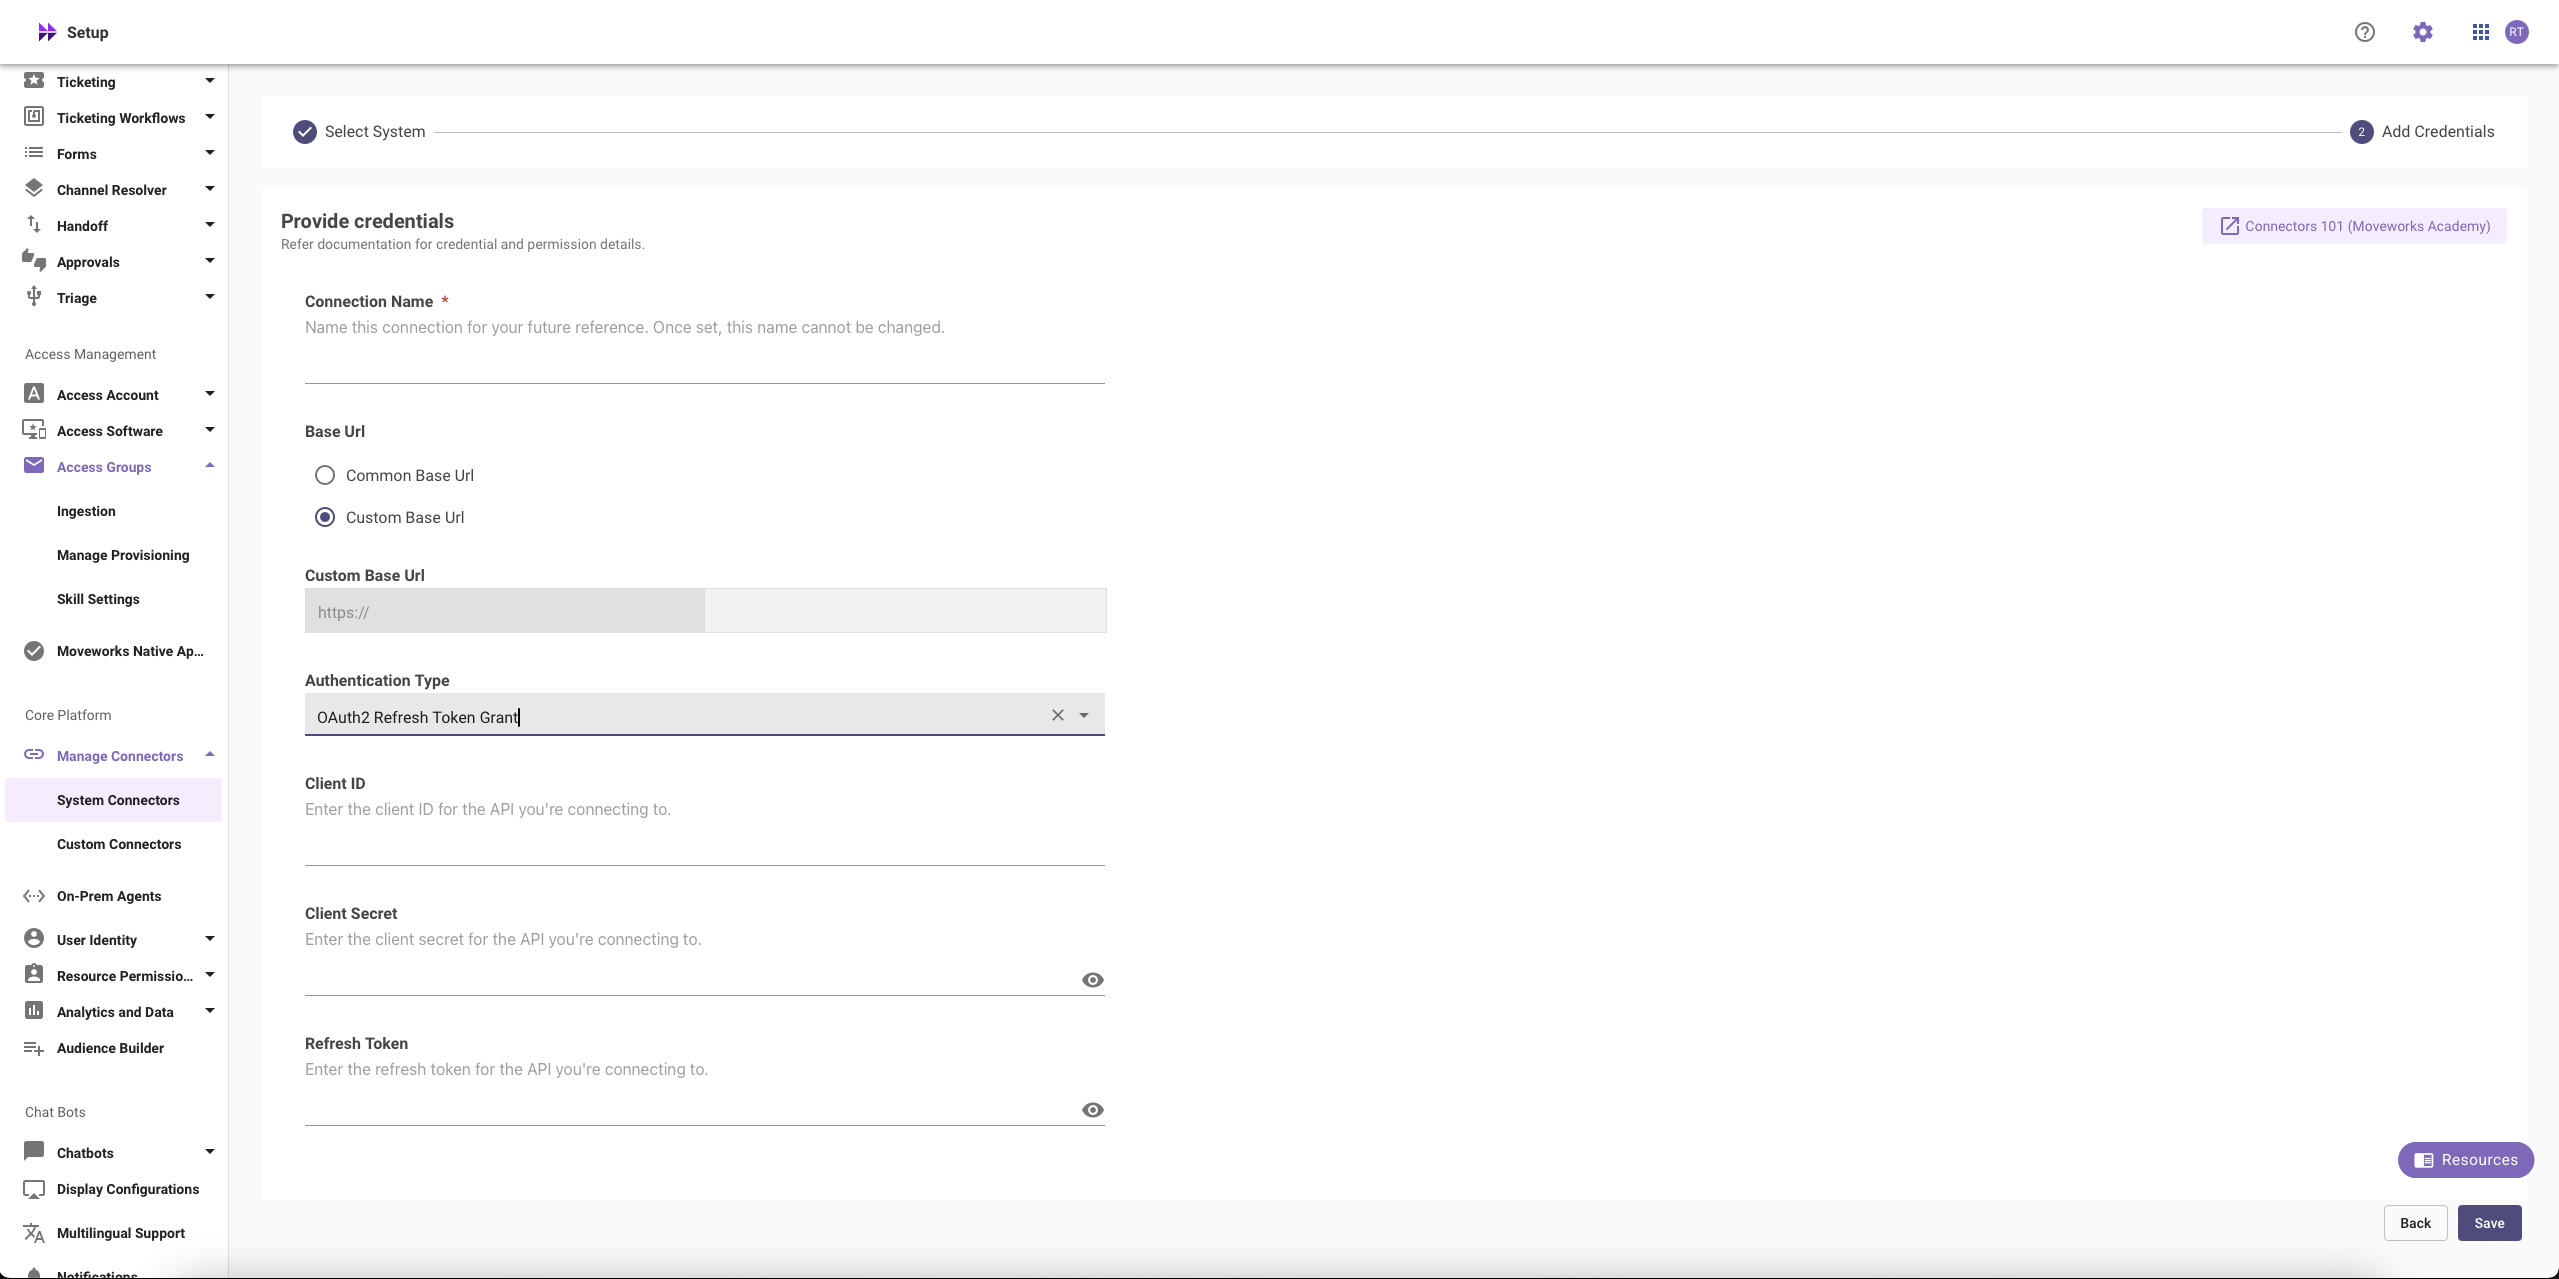
- Instance:
- Click on ‘Save’
Setting up OAuth 2.0 with JWT
Have prepared your Java KeyStore certificate and password.
You can generate the Java KeyStore (.jks) file, certificate (.crt) file, and password on your own. See the JWT Certificate Generation Guide (Mac & Windows) for step-by-step instructions.
Step 1: Create a Service Account
- Create a service account user (
username,email(required) &password), note them down. Your instance name is the prefix of your URL:https://{{instance_name}}.service-now.com - Access your ServiceNow instance by navigating to the URL provided in the previous step
- Assign the required permissions to this service account by following the process mentioned above.
Step 2: Install the certificate and create the JWT provider
First, we will create a JWT provider in your instance that will be responsible for generating authentication tokens for our services to verify that the service account is properly authenticated into ServiceNow. The following steps will walk you through creating the records below:
- MW Java Key Store
- MW JKS Certificate
- JWT Key
- JWT Provider
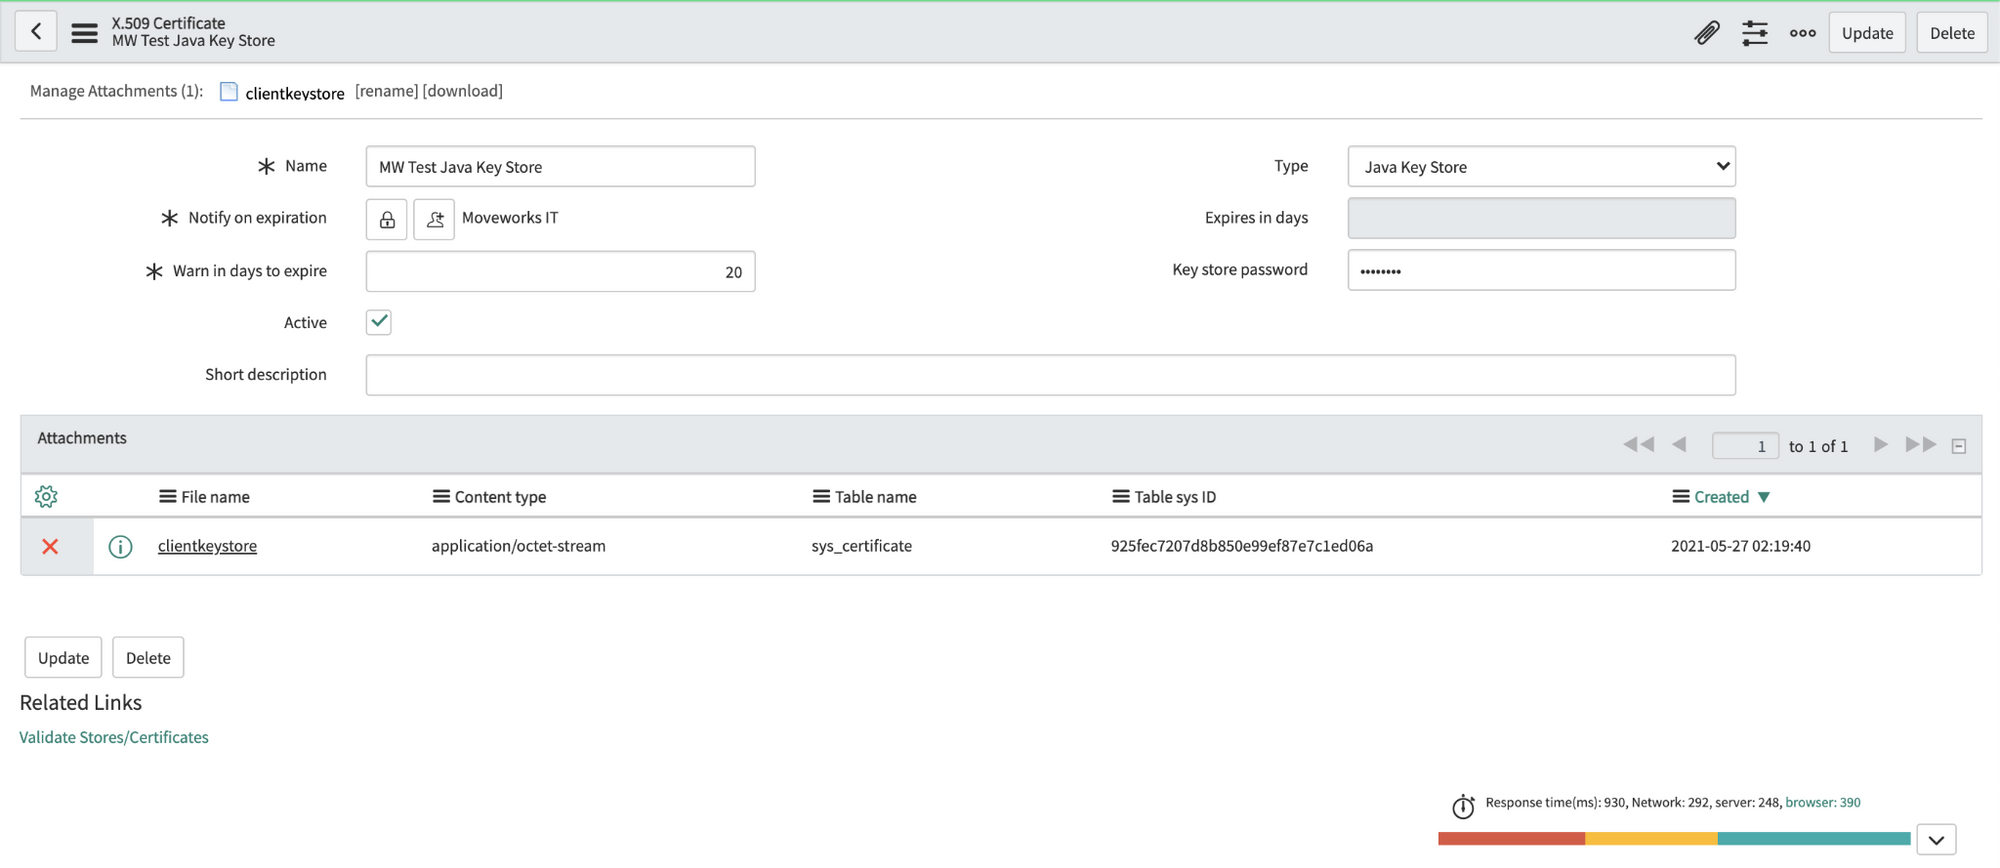
- Navigate to the X.509 Certificate table in SNOW (search for “Certificates” to find it), create a new record as follows:
Name: MW Java Key Store
Type: Java Key Store - Click on the paperclip in the upper right to attach the JKS file. The file will have a
.jksextension. - Enter your Java KeyStore password. Right click the top gray bar, click save.
Important: If you save before entering the password, it may seem to auto populate the Key-store password. This doesn’t always work correctly, so always enter the password manually. - Click “Validate Stores/Certificates” under Related Links to ensure the record was configured properly.
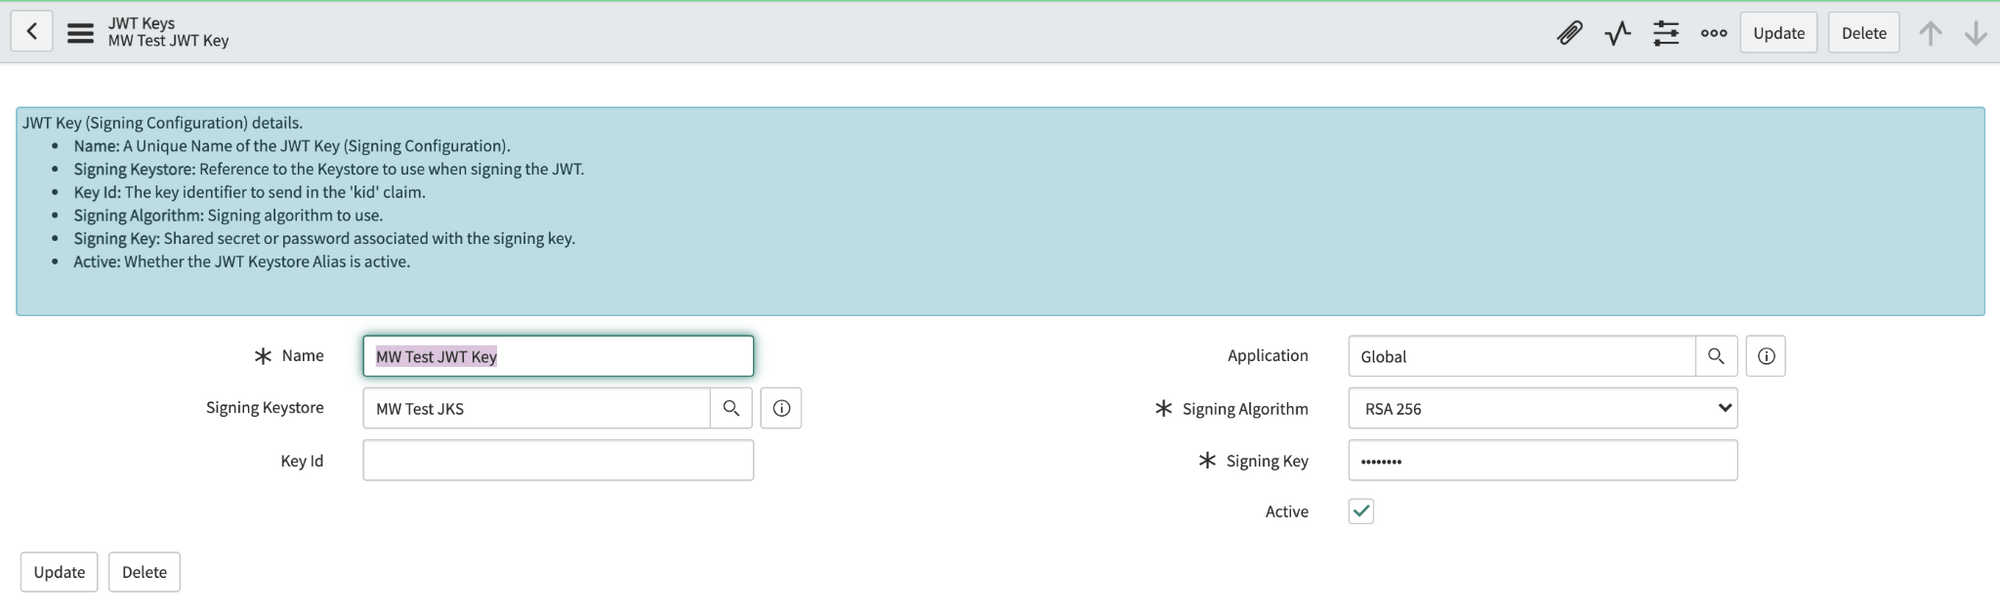
- Navigate to the JWT Keys table (under System Oauth). Create a new record and set its Signing Key Store to the certificate record you made in the previous step. Enter the same Java KeyStore password in the Signing Key field. Save this record.
- Navigate to the JWT Provider table. Create a new record and set its Signing Configuration to the key record you made in the previous step. Update the Expiry Interval from 60 sec to 3600 sec (1 hour).

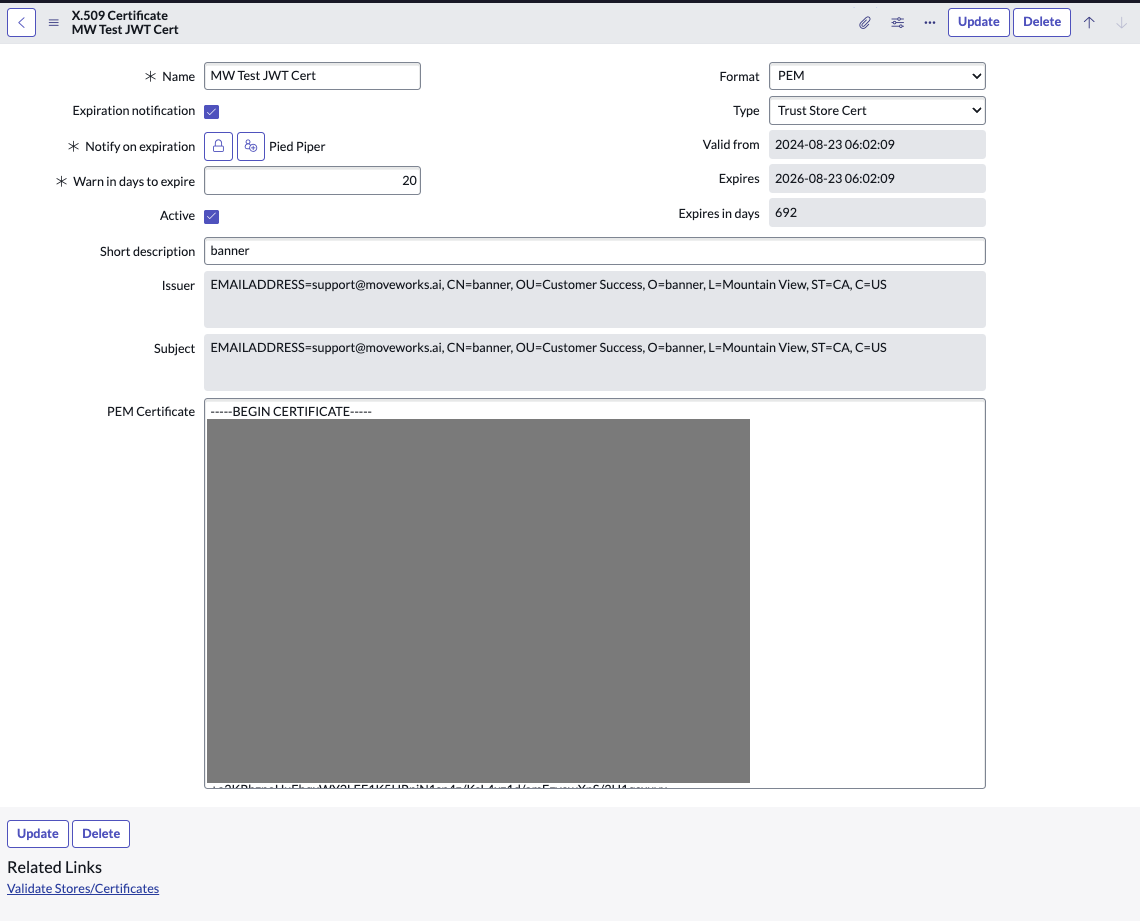
- Navigate to the X.509 Certificate table again and create a new record as follows:
Name: MW JKS Certificate
Format: PEM
Type: Trust Store Cert - Extract the contents of the JKS Certificate and paste it in the PEM Certificate section. The Certificate file will have a
.crtextension. You can either use your terminal / command prompt or a text editor to view and copy the contents of this file. - Click “Validate Stores/Certificates” under Related Links to ensure the record was configured properly.
Step 3: Register OAuth 2.0 API Client
- In the top left side of navigation bar, Click on ‘All’, search for ‘System OAuth’ option in the search bar and then Click on ‘Application Registry’ under it
- Now, in the top right side of navigation bar, Click on the ‘New’ button
- Click on ‘Create an OAuth JWT API endpoint for external clients’
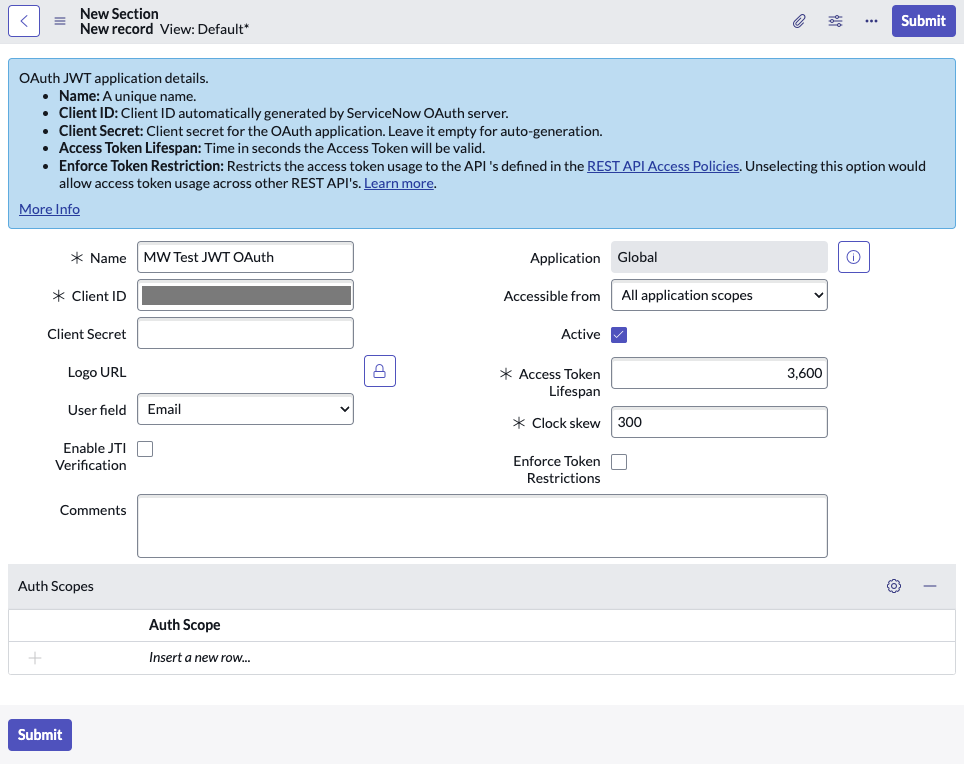
- Fill in the necessary details and click on ‘Submit’
📘 Note
- Set Access Token Lifespan to 3600
- Disable JTI Verification
- Copy the Client ID and Client Secret and store it in a safe storage to use it in the next step.
- Navigate to JWT Providers(under System OAuth) and update the JWT Provider that you created above with the following claim values:
aud: Client ID of the App Registry record created
iss: Client ID of the App Registry record created
sub: Email ID of the service account user that you created above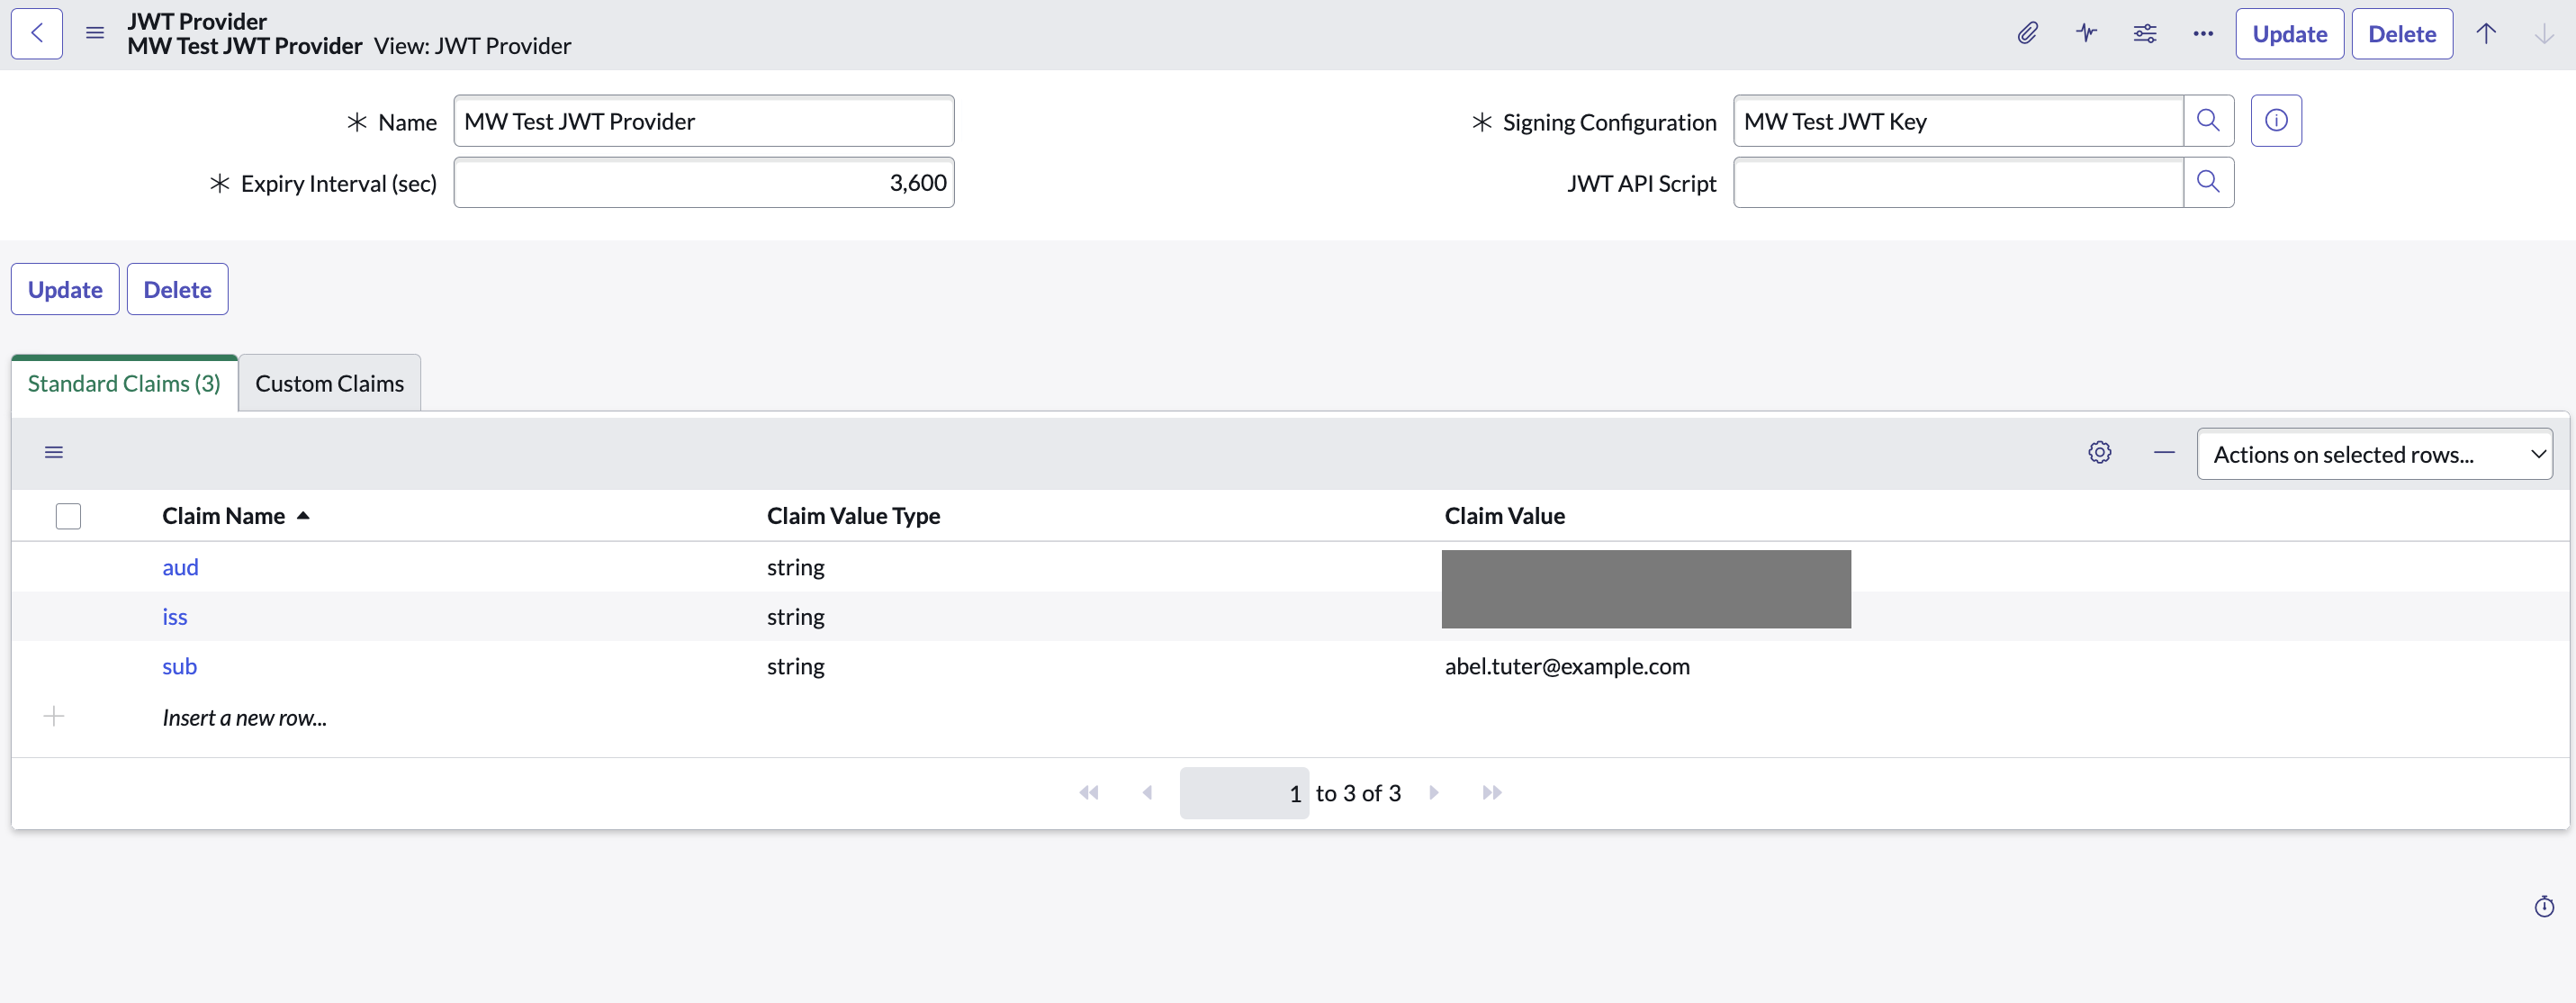
- Click on the OAuth Client to open it again
- In the related Lists under Jwt Verifier Maps, click on New to create a new JWT verifier map.
- Make sure to set the Shared Key value to the same Java KeyStore password.
- For Sys certificate, click on the search icon and select the MW JKS Certificate that you created before and click on Submit.
- Copy the Kid of the newly created Jwt Verifier Map.
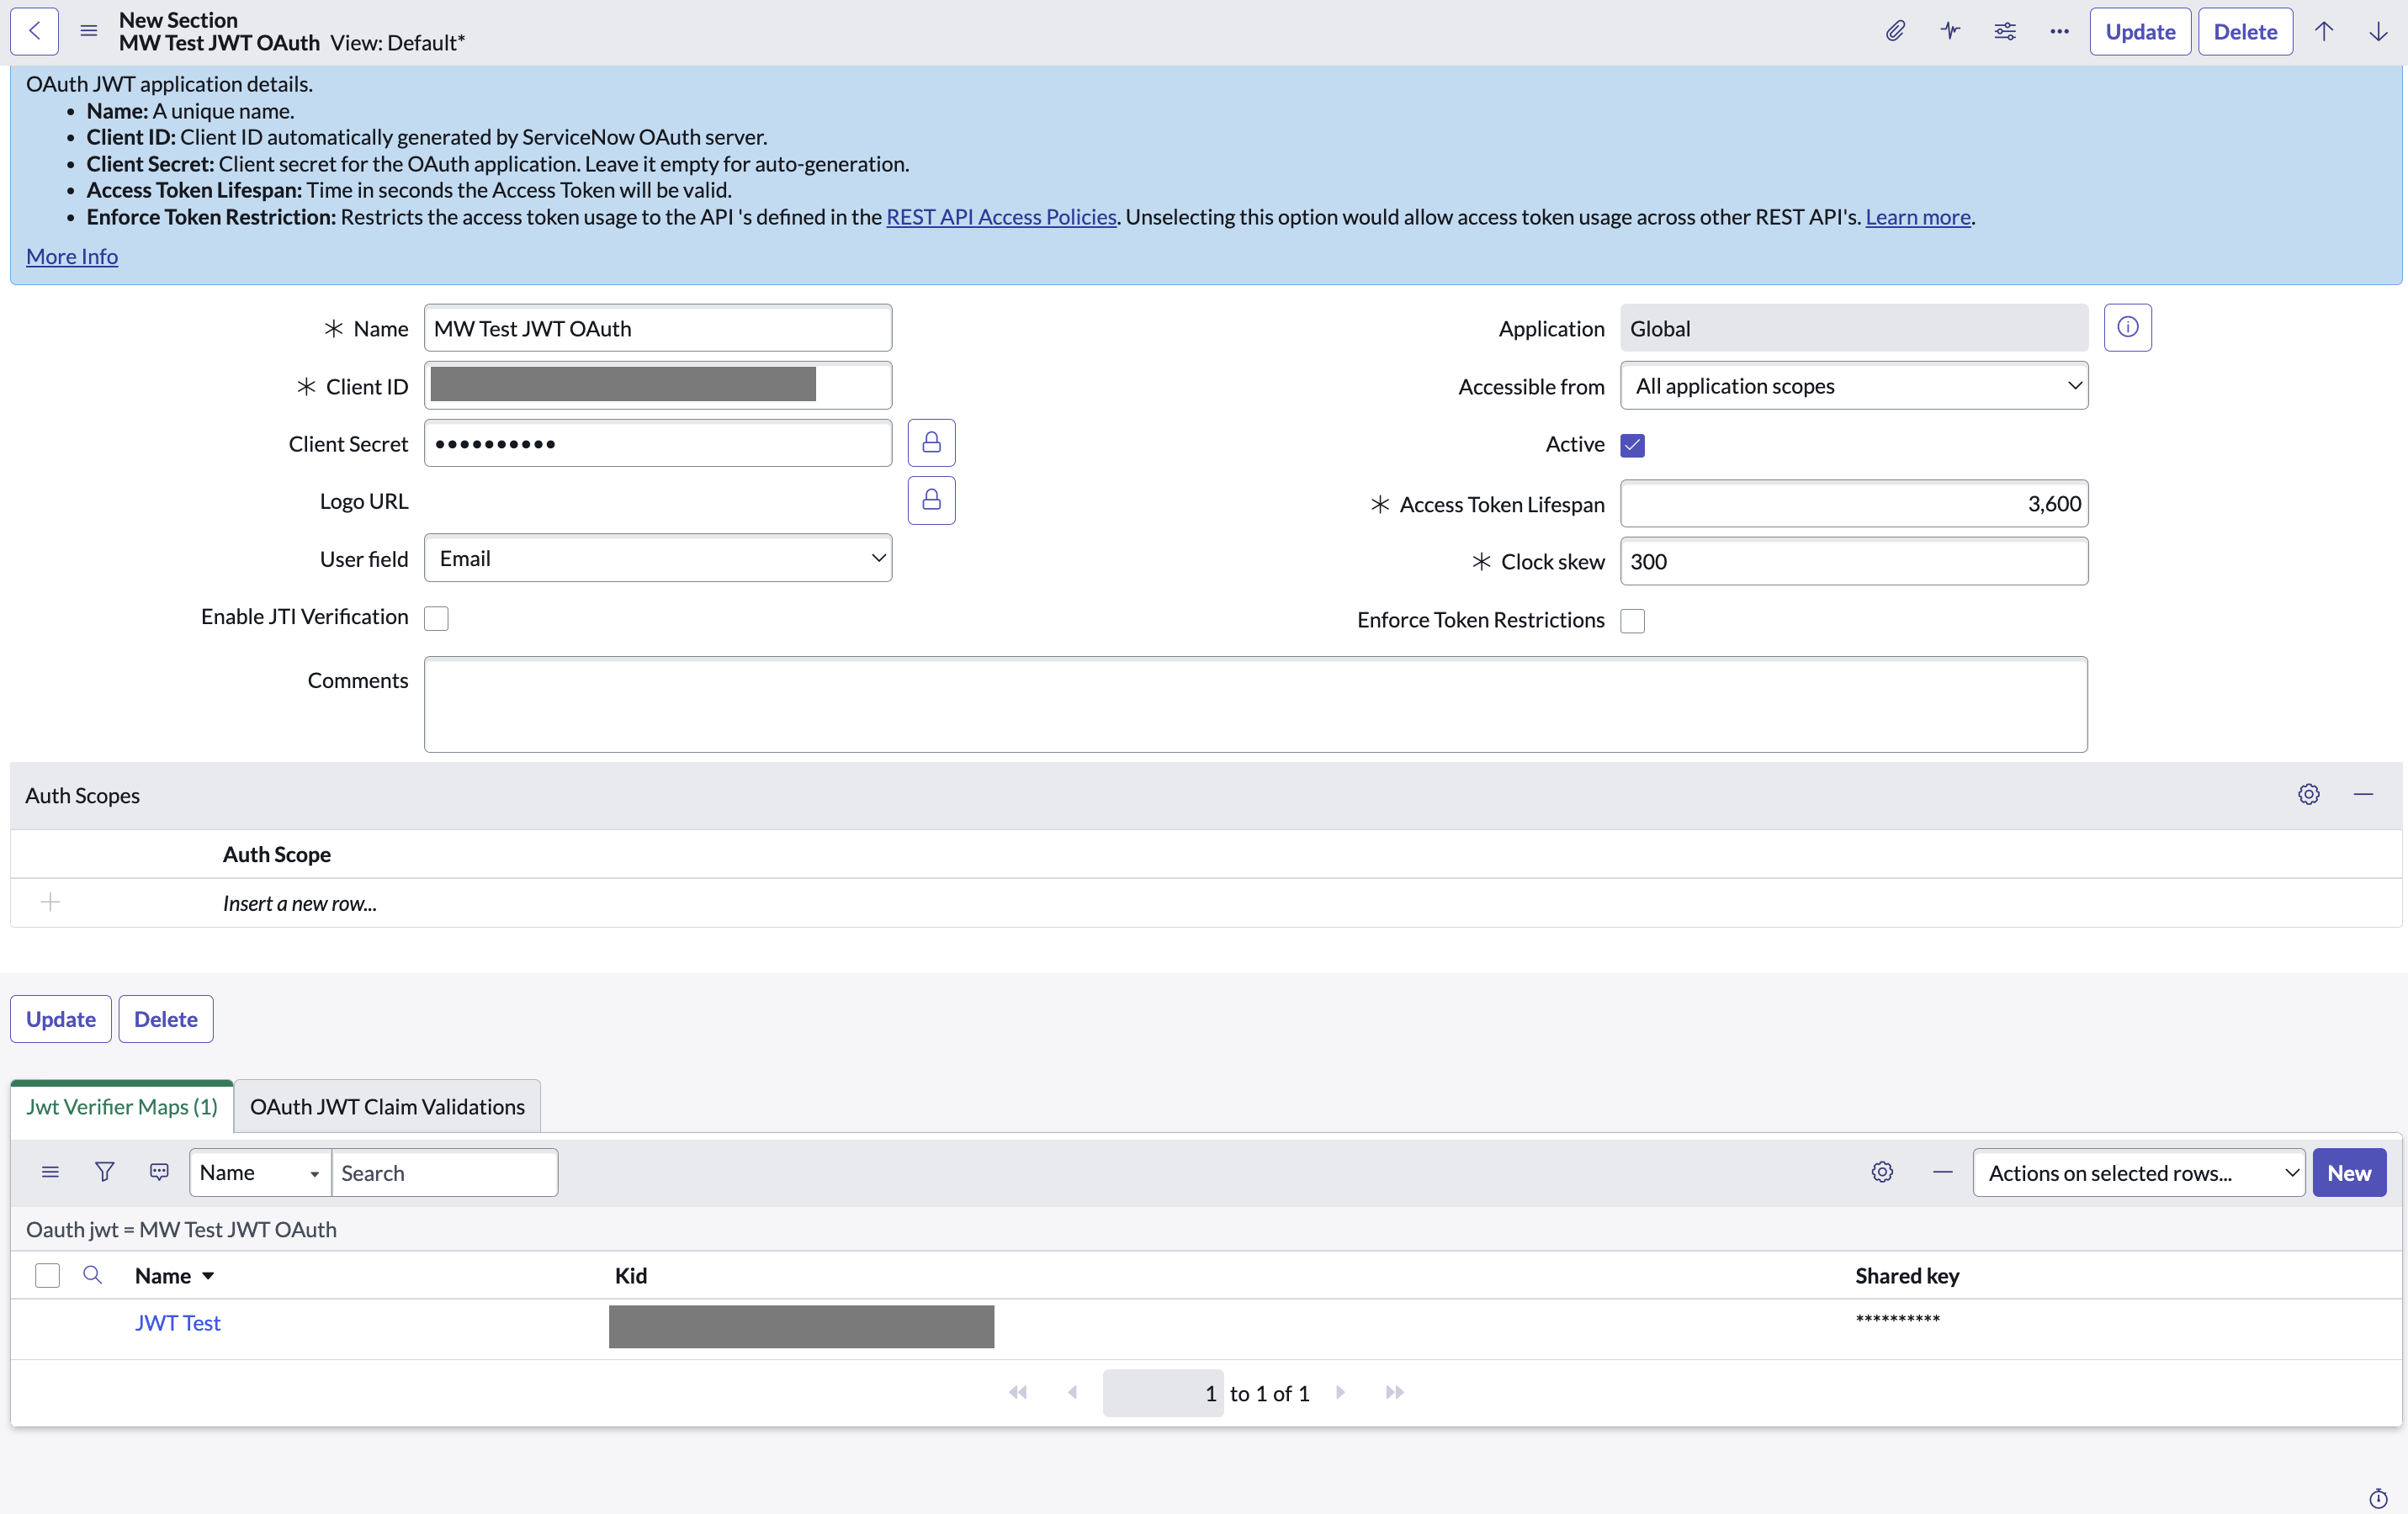
- Navigate to JWT Keys (under System OAuth) and select the JWT Key you created above. Update the Key ID with the Kid that was auto-generated in the previous step.
Step 4: Generate the Private Key file
In this step, you will generate the Private Key file from your Java KeyStore file (.jks file). This is crucial for configuring the Connector in subsequent steps.
Requirements:
- Java KeyTool: Available with the Java Development Kit (JDK).
- OpenSSL: Ensure OpenSSL is installed on your system. It’s available by default in most Unix/Linux systems and MacOS, but may need to be installed separately on Windows.
Procedure:
- Open Your Terminal/Command Prompt
- Windows: Search for
cmdorCommand Promptin Start and open it. - MacOS/Linux: Open
Terminalfrom Applications or your preferred method.
- Windows: Search for
- Navigate to the Directory Holding Your
.jksFile
Use thecdcommand followed by the path to the directory:shell - Convert
.jksto.p12File
ReplaceliveCERT.jkswith your.jksfile name andyour-dest-file-name.p12with your desired.p12file name.shell- Input your Java KeyStore password when prompted.
- Extract the Private Key to a PEM File
Ensure OpenSSL is accessible in your system’s command line or terminal. Run:Replaceshellyour-dest-file-name.p12with your.p12file name andyour-private-key-file-name.pemwith your desired output filename for the PEM.
Now, you will have your-private-key-file-name.pem, which will be utilized in configuring the Connector in the following steps.
- Windows Users: If OpenSSL isn’t installed, you can download it from OpenSSL’s official page or use a third-party distribution like Cygwin or Git Bash that includes OpenSSL.
- MacOS/Linux Users: OpenSSL should be pre-installed. If not, you can install it via Homebrew (Mac) or your Linux distribution’s package manager (
aptfor Ubuntu,yumfor CentOS, etc.) - Make sure to replace placeholders (like
liveCERT.jks,your-dest-file-name.p12, andyour-private-key-file-name.pem) with actual file names specific to your scenario.
Step 5: Configure in Moveworks Setup
- Go to Manage Connectors > System Connectors, then click on ‘CREATE NEW’ (As shown in Step 3 of Setting up OAuth 2.0 with Password Grant)
- Click on ‘ServiceNow’ Connector, then click on ‘Next ADD CREDS’ (As shown in Step 3 of Setting up OAuth 2.0 with Password Grant)
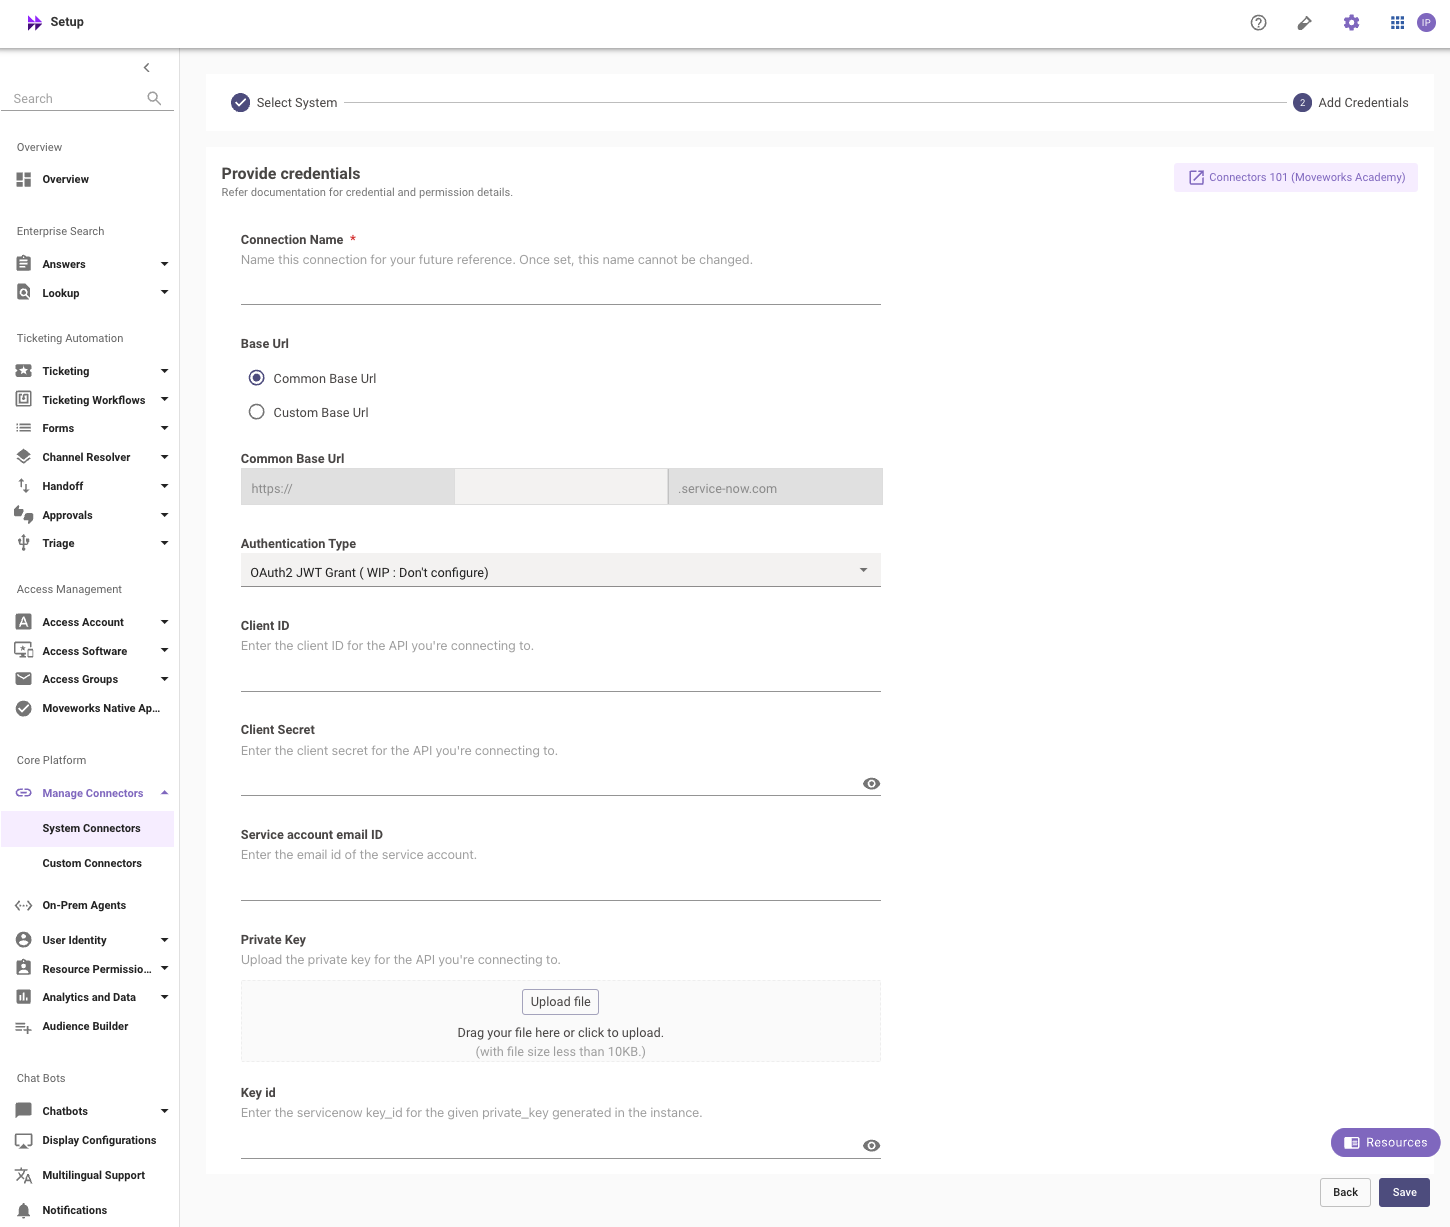
- Fill in the
Instance,Client ID,Client Secret,Service account email ID,Key idandPrivate Key fileobtained in the previous steps- Instance:
- If ‘Common Base URL’ option is selected, just enter
instance_namethat appears inhttps://{{instance_name}}.service-now.com - If ‘Custom Base URL’ option is selected, enter the Instance URL after ‘https://’
- If ‘Common Base URL’ option is selected, just enter
- Authentication Type: Select ‘OAuth2 JWT Grant’ from the dropdown
- Client ID:
Client ID - Client Secret:
Client Secret - Service account email ID: Email ID of the service account that you created above
- Private Key: Upload the
.pemPrivate Key file that you generated in the previous step - Key id: Enter the Key ID that was generated at Step 3.11
- Instance:
- Click on ‘Save’
Appendix A: APIs Accessed
Read-Only API Accessed
Access to these APIs will allow the Moveworks bot to support filling of Catalog Items within the Moveworks bot and/or Moveworks Web interface.
/api/sn_sc/v1/servicecatalog/items/<form_id>- Attributes needed: sys_id, variables, picture, categories, catalogs, visible_standalone, sys_class_name, ui_policy, client_script, title, name, short_description, description
/api/now/v2/table/sc_cat_item- Attributes needed: sys_id, active, hide_sp
/api/now/v2/table/item_option_new- Attributes needed: default_value, sys_id, question_text, description, mandatory, active, type, choices, lookup_table, lookup_value, reference_qual_condition, variable_set
/api/now/v2/table/sc_catalog- Attributes needed: sys_id, active, title
/api/now/v2/table/sc_category- Attributes needed: sys_id, active, title
/api/now/v2/table/sys_dictionary- Attributes needed: element, display, name
/api/now/v2/table/catalog_ui_policy- Attributes needed: sys_id, active, catalog_item, variable_set, catalog_conditions, reverse_if_false, order, applies_catalog, global
/api/now/v2/table/catalog_ui_policy_action- Attributes needed: sys_id, catalog_item, variable_set, mandatory, cleared, disabled, visible, order, ui_policy
/api/now/v2/table/sys_db_object- Attributes needed: sys_id, name, super_class
Additional Access Required for ServiceNow Message Brokering (Optional)
The APIs below allow the Moveworks bot to support Message Brokering for Live Agent Chat within the Moveworks bot and/or Moveworks Web interface.
Pre-requisites: The Virtual Agent API plugin should be installed.
/api/now/table/awa_agent_presence_capacity- READ Permission needed to get the number of Live Agents available in a queue
- Tables to grant READ access to:
awa_agent_presenceawa_agent_capacityawa_agent_channel_availability
/api/now/table/interaction- Permission needed to be able to transfer attachments between an agent and a user.
- The service account needs to have the
virtual_agent_adminandinteraction_agentroles.
Appendix B: Moveworks Contact Type
It’s recommended to add a Moveworks-specific contact type so all Incident tickets created by the bot will have the same contact type. This can be called “Moveworks” and later on renamed to be the finalized bot name.