Quickstart #1: Build Your First Plugin
Quickstart #1: Build Your First Plugin
Build a PTO-balance plugin from scratch — HTTP Action, Conversational Process, slot, and launch.
Overview
In Agent Studio, you don’t build agents from scratch — you build plugins. Plugins are the tools your Moveworks AI Assistant calls when a user asks for something. The Assistant handles reasoning, language understanding, and orchestration. You write the tool.
This guide walks you through building your first plugin: a PTO (Paid Time Off) balance lookup. By the end, an employee can type “what’s my PTO balance?” in the Assistant and your plugin handles the rest.
You’ll wire up four things:
- An HTTP Action that hits an external API.
- A Slot that captures the missing piece of input (vacation vs. sick).
- A Conversational Process that runs the action and returns the result.
- A Launch Configuration that controls who can use the plugin.
Once you’ve done this once, the same pattern carries you through every other quickstart in this series.
Prerequisites
- Access to the Agent Studio app.
- Basic understanding of Actions.
Background
Before getting started, here are the concepts you need to know.
What is an Agent?
An agent is the AI system on the other side of the chat — it interprets natural language, decides what to do, and acts. In the Moveworks platform, that agent is your AI Assistant. You don’t rebuild it. You extend it by giving it plugins.
What is a Plugin?
A plugin is a tool the AI Assistant can call. It’s a self-contained unit of capability — fetch a PTO balance, file a ticket, look up an employee — that the Assistant chooses to invoke when it matches a user’s request.
A plugin has three components:
- A Trigger. Tells the Assistant when to consider this plugin (a conversational utterance, a system event, a schedule).
- A Launch Configuration. Controls which end users are allowed to invoke it.
- A Process. The execution logic — what actually runs.
In this guide, you’ll build a plugin triggered conversationally that runs a Conversational Process. A Conversational Process defines the data the plugin needs and the steps it executes.
Triggers and Launch Configurations are existing concepts. The Conversational Process is the new piece.
Define when the Assistant should consider invoking this plugin.
Control which end users are allowed to invoke this plugin.
The execution logic — Activities, Decision Policies, and Slots.
What exactly goes into a Conversational Process?
A Conversational Process houses the logic that defines what a Plugin actually does. There are several key building blocks involved in a Process: Activities (key steps to execute throughout the process), Decision Policies (controls when to run certain activities), and Slots (values that the process needs to make decisions and execute activities).
- Activities. Key steps to perform throughout the process. For example, an Activity can involve taking action in some external system, or sharing a piece of configured content back to the end user.
- Decision Policies. Represent decision points in a process, which can control when to run certain Activities.
- Slots. Values that the process needs in order to effectively execute. For example, Slots may be required in order to execute Activities and make Decisions. There are a few interesting properties of Slots that we can leverage, for example:
- Input Validator. Ensures that a Slot value meets a certain condition (via DSL rule).
- Slot Inference Policy. Specifies whether an AI Agent can automatically infer a value for the slot.
- Resolver Strategy. Determines how an AI agent can get a value for the Slot. For example, a Resolver can help resolve natural language values to API values that a Process will need to use.
What You’ll Build
The objective of the plugin you’re about to build is to allow an employee to get their PTO (Paid Time Off) balance.
Before starting to build, we always recommend that you first map out the desired end user experience and the overall building blocks of the Conversational Process.
Here is an example of the end-user experience we hope to enable:
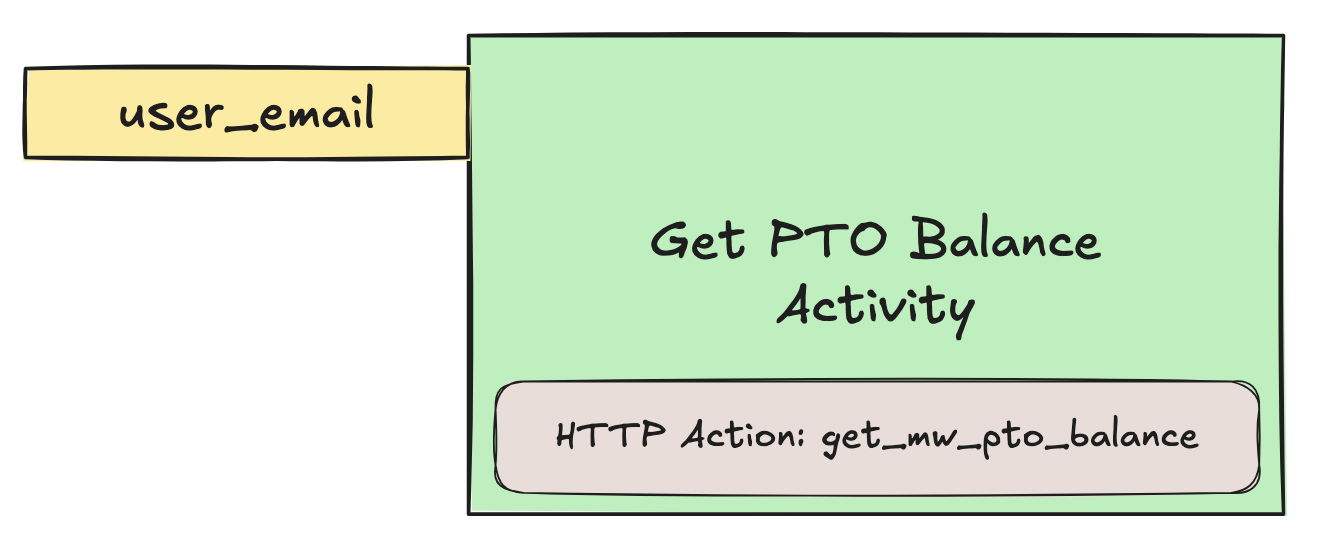
To get to this experience, the Conversational Process should consist of one Activity (powered by an HTTP Action) and one user email Slot required in order to run the Activity:
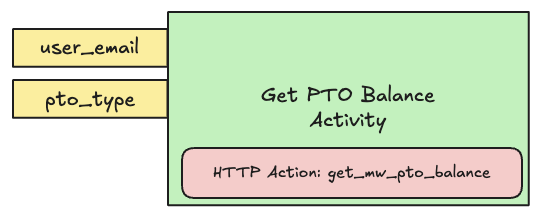
You’ll build an end-to-end working Plugin via these phases:
- Set up an Action (HTTP Action).
- Build the Conversational Process, containing the 1 Activity (using the Action set up in the previous phase) and the 1 Slot, as illustrated above.
- Add the Conversational Process to your AI Agent by launching a Plugin.
Let’s get started!
Phase 0: Set Up Your Connector
️ Important building notes if you are using the Moveworks Developer Labs environment
- If you are working in a Moveworks lab environment, name anything you save (Plugin, Action, Data Type, etc.) with
<fullname>_<descriptive_name>- For example:
lucasrollo_Submit_PTO_Action
- For example:
- When launching your Plugin, make sure to only launch to yourself! You can do this by going to Your Plugin > Launch Configuration > Allow Selected Users > the email on your credential card
You may be able to skip this phase if you’ve completed another Agent Studio Quickstart guide.
You can skip this phase if:
- You have already created a
firstname_lastname_moveworks_purpleconnector.
This section will walk you through how to set up your own connector to the Moveworks Purple API (which powers the Actions used in the Quickstart guides), so no need to repeat this step if you’ve done it before.
In this guide, the PTO data that your Action will access lives behind the Moveworks Purple API Connector. To access this data via your Action, you need to set up a (reusable) connector:
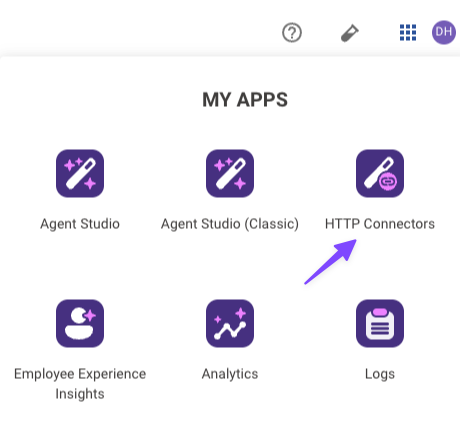
Open HTTP Connectors
Navigate to the App Picker in the top right corner of Agent Studio. Click on “HTTP Connectors”, which will take you to another browser tab.
You’re now fully ready to start building. On to Phase 1!
Phase 1: Set Up Your Action (Get PTO Balance)
️ Important building notes if you are using the Moveworks Developer Labs environment
- If you are working in a Moveworks lab environment, name anything you save (Plugin, Action, Data Type, etc.) with
<fullname>_<descriptive_name>- For example:
lucasrollo_Submit_PTO_Action
- For example:
- When launching your Plugin, make sure to only launch to yourself! You can do this by going to Your Plugin > Launch Configuration > Allow Selected Users > the email on your credential card
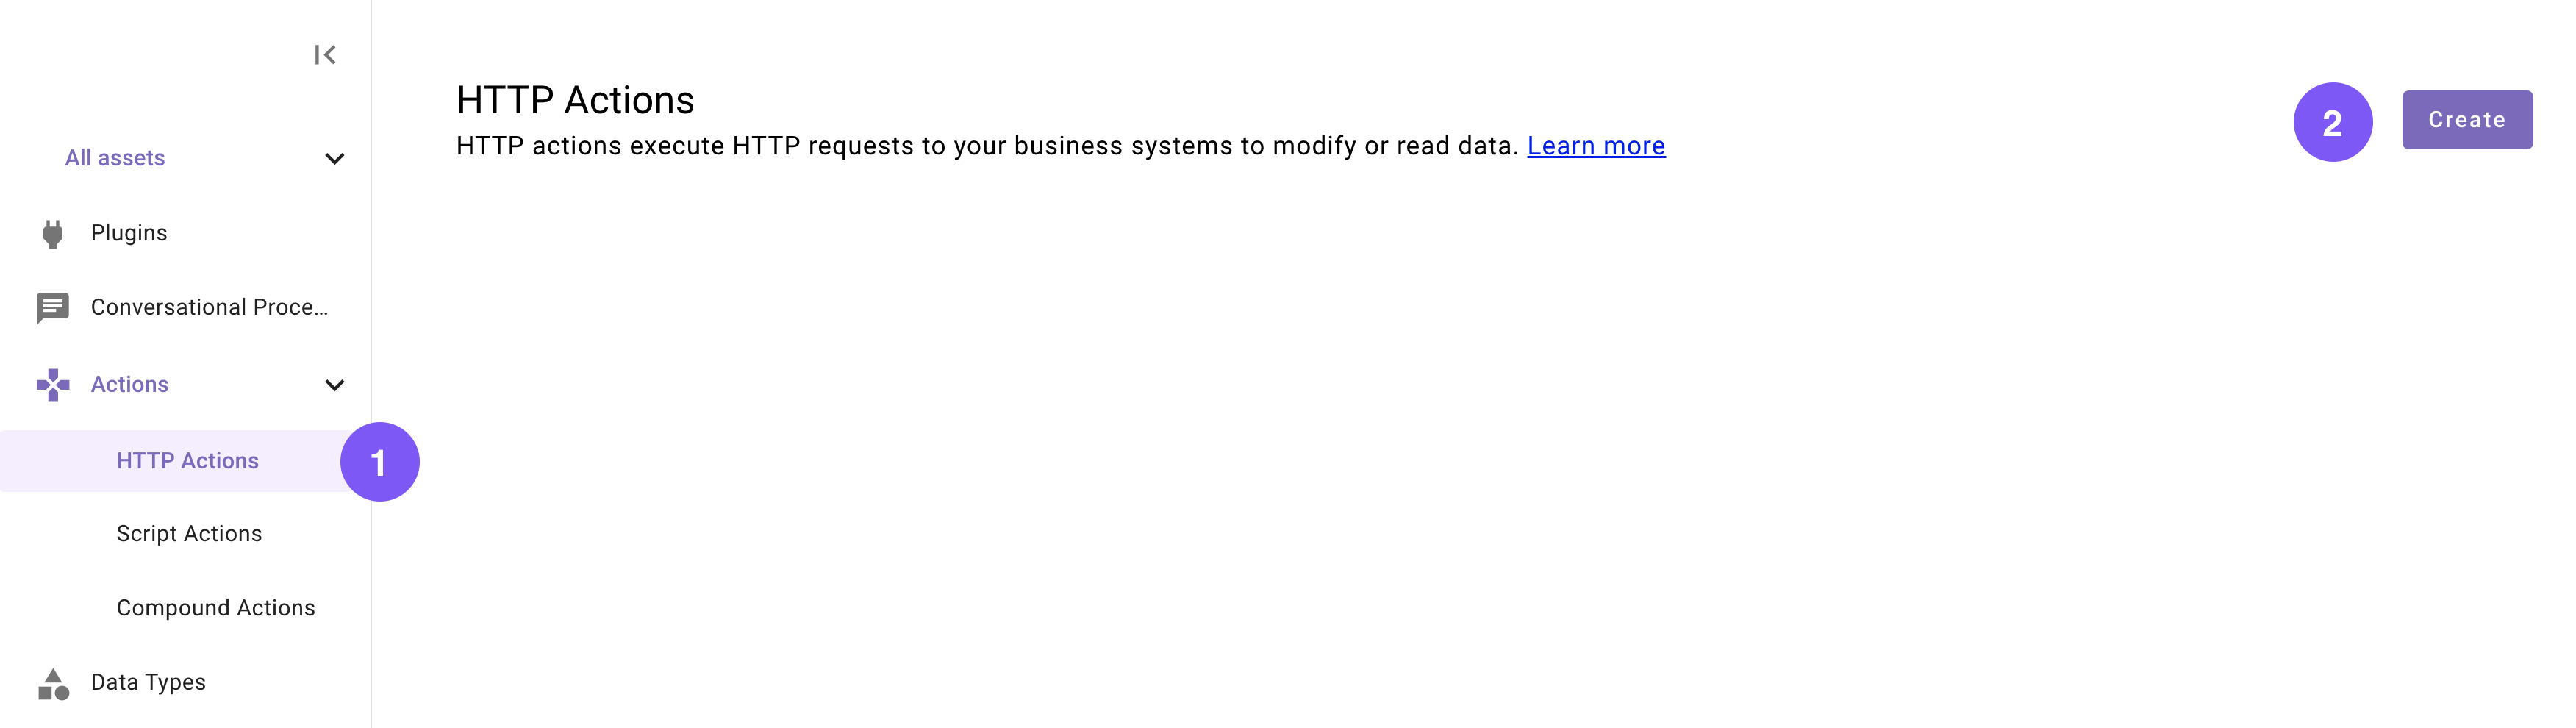
We’ll start by creating an HTTP Action that can query an external system for a user’s PTO balance.
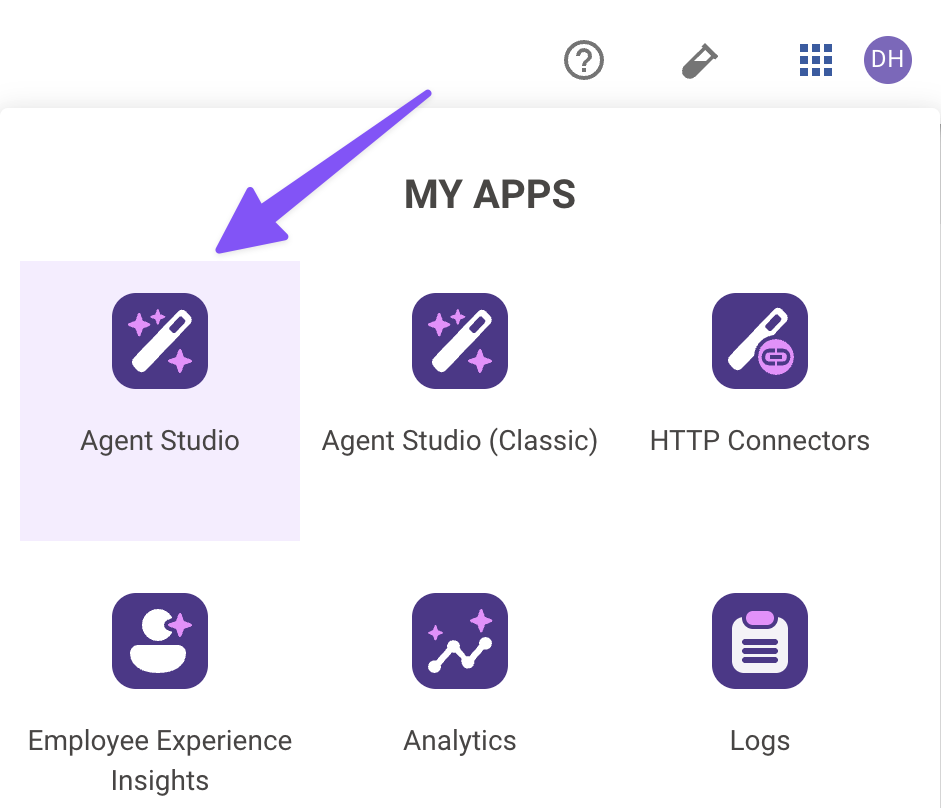
Navigate to Agent Studio
Navigate to the App Picker in the top right corner. Click on “Agent Studio”.
Set the title and description
Set the following Title and Description for your Action (be sure to replace “firstname” and “lastname” with your corresponding information).

Import the API details
Enter the details of your API:
-
Click on the “Import” icon to the right of the “TEST” button.
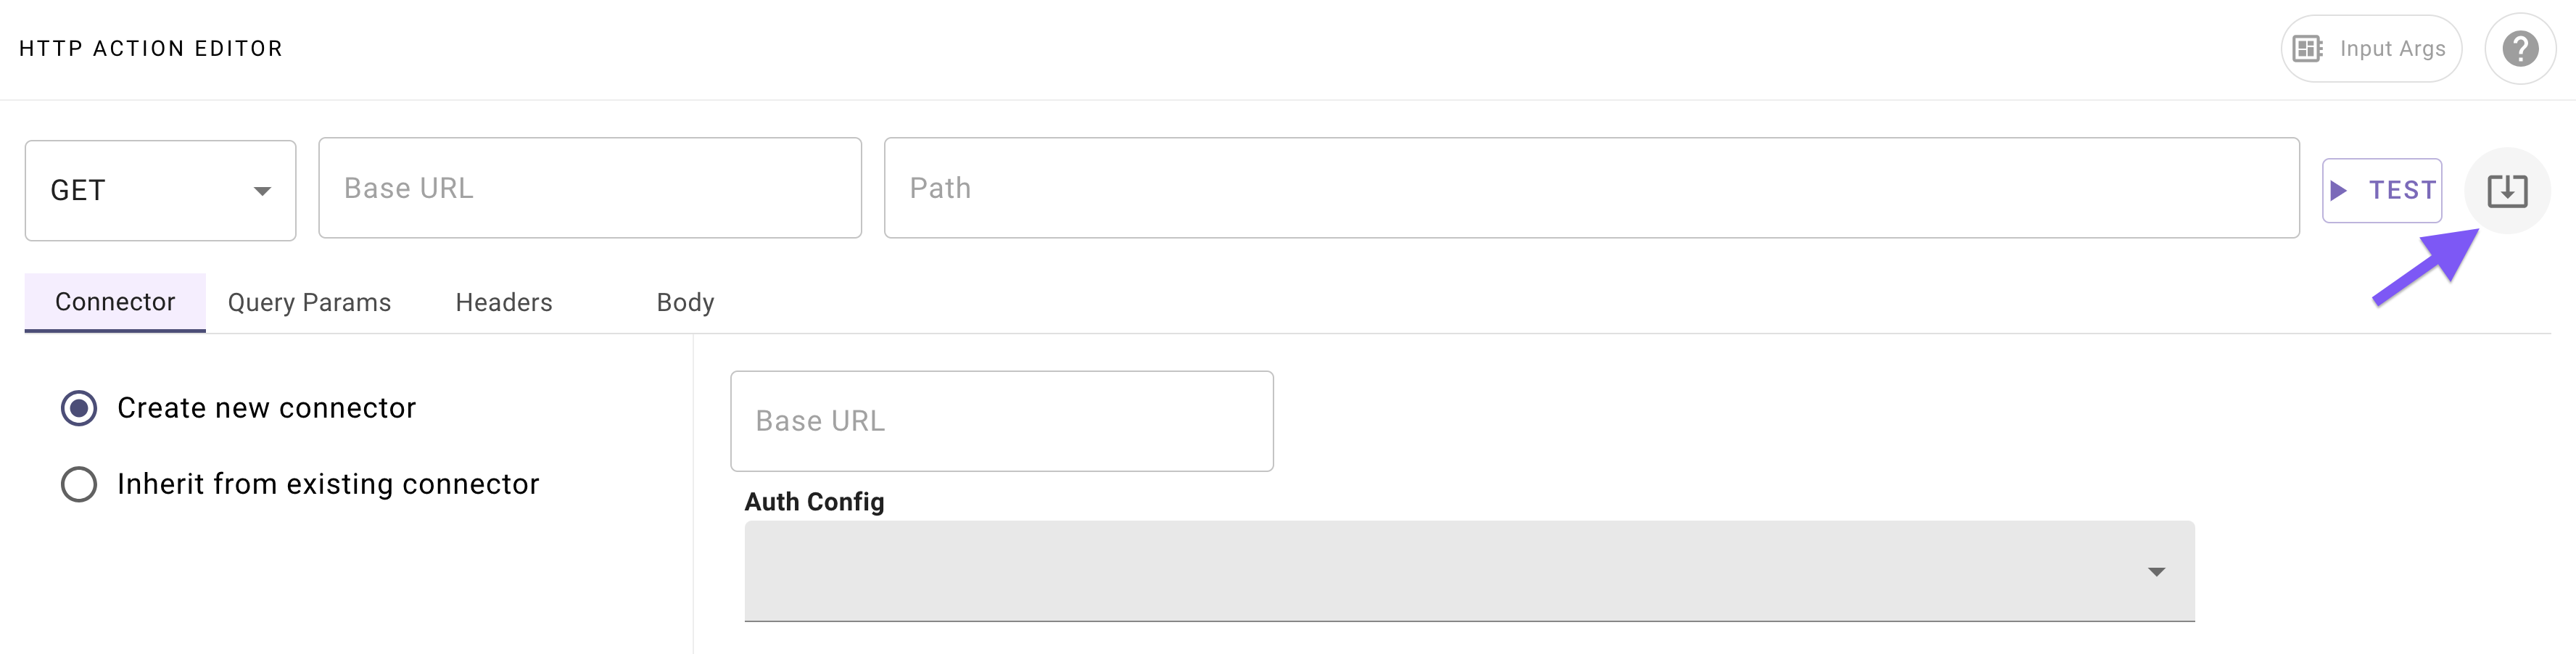
-
Paste the following cURL command (this represents an endpoint which has one dynamic user email query parameter):
cURL -
Click “Import” (your Action should now be auto-populated with details).
Add your connector
Add your Connector:
-
Navigate to the Connector tab.
-
Select the “Inherit from existing connector” radio button.
-
Select the Connector you created in Phase 0 from the dropdown (e.g.
firstname_lastname_moveworks_purple).
Define input arguments
Define a formal input argument to represent the “user email” input this Action requires:
-
Click on the “Input Args” button near the top right corner.

-
Fill out the following details for your
emailargument: -
Fill out the following details for your
pto_typeargument: -
Hit “Save” and hit the “X” icon to close this “Input Arguments” pop up.

Congratulations! You've set up your first Action.
You should see your Action marked as “Published” in the HTTP Action library. In the next phase, you’ll use this Action in a Conversational Process, as part of the main Action Activity in that process.
Phase 2: Build Your Conversational Process
️ Important building notes if you are using the Moveworks Developer Labs environment
- If you are working in a Moveworks lab environment, name anything you save (Plugin, Action, Data Type, etc.) with
<fullname>_<descriptive_name>- For example:
lucasrollo_Submit_PTO_Action
- For example:
- When launching your Plugin, make sure to only launch to yourself! You can do this by going to Your Plugin > Launch Configuration > Allow Selected Users > the email on your credential card
You will now leverage the action you just created to retrieve your user’s PTO balance. (Conversational processes will often involve multiple actions, but we’ll keep it simple for this use case).
In this phase, you’ll 1) build a user_email Slot, and 2) an Action Activity to fetch PTO balance (which requires the user email Slot as input). Here’s a reminder of the bird’s-eye view for our Process.
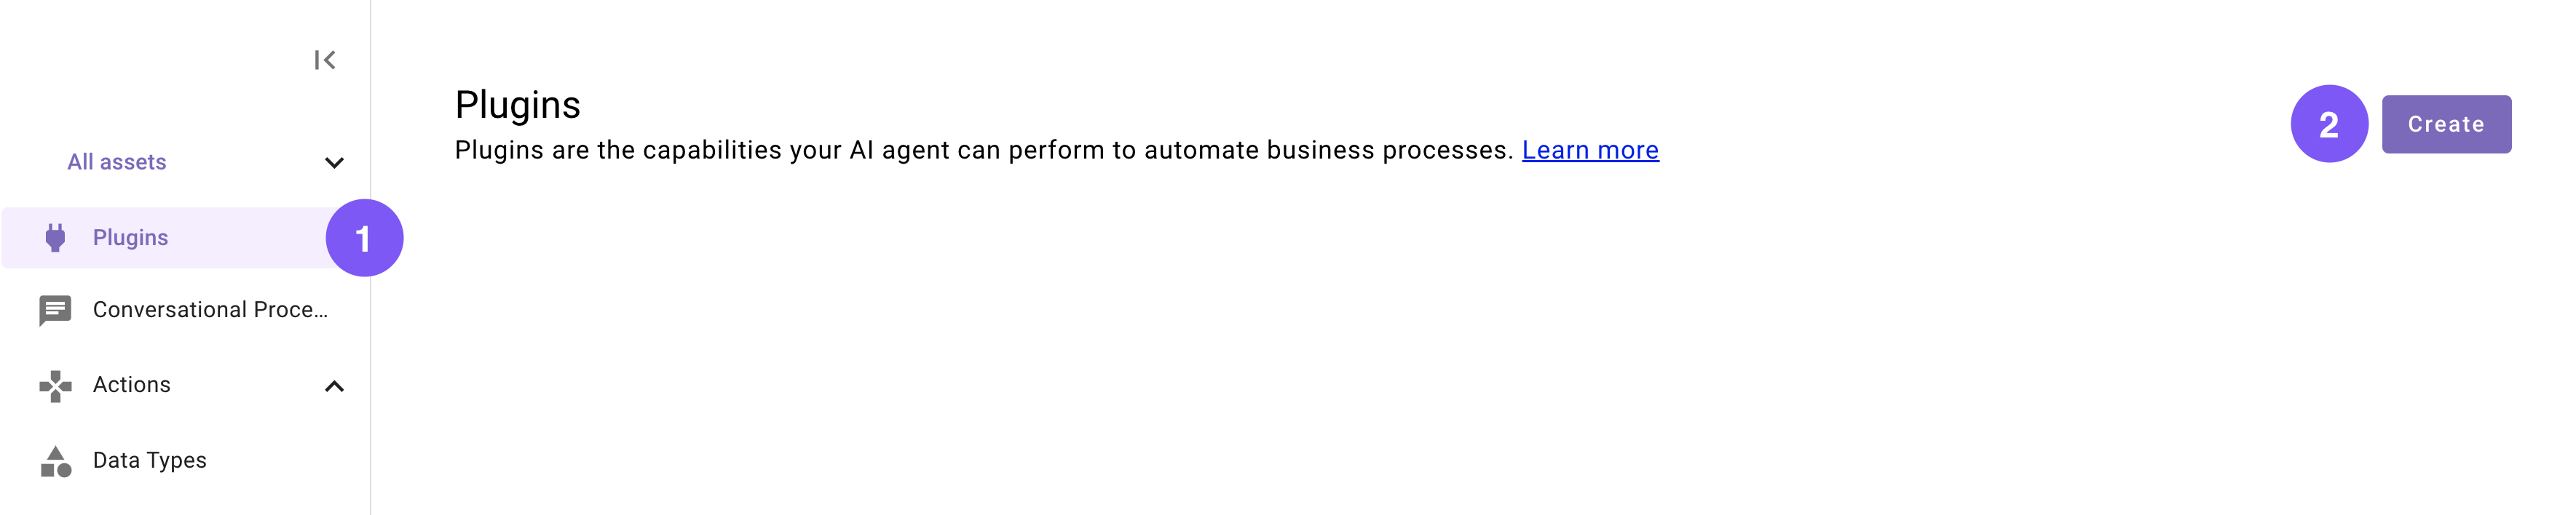
Create a new Conversational Process
Navigate to a new Conversational Process (navigate to the library and click “Create”).

Set the title and description
Set the following title and description for your Conversational Process (be sure to replace “firstname” and “lastname” with your corresponding information).
Add a Slot for PTO type
Add a new Slot to represent the user email that this process will need to collect. 📖 Learn more about Slots.
-
Click on the “Slots” button near the top right corner of the editor.

-
Click “Create New” in the Slots pop up.
-
Fill out the following details for your Slot:
-
Before saving this slot you will add an Resolver strategy. You want to power this Slot with a Static Resolver.
-
At the very bottom of the Slot creation popup, click on “Resolver Strategy” and “Create”.
-
Click ”+ Add Method”.
-
Fill out the following initial details for your Method.
-
-
Add the following Static Options for your Static Resolver Method. (Note: the “Raw Value” column contains the actual values that your “get mw pto balance” HTTP Action expects in order to successfully retrieve the type PTO balance).
- Click the “X” in the top right corner of the “Strategy Definition” pop up.
-
-
Hit “Save” (scroll to the bottom of the slot popup) and hit the “X” icon to close this “Slots” pop up.
Build an Action Activity
Build an Action Activity that will perform the retrieval of a user’s PTO balance. 📖 Learn more about Activities.
-
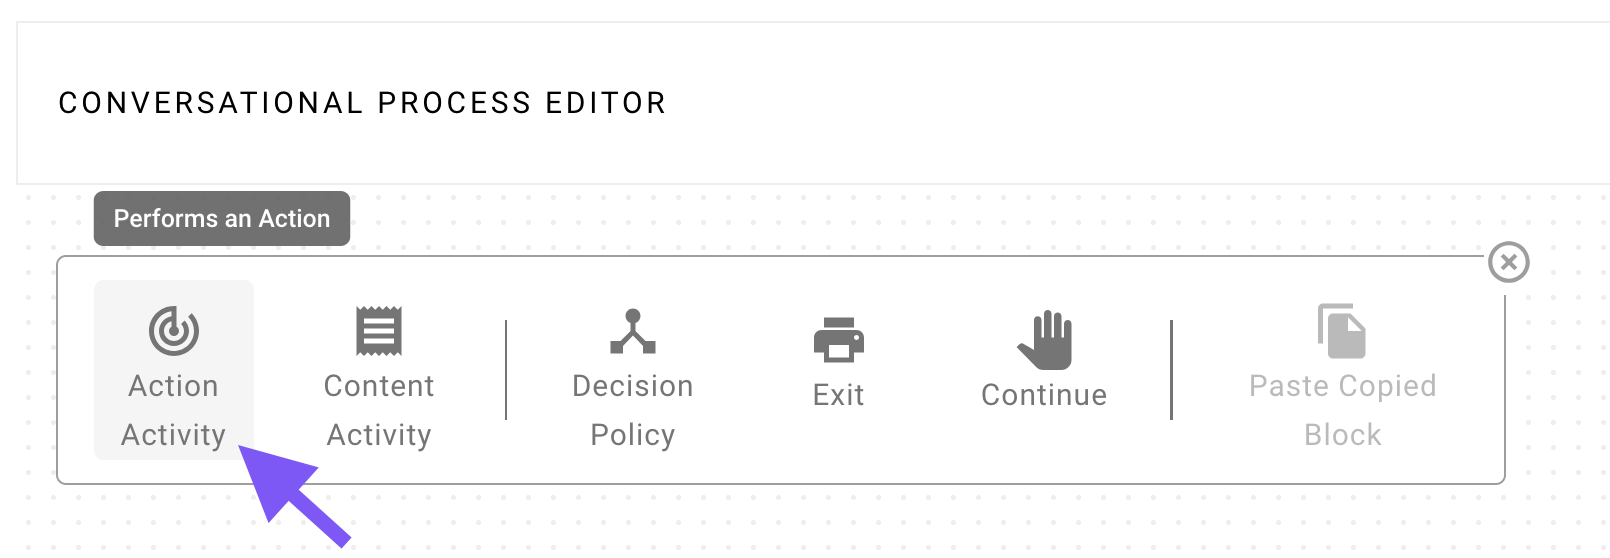
Click on the ”+ Add a block to your process” button in the main section of the editor.
-
Click on “Action Activity”.
-
Fill out the following details for your Action Activity, which mostly involves connecting your Slot to the input(s) of the HTTP Action (and mapping the result of the Action back to the Conversational Process):
Validate your process
Click “Validate” (Located in the top right corner. Click on the caret icon next to the Publish button). If everything went well so far, the Console (bottom of the editor) will say “Validation successful”.
💡Pro-tip: You can also use the following hotkeys to validate without pressing the button:
Awesome! You've just built the main part of this Plugin: the Conversational Process.
We’re ready for the last step: now you’ll launch a Plugin — this packages the Conversational Process into a tool that your AI Agent can use directly.
Phase 3: Launch a Plugin
️ Important building notes if you are using the Moveworks Developer Labs environment
- If you are working in a Moveworks lab environment, name anything you save (Plugin, Action, Data Type, etc.) with
<fullname>_<descriptive_name>- For example:
lucasrollo_Submit_PTO_Action
- For example:
- When launching your Plugin, make sure to only launch to yourself! You can do this by going to Your
In our final section, you’ll learn how to add your Conversational Process to a Plugin, and control the Triggering scenarios of your Plugin, and specify which end users are allowed to use your Plugin.
Set the title and description
Set the following title and description for your Plugin (be sure to replace “firstname” and “lastname” with your corresponding information).
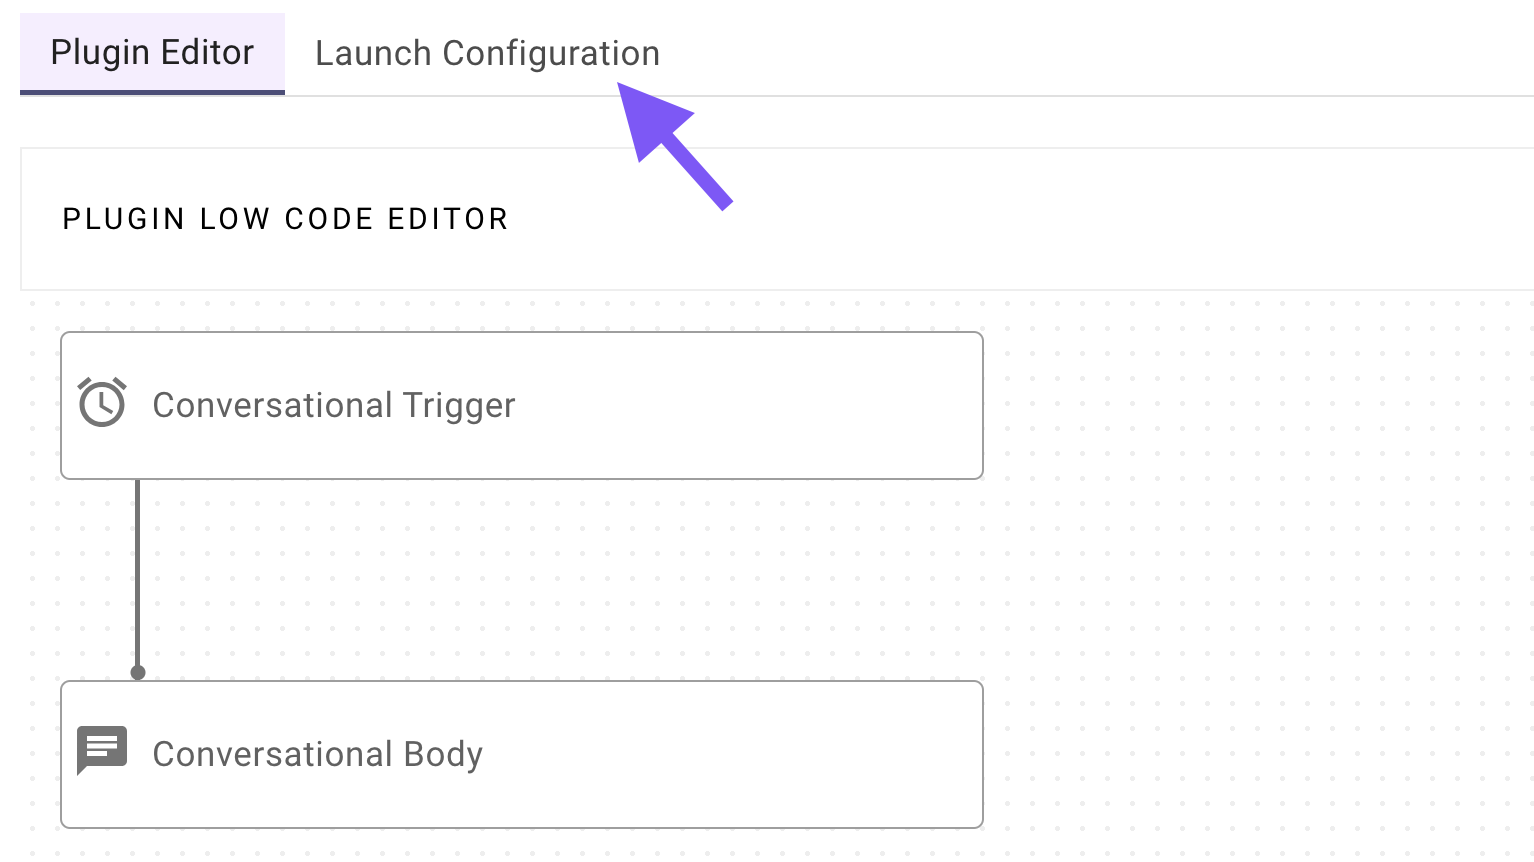
Define a Conversational Trigger
Define a Conversational Trigger. 📖 Learn more about Natural Language Triggers.
-
Make sure the Conversational tab is selected and click “No triggers configured”.
-
In the panel that appears on the right, either:
-
Approve (click “Trigger”) 5 of the auto-generated suggested positive examples, or
-
Add the following recommended utterances:
-
Choose your Conversational Process
Choose your Conversational Process (the one you built in Phase 2).
- Click on “No body configured”.
- In the panel that appears on the right, search for and select the Conversational Process that you built in Phase 2 (should be named
firstname_lastname_get_mw_pto_balance_process)
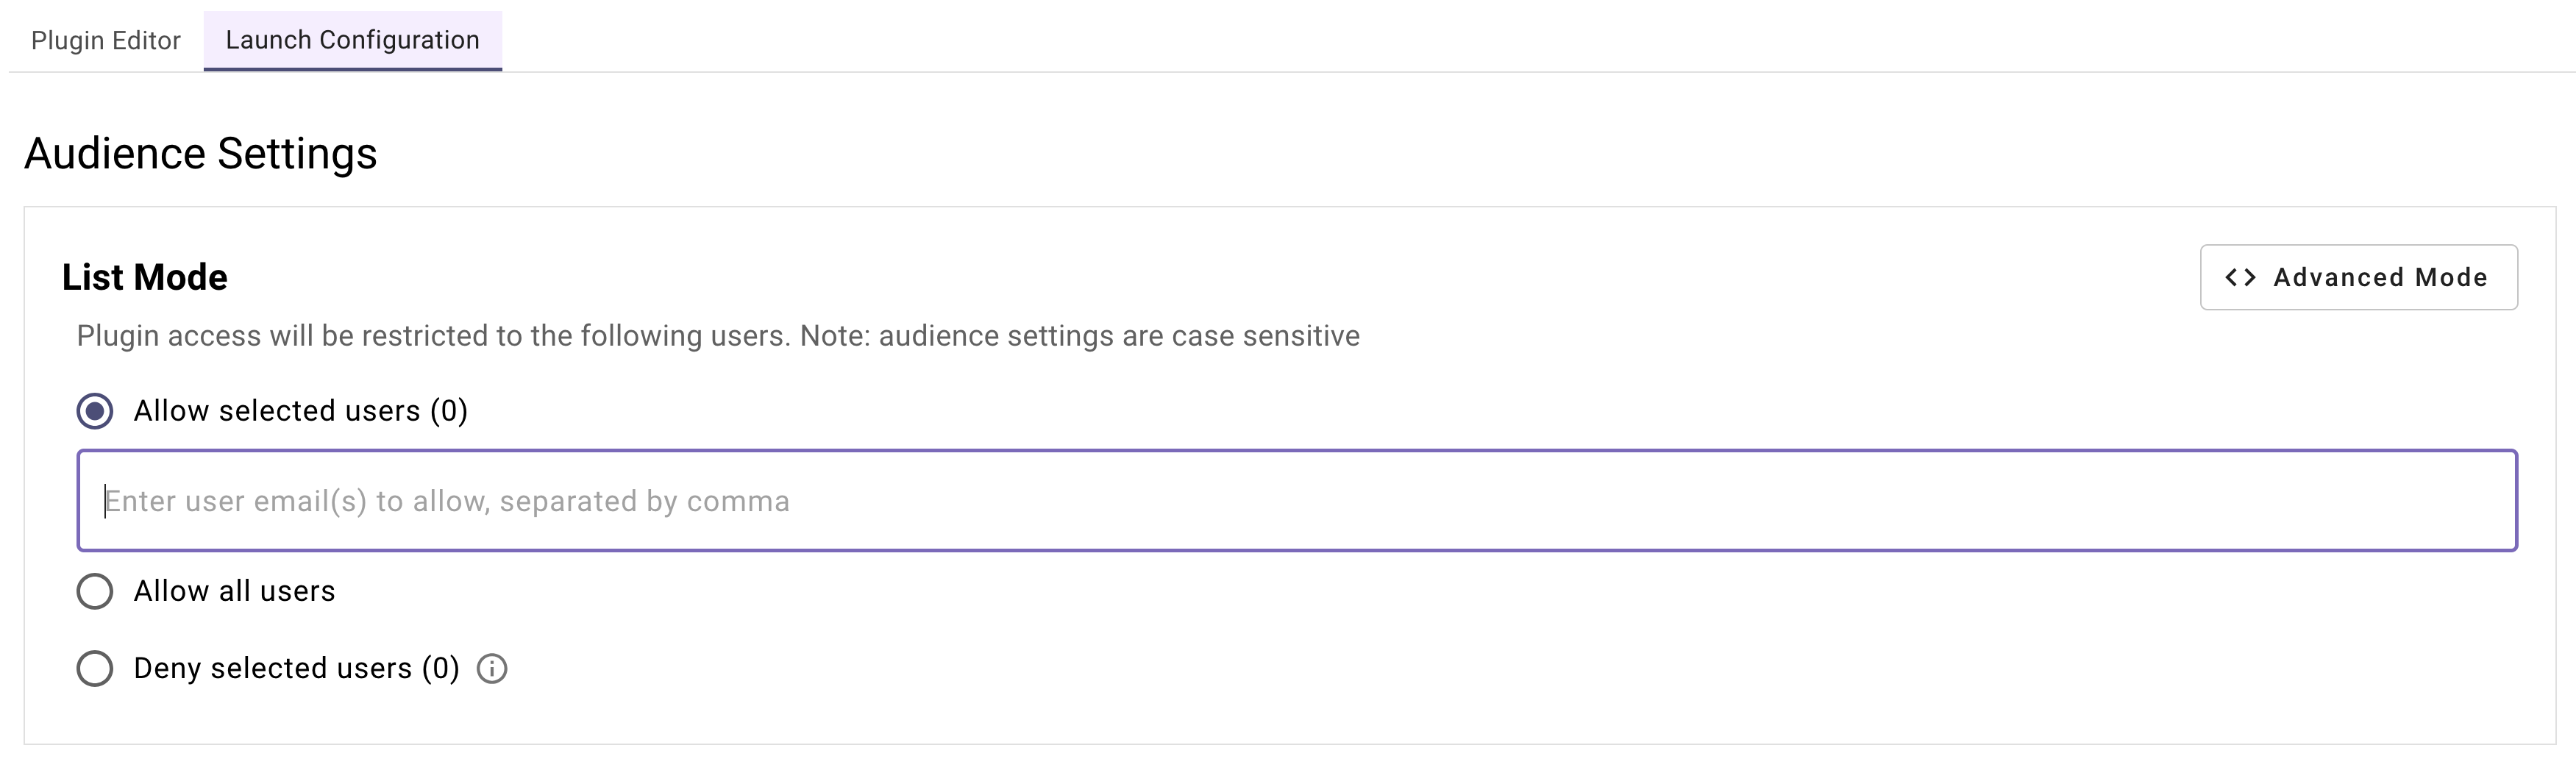
Don't forget to press enter when adding user emails
After entering emails under “allow selected users” press “enter” or the email will not save when publishing.
And that's all! You've built your Plugin, and now it's ready for you to use.
Use one of your triggering examples (e.g. “check PTO balance”) to access the Plugin in conversation.
Reflecting on Your First Plugin
Congratulations, you’ve successfully completed the entire quick-start guide! You’ve built a fully functional PTO balance Plugin from the ground up, and that’s no small feat.
Through this guide, you’ve created a Plugin that:
- Retrieves PTO balance information from an external system with a well-crafted Action.
- Prompts users for details using Slots to make it interactive and user-friendly.
- Activates effortlessly with Conversational Triggers you’ve set up.
- Controls access perfectly with Launch Configurations you’ve just finalized.
From start to finish, you’ve mastered every step of the process — amazing work! Your Plugin is now ready to help users check their PTO balances with ease.
Next step: Test your plugin. See our Testing & Error Handling guide for how to test, debug, and handle errors in production.