OAuth 2.0 - Authorization Code
OAuth 2.0 - Authorization Code
OAuth 2.0 with Authorization Code Grant
The OAuth 2.0 Authorization Code Grant is a secure authentication method designed for applications that require delegated access to user resources. This flow is commonly used by web and mobile applications that need to authenticate users and obtain an access token to act on their behalf.
In this flow, the user is redirected to the authorization server (your application) to grant permissions. Once authorized, the server provides an authorization code, which the application exchanges for an access token.
After obtaining the access token, the application can use it to authenticate API requests on behalf of the user. If the access token expires, the application may use a refresh token (if provided) to obtain a new one, avoiding the need for re-authentication.
Callback URLs
Your callback URL depends on which data center your Moveworks org is hosted in. Replace <org> with your Moveworks org name.
To find your org name:
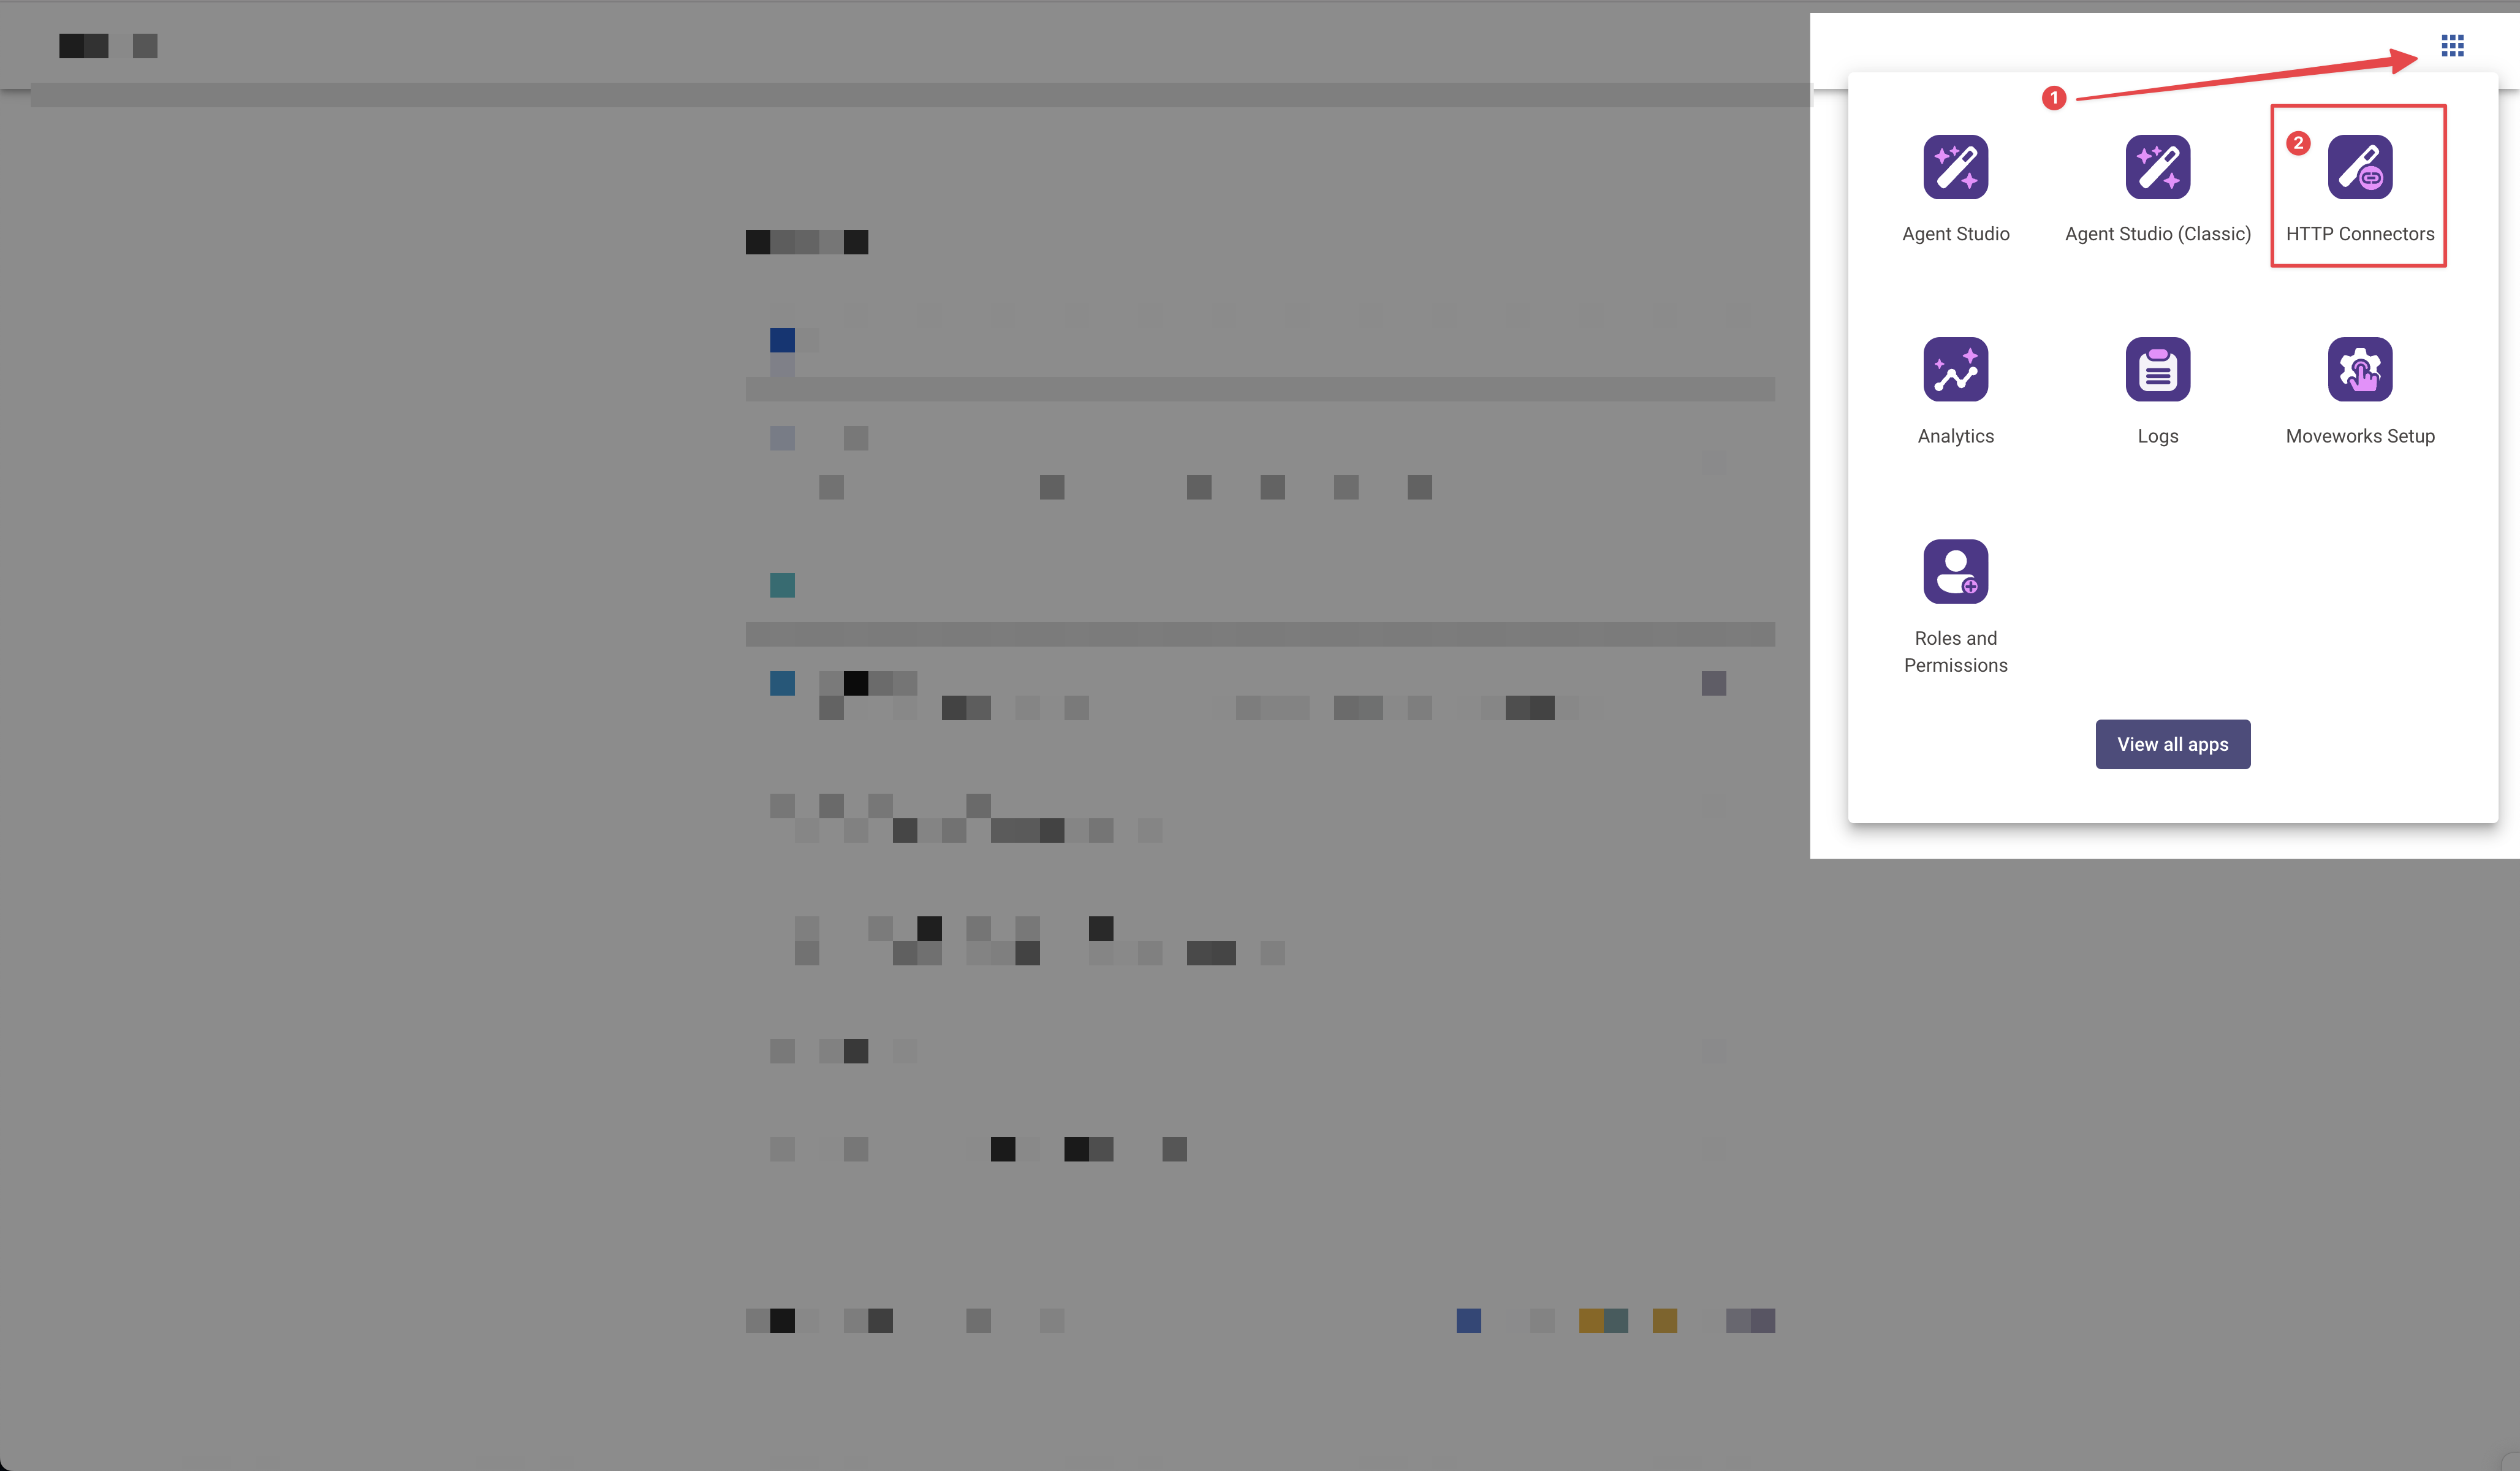
- Go to Agent Studio.
- Copy the base URL (e.g.,
https://acme.moveworks.com). - Your org name is the subdomain (e.g.,
acme).
Moveworks automatically uses your org-specific redirect URI during the authorization request. You should not provide a custom redirect_uri query parameter unless explicitly instructed by Moveworks.
Configuration Steps
-
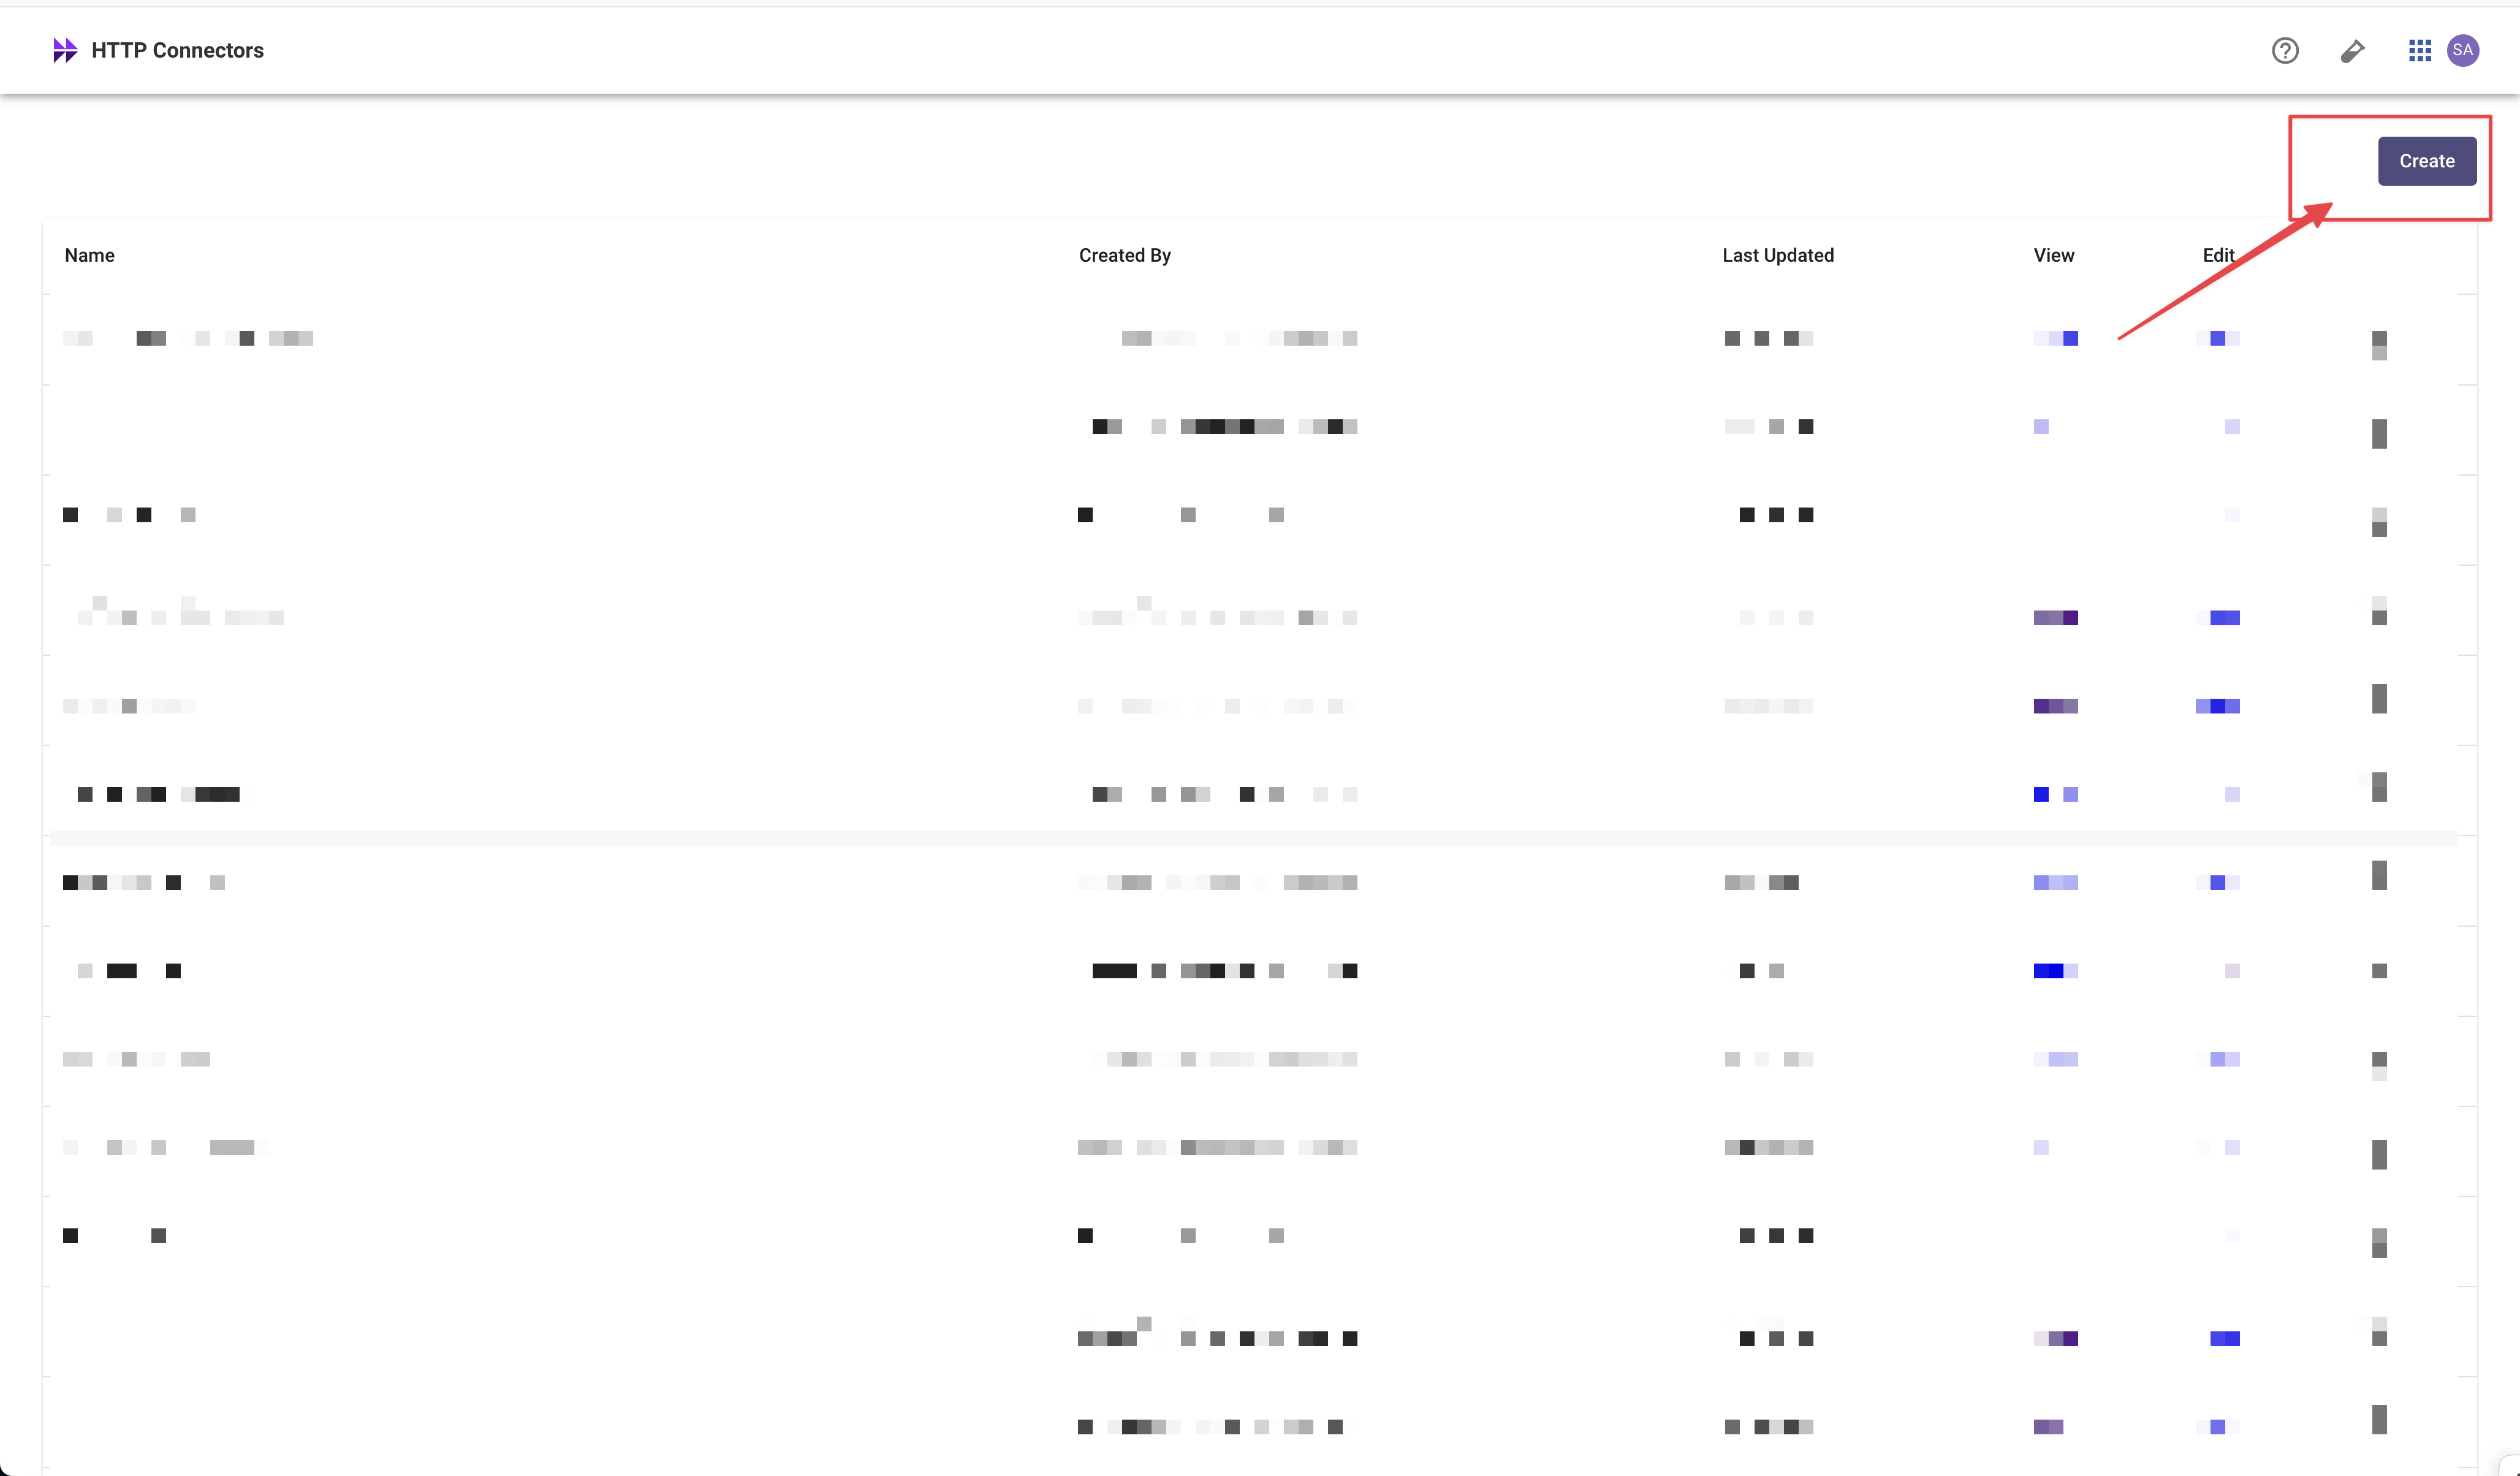
Within Moveworks, go to HTTP Connectors
-
Create a new connector
-
Enter the: Name, Display Name, and Display Description:
- Name: the internal name for this connector.
- Display Name: End user facing name for this integration. All end users will see this name so pick an appropriate name. We recommend the system name itself (i.e. Workday, Salesforce, etc.).
- Display Description: End user facing description for this integration. All end users will see this description so pick an appropriate description. We recommend being as clear as possible on what this integration unlocks.
- I.e.: “This integration allows Moveworks/ (or assistant name) to look up and edit data within Salesforce.
-
Select
Oauth2from the **Auth Config ** dropdown list. -
Then select,
Authorization Code Grantfrom the Oauth2 Grant Type drop down.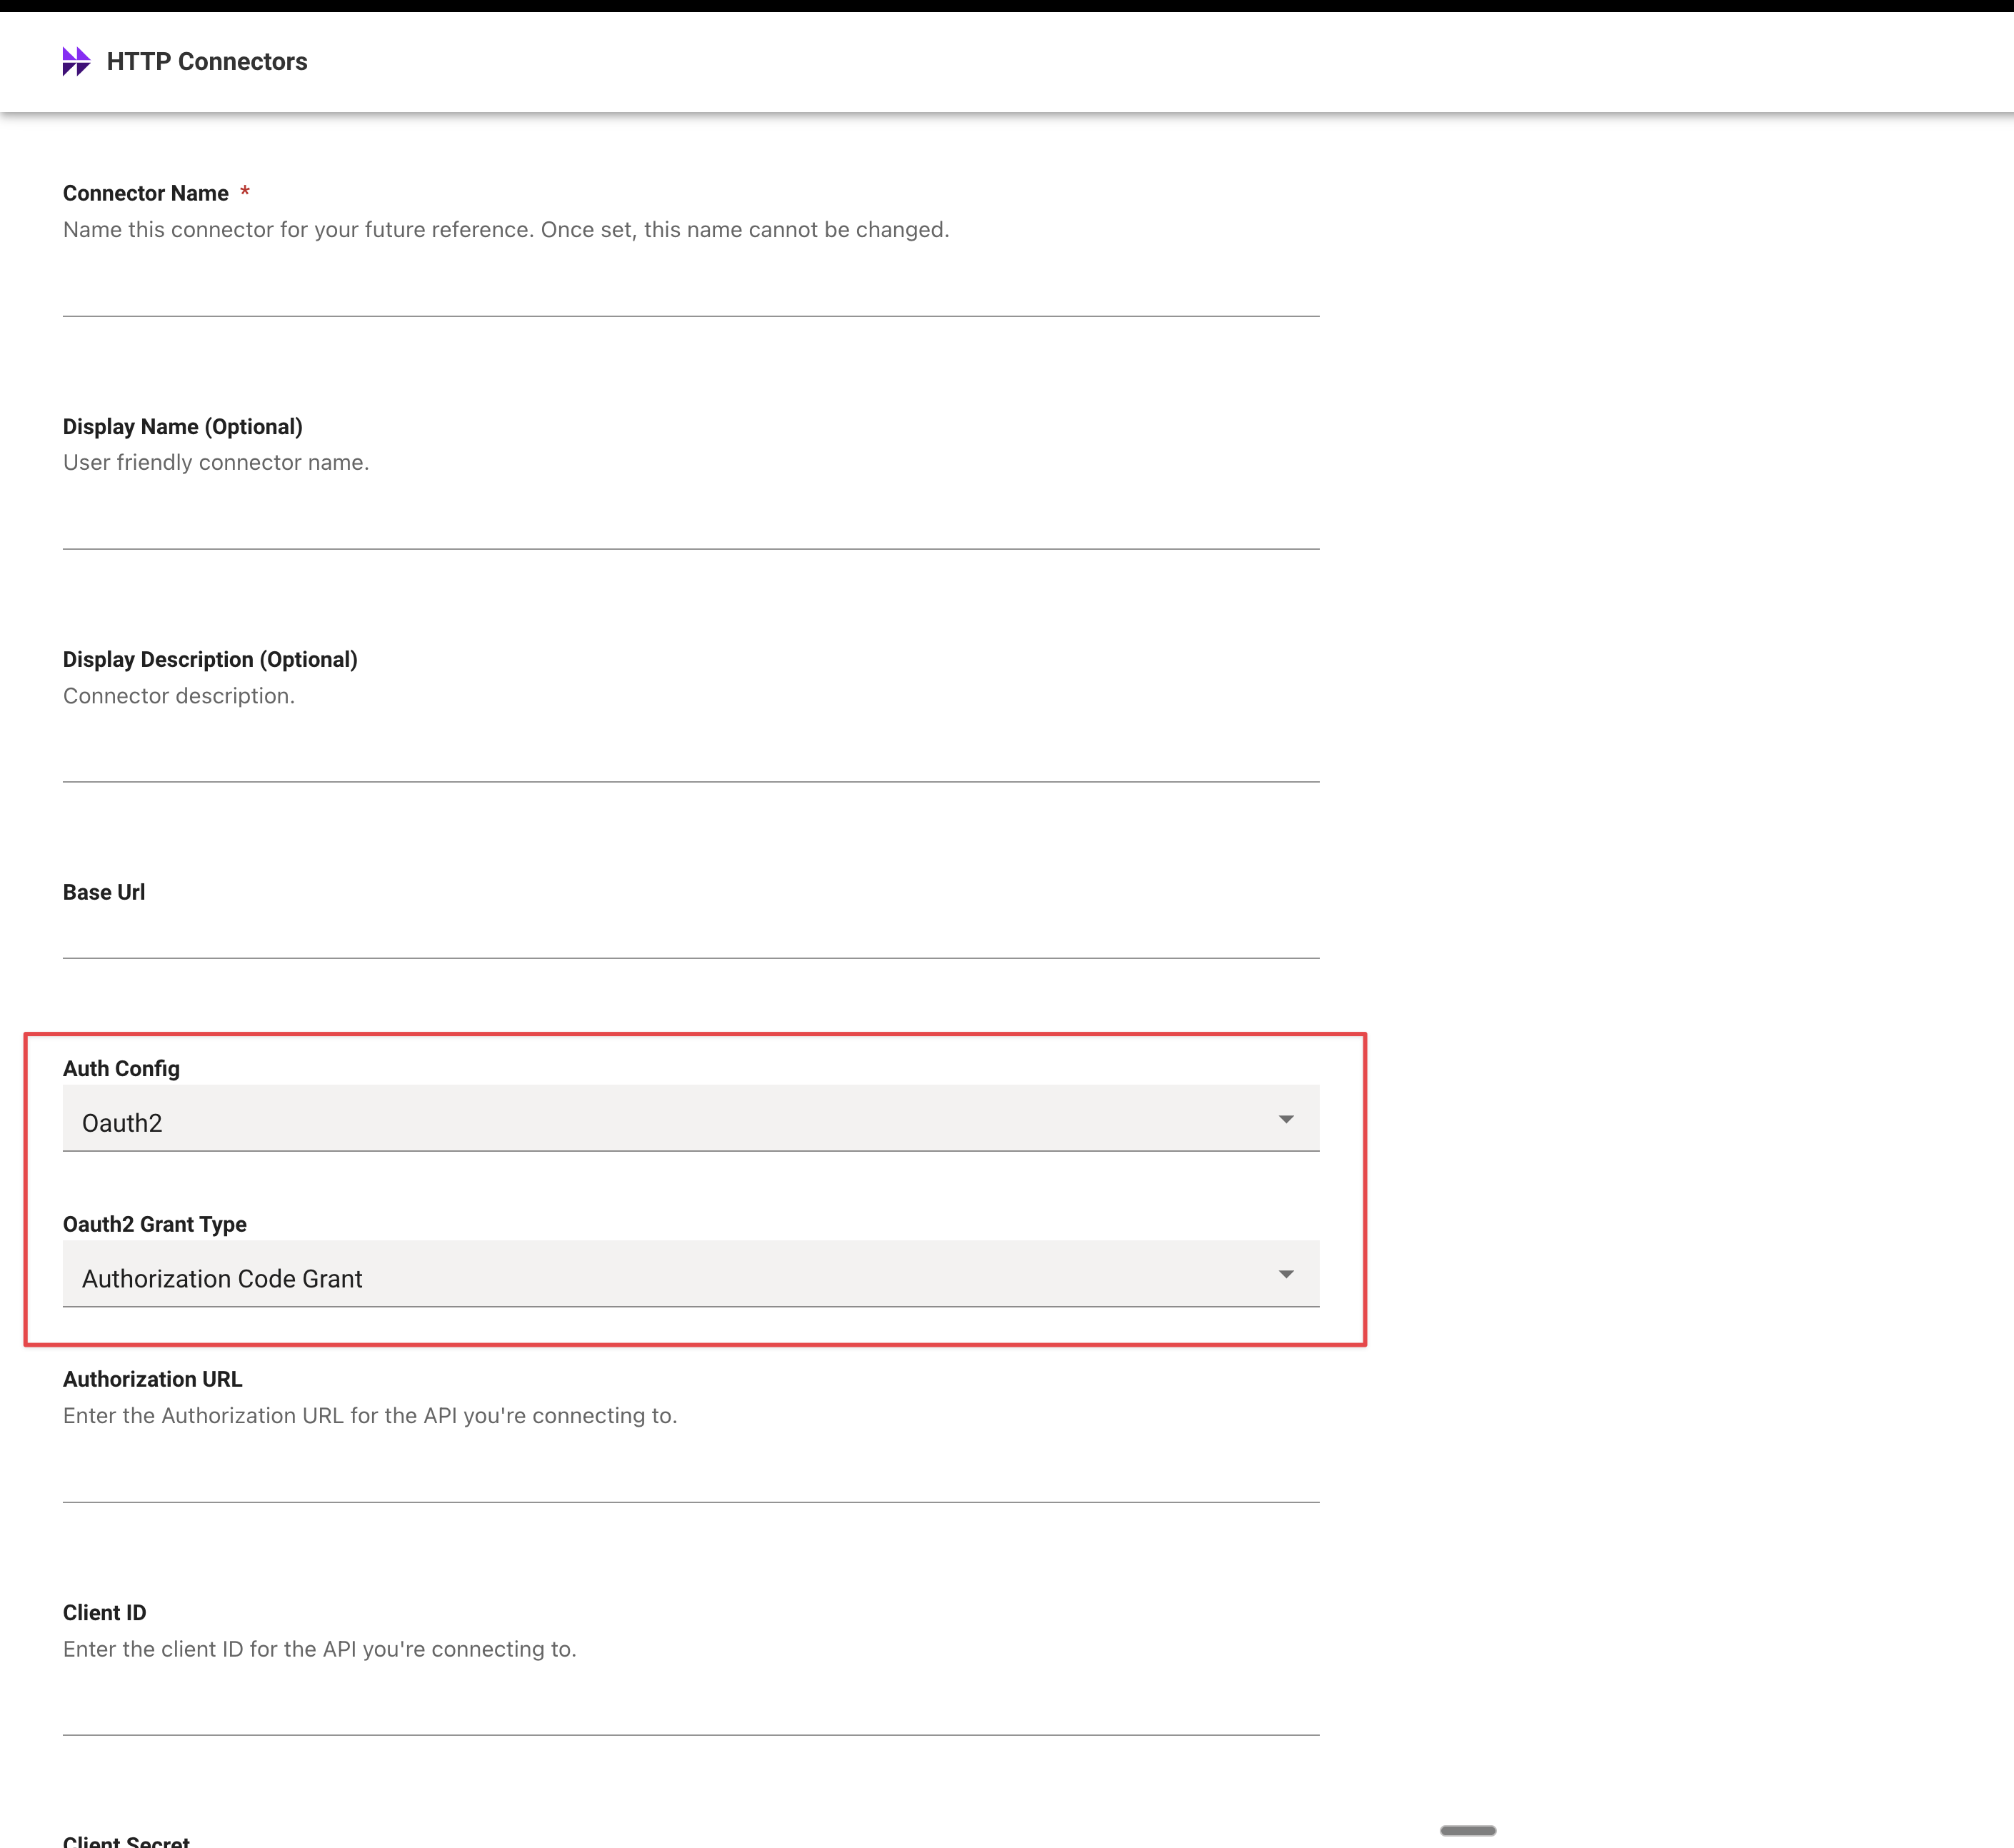
-
Enter the following required fields:
Authorization URL: The authorization endpoint for the third-party system. This is obtained from the third-party system’s API documentationClient ID: The Client ID generated from the third-party OAuth application.Client Secret: The Client Secret generated from the third-party OAuth application.Authorization Code Grant Scope: The scopes that you wish this connector to have access to. This is obtained from the third-party system’s API documentation.Oauth2 Token Url: The token endpoint for the third-party system. This is obtained from the third-party system’s API documentation.
Parameters Automatically Added by Moveworks
Moveworks automatically includes several required OAuth parameters when initiating the authorization request. These must not be configured manually in the connector.
Moveworks automatically sets:
response_type=coderedirect_uri(your org-specific callback URL)access_type=offlinestate(a randomly generated value used for CSRF protection)
Do not add these parameters under Additional Request Data or Query Params. Only configure third-party-specific parameters such as
audienceorpromptif required by the provider’s documentation. -
Recommended Info:
Revoke URL: The revocation endpoint for the third-party system. This will allow end-users to revoke their tokens. This is obtained from the third-party system’s API documentation and is highly recommended.Instructions URL (Optional): This URL will be shown to end-users in the case of revocation failing. We recommend putting instructions for end-users to revoke tokens inside of the third-party itself here.Authorization Code Grant Revoke Access Token Options Revoke Access Token AuthenticationRevocation token key: The name of the key that the revocation endpoint would use when sending the access token. We use ‘token’ by default.- If needed, you can leverage Oauth2 Custom Oauth Request Options Additional Request Data to send additional body data required by the third-party system. Data is sent in x-www-form-urlencoded format in the body.
Do not include OAuth parameters that Moveworks already generates (state,response_type,redirect_uri, oraccess_type). Only include third-party-specific parameters (e.g.,audience,prompt) when required.
End User Experience
When a Moveworks plugin requires access to a third-party system on behalf of an end user, Moveworks runs a pre-flight check to ensure that all required connectors are authorized before the plugin runs. Once authorized, the plugin will execute automatically. The end-user experience is as follows:
- The user triggers a plugin (directly, via a multi-step process, or via a webhook-triggered conversational process).
- The agent runs a pre-flight check on the plugin’s UCA connectors.
- If they have previously given consent and they have a valid token: their plugin will proceed like any other plugin.
- If they are not yet authorized (have not given consent before) or they have an invalid token (expired, wrong scopes, etc.) they will be asked to give consent with a message and auth button (LLM may summarize differently):
- “I can’t check your availability for tomorrow because Google Calendar isn’t connected for your account - please grant access to Google Calendar, and then I’ll be able to list your open 30-minute slots tomorrow automatically. [Grant access to Google Calendar]
- The user would then click the button and be taken to the 3rd party authentication page:

- Note: The user is required to complete authorization for all listed connectors before the plugin will execute. There is no “skip” option; partial authorization would cause the plugin to fail mid-run.
- The user clicks through to the third-party authorization page in a new browser tab and completes the auth flow.
- After successful auth, the user is automatically redirected back to the assistant.
- The plugin resumes automatically and the original task continues — no need to re-trigger the request or respond with “retry.”
Auto-restart
If the user switches topics during the auth flow (for example, they start a different conversation while the auth tab is open, or they step away and come back later) the agent preserves the pre-flight state and automatically resumes the original plugin once authorization is complete. This auto-resume window is valid for 30 minutes. After 30 minutes, the user will need to re-trigger their original request.
Multiple connectors
If a plugin requires authorization for multiple systems, the agent presents them together so the user understands the full set of connections needed before they start. As each connector is authorized, the auth card updates to show progress. The plugin runs automatically once all required connectors are authorized.
MyMoveworks SSO
Customers who wish to use this feature must add all their end users to the My Moveworks SSO. This step is essential because it grants end users access to the connections page, where they can provide consent to connect with third-party systems and subsequently utilize plugins. This setup is necessary to ensure a secure implementation of OAuth 2 using the Authorization Code grant type.
End users with access to My Moveworks SSO will not have visibility into developer or admin-facing products unless they have the appropriate roles or permissions. For detailed instructions on adding users to the MyMoveworks SSO, please refer to our SSO documentation: /service-management/administration/my-moveworks-sso/overview#/