Lab #0: Setup Lab Environments
Overview
- Learning Objectives: Configure the foundational environments required for the Moveworks implementation. By the end of this lab, you will have a functional Okta tenant, access to Moveworks Setup, and a secured Single Sign-On (SSO) connection between the two.
- Recommendations:
- Leverage two monitors — there will be a lot of copy + pasting from disparate systems in this lab
- Open a Notes or Spreadsheet doc
- Maintain access to the following pages (keep them open in separate browser tabs):
- ServiceNow PDI Landing Page
- Okta Dashboard
- My Moveworks portal
- Estimated Time: 60 minutes
- Prerequisites:
- Work email address
- Access to Moveworks Tenant URL (provided by instructor)
- Access to a ServiceNow PDI (provided by instructor)
- Okta Verify Application installed on your mobile device
🛠️ 1: Walkthrough
1.1: Access Moveworks & Moveworks Setup
Goal: Use the “side-door” entry to gain initial administrative access.
Temporary access links are only valid for 15 minutes. If you need to login to the environment again, send yourself an activation email via my.moveworks.com/welcome
-
Log in to the Moveworks portal using your assigned lab credentials:
my.moveworks.com/welcome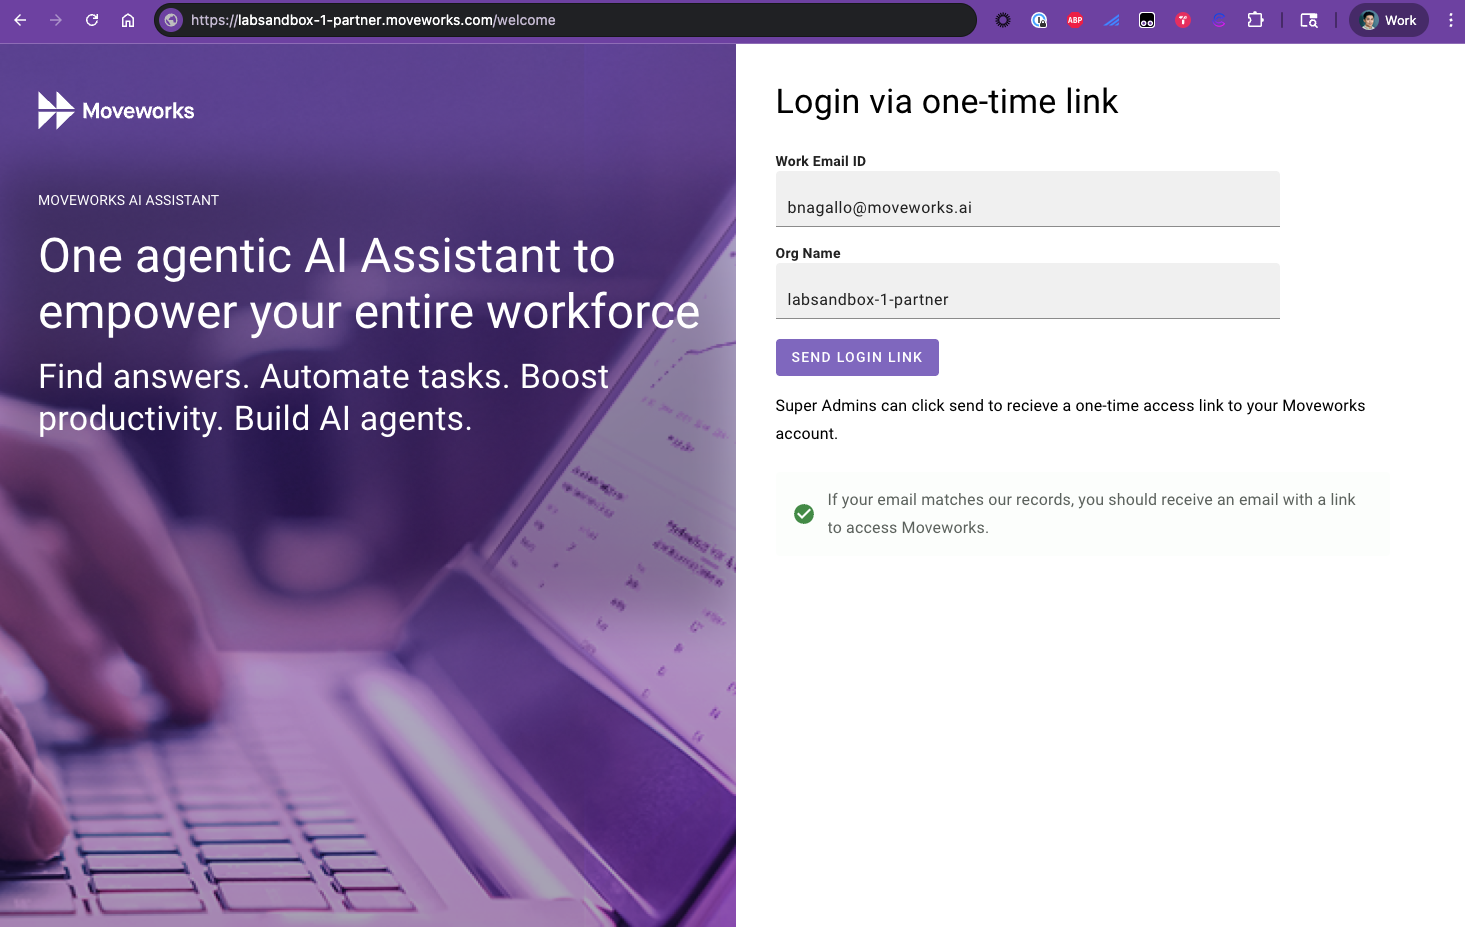
-
Work Email: Enter the work email address you used during the Okta PDI step.
-
Org Name: In the Org Name field, enter your specific organization name.
- Example: If your organization is
labsandbox-1-partner, your Org Name islabsandbox-1-partner
- Example: If your organization is
Note: Retain your org name, you will need it for a later step
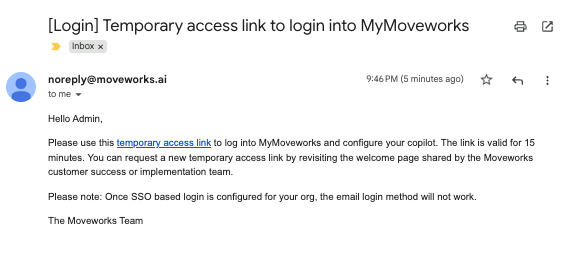 4. Upon clicking the link, you will be redirected to an assistant window within My Moveworks
- Say
Hito start interacting with Moveworks- Moveworks won’t be able to do much yet, since this instance still needs to be configured!
- Click the
Manage appsin the lower left to be redirected to theMy Moveworks Product Page
- On this screen we can see all of the available products within this Moveworks instance. To start implementing Moveworks, we will use Moveworks Setup, which is how the base functionality of Moveworks is configured.
- Select
Moveworks Setup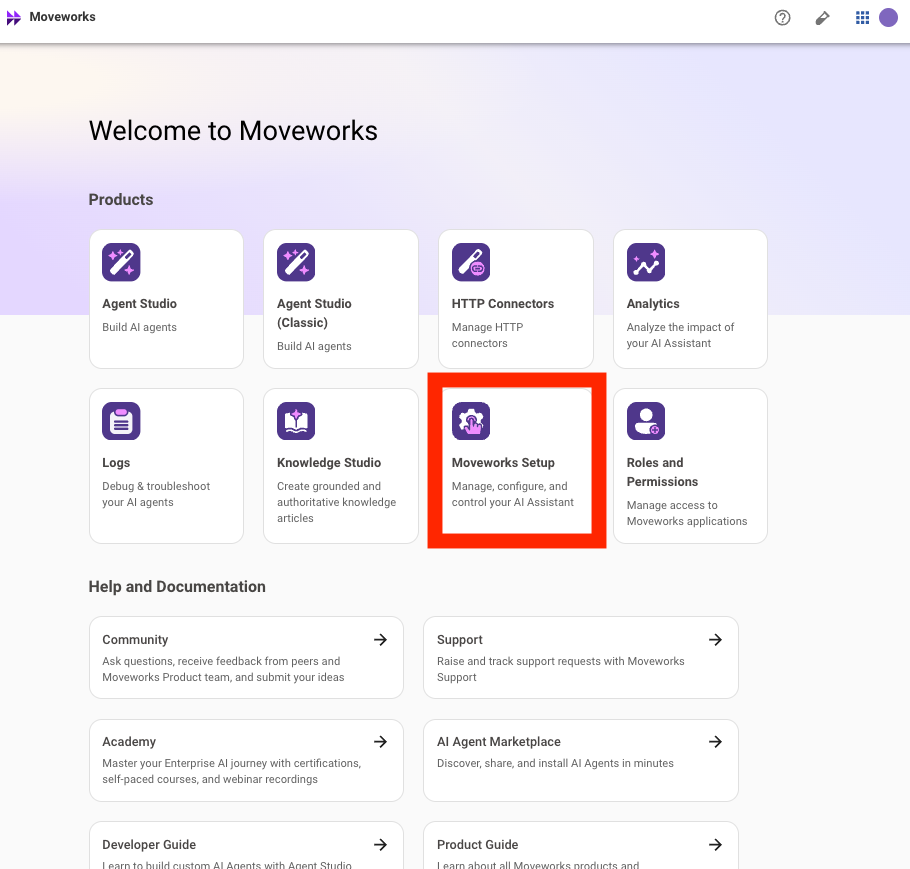
- Select
- You will be redirected to the
Moveworks Setup Overview Page& be able to see all of the available configuration modules for this Moveworks instance. Next we will set up SSO so you can log back in without a temporary link.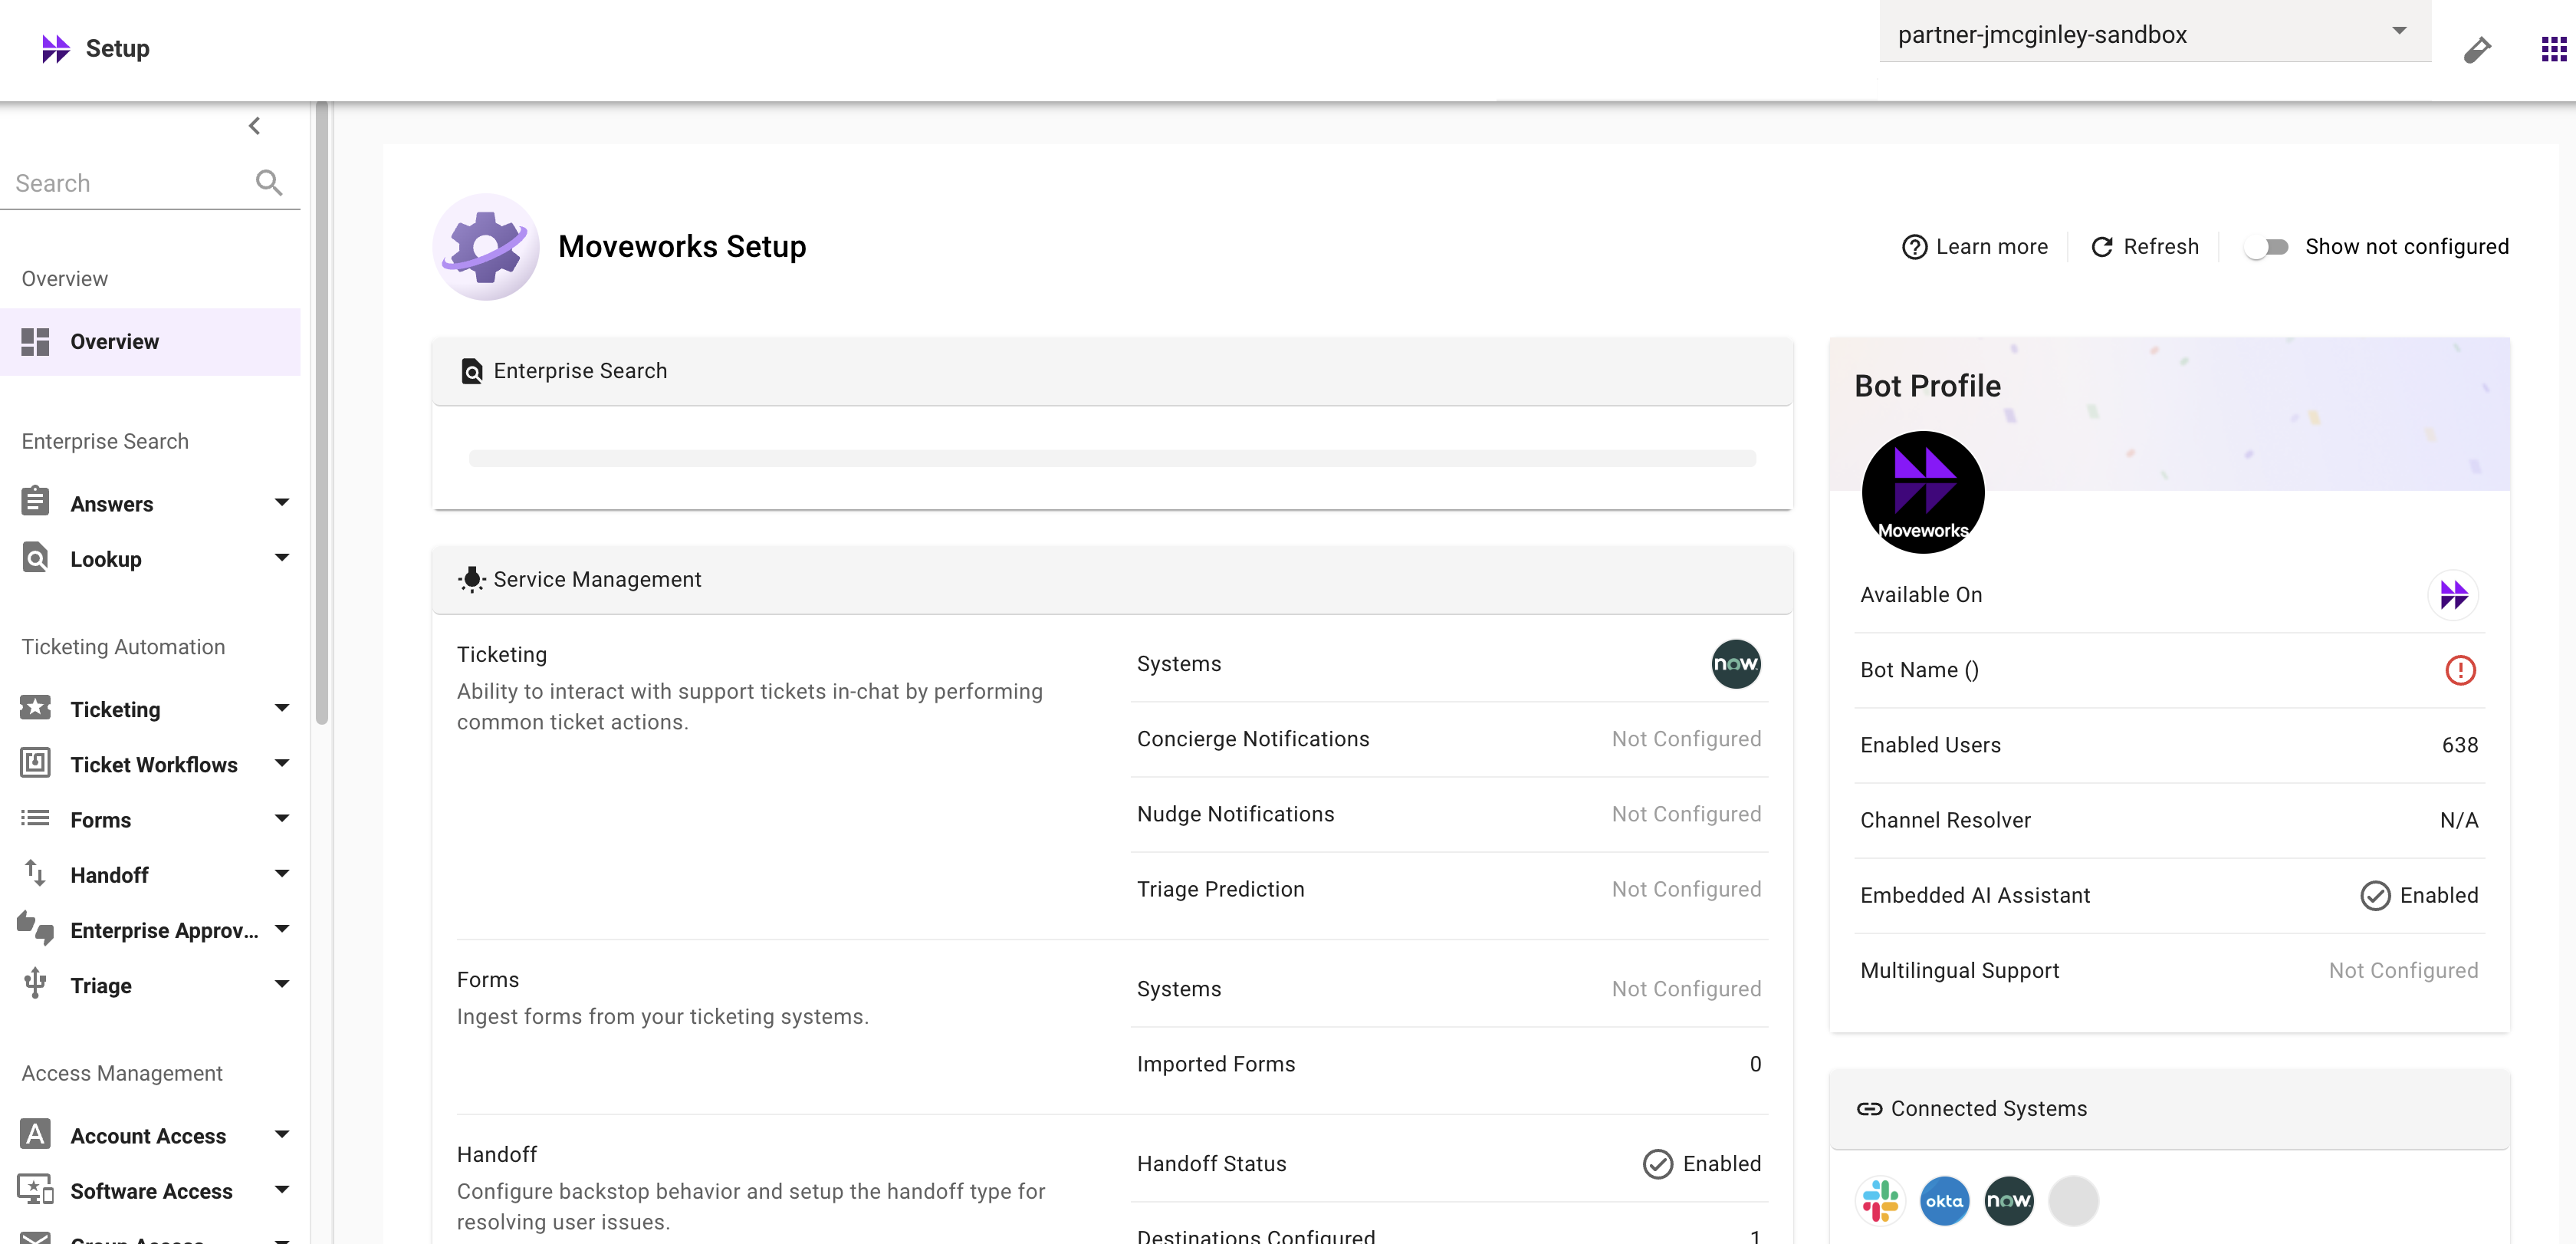
1.2: Setting up The Okta Trial Environment & Moveworks Application
Goal: Establish a sandbox Identity Provider (IdP) to simulate enterprise authentication.
Keep these tabs open throughout the lab:
- Okta Admin Console
- Moveworks Setup
- ServiceNow PDI Landing Page (magic link page)
Keep this information on hand (Notes doc or spreadsheet recommended):
- Moveworks Instance Name (e.g.
labsandbox-1-partner) - Okta Client ID & Client Secret (saved in step 9 below)
- ServiceNow Admin
sys_id(saved in Lab 0 step 1.5)
- Sign Up: Go to Okta & get a free trial of the Okta platform
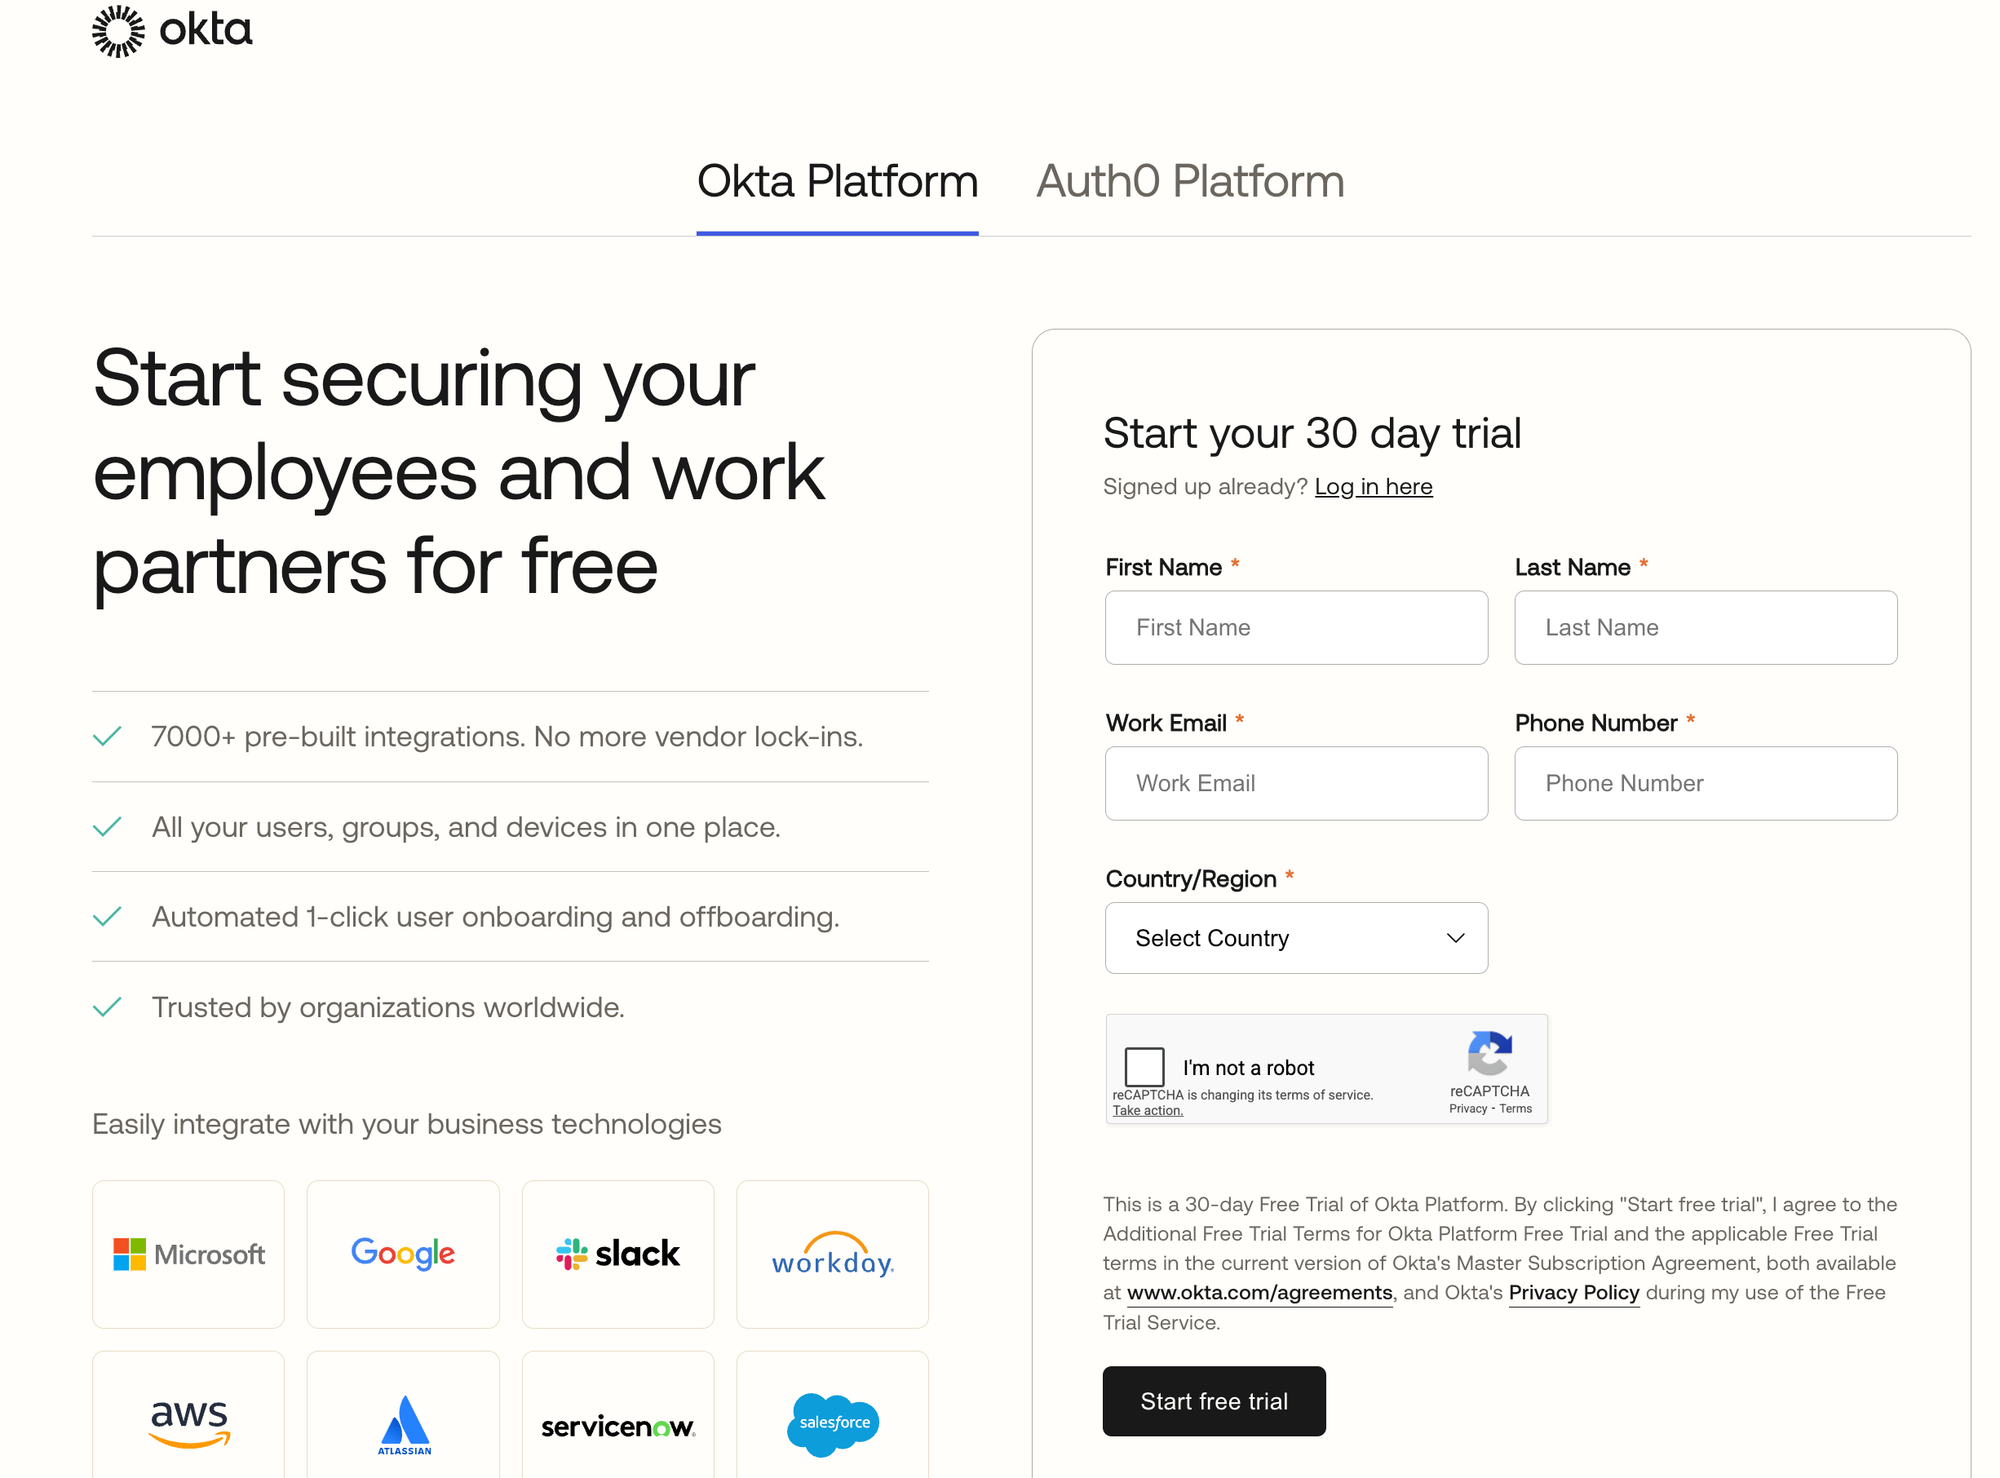
- Register: Fill out the form using your work email address if possible.
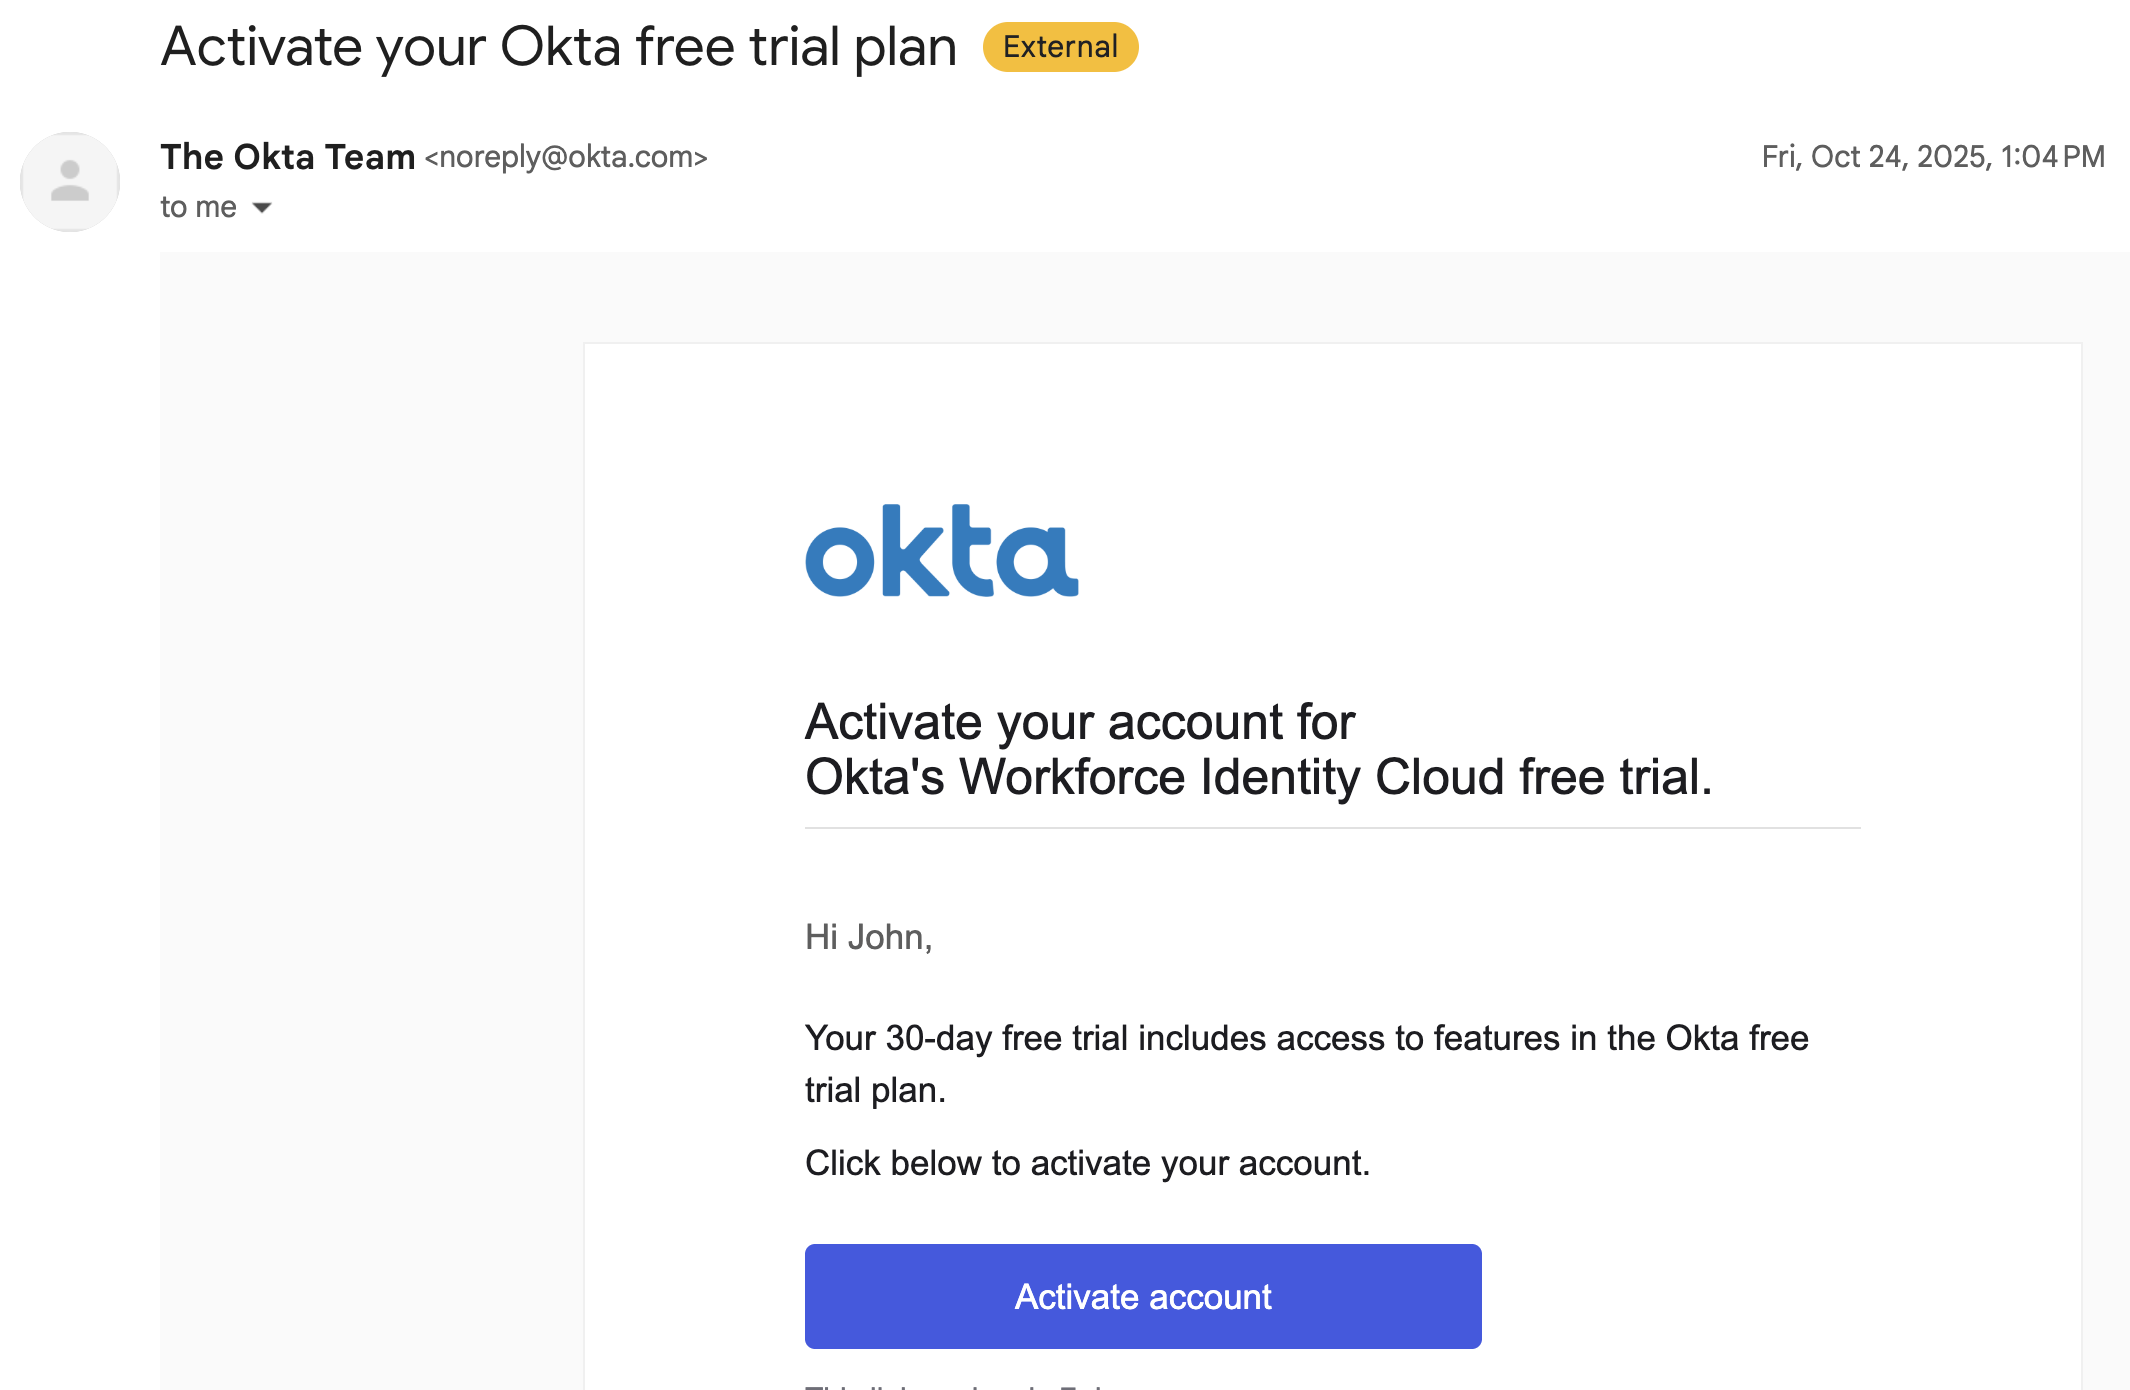
- Activate: Check your email for the activation link. Your Okta Tenant URL will look like:
https://trial-#######.okta.com.
Note: You will need to configure a password & set up the Okta Verify app using your mobile device. Keep your mobile device handy, as you will need to use Okta verify again to login to the Okta Admin Dashboard
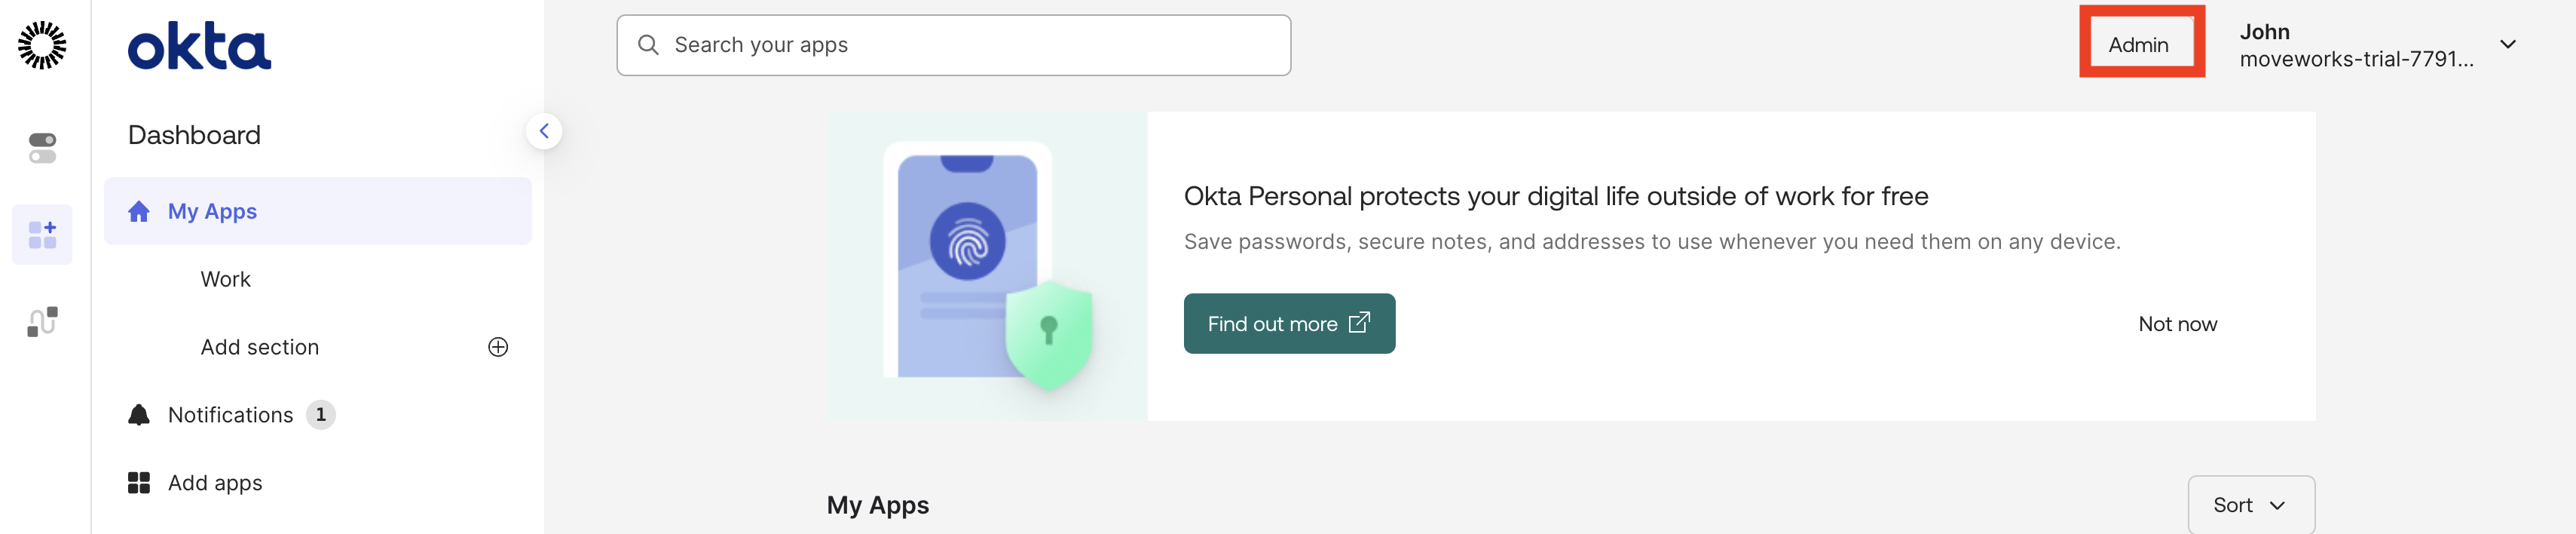
 4. Admin Console: Log in and ensure you are in the Admin Console (click “Admin” in the top-right if you are on the user dashboard).
Note: If you are prompted to import apps, select the skip button and continue
 5. Add User: Navigate to
 Directory > People > Add Person
- Create your own user account (if not already listed).
- Fill in your details and click
Save. After adding your own user account if should look like this: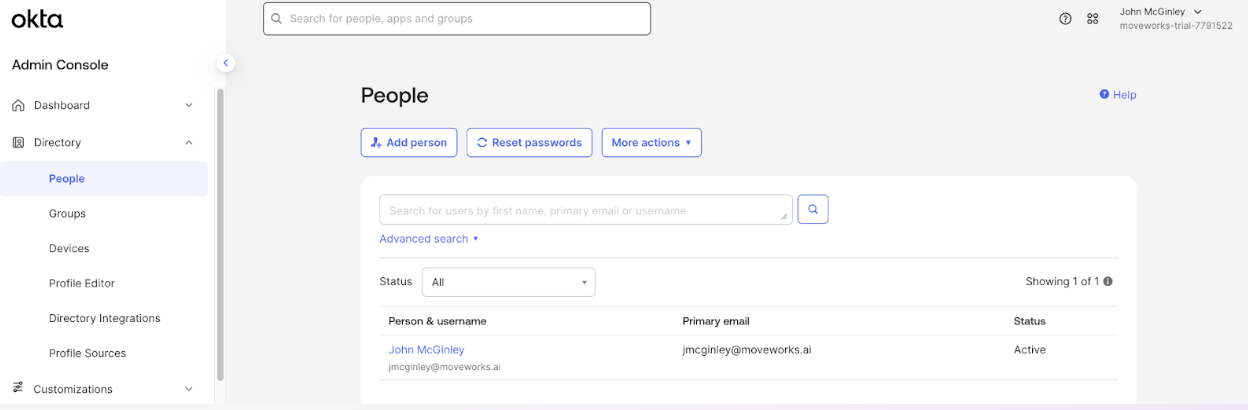
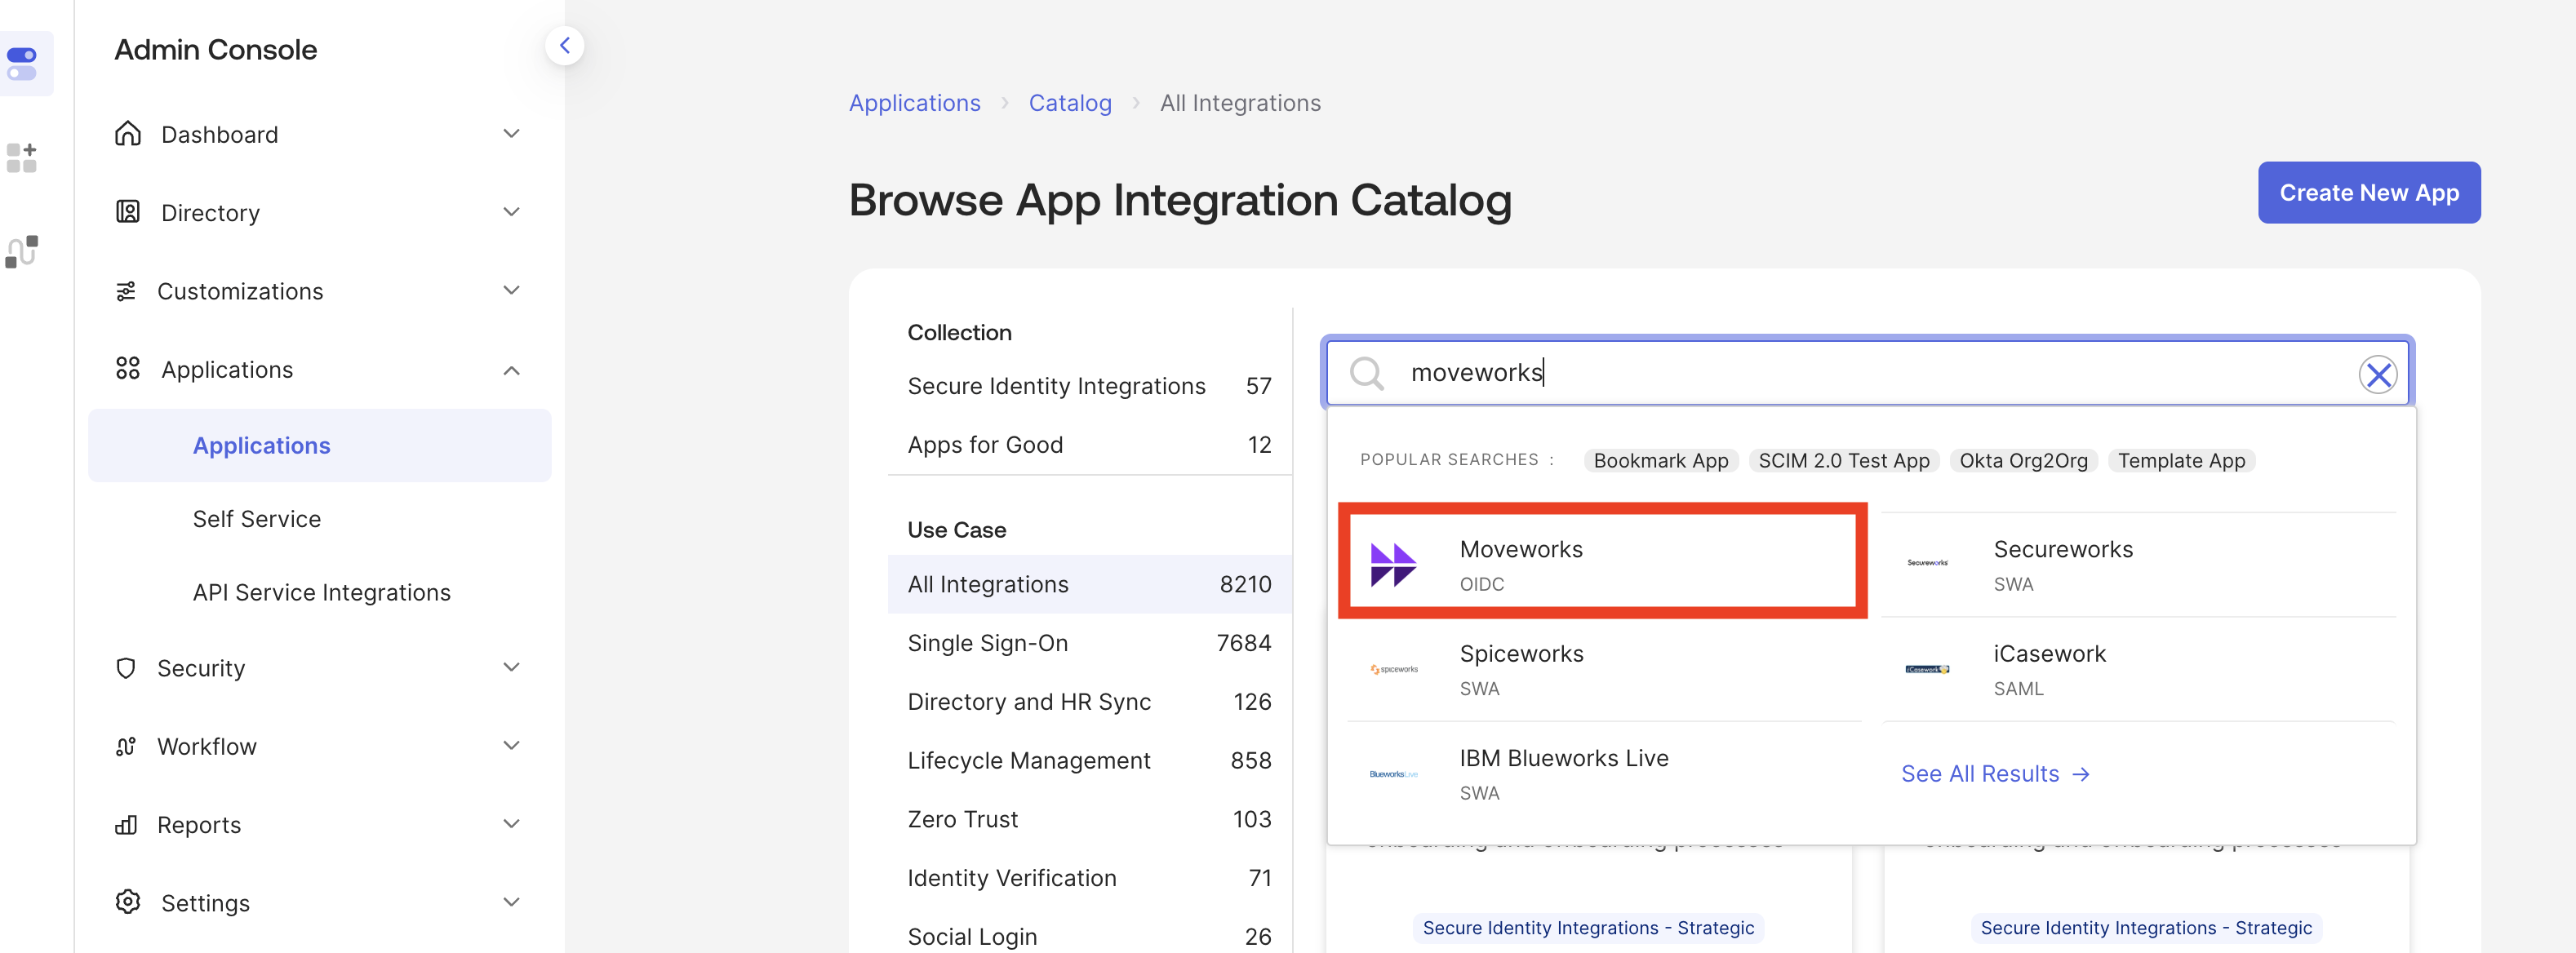
- Find the Moveworks App: Navigate to
Applications > Applications > Browse App Integration Catalog- Search for
Moveworksand selectMoveworks OIDC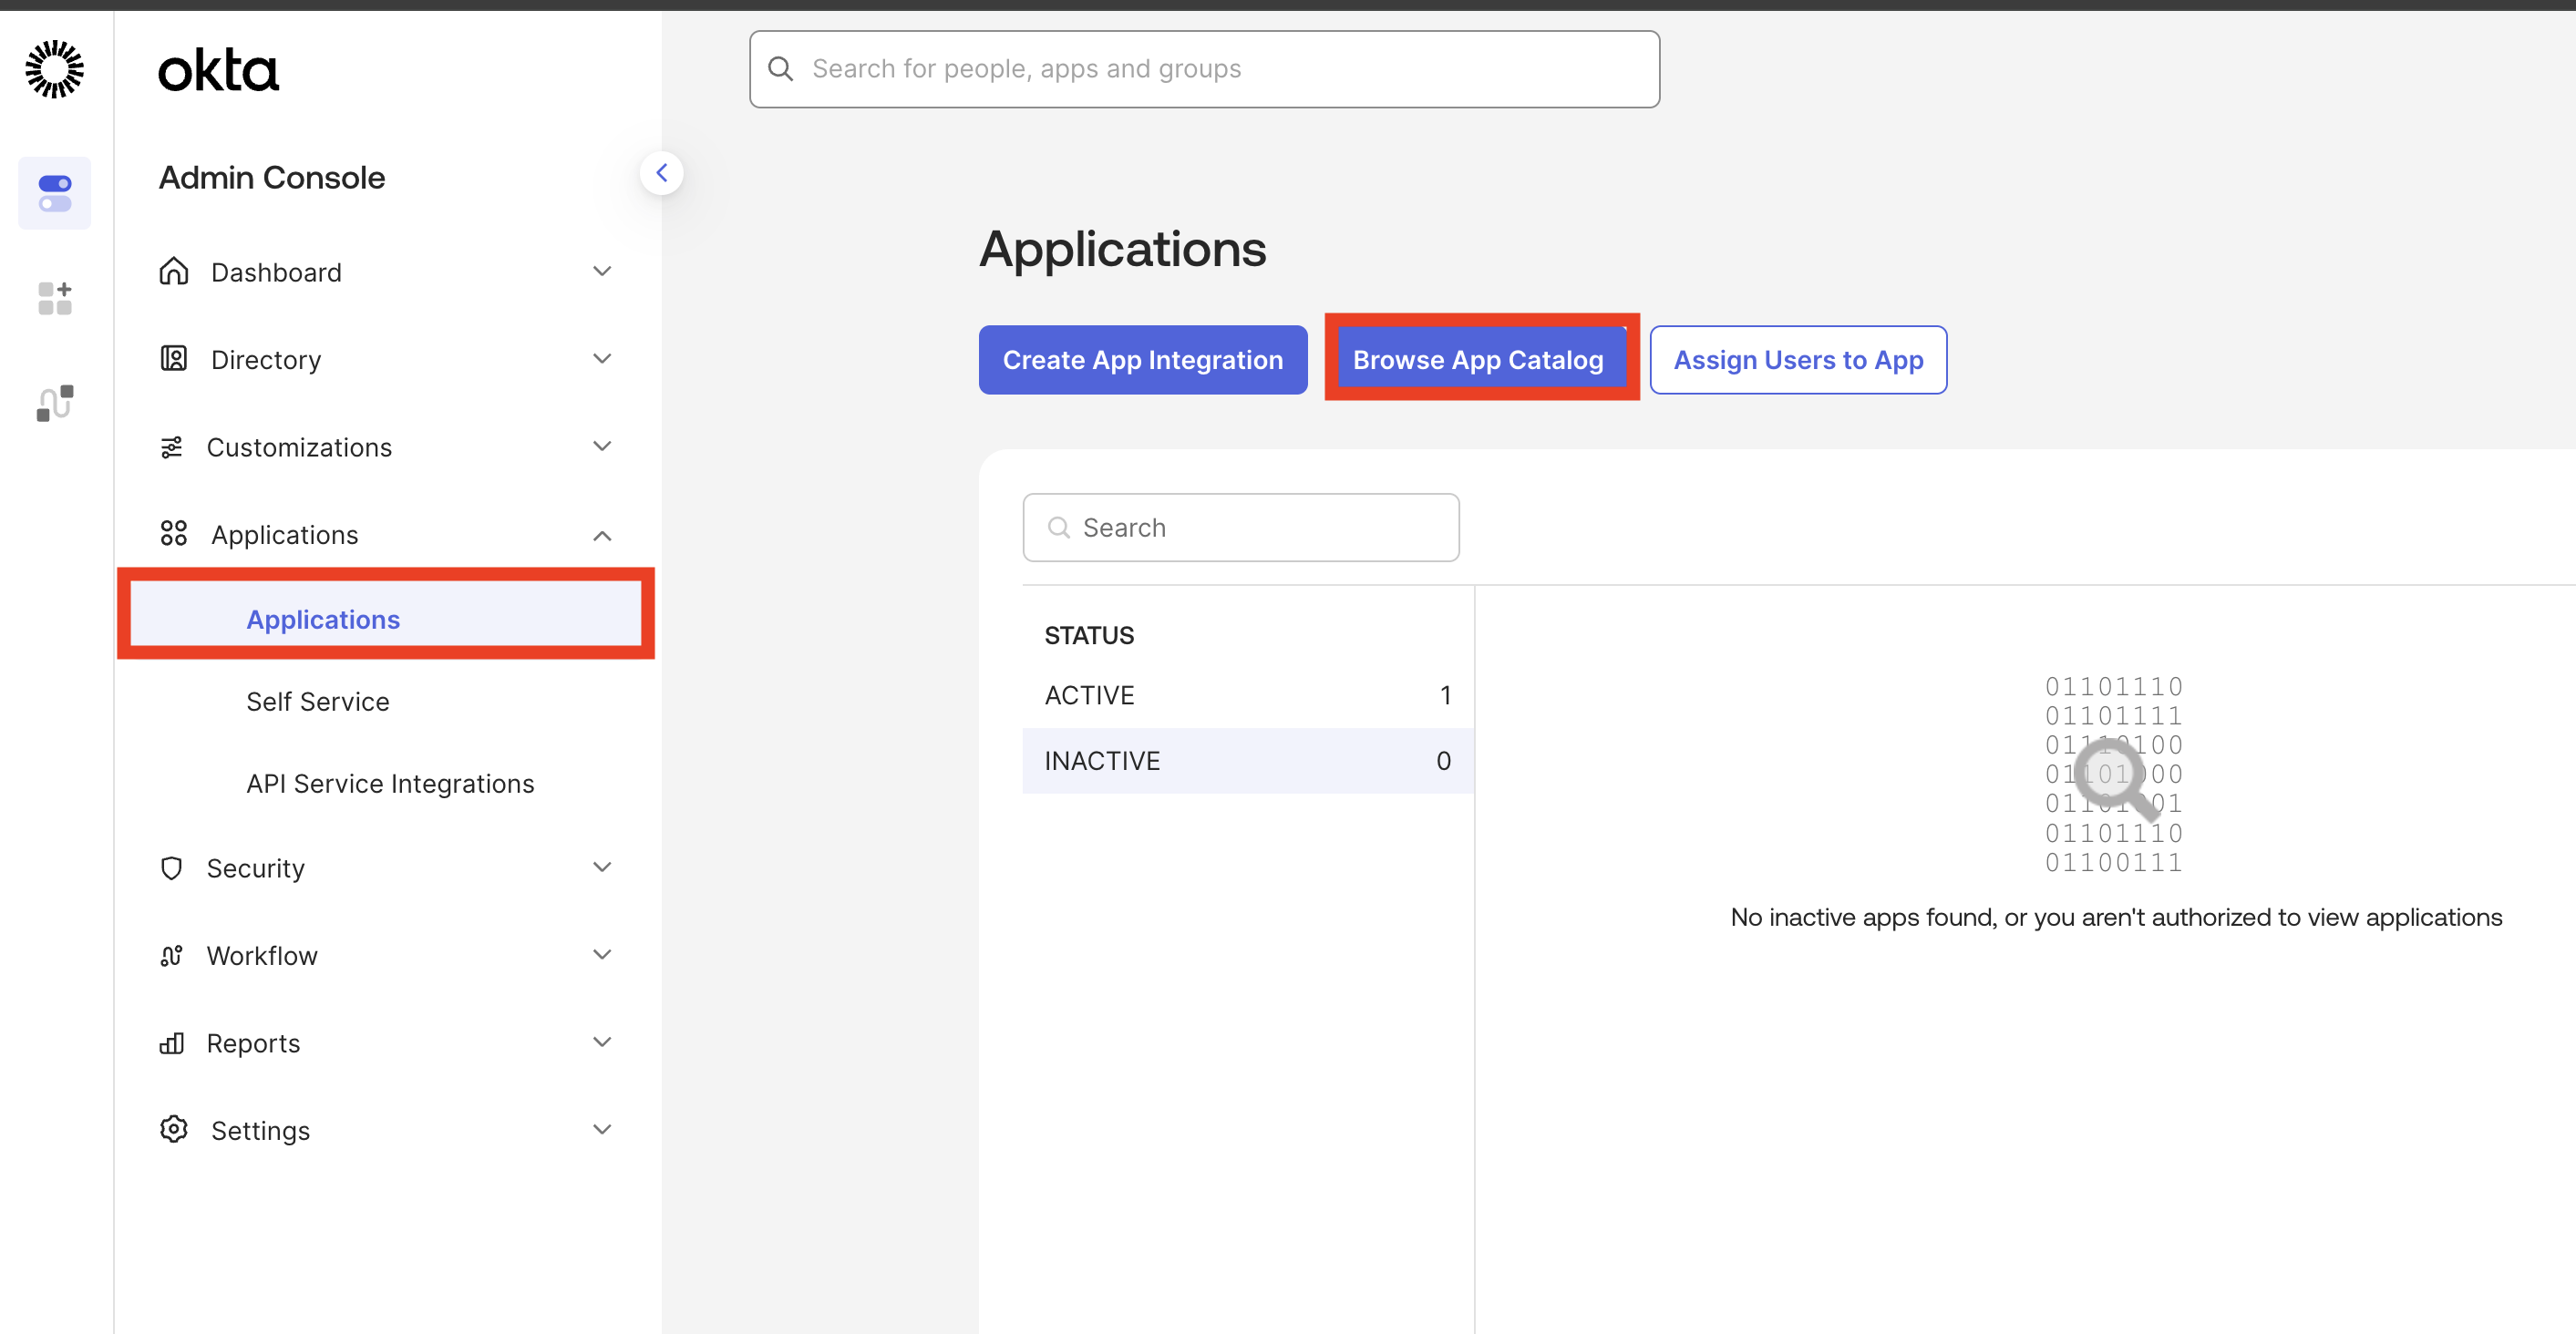
- Search for
- Configure the Moveworks App.
- Application Label:
Moveworks - Subdomain:
[moveworks-instance-name] - Data Center: moveworks.com
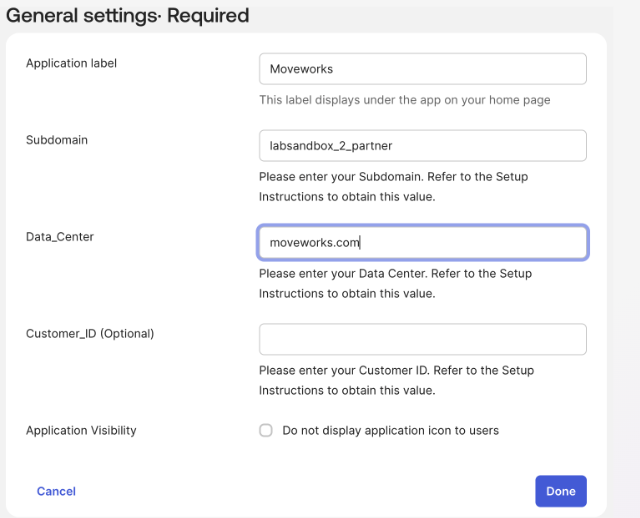
- Application Label:
- Assign your user to the application:
- Go to the
Assignmentstab. - Click
Assign > Assign to Peopleand select your user.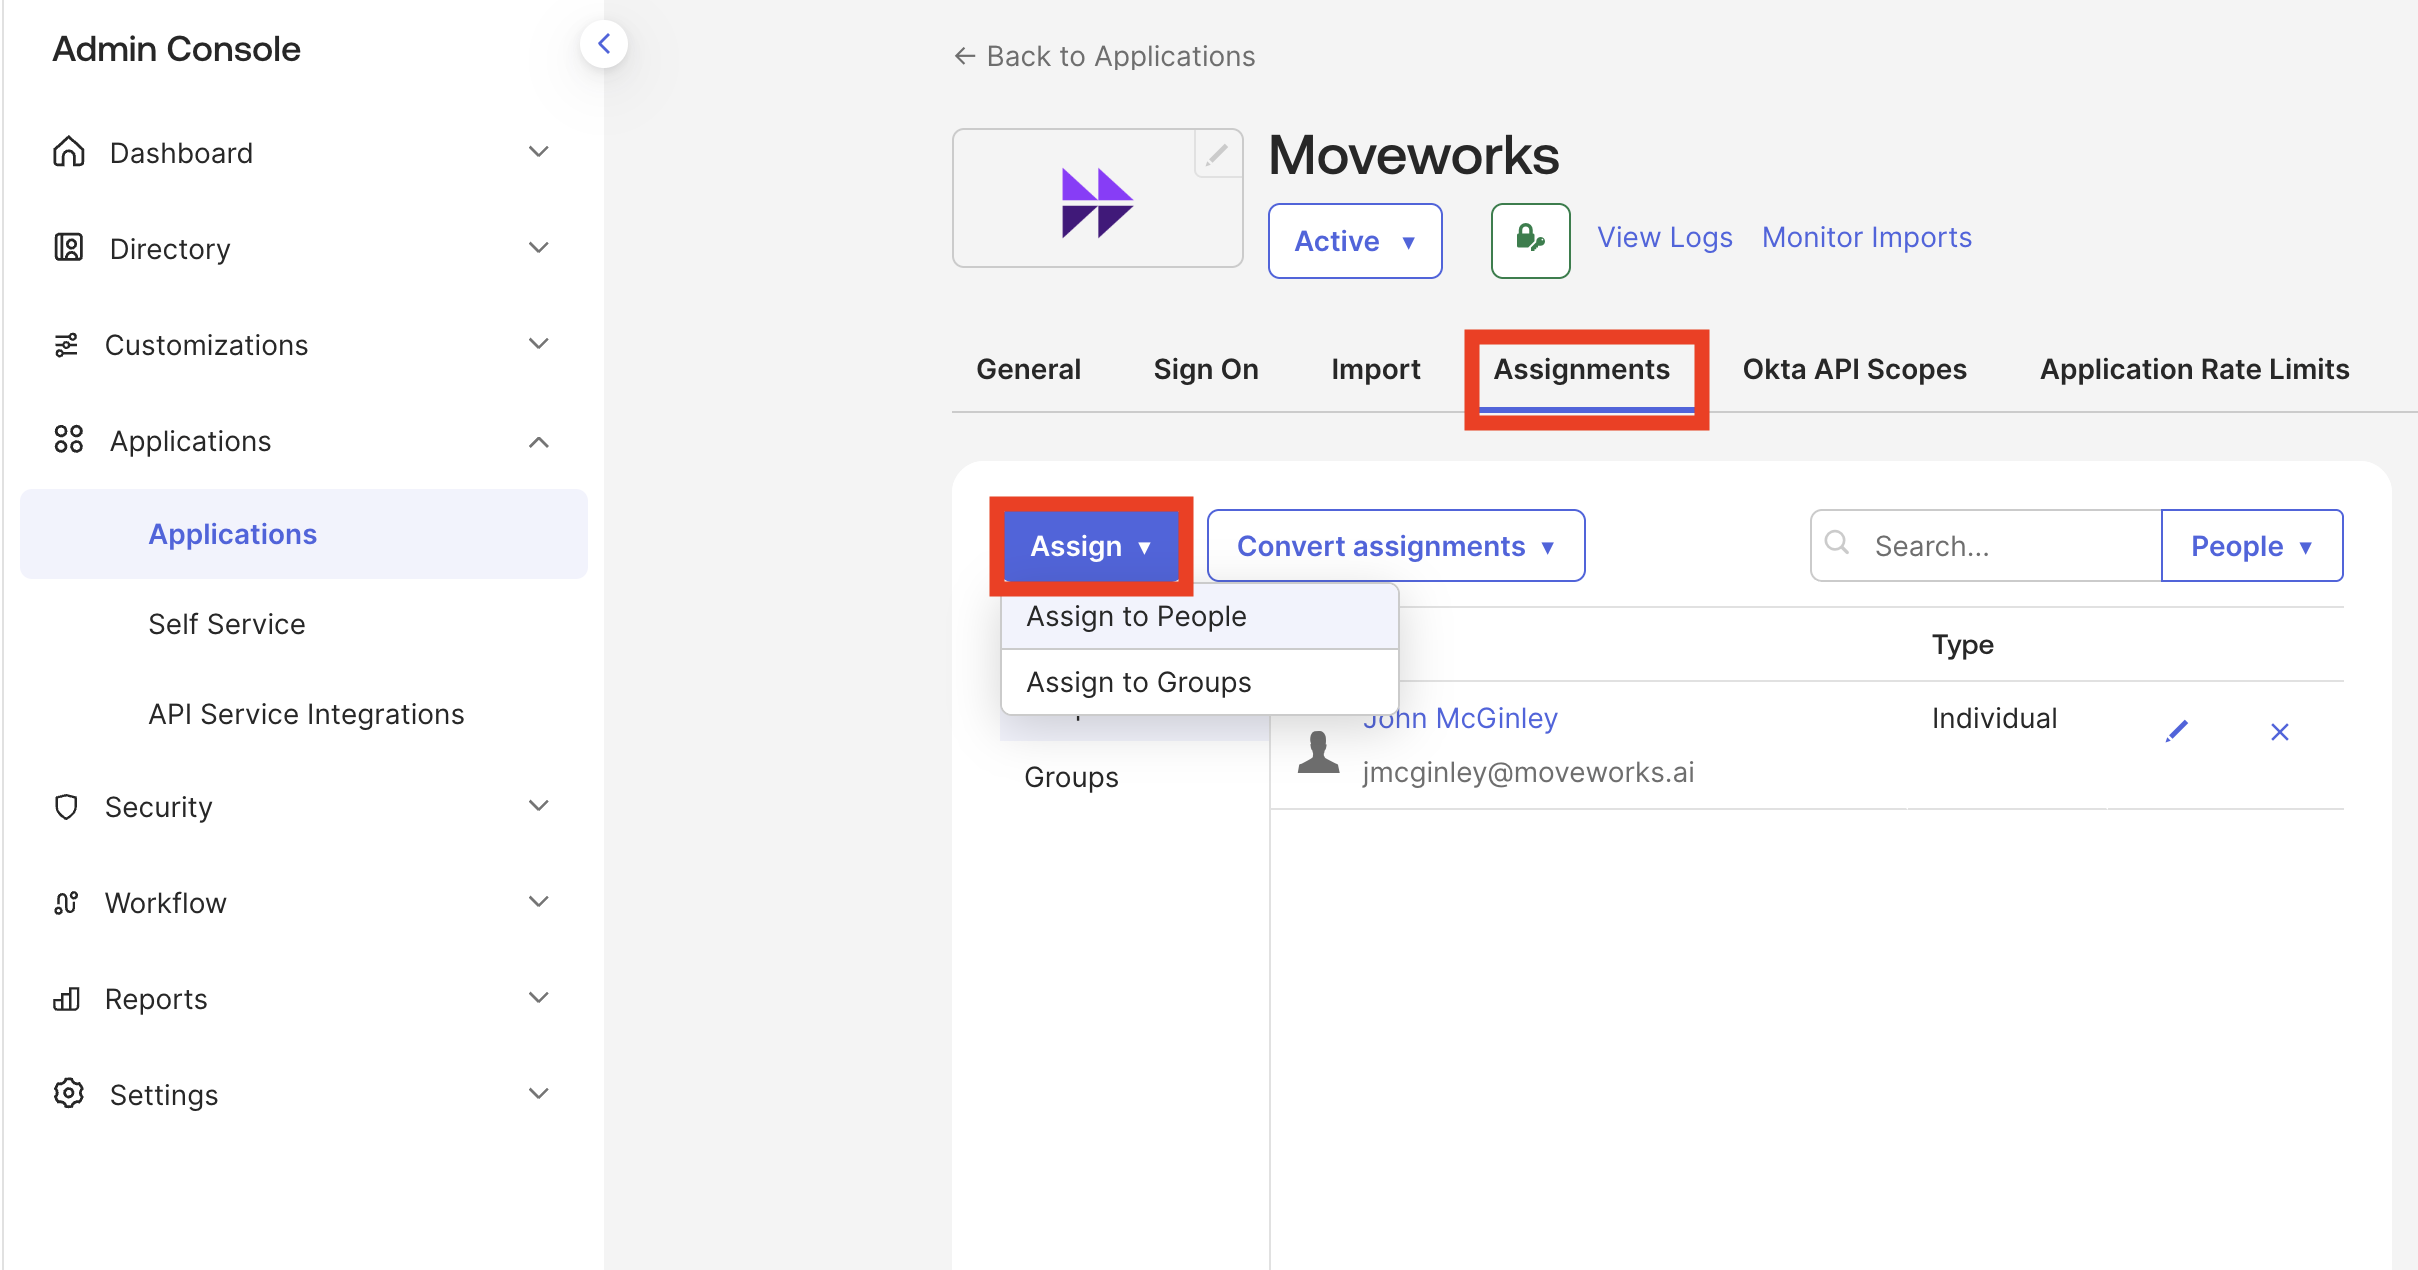
- Go to the
- Save your Credentials:
- Navigate to the
Sign Ontab & save yourClient ID & Client Secret- These credentials are required later when setting up My Moveworks SSO Access in Step 1.4!
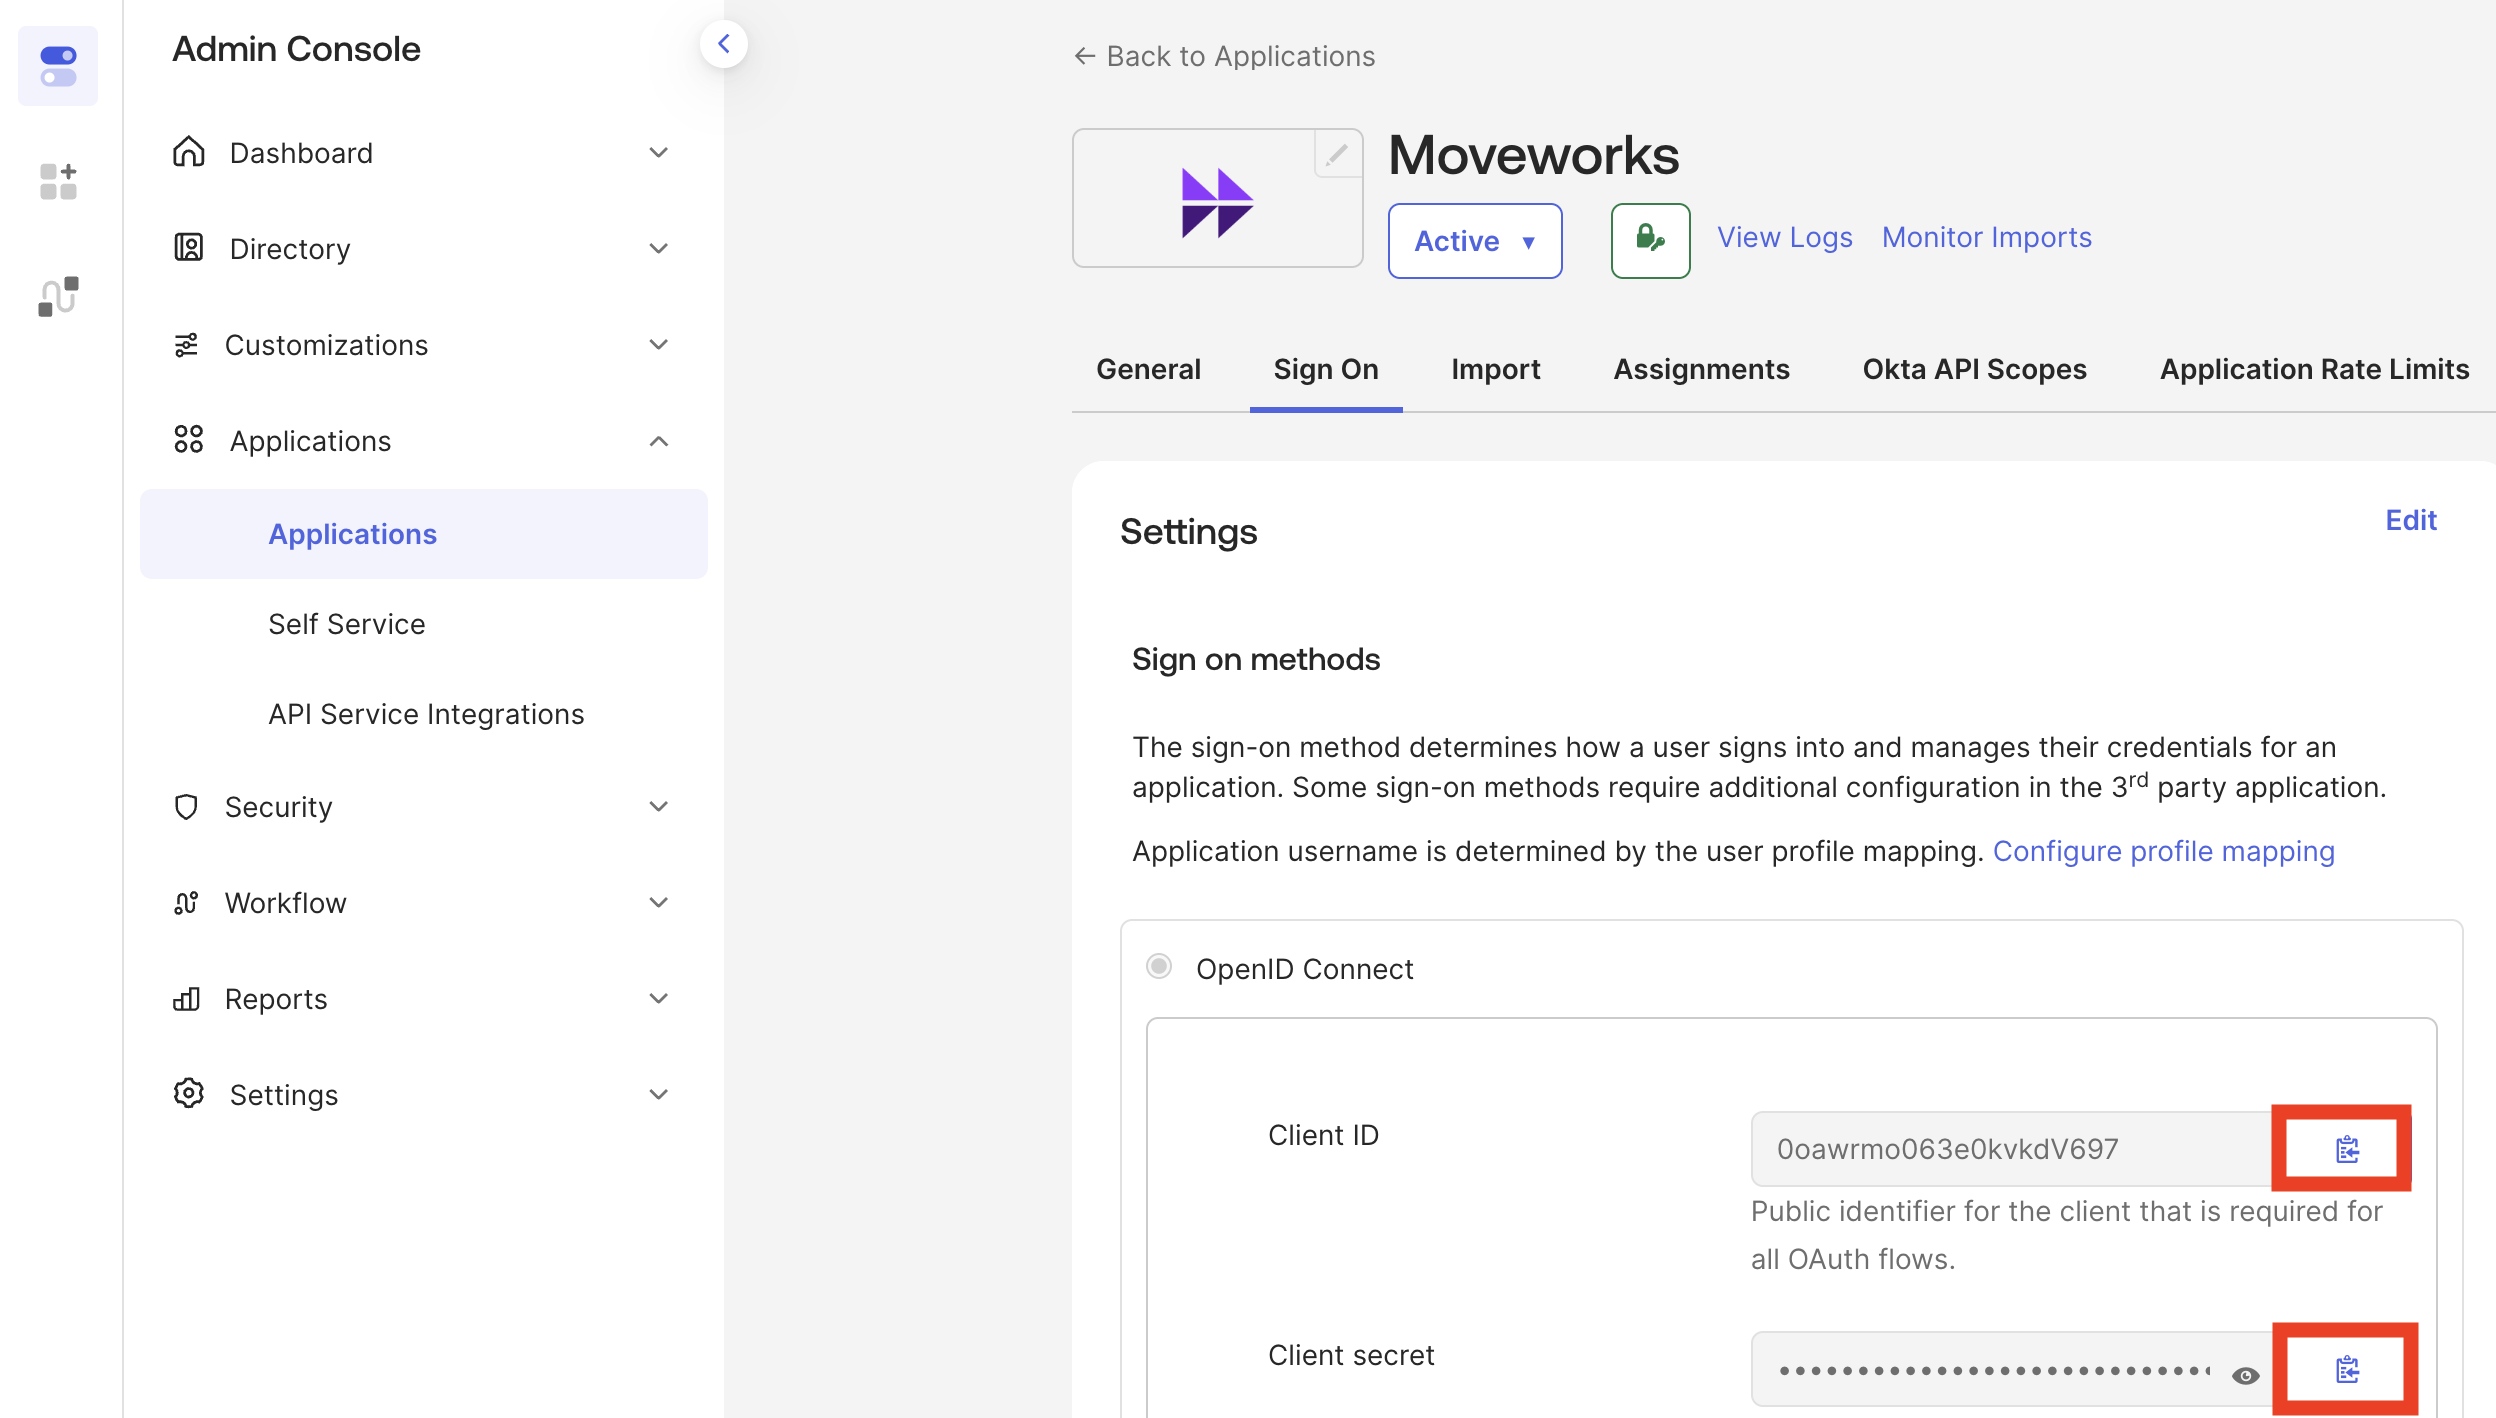
- These credentials are required later when setting up My Moveworks SSO Access in Step 1.4!
- Navigate to the
Note: While going through the rest of the Moveworks Labs, we recommend keeping your Okta session opened in a tab on your browser, for ease of navigation
1.3: [OPTIONAL] Simplifying the Okta Login
You will always need to enter an Okta Verify code to get into the Admin panel within your Okta trial instance, but you can take the following steps so that your end-user okta session persists longer & no longer prompts Okta Verify
- Within the Okta Admin Console, navigate to
Global Session Policy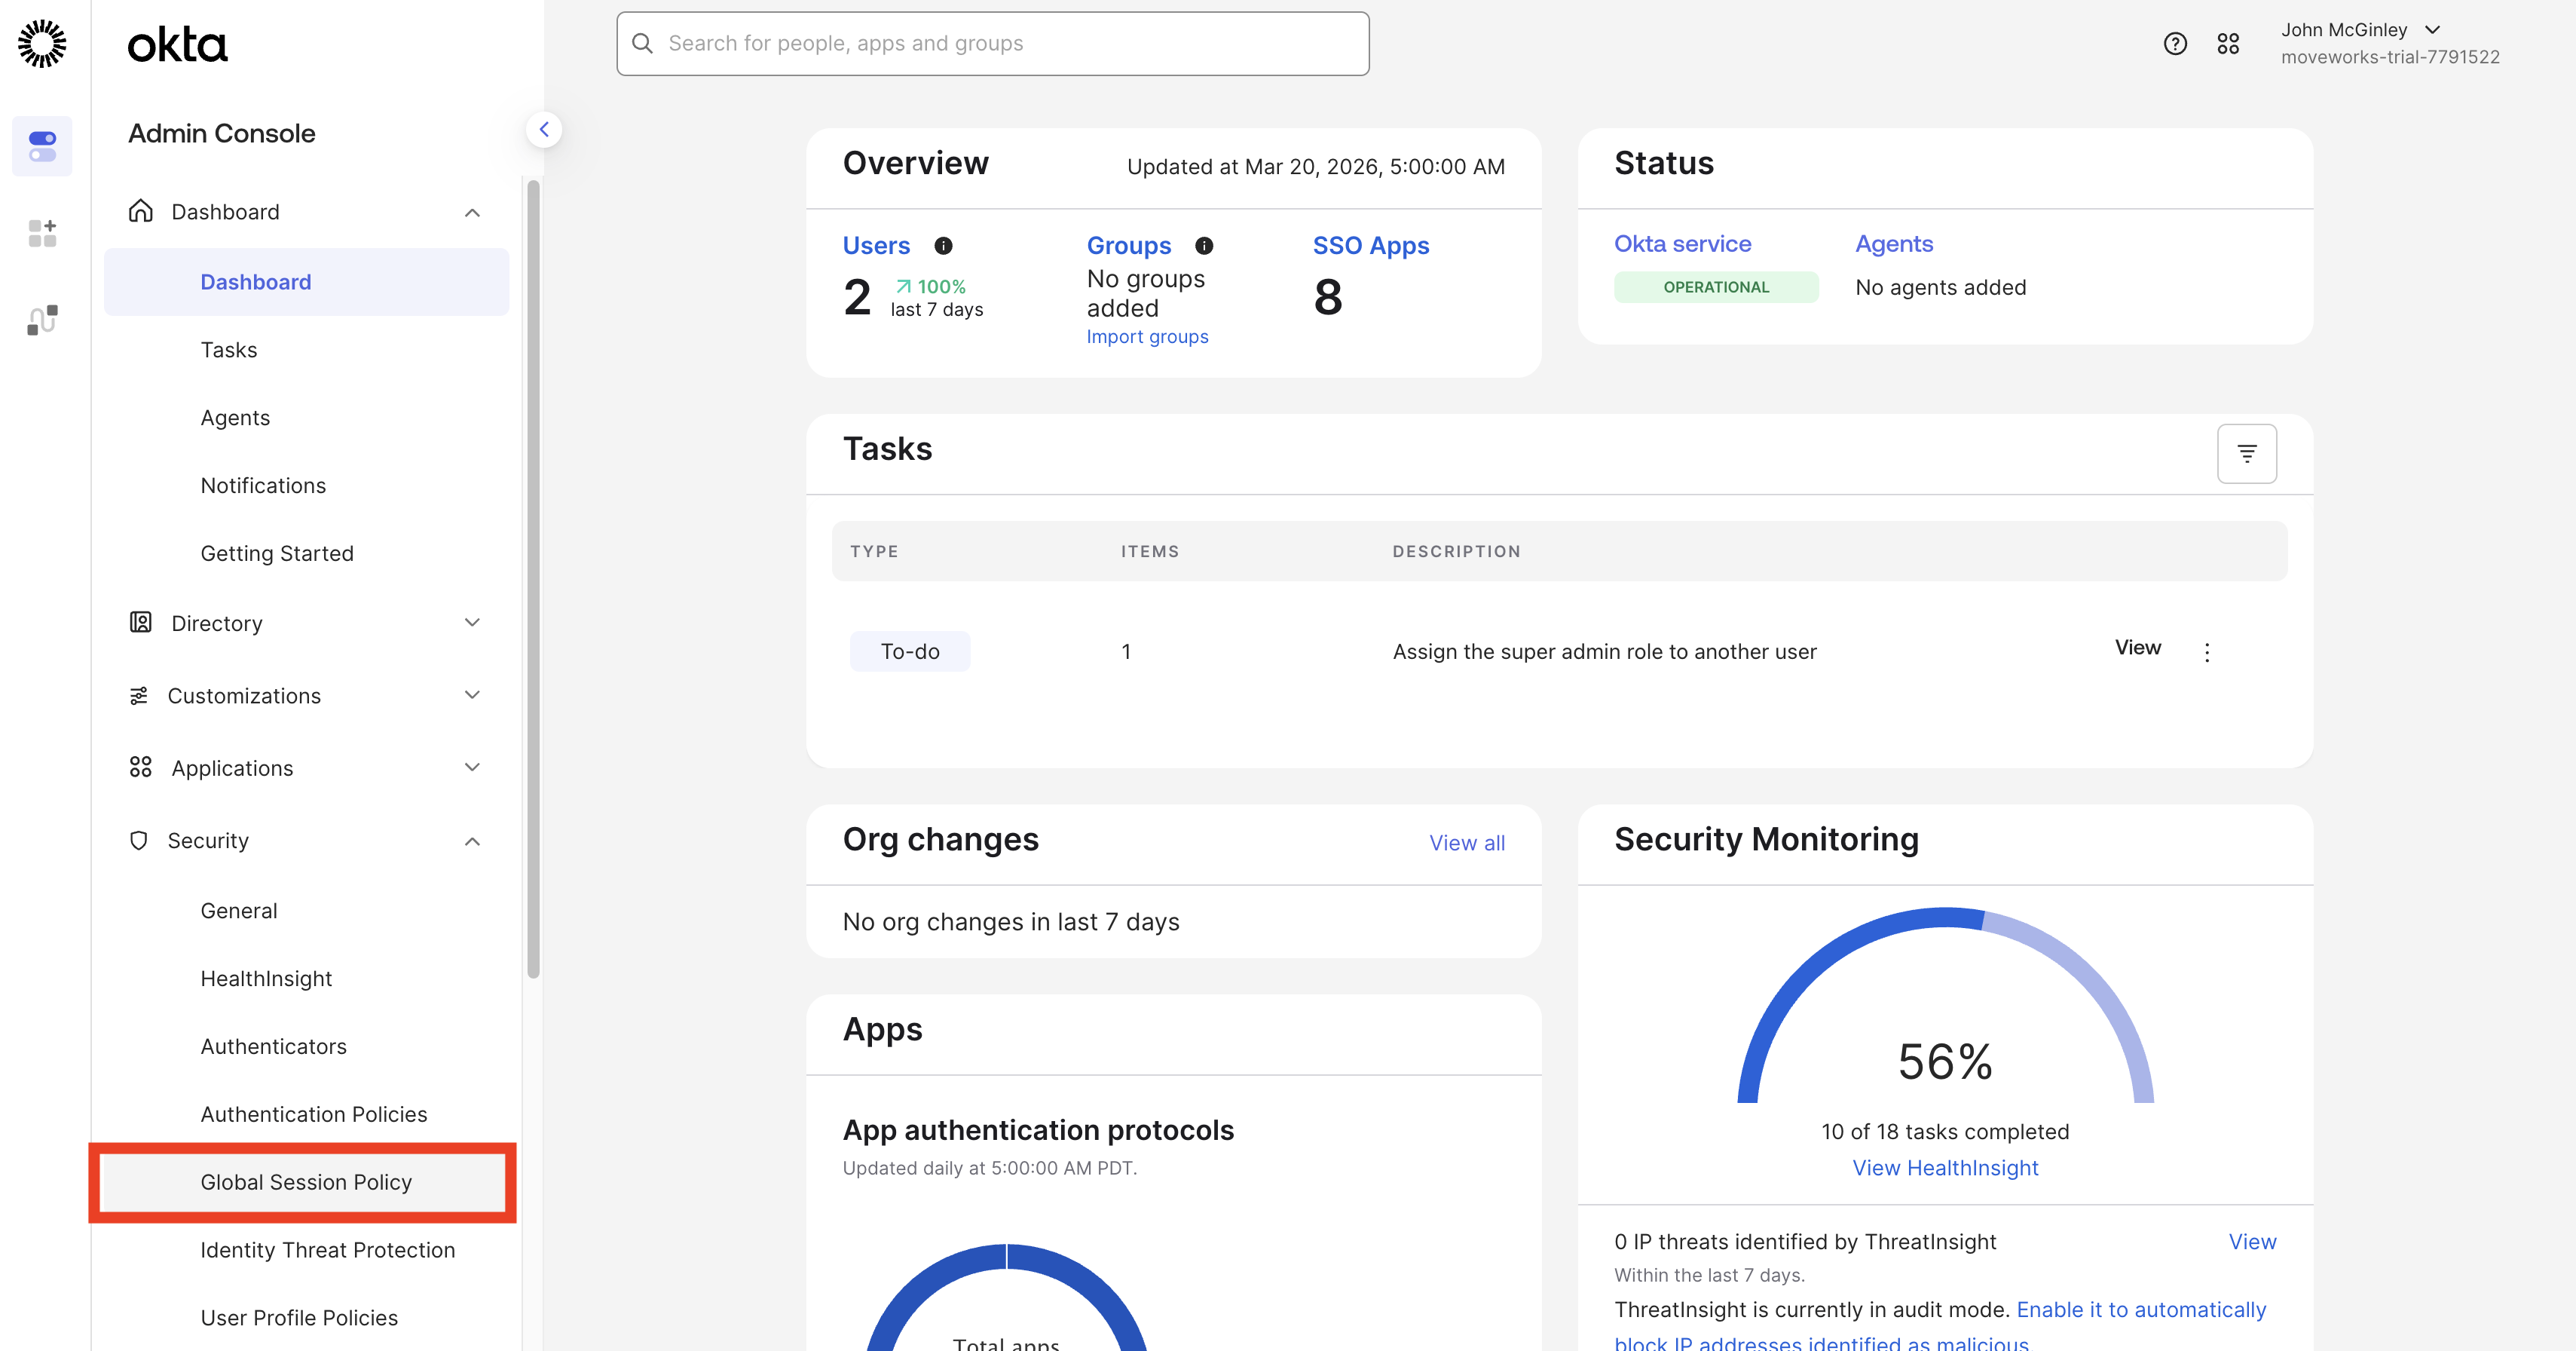
- Edit the Default Policy

- Allow users to set Establish the user session with:
A password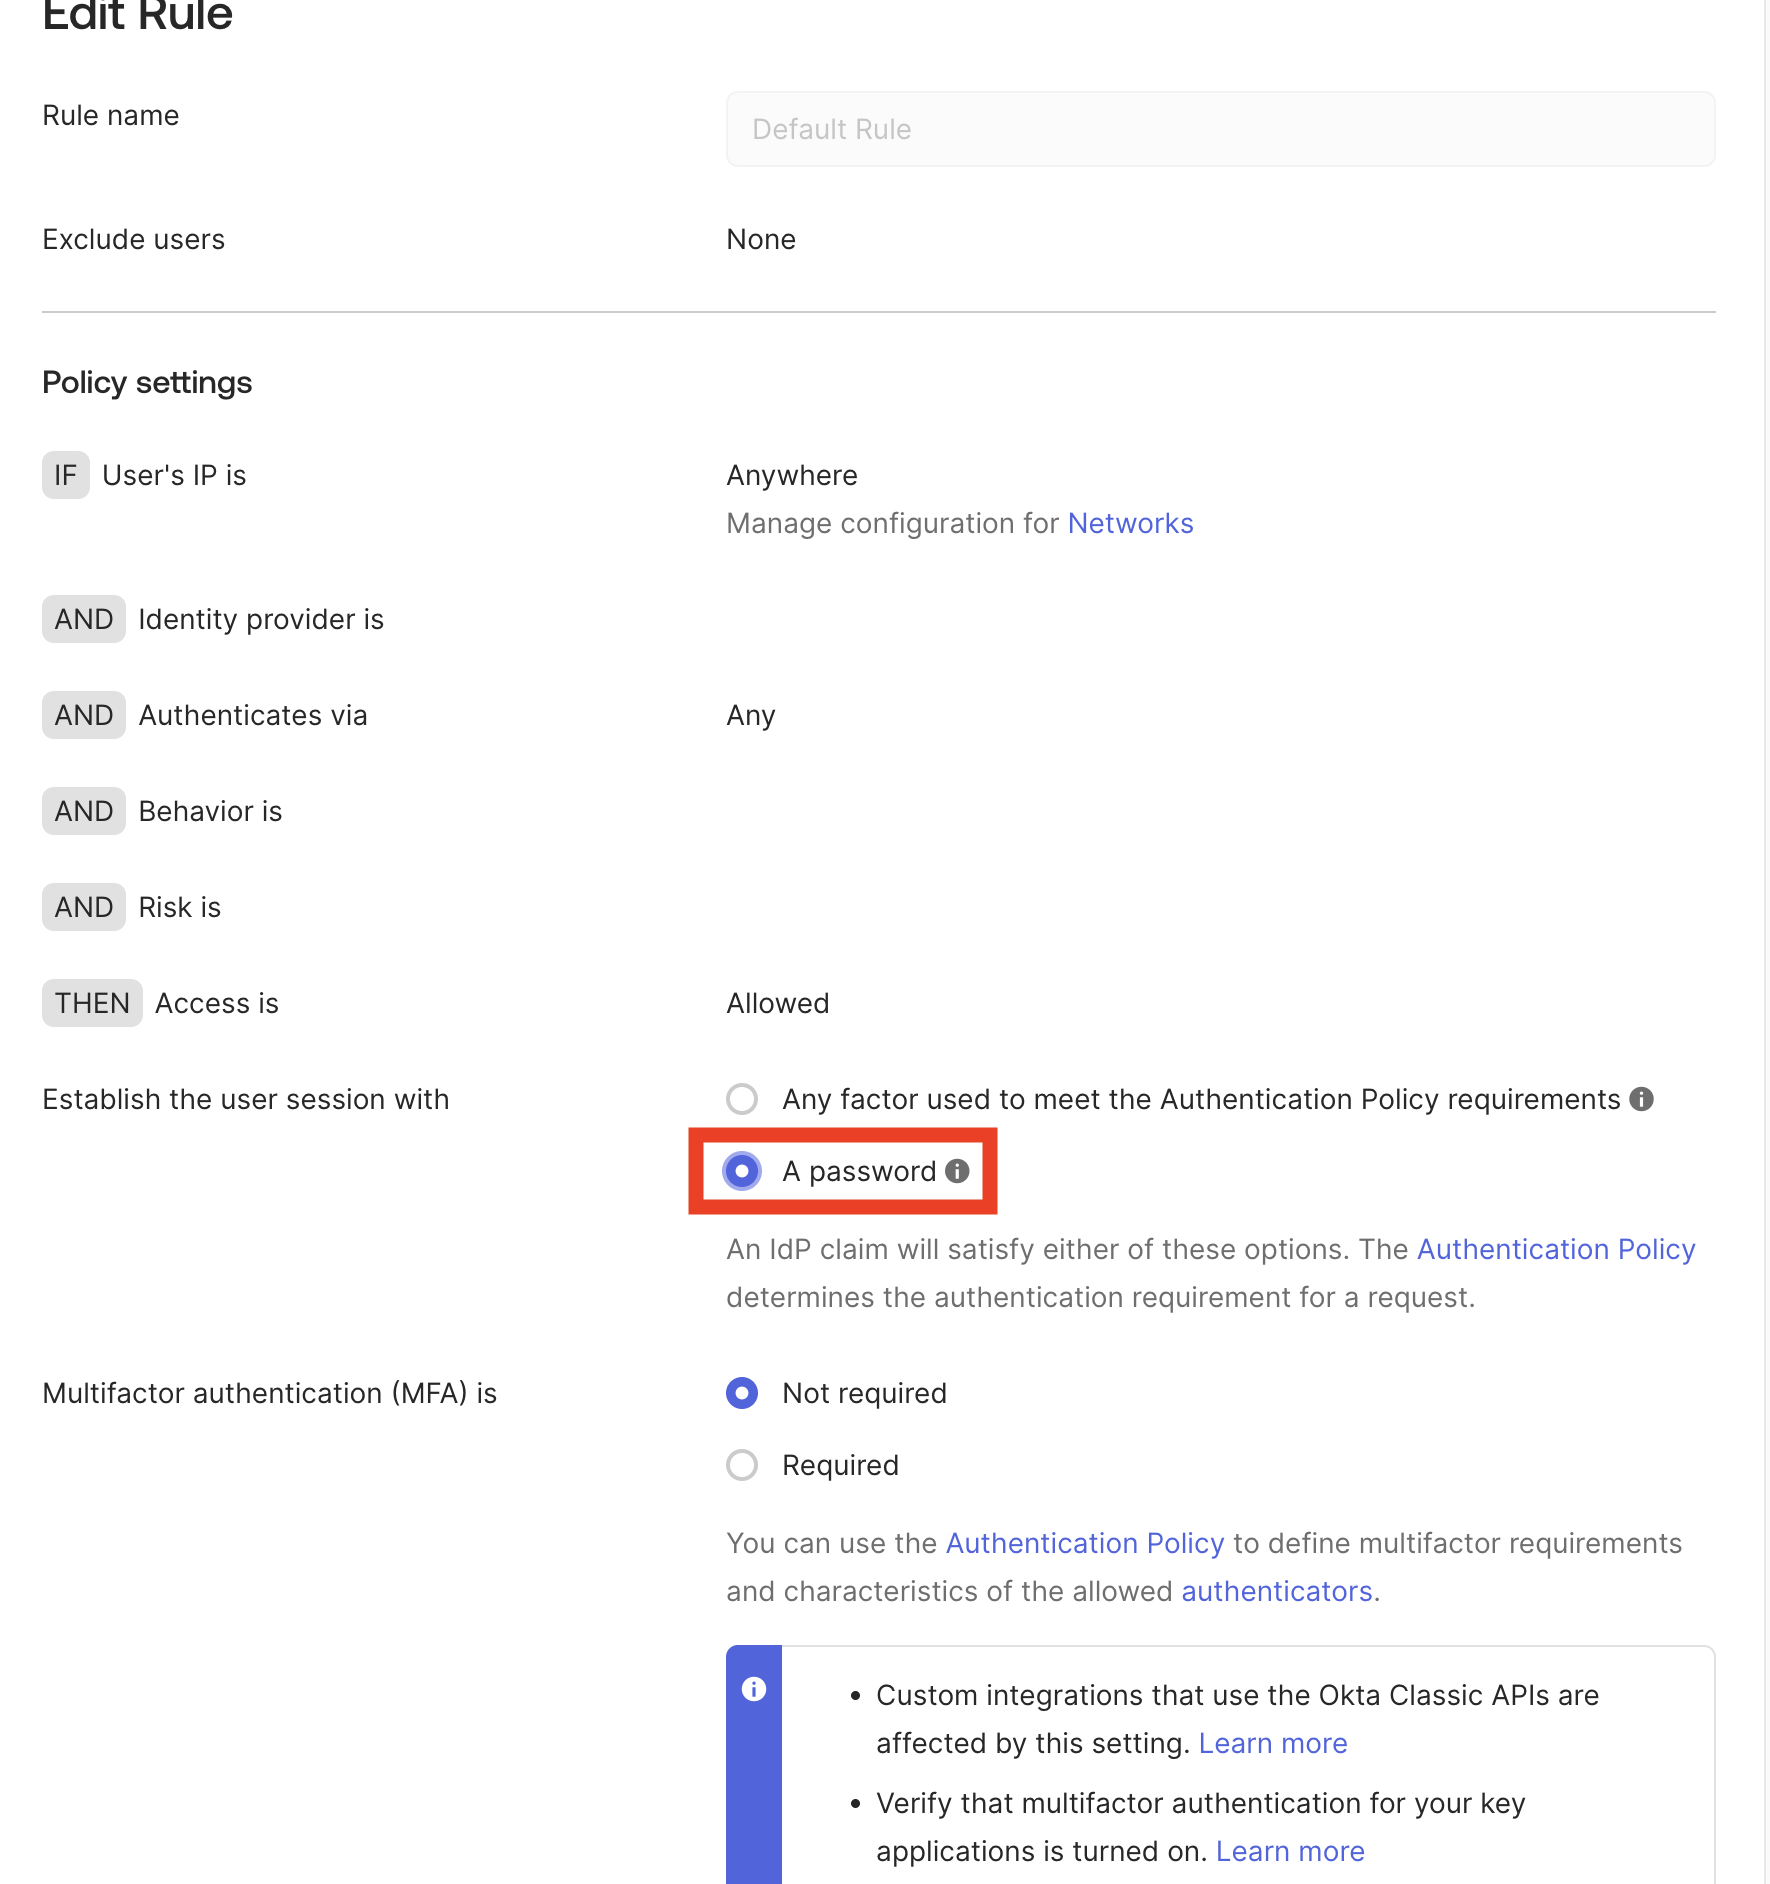
- Set the
Maxmimum Okta global session lifetime&Maximum Okta global session idle timeto the desired length. We recommend 2 days for each.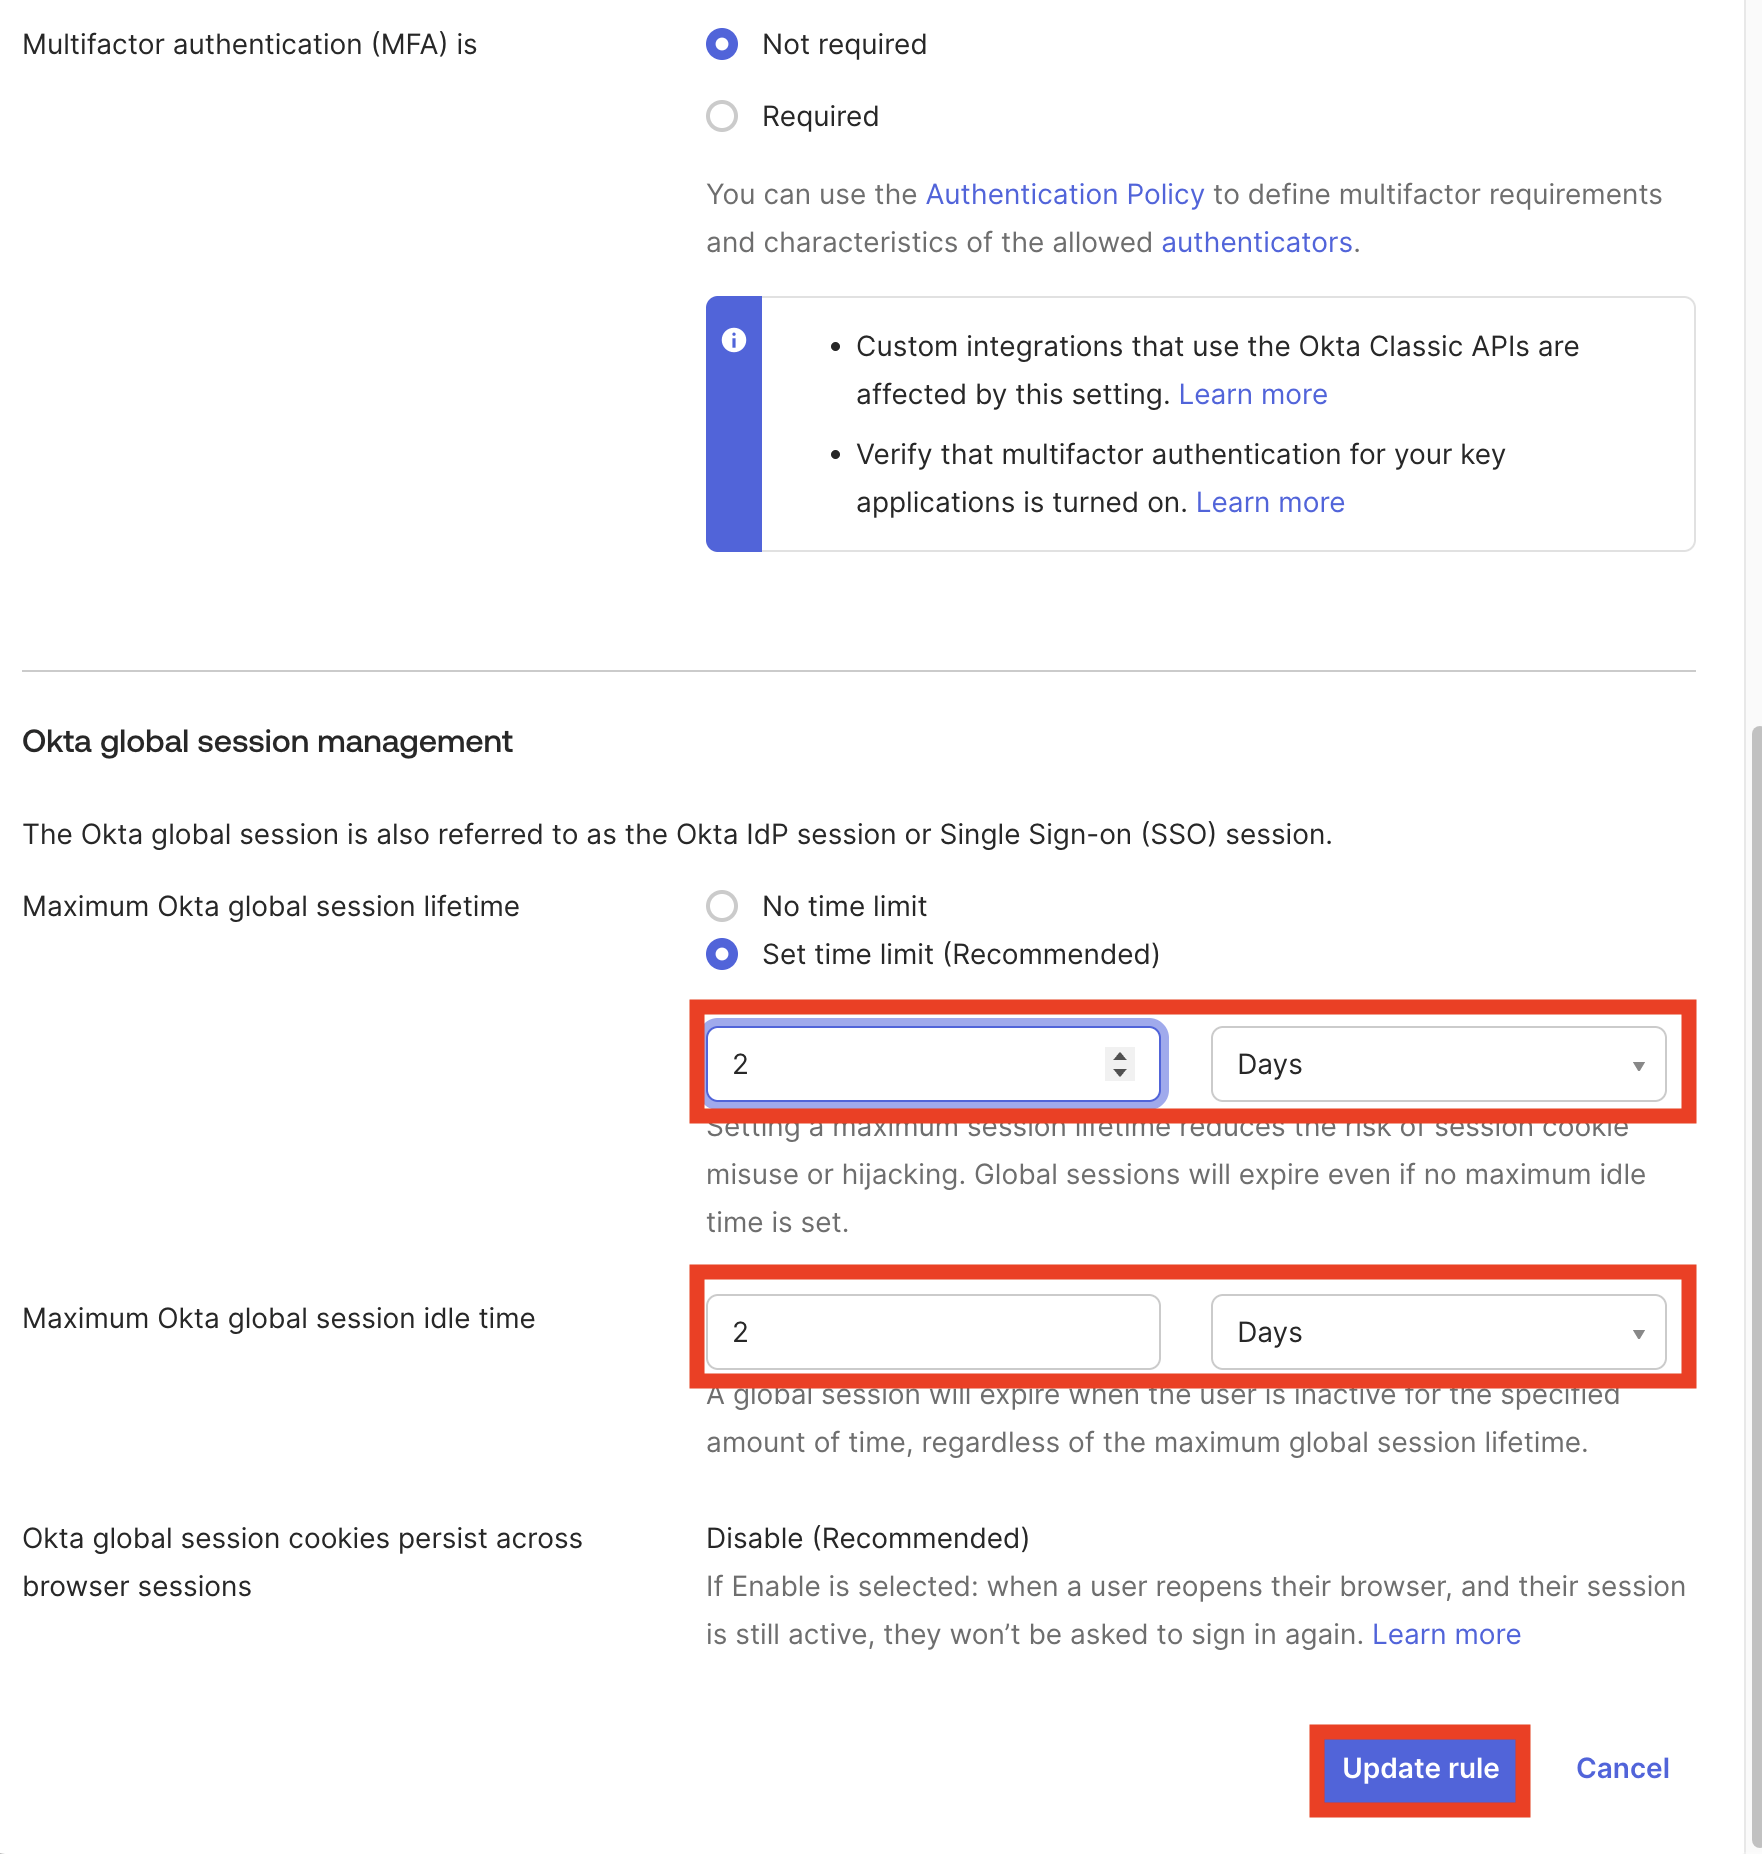
1.4: Setup My Moveworks Okta SSO
Goal: Bridge Moveworks and Okta using OIDC.
Note: You will need the idp Client ID, Client Secret, and URL from your Okta instance to complete this step
- In the upper left hand search bar, type in
SSOand navigate toOrganizational Details > Tenant Settings > Single Sign-On (SSO), - Select
Create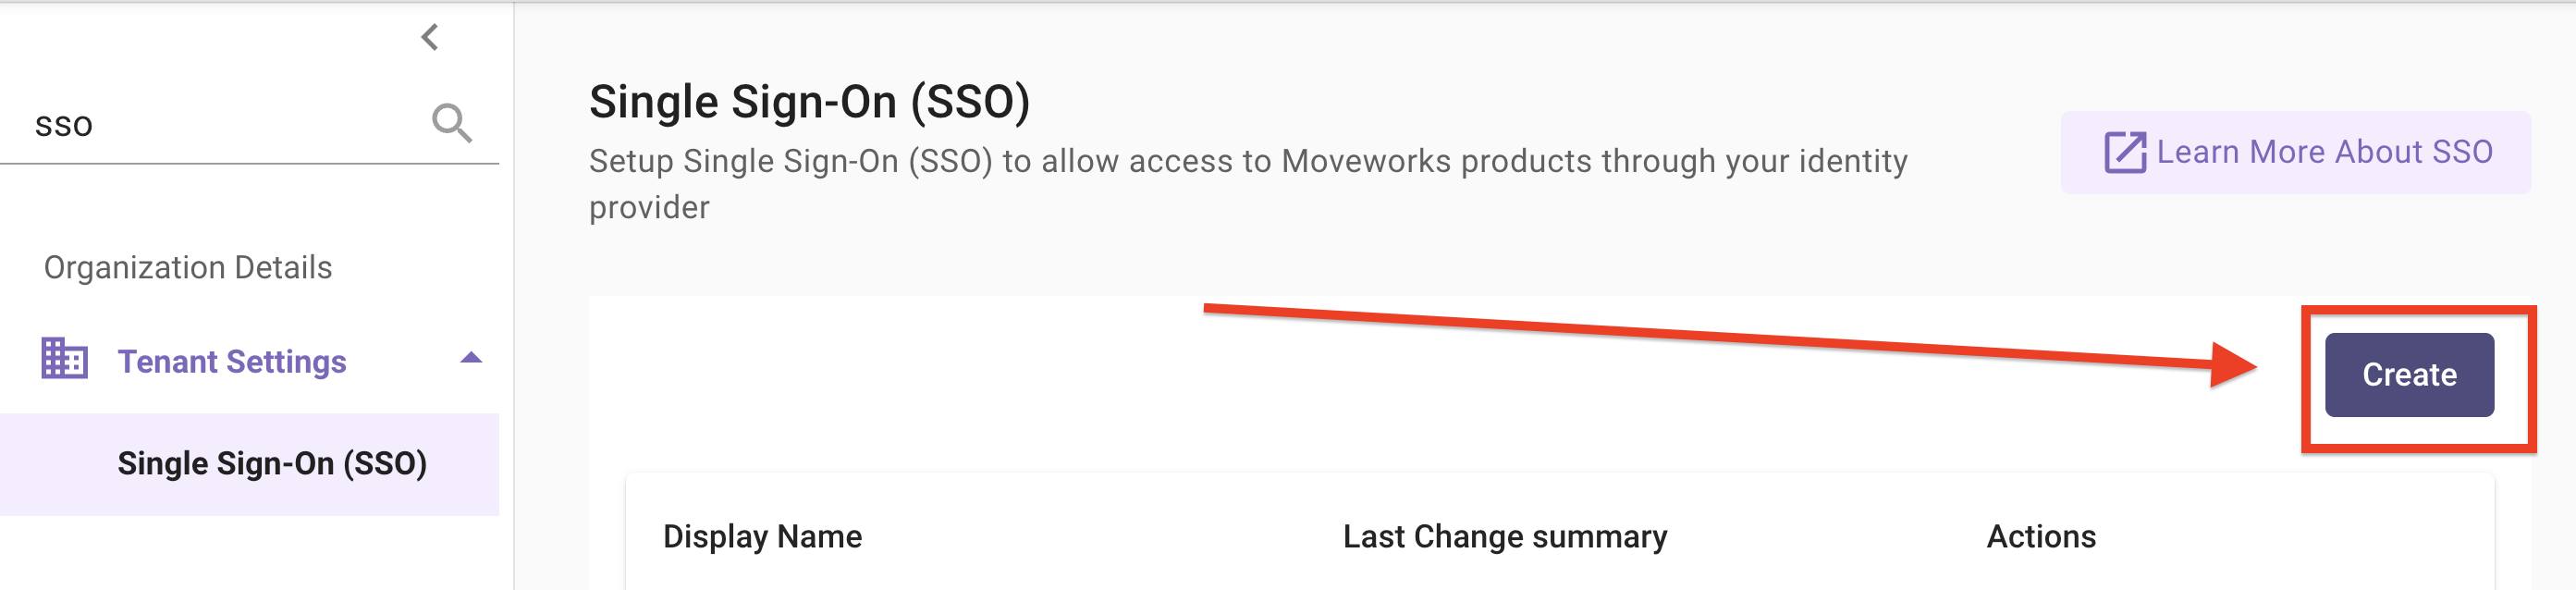
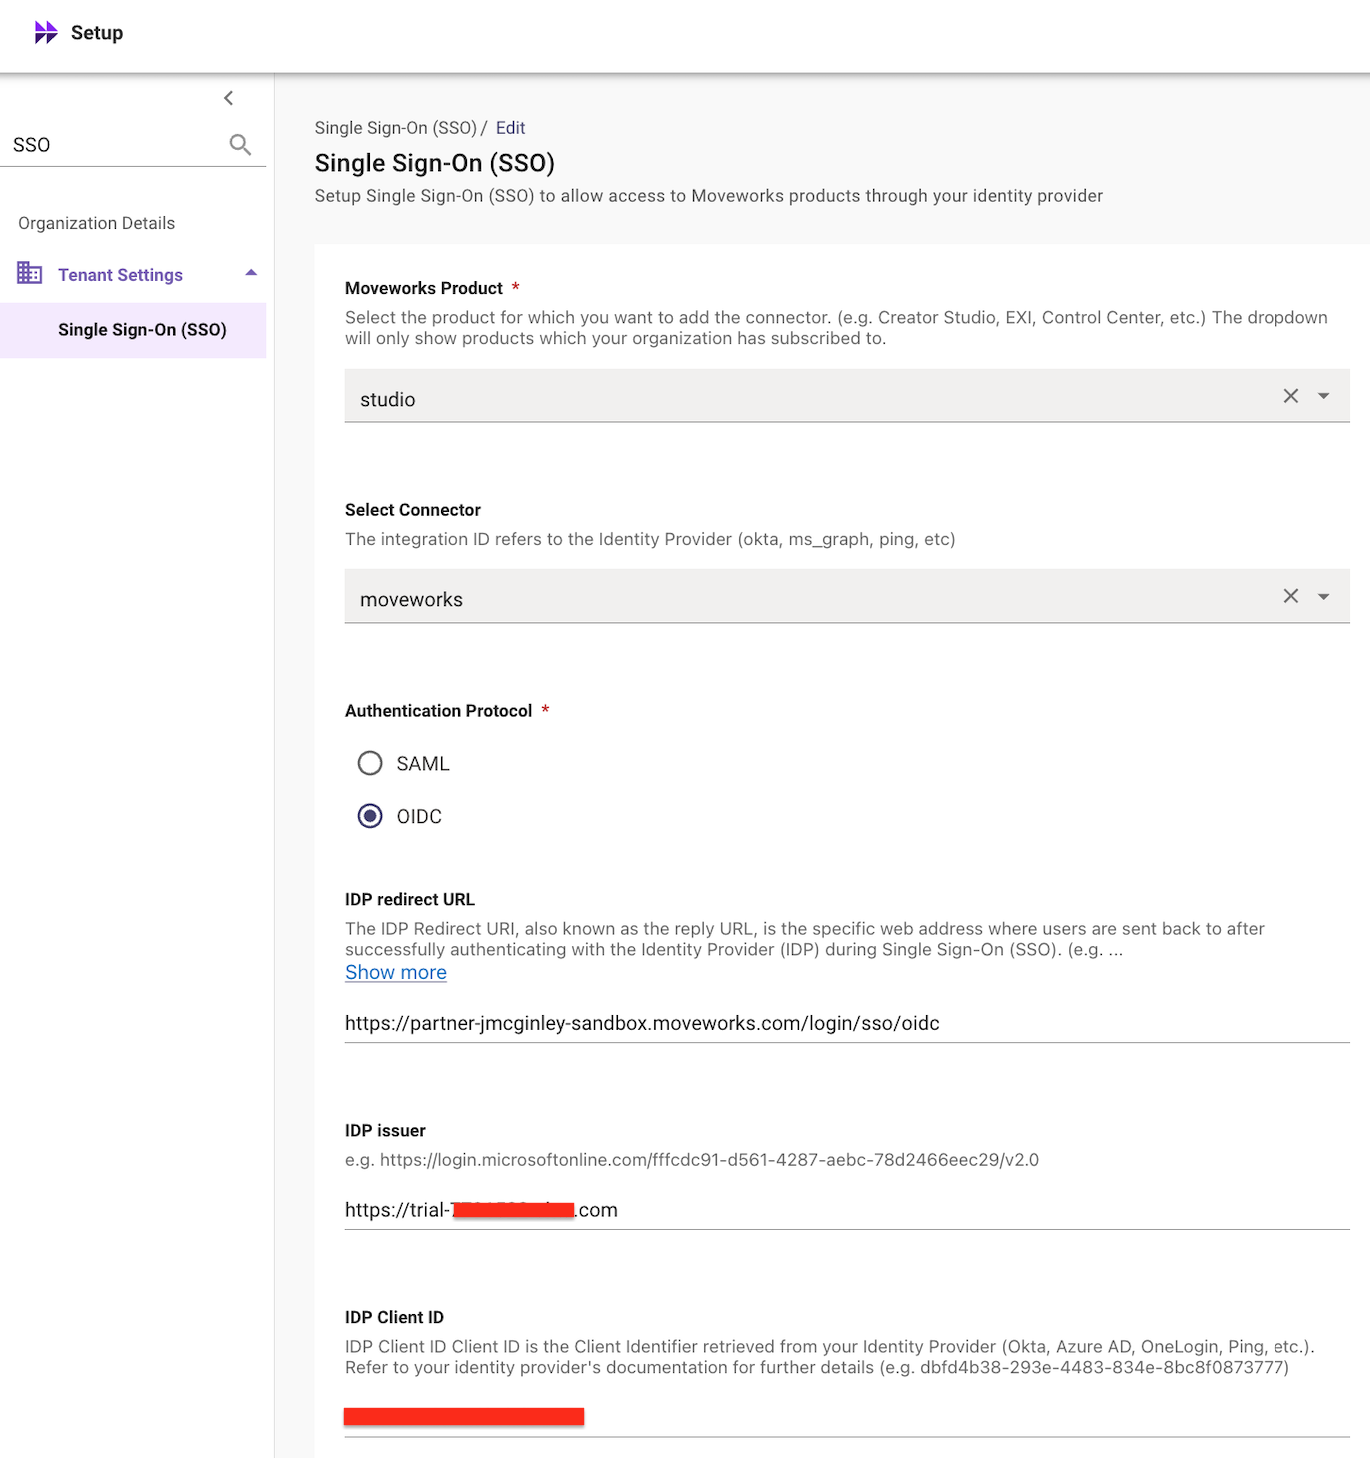
- Add the configuration details
- Moveworks Product:
Studio - Connector:
moveworks - Authentication Protocol:
OIDC - IDP Redirect URL:
https://[moveworks-instance-name].moveworks.com/login/sso/oidc
- IDP Issuer: Your Okta Trial Instance URL
https://trial-[your_number].okta.com
- IDP Client ID + Secret
- Retrieved these values from the SSO tab in the Moveworks App created in Okta
- Moveworks Product:
Do NOT append -admin to your Okta URL. Using https://trial-[your_number]-admin.okta.com will cause SSO to fail. The correct issuer URL ends in .okta.com only.
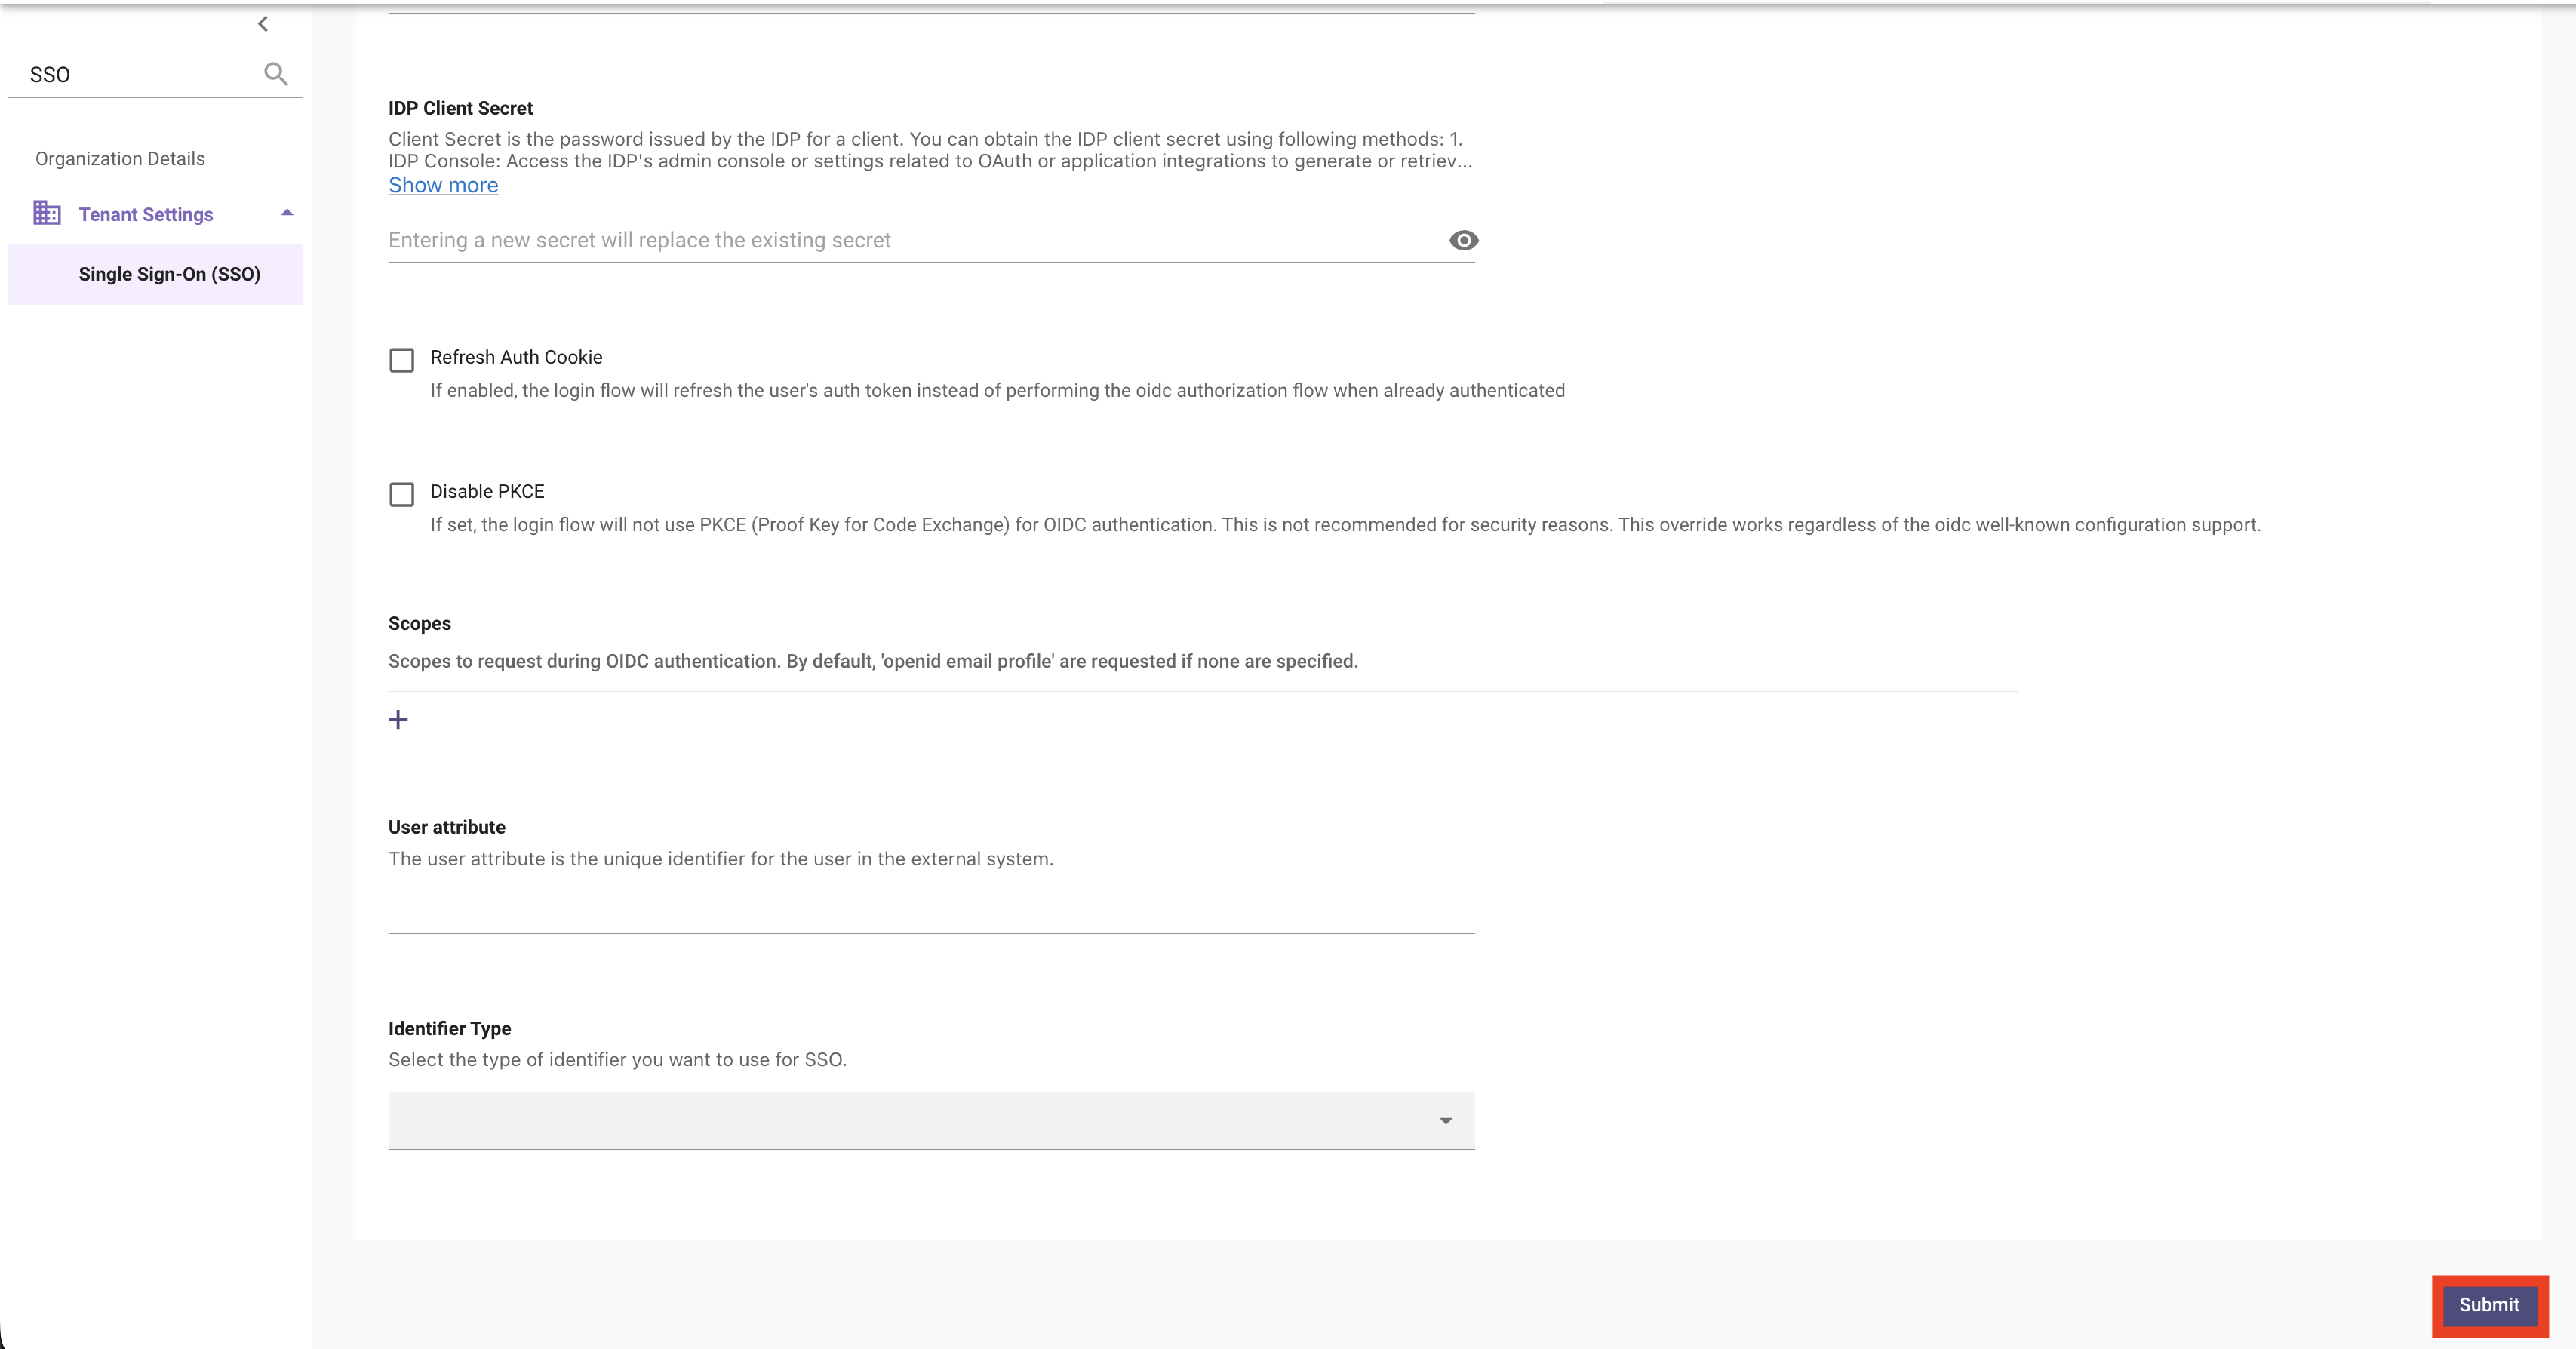
 4. The other information can be left blank. After you are finished
 Submit your configuration
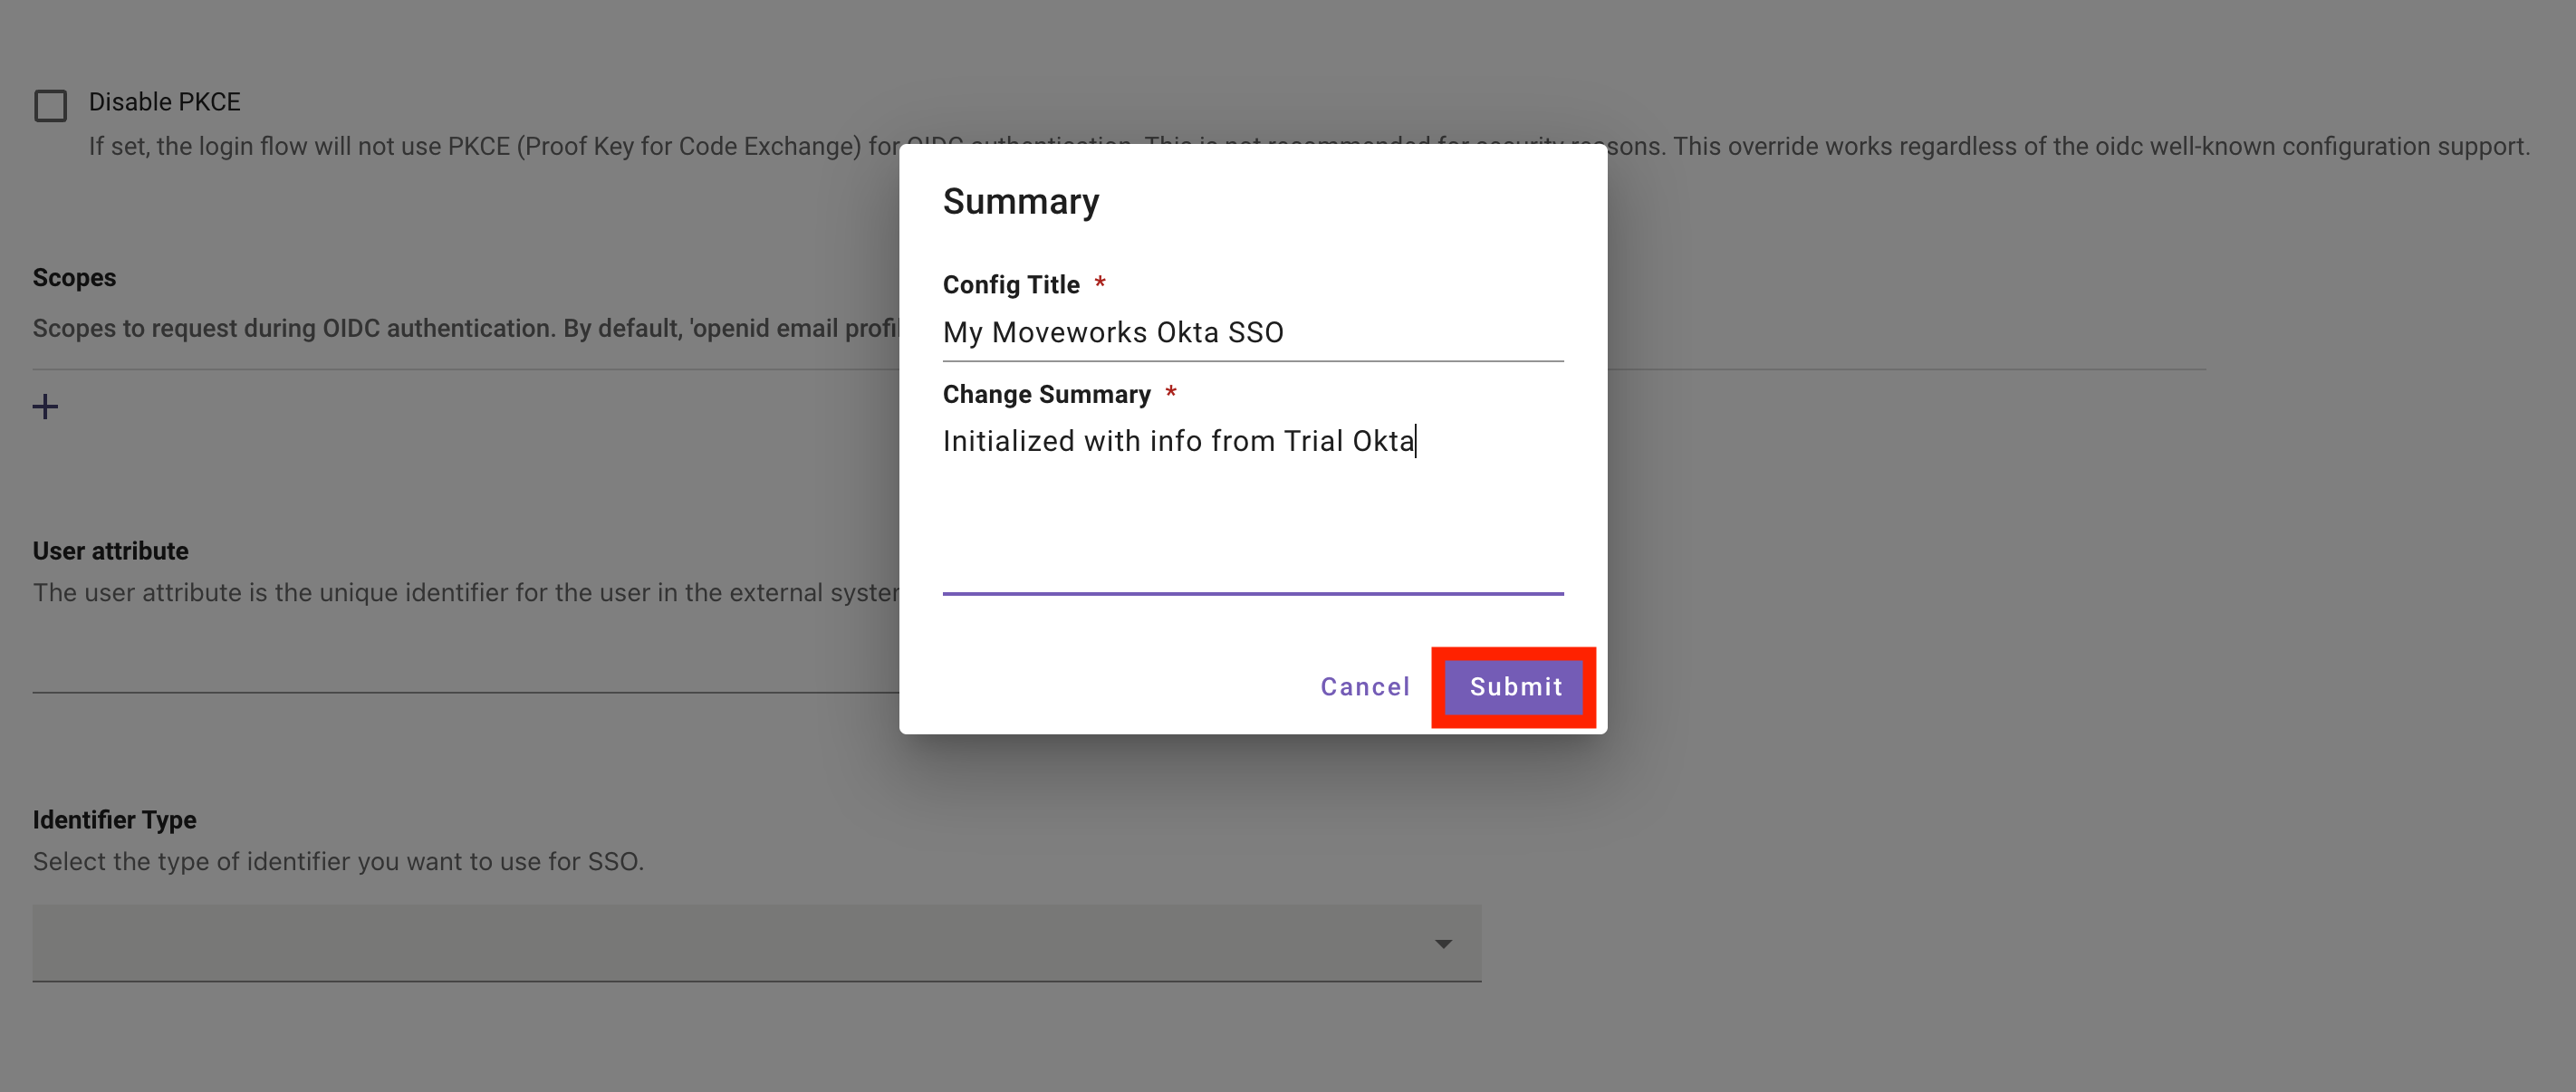
 5. Every time you save a configuration within Moveworks, you will leave a change history. This will appear in the
 Configuration Logs module.
Note: Always describe what you did in your change summary. Your future self will thank you!
1.5: Logging into the ServiceNow PDI
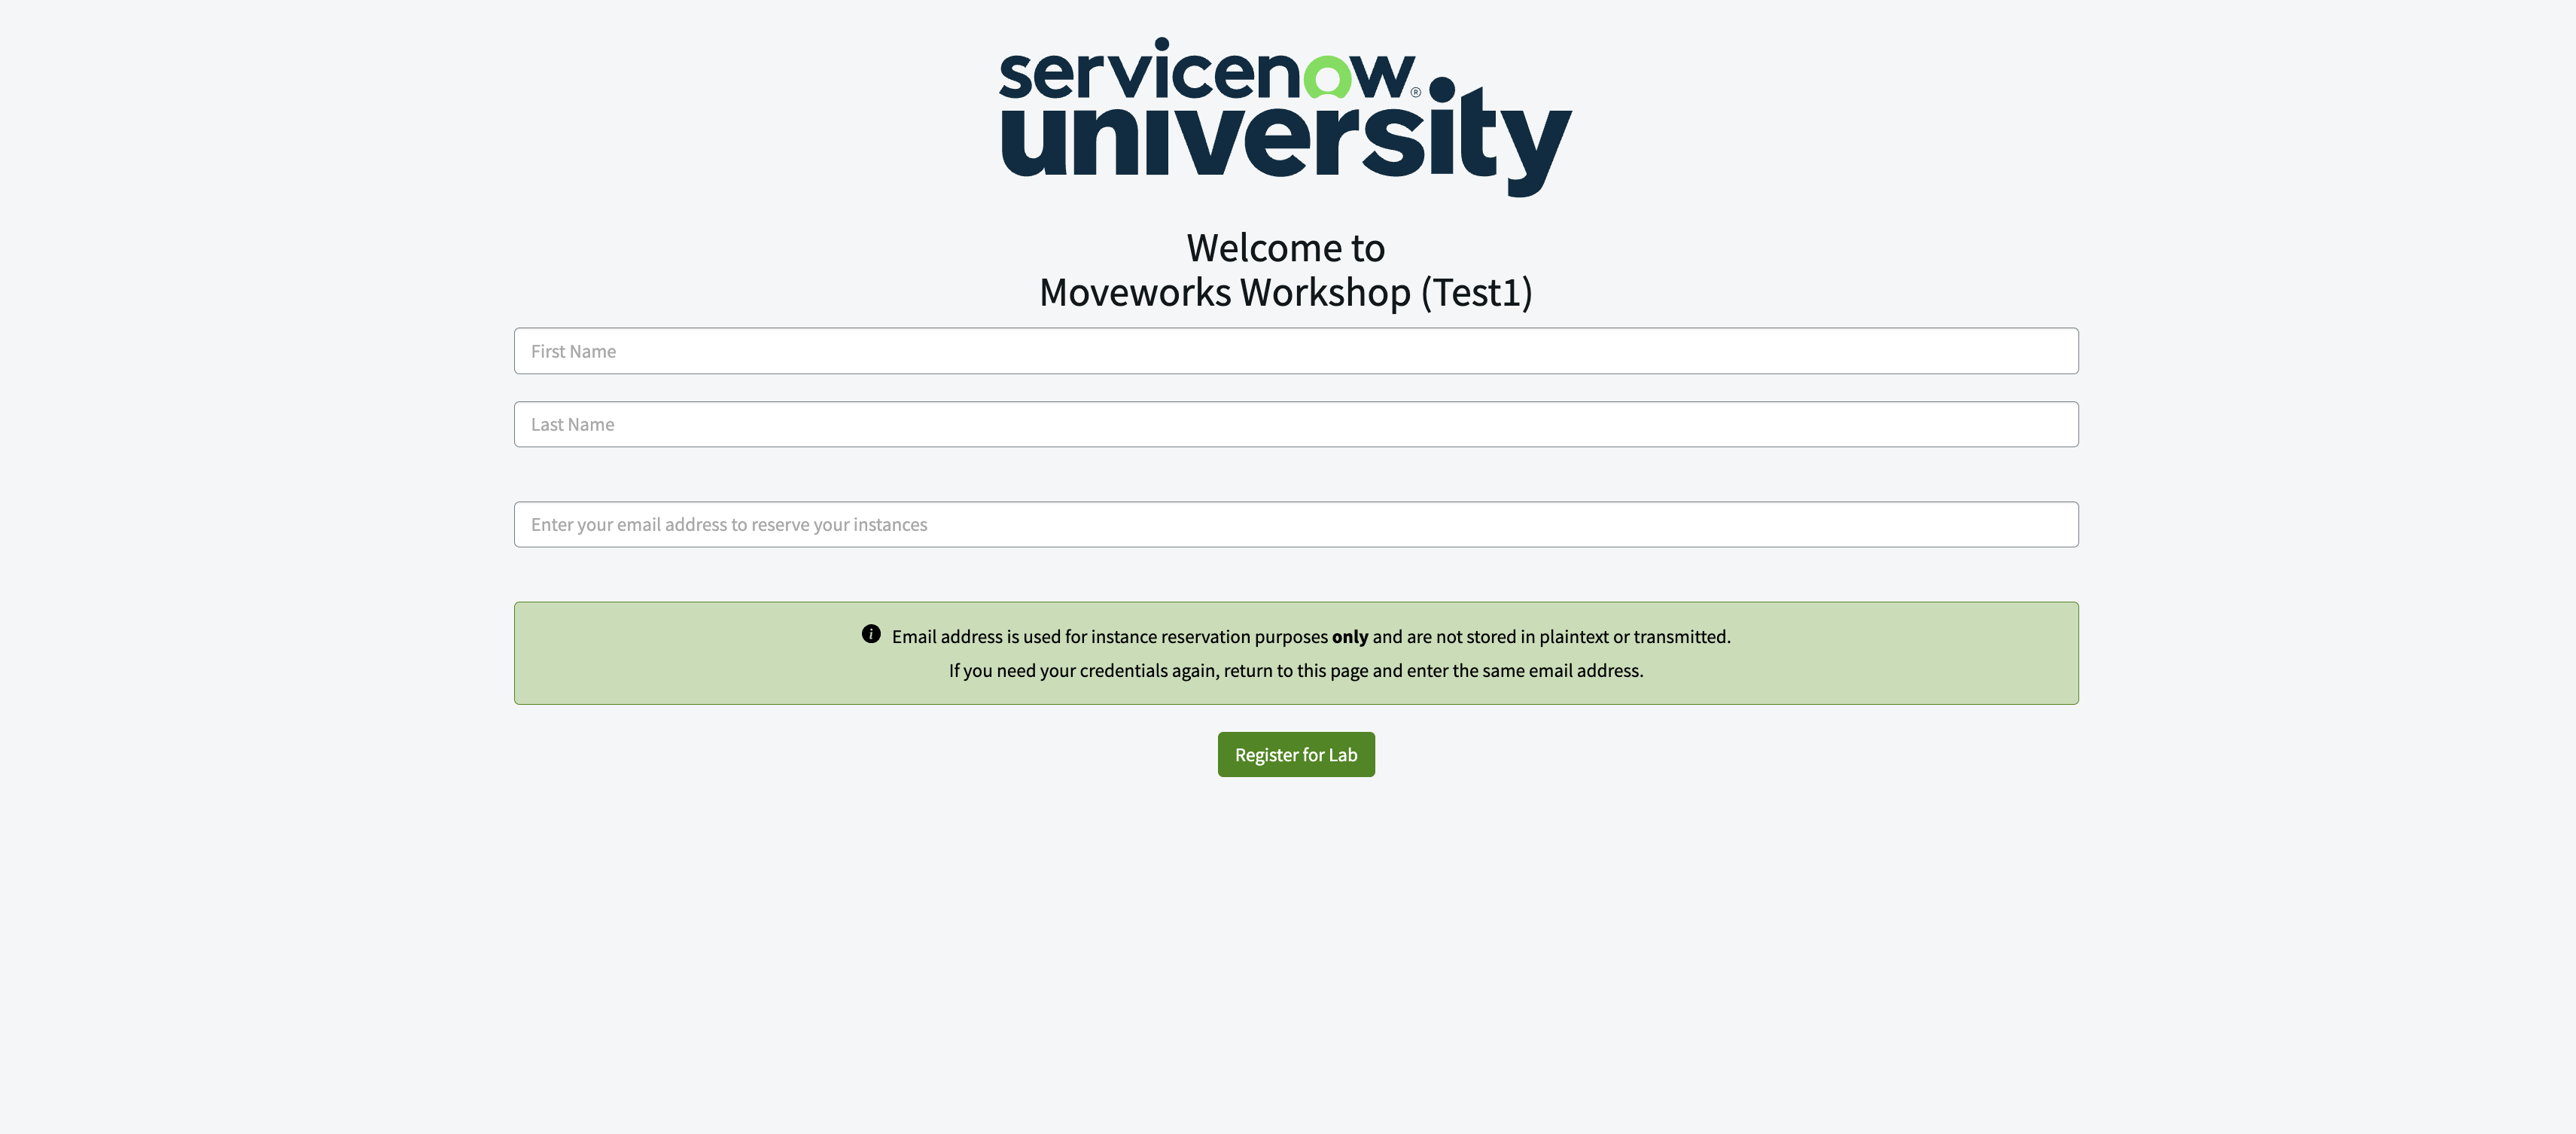
- Your instructor will provide a Student instance sign-up URL & Reservation Code
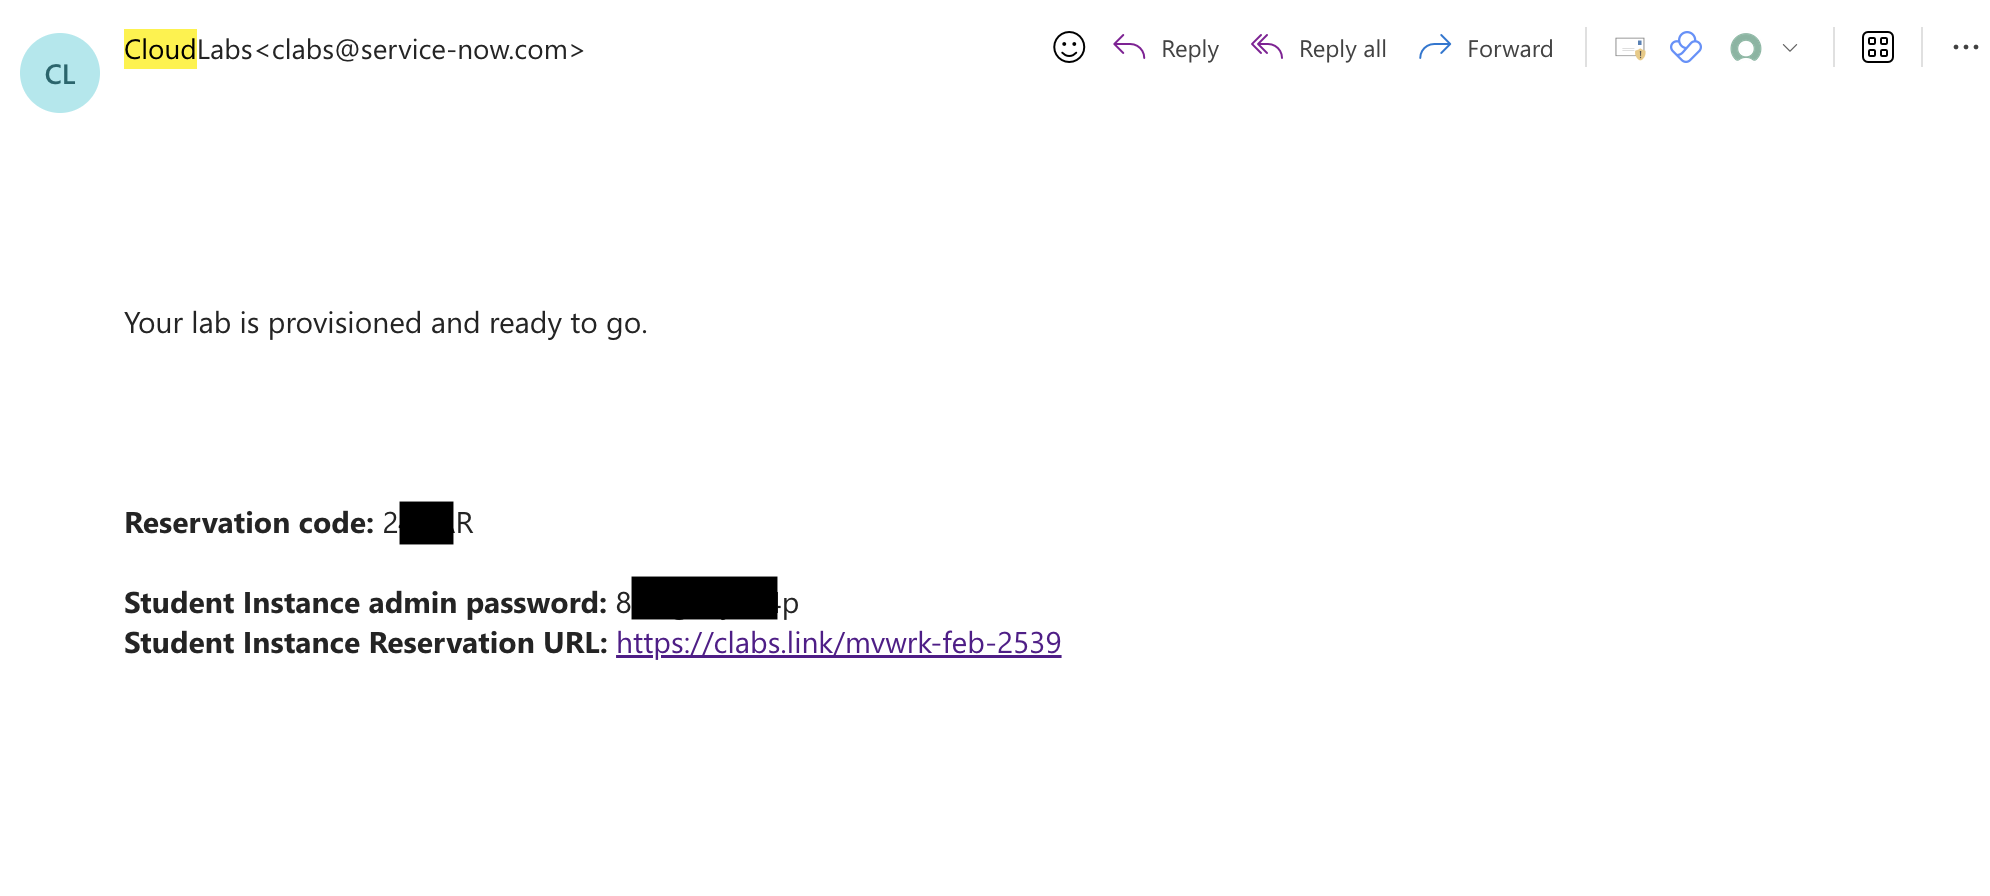
- Navigate to the URL, and enter your name (first, last) and your work email
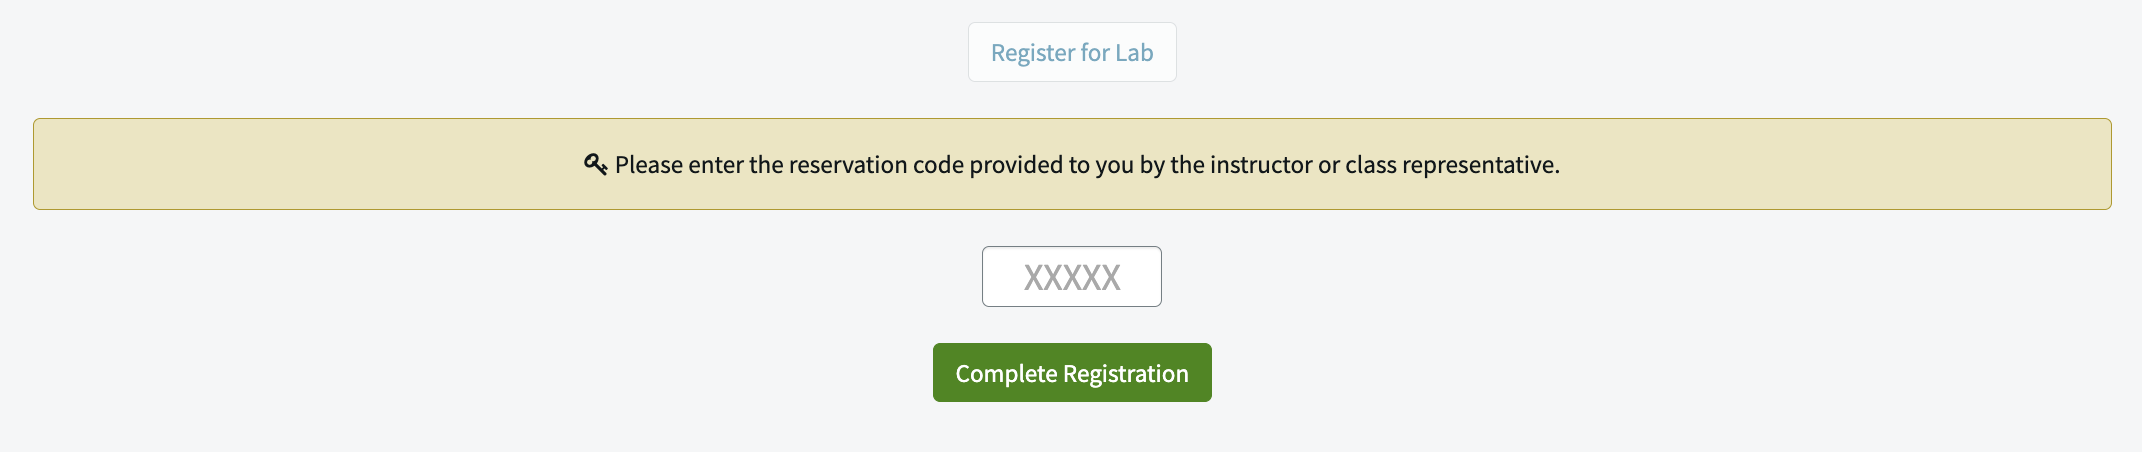
- After claiming the instance, enter the reservation code provided by your instructor
- You will be redirected to a page where you can leverage the magic link to login to your instance
Note: We recommend keeping this tab open for the duration of your lab work. This will allow you to have quick access to logging back into your lab instance, as well as your admin username & password
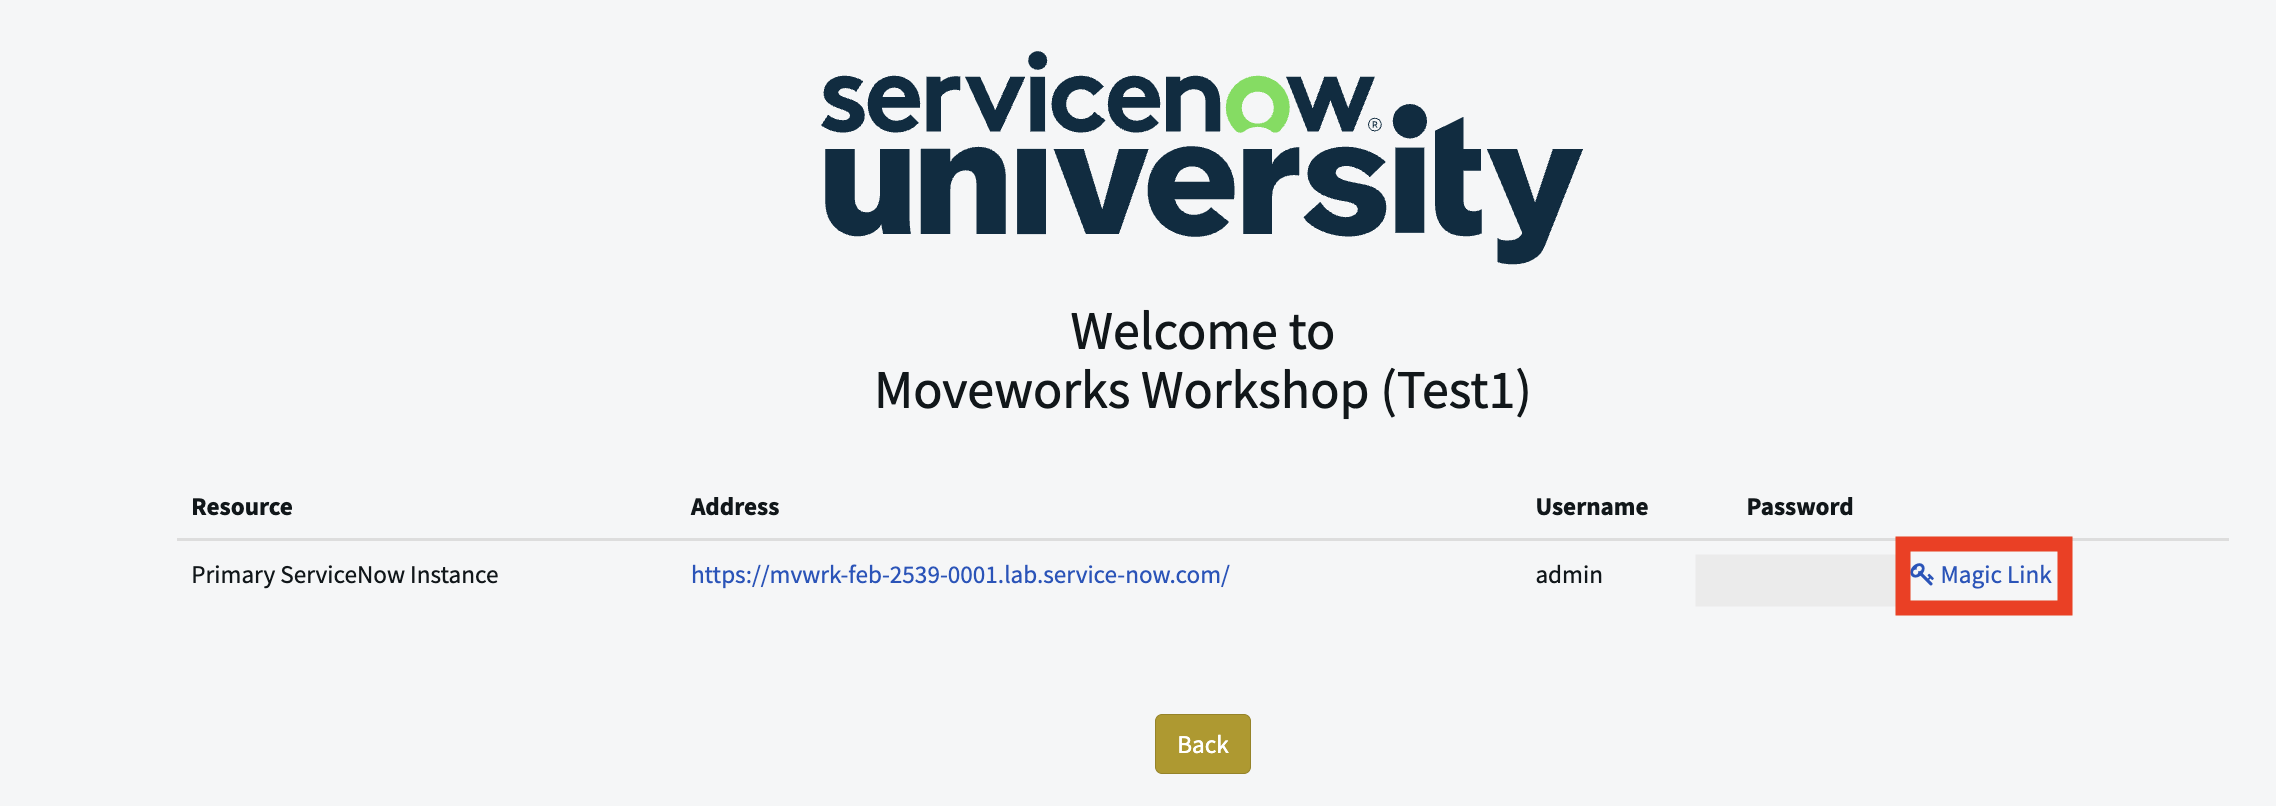 5. After clicking the Magic Link, you will be redirected to your ServiceNow instance as an admin
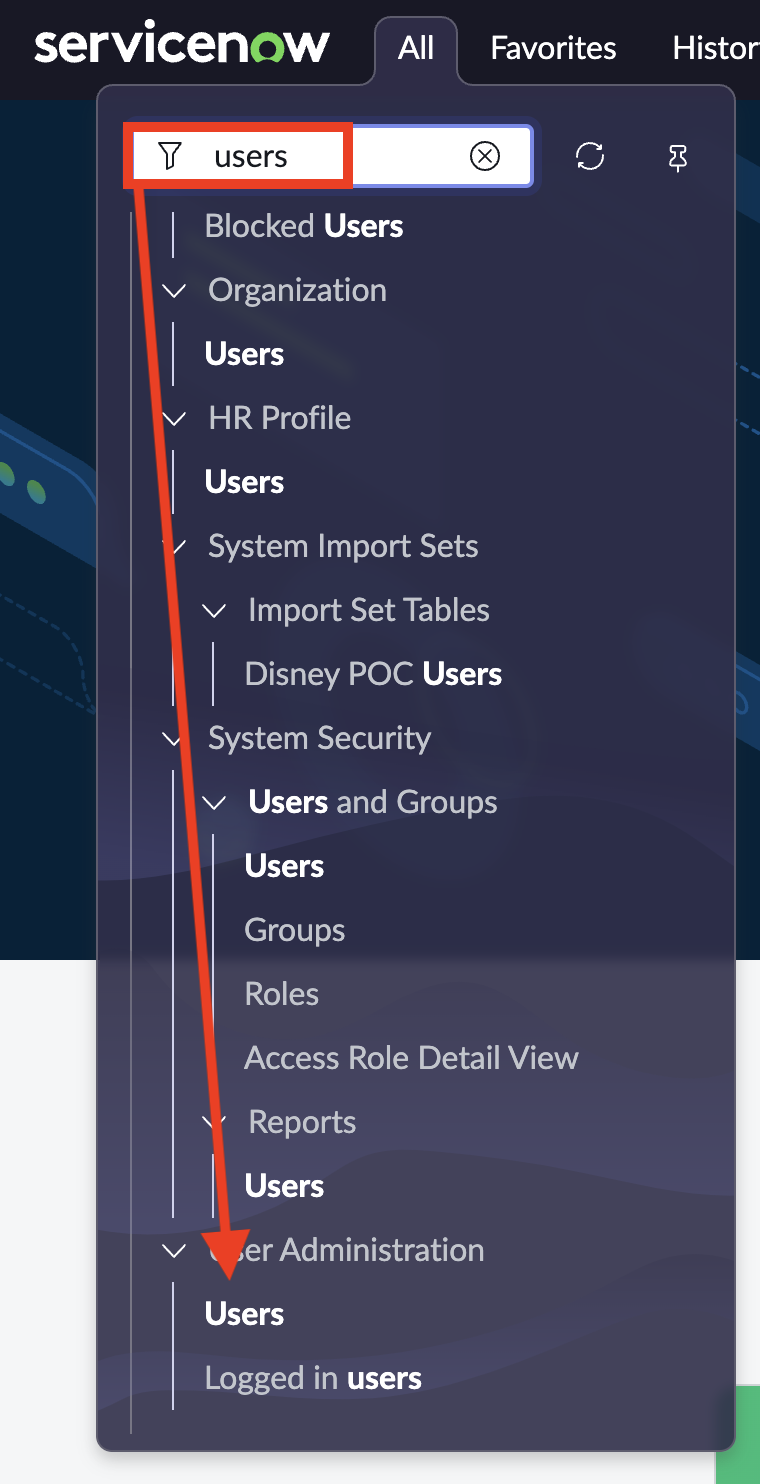
 6. Go to User Administration > Users
- You can find it by searching for “Users” in the menu and scrolling to the User Administration section
- Add a new user with your email address.
This is user account will be leveraged for your Moveworks <> ServiceNow Connection
- Set your
DepartmenttoIT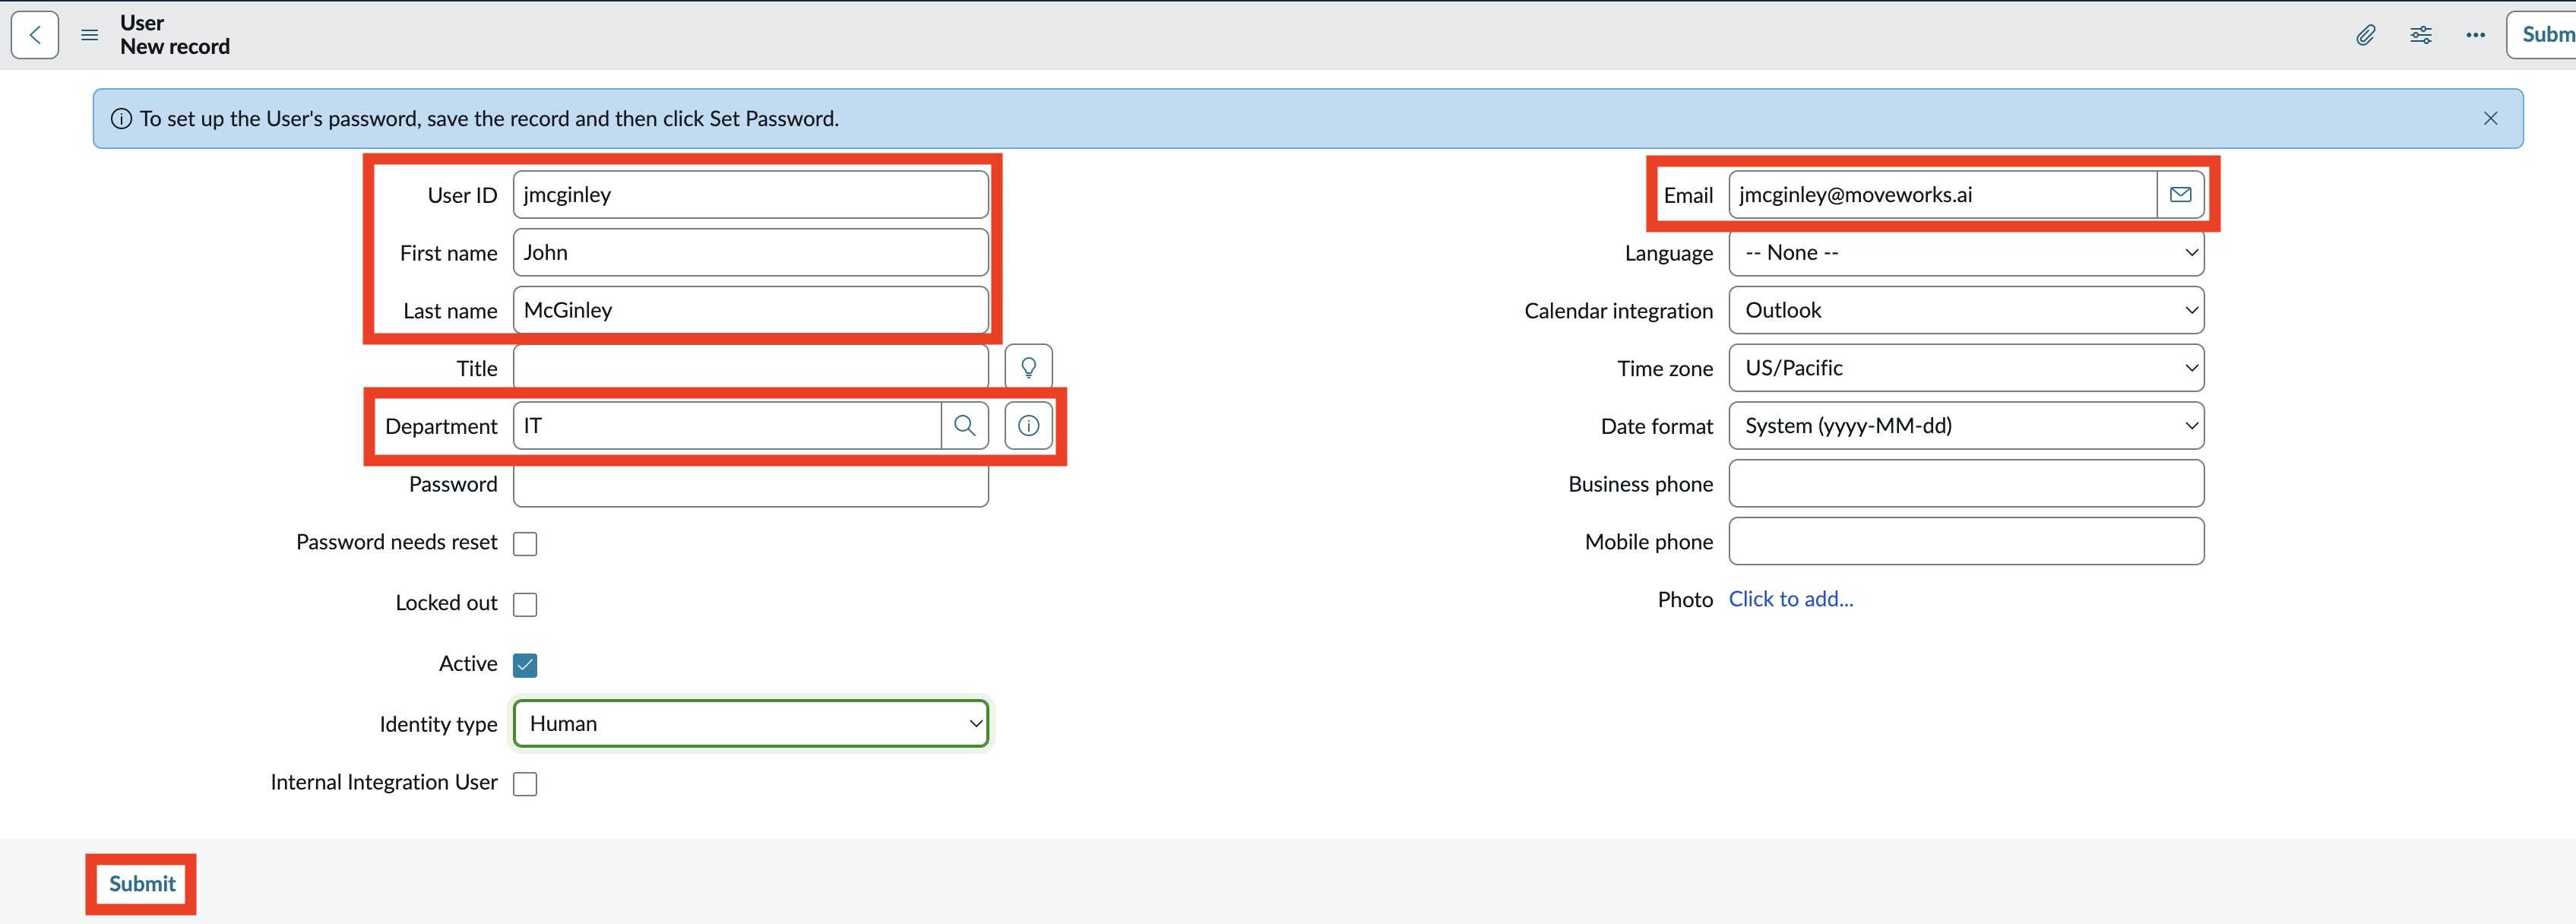
- Set your
- Search for the Admin account, and copy the sys_id into your notes (you will need it later)
- Search by
User ID - Enter
admin - Right click the
adminprofile and selectCopy sys_id

- Search by
1.6: If Working with a Partner — Sharing a Moveworks Instance
If you are sharing a Moveworks instance with a lab partner, complete the following steps to grant them access.
Step 1 — Okta: Add your partner as a user
- In the Okta Admin Console, go to
Directory > People > Add Person - Fill in your partner’s name and work email, then click
Save - Go to
Applications > Applications, open theMoveworksapp, and go to theAssignmentstab - Click
Assign > Assign to Peopleand assign your partner
Step 2 — ServiceNow: Add your partner as a user
- In your ServiceNow PDI, go to
User Administration > Users - Click
Newand fill in your partner’s name and work email - Set their
DepartmenttoIT - Click
Save
Step 3 — Moveworks: Grant your partner admin access (complete after Lab 2)
Your partner must be ingested into the Moveworks roster (Lab 2) before you can assign them roles.
- In My Moveworks, click the grid icon in the upper right corner
- Select
Roles and Permissions - Find your partner’s name and assign them all roles
✅ 2: Verification & Next Steps
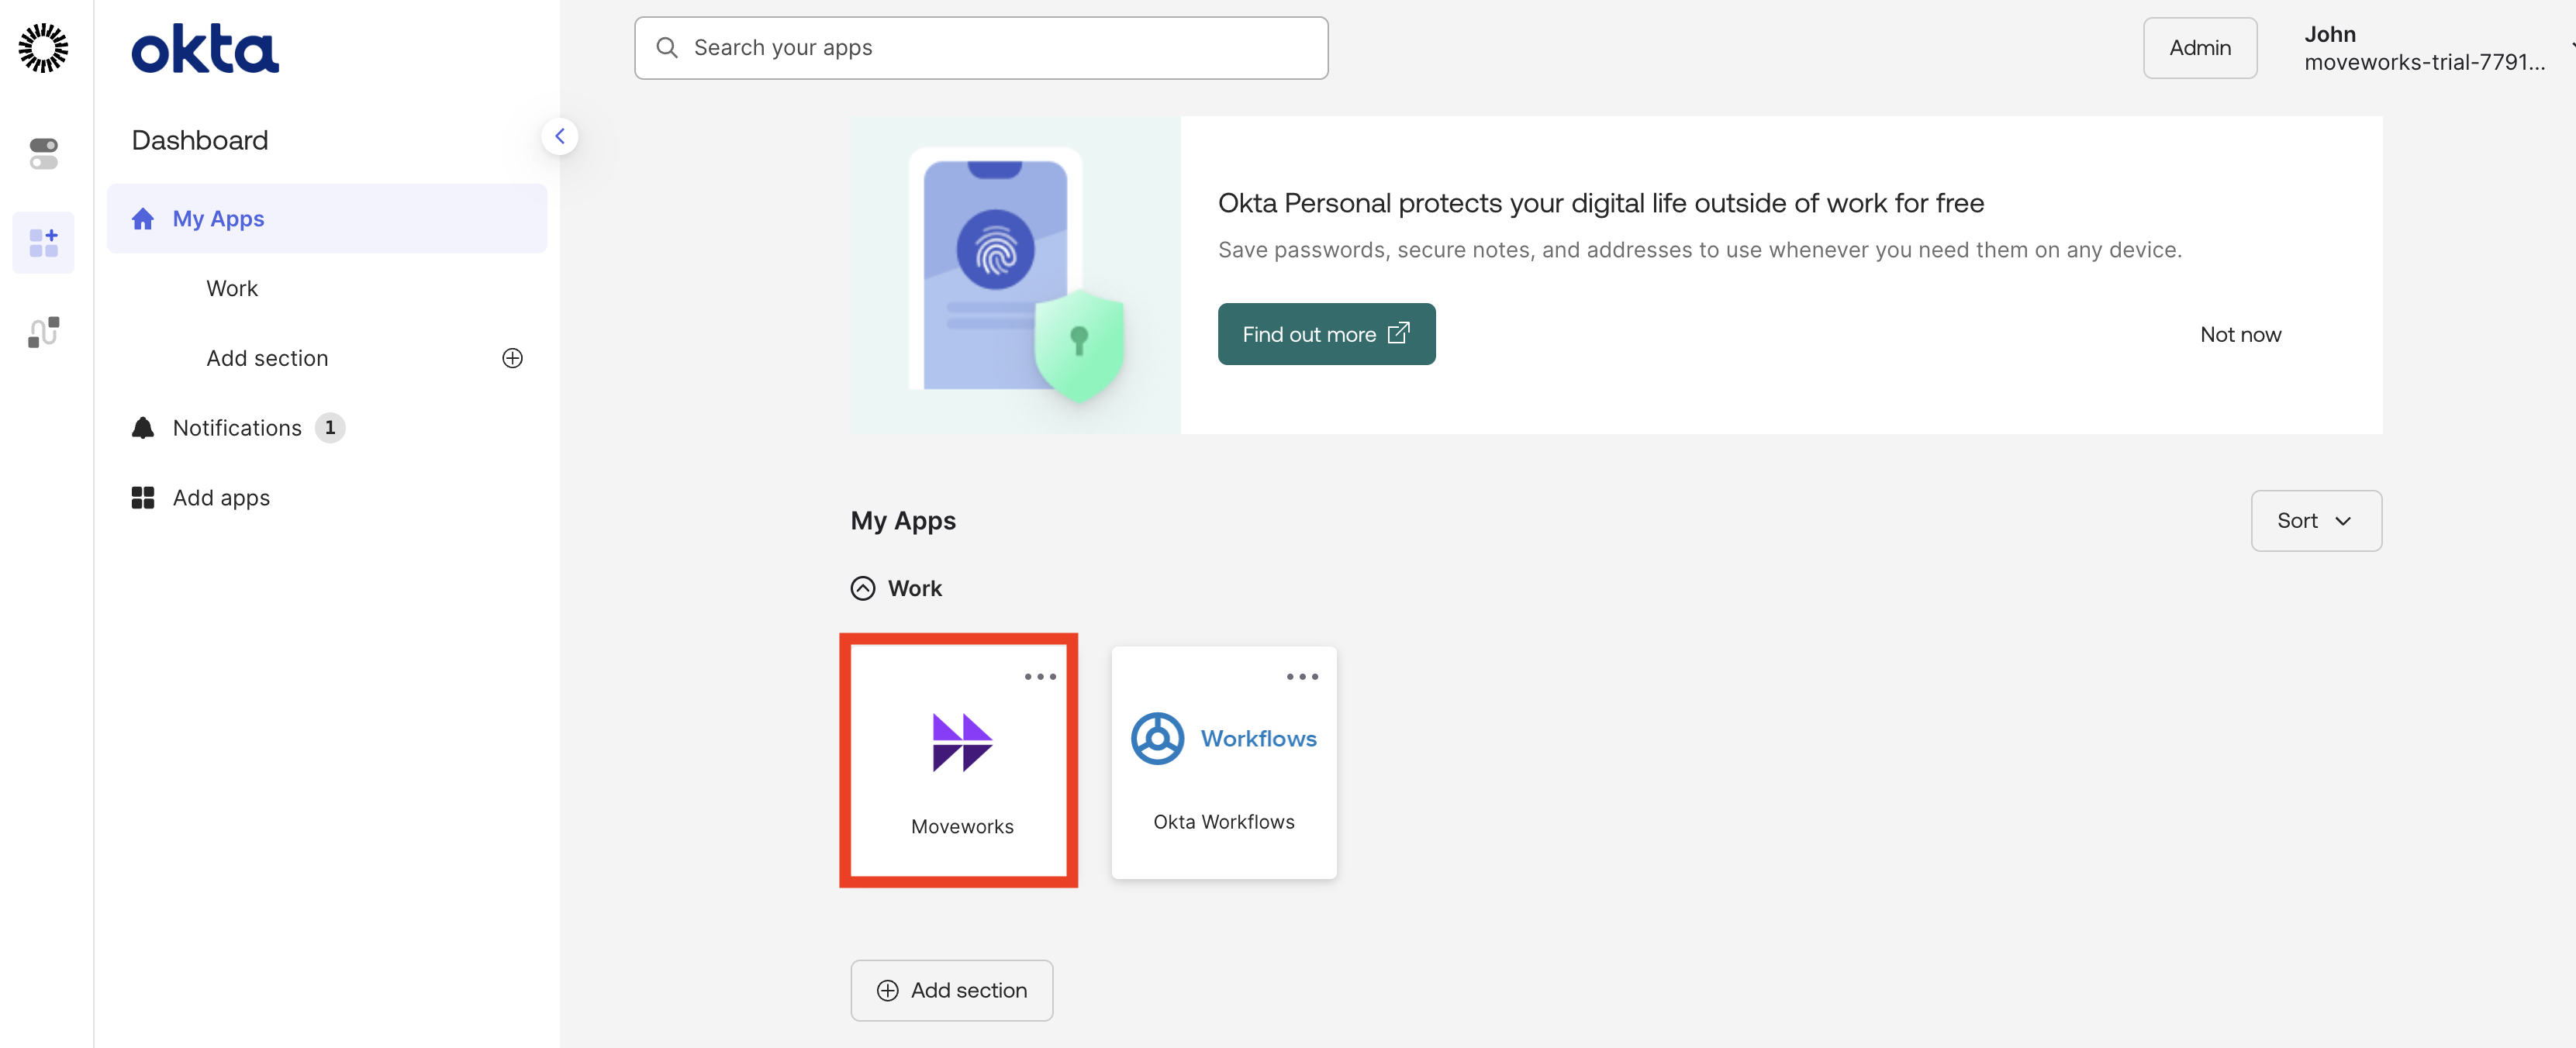
- Check Success: Go to your Okta instance, and click the Moveworks application to confirm it redirects you to Moveworks on Web
🪞 3: Reflecting on This Configuration
Through this guide, you’ve learned the following:
- The difference between Moveworks Temporary Access Links (One-time) and SSO Access (Enterprise).
- One-Time → my.moveworks.com/welcome
- SSO → Configured via an IDAM provider, such as Okta, Microsoft, or Google
- How to connect an IdP provider to Moveworks for SSO
- The importance of User Assignments within the IdP to grant platform access.
⚙️ 4: Configuration Details
Use the table below to fill in the required fields accurately.